MO HEALTH 355240 Compact Air Fryer Instruction Manual
A Healthy Alternative
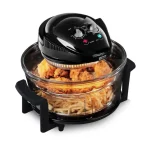
Enjoy your favorite fried foods without the fat! This Mo Farah Compact Air Fryer provides an easy and healthier way of preparing your favorite meals using rapid hot air circulation from the top grill. Food is heated from all directions and little to no oil is needed for most ingredients.
Please read this manual carefully BEFORE using the appliance for your own safety. It has been designed to provide many years of trouble-free use.
There are many benefits to using a Compact Air Fryer:
- Simple to use controls for cooking quick, healthy meals.
- 1.SL frying capacity.
- Rapid air circulation system to cook food fast and save energy.
- Healthy way to fry food without oil and 80% less fat.
- Air Fried food retains its nutritional value, but still has the taste of delicious fried food.
Welcome
Thank you for choosing this product. Each of our projects has been carefully
designed to be great at what it does and this one is no exception. We hope you enjoy your new Compact Air Fryer.
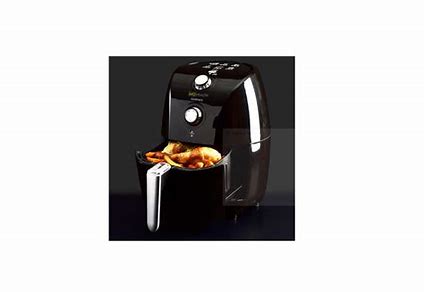
Your Compact Air Fryer
In The Box
Carefully remove your compact air fryer from the box.
- Instruction Manual
- Air Fryer
- Outer pot
- Metal rack
General Safety
- Ensure that you read all of the safety instructions before using this product.
- This product has been designed and manufactured to meet European safety standards, but like any electrical equipment, care must be taken if you are to obtain the best results and safety is to be assured.
- Do read the operating instructions before you attempt to use the product.
- Do ensure that all electrical connections (including the mains plug, extension leads and interconnections between pieces of equipment) are properly made in accordance with the instructions.
- Switch off and remove the mains plug or mains adapter when making or changing any connections.
- Do consult your dealer if you are ever in doubt about the installation, operation or safety of your product.
- Don’t remove any fixed covers as this may expose you to dangerous voltages.
- Don’t continue to operate the product if you are ever in doubt about it working normally, or if it is damaged in any way. Switch it off, withdraw the plug from the mains and consult your dealer.
- There are no user serviceable parts in the product. When servicing, refer to qualified service personnel.
- Don’t leave the product switched on when it is unattended for long periods of time, unless it is specifically stated that it is designed for unattended operation or has a standby mode.
- Don’t obstruct the ventilation vents on the product, for example with curtains or soft furnishings, as this may cause overheating.
- Don’t place the product in closed bookcases or racks without proper ventilation.
- Don’t use the product in humid or damp conditions, or allow it to be exposed to rain or moisture.
- Store the product in a clean, dry environment.
- The product should not be exposed to dripping or splashing and no objects filled with liquids, such as vases, should be placed on it.
- Position the power cable and other connected cables so that they are not likely to be walked on, pinched or where items can be placed on or against them.
- Never allow children to insert foreign objects into holes or slots on the product.
- No naked flame sources, such as lighted candles, should be placed on the product.
- Disconnect the product from the mains supply before cleaning.
- Don’t use any liquids or aerosol cleaners, as this may damage the product. Use a soft, dust-free cloth.
- Contact local authorities for means of disposal.
- Make sure that other people in your household are conversant with the operation of the product.
Product Safety
- Do not use this product for anything other than its’ intended use.
- This appliance is for household use only.
- This appliance includes a heating function. Please ensure that the appliance is used on a stable, level, and heat resistant surface.
- Do not immerse cords, plugs or any part of the appliance in water or another liquid.
- Do not use the appliance outdoors.
- Do not place the air fryer on or near combustible materials such as a tablecloth or curtain.
- Do not place the air fryer against a wall or against other appliances. Leave at least 1 Dem free space on the back and sides and 1 Dem free space above the appliance.
- Allow the air fryer to cool down for approx. 30 minutes before you handle or clean it.
- Make sure the food prepared in the air fryer comes out golden-yellow instead of dark brown. Remove burnt remnants.
- During air frying, hot steam is released through the air outlet openings. Keep your hands and face at a safe distance from the steam and from the air outlet openings.
- Hot steam and air may escape when you remove the food basket from the air fryer.
- Any baking trays or oven dishes used in the air fryer will become hot. Always use oven gloves when handling or removing anything from the AirFryer.
- WARNING: DO NOT FILL THE AIR FRYER FOOD BASKET WITH OIL THIS IS A FIRE HAZARD.
- Always put ingredients to be fried in the basket.
- DO NOT place anything on top of the Air Fryer.
- This appliance can be used by children aged from eight years and above; persons with reduced physical, sensory or mental capabilities; persons with lack of experience and knowledge etc. if they are supervised, or instructed on how to use the appliance in a safe way as well as being aware of the potential hazards.
- Always unplug the appliance from the mains supply socket and allow it to cool down completely before cleaning.
- The appliance is intended to be used in a household or similar applications such as:
– Staff kitchen areas in shops, offices and other working environments
– Farm houses
– By clients in hotels, motels and other residential type environments
– Bed and breakfast type environments
![]() CAUTION HOT SURFACE! DO NOT TOUCH HOT SURFACES WHEN USING THIS APPLIANCE.
CAUTION HOT SURFACE! DO NOT TOUCH HOT SURFACES WHEN USING THIS APPLIANCE.
Description Of Parts
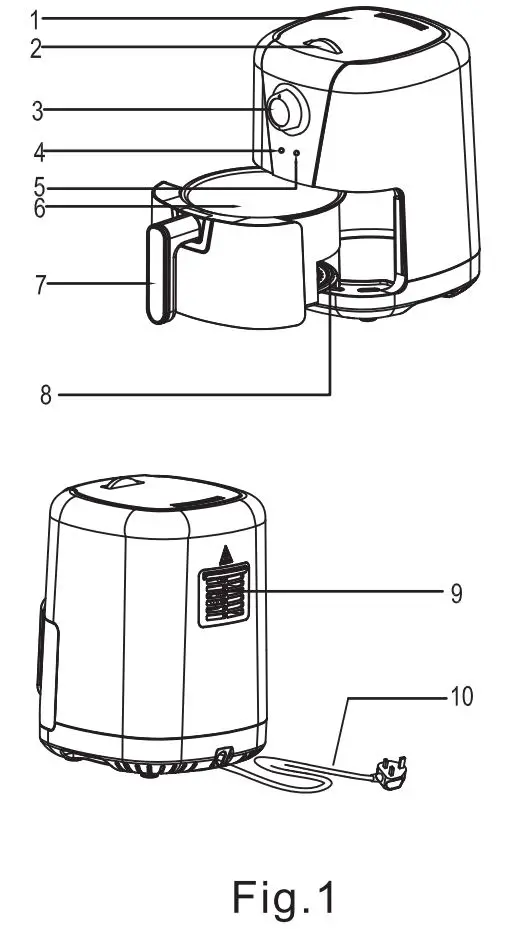
General description (Fig.1)
- Lid
- Temperature control dial
- Timer dial
- Power-on light
- Heat-on light
- Outer pot
- Basket handle
- Metal rack
- Air outlet openings
- Power cord

Using your Air Fryer
Before first use:
- Remove all packaging materials.
- Remove any stickers or labels from the appliance.
- Thoroughly clean the metal rack and pan with hot water, some washing-up liquid and a non-abrasive sponge.
- Wipe inside and outside of the appliance with a moist cloth.
- Do not fill the pan with oil or frying fat. This is an oil-free fryer that works through the rapid circulation of hot air.
Automatic Switch Off:
- The Air Fryer has a built-in timer, which will automatically shut down the Air Fryer when the timer reaches zero. You can manually switch the unit off by turning the timer dial anti-clockwise to zero.
- Air Fryer Drawer Safety Switch – For your safety, this air fryer contains a safety switch in the drawer designed to keep it from accidentally turning on if the frying basket and drawer are not properly situated inside the appliance, whilst the timer is not set. To use the air fryer, please ensure the basket is correctly inside the drawer, the drawer is fully closed and the cooking timer has been set.
Preparing for Use:
- Place the appliance on a stable, horizontal and even surface.
- Do not place the appliance on non-heart-resistant surface.
- Place the metal rack in the pan.
- Pull the cord from the storage compartment which locates on the bottom of the appliance.
- Do not fill the pan with oil or any other liquid.
- Do not put anything on top of the appliance, the airflow will be disrupted and affects the hot air frying result.
Air Frying:
- Connect the mains plug into an earthed wall socket.
- Carefully pull the pan out of the Hot-air fryer.
- Slide the pan back into the Hot-air fryer.
- Noting to carefully align with the guides in the body of the fryer.
Caution: Do not touch the pan during and some time after use, as it gets very hot. Only hold the pan by the handle. - Determine the required preparation time for the ingredient (see section ‘Settings’ in this chapter).
- To switch on the appliance, turn the timer knob to the required preparation time
- Turn the temperature control dial to the required temperature.
- Add 3 minutes to the preparation time when the appliance is cold.
Pre-heating:
If you want, you can also let the appliance preheat without any ingredients inside. In that case, turn the timer dial to more than 3 minutes and wait until the heating-up light goes out (after approx. 3 minutes). Then fill the basket and turn the timer dial to the required preparation time.
a. The timer starts counting down the set preparation time.
b. During the hot air frying process, the heating-up light comes on and goes out from time to time. This indicates that the heating element is switched on and off to maintain the set temperature.
c. Excess oil from the ingredients is collected on the bottom of the pan.
- Some ingredients require shaking halfway through the preparation time (see section “Settings” in this chapter). To shake the ingredients, pull the pan out of the appliance by the handle and shake it. Then slide the pan back into the fryer.
Tip: If you set the timer to half the preparation time, you hear the timer bell when you have to shake the ingredients. However, this means that you have to set the timer again to the remaining preparation time after shaking.
When you hear the timer bell, the set preparation time has elapsed. Pull the pan out of the appliance and place it on the trial framework.
Note: You can also switch off the appliance manually. To do this, turn the timer control dial to zero.
- Check if the ingredients are ready. If the ingredients are not ready yet, simply slide the pan back into the appliance and set the timer for a few extra minutes.
- To remove ingredients (e.g. fries), pull the pan out of the Hot-air fryer and place it on trial framework.
Do not turn the basket upside down with the pan still attached to it, as any excess oil that has collected on the bottom of the pan will leak onto the ingredients. Both the pan and ingredients will be very hot. Depending on the type of ingredients in the fryer, steam may escape from the pan so care is needed. - Empty the basket into a bowl or onto a plate.
- When a batch of ingredients is ready, the Air Fryer is instantly ready for preparing another batch.
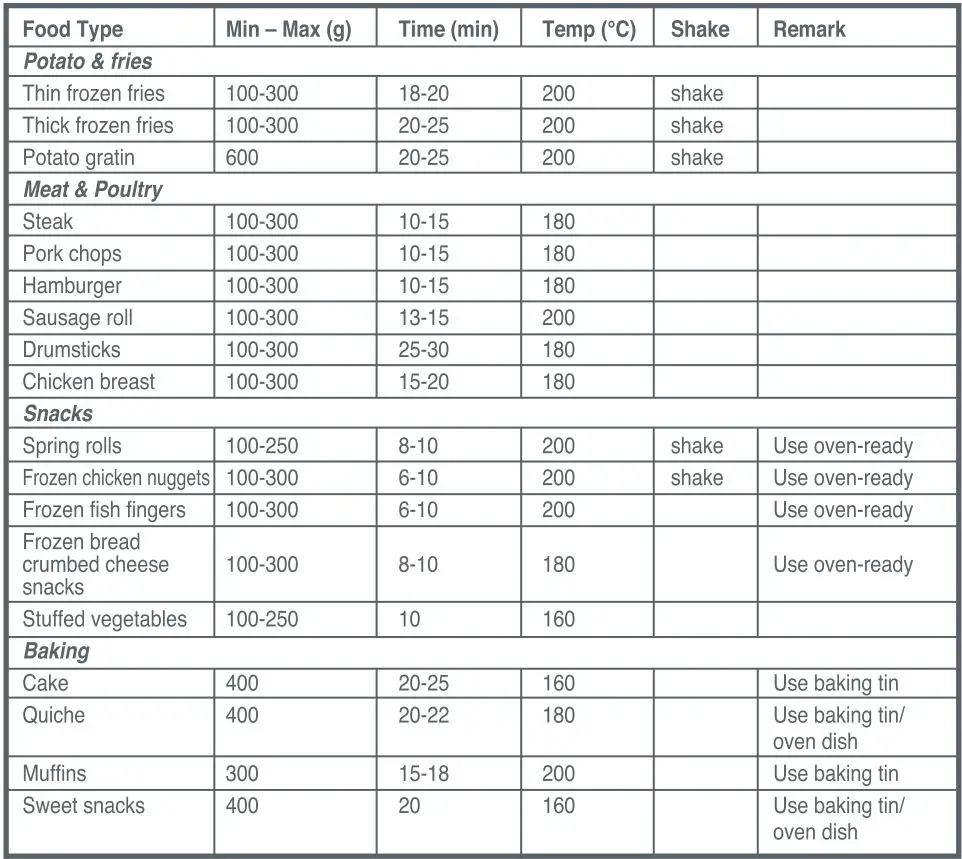
Settings:
- This table below will help you to select the basic settings for the ingredients.
Note: Keep in mind that these settings are indications. As ingredients differ in origin, size, shape as well as brand, we cannot guarantee the best setting for your ingredients. Because the Rapid Air technology instantly reheats the air inside the appliance instantly, pulling the pan briefly out of the appliance during hot air frying barely disturbs the process.
Tips:
- Smaller ingredients usually require a slightly shorter preparation time than larger ingredients.
- A larger amount of ingredients only requires a slightly longer preparation time, a smaller amount of ingredients only requires a slightly shorter preparation time.
- Shaking smaller ingredients halfway through the preparation time optimizes the end result and can help prevent unevenly fried ingredients.
- Add some oil to fresh potatoes for a crispy result. Fry your ingredients in the Hot-air fryer within a few minutes after you added the oil.
- Do not prepare extremely greasy ingredients such as sausages in the Hot-air fryer.
- Snacks that can be prepared in a oven can also be prepared in the Hot-air fryer
- The optimal amount for preparing crispy fries is 200 grams.
- Use pre-made dough to prepare filled snacks quickly and easily. Pre-made dough also requires a shorter preparation time than home-made dough.
- Place a baking tin or oven dish in the Hot-air fryer basket if you want to bake a cake or quiche or if you want to fry fragile ingredients or filled ingredients
- You can also use the Hot-air fryer to reheat ingredients. To reheat ingredients, set the temperature to 150°C for up to 10 minutes.
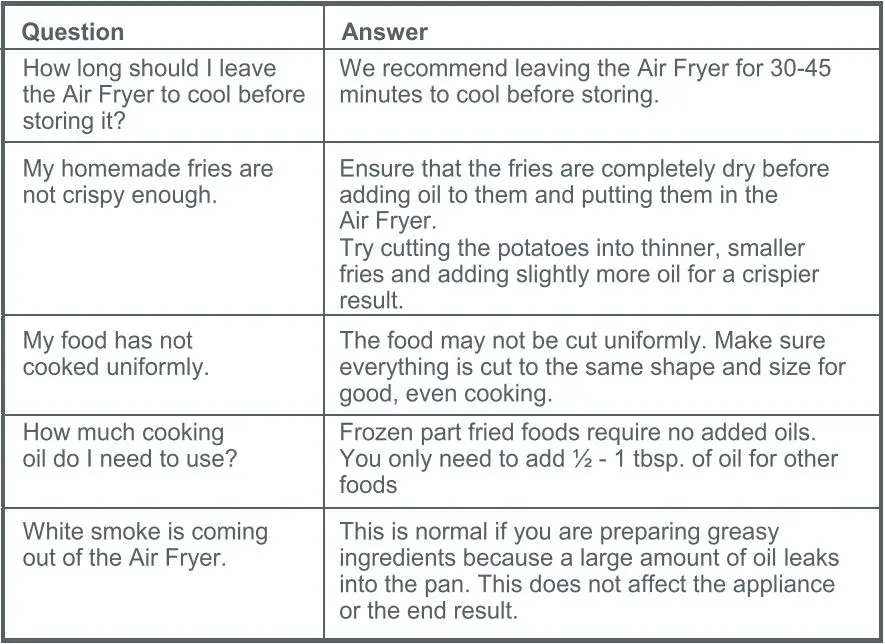
Troubleshooting
Cleaning and Care
WARNING! DO NOT IMMERSE THE APPLIANCE IN WATER OR ANY OTHER LIQUID.
- Clean the appliance after every use. The pan and the non-stick coating metal rack. Do not use metal kitchen utensils or abrasive cleaning materials to clean them, as this may damage the non-stick coating.
- Remove the mains plug from the wall socket and let the appliance cool down.
Note: Remove the pan to let the Hot-air fryer cool down more quickly .. - Wipe the outside of the appliance with a moist cloth.
- Clean the pan, grill with hot water, some washing-up liquid and a non-abrasive sponge.
- You can use degreasing liquid to remove any remaining dirt.
Tip: If dirt is stuck to the grill or the bottom of the pan, fill the pan with hot water with some washing-up liquid. Put the basket in the pan and let the pan and the basket soak for approximately 10 minutes.
- Clean the inside of the appliance with hot water and non-abrasive sponge.
- Clean the heating element with a cleaning brush to remove any food residues.
To store your appliance:
- Unplug the appliance and let it cool down.
- Make sure all parts are clean and dry.
Recipes
Homemade Fries
Ingredients
2 large potatoes
½ tbsp. paprika
Pinch of salt
Pinch of pepper
1 tbsp. Sunflower oil
Method
- Wash, peel and slice the potatoes.
- Dry with kitchen paper.
- Cut the potatoes into your desired length and thickness.
- Bring a large pot of water to the boil with a pinch of salt. Add the chips and allow to part boil for 10 minutes.
- Strain the fries and immediately run under cold water to stop them from cooking any more.
- Pour the oil in a bowl, with the paprika, salt and pepper. Put the fries on top and mix until all the fries are coated.
- Remove the fries from the bowl with your fingers or kitchen utensil so that the excess oil stays behind in the bowl.
- Place the fries in the air fryer food basket, and then set the lime & temperature as shown on the reference table.
- Variations: Try replacing ½ tbsp. of paprika with ½ tbsp. garlic powder, or ½ tbsp. of grated parmesan cheese.
Bacon and Egg Breakfast Muffin
Ingredients
1 free range egg
1 strip of bacon
1 English muffin
Cheese to slice
Pinch of pepper and
salt to taste
Method
- Crack the egg into a small ramekin or oven proof dish.
- Cut the English muffin in half and layer cheese on one half.
- Place the muffin, bacon and egg (in the ramekin) into the Air Fryer food basket.
- Turn the Air Fryer to 200’C for 6 minutes.
- Once it’s cooked, assemble your breakfast muffin and enjoy.
Tip: Try adding some mustard on the muffin for extra flavor.
Prosciutto and Mozzarella Sandwich
Ingredients
2 slices of bread
2 slices of prosciutto
2 slices of tomato
2 slices of mozzarella cheese
2 basil leaves
½ pinch of salt & pepper
1 tsp. of olive oil
Method
- Lay prosciutto and mozzarella cheese on top of one slice of bread. Add the second slice of bread on top, making a sandwich.
- Put the sandwich into your Air Fryer for 5 minutes at 200’C
- Once the timer bell has rung, carefully remove the sandwich.
- Remove the top slice of bread and drizzle the tsp. of olive oil over the mozzarella.
- Add the pinch of salt and pepper to season and top with tomato and basil.
- Put the second slice of bread on top and serve.
Electrical information
(Fixed Mains Plug Only)
The mains lead supplied with this product is fitted with a 8S1363/A 7 amp plug. If it is not suitable for your supply sockets it must be replaced with an appropriate plug.
If the plug becomes damaged and/or needs to be replaced please follow the wiring instructions on the next page. The plug removed must be disposed of immediately. It must not be plugged into a supply socket as this will be an electrical hazard.
If the fuse needs to be replaced it must be of the same rating and ASTA approved to 8S1362. If the plug is changed, a fuse of the appropriate rating must be fitted in the plug, adapter or at the distribution board. If the fuse in a molded plug is replaced, the fuse cover must be refitted before the appliance can be used.
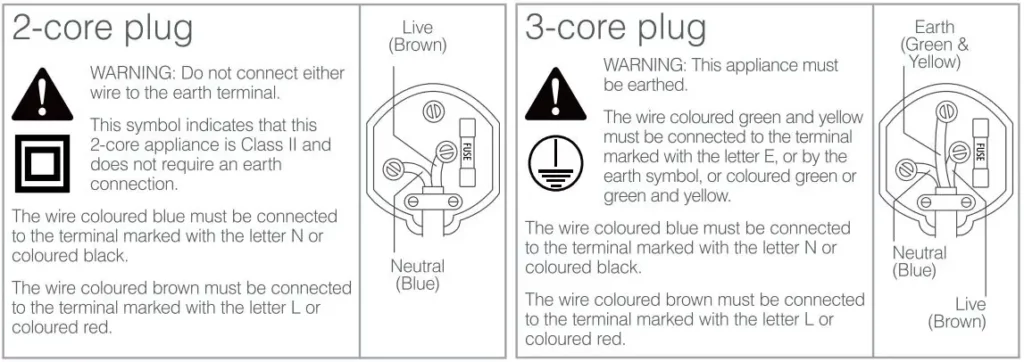
Wiring Instructions
The supply cable will be either 2-core or 3-core. Follow the appropriate wiring instructions shown. In both cases ensure that the outer sheath of the cable is firmly held by the cable clamp.
Electrical Information
(Power adapters only)
Never open the power adapter, you risk getting an electric shock.
Only use the power adapter that is supplied with your product.
You must always connect the power adapter to the product before connecting to the mains power supply.
The power adapter must be used indoors only, and must not be subjected to damp conditions.
The power adapter does not have any user serviceable parts.
Guarantee
This product is guaranteed for twelve months from the date or original purchase. If any defect should occur due to faulty materials or workmanship, please return the goods, along with your receipt to the store you purchased the item from.
You will need to have your receipt or purchase to hand.
The guarantee is subject to the following provisions:
- It is only valid within the boundaries of the country of purchase.
- The product must be correctly installed and operated in accordance with the instructions contained in the User Manual.
- The product must be used solely for domestic purposes.
- The guarantee will be rendered invalid if the product is re-sold or has been damaged by inexpert repair.
- The manufacturer disclaims any liability for incidental or consequential damages.
- The guarantee is in addition to, and does not diminish, your statutory or legal rights.
Technical Specification
This appliance complies with the below listed EU Directives
2014/30/EU Electromagnetic Compatibility Directive
2014/35/EU Low Voltage Directive
2011/65/EU Restriction of Hazardous Substances
1935/2004/EC Materials & Articles in Contact with Food
(LFGB sections 30&31)
The complete declaration of conformity is available upon request for relevant enquiries
![]()
![]()