MONOPRICE Z-Wave Plus Smart In-Wall On/Off Switch User Manual
SAFETY WARNINGS AND GUIDELINES
Please read this entire manual before using this device, paying extra attention to these safety warnings and guidelines. Please keep this manual in a safe place for future reference.
- This device is intended for indoor use only.
- Do not expose this device to water or moisture of any kind.
- Do not touch the device with wet hands.
- Prior to physical installation, use your circuit breaker or fuse box to remove electric power from the room, then test the circuit to ensure that electric power is not present. Clean using a soft, dry cloth only.
- Do not use chemical cleaners, solvents, or detergents. For stubborn deposits, moisten the cloth with warm water.
- This device has no user serviceable parts. Do not attempt to open, service, or modify this device.
INTRODUCTION
This Monoprice Z-Wave Plus® In-Wall On/Off Switch is a perfect replacement for a traditional wall switch, allowing for manual and remote control of incandescent, LED, and fluorescent lighting, as well as other electrical loads. It is fully compatible with other Z-Wave® wireless devices, allowing for programmable functions in custom scenes. It can be used with most Z-Wave compliant controllers. As part of any Z-Wave network, each device can be remotely controlled by commands sent from Z-Wave controllers in real time. Each AC powered device acts as wireless repeater, transmitting the RF signal from one to device to another, thereby extending the wireless range of the mesh network.
FEATURES
- Perfect replacement for a regular wall switch
- Compatible with 120 VAC, 15 amp electrical circuits
- Wireless Z-Wave® technology creates a mesh network for command and control interoperability with other Z-Wave compliant controllers and devices
- Manual and remote on/off control of any connected lighting or other electrical load
- Can be used for single pole or 3-way (multi-location) operation
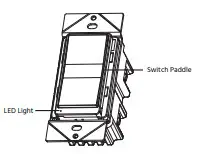
- A blue LED illuminates when the load is off
PACKAGE CONTENTS
Please take an inventory of the package contents to ensure you have all the items listed below. If anything is missing or damaged, please contact Monoprice Customer Service for a replacement.
- 1x Z-Wave Plus® Smart In-Wall On/Off Switch
- 1x Wall Plate with Mount and Screws
- 1x User’s Manual
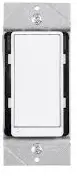
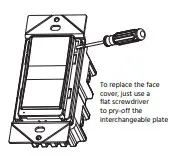
PRODUCT OVERVIEW
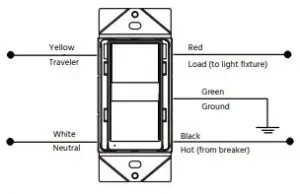
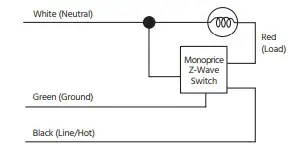
WIRING DIAGRAMS Single Switch
3-Way Switch
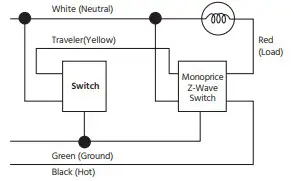
WARNING!!! Prior to physical installation, use your circuit breaker or fuse box to remove electric power from the room, then test the circuit to ensure that electric power is not present.
- Remove the old switch and faceplate from the electric box, then disconnect the wire leads.
- Connect the wire leads to the smart switch, as shown in either the Single Switch or 3-Way Switch wiring diagrams in the WIRING DIAGRAMS section above.
- Check each wiring connection to ensure that it is secure and that there are no stray wire strands.
- Insert the switch into the electric box, then secure the switch to the box using two screws.
- Use the included screws to attach the faceplate to the switch.
- Restore power at the circuit breaker or fuse box.
OPERATION
The connected light/device can be turned on in two ways:
- Using a Z-Wave® controller or remote
- Manually using the paddle on the switch
Remote Operation Z-Wave remotes provide control of an individual device, groups of devices, and scenes. Some brands of Z-Wave certified remotes may not offer as much flexibility in how you can set up your lighting control network. Please refer to your controller’s instructions for details on its capabilities and instructions for adding and controlling devices.
Manual Operation
- Momentarily press the top of the paddle to turn on the connected device.
- Momentarily press the bottom of the paddle to turn off the connected device.
- Press and hold the top or bottom of the paddle for 1.5 seconds to turn on the nodes of association group 3.
- Press and hold the top or bottom of the paddle for 1.5 seconds to turn off the nodes of association group 3.
- With the Z-Wave® controller in “adding” mode, press and hold the top or bottom of the paddle for 3 seconds. The controller will verify the add ition and will assign a node ID to the switch.
- With the Z-Wave controller in “removing” mode, press and hold the top or bottom of the paddle for 3 seconds. The controller will verify the removal, then will remove the switch from the network. When removed from the network, the LED will blink whenever the switch is turned on.
- If the primary controller is missing or inoperable, you can reset the switch to its factory default settings by pressing and holding the top or bottom paddle for 10 seconds.
Note: After a power failure, the switch will be turned off.
ADVANCED OPERATION
Configuration The following Advance d Operation parameters require that you have an advance d controller. Basic remotes do not have this capability.
| Parameter No. | Size | Description | Valid Value | Default Value |
| 1 | 1 Byte | Synchronization of load power and LED indicator | 0:Power on, Led off
1:Power on,Led on |
Default=0 |
Association
| Grouping ID | Max number of Nodes | Description |
| 1 | 1 | Lifeline: Send device reset locally notification |
| 2 | 5 | Status Report: Send basic report |
| 3 | 5 | AssGroupSet: Send Basic set command |
ALL-ON AND ALL-OFF COMMANDS
Depending upon your primary controller, the Monoprice Z -Wave® Switch can be set to respond to All-On and All-Off commands in one of four different ways. Some controllers may not be able to change the response from its default setting. Please refer to your controller’s instructions for information on whether or not it supports the configuration function and if so, how to change the setting.
- It will respond to All-On and All-Off commands (default).
- It will not respond to All-On or All-Off commands.
- It will respond to All-Off commands, but will not respond All-On commands.
- It will respond to All-On commands, but will not respond All-Off commands.
WIRELESS RANGE
This device complies with the Z -Wave® standard of open lin-e-of sight transmission distances of up to 131 feet. Actual performance in a home dep ends on the number of walls between the remote controller and the destination device, the type of construction, and the number of Z -Wave enabled devices installed in the contro l network. AC powered Z-Wave enabled devices act as a signal repeater and multiple devices result in more possible transmission routes , which helps eliminate RF “dead spots.” The wireless RF range is affected in the following ways:
- Each wall or obstacle (i.e.: refrigerator, big screen TV, etc.) between the remote or Z -Wave device and the destination device will reduce the maximum range by approximately 25 -30%.
- Brick, tile, or concrete walls block more of the RF signal than walls made of wooden studs and plasterboard (drywall).
- Wall mounted Z -Wave devices installed in metal junction boxes may suffer a significant loss of range (approximately 20%) , since the metal box blocks a larger part of the RF signal.
The following table shows some basic calculations for RF range.
| From the Remote (or repeating Z-Wave module) to destination device: | |||||
| Type of Construction | Wood Frame with Drywall | Brick, Tile or Concrete | |||
| Plastic
J-Boxes* |
Metal
J-Boxes |
Plastic
J-Boxes* |
Metal
J-Boxes |
||
| Number of Walls or Obstacles | 0** | 131’ | 105’ | 131’ | 100’ |
| 1 | 90’ | 76’ | 80’ | 65’ | |
| 2 | 66’ | 52’ | 48’ | 40’ | |
| 3 | 45’ | 35’ | 28’ | 20’ | |
Note: The distances shown in the table above are typical examples. Actual perf ormance in your home will vary.
TECHNICAL SUPPORT
Monoprice is pleased to pro vide free, live, online technical support to assist you with any questions you may have about installation, setup, troubleshooting, or product recommendations. If you ever need assistance with your new product, please come online to talk to one of our frie ndly and knowledgeable Tech Support Associates. Technical support is available through the online chat button on our website www.monoprice.com or through email by sending a message to [email protected]. Check the website for support times and links.
SPECIFICATIONS
| Model | 36737 |
| Z-Wave® Frequency | 908.42 MHz |
| Voltage | 120 VAC, 60Hz |
| Incandescent | 1000W |
| Electronic Ballast | 5A |
| Standard Ballast | 1200VA |
| Resistive | 1800W (15A) |
| Motor | 1/2 HP |
| Operating Temperature | +32 ~ +104°F (0 ~ +40°C) |
| Wire Strip Length | 5/8″ (16mm) |
| Supply Connection | 14AWG wires, suitable for at least +167°F (+75°C) |
| Screw Torque | 20 lbf-in |
| Range (between Wireless Controller and the closest Z-Wave receiver module) |
Up to 131 ft. line of sight |
| Dimensions | 4.1″ x 1.7″ x 1.8″
(104 x 43 x 46 mm) |
| Weight | 5.2 oz. (147g) |
REGULATORY COMPLIANCE
Notice for FCC

This device complies with Part 15 of the FCC rules. Operation is subject to the following two conditions: (1) this device may not cause harmful interference, and (2) this device must accept any interference received, including interference that may cause undesired operation. Modifying the equipment without Monoprice’s authorization may result in the equipment no longer complying with FCC requirements for Class B digital devices. In that event, your right to use the equipment may be limited by FCC regulations, and you may be required to correct any interference to radio or television communications at your own expense. This equipment has been tested and found to comply with the limits for a Class B digital device, pursuant to Part 15 of the FCC Rules. These limits are designed to provide reasonable protection against harmful interference in a residential installation. This equipment generates, uses and can radiate radio frequency energy and, if not installed and used in accordance with the instructions, may cause harmful interference to radio communications. However, there is no guarantee that interference will not occur in a particular installation. If this equipment does cause harmful interference to radio or television reception, which can be determined by turning the equipment
off and on, the user is encouraged to try to correct the interference by one or more of the following measures:
- Reorient or relocate the receiving antenna.
- Increase the separation between the equipment and receiver.
- Connect the equipment into an outlet on a circuit different from that to which the receiver is connected.
- Consult the dealer or an experienced radio/TV technician for help.
RF Exposure Statement for FCC Caution This equipment complies with radiation exposure limits set forth for an uncontrolled environment. End users must follow the specific operating instructions for satisfying RF exposure compliance. This transmitter must be at least 20 cm from the user and must not be collocated or operated in conjunction with any other antenna or transmitter.
Notice for Industry Canada This Class B digital apparatus complies with Canadian ICES-003. Cet appareil numérique de la classe B est conforme à la norme NMB-003 du Canada.
RF Exposure Statement for Industry Canada Caution This equipment complies with radiation exposure limits set forth for an uncontrolled environment. End users must follow the specific operating instructions for satisfying RF exposure compliance. This transmitter must be at least 20 cm from the user and must not be collocated or operated in conjunction with any other antenna or transmitter.
Z-Wave® and Z-Wave Plus® are registered trademarks of Sigma Designs and its subsidiaries in the United States and other countries.
Monoprice MP True Wireless Earphones
Accessories
- lx Pair ofTrue Wireless Earphones
- lx Charging Box
- lx Micro USB Charging Cable
- 2x Pairs of Spare Eartips (Small and Large) lx User’s Manual
Product Overview
Power On & Pairing
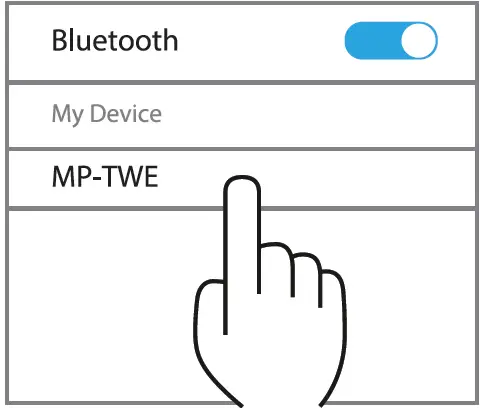

Turn on the left and right earbuds by pressing the MFB on both earphones for 3 seconds. The earphones will automatically enter pairing mode. Search the list of available Bluetooth• devices for the name “MP-TWE”, then select it to connect.
The earphones will give the following voice prompts:
Power on-Connected – Left Channel(Pairing)- Right Channel
TWS Function
The left earphone is the “Master Earphone”, with the built-in microphone and hands-free functionality.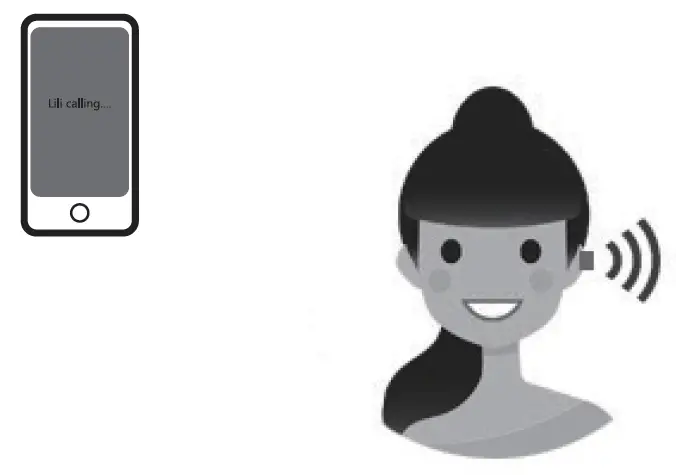
The right earphone is the “Secondary Earphone”, which can be paired with the left one to get stereo sound 
Make sure the two earphones are successfully powered on. They will connect automatically. 
NOTE: Do not cover the earphones with your hand or anything else. Doing so can break the Bluetooth• connection.
Single Mode

Power On &Pairing left earbud to the device as following steps:
- After paired both earbuds, you can put back the right side to the charging box for charging , then pairing the left side to your device. The pairing name still be “MP-TWE”, after paired successfully, there will be a prompt “connected”. Then it can play music and make call only via the left earbud.
- If the left earbud power off, turn on the left earbud by pressing MFB almost 3s, then 1 click on the MFB of left earbud, it will go to pairing status with a prompt “Pairing, Pairing”, The pairing name still be “MP-TWE”, after paired successfully, there will be a prompt “Pairing successfully, connected”. Then it can play music and make call only via the left earbud.
Charging
The blue LED turns off when the earphones are fully charged.
The initial charging time is around 4 hours.
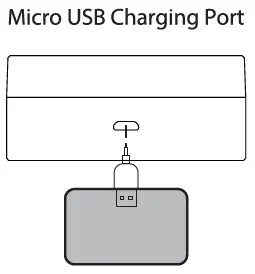
Connect the micro USB cable to the charging box until the blue LED indicator flashes.
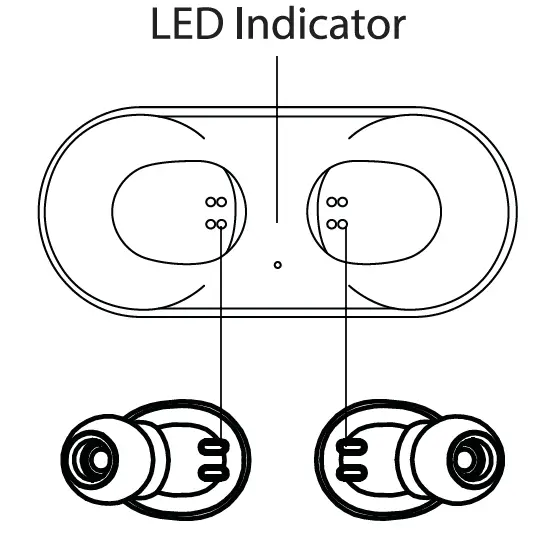
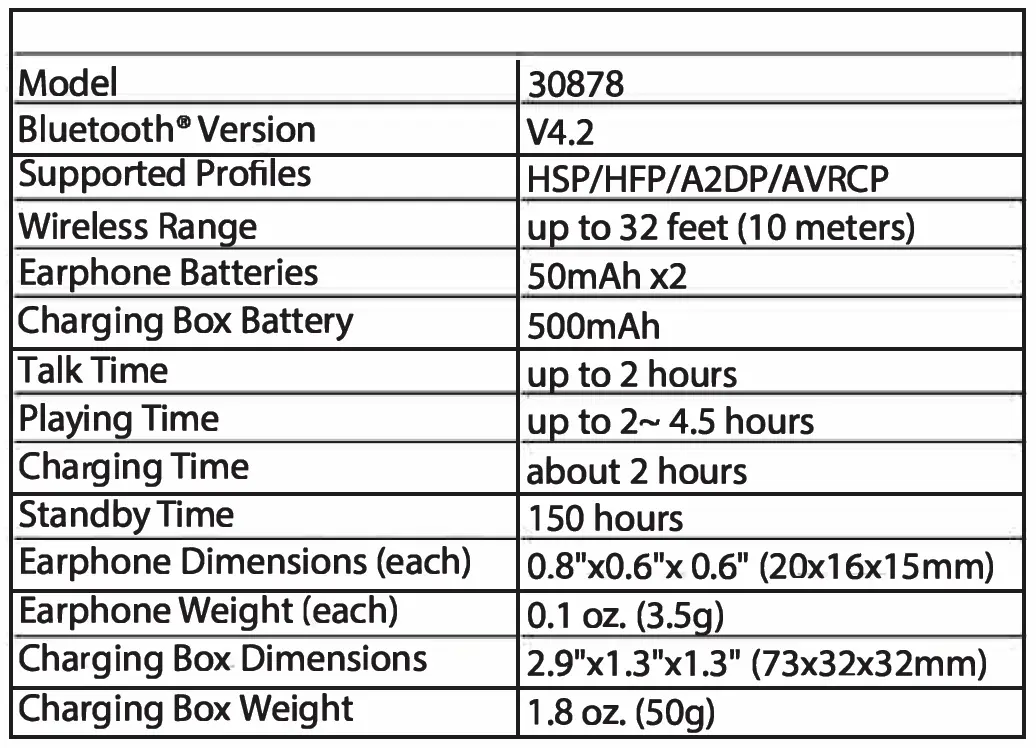
Specifications
LED Indicator
Tips
- Make sure that the earphones are fully charged.
- Put both left and right earphones within 1 foot.
- Turn on both earphones simultaneously by pressing the multi-function buttons on left and right earphones for 4 seconds until the blue light & white light flash alternatively .
- The left and right earphones will be paired with each other.
- When pairing is successful, you will hear the voice prompt “connected Left channel/Right channel”, the LED indicators on the eaphones with flash blue every 7 seconds.
- Turn on the Bluetooth8 function of your device and select “MP-lWE” from the device list, then click connect. When Bluetooth is connected successfully, you will hear the voice prompt “Second device connected”.
Music and Call Control
Streaming Audio
Once paired, you can wirelessly stream audio from your device to your earphones. Music will automatically pause when you receive an incoming phone call and will resume once the call has ended.
Play / Pause: Press the multi-function button once
Next Track: Double-press the multi-function button
Volume Control: You may adjust the volume through your cell phone
Making Calls
Once paired with your smartphone, making and answering phone calls can be managed via the multi-function button.
FAQ
Q: My earphones will not turn on.
A: Please recharge them and make sure they have enough power.
Q:Why can I only hear music from one of the earphones?
A: Make sure the earphones are synced together:
- Hold the multi-function button of both units until the LED flashes blue and white alternately.
- Wait until you hear a voice prompt telling you the two devices are connected.
Q: What if the right earphone cuts out, but the left one is fine?
A: Please try the reset procedure with both earphones, and then try the Stereo Pairing again.
Q: The earphones can not be found or pairing fails.
- The earphones do not enter the pairing mode, please enable the earphones to enter pairing mode.
- The Bluetooth” application of the smartphone or device is not operating. Please restart the smartphone or device and restart the pairing process with the earphones.
Q:What if the sound is unclear?
- Please try changing the position of your device nearer to the earphones. A direct line of sight is best.
- Please try the reset procedure on the earphones, you will need to pair them again. We also recommend deleting the pairing with your phone, and then perform the pairing again.
INTRODUCTION
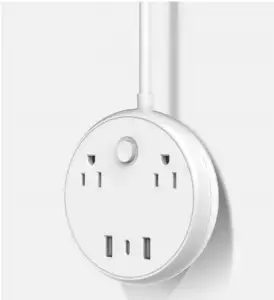
This 2-Outlet 57-Watt USB-C® Power Strip features two AC power outlets, one USB Type-C® port, and two USB Type-A ports. The USB-C® port can provide up to 45 watts of Power Delivery (PD) 3.0, while the Type-A ports can delivery a total of 2.4 amps/12watts of Battery Charging (BC) for mobile devices. The AC outlets support up to 10 amps/1250 watts of power to connected AC devices.
FEATURES
- Two AC power outlets rated for a total of 10 amps/1250 watts at 125 VAC
- USB-C® port supports up to 45 watts of Power Delivery (PD) 3.0
- Two USB Type-A ports support a total of up to 2.4 amps/12 watts of Battery Charging (BC) for mobile devices
- Accurate limited current output
- Over current, short circuit, and over temperature protection circuits with auto recovery
- Overload and over voltage protection
- Intelligent LED for PD charging
ONLINE SUPPORT
Monoprice is pleased to provide free online support. For order related issues, contact the Customer Service department through the Live Chat link on our website www.monoprice.com or via email at [email protected]
For technical issues, contact the Technical Support department through the online chat button on our website www.monoprice.com or by sending an email to [email protected]
Check the website for support times and links.
PACKAGE CONTENTS
Please take an inventory of the package contents to ensure you have all the items listed below. If anything is missing or damaged, please contact Monoprice Customer Service for a replacement.
- 1x 2-Outlet 57-Watt USB-C® Power Strip
- 1x Quick User’s Guide
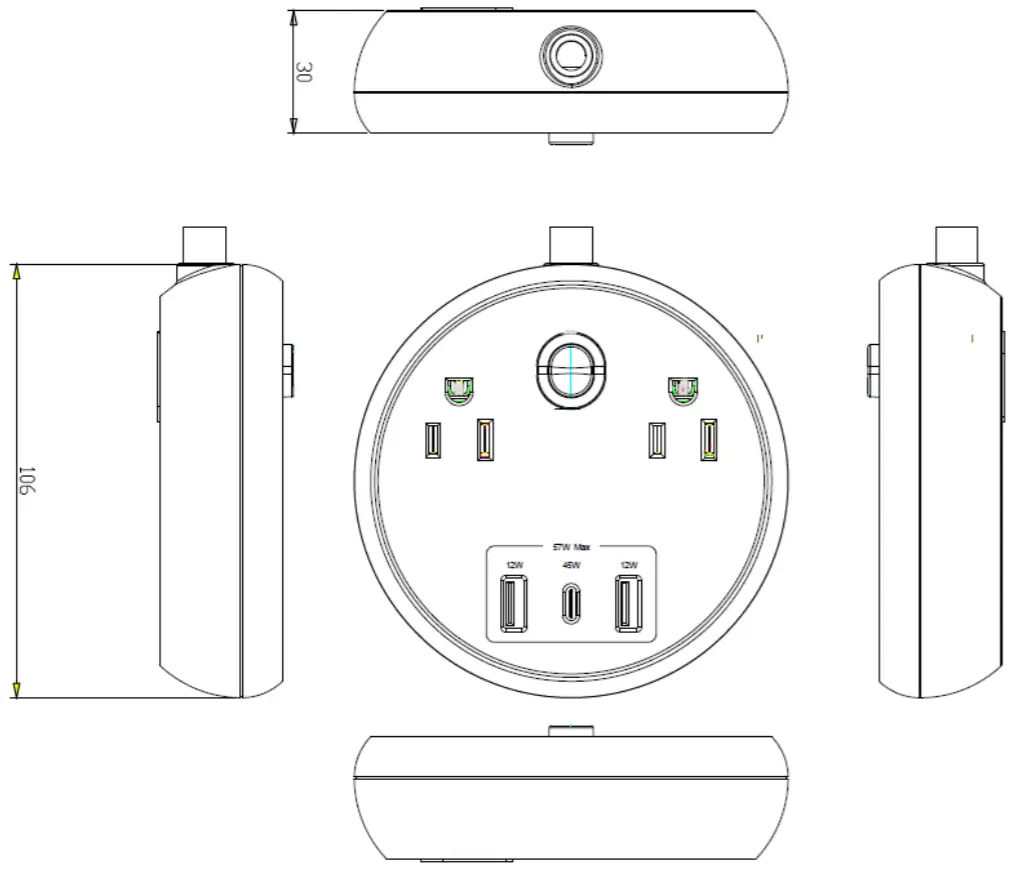
DIMENSIONS DIAGRAM

SPECIFICATIONS
| Model | 41809 |
| Input Power | 125 VAC, 60Hz |
| Outputs | 2x AC, 1x USB Type-C®, 2x USB Type-A |
| AC Output Power | 125 VAC, 60Hz, 10 amps/1250 watts |
| USB Type-C Output Power | 5V/3A, 9V/3A, 12V/3A, 20V/2.25A |
| USB Type-A Output Power (total) | 5 VDC, 2.4A |
| Over Current Protection | Yes |
| Over Voltage Protection | Yes |
| Overload Protection | Yes |
| Short Circuit Protection | Yes |
| Over Temperature Protection | Yes |
| Ripple and Noise | ≤ 200mV |
| Efficiency | ≥ 81.38% |
| Line Regulation | ± 5% |
| Operating Temperature | +32 ~ +77°F (0 ~ +25°C) |
| Storage Temperature | -4 ~ +185°F (-20 ~ +85°C) |
| Operating Humidity | 20 ~ 90% RH, noncondensing |
| Storage Humidity | 5 ~ 95% RH, noncondensing |
| Dimensions | ø4.2″ x 1.2″ (ø106 x 30 mm) |
| Certifications | FCC, ETL |
REGULATORY COMPLIANCE
Notice for FCC}
This device complies with Part 15 of the FCC rules. Operation is subject to the following two conditions: (1) this device may not cause harmful interference, and (2) this device must accept any interference received, including interference that may cause undesired operation.
Modifying the equipment without Monoprice’s authorization may result in the equipment no longer complying with FCC requirements for Class B digital devices. In that event, your right to use the equipment may be limited by FCC regulations, and you may be required to correct any interference to radio or television communications at your own expense.
This equipment has been tested and found to comply with the limits for a Class B digital device, pursuant to Part 15 of the FCC Rules. These limits are designed to provide reasonable protection against harmful interference in a residential installation. This equipment generates, uses and can radiate radio frequency energy and, if not installed and used in accordance with the instructions, may cause harmful interference to radio communications. However, there is no guarantee that interference will not occur in a particular installation. If this equipment does cause harmful interference to radio or television reception, which can be determined by turning the equipment off and on, the user is encouraged to try to correct the interference by one or more of the following measures:
- Reorient or relocate the receiving antenna.
- Increase the separation between the equipment and receiver.
- Connect the equipment into an outlet on a circuit different from that to which the receiver is connected.
- Consult the dealer or an experienced radio/TV technician for help.
Notice for Industry Canada
This Class B digital apparatus complies with Canadian ICES-003.

SAFETY WARNINGS AND GUIDELINES
Please read this entire manual before using this device, paying extra attention to these safety warnings and guidelines. Please keep this manual in a safe place for future reference.
- This device is intended for indoor use only.
- Do not expose this device to water or moisture of any Do not place drinks or other containers with moisture on or near the device. If moisture does get in or on the device, immediately unplug it from the power outlet and allow it to fully dry before reapplying power.
- Do not touch the device, the power cord, or any other connected cables with wet
- Do not subject the product to extreme force, shock, or fluctuations in temperature or
- Prior to operation, check the unit and power cord for physical damage. Do not use if physical damage has occurred.
- Before plugging the unit into a power outlet, ensure that the outlet provides the same type and level of power required by the device.
- Unplug this device from the power source when not in
- Take care to prevent damage to the power cord. Do not allow it to become crimped, pinched, walked on, or
- become tangled with other cords. Ensure that the power cord does not present a tripping hazard
- Never unplug the unit by pulling on the power cord. Always grasp the connector head or adapter body
- Ensure that power is turned off and disconnected before making any electrical
- Clean using a soft, dry cloth only. Do not use chemical cleaners, solvents, or For stubborn deposits, moisten the cloth with warm water.
- This device has no user serviceable Do not attempt to open, service, or modify this device.
INTRODUCTION
Connect and control up to four host devices, such as computers or laptops, using a single USB keyboard and mouse and this KVM switch. The switch can display all four video inputs in quadview on a single HDMI® display or only the selected video input. It supports USB 3.0 connections and can provide up to 5Gbps data bandwidth. It supports video resolutions up to 1080p@60Hz and can be controlled using the front panel buttons, keyboard hotkeys, and the included IR remote control.
FEATURES
- Supports the 1080p@60Hz HDMI® video resolution
- Control up to four host devices using a single USB keyboard and mouse
- Can display all four inputs in quadview on a single HDMI display, as well as fullscreen display of a single input
- Supports up to 5Gbps data bandwidth
- Compliant with the HDMI 3 specification
- Seamless HDMI switching and lag free KVM control
- Plug and play, no software or drivers required
- Can be controlled using the front panel buttons, keyboard hotkeys, or the included IR remote control
CUSTOMER SERVICE
The Monoprice Customer Service department is dedicated to ensuring that your ordering, purchasing, and delivery experience is second to none. If you have any problem with your order, please give us an opportunity to make it right. You can contact a Monoprice Customer Service representative through the Live Chat link on our website www.monoprice.com or via email at support@monoprice.com. Check the website for support times and links
PACKAGE CONTENTS
Please take an inventory of the package contents to ensure you have all the items listed below. If anything is missing or damaged, please contact Monoprice Customer Service for a replacement.
1x KVM switch
1x AC power adapter
1x IR remote control
4x USB 3.0 cable
1x HDMI® cable
1x User’s manual
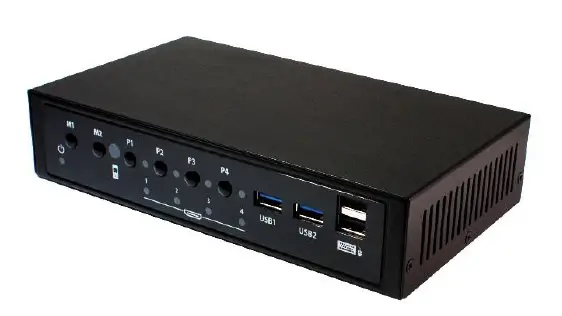
PRODUCT OVERVIEW
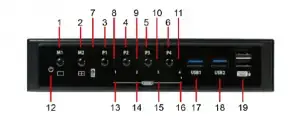
Front Panel

- M2: Press the button to select quadview mode.
- P1: Press the button to select HDMI® port 1 and USB port
- P2: Press the button to select HDMI port 2 and USB port
- P3: Press the button to select HDMI port 3 and USB port
- P4: Press the button to select HDMI port 4 and USB port
- IR Receiver: Aim the included remote towards the IR
- 1: The LED indicator illuminates when the HDMI/USB 1 output is selected.
- 2: The LED indicator illuminates when the HDMI/USB 2 output is selected.
- 3: The LED indicator illuminates when the HDMI/USB 3 output is selected.
- 4: The LED indicator illuminates when the HDMI/USB 4 output is selected.
- Power: The LED indicator illuminates when power is applied.
- HDMI 1: The LED indicator illuminates when an HDMI source is connected to HDMI port
- HDMI 2: The LED indicator illuminates when an HDMI source is connected to HDMI port
- HDMI 2: The LED indicator illuminates when an HDMI source is connected to HDMI port
- HDMI 3: The LED indicator illuminates when an HDMI
- HDMI 4: The LED indicator illuminates when an HDMI source is connected to HDMI port
- USB1: Downstream USB 0 port.
- USB2: Downstream USB 0 port.
- Keyboard/Mouse: Two USB 0 ports for connecting a USB keyboard and mouse.
- HDMI 4: HDMI® input 4.
- HDMI 3: HDMI input
- HDMI 2: HDMI input
- HDMI 1: HDMI input
- HDMI Out: HDMI output
- DC-12V: DC barrel connector for connecting the included AC power
- USB 4: USB input 4
- USB 3: USB input
- USB 2: USB input 2:
- USB 1: USB input
- ON: Power switch.
IR Remote Control
- P1: Press the button to select the HDMI® 1/USB 1
- P2: Press the button to select the HDMI 2/USB 2
- P3: Press the button to select the HDMI 3/USB 3
- P4: Press the button to select the HDMI 4/USB 4
M1: Press the button to select fullscreen mode

- M2: Press the button to select quadview mode.
- M3: Not used.
- R1: Not used.
- R2: Not used.
- R3: Not used
SAMPLE CONNECTION DIAGRAMS
Rear Panel
Front Panel

HOTKEY CONTROL
The KVM switch can be controlled using hotkeys on the connected keyboard. To use a hotkey, first press the Scroll Lock key twice, then type the desired number key (1-6). They hotkeys are detailed in the following table:
| Hotkey | Function |
| 1 | Selects the HDMI® 1/USB 1 input. |
| 2 | Selects the HDMI 2/USB 2 input. |
| 3 | Selects the HDMI 3/USB 3 input. |
| Hotkey | Function |
| 4 | Selects the HDMI® 4/USB 4 input. |
| 5 | Selects fullscreen mode. |
| 6 | Selects quadview mode. |
For example, if you want to select the HDMI 2/USB 2 input, type the following keys in succession:
Scroll Lock + Scroll Lock + 2
TECHNICAL SUPPORT
Monoprice is pleased to provide free, live, online technical support to assist you with any questions you may have about installation, setup, troubleshooting, or product recommendations. If you ever need assistance with your new product, please come online to talk to one of our friendly and knowledgeable Tech Support Associates. Technical support is available through the online chat button on our website www.monoprice.com or through email by sending a message to tech@monoprice.com. Check the website for support times and links.
SPECIFICATIONS
| Model | 36632 |
| Upstream Connections | 4x HDMI®, 4x USB |
| Downstream Connections | 1x HDMI, 2x USB 3.0 data, 1x USB keyboard, 1x USB mouse |
| Video Resolution | Up to 1080p@60Hz |
| Color Spaces | 24-bit/30-bit RGB, YPbPr 4:4:4 |
| HDMI Version | 1.3 |
|
Control Options |
Front panel buttons, IR remote control, keyboard hotkeys |
| USB Data Bandwidth | 5Gbps |
| Input Power | 12 VDC, 2A |
| AC Adapter Input Power | 100 ~ 240 VAC, 50/60 Hz |
| Power Consumption | Up to 8.4 watts |
| Dimensions | 7.3″ x 4.2″ x 1.6″
(185 x 106 x 40 mm) |
Blackbird™ is a trademark of Monoprice Inc.
HDMI®, the HDMI Logo, and High-Definition Multimedia Interface are trademarks or registered trademarks of HDMI Licensing LLC in the United States and other countries.
]]>