![]()

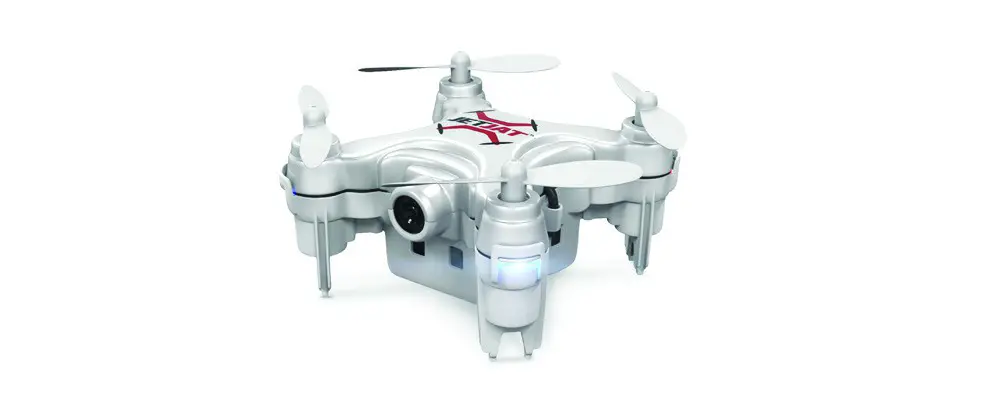
JETJAT® ULTRA™
Owner’s Manual
Ages 8+
For Owner’s Manual updates, warranty information, and support, please visit: https://www.mota.com/ultra
Please read this manual carefully before flying! It has valuable safety information and tips on fun and efficient flight. Please keep this manual in a safe place.
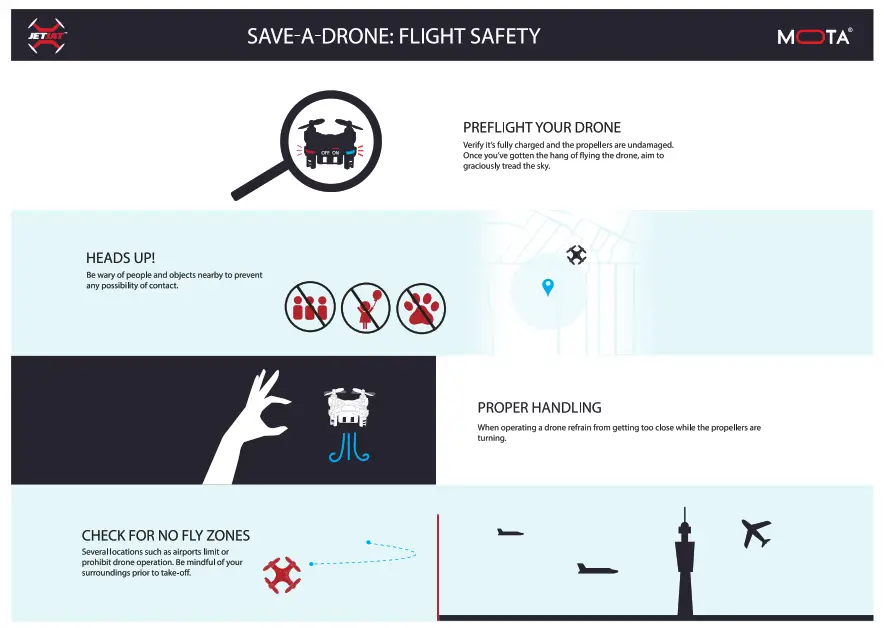
FlySafely!
Drones are sophisticated precision devices capable of complex aerial maneuvers. Please read these safety instructions before using your drone. Failure to operate your drone safely could degrade its performance and cause harm to people, animals, or property.
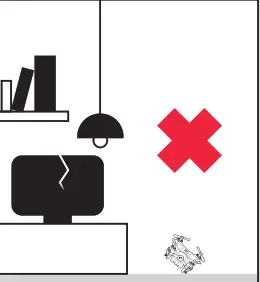
Please do not fly:
– Near or around obstacles such as birds or pets, aircraft, helicopters, other drones, antennas or overhead lines, or airborne toys like kites.
-In or near airports or restricted areas. -In adverse conditions such as strong winds, rain, hail, snow, or sleet.
-If you are impaired, tired, or distracted.
Please do:
-Know and comply with laws and regulations respecting drone use in your area.
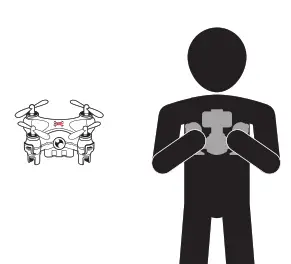
-Keep hands away from rotors when drone is switched on.
-Fly within controller range.
Fly Safely! Find Out How: http://go.mota.com/028

IN THE BOX
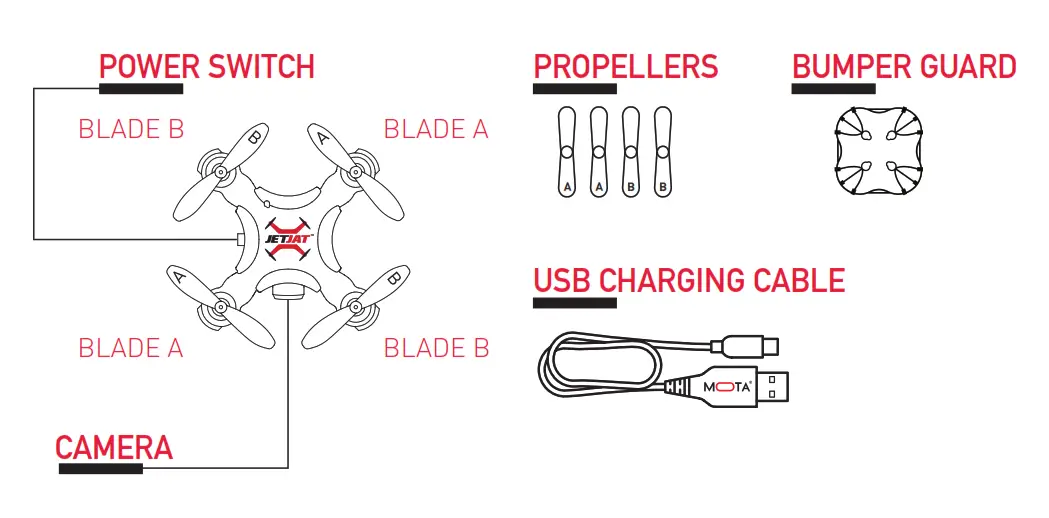
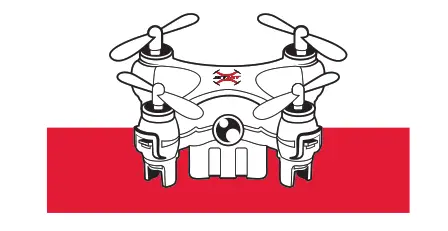
JETJAT ULTRA

Please note: Throttle and directional controls depicted here are using Mode 2.
FLIGHT PREPARATION
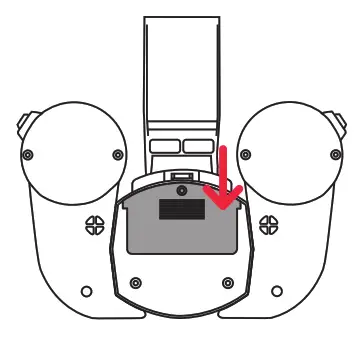
1 Controller Battery Installation
❶ OPEN THE BATTERY COVER ON THE CONTROLLER.
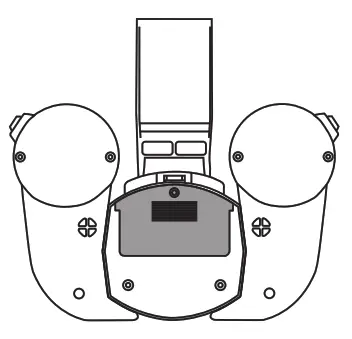
❷ INSTALL 2 AAA BATTERIES (NOT INCLUDED).
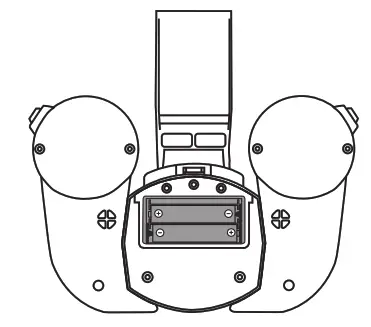 ❸ CLOSE THE BATTERY COVER.
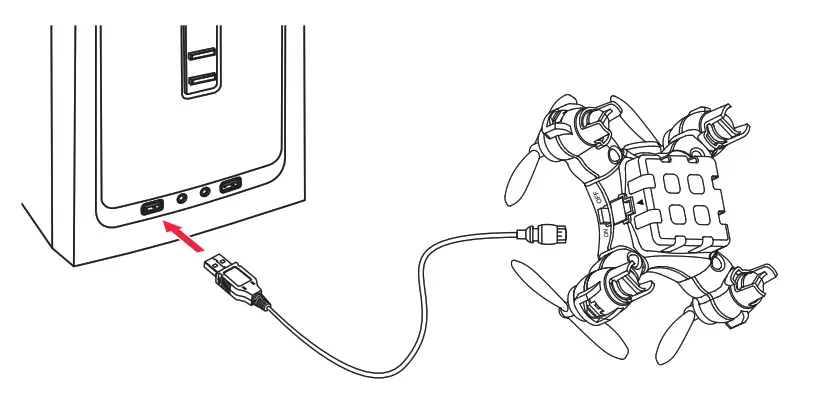
2 Charging Your JETJAT ULTRA
Connect the drone to the charging gable, then insert the charging cable into the port of a USB charger. When the USB indicator is ON, the battery is charging. When the indicator is OFF, the battery is fully charged. The USB charging cable is compatible with a computer USB port, an Apple charger, or any other USB charging device, including portable USB chargers and USB car chargers.
CAUTION
Battery life: Flight time is 4 – 5 minutes when battery is charged and with minimal wind resistance.* Land your JETJAT ULTRA immediately when the battery is low and recharge.
Controller range: The effective range between controller and drone is approximately 80 feet.* Flying outside of the recommended range may cause a crash or loss of the drone.
Warning: Do not fly in moderate or high winds, as the drone may be carried away or crash. While flying, do not throttle down quickly as this may cause the drone to lose altitude uncontrollably.
*Flight time and controller range depend on battery status and condition, flight conditions, and drone operation.
Safe Distance
- While flying, do not quickly throttle down as this may cause the drone to plummet and result in damage.
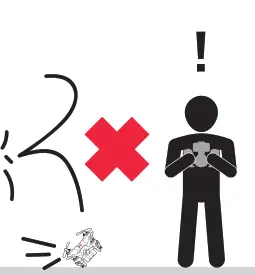
- Fly your drone at least 3 feet above the ground.
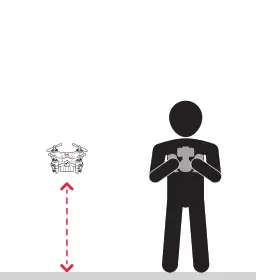
- Be aware of your drone’s surroundings and avoid flying near obstacles.
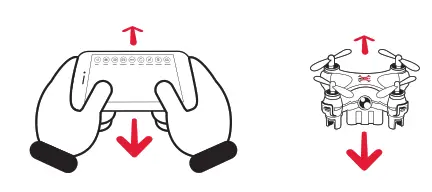
Pairing JETJAT ULTRA with Controller
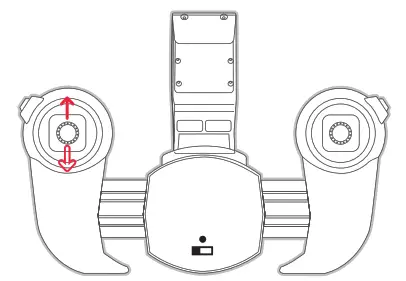
- Switch the drone and the controller ON. The controller will beep once.
- Push the Throttle Flight Stick on the left to the full upward position. The controller will beep once.
- Pull the Throttle Flight Stick to the full downward position. The controller will beep once more, indicating successful linking.
- Your JETJAT ULTRA is now ready for flight.
App Installation
Download and Install the App
- Install the App by following one of the methods below
a) Please visit http://go.mota.com/30.
b) Follow the QRC, below.
c) Once the page loads, follow the link to download the MOTA JETJAT ULTRA app from the Apple App Store (for iOS) or Google Play (for Android).
d) Search for JETJAT ULTRA in iTunes in the Apple App Store (for iOS) or Google Play (for Android).
NOTE: To maximize the reception of Wi-FI video streaming during operation, point the antenna downward. http://go.mota.com/60
Wi-Fi Connection (iOS)
CAUTION
When flying keep as much distance as possible from other Wi-Fi signals in order to avoid potential interference
Turn off Wi-Fi and reconnect if there is no Wi-Fi signal found.
Completely exit the app when you need to recharge the ULTRA’s battery.
Do not launch the app until a Wi-Fi connection to the drone is restored.
Wi-Fi range is approximately 80 feet. To ensure normal flight behavior, do not exceed this range.
Wi-Fi Connection Steps (iOS)
a) With the battery inserted into and connected to the drone, turn ON the power switch, and the power indicator will begin to flash rapidly.
b) Go to the Settings menu of your iPhone or iPad.
c) Select Wi-Fi to access the available Wi-Fi networks.
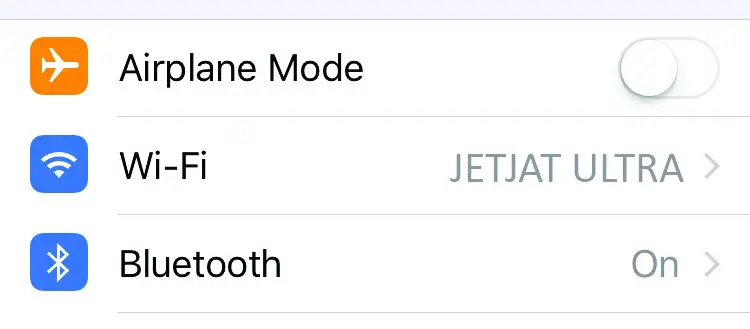
d) Connect to the network.
e) Navigate to the MOTA JETJAT Ultra app on your device and tap the icon to display the Home Screen.
Wi-Fi Connection (Android)
Wi-Fi Connection Steps (Android)
a) With the battery inserted into and connected to the drone, turn the power switch ON. The power indicator will begin to flash rapidly.
b) Go to the Settings menu of your Android device.
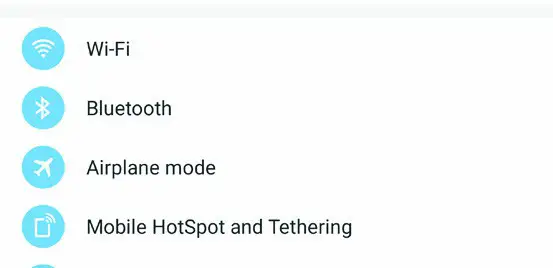
c) Select Wi-Fi to see available Wi-Fi networks.
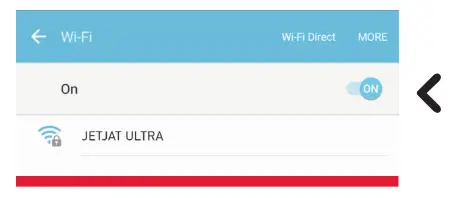
d) Connect to the network.
e) Navigate to the MOTA JETJAT Ultra app on your mobile device and tap the icon to display the Home Screen.
USING THE JETJAT ULTRA APP
Accessing the App Interface
- Navigate to the MOTA JETJAT ULTRA app on your mobile device and tap the icon to display the Home Screen.
- Tap “Play” to enter the Control Screen.
- You will see the drone’s flight controls overlaid on the streaming video from the drone’s camera.
HOME SCREEN

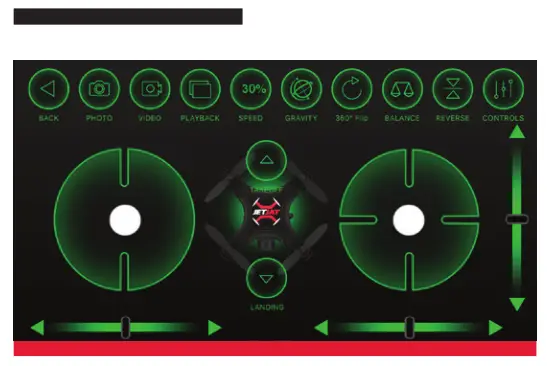
CONTROL SCREEN ON
CONTROL SCREEN OFF
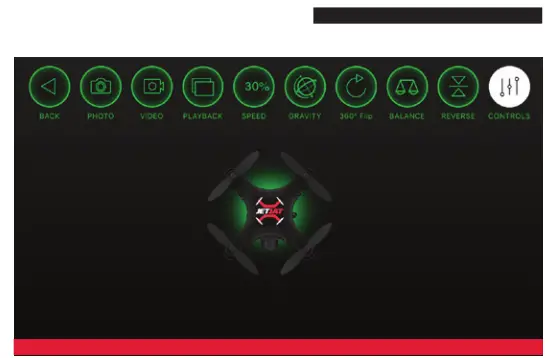
Note: When using the controller to guide the drone, please first link the drone with the controller prior to connecting to Wi-Fi. Turn off the phone’s own control interface when using the controller for an unobstructed view of the controls while streaming video.
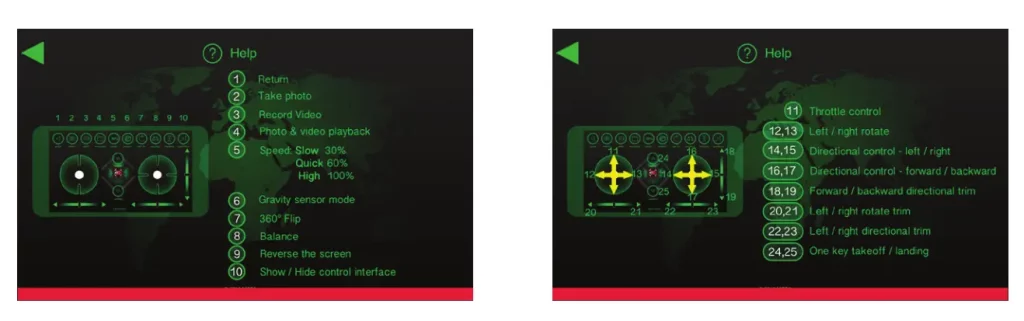
App Control Interface
Flight Settings
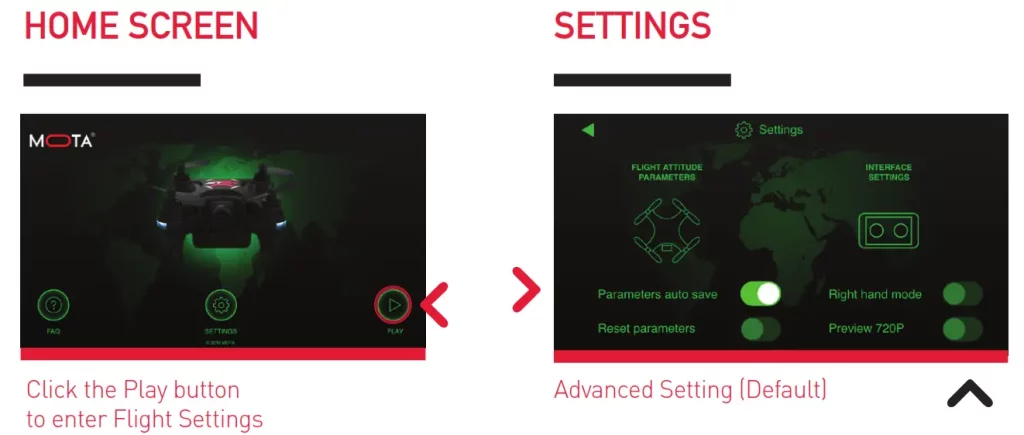
Advanced Setting (Default) Left and Right throttle. (to turn ON swipe left;
to turn OFF swipe right)
One-Touch Take Off / One-Touch Landing
One-Touch Take Off
Place the drone on a flat level surface and tap the one-touch take-off icon. After taking off, the drone will hover and maintain height at about 5 feet above the ground.
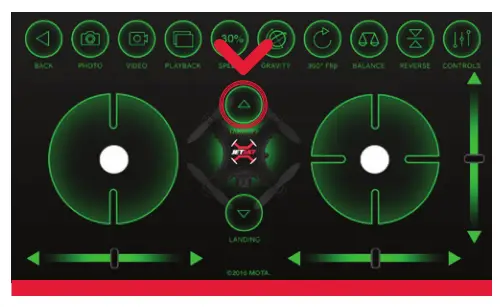
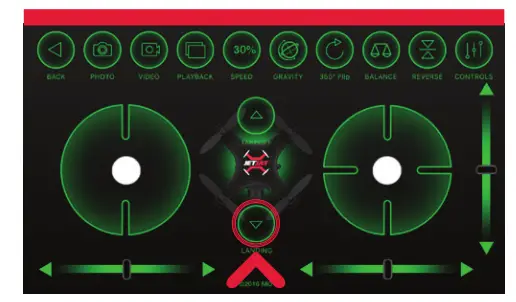
One-Touch Landing
After tapping the one-touch landing icon, the drone will descend and land automatically.
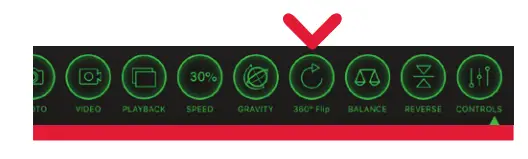
One-Touch 360° Flip / One-Touch Calibration
One-Touch 360° Flips
While hovering in the air, tapping on the One-Touch Flips and Rolls icon will cause the drone to flip or roll.
One-Touch Calibration
If the drone begins to exhibit unstable flight, place the drone on a flat, level surface and tap the one-touch calibration icon. The LED indicators on the drone will flash rapidly while calibration is taking place.
Take Photos and Videos
The JETJAT ULTRA features a high-quality 640 x 480 SD resolution camera that live streams video directly to your smartphone. There is no need to switch the camera ON or OFF.
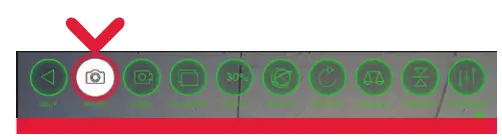
- Snap a Photo: Tap the Photo icon. The photo will be saved in the photo album on your phone.
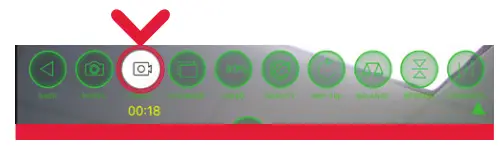
- Start / Stop Video Capture: Tap the Video icon to begin and end recording. The elapsed time will be displayed, confirming you are recording. The video will be saved in the video album on your phone
NOTE: If you don’t see the Video icon, check the Wi-Fi connection between your phone and the ULTRA.
 You cannot take a photo and record video at the same time.
Responsiveness Modes
Responsiveness Modes
-There are three levels of responsiveness:
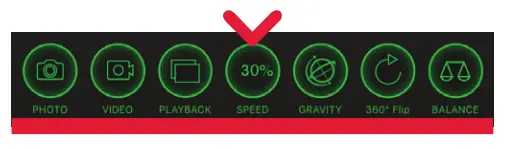
-The default mode is Easy Mode (30%).
-Tapping the Responsiveness icon once from Easy Mode will cause the drone to enter Intermediate Mode (60%).
-Tapping the Responsiveness icon once from Medium Mode will cause the drone to enter Fast Mode (100%).
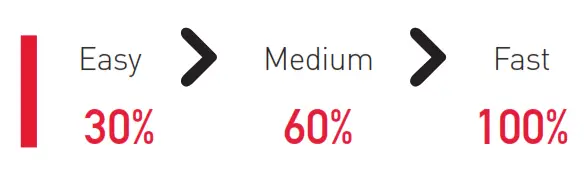
– Tapping the icon again will cause the drone to revert back to Easy Mode. The higher the setting, the more quickly the drone will respond. The lower the setting, the more slowly the drone will respond.
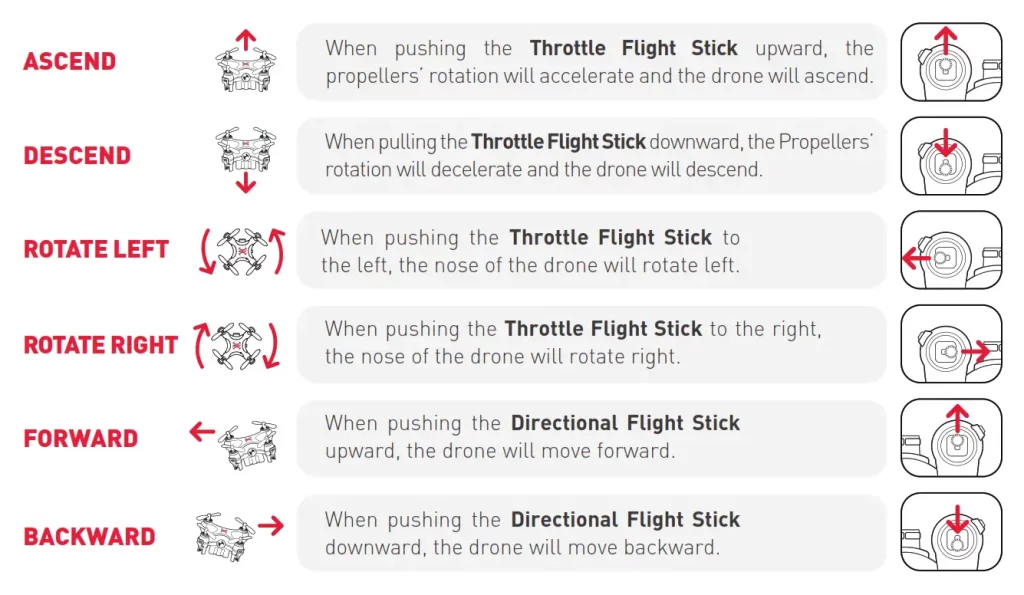
FLIGHT CONTROL
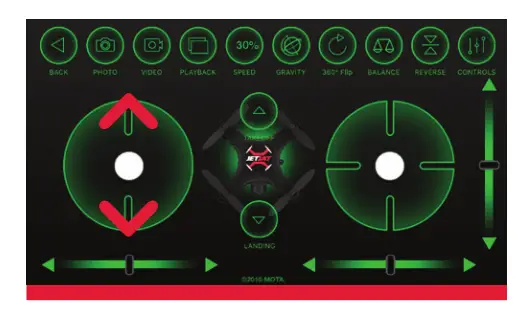
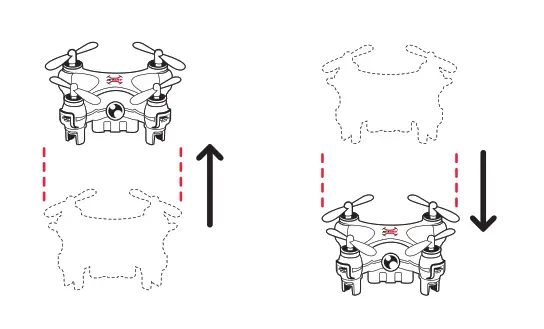
Throttle Control
- Tap and hold the Throttle Control disc. Dragging the disc up will cause the propellers to rotate. The speed of rotation increases with how far you drag the disc, resulting in vertical lift. Dragging the disc down will cause the speed of the propellers to slow, resulting in a loss of altitude.
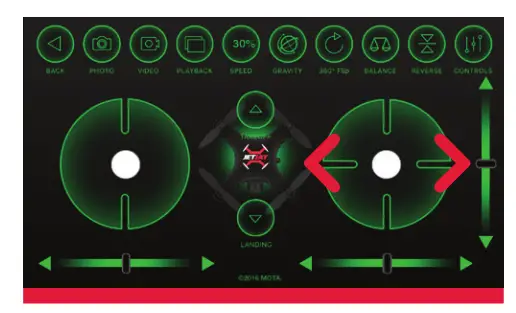
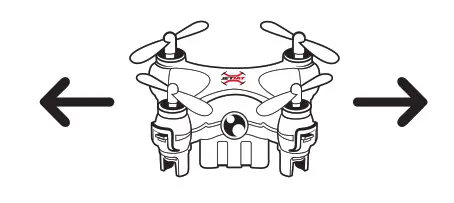
- Directional Control (Roll Left/Roll Right)
Tap and hold the Directional Control disc. Dragging the disc left will cause the drone to fly to the left, and dragging the disc to the right will cause the drone to fly to the right.
Directional Control (Roll Left/Roll Right)
Tap and hold the Directional Control disc. Dragging the disc left will cause the drone to fly to the left, and dragging the disc to the right will cause the drone to fly to the right.
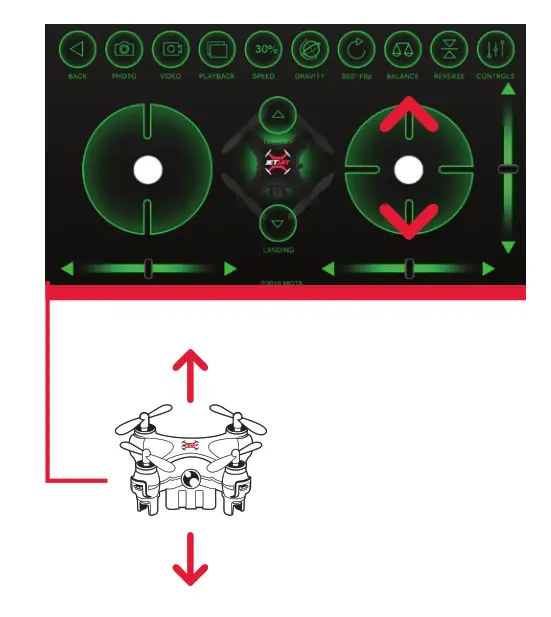
3. Pitch Control (Fly Forward / Fly Backward)
Tap and hold the Directional Control disc. Dragging the disc up will cause the drone to fly forward, and dragging the disc down will cause the drone to fly backward.
4. Rotation Control (Rotate Left / Rotate Right)
Tap and hold the Directional Control disc. Dragging the disc left will cause the drone to rotate to the left, and dragging the disc right will cause the drone to rotate to the right.

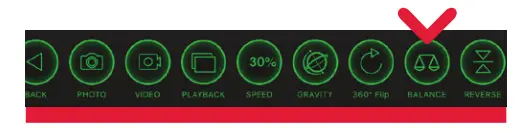
TRIM SETTINGS
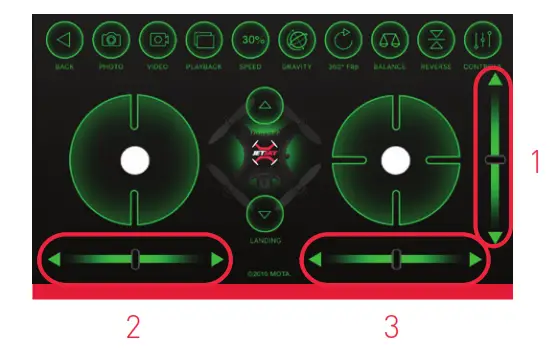
Note: Move the black bar in the opposite direction of drift
1) Forward / Backward Trim If the drone drifts forward or backward while hovering, adjust the trim setting until hovering is stable.
2) Left / Right Drift Trim
If the drone drifts left or right while hovering, adjust the trim setting until hovering is stable.
3) Rotational Trim
If the drone rotates to the left or to the right while hovering, adjust the trim setting until rotation ceases.
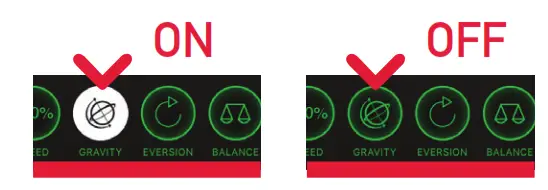
MOTION SENSOR MODE
The Motion Sensor control is set to OFF by default. To switch it ON, tap the icon. The icon will glow to show that Motion Sensor control is ON.
When the Motion Sensor control is ON, the pitch and aileron controls will be linked. This means that you can use the movement of your phone to direct left/right, forward/backward directional control of the drone. Please note, you must still use the throttle icon in the app to control height and rotation. In this mode, one-hand flight operation is possible. Mobile device motion control is as follows:
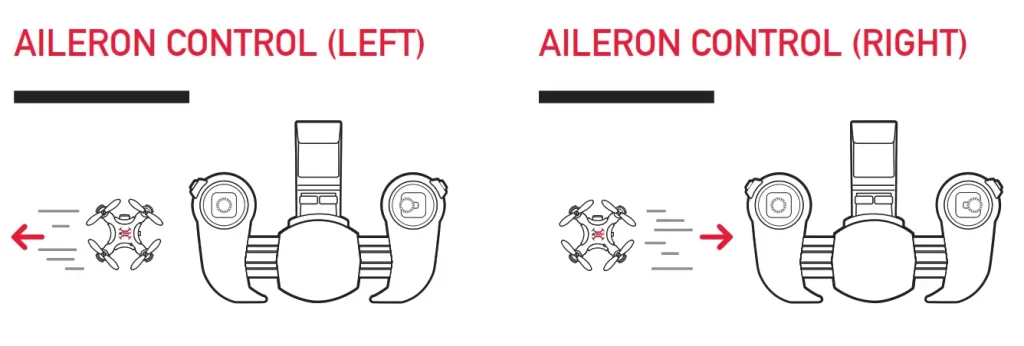
- Aileron Control (Roll Left / Roll Right)
Tilting your mobile device to the left or right will cause the Aileron Control disc to move to the left and right respectively, causing the drone to fly left or right.
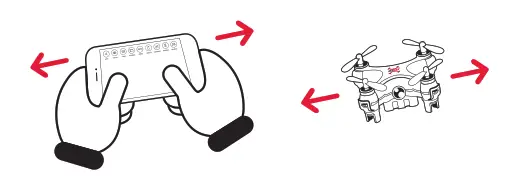
- Pitch Control (Fly Forward / Fly Backward)
Tilting your mobile device forward or backward will cause the Pitch Control disc to move up and down respectively, causing the drone to fly forward and backward.
FLIGHT CONTROL SUMMARY
Aileron Control (Left/Right)
Mode 1 / Mode 2 Switching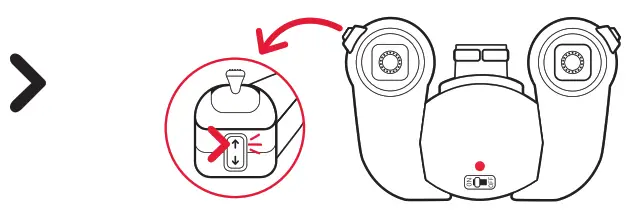
With the controller ON, click the switch on the left side of the controller to enter Mode 1.
Mode 2 is the default setting, which most prefer. If you prefer to control the Flight Sticks with your other hand, you may want switch to Mode 1.
FLIGHT CONTROL
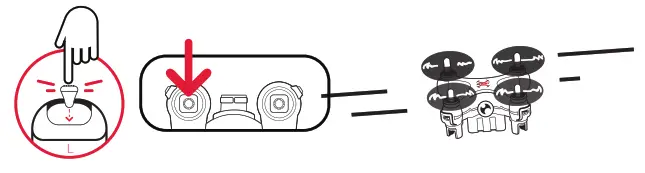
Speed Selection
EASY
Gently press the Throttle Flight Stick. If the controller beeps once, it indicates easy mode.
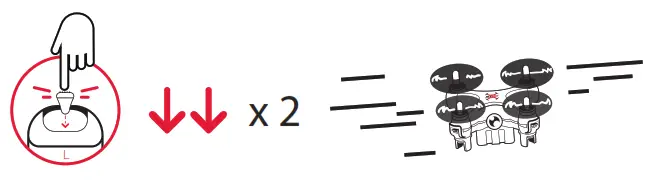
 MEDIUM
Gently press the Throttle Flight Stick. If the controller beeps twice, it indicates medium mode.
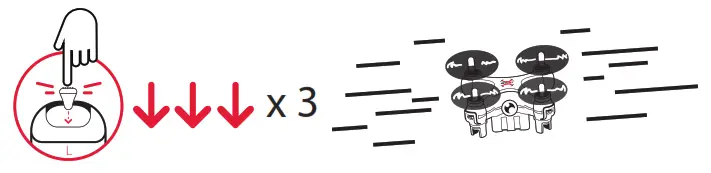
 FAST
FAST
Gently press the Throttle Flight Stick. If the controller beeps three times, it indicates fast mode.
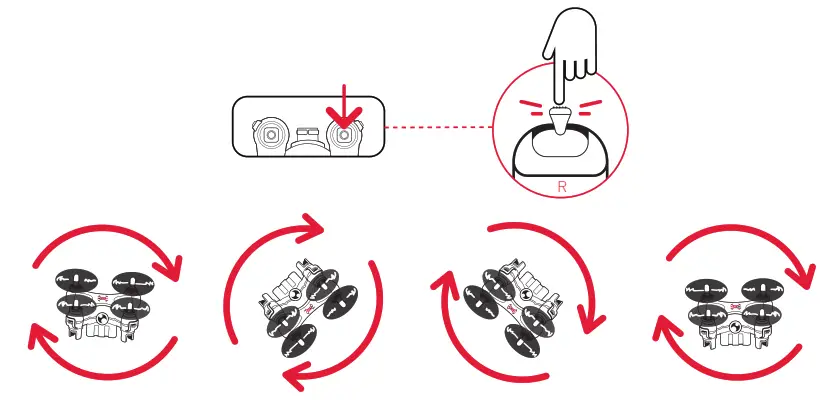
360° Flips
Gently press the Directional Flight Stick. When it beeps 3 times, this indicates the ULTRA has entered 360° Flip mode. From here, push the Directional Flight Stick in the direction you would like to flip and roll your drone.
TROUBLESHOOTING
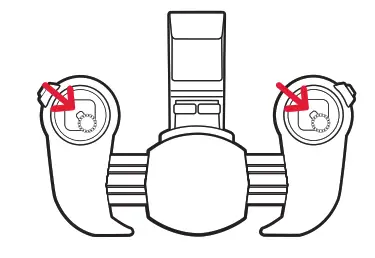
Accelerometer Calibration
If your drone becomes unstable in flight or drifts in one direction, you should calibrate the accelerometer.
- Place the drone on a flat, level surface.
- After successful pairing, pull both the Throttle Flight Stick and the Directional Flight Stick to their bottom-right corners simultaneously. The indicator lights on the drone will flash. When the indicator lights are steadily lit without interruption, calibration is successful.
Low Battery Indication
The drone’s blue-and-red LED lights blink rapidly. Please land immediately and recharge.
Loss of Wi-Fi Communication
If the blue Wi-Fi indicator light on the bottom of the drone is not lit, the drone’s Wi-Fi communication with your phone is outside of specification. This could degrade the video. Please check that the batteries in the drone, the controller, and your phone are fully charged.
Faulty Take Off
If the drone is not lifting off and flipping over before takeoff please make sure that the blade arrangement is correct. Please refer to “blade arrangement diagram” on Page (5).
FAQ
Q. How high can it fly?
A. The ULTRA can fly up to 25 meters (about 80 feet) in any direction before it loses the controller signal. If that happens, it will crash so always keep it in range and in sight.
Q. Does it come with propeller guards?
A. As a matter of fact it does! Inside the box you’ll find easy-to-install propeller guards, a quick and easy installation.
Q. How long does it take to charge?
And how do you charge it?
A. From 0% to 100%, the estimated charging time is 20 minutes. That will vary over time, as new batteries, even ones with advanced li-ion chemistry like in the ULTRA, charge quicker than older ones.
Q. Can it be used on iOS and Androids?
A. Yes, both phones compatible. Note: tablets and larger phones like the iPhone 6 Plus and Samsung Galaxy edge S7 may not fit on the controller if the phone is in a case of any kind.
Q. There was no SD card in the drone, how do I record or store my videos or photos?
A. The JETJAT ULTRA is smartphone compatible. With the push of a button you will be able to take photos and record videos straight to your phone without any additional products like an SD card.
Q. I’m new at this, how do I fly the drone?
A. Find any information you need to learn how to fly on our website, www.mota.com. There is also an owner’s manual in the package contents that give you step-by-step instructions on how to fly, as well as detailed information about the product itself and its capabilities and functions.
Q. I’d like to provide feedback, where do I go?
A. All MOTA Customers have a direct line to our customer support. You can reach us directly at [email protected], and for any issues regarding the product itself like shipping or usability issues do not hesitate to issue a ticket with our support team on www.mota.com for assistance.
Lithium Battery Safety Guide
: If the device is not operating. charging the lithium battery may cause fire, injury, or loss of property. The user should be aware of the risks while using the product. The manufacturer shall not in any way be liable to you or to any third party for any damages you or any third party may suffer as a result of use, intended or unintended. Please carefully read these safety guidelines and charging instructions before use.
Lithium Battery Guarantee
Mota Group, Inc, guarantees quality materials and workmanship for this product. Under no circumstances will Mota Group, Inc, compensate an amount higher than the valued retail price.
Your drone uses an internal high-performance non-removable lithium battery. The controller uses 3 AAA replaceable batteries. Please store the drone and batteries in a cool, dry environment away from children and pets.
- Do not disassemble, pierce, cut, or distort the drone or its batteries. Doing so is a safety hazard and violates the warranty.
- Please use the only USB charger cable included with the drone.
- When charging, ensure the drone is in a ventilated area, on a hard surface, and uncovered, and do not leave it unattended more than a few minutes. The drone automatically stops charging after the battery is full (you will see the red light on the USB connector turn OFF) but is recommended you disconnect the power source once your drone is charged.
- Do not fly or store the drone in very high temperatures or near any heat source, open flame, or flammable materials.
- Metal objects may cause a short in the battery if they touch its positive (“+”) and/or negative (“-”) terminals. Please do not store or transport the drone and transmitter with metallic objects os any kind such as coins, keys, thumb drives, etc.
- In the unlikely event the drone or transmitter’s batteries emit an odor, smoke or liquid, or if you notice any other abnormal condition, immediately disconnect the drone from the charging device (if connected) and take the drone transmitter ON or OFF. Do not touch any liquids as it may irritate the skin. If irritation persists, seek medical attention.
- When the batteries reach the end of their useful life. please dispose of the drone and transmitter batteries at an authorized recycling center or organization.
Copyright (©) 2016 Mota Group, Inc. All rights reserved.