![]()
Model no. 011-1976-6
Classic Series Battery Charger
INSTRUCTION
MANUAL
IMPORTANT SAFETY INSTRUCTIONS.
SAVE THESE INSTRUCTIONS.
This manual contains important safety and operating instructions.
Model no. 011-1976-6 l Questions? Contact us 1-888-942-6686
IF ANY PARTS ARE MISSING OR DAMAGED, OR IF YOU HAVE ANY QUESTIONS,
PLEASE CALL OUR TOLL-FREE HELPLINE AT 1-888-942-6686.
 Read and understand this instruction manual thoroughly before using the product. It contains important information for your safety as well as operating and maintenance advice. Keep this instruction manual for future use. Should this product be passed on to a third party, this instruction manual must be included.
 This MotoMaster product carries a three (3) year warranty against defects in workmanship and materials. At its discretion, MotoMaster Canada agrees to have any defective part(s) repaired or replaced free of charge, within the stated warranty period, when returned by the original purchaser with proof of purchase. This product is not guaranteed against wear or breakage due to misuse and/or abuse.
INTRODUCTION
This MotoMaster Classic Series Battery Charger features advanced technology that makes battery charging faster, easier, and safer while helping to maximize the performance and life of your batteries.
This battery charger is designed for use on all types of 12-volt lead-acid batteries including Wet (flooded), Maintenance-free (MF), Calcium (Ca), Enhanced Flooded (EFB), Absorbed Glass Mat (AGM), and Gel. It is suitable for charging batteries rated from 10 to 500 Amp-hours and maintaining batteries from 10 to 500 Amp-hours.
This manual will explain how to use the charger safely and effectively. Please read and follow these instructions and precautions carefully.
IMPORTANT SAFETY INSTRUCTIONS
SAVE THESE INSTRUCTIONS.
- Read all instructions, warnings, and cautions printed on the battery charger, battery, and vehicle or equipment using the battery.
- DO NOT expose the charger to rain or snow.
- Use of an attachment not recommended or sold by the battery charger manufacturer may result in a risk of fire, electric shock, or injury to persons.
- To reduce the risk of damage to the electric plug and cord, pull by the plug rather than the cord when disconnecting the charger.
- An extension cord should not be used unless absolutely necessary.
The use of an improper extension cord could result in a risk of fire and electric shock. If an extension cord must be used, make sure:
The pins on the plug of the extension cord are the same number, size, and shape as those of the plug-on charger.
The extension cord is properly wired and in good electrical condition.
The wire size is large enough for the AC ampere rating of the charger, as specified in the chart on the following page. - DO NOT operate charger with a damaged cord or plug—replace the cord or plug immediately.
- DO NOT operate charger if it has received a sharp blow, been dropped, or otherwise damaged in any way—take it to a qualified serviceman.
- DO NOT disassemble the charger. Take it to a qualified service professional if service or repair is required. Incorrect assembly may result in fire or electric shock.
To reduce the risk of electric shock, unplug the charger from the outlet before attempting any maintenance or cleaning. Turning off controls will not reduce this risk.
WARNING—RISK OF EXPLOSIVE GASES. - WORKING IN THE VICINITY OF A LEAD-ACID BATTERY IS DANGEROUS. BATTERIES GENERATE EXPLOSIVE GASES DURING NORMAL BATTERY OPERATION. FOR THIS REASON, IT IS OF UTMOST IMPORTANCE THAT YOU FOLLOW THE INSTRUCTIONS EACH TIME YOU USE THE CHARGER.
- To reduce the risk of battery explosion, follow these instructions and those published by the battery manufacturer and manufacturer of any equipment you intend to use in the vicinity of the battery. Review cautionary markings on these products and on the engine.
PERSONAL SAFETY INSTRUCTIONS.
- Consider having someone close by to come to your aid when you work near a lead-acid battery.
- Have plenty of fresh water and soap nearby in case battery acid contacts skin, clothing, or eyes.
- Wear complete eye protection and clothing protection. Avoid touching eyes while working near the battery.
- If battery acid contacts skin or clothing, wash immediately with soap and water. If acid enters the eye, immediately flood the eye with running cold water for at least 10 minutes and get medical attention immediately.
- NEVER smoke or allow a spark or flame in the vicinity of the battery or engine.
- Take extra precautions to avoid dropping a metal tool onto the battery. It may spark or create a short circuit that can cause an explosion.
- Remove personal metal items such as rings, bracelets, necklaces, and watches when working with a lead-acid battery. A lead-acid battery can produce a short-circuit current high enough to weld a ring or the like to metal, causing a severe burn.
- Use a charger for charging a LEAD-ACID battery only. It is not intended to supply power to a low voltage electrical system other than in a starter-motor application. Do not use a battery charger for charging dry-cell batteries that are commonly used with home appliances. These batteries may burst and cause injury to persons and damage to property.
- NEVER charge a frozen battery.
AC ELECTRICAL CONNECTIONS
PLUGGING CHARGER IN
Your charger requires a 120 V AC electrical wall outlet receptacle installed according to local codes and ordinances.
USING AN EXTENSION CORD
An extension cord should not be used unless absolutely necessary. The use of an improper extension cord could result in a risk of fire and electric shock. If an extension cord must be used, make sure:
- The pins on the plug of the extension cord are the same number, size, and shape as those of the plug-on charger.
- The extension cord is properly wired and in good electrical condition.
- The wire size is large enough for AC ampere rating of charger as specified in the chart below:
MINIMUM RECOMMENDED EXTENSION CORD
| Length of Cord, Metres (Feet) | AWG* Size of Cord |
| 7.6 (25) | 16 |
| 15.2 (50) | 14 |
| 30.5 (100) | 10 |
| 45.6 (150) | 8 |
*AWG = American Wire Gauge
PREPARING TO CHARGE
- If it is necessary to remove the battery from the vehicle to charge, always remove the grounded terminal from the battery first. Make sure all accessories in the vehicle are off so as not to cause an arc.
- Be sure the area around the battery is well ventilated while the battery is being charged.
- Clean battery terminals. Be careful to keep corrosion from coming in contact with eyes.
- Add distilled water in each cell until battery acid reaches the level specified by the battery manufacturer. Do not overfill. For a battery without removable cell caps, such as valve-regulated lead-acid batteries, carefully follow the manufacturer’s recharging instructions.
- Study all battery manufacturer’s specific precautions while charging and follow recommended rates of charge.
- Determine voltage of battery by referring to car owner’s manual and make sure that output voltage selector switch is set at the correct voltage. If the charger has adjustable charge rate, charge the battery initially at the lowest rate.
CHARGER LOCATION
- Locate charger as far away from battery as DC cables permit.
- Never place charger directly above battery being charged; gases from battery will corrode and damage the charger.
- Never allow battery acid to drip on the charger when reading electrolyte specific gravity or filling the battery.
- Do not operate chargers in a closed-in area or restrict ventilation in any way.
- Do not set a battery on top of the charger.
DC CONNECTION PRECAUTIONS
- Connect and disconnect DC output clips only after removing the AC cord from the electrical outlet. Never allow clips to touch each other.
- Attach clips to the battery and chassis as indicated in the Connecting Your Battery section.
CONNECTING YOUR BATTERY
FOLLOW THESE STEPS WHEN THE BATTERY IS INSTALLED IN THE VEHICLE
WARNING: A SPARK NEAR THE BATTERY MAY CAUSE A BATTERY EXPLOSION. TO REDUCE THE RISK OF A SPARK NEAR THE BATTERY:
- Position AC and DC cords to reduce the risk of damage by hood, door or moving engine part.
- Stay clear of fan blades, belts, pulleys, and other parts that can cause injury to persons.
- Check the polarity of battery posts. POSITIVE (POS, P, +) battery post usually has a larger diameter than NEGATIVE (NEG, N, -) post.
- Determine which post of battery is grounded (connected) to the chassis. If negative post is grounded to chassis (as in most vehicles), see the step “For negative-grounded vehicle”. If a positive post is grounded to the chassis, see the step “For positive-grounded vehicle”.
- For a negative-grounded vehicle, connect POSITIVE (RED) clip from battery charger to POSITIVE (POS, P, +) ungrounded post of the battery. Connect NEGATIVE (BLACK) clip to vehicle chassis or engine block away from the battery. Do not connect the clip to carburetor, fuel lines, or sheet-metal body parts. Connect to a heavy-gauge metal part of the frame or engine block.
- For a positive-grounded vehicle, connect NEGATIVE (BLACK) clip from battery charger to NEGATIVE (NEG, N, -) ungrounded post of the battery. Connect POSITIVE (RED) clip to vehicle chassis or engine block away from the battery. Do not connect the clip to carburetor, fuel lines, or sheet-metal body parts. Connect to a heavy-gauge metal part of the frame or engine block.
- When disconnecting the charger, turn switches off, disconnect the AC cord, remove the clip from the vehicle chassis, and then remove the clip from the battery terminal.
FOLLOW THESE STEPS WHEN THE BATTERY IS OUTSIDE THE VEHICLE
WARNING: A SPARK NEAR THE BATTERY MAY CAUSE A BATTERY EXPLOSION. TO REDUCE THE RISK OF A SPARK NEAR THE BATTERY:
- Check the polarity of battery posts. POSITIVE (POS, P, +) battery post usually has a larger diameter than NEGATIVE (NEG, N, -) post.
- Attach at least a 24″ (61 cm) 6-gauge (AWG) insulated battery cable to NEGATIVE (NEG, N, -) battery post.
- Connect POSITIVE (RED) charger clip to POSITIVE (POS, P, +) post of the battery.
- Position yourself and the free end of the cable as far away from the battery as possible—then connect the NEGATIVE (BLACK) charger clip to the free end of the cable.
- Do not face battery when making the final connection.
- When disconnecting the charger, always do so in the reverse sequence of connecting procedure and break the first connection while as far away from the battery as practical.
- A marine (boat) battery must be removed and charged on shore. To charge it on board requires equipment specially designed for marine use.
 WARNING
A SPARK NEAR A BATTERY MAY CAUSE A BATTERY EXPLOSION!
Battery chargers may get hot during operation. DO NOT set charger on flammable materials like carpeting, upholstery, paper, cardboard, etc. The charger may damage leather and plastic.
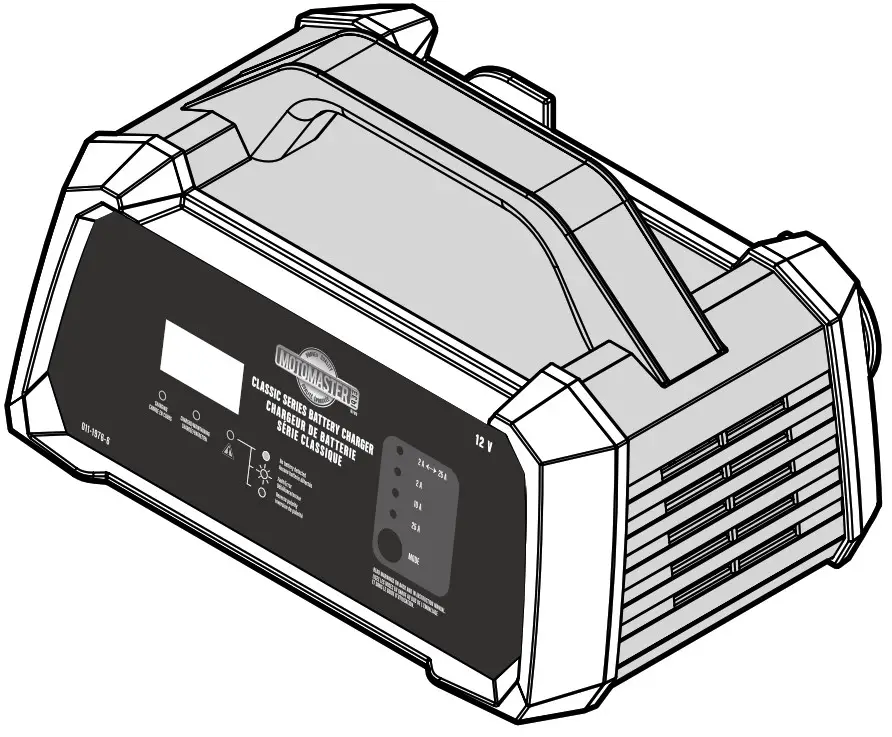
CONTROLS AND INDICATORS
 A. Digital Display
During charging, the digital display will alternate between Volts (V), Amps (A), and Battery State of Charge (%). It can also display Fault Codes if a charging error is detected.
Volts—Actual charging voltage will be displayed. Charging voltage can reach up to 14.4 V— this is normal and required to effectively charge a 12-volt battery.
Amps—Actual charging amperage will be displayed. While you may select 2 A, 10 A, or 25 A charge modes, these are maximum currents and the battery charger will reduce the actual current delivered to the battery based on feedback from the battery and other factors.
Stage of Charge—The approximate battery state of charge is displayed. A reading of “LO” indicates that the battery is below 50% state of charge. Above 50%, the percentage will display in 10% increments between 60 to 90% capacity. Once the battery is fully charged, the display will read “100%”.
NOTE: About 30 minutes after reaching full charge, the battery charger will enter a power-saving mode and the digital display will turn off.
Fault Codes—The charger will continuously monitor charge progress and collect feedback from the battery during charging. In the event an abnormal condition is detected, charging will stop and a fault code (e.g., “F01”) may be displayed. (See “Troubleshooting/Fault Codes” for possible causes and solutions.)
NOTE: A fault condition will also be indicated by the  LED illuminating.
B. Charge Status Indicators
CHARGING LED—Indicates battery is charging.
CHARGED/MAINTAINING LED—Indicates charging is complete and the battery charger has entered the Maintain stage. (See Understanding Charging Stages.)
LED—Indicates one of three possible error conditions:
- Amber (solid)—No battery detected. Check to ensure that clamp connection to the battery posts are clean and solid. If connections are good, the battery is severely discharged (<1.5 V) and may be unsafe to charge. The battery should be tested or replaced.
- Red (flashing)—A fault has been detected and charging has been aborted. Check the digital display for a Fault Code and see “Troubleshooting/Fault Codes” for possible causes and solutions.
- Red (solid)—Reverse polarity has been detected. Reverse clamp connections.
C. Charging Modes
There are 4 charging modes to choose from. Pressing the MODE button repeatedly will cycle through each of the charge modes. See below for an overview of each mode. Charging will automatically begin about 5 seconds after the charge mode has been selected.
NOTE: The battery charger will retain the last selected mode in memory. In the event AC power is disrupted (e.g., power failure), the charger will re-start in the last selected mode once power is restored.
| MODE | EXPLANATION | Battery Capacity Range | |
| Charging | Maintenance | ||
| 2 A<>25 A | For charging most sizes of 12 V lead-acid batteries. Select this mode If you are unsure about the capacity rating of your battery. | 10 to 500 Amp-hour |
10 to 500 Amp-hour |
| 2 A | For charging small to medium 12 V lead-acid batteries. | 10 to 50 Amp-hour | 10 to 400 Amp-hour |
| 10 A | For charging medium to large 12 V lead-acid batteries. | 30 to 200 Amp-hour | 30 to 400 Amp-hour |
| 25 A | For faster charging of large 12 V batteries or charging extra-large ones. | 80 to 500 Amp-hour | 80 to 500 Amp-hour |
*About the 2 A<>25 A mode—To help a battery deliver its maximum performance and lifespan, it is important to charge it at a rate that is appropriate and safe for its capacity. Charging a battery at too high a charge rate, while fast, can overheat a battery and shorten its expected life. Conversely, charging a battery at too low a charge rate, while safer, can take unnecessarily long and can even result in the battery never truly reaching full charge. In the “2 A<>25 A” mode, the charger starts charging at a low, safe current and gradually increases the rate as the battery demonstrates it can accept a higher current. The result is a balance between the shortest charging time and safely charging a battery to its utmost capacity.
| Examples of Battery Sizes In Common Applications | |
| Small (10-25 Ah) | Motorcycle, scooter, AN, personal watercraft, snowmobile. |
| Medium (30-50 Ah) | Compact car, mid-size sedan, compact SUV, riding mower, UTV. |
| Large (60-100 Ah) | Full-size car, large SUV, truck, boat, RV, farm tractor. |
| Extra large (100 Ah+) | Large marine, tractor-trailer, bus, multiple batteries connected in a bank. |
For reference only. Please check the specifications listed on your battery or consult with the battery manufacturer.
CHARGING YOUR BATTERY
- Connect the charger clamps to the battery (following the steps outlined in “Connecting Your Battery”).
- Plug the charger AC plug into an electrical outlet.
NOTE: If a fault or error is detected, the LED will illuminate (see Charge Status Indicators). - Press the MODE button to select a charging program.
NOTE: If no selection is made within 5 seconds, the charger will default to the last selection in memory and automatically begin charging. - Your battery is fully charged when the CHARGED/MAINTAINING LED illuminates and the display reads “100%”.
NOTE: Your battery is ready to start an engine once it reaches 80%. - Stop charging at any time by disconnecting the charger AC plug from the electrical outlet.
UNDERSTANDING FACTORS THAT AFFECT CHARGING TIME
The time it takes to fully recharge a battery depends on several factors including:
1. Battery Depth of Discharge
The greater the depth of discharge, the longer it will take to fully charge a battery. For example, a battery discharged to a level of 50% will take about twice as long to fully charge as a battery discharged only 25%.
2. Battery Size
If charged at the same current, a larger (higher capacity) battery will require more time to fully charge than a smaller (lower capacity) battery. This difference can be overcome by charging larger batteries at a higher current.
3. Battery Age and Condition
As the battery ages, its internal resistance will increase, impacting its ability to accept current. This effect is particularly noticeable in batteries that have not been well-maintained over their life.
4. Battery Type
Some battery chemistries, such as AGM and gel, have lower internal resistance which means they can accept charge better without generating damaging heat. Such batteries can charge up to 2 times faster than traditional wet battery types.
5. Charge Rate
The charge rate is measured in amperes (A). A battery charged at a lower rate will take longer to fully charge than a battery charged at a higher rate. This does not mean that one should always charge the battery at the highest ampere available as this can cause overheating and premature battery failure. A battery should be charged at a rate appropriate for its size—a good, safe rule of thumb is about 1/10it’s Amp-hour capacity (e.g., 100 Ah battery x1/10=10 A).
6. Cold Temperature
Cold temperatures slow down the chemical reaction that takes place inside a battery when it is charging. Charging a battery at a cold temperature can greatly increase the amount of time required to charge the battery. The ideal charging temperature is between 10 to 25 C (50 to 77 F).
UNDERSTANDING THE MULTI-STAGE CHARGING PROCESS
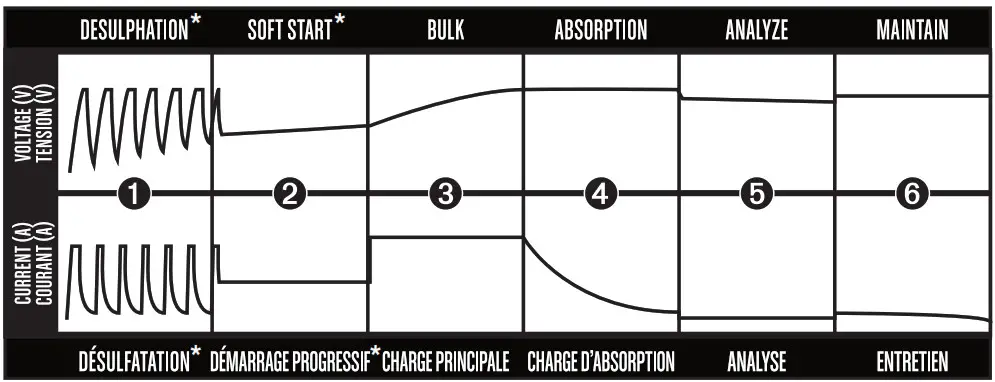
STAGE 1 DESULPHATION*
Pulses of voltage and current help recover sulfated or deeply discharged batteries.
STAGE 2 SOFT START*
Gently introduces current to condition deeply discharged batteries and prevent overheating that could damage the battery.
STAGE 3 BULK
Charging with the maximum current to bring the battery to about 80% capacity.
STAGE 4 ABSORPTION
Charging with constant voltage while reducing current to safely bring the battery to 100% capacity. This stage is key to maximizing battery performance and battery life.
STAGE 5 ANALYZE
Tests if the battery is holding charge.
STAGE 6 MAINTENANCE
Monitors battery voltage and provides top-up charging when necessary to keep the battery fully charged
* If necessary
MAINTENANCE AND CARE
- Wipe clean cords and clamps after each use.
- Store the power and output cables neatly to prevent damage.
- The charger housing may be cleaned using a damp cloth and mild cleaning agent.
- Always unplug the charger when not in use.
- Keep the charger stored in a cool, dry place.
TROUBLESHOOTING/FAULT CODES
| Error Code | Condition | Cause | Solution |
 |
The charger does not detect a battery connected to it. | The charger does not recognize the battery. | Connect the battery to the charger BEFORE connecting the charger to AC power. |
| Poor clamp connection. | Ensure battery posts are clean. Rock clamps back and forth on battery posts to ensure a good connection. | ||
| Battery voltage is under 1.5 V (battery must have a MINIMUM of 1.5 V to activate charger). | Check battery voltage with a voltmeter. If LESS than 1.5 V, replace the battery. (A battery with less than 1.5 V is likely beyond salvage due to extreme sulphation or some other internal failure.) You may try to boost the battery using booster cables connected to another vehicle. This may raise the battery voltage above 1.5 V allowing the battery charger to activate. |
||
 |
The battery voltage is tt less than 10 V after some time of charging. |
The battery is defective. | Replace the battery. |
| A load may be connected to the battery. | Do not use the battery during charging. | ||
 |
The battery voltage is too high. | The battery is not a 12 V battery. | Confirm that the battery is 12 V, not 24 V. |
 |
The actual charge rate exceeds the selected charging rate. | A load may be connected to the battery. | Disconnect the load and attempt to charge again. |
| Charger error. | Disconnect the battery and the AC power; attempt to charge again. | ||
 |
The temperature of the charger is too high. | High ambient tempera- lure or poor ventilation. |
Ensure adequate ventilation. The charger will resume charging after cooling. |
| Error Code | Condition | Cause | Solution |
. |
The battery does not go into Maintenance mode after being charged for 24 hours. Note: When F05 appears, disconnect AC power and remove clamps from the battery. Re-connect and attempt to charge again. |
The charge current is too low. | Try charging battery again using a higher charge rate. |
| There is a load placed on the battery while charging. | Remove any loads connected to the battery during charging. | ||
| The battery is defective and will not accept a charge. | Replace battery. | ||
. |
Reverse polarity. | The battery clamps are incorrectly connected. | Reverse clamp connections. |
TECHNICAL SPECIFICATIONS
| Input Voltage AC | 120 V AC, 60 Hz |
| Working Voltage AC | 104 —127 V AC, 60 Hz |
| Input Amps | 10 A (max.) |
| Charging Voltage | 14.4 V |
| Charging Current | 2/10/25 A |
| Minimum Battery Voltage | 1.5 V |
| Ambient Operating Temperature | -20 to 40°C (-4 to 104°F). |
| Charger Type | 6-step, fully automatic |
| Compatible Battery Voltage | 12 V (nominal) |
| Compatible Battery Types | All lead-acid (Wet, MF, Ca, AGM and Gel) |
| Compatible Battery Capacities | Charging: 10 to 500 Amp-hour Maintenance: 10 to 500 Amp-hour |
| Dimensions (L x W x H) | 117/16x 8 11 /16 x 61/2″(29 x 22 x 16.5 cm) |
| Weight | 4 lb 3 oz (1.9 kg) |