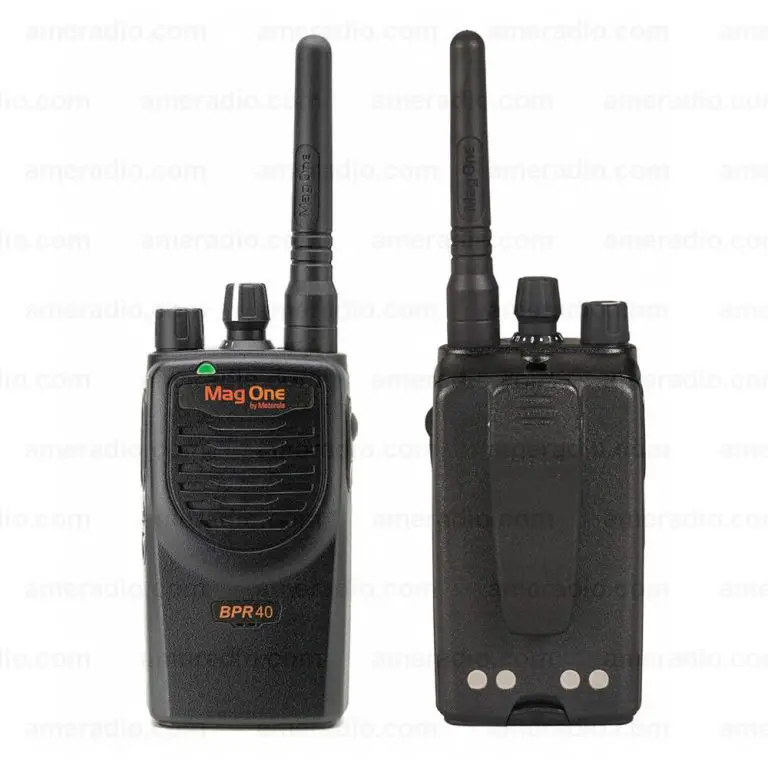
motorola MagOne BPR40 Portable Two-Way Radio

PRODUCT SAFETY AND RF EXPOSURE COMPLIANCE
ATTENTION!
Before using this product, read the operating instructions for safe usage contained in the Product Safety and RF Exposure booklet enclosed with your radio.
This radio is restricted to occupational use only to satisfy FCC RF energy exposure requirements. Before using this product, read the RF energy awareness information and operating instructions in the Product Safety and RF Exposure booklet enclosed with your radio (Motorola Solutions Publication part number 6881095C98) to ensure compliance with RF energy exposure limits.
For a list of Motorola Solutions-approved antennas, batteries, and other accessories, visit the following web site which lists approved accessories: http://www.motorola.com
Mag One™ by Motorola Solutions is registered in the U.S. Patent and Trademark Office.
All other products and service names are the property of their own respective owners.
NOTICE TO USERS (FCC)
This device complies with Part 15 of the FCC rules per the following conditions:
- This device may not cause harmful interference
- This device must accept any interference received, including interference that may cause undesired operation.
- Changes or modifications made to this device, not expressly approved by Motorola Solutions, could void the authority of the user to operate this equipment.
NOTICE TO USERS (INDUSTRY CANADA)
The operations of your Motorola Solutions radio is subject to the Radiocommunications Act and must comply with rules and regulations of the Federal Government’s department of Industry Canada. Industry Canada requires that all operators using Private Land Mobile frequencies obtain a radio license before operating their equipment.
Motorola Solutions, Inc
500 W Monroe Street
Chicago, IL 60661 U.S.A.
@ 2013 and 2020 Motorola Solutions. Inc. All Rights Reserved. Printed In
Attaching and Removing the Antenna
To Attach Antenna
- Fasten the antenna to the radio by placing the threaded end of the antenna into the Antenna Connector.
- Rotate the antenna clockwise until tight.
To Remove Antenna
- Turn the antenna in a counter-clockwise direction until it disengages from the radio.
Attaching and Removing the Battery

To Attach Battery
- Align and fit the battery tongue into the groove of the chassis of the radio.
- Secure the latch at the bottom of the radio.
To Remove Battery
- Unlatch the battery clasp at the bottom of the radio.
- Gently lift the hilt of the battery nearest to the battery latch away from the housing.
- Slide battery downwards to remove.
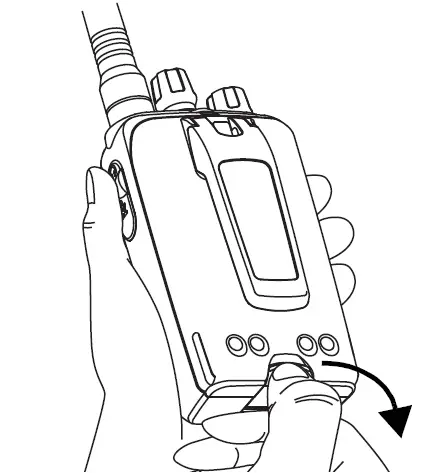
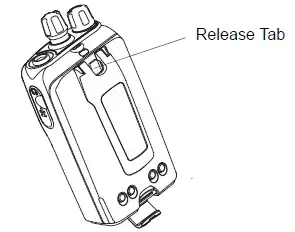
Attaching and Removing the Belt Clip
To Attach Belt Clip
- Align mounting rails of the radio with the grooves of the belt clip.
- Slide the belt clip downwards until it clicks into place.
To Remove Belt Clip
- Lift the release tab.
- Slide the belt clip upwards.
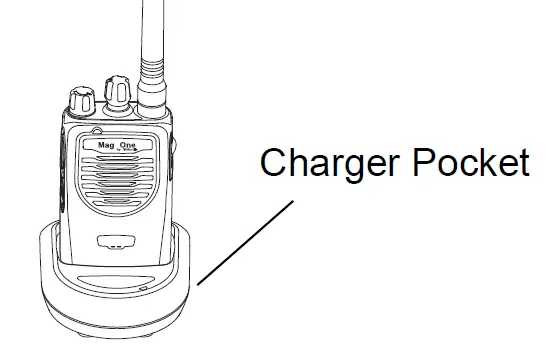
Charging your Radio
- Turn off your radio and the A/C power supply to your charger if they are on.
- Place your radio in the charger pocket.
- Turn on the charger A/C power supply.
- While charging your radio, the charger LED shows a steady red light. The radio should be charged at least 16 hours initially before decreasing charging time to 12 hours.
- Turn off the charger A/C power supply, and remove the radio from the charger pocket.
- For more details, refer to your Tri-Chem Charger User Guide (6871916T01).
OVERVIEW
| Types | Part No. | Description |
| Antenna | PMAD4051_R | Mag One 150-174MHz Antenna |
| PMAE4020_R | Mag One 450-470MHz Antenna | |
| Audio Accessory | PMMN4008_ | Remote Speaker Microphone |
| PMLN4442_ | Earbud with in-line mic and PTT/VOX* Switch | |
| PMLN4443_ | Ear Receiver with in-line mic and PTT/VOX* Switch | |
| PMLN4445_ | Ultra Lightweight Headset with In-line PTT/VOX* Switch | |
| PMLN4294_ | Earbud with Microphone & PTT Combined | |
| PMLN4605_ | Clear Acoustic Kit | |
| PMLN4606_ | 2-Wire Surveillance Kit with Clear Acoustic Tube | |
| PMLN4658 _ | D-shell Earset with Boom Mic with PTT/VOX* Switch | |
| Battery | PMNN4071_R | Mag One NiMH 1200mAH |
| PMNN4075_R | Mag One Li-Ion 1500mAH | |
| Carry Accessory | PMLN4743_ | Mag One Spring Belt Clip |
| PMLN4741_ | Mag One Soft Leather Carry Case | |
| PMLN4742_ | Mag One Hard Leather Carry Case | |
| Charger | PMLN5041_R | Mag One Tri-Chem SUC Base |
| PMLN5048_R | Mag One Tri-Chem SUC with Switching PS US Plug | |
| EPNN9288_ | Switching Power Supply with AC Cord, US plug, 90–264 VAC |
LED Indicators
| LED Indicators | |||
| Colour | State | Indication | |
| Red | Illuminated | Radio is transmitting. | |
| Blinking | Battery voltage is low. | ||
| Green | Illuminated | Radio is receiving with PL/DPL disabled. | |
| Blinking | Radio is in active scanning mode. | ||
| Orange | Illuminated | Radio is receiving with PL/DPL enabled. | |
| Blinking | An error has occured. | ||
Audio Alert Tones
| Tone Name | Tone Cadence | Description | ||||||
| In Chirp Tone | Programmable buttons are pressed. | |||||||
| Out Chirp Tone | Programmable buttons are pressed. | |||||||
| Bad Key Chirp Tone | Invalid programmable button function (i.e. pressing programmable button while button lock is activated.) | |||||||
| Talk Prohibit Tone | Continuous tone is heard if PTT is pressed when transmit is not allowed. | |||||||
| Low Battery Alert Tone | Repeating tone heard if battery level is low. | |||||||
| Priority Channel Alert Tone | Received priority channel in Priority Scan mode. | |||||||
Programmable Buttons
The following functions can be assigned as short press (press and release) or long press (press and hold for 1 second) in the programmable buttons.
| Button | Function |
| High/Low Power | Selects desired power level to High† or Low*. |
| Volume Set | Allows you to check the audio and alert tone volume level. |
| Monitor | Allows you to monitor the current channel for activity; disables squelch. |
| Sticky Monitor* | The radio monitors continually until you press this button again. |
| Scan | Starts* or Stops† channel scan. |
| Nuisance Channel Delete† | Removes unwanted channel(s) temporarily from scan list during scan. |
| Repeater/Talkaround | Toggles radio between functioning in Repeater mode† or Talkaround mode*. |
| PL/DPL | Enables†/Disables* radio from requiring matching PL/DPL to receive messages. |
| Button Lock | Locks* or unlocks† all buttons except PTT, Channel Knob and On/Off/Volume Knob. |
| Battery Save Mode | Toggles between functioning with Battery Saver ON* or Battery Saver OFF†. |
| Squelch | Selects desired squelch level: Normal† or Tight*. |
† In Chirp Tone
* Out Chirp Tone
• Your radio default functions are described below. If re-programmed, enter the new functions.
| Press Type | Programmable Button 1 | Programmable Button 2 | ||
| Default | Re-programmed | Default | Re-programmed | |
| Short Press | Monitor | Scan | ||
| Long Press | Sticky Monitor | Nuisance Channel Delete | ||