
Please Read These Instructions
Before Using Your Mower![]()
Operating Instructions for model
SP160 R Lawnmower
with ST 120 OHV engine

Product Code: 299439043/MC
Do not return this product to store, please call the Service Link Helpline
Products with petrol in cannot be returned to store
Supported by
 For all your Warranty, Parts and Service needs
0800 121 6585
1800 806 149 ROI
www.servicelink.org.uk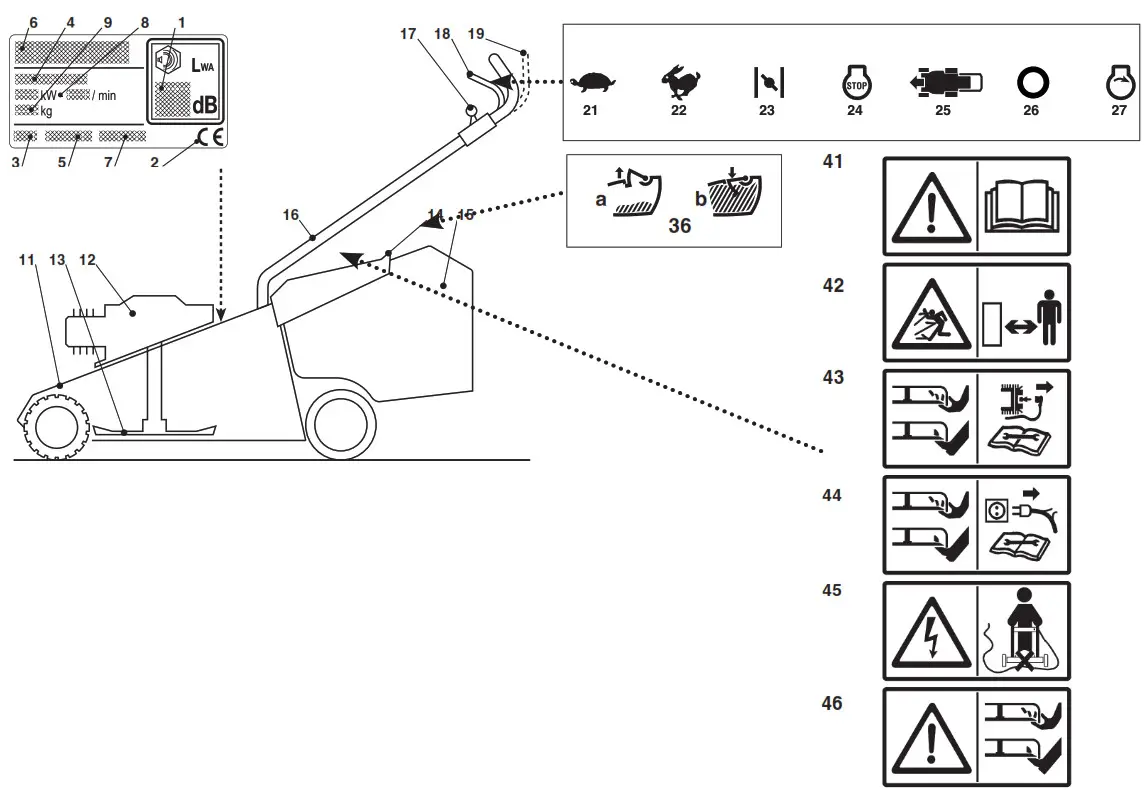
| NTL 434-R, NTL 434 TR-R | ||
| [61] | kW | 1,5 ÷ 2,75 |
| [62] | mi n-1 | 2800±100 ÷ 2900±100 |
| [63] | kg | 31 – 33 |
| [64] | cm | 41 |
| [65] [66] |
dB(A) dB(A) |
79 1,37 |
| [67] [66] |
dB(A) dB(A) |
93 0,9 |
| [68] | dB(A) | 94 |
| [69] [66] |
m/s2 m/s2 |
6 1,35 |
| [70] | 81004341/3 | |
 IMPORTANT – READ CAREFULLY BEFORE USING THE MACHINE. Keep for future reference
GETTING TO KNOW THE MACHINE
DESCRIPTION OF THE MACHINE AND ITS RANGE OF USE
This machine is garden equipment, namely a pedestrian-controlled lawnmower. The machine is essentially composed of an engine that drives a blade enclosed in a casing, equipped with wheels and a handle. The operator is able to operate the machine and use the main controls, always staying behind the handle at a safe distance from the rotating blade. If the operator leaves the machine, the engine and blade will stop within a few seconds.
Intended use
This machine was designed and manufactured for cutting (and collecting) grass in gardens and grassy areas, in areas in proportion to its cutting capacity, done by a pedestrian operator. The presence of accessories or specific devices can prevent cut grass from being collected, depositing cut grass on the ground.
Improper use
Any other usage may be hazardous and harm persons and/or damage things. Examples of improper use may include, but are not limited to:
– transporting persons, children or animals on the machine;
– letting oneself be transported by the machine;
– using the machine to tow or push loads;
– using the machine for leaf or debris collection;
– using the machine to trim hedges, or for cutting vegetation other than grass;
– use of the machine by more than one person;
– using the blades on surfaces other than grass.
IDENTIFICATION LABEL AND MACHINE COMPONENTS (see pictures on page 2)
| 1. Acoustic power level | 10. Chassis |
| 2. Conformity marking | 11. Engine |
| 3. Year of manufacture | 12. Blade (Blade) |
| 4. Type of lawnmower | 13. Stone-guard |
| 5. Serial number | 14. Grass-catcher |
| 6. Name and address of Manufacturer | 17. Handle |
| 7. Article Code | 16. Throttle trigger |
| 8. Engine power and speed | 17. Engine brake lever |
| 9. Mass in kilograms | 18. Drive engagement lever |
As soon as you have purchased the machine, write the identification numbers (3-4-5) in the spaces on the last page of this manual. An example of the declaration of conformity can be found on page 12 of this manual.
DESCRIPTION OF SYMBOLS ON CONTROLS (where applicable) (see pictures on page 2)
21. Slow 22. Fast 23. Choke
24. Engine Stop
25. Drive on
26. Idle 27. Engine ignition
36. Grass-catcher contents indicator: lifted (a) = empty / lowered (b) = full
SAFETY REQUIREMENTS – Your lawnmower must be used carefully. Symbols have therefore been placed on various parts of the machine to remind you of the main precautions to be taken. Their meaning is explained below. You are also asked to carefully read the safety regulations in the specific chapter of this manual. Replace damaged or unreadable labels (see pictures on page 2).
41. Warning: Read the instruction manual before using the machine.
42. Risk of thrown objects. Keep all persons away from the work area whilst mowing.
43. Danger of cutting yourself. Moving blades. Do not put hands or feet near or under the opening of the blade housing. Disconnect the spark plug cap and read the instructions before carrying out any maintenance or repairs.
44. Only for electric lawnmowers 45. Only for electric lawnmowers
46. Danger of cutting yourself. Moving blades. Do not put hands or feet near or under the opening of the blade housing.
Technical specifications (see page 2)
[61] Nominal power
[62] Max. engine operation speed
[63] Machine weight
[64] Cutting width
[65] Sound pressure level, measured
[66] Measurement uncertainty
[67] Sound power level, measured
[68] Sound power level, guaranteed
[69] Vibration level
[70] Blade code
SAFETY REGULATIONS
A) TRAINING
- Read the instructions carefully. Become familiar with the controls and the proper use of the lawnmower. Learn how to stop the engine quickly.
- Never allow children or persons unfamiliar with these instructions to use the lawnmower. Local regulations can restrict the minimum age of the operator.
- Never use the lawnmower:
– when people, especially children or pets are nearby;
– if the operator is tired or unwell, or has taken medicine, drugs, alcohol or any substances that may impair their ability to react and be attentive. - Bear in mind that the operator or user is responsible for accidents or unexpected events occurring to other people or their property.
B) PRELIMINARY OPERATIONS
- Whilst mowing, always wear sturdy slip-resistant footwear and long trousers. Do not operate the lawnmower when barefoot or wearing open sandals.
- Thoroughly inspect the entire work area and remove anything that could be thrown by the machine or damage the cutting unit or engine (stones, branches, iron wire, bones, etc.).
- WARNING: DANGER! Petrol is highly flammable.
– store the fuel in suitable containers;
– add fuel using a funnel, only outdoors; never smoke whilst doing this and whenever fuel is handled;
– add petrol before starting the engine; never add petrol or remove the petrol tank cap whilst the engine is running or when it is hot;
– if you have spilled some fuel, do not attempt to start the engine but move the lawnmower away from the area of spillage to avoid creating any source of ignition until the fuel has evaporated and fuel vapors have dissipated. – always put the tank and fuel container caps back on and tighten well; - Replace faulty silencers
- Before use, always inspect the machine and in particular:
– the safety lever must move freely, it must not need forcing and should return automatically and rapidly back to the neutral position determining the cutting blade stopping; – to see that the blade, screws, and cutting unit are not worn or damaged.
Replace damaged or worn blades and screws to preserve balance. Replace damaged or unreadable labels. - Before starting work, fit the exit guards (grass-catcher or stone-guard).
C) DURING USE
- Do not operate the engine in a confined space where dangerous carbon monoxide fumes can develop.
- Mow only in daylight or with good artificial light in good visibility conditions.
- If possible, avoid mowing wet grass. Avoid working in the rain and when there is a thunderstorm risk.
- Make sure you have a steady foothold on slopes.
- Never run, always walk; do not let the lawnmower pull you.
- Always mow transversely on slopes and never up and down.
- Be extremely careful when changing direction on slopes.
- Do not mow on land that slopes more than 20°.
- Be very careful near ravines, ditches or embankments.
- Be extremely careful when pulling the lawnmower towards you.
- Immobilize the blade if the lawnmower must be inclined for transporting, when moving over surfaces other than grass and when the lawnmower is transported from or to an area that must be cut.
- Never operate the lawnmower with damaged guards or without the grass-catcher or stone-guard.
- Do not tamper with or disable safety systems.
- Do not change the engine settings or overspeed the engine.
- On power-driven models, disengage the wheel drive before starting the engine.
- Start the engine carefully according to the instructions, keeping feet away from the blade.
- Do not incline the lawnmower for starting. Start the machine on a flat surface without obstacles or high grass.
- Never place your hands and feet near or under rotating parts. Always keep away from the discharge opening.
- Do not start the machine when standing in front of the discharge opening.
- Do not lift or transport the lawnmower when the engine is running.
- Stop the engine and disconnect the spark plug cable:
– before making any adjustments under the cutting deck or before unclogging the chute:
– before checking, cleaning or working on the lawnmower;
– after striking a foreign object. Inspect the machine for any damage to the lawnmower and make the necessary repairs before using it again;
– if the lawnmower begins to vibrate abnormally (Immediately look for the cause of the vibrations and take it to a Mountfield Authorised Service Dealer for necessary inspections). - Stop the engine:
– whenever you leave the lawnmower unattended. Also remove the key on models with electric start;
– before refuelling;
– whenever you remove or reattach the grass-catcher;
– before adjusting the cutting height. - Reduce the throttle setting before stopping the engine. Shut ott the fuel supply when mowing is completed, following the instructions in the engine manual.
- When mowing, always keep a safe distance from the rotary blades, given by the length of the handle.
- WARNING – If something breaks or an accident occurs during mowing, turn off the engine immediately and move the machine away to prevent further damage; if an accident occurs with injuries or third parties are injured, carry out the first aid measures most suitable for the situation immediately and contact the medical authorities for any necessary health Carefully remove any debris that might cause damage or harm persons or animals should it not be seen.
- WARNING – The level of noise and vibration found in the present instructions are maximum values of using the The use of a blade unbalanced, the excessive speed of movement, the absence of maintenance have a significant influence in the noise and vibrations. It is necessary to take preventive measures to avoid possible damage due to high noise and stress from vibration; perform machine maintenance, wear ear protection, take breaks whilst working.
D) MAINTENANCE AND STORAGE
- Keep all nuts and screws tight to be sure the equipment is in a safe working condition. Routine maintenance is essential for safety and for maintaining a high-performance level.
- Do not store the lawnmower with fuel in the tank in an area where fuel vapors could reach an open flame, a spark, or a strong heat source.
- Allow the engine to cool before storing the lawnmower in any enclosure.
- To reduce fire hazards, keep the engine, silencer, battery compartment, and petrol storage area free of grass, leaves, or excessive Never leave containers with cut grass inside a storage area.
- Check the stone-guard and grass-catcher frequently for wear or deterioration.
- If the fuel tank has to be emptied, this should be done outdoors once the engine has cooled down.
- Wear work gloves for disassembling and reassembling blades.
- Keep the blade balanced during sharpening. All work on the blade (disassembly, sharpening, balancing, reassembly and/or replacing) are demanding jobs that require special skill as well as special tools. For safety reasons, these jobs are best carried out at a specialised centre.
- For safety reasons, never use the machine when it has worn or damaged parts. Parts must be replaced and not repaired. Use original spare parts. Parts that are not of the same quality can damage the equipment and impair your safety
E) TRANSPORTATION AND HANDLING
- Whenever the machine is to be handled, lifted, transported or tilted you must:
— wear sturdy work gloves;
— grasp the machine at the points that offer a safe grip, taking account of the weight and its distribution.
— use an appropriate number of people for the weight of the machine and the characteristics of the vehicle or the place where it must be placed or collected.
— make sure that machine movements do not cause petrol leaks, damage or injuries. - During transport, fasten the machine securely with cables or chains.
OPERATING INSTRUCTIONS
For information on the engine and the battery (if supplied), read the relevant manuals.
COMPLETE ASSEMBLY
NOTE – The number which precedes each paragraph links the references in the text to the respective illustrations (listed on page 2 and following pages).
NOTE – The machine can be supplied with some parts already assembled.
WARNING – Unpacking and completing the assembly should be done on a flat and stable surface, with enough space for moving the machine and its packaging, always using suitable equipment. Disposal of the packaging should be done in accordance with the local regulations in force.
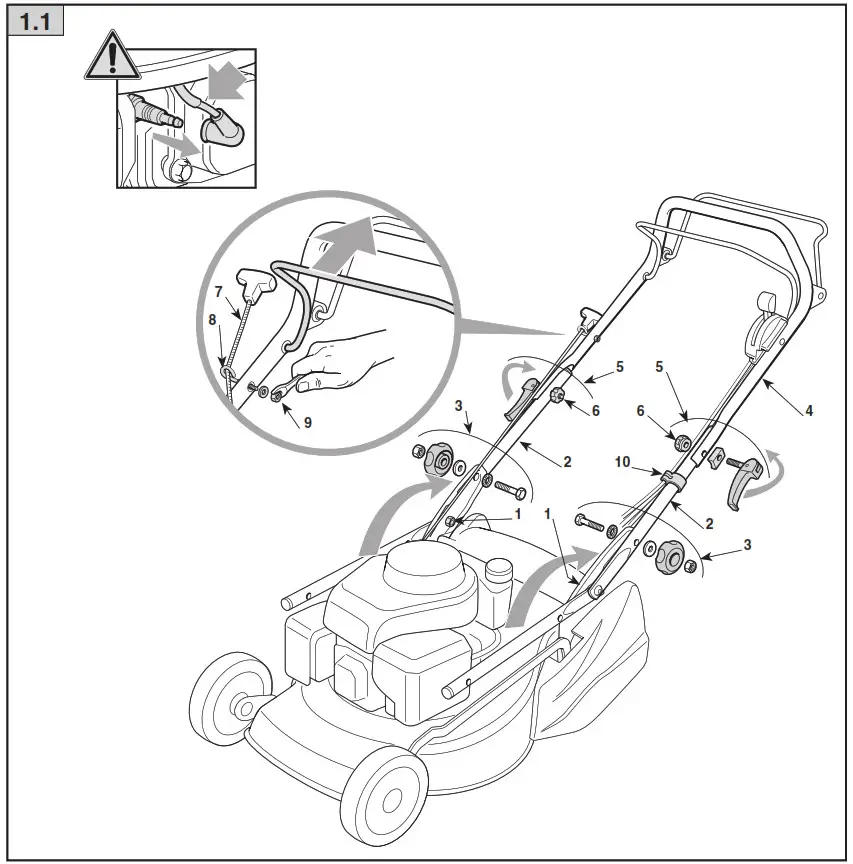
1.1 Handle assembly
Loosen the two lower nuts (1). Return the lower part of the handle, which is made up of two pre-assembled elements (2), to the work position and lock into place by using the nuts (1) and the lower knobs (3). Fit the upper part of the handle (4) to the lower ones (2) by means of the clamps (5), as shown. The ring nuts (6) on the clamps (5) must be screwed so they keep the top part (4) firmly fixed, without too much effort required to lock or release them. Close both clamps (5) after adjustment. Hook the starter cable (7) to the guide spiral (8). Tighten the nut (9) to secure the spiral 8). Fit the cable clamp (10) as shown and secure the control cables.
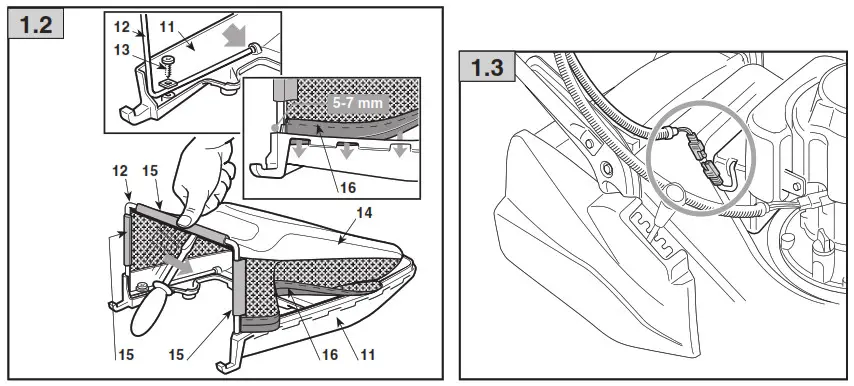
1.2 Grass-catcher assembly
With the plastic part (11) upside-down, fasten the frame (12) to the plastic part using the screws (13). Insert the frame (12) into the sack (14) and attach the plastic profile (15) with the help of a screwdriver, as shown in the drawing. Fit the edge of the cloth (16) right into the groove of the plastic part (11), starting 5-7 mm from the ends.
1.3 Battery connection (if present)
- Electric key ignition models
Connect the battery cable to the general wiring connector on the lawnmower. - Electric push-button ignition models
Insert the supplied battery in the relative engine compartment (par. 3.2b, “III - “IV”).
CONTROL DESCRIPTION
NOTE – The meaning of the symbols on controls are explained in the previous pages.
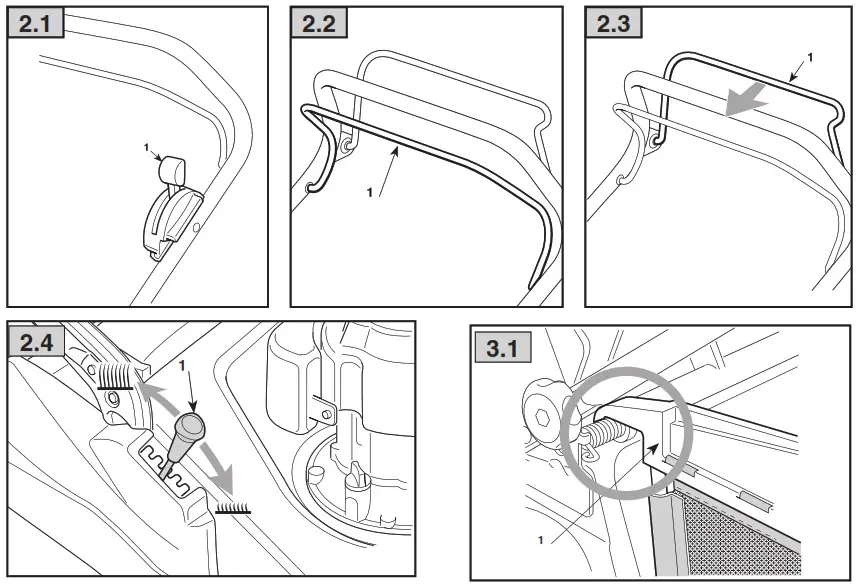
2.1 Throttle
The throttle is controlled by the lever (1) and positioned as shown on the relative plate. Some models have a fixed speed, and therefore no need of a throttle.
2.2 Blade brake
The blade brake is controlled by the lever (1) which must be held against the handle for ignition and during lawnmower operations.
The engine stops when the lever is released.
IMPORTANT – The blade must stop within a few seconds of when the lever is released; if you notice that more time is required for it to stop, contact a Mountfield Authorised Service Dealer immediately.
2.3 Drive lever (if provided)
On power-driven models, pull the lever (1) against the handle for forward movement.
The lawnmower stops moving forward when the lever is released.
The engine must always be started with the drive off.
2.4 Cutting height adjustment
The cutting height is adjusted by the specific lever (1).
DO THIS WHEN THE BLADE IS STOPPED.
GRASS CUTTING
3.1 Fastening the grass-catcher
Lift the stone-guard and fasten the grass-catcher (1) correctly as shown in the illustration.
3.2 Engine ignition During ignition, follow the instructions in the engine manual.
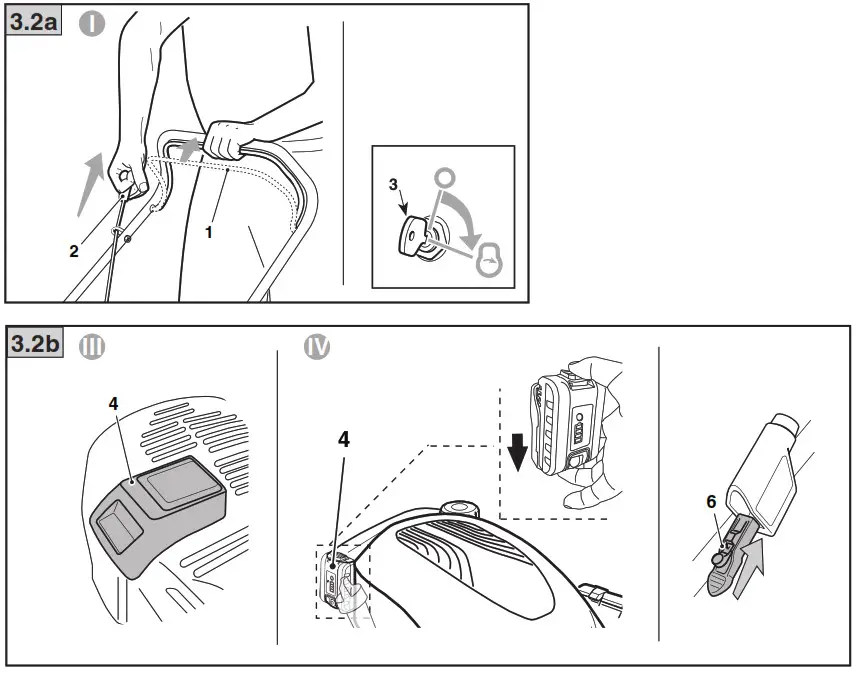
3.2a
• Manual ignition models (“I”)
Pull the blade brake lever (1) against the handle and firmly tug the knob on the ignition cable (2).
• Electric key ignition models
Pull the blade brake lever (1) against the handle and turn the ignition key (3).
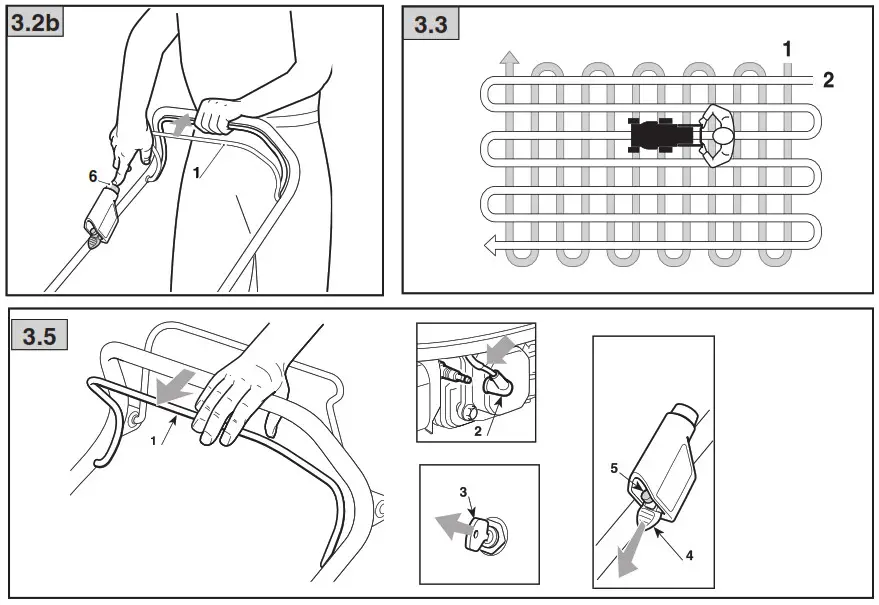
3.2b
• Electric push-button ignition models (“Ill – “IV”)
— Insert the supplied battery in the relative engine compartment (4); (follow the instructions provided in the engine manual).
— Insert the key as far as possible (if fitted) (5).
— Pull the engine blade brake lever towards the handle (1).
NOTE: Keep pulling the engine / blade brake lever or the engine will stop.
— Press and hold the starter button until the engine switches on (6).
3.3 Grass cutting
The appearance of the lawn will improve if you alternate cutting in both directions at the same height.
• Grass-catcher full warning indicator (if applicable): whilst working, with the blade in motion, the indicator remains lifted as long as the grass-catcher is able to hold cut grass’ when it lowers, it means that the grass-catcher is full and it must be emptied.
3.4 Emptying the grass-catcher
When the grass-catcher is too full, grass is no longer collected efficiently, the sound of the lawnmower changes and the grass-catcher is no longer inflated by the air flow created by the blade. To remove and empty the grass-catcher,
– stop the engine and wait for the blade to stop;
– lift the stone-guard, grasp the handle and remove the grass-catcher keeping it in tilted position.
3.5 When work Is finished
When work has been completed, release the brake lever (1) and discon-nect the spark plug cap (2).
• Electric key ignition models Remove the ignition key (3).
• Electric push-button Ignition models Press the tab (5) and remove the consent key (4).
WAIT UNTIL THE CUTTING MEANS STOPS before proceeding any further.
3.6 Lawn care recommendation
Each type of grass has different features and may thus require different ways to care for the lawn; always read the instructions on seed boxes for mowing height for the growth conditions in the work area. Keep in mind that the most grass is made up of a stem and one or more lea-ves. If leaves are fully cut, the lawn is damaged and growth is more difficult.
The following indications generally apply:
- too low a cut causes grass tears and uprooting, with a “spotted” aspect;
- in the summer, cutting must be higher to avoid the ground from drying;
- do not cut wet grass; this could reduce blade efficiency due to sticky grass and tear the lawn;
- for particularly high grass initially mow at maximum admitted machine height followed by a second mow after two or three days.
ROUTINE MAINTENANCE
IMPORTANT – Routine and accurate maintenance is essential in maintaining original machine safety and performance levels.
Each adjustment or maintenance operation must be done with the engine stopped, atter removing the spark plug cap Store the lawnmower in a dry place.
- Wear sturdy work gloves before cleaning, maintaining or adjusting the machine.
- Wash the machine with water after each mowing, remove grass debris and mud accumulated under the chassis to prevent it from drying and causing problems the next time the lawnmower is used.
- Use the specific attachment for the water hose to clean the intemal parts of the lawnmower (if provided). Place the machine on a flat firm surface, select the lowest cutting height and always stand behind the lawnmower handle when cleaning
- The paintwork on the inside of the chasis may peel oft in time due to the abrasive action of the cut grass; in this case, touch up the paintwork using a rustproof paint to prevent the formation of rust that would lead to corrosion of the metal .
- If accessing the lower part is necessary, only tilt the machine on the side indicated in the engine manual, following the relevant instructions.
- Do not drip petrol onto the plastic parts of the engine or the machine to prevent damaging them and remove all traces of spilt petrol immediately. The warranty does not cover damage to plastic parts caused by petrol.
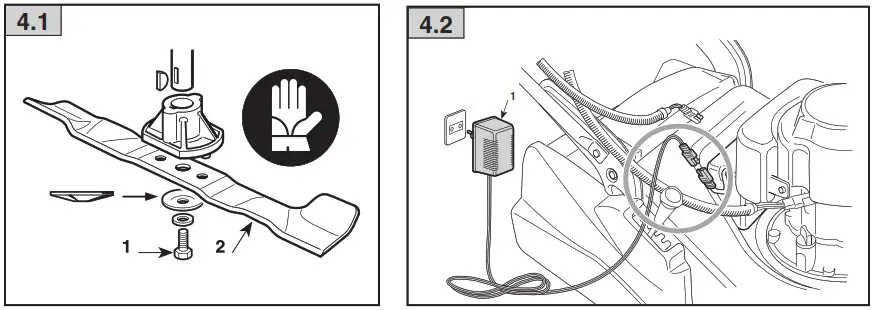
4.1 Blade maintenance
Each adjustment made to the blade is best carried out at a Mountfield au-thorised service dealer that has the most appropriate tools. Only blades with code shown in the table on page 2. Given product evolution, the above mentioned blades may be replaced in time by others, with similar interchangeable and operating safety features. Reassemble the blade (2) with the code facing the ground, following the steps indicated in the illustration. Tighten the central screw (1) using a torque wrench set to 35-40 Nm.
4.2 Battery recharging (where applicable)
• Electric key ignition models To recharge a flat battery, connect it to the battery charger (1) following the instructions in the battery maintenance manual. Do not connect the battery charger directly to the engine terminal. It is not possible to ignite the engine using the battery charger as a power source, as it may get damaged. If you do not use the lawnmower for a long period of time, disconnect the battery from the engine wiring, making sure the charge level is good.
• Electric push-button ignition models
Read the engine instruction manual for instructions regarding autonomy, recharging, reinstating and maintenance of the battery.
NVIRONMENTAL PROTECTION
Environmental protection should be a priority of considerable importance when using the machine, for the benefit of both social coexistence and the environment in which we live.
– Try not to cause any disturbance to the surrounding area.
– Comply with local regulations for the disposal of waste materials after mowing.
– Comply with local regulations for the disposal of packaging, deteriorated parts or any elements with a strong environmental impact; this waste must not be disposed of as normal waste, it must be separated and taken to specified waste disposal centres where the material will be recycled.
– When decommissioning, do not pollute the environment with the machine, hand it over to a disposal centre, in accordance with the local regulations in force.
DIAGNOSTIC
| What to do when … | |
| Source of problem | Corrective action |
| 1. Petrol mower does not work | |
| There is no oil or fuel in the engine | Check the oil and fuel levels |
| The spark plug and air filter are not working. | Clean the spark plug and the filter, which may be caked, or replace |
| The fuel has not been emptied by the mower at the end of last season | The carburetor float may be stuck. Tilt the mower over towards the carburetor side |
| 2. Cut grass is not blown into the grass box | |
| The blade has received a knock | Sharpen the blade or replace it. Check the guides which direct the grass towards the grass box |
| The mower’s blade housing is dirty undemeath | Clean the blade housing so as to give an easier path for the grass to the grass box |
| 3. Mower struggles to cut grass | |
| The blade is not in good conditions | Sharpen the blade or replace it |
For any doubts or problems, please do not hesitate to contact your nearest Mountfield Authorised Service Dealer

Service link
What Is Service Link? Service Link is an aftersales help and advice helpline with a national network of garden machinery repair specialists.
> How can we help you? Here at Service Link we can help with all your trouble shooting, warranty, parts and service needs. Call us and speak to one of our advisors and if required, visit one of our 450 centres across the UK and Ireland.
> How can you contact us? If in the unlikely event that this product does require our help please visit the Service Link website at www.servicelink.org.uk or alternatively contact the helpline on 0800 121 6585 in the UK or 1800806149 in ROI.
CERTIFICATE OF CONFORMITY
A certificate of conformity is enclosed with the documentation as a separate document. An EXAMPLE is shown below.

Guarantee
Congratulations on the purchase of your Mountfield lawnmower. This product has been manufactured to the highest quality standards and is guaranteed for domestic use against faulty parts or manufacture for a period of 3 years from the date of purchase. Please note that if the machine is used commercially the guarantee period is 90 days from the date of purchase. If you experience any problem with your Mountfield lawnmower please call our technical helpline on 0800 121 6585 or 1800 806 149 ROI and our operators will endeavour to solve your problem. In the event your problem cannot be resolved over the phone the operator will refer you to one of our local Mountfield authorised service dealers.
This guarantee is subject to the following terms;
- This guarantee is not transferable. An original proof of purchase will be required in the event of a claim.
- For products with a warranty period in excess of 2 years the warranty is conditional on your machine receiving an annual service by an approved Mountfield Authorised Service Dealer. Servicing at the correct intervals will not only maintain the performance and reliability of your lawnmower it also increases the resale value. A service schedule should be kept including invoicing and receipts. Please phone 0800 121 6585 or 1800 806 149 ROI to locate your nearest Mountfield Authorised Service Dealer or visit servicelink.org.uk. Service procedures (for example carb cleaning, draining engine oil, blade sharpening, belt and cable adjustment) and consumable parts that require periodic replacement (for example the spark plug, air filter and oil) are not covered under this guarantee. This also applies to parts subject to fair wear and tear (for example wheels, bearings, starter cord, cables, belts and blade).
- Delivery and collection of the machine is your responsibility and not covered under this guarantee.
- The guarantee does not cover any breakages or damage that are a result of the following; misuse, alteration, improper assembly or adjustment, neglect or accident.
- Expenses and costs incurred from loss of utility will not be compensated.
- The guarantee does not cover machines that are transported outside of the UK & Eire.
- Where a mower is fitted with an engine not manufactured by Mountfield, the engine manufacturer guarantees the engine.
This guarantee is in addition to and does not detract from your contractual rights under statute or common law.
On delivery of your new Mountfield mower, we suggest that you complete the box to the right.
The information for your machine is on the serial number label, which is fixed on the cutter deck at the base of the handles. You will be asked for these details
if you have any problems or require spare parts.
Please keep your receipt, proof of purchase will be required in the event of a claim.

| Service Record | |
| 1st Service Date of service ………………………………………… Next service due …………………………………….. Dealer’s Signature …………………………………. Dealer’s Stamp: |
2nd Service Date of service ………………………………………… Next service due …………………………………….. Dealer’s Signature …………………………………. Dealer’s Stamp: |
STIGA LTD
Unit 8, Bluewater Estate, Bell Close, Plympton, Plymouth, Devon, PL7 4JH, England.
manufactured by ST. S.p.A. Via del Lavoro, 6 I-31033 Castelfranco Veneto (TV) Italy