
WRP18 Smart Ring Light
Instruction Manual
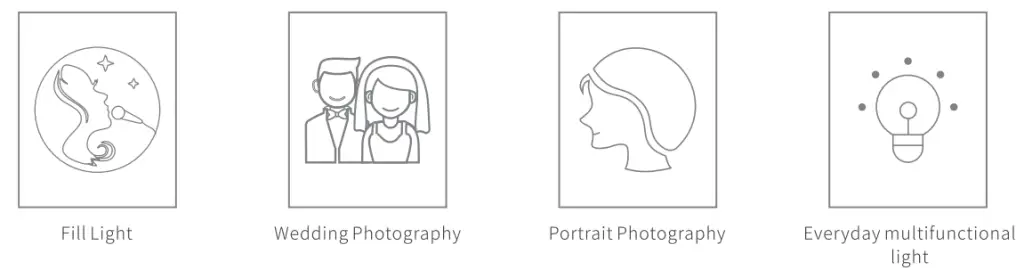
Applications
Safety Notes
Introduction to Main Functions

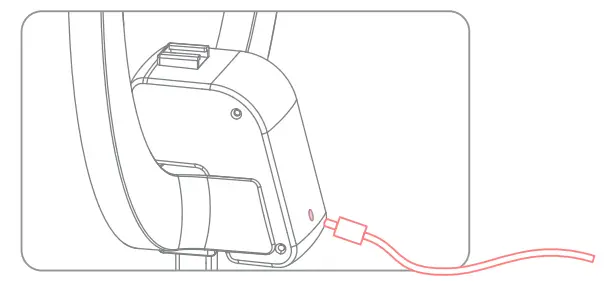
PowerSupply
Using.a power
adapter (DC}
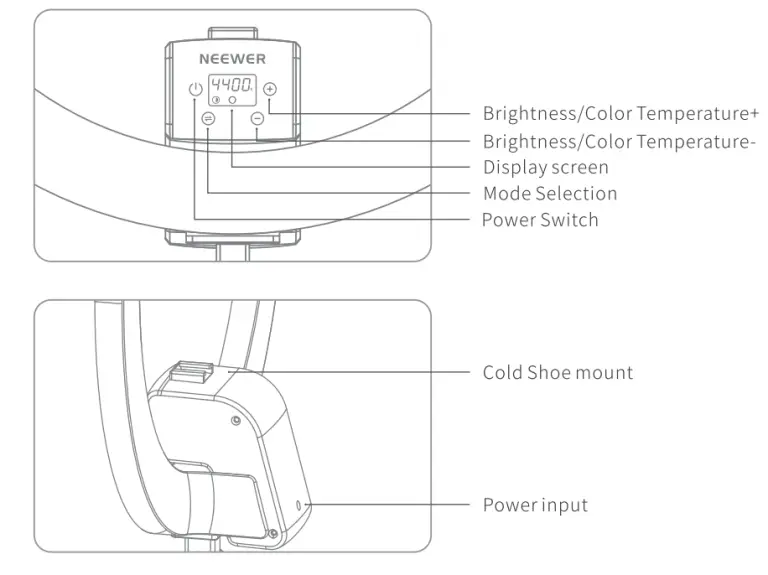
Functions mode
Control Mode
OS system control mode
https://itunes.apple.com/cn/app/neewer/id1455948340?mt=8
Scan and download the Q code,then open and register through the app to login
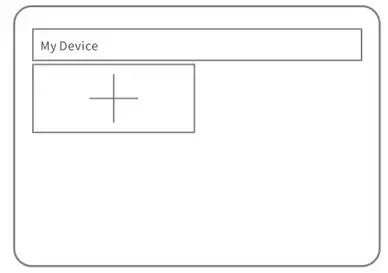
 Click”+to add a device
 Select “Wifi gs the connection method.
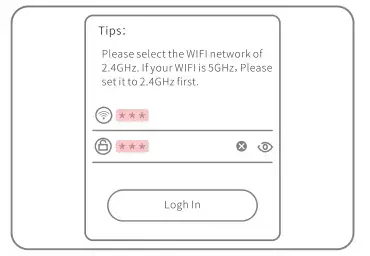
 To use the Neewer app fully, please register for an account to receive a password and login

Enter your router’s Wi.Fi password.
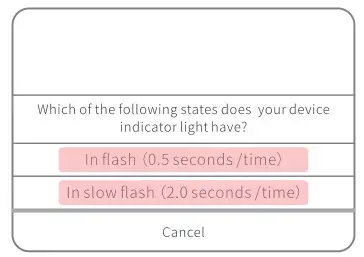
 Select “fast flash” or slow flash”(Must match the ring light display).
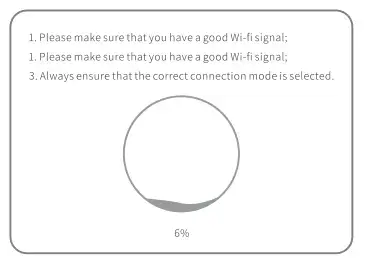
Please wait for the connection to reach 100% before entering the control panel.
after entering the above screen, slide the control tab to control the wRP ring light
When connecting to WIFI, the next step must be performed using the same WIFI network, otherwise, the connection will fail.
Important: If using one host to connect 5 WRP18 Smart Ring Lights, please ensure that the router reaches 1000Mbps (network bandwidth transmission up to 125MB/S) to avoid any delay to the transfer of data.
Connecting multiple devices depends on your network (router broadband internet speed).
Android system control mode
Scan and download the QRcode, then open and register through the app to log in

https://a.app.qq.com/o/simple.jsp?pkgname=neewer.nginx.annularlight
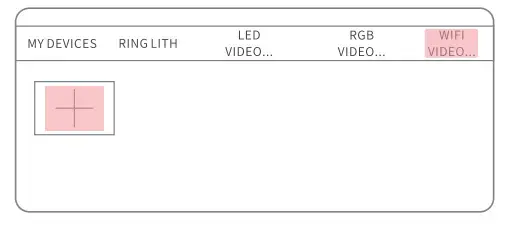
Click WIFI Light →”+” to add a device
To use the Neewer app fully, please register for an account to receive a password and log in.
Enter your router’s Wi. Fi password
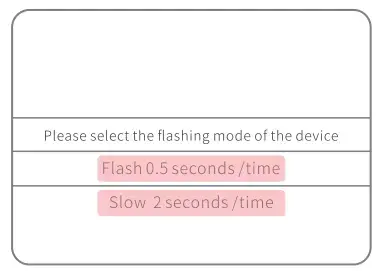
Select “fast flash or slow flash” (Must match the ring light display).
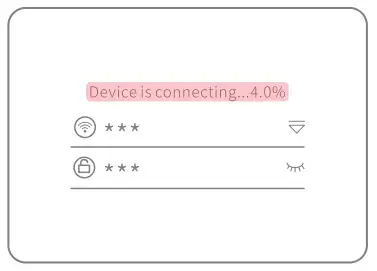 Please wait for the connection to reach 100% before entering the control panel
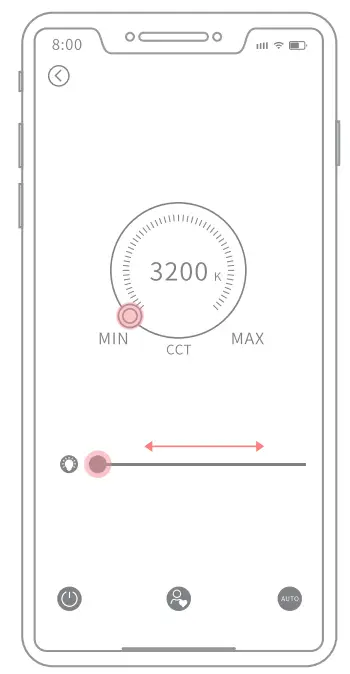
After entering the above screen, slide the control tab to control the wrap ring light
 When connecting to WIFI, the next step must be performed using the same WIFI network, otherwise, the connection will fail.
Important: If using one host to connect 5 WRP18 Smart Ring Lights, please ensure that the router reaches 1000Mbps (network bandwidth transmission up to 125M B/S) to avoid any delay to the transfer of data.
Connecting multiple devices depends on your network (router broadband internet speed).
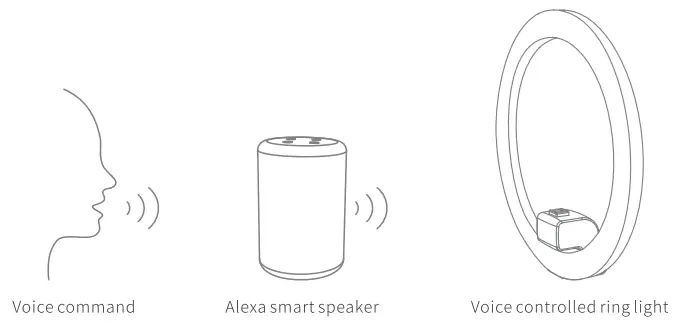
Voice Control
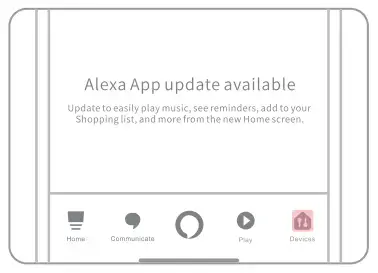
Go to the app store to download Alexa” and open the app
Click on ![]() “to enter the selection field
“to enter the selection field
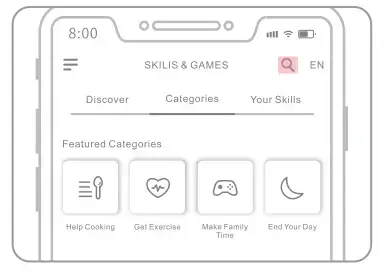
Click “Sills&Games”.
When entering the Alexa” app for the first time, you will need to register for an account name and password to log in successfully.
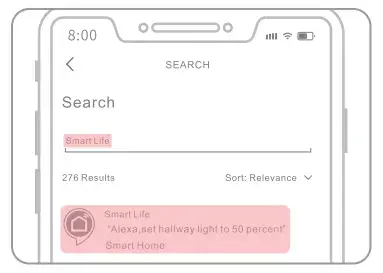
Click the search icon
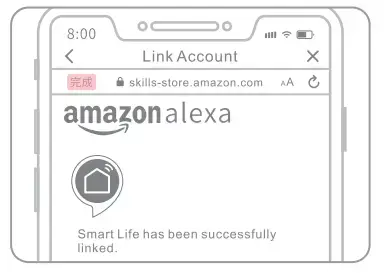
Enter “Smart Life and click the icon to enter.
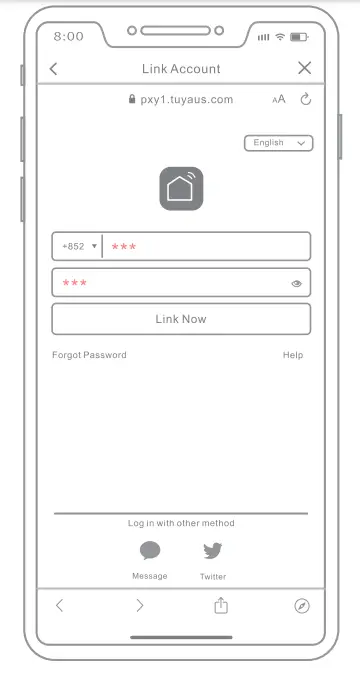
Select “ENABLE TO USE”.
Log into the NEEWER” App account and password.
 When connecting to wIF, the next step must be performed using the same WI[network, otherwise, the connection will fail.
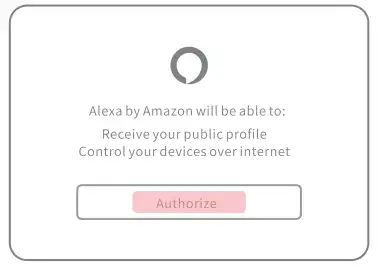
Click “Authorize”.
Click “Finish”.
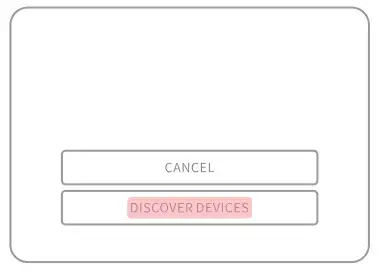
Select “DISCOVER DEVICES”.
 When you enter the “Alexa” app, you need to register an account and password to log in.
Wait for the progress bar to reach the end.

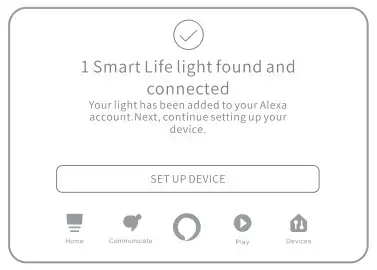
Click “SET UP DEVICE” and then click “DONE”.
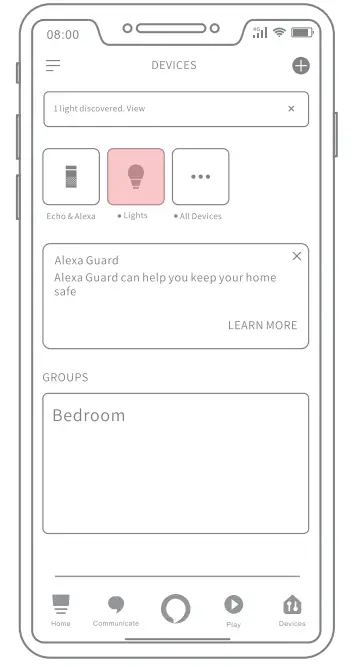
After returning to the home page, select “Devices”.
 Click the “Lights” icon to enter the control panel.

Ring Light Control using Alexa
Add device

Open the “Alexa” App, enter the homepage and select “![]() ” in the upper right corner to add a device→”Add Device”→”Light”→”Other”.
” in the upper right corner to add a device→”Add Device”→”Light”→”Other”.
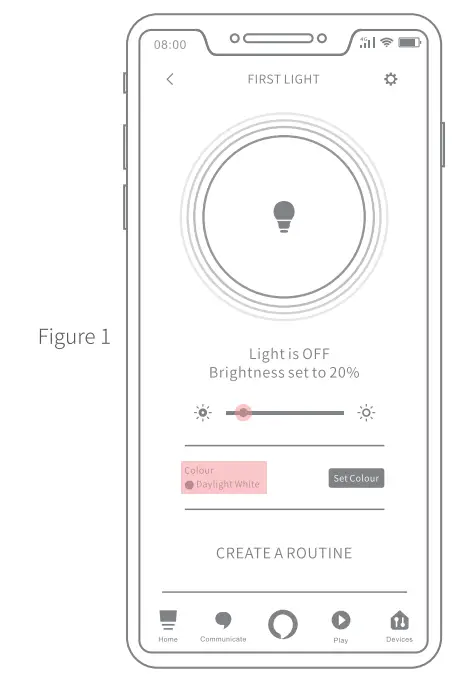
- : Select the ” ● ” icon and slide left or right to adjust the brightness level between 1%-100%;
- : Choose “Set Colour” to set the color temperature to one of 5 colors (warm white, soft white, white, daylight white, cool white).
If the brightness or color temperature doesn’t match the desired effect requested using your voice, please repeat the voice control command.
Alexa smart speaker control
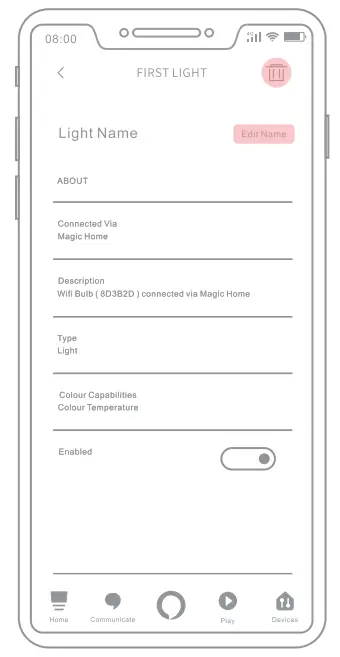
The <light name> prompt may not show the actual name. You can check the assigned light name and voice control via the”  “settings icon in the top right corner of Figure I on the previous page. You can also change the assigned name if you so wish.
Example of single ring light control:
- Turn the light on/off: Alexa, turn ON <light name>; turn OFF <light name>;
- Brightness: Alexa, set <name of light> to <brightness> percent; @Color temperature: Alexa, Set <name of light> to <supported color temperature>, eg. “Warm white”.
- (Color options include: Warm white, Soft white, White, Daylight White, Cool white);
- Make the brightness brighter/darker: Alexa, Brighten <name of light>; Alexa, Dim <name of light>;(Brightness level of lighting will adjust in increments of 25%);
- Adjust the color temperature to cold/warm: Alexa, Make <name of light> <color temperature decrease>” (example: a)Soft to Softer b) Warm to Warmer ); Alexa, Make <name of light> <color temperature increase>”(Example: a)White to Whiter b) Cool to Cooler;)
If the connection fails, please try to reset and reconnect.
Example of voice control over all ring lights:
- Turn the lights on/off: Alexa, turn ON all lights; turn OFF all lights;
- Brightness: Alexa, set all lights to <brightness> percent;
- Color temperature: Alexa, Set all lights to <supported color temperature>, eg “Warm white”. (Color temperatures are: Warm white, Soft white, White, Daylight White, Cool white);
- Adjust the brightness to brighter/darker levels: Alexa, Brighten all lights; Alexa, Dim all lights; (Brightness level of lighting will adjust in increments of 25%);
- Adjust the color temperature to cold/warm: Alexa, Make all lights <color temperature decrease>” (example: a)Soft to Softer b) Warm to Warmer ); Alexa, Make all lights <color temperature increase>” (example: a)White to Whiter b) Cool to Cooler;)
Example of adding multiple groups of ring lights for voice control:

From the homepage, select the upper right corner ” ![]() “-“Add Group”—>”Bedroom (you can also customize the name)”->” Select the lamp that needs a group”.
“-“Add Group”—>”Bedroom (you can also customize the name)”->” Select the lamp that needs a group”.
- Turn the light on/off: Alexa, turn ON <bedroom lights >;turn OFF <bedroom light s>;
- Brightness: Alexa, set <bedroom light> to <brightness> percent;
- Color temperature: Alexa, Set <bed room light> to <supported color temperature>, eg “Soft White”. (Colors are: Warm white, Soft white, White, Daylight White, Cool white);
- Adjust the brightness to brighter/darker: Alexa, Brighten <bedroom light>; Alexa, Dim <name of light>; (Brightness level of lighting will adjust in increments of 25%);
- Adjust the color temperature to cold/warm: Alexa, Make <bedroom light> <color temperature decrease>” (example: a)Soft to Softer b) Warm to Warmer ); Alexa, Make <bedroom of light> <color temperature increase>”(Example: a)White to Whiter b) Cool to Cooler;)
The name assigned here <room light> is used for illustration purposes only. Please check the name of the light combination via the application (my homepage) and control it using your voice.
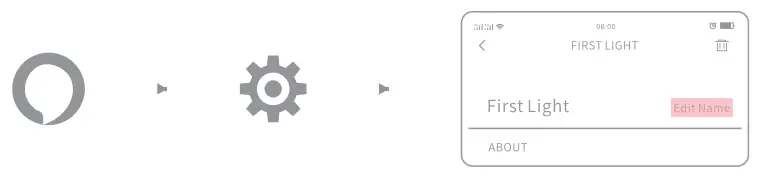
Delete a device
Open the “Alexa” App, enter the homepage and select “ ” settings in the upper right corner → click the delete icon, and then click “Delete” to confirm the deletion.
Modify light name
 Open the “Alexa” App, enter the homepage and select ” ” settings in the upper right corner → click “Edit Name”, and then modify the name.
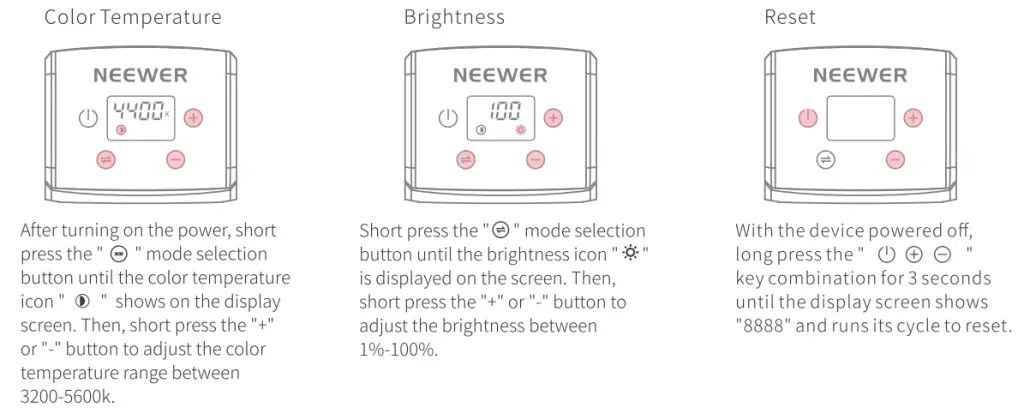
When you need to reset, please press and hold the ring light for 3 seconds ”  ” + “+” + “-” key combination, until the display, shows “8888” and has run its cycle to reset.
install ring light

Install the adapter base

Attach the phone holder

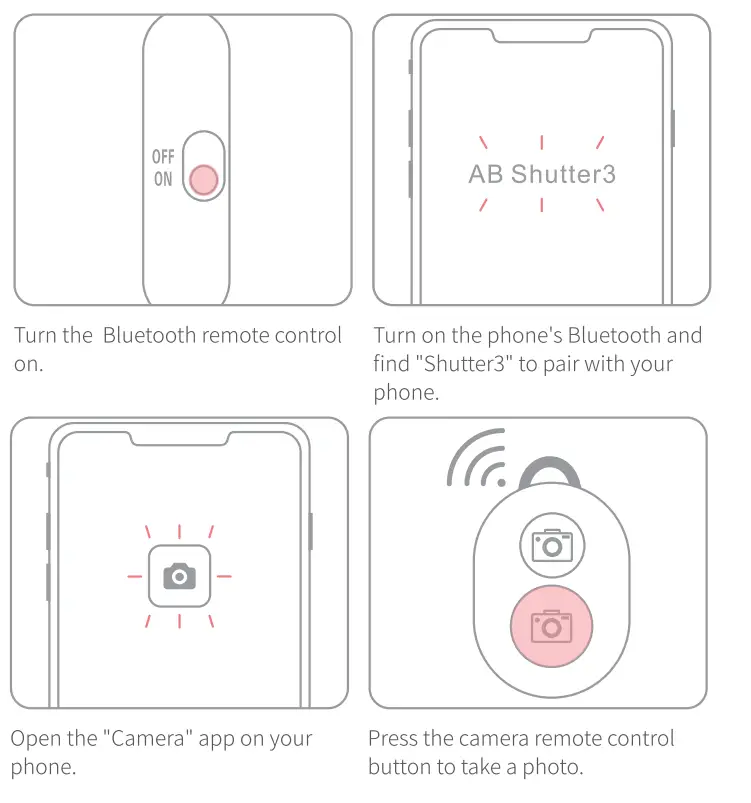
Bluetooth Remote Control

If the indicator light on the remote control is not lit, check whether the battery cover is loose or replace it with a new battery.
Notes
- Do not look directly at the light to prevent eyesight damage.
- Do not modify the cable without authorization to prevent any risk of injury.
- Do not modify the circuit board or disassemble the product without prior authorization.
- Please use the power adapter in the accessories or use a certified power adapter.
- Please do not use alcohol or liquid to wipe the ring light to prevent damage to the product.
- Do not subject the product to any form of physical shock.
- Do not expose the product to the sun for long periods of time.
- When not in use, please unplug the power cable.
- Please use a soft cloth to wipe the product.
- Android users must have the GPS function activated to use the “NEEWER” APR
- If the WIFI connection is unsuccessful, please ensure that you have not connected to a router equipped with only a 5G band, or a WIFI name containing special characters.
- If the APP does not connect successfully, please try updating the APP.
- Failure to comply with the above recommendations and warnings listed in the manual will invalidate the warranty.
Product Specifications
| Model | WRP18 |
| Number of LED beads | 272 |
| Bluetooth range | >15m |
| CRI | >95 |
| Illumination 100% (LUX) | 0.5M 2150Lux 1M 880Lux |
| Color temperature | 3200-5600K(±100) |
| Input voltage | DC IN 12-15V |
| Power | 42W |
| Size | 480*480*96mm |
This device complies with Part 15 of the FCC Rules. Operation is subject to the following two conditions: (1) this device may not cause harmful interference, and (2) this device must accept any interference received, including interference that may cause undesired operation
This device has been tested and found to comply with the limits for a Class B digital device, pursuant to Part 15 of the FCC Rules. These limits are designed to provide reasonable protection against harmful interference in a residential installation. This device generates, uses, and can radiate radio frequency energy and, if not installed and used in accordance with the instructions, may cause harmful interference to radio communications.
However, there is no guarantee that interference will not occur in a particular installation. If this device does cause harmful interference to radio or television reception, which can be determined by turning the device off and on, the user is encouraged to try to correct the interference by one or more of the following measures:
-Reorient or relocate the receiving antenna.
-Increase the separation between the device and receiver.
-Connect the device into an outlet on a circuit different from that to which the receiver is connected.
-Consult the dealer or an experienced radio/TV technician for help
Changes or modifications not expressly approved by the party responsible for compliance could void the user’s authority to operate the equipment
FCC Radiation Exposure Statement The antennas used for this transmitter must be installed to provide a separation distance of at least 20 cm from all persons and must not be co-located for operating in conjunction with any other antenna or transmitter.