
Quick reference guide
Dishwasher
Before using it for the first time, read the operating instructions.
Setting up Home Connect
Tip: Connect your appliance to a mobile device. You can conveniently change all settings via the Home Connect app.
- Install the Home Connect app on your mobile device and follow the instructions.
- Scan the QR code using the Home Connect app.


http://qr.homeconnect.com?aG9tZWNvbm5lY3Q6Ly9vcGVuUGFpcmluZz9wc2V1ZG9WaWI9U00wMQ==


Overview of water hardness settings
Overview of water hardness settings
You can find an overview of the water hardness values that can be selected here.
A table of country-specific units can be found in the instruction manual.
| Hardness range | mmol/l | Setting value |
| Soft | 0 – 1.1 | 0 – 8 |
| Soft | 1.2 – 1.4 | 9-10 |
| Medium | 1.5 – 1.8 | 11 – 12 |
| Medium | 1.9 – 2.1 | 13 -15 |
| Medium | 2.2 – 2.9 | 16 – 20 |
| Hard | 3.0 – 3.7 | 21 – 26 |
| Hard | 3.8 – 5.4 | 27 – 38 |
| Hard | 5.5 – 8.9 | 39 – 62 |
Setting the water softening system
- Press
 .
. - To open the basic settings, press

- Press repeatedly until the display shows “Water hardness”.
- Press – or + repeatedly until the right water hardness has been set.
- To save the settings, press


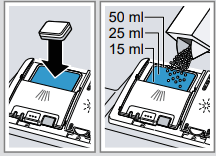
Adding special salt 
To avoid damage to the appliance, only add a special salt to the dispenser for special salt just before the program starts.
- Unscrew the lid of the dispenser for special salt and remove.
- On initial start-up: Fill the dispenser right up with water.
- Add the special salt to the dispenser. The water in the dispenser is displaced and forced out. Never add detergent.
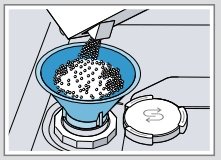
- Place the lid back on the dispenser and turn to close.

Adding rinse aid 
- Press the catch on the lid of the dispenser for rinse aid
1and lift2.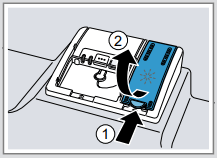
- Add rinse aid up to the max mark.
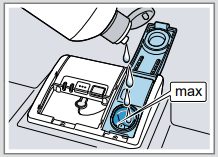
- Close the lid of the dispenser for rinse aid.
 The lid clicks into position.


Adding detergent 
- Add the detergent to the dry detergent dispenser.
- Close the lid of the detergent dispenser.
The lid clicks into position.

Programs
The program data has been measured in the laboratory according to European standard EN 60436.
The consumption figures depend on the program and additional function selected.
The running time will change if the rinse aid system is switched off or the rinse aid needs to be added.
| Program | 1) Duration [h:min] 2) Energy [kWh] 3) Water [I] |
| Chef Chef 70 |
1) 2:40 – 2:45 2) 1,400 -1,500 3) 10,5 – 13,5 |
| Auto Auto 45-65° |
1) 1:40 – 2:40 2) 0,680 -1,300 3) 7,0 -15,5 |
| Eco Eco 50° |
1) 3:55 2) 0,635 3) 9,5 |
| Silence Silence 50°’ |
1) 4:00 2) 0,800 3) 10,5 |
| Glass Glass 40° |
1) 1:40 – 1:45 2) 0,750 – 0,800 3) 11,1 – 13,7 |
| Classic Classic 60° |
1) 1:29 2) 1,050 3) 11,5 |
| Express Express 45° |
1) 0:35 ‘ 2) 0,710 3) 10,5 |
| Easy Clean Easy Clean |
1) 2:10 2) 1,350 3) 15,0 |
 Favorite |
1) 0:15-0:15 2) 0,050 -0,050 3) 4,0 -4,0 |
| 1. Suitable program for running at night: it takes longer, but is extremely quiet. 2. half standard load |
|
How to use your appliance
- Load the tableware.
Only clean tableware that is suitable for dishwashers. Remove large remnants of food from the tableware. Check that the spray arms can rotate freely. - Add detergent.
- Switch on the appliance .
- Select the program.
- Start the program Start.
- Remove the tableware at the end of the program.
- To cancel the program, press Reset 4sec. for approx. 4 seconds.
The program is canceled and ends after approx. 1 minute.
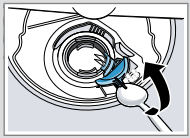
Cleaning filters
- After each wash check the filters for residue.
- Turn the coarse filter anticlockwise
1and remove the filter system2. - Pull down the microfilter to remove it.
- Press the locking catches
1together and lift the coarse filter out2. - Clean the filter elements under running water.
- Re-assemble the filter system.
- Insert the filter system into the appliance and turn the coarse filter clockwise.
Make sure that the arrow markings match up.
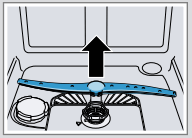
Cleaning spray arms
- Unscrew the upper spray arm
1and pull down to remove2.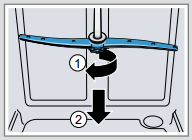
- Pull up the lower spray arm to remove.
- Check the outlet nozzles on the spray arms for blockages under running water and remove any foreign bodies.
- Insert the lower spray arm.
The spray arm clicks into position. - Insert the upper spray arm and screw it firmly in place.


Clean wastewater pump
- Disconnect the appliance from the power supply.
- Remove the filter system.
- Scoop out any water.
- Prise off the pump cover using a spoon and grip it by the crosspiece.
- Lift the pump cover inwards at an angle and remove it.
- Remove any remnants of food and foreign bodies in the area of the impeller.
- Insert the pump cover
1and press down2. The pump cover clicks into position.
 - Install the filter system.


Troubleshooting
| Fault | Cause and troubleshooting |
| E:3200 or indicator for water supply lights up. | The supply hose is kinked. |
| The water tap is turned off. |
|
| The water tap is jammed or furred up. The flow rate must be at least 10 1/min when the water supply is open. |
|
| The filters in the water connection of the supply or AquaStop hose are blocked. 1. Switch off the appliance. 2. Pull out the mains plug. 3. Turn off the water tap. 4. Unscrew the water connection. 5. Remove the filter from the supply hose.  7. Re-insert the filter in the supply hose. 8. Screw the water connection back on. 9. Check the water connection for leaks. 10. Restore the power supply. 11. Switch the appliance on. |
|
| E:9240 lights up. | Filters are soiled or blocked. |
| E:6102 lights up. | The wastewater pump is blocked. |
| The cover of the wastewater pump is loose |
|
| Remnants of food on
tableware. |
Tableware is placed too close together or the basket is overfilled 1. Arrange tableware with sufficient space in between. The spray jets must reach the surfaces of the tableware. 2. Avoid points of contact. |
| Spray arm rotation is blocked. |
|
| Spray arm nozzles are blocked. |
|
| Filters are soiled. |
|
| Filters are inserted incorrectly and/or not engaged. 1. Insert the filters properly. 2. Engage the filters. |
|
| The washing program selected too weak. |
|
| Removable streaks are present on glasses, glassware with a metallic appearance, and cutlery. | The amount of rinse aid to be dispensed is set too high. |
| No rinse aid has been added. |
|
| Rust spots on cutlery. | Cutlery is not sufficiently rust-resistant. Knife blades are often more severely affected. |
| Cutlery may also rust if washed together with rusting items. |
|
| Detergent residue is present in the detergent dispenser or the tablet collecting tray. | Spray arms were blocked by tableware so detergent was not rinsed out. |