NF18MESH CloudMesh Networking Gateway
User Guide
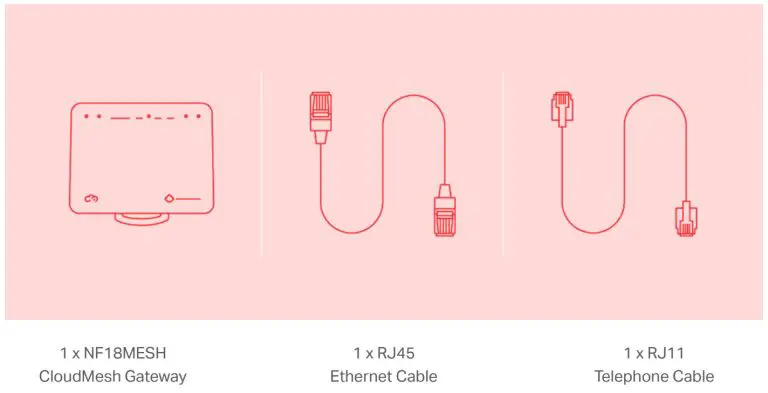
What’s in the box


Please Read Before Use
 |
Location The gateway is designed for indoor use only. Place the gateway in a central location for the best WiFi performance. |
 |
Airflow • Do not restrict airflow around the gateway. • The gateway is air-cooled and may overheat where airflow has been restricted. • Always allow a minimum clearance of 5cm around all sides and the top of the gateway. • The gateway may become warm during normal use. Do not cover, do not put in an enclosed space, do not put under or behind large items of furniture. |
 |
Environment • Do not place the gateway in direct sunlight or any hot areas. • Safe operating temperature of the gateway is between 0° and 40°C • Do not allow the gateway to come in contact with any liquid or moisture. • Do not place the gateway in any wet or humid areas such as kitchen, bathroom or laundry rooms. |
 |
Power Supply Always use only the power supply unit that came with the gateway. You should immediately stop using the power supply unit if the cable or power supply unit is damaged. |
 |
Service There are no user-serviceable components in the gateway. Do not attempt to disassemble, repair, or modify the gateway. |
 |
Small Children Do not leave the gateway and its accessories within the reach of small children or allow them to play with it. The gateway contains small parts with sharp edges that may cause an injury or which could become detached and create a choking hazard. |
 |
RF Exposure The gateway contains a transmitter and a receiver. When it is on, it receives and transmits RF energy. The gateway conforms with the radio frequency (RF) exposure limits adopted by the Australian Communications and Media Authority Radiocommunications (Electromagnetic Radiation – Human Exposure) Standard 2014 when used at a distance of not less than 20 cm from the body.) |
 |
Product Handling • Always treat the gateway and its accessories with care and keep it in a clean and dust-free place. • Do not expose the gateway or its accessories to open flames. • Do not drop, throw or try to bend the gateway or its accessories. • Do not use harsh chemicals, cleaning solvents, or aerosols to clean the gateway or its accessories. • Please check local regulations for the disposal of electronic products. • Arrange power and Ethernet cables in a manner such that they are not likely to be stepped on or have items placed on them. |
Getting Started
Pre-configured?
If you received the Netcomm NF18MESH modem from More, the device will be pre-configured. Follow the steps specific to your FTTP NBN connection on the following pages to get connected.
How to connect your Netcomm modem: FTTP Connections
Step 1
Locate the NBN connection box that has been installed inside your property.

Step 2
Gently lift the cover of the NBN Connection Box. To do this press the two clips on either side and lift the cover at an angle.
Step 3
Ensure that the power cable is securely in place and that the ‘Power’ and ‘Optical’ lights are showing a steady green on the connection box. 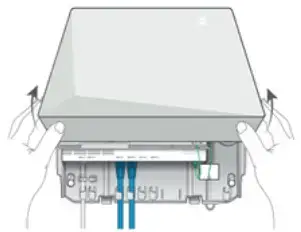
Step 4
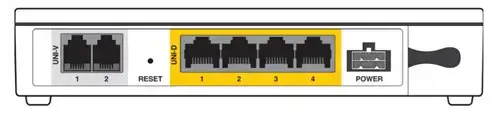
Now look on the underside of the NBN Connection Box where you can see the Uni-D ports surrounded by yellow.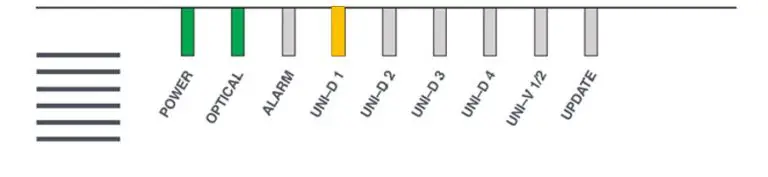
Using an Ethernet network cable, connect your router from its WAN port to the relevant Uni-D port on the NBN Connection Box. We generally activate the next available Uni-D port – starting with Uni-D 1. We will detail your Uni-D port number in our emails to you.
Step 5
Check lights. After you have successfully connected your modem please wait a couple of minutes for it to connect to the network.
Once connected to the network, the Power, WAN & WiFi 2.4 – 5 lights will display a steady green light. The Internet light will be flashing.
Final Steps
After you’ve completed the steps to connect your NetComm NF18MESH modem, wait up to 20 mins to connect to your devices.
Once connected, run a test to check the speed of your connection at www.speedtest.net
If the modem is still not connected after 20 minutes, please contact our technical support team for further assistance:
Technical Support
If you require assistance setting up your BYO device our team is available.
1800 733 368
7am – Midnight (Weekdays) AET
8am – 8pm (Weekends) AET
Overseas: +61390219630
WhatsApp: +61480096696
How to connect an NF18MESH modem (That is NOT pre-configured)
Before You Begin
Ensure that you have the following information on hand
- How your INTERNET SERVICE will physically connect to the gateway, see below.
- The SETTINGS are specific to your type of service.
These are two ways to connect the gateway to the Internet service:
Ethernet WAN
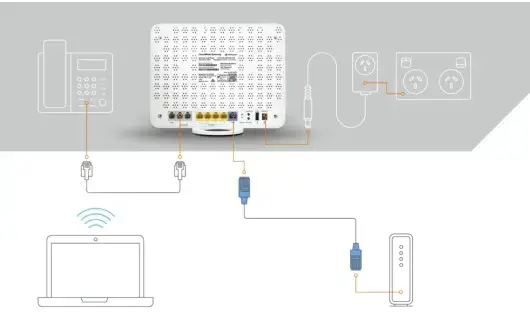
This is the most common access type in Australia and New Zealand and covers fixed-line technologies such as nbn™ FTTP, HFC, FTTC as well as nbn™ Fixed Wireless and Sky Master satellite services. This type of Internet service uses the blue WAN port on the back of the gateway to connect to the dedicated connection box installed by your access network provider.
ADSL or VDSL
These access types are provided by nbn™ FTTB, FTTN, or ADSL/VDSL over a traditional telephone line.
This connection uses the grey DSL port of the back of the gateway.
Logging in to the web interface
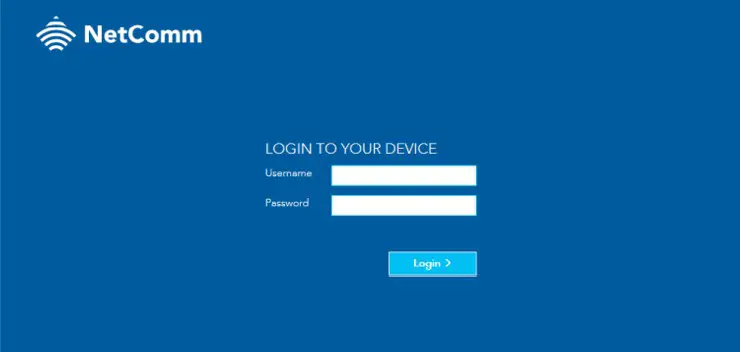
- Open web browser
(such as Mozilla Firefox or Google Chrome), type http://cloudmesh.net into the address bar and press Enter.
If you encounter difficulties connecting, type http://192.168.20.1 and press Enter. - At the login screen
Type admin into the Username field. In the Password field, enter the password printed on the gateway label
(affixed to the back panel of the gateway) then click the Login > button.
Note – The graphics that appear in the section represent the display from a Windows browser. The same graphics will display differently when viewed on a handheld device.
If you’re unable to log in, perform a factory reset of the modem.
Using The First-Time Setup Wizard
Upon first login
The gateway displays the first-time setup wizard.
We recommend using the wizard to configure your Internet connection.
Click the Yes, start the setup wizard button.

- Under Internet Services
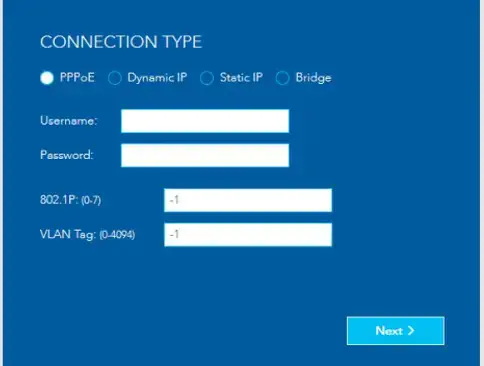
select Ethernet WAN. - Under Connection Type
select the type of connection your ISP has configured for you, i.e. PPPoE, Dynamic IP, Static IP or Bridge. - Enter the details
Enter the details required for your specific Connection Type.
Using The First-Time Setup Wizard Ethernet WAN

PPPoE
Enter the username and password, 802.1P priority and VLAN Tag provided in your connection email from More.
When you have finished, click the Next > button to go to the WIRELESS settings.
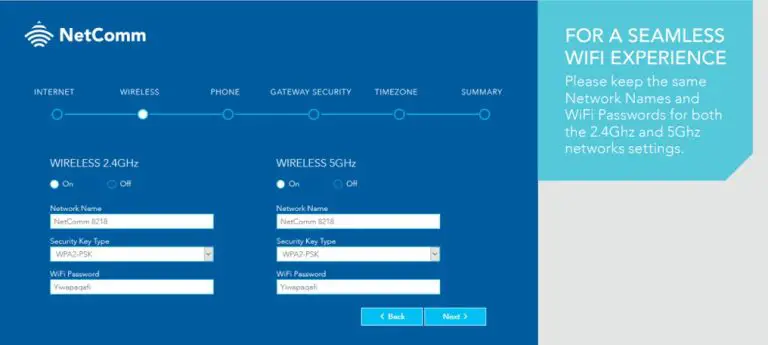
Using The First-Time Setup Wizard Wireless
- On this page
You can configure the wireless networks of the gateway, Enter the Network Name (the name displayed on client devices when they scan for wireless networks), the Security Key Type (encryption type) and the WiFi password. - When you have finished
Click the Next > button.
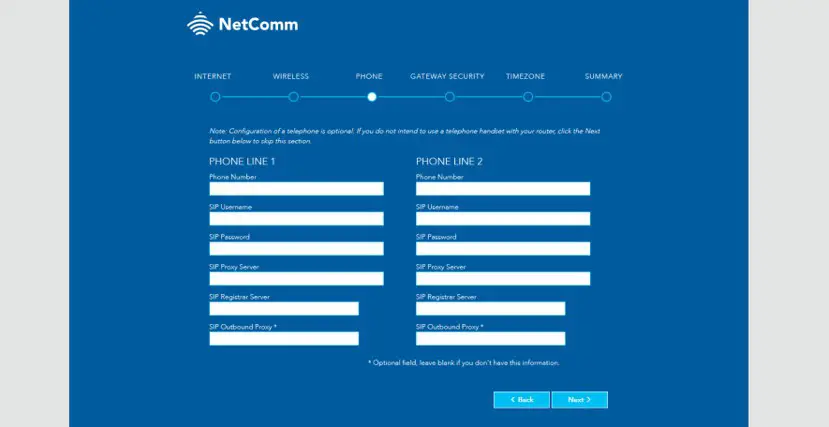
Using The First-Time Setup Wizard Phone
- Configuration of VoIP telephone is optional
If you do not intend to use a telephone handset with the gateway, click the Next > button to skip this section - To configure a telephone
Enter the details into the fields shown for each line you wish to use. If you do not know the values to enter, contact More. Click the Next > button when you have finished.
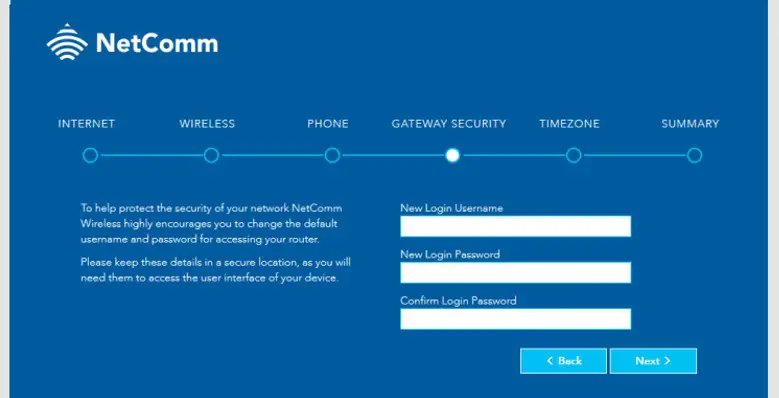
Using The First-Time Setup Wizard Gateway Security
- We highly recommend
that you configure a new username and password to access the gateway. - Usernames and passwords are case sensitive
can be up to 16 characters in length and may comprise letters, special characters and numbers without spaces.
When you have finished entering the new credentials, click the Next > button.
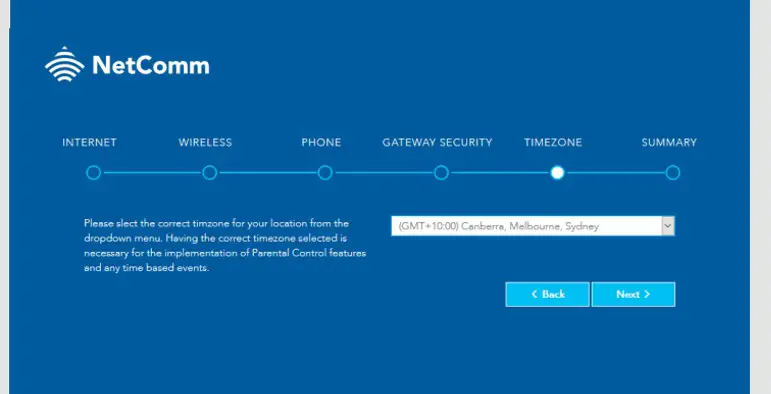
Using The First-Time Setup Wizard Timezone
- Specify the timezone
where the gateway is located for correct timekeeping and the log-keeping function of the gateway. - Click the Next > button
when you have chosen the correct timezone.
Using The First-Time Setup Wizard Summary
- The wizard displays a summary of the entered information
Check that the details are correct. If they are correct, click the Finish > button.
If they are not, click the < Back button to go back to the relevant screen to make changes. - When you click the Finish > button
the gateway returns you to the SUMMARY page.
© More 2022
| FTTP Connections
more.com.au