NETGEAR A6150 AC1200 WiFi USB Adapter

Support
Thank you for purchasing this NETGEAR product. You can visit https://www.netgear.com/support/ to register your product, get help, access the latest downloads and user manuals, and join our community. We recommend that you use only official NETGEAR support resources.
Compliance and Conformity
For regulatory compliance information including the EU Declaration of Conformity, visit https://www.netgear.com/about/regulatory/.
See the regulatory compliance document before connecting the power supply.
Do not use this device outdoors. If you connect cables or devices that are outdoors to this device, see http://kb.netgear.com/000057103 for safety and warranty information.
Trademarks
© NETGEAR, Inc., NETGEAR, and the NETGEAR Logo are trademarks of NETGEAR, Inc. Any non-NETGEAR trademarks are used for reference purposes only.
Install Your Adapter and Connect to a WiFi Network
The NETGEAR AC1200 WiFi USB Adapter Model A6150, in this manual referred to as the adapter, is a USB2.0, dual-band WiFi adapter that provides a combined throughput of 1200 Mbps (300 Mbps at 2.4 GHz and , 866 Mbps at 5 GHz). The adapter supports multiuser MIMO (MU-MIMO) and beamforming and integrates an internal antenna in a nano-size format.
When you insert the adapter in a Windows-based computer or Mac, the adapter enables that computer to join an 802.11 a/b/g/n or ac WiFi network.
This chapter contains the following sections:
- Package contents
- Status LED
- Use the adapter with a Windows-based computer
- Use the adapter with a Mac
Note: For more information about the topics that are covered in this manual, visit the support website at netgear.com/support/.
Note: Firmware updates with new features and bug fixes are made available from time to time at netgear.com/support/download/. You can check for and download new firmware manually. If the features or behavior of your product does not match what is described in this manual, you might need to update the firmware.
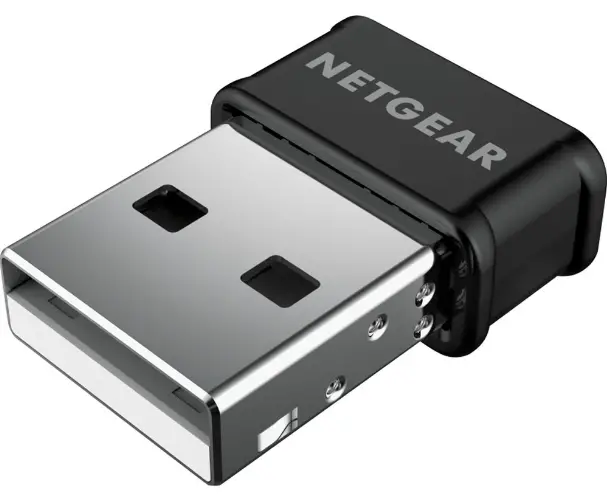
Package contents
The package contains the adapter and the resource CD.
Figure 1. Package contents
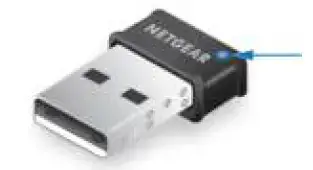
Status LED
The adapter contains a small status LED that lights when you insert the adapter into the USB port of your computer.
Figure 2. Status LED
Table 1. Status LED

Use the adapter with a Windows-based computer
Other than driver software, the adapter does not come with NETGEAR adapter software. That is, it does not come with an adapter-specific graphical user interface. Instead, to establish a WiFi connection with the adapter, use the software that is already built in into your Windows-based computer. The adapter supports Windows 10, Windows 8.1, Windows 8, and Windows 7.
Set up your adapter with a Windows-based computer
You can install the drivers that support Windows 10, Windows 8.1, Windows 8, and Windows7.
After you install the Windows drivers, you can insert the adapter in your Windows-based computer, and use the built-in Windows configuration tool to connect the adapter to a WiFi network.
To set up your adapter with a Windows-based computer:
- Insert the resource CD in your computer CD drive.
Note: If your computer does not include a CD drive, visit
https://www.netgear.com/support/product/A6150 to download the adapter software.
The NETGEAR Resource CD window opens.
Note: If the NETGEAR Resource CD window does not open, browse the files on the CD and double-click the autostart.exe file. - Click the Install Windows Driver button.
All Windows drivers are installed on your computer. - Wait for the installation windows to show that the drivers are successfully installed.
- Insert your adapter into your computer’s USB port.
The adapter device driver software for your Windows version is installed. - Connect your adapter to a WiFi network using a built-in Windows configuration tool. For more information, see Join a WiFi network using the built-in Windows tool on page 7.
Join a WiFi network using the built-in Windows tool
After you install the adapter (see Set up your adapter with a Windows-based computer on page 6), you can use the built-in Windows configuration tool (the Connect to a network tool) to connect the adapter to a WiFi network.
To join a WiFi network on a Windows-based computer:
- Depending on the Windows version, select the Network or icon in the notification area of your screen.
The Connect to a network tool opens and a list of WiFi networks in your area displays. Note: You can also open the Connect to a network tool from the Network and Sharing Center at the following path:- Windows 10. Select Start > Settings > Network & Internet > Status > Network and Sharing Center, and click Connect to a network.
- Windows 7, 8, or 8.1. Select Start > Control Panel > Network and Sharing Center, and click Connect to a network.
- From the list of networks, select the WiFi network, and click the Connect button. A pop-up window opens
- If the WiFi network is secured, enter the security key (and, if applicable, other required security information), and click the OK button.
The security key is also referred to as the WiFi passphrase or WiFi password.
If the security key is identical to the one that is defined for the WiFi network, the adapter lets the computer join the network, which can take a few minutes.
Use the adapter with a Mac
The adapter comes with a macOS driver and NETGEAR adapter software (that is, an adapter-specific graphical user interface). To establish a WiFi connection with the adapter, use the NETGEAR adapter software.
Set up your adapter with a Mac
Note:
Some builds of macOS require approval to install client software. If your adapter software installation is blocked during initial installation, you must override your Mac’s security and privacy settings and allow your Mac to install the driver. For more information, see the Apple Mac support site.
To set up your adapter with a Mac:
- Insert the resource CD in your Mac CD drive.
Note: If your Mac does not include a CD drive, visit
https://www.netgear.com/support/product/A6150 to download the adapter software. The NETGEAR Resource CD window opens.
Note: If the NETGEAR Resource CD window does not open, browse the files on the CD and double-click the file ending in .dmg or .pkg. The following are examples of adapter software file names: A6150_MAC_V1.0.0.1.dmg or A6150_MAC_V1.0.0.1.pkg. - Follow the prompts to install the adapter software.
- When prompted, restart your Mac. If you are not prompted, restart your Mac anyway.
- Insert your adapter into your Mac’s USB port. The NETGEAR adapter icon is displayed in your Mac’s menu bar.
Note: If you remove the adapter from your Mac’s USB port, the icon displays with an X, indicating that the adapter is not present. - Connect your adapter to a WiFi network using the adapter software. For more information, see Join a WiFi network on a Mac on page 9.
Join a WiFi network on a Mac
After you install the adapter (see Set up your adapter with a Mac on page 8), you can use the NETGEAR adapter software to connect the adapter to a WiFi network.
To join a WiFi network on a Mac:
- Click the NETGEAR adapter icon in your Mac’s menu bar.
A menu displays. The menu includes a list of existing WiFi networks in your area. - Select a WiFi network.
- If the WiFi network is secured, enter the password (and, if applicable, other required security information) and click the Join button.
The password is also referred to as the WiFi passphrase or security key.
If the password is identical to the one that is defined for the WiFi network, the adapter lets the Mac join the network, which can take a few minutes. Your settings are saved in a profile.
Use WPS to join a WiFi network on a Mac
After you install the adapter (see Set up your adapter with a Mac on page 8), you can use the NETGEAR adapter software to connect the adapter to a WiFi network using Wi-Fi Protected Setup (WPS).
Before you use a WPS method to let the Mac join a hidden network, make sure of the following:
- Your WiFi router or access point supports WPS.
- The security on your WiFi router or access point is not set to WEP. WEP and WPS are incompatible. You cannot use WPS if the security on your WiFi router or access point is set to WEP.
The adapter provides two methods to make a WPS connection. You can use the Push Button Configuration (PBC) method or the PIN method. The PBC method is the easier one but requires that the WiFi router or access point to which you are trying to connect provides either a physical WPS button or a software WPS or PBC button.
Use WPS with the PBC method to join a WiFi network on a Mac You can
use the Push Button Configuration (PBC) method to make a WPS connection.
To use WPS with the PBC method to join a WiFi network on a Mac:
- Click the NETGEAR adapter icon in your Mac’s menu bar.
A menu displays. - Select WPS.
The WPS pop-up window opens. - Click the PBC button.
For 2 minutes, the NETGEAR adapter software scans for the WiFi router or access point. - Within 2 minutes, either press the physical WPS button on the WiFi router or access point or log in to your WiFi router or access point and click the software WPS button on the WPS configuration page of the WiFi router or access point.
Note: The WPS button for your WiFi router or access point might be named something different.
When the NETGEAR adapter software detects the WiFi router or access point, the adapter lets the Mac join the WiFi network. Your settings are saved in a profile.
Use WPS with the PIN method to join a WiFi network on a Mac You can
use the PIN method to make a WPS connection.
To use WPS with the PIN method to join a WiFi network on a Mac:
- Click the NETGEAR adapter icon in your Mac’s menu bar.
A menu displays. - Select WPS.
The WPS pop-up window opens. - Write down the PIN number that displays in the window and leave the WPS pop-up window open.
- Log in to your WiFi router or access point, enter the PIN number on the WPS configuration page of the WiFi router or access point, and click the button to active WPS on the WiFi router or access point.
- In the WPS pop-up window on the your Mac, click the PIN button. For 2 minutes, the NETGEAR adapter software scans for the WiFi router or access point. The adapter lets the Mac join the WiFi network when it detects the WiFi router or access point. Your settings are saved in a profile.
View information about or change a WiFi network on a Mac
After you install the adapter (see Set up your adapter with a Mac on page 8), you can use the NETGEAR adapter software to view information about a WiFi network or change the security of a WiFi network.
To view information about a WiFi network or change the security of a WiFi network a Mac:
- Click the NETGEAR adapter icon in your Mac’s menu bar.
A menu displays. - Select Open Wireless Utility.
A pop-up window opens. The window shows all broadcast (non-hidden) WiFi networks in your area. A lock icon indicates that the network is secured. The WiFi icon indicates the strength of the network in your area. - To view information about WiFi profiles, click the Profiles button.
The Preferred Network pop-up window opens. The window shows the types of security for the WiFi networks in your area. A green circle indicates that the Mac is connected to the WiFi network. - To view more information about a WiFi network, click it in the Network Name column. The windows shows the security and password (if any) that are set up for the WiFi network.
- To make changes to the security, do the following:
- From the Security menu, select another type of security or select None to change the network to an open network without security.
Note: We do not recommend an open network without security. (For some situations, for example when you manage a WiFi network for a WiFi hotspot in a public place, an open network without security might be appropriate.) - Depending on your selection from the Security menu, enter the required information for the type of security.
- Click the Apply button.
If you are connected to the WiFi network that you changed, you are disconnected and must reconnect using the new type of security and associated credentials.
- From the Security menu, select another type of security or select None to change the network to an open network without security.
Join a hidden WiFi network on a Mac
After you install the adapter (see Set up your adapter with a Mac on page 8), you can use the NETGEAR adapter software to connect the Mac to a hidden WiFi network. A hidden network is a network that does not broadcast its SSID (WiFi network name). If the network name is not displayed in the menu of the NETGEAR adapter software, the network that you are trying to join is either not functioning or is hidden. To let the Mac join a hidden network, you can use WPS (see Use WPS to join a WiFi network on a Mac on page 9) or enter the hidden network’s information manually. To enter the hidden network’s information manually, you must know the SSID, type of security, and required information for the type of security (usually a WiFi password). After the Mac joins the network, it saves the network connection information to a profile. Both the NETGEAR adapter software and the Mac AirPort utility can use this profile. If the network information does not change, the next time that you launch the NETGEAR adapter software, the Mac connects automatically to the network that it joined previously.
To join a hidden WiFi network on a Mac:
- Click the NETGEAR adapter icon in your Mac’s menu bar.
A menu displays. - Select Join Other Network.
A pop-up window opens. - In the Network Name field, enter the WiFi network name (SSID).
- From the Security menu, select the type of security that is associated with the WiFi network and enter the required information for that type of security:
- None. The network is not secure and does not require a key or passphrase.
- Open_System WEP. Enter the WiFi network password in the Password field.
- Shared_Key WEP. Enter the WiFi network password in the Password field.
- WPA_PSK TKIP. Enter the WiFi network password in the Password field.
- WPA_PSK AES. Enter the WiFi network password in the Password field.
- WPA2_PSK TKIP. Enter the WiFi network password in the Password field.
- WPA2_PSK AES. Enter the WiFi network password in the Password field.
- WPA Enterprise TKIP. Select an option from the 802.1x EAP menu, enter the network user name in the User Name field, and either enter the WiFi network password in the Password field or select certificate information from the CA Certificate and Client Certificate menus.
- WPA Enterprise AES. Select an option from the 802.1x EAP menu, enter the network user name in the User Name field, and either enter the WiFi network password in the Password field or select certificate information from the CA Certificate and Client Certificate menus.
- WPA2 Enterprise TKIP. Select an option from the 802.1x EAP menu, enter the network user name in the User Name field, and either enter the WiFi network password in the Password field or select certificate information from the CA Certificate and Client Certificate menus.
- WPA2 Enterprise AES. Select an option from the 802.1x EAP menu, enter the network user name in the User Name field, and either enter the WiFi network password in the Password field or select certificate information from the CA Certificate and Client Certificate menus.
- 802.1X WEP. Select an option from the 802.1x EAP menu, enter the network user name in the User Name field, and either enter the WiFi network password in the Password field or select certificate information from the CA Certificate and Client Certificate menus.
- Click the Join button.
The adapter lets the Mac join the WiFi network, which can take a few minutes. Your settings are saved in a profile.
Troubleshooting and Frequently
Asked Questions
This chapter describes how you can troubleshoot the adapter and network environment, and addresses frequently asked questions (FAQ).
The chapter includes the following sections:
- The adapter LED does not light
- The adapter does not connect to a WiFi network
- When I connect the adapter to a WiFi network, I cannot access the Internet
- When I connect the adapter to a WiFi network, I cannot access a shared resource
- How can I improve the speed of the WiFi connection?
- How do I view the speed of the WiFi connection on a Windows-based computer?
- How do I view the speed of the WiFi connection on a Mac?
- Where can I find more information about the built-in Windows tool?
The adapter LED does not light
If the LED does not light when you insert the adapter into a USB port on your computer, try these troubleshooting tips:
- Remove and reinsert the adapter.
- Insert the adapter in a different USB port on your computer, if one is available.
- If you use a Windows-based computer, open the Windows device manager to see if the adapter is recognized and enabled. If necessary, reinstall the adapter software.
The adapter does not connect to a WiFi network
If you cannot connect the adapter to a selected WiFi network as described in Join a WiFi network using the built-in Windows tool on page 7 or Join a WiFi network on a Mac on page 9, try these troubleshooting tips:
- Make sure that your adapter is inserted securely into the USB port on your computer.
- If the network uses WiFi security, check that you use the correct WiFi security settings, in particular, the correct WiFi passphrase (or WiFi password).
When I connect the adapter to a WiFi network, I cannot access the Internet
If you can connect the adapter to a WiFi network but the network is not connected to the Internet, try these troubleshooting tips:
- Make sure that you are connected to the correct WiFi network. If you are, check to see if the WiFi router’s or access point’s Internet connection is working.
- If the Internet connection of the WiFi router or access point does not work, restart the Internet modem (or any other device that serves as your ISP connection), the WiFi router or access point, and the computer in which the adapter is installed.
When I connect the adapter to a WiFi network, I cannot access a shared resource
If you cannot access a shared resource such as a printer, try these troubleshooting tips:
- Make sure that the WiFi router or access point is physically connected to the LAN Ethernet network.
- Make sure that the resource that you are trying to access is connected to the LAN Ethernet network.
- Make sure that the IP addresses and the networking settings in the LAN Ethernet network are configured correctly.
How can I improve the speed of the WiFi connection?
The connection speed can vary depending on the type of USB port on your computer, the capacity of the WiFi router or access point for the WiFi network, and the type of Internet connection.
For information about viewing the physical rate of the adapter’s WiFi connection see How do I view the speed of the WiFi connection on a Windows-based computer? on page 17 or How do I view the speed of the WiFi connection on a Mac? on page 17. The following limits might apply to the speed of the WiFi connection:
- If the physical rate is limited to 54 Mbps, the adapter might be connected to an 802.11a, 802.11b, or 802.11g network. If you want a faster physical rate, connect to an 802.11ac or 802.11n network, if available.
- If the physical rate is limited to 54 Mbps, the network security might be WPA (TKIP). When WPA (TKIP) security mode is configured on the WiFi router or access point, WiFi regulations allow the adapter to connect at up to 54 Mbps only. For a faster connection, configure the security for the WiFi router or access point as WPA2 or WPA + WPA2 mixed WiFi security. The connection speed still depends on the WiFi capacity of the WiFi router or access point.
- If your computer does not include a USB 2.0 port, the physical rate is limited to the 14 Mbps of the USB 1.1 legacy standard.
How do I view the speed of the WiFi connection on a Windows-based computer?
While your computer is connected to a WiFi network using the adapter, you can view the speed of the WiFi connection.
To view the speed of the WiFi connection on a Windows-based computer:
- Depending on the Windows version, select the Network or icon in the notification area of your screen.
The Connect to a network tool opens and a list of networks display. - Right-click the active WiFi connection and, from the menu, select Status.
A pop-up window opens and shows information about the connection, including the speed.
Note: You can also view the speed of the WiFi connection from the Network and Sharing Center at the following path:- Windows 10. Select Start > Settings > Network & Internet > Status > Network and Sharing Center, and click the active WiFi connection.
- Windows 7, 8, or 8.1. Select Start > Control Panel > Network and Sharing Center, and click the active WiFi connection.
How do I view the speed of the WiFi connection on a Mac?
While your Mac is connected to a WiFi network using the adapter, you can view the speed of the WiFi connection.
To view the speed of the WiFi connection on a Mac:
Hold down the Option key and click the AirPort icon in your Mac’s menu bar. Detailed information about the WiFi connection displays. The Tx Rate field shows the speed of the WiFi connection.
Where can I find more information about the built-in Windows tool?
Other than driver software, the adapter does not come with NETGEAR adapter software for Windows. That is, it does not come with an adapter-specific graphical user interface for Windows. Instead, the adapter uses software that is already built into your Windows-based computer. You can find more information about the built-in software in your Windows-based computer at the Microsoft Windows support site.
Note: For Macs, the adapter comes with a macOS driver and NETGEAR adapter software, that is, an adapter-specific graphical user interface for macOS.
Factory Default Settings and Technical Specifications
This appendix includes the following sections:
- Factory default settings
- Technical specifications
Note: For more information, see the data sheet that you can download by visiting netgear.com/support/download/.
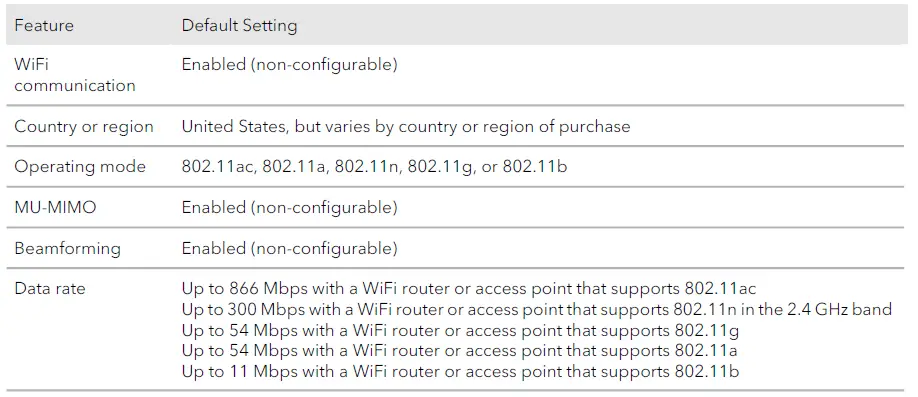
Factory default settings
The following table lists the default settings of your adapter.
Table 2. Factory default settings
Technical specifications
The following table lists the technical specifications of your adapter.
Table 3. Technical specifications
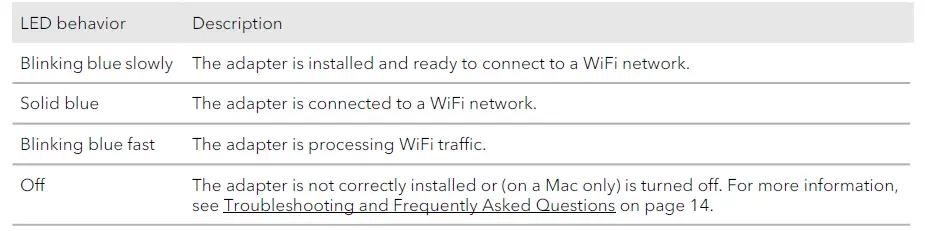
Table 3. Technical specifications (Continued)