Nikon AF-S NIKKOR 180-400mm f 4E TC1.4 FL ED VR User Manual
Before using this product, please carefully read both these instructions and the camera manual. Note: This lens does not support D2-series, D1-series, D200, D100, D90, D80, D70-series, D60, D50, D40-series, or D3000 digital SLR cameras or film SLR cameras.
About This Lens
This lens features a built-in teleconverter. Use the teleconverter switch to switch between focal length multipliers of 1× and 1.4×.
For Your Safety
To prevent damage to property or injury to yourself or to others, read “For Your Safety” in its entirety before using this product.
Keep these safety instructions where all those who use this product will read them.
![]() WARNING: Failure to observe the precautions marked with this icon could result in death or severe injury.
WARNING: Failure to observe the precautions marked with this icon could result in death or severe injury.
![]() CAUTION: Failure to observe the precautions marked with this icon could result in injury or property damage.
CAUTION: Failure to observe the precautions marked with this icon could result in injury or property damage.
![]() WARNING
WARNING
- Do not disassemble or modify this product. Do not touch internal parts that become exposed as the result of a fall or other accident.
Failure to observe these precautions could result in electric shock or other injury. - Should you notice any abnormalities such as the product producing smoke, heat, or unusual odors, immediately disconnect the camera power source.
Continued operation could result in fire, burns or other injury. - Keep dry.
Do not handle with wet hands.
Failure to observe these precautions could result in fire or electric shock. - Do not use this product in the presence of flammable dust or gas such as propane, gasoline or aerosols.
Failure to observe this precaution could result in explosion or fire. - Do not directly view the sun or other bright light source through the lens or camera.
Failure to observe this precaution could result in visual impairment. - Keep this product out of reach of children.
Failure to observe this precaution could result in injury or product malfunction. In addition, note that small parts constitute a choking hazard. Should a child swallow any part of this product, seek immediate medical attention. - Do not entangle, wrap or twist the straps around your neck.
Failure to observe this precaution could result in accidents. - Do not handle with bare hands in locations exposed to extremely high or low temperatures.
Failure to observe this precaution could result in burns or frostbite.
![]() CAUTION
CAUTION
- Do not leave the lens pointed at the sun or other strong light sources.
Light focused by the lens is a source of fire and damage to the product’s internal parts. - Do not leave the product where it will be exposed to extremely high temperatures, for an extended period such as in an enclosed automobile or in direct sunlight.
Failure to observe this precaution could result in fire or product malfunction. - Do not transport cameras or lenses with tripods or similar accessories attached.
Failure to observe this precaution could result in injury or product malfunction.
Notice for Customers in Canada
CAN ICES-3 B / NMB-3 B
Parts of the Lens
- Rubber grip
- Zoom ring
- Focal length scale
- Focal length mark
- Focus distance indicator
- Focus distance mark
- Lens rotation index
- Tripod collar ring rotation index
- Focus ring
- Tripod collar ring
- Strap eyelet
- Slip-in filter holder
- Slip-in filter holder screw
- Lens mounting mark
- Rubber lens-mount gasket
- CPU contacts
- Focus function button (focus lock/memory recall/AF start)
- Tripod collar ring attachment screw
- Built-in rotating tripod collar
- Focus-mode switch
- Focus limit switch
- Vibration reduction switch
- Focus function selector (AF-L/MEMORY RECALL/AF-ON)
- Beep on/off switch
- Teleconverter switch
- Teleconverter switch lock
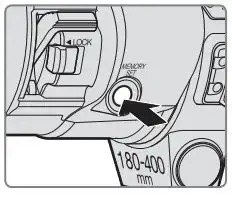
- Memory set button
- Security slot (for security cable lock)
- Lens hood screw
- Lens hood
Focus
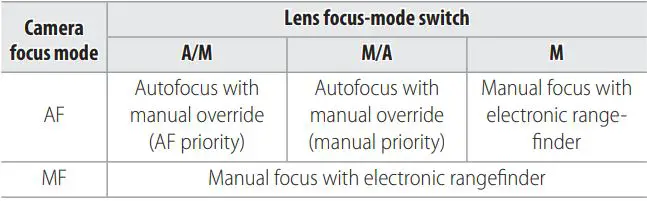
Supported focus modes are shown in the following table (for information on camera focus modes, see the camera manual).
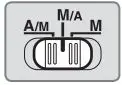
A/M and M/A Modes
- M/A (manual priority): Autofocus can be instantly over-ridden by rotating the lens focus ring.
- A/M (AF priority): As above, except that the focus ring must be rotated farther before autofocus is over-ridden. Choose this option to place greater dependence on autofocus.
Autofocus with Manual Override
To use manual focus in autofocus mode:
- Slide the lens focus-mode switch to A/M or M/A.
- Focus.
When the camera is in autofocus mode, autofocus can be over-ridden by rotating the lens focus ring while the shutter-release button is pressed halfway or an AF-ON button (either the AF-ON button on the camera, if any, or if the focus function selector is in the AF-ON position, a lens focus function button) is pressed. To refocus using autofocus, press the shutter-release button halfway or press the AF-ON button again.
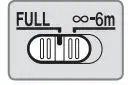
The Focus Limit Switch
This switch determines the focus distance limits for autofocus.
- FULL: Select this option to use the entire focus range.
- ∞–6m: If your subject will always be at distance of at least 6 m (19.7 ft), select this option for faster focusing.
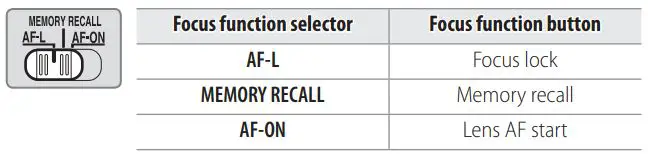
The Focus Function Buttons and Selector
The function assigned to the focus function buttons can be selected using the focus function selector.
 The assigned function can be performed by pressing any of the four function buttons. The focus buttons can be rotated to a new position; for more information, contact Nikon-authorized service personnel.
Focus Lock (AF-L)
When AF-L is selected with the focus function selector, focus will lock while a focus function button is pressed. Use focus lock to recompose shots after focusing or, if autofocus is unable to focus on the selected subject, after focusing on another object at the same distance.
- Slide the lens focus-mode switch to A/M or M/A.
- Slide the focus function selector to AF-L.
- Lock focus.
Focus can be locked by pressing any of the focus function buttons and remains locked while the button is pressed. Focus can also be locked using camera controls.
Memory Recall
Save and recall frequently-used lens focus positions. Before recalling a saved focus position, set the lens to the focal length in effect when the position was saved.
Saving Focus Positions
- Slide the beep on/off switch to ♪ .
- Focus.
- Press the memory set button.
This operation can be performed in any focus mode regardless of the position of the focus function selector. A beep will sound if the operation is successful. If the operation fails, the focus distance indicator will revolve back and forth some ten times and the lens will sound a short beep followed by three long beeps; focus and press the memory set button again. The stored distance is not deleted if the camera is turned off or the lens is detached.
Using Stored Focus Positions
- Slide the focus function selector to MEMORY RECALL.
- Recall the stored focus distance.
Press any of the focus function buttons to focus at the stored distance. The camera will refocus at the stored distance even when the shutter-release button is pressed halfway; normal focus is restored when the focus function button is released. Keep the focus function button pressed until the photograph is taken.
Note that if the current focal length differs from that selected when the focus position was saved, the focus position will differ slightly from the saved value (a warning beep will sound if the beep on/off switch is in the ♪ position). Special attention is required at focal lengths longer than that selected when the focus position was saved.
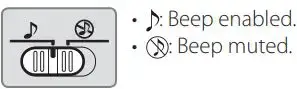
The Beep on/off Switch
The beep on/off switch can be used to enable or mute the beep that sounds during memory set and recall operations.
AF Start (AF-ON)
When the focus function selector is in the AF-ON position, you can press a lens focus function button to focus using autofocus.
- Slide the lens focus-mode switch to A/M or M/A.
- Slide the focus function selector to AF-ON.
- Focus.
Press any of the focus function buttons to focus using autofocus. You can also focus using camera controls.
Assigning Roles to the Focus Function Buttons
Before using camera controls to assign a role to the focus function buttons, slide the focus function selector to AF-L. For information on button assignment, see the camera manual.
Zoom
Before focusing, rotate the zoom ring to adjust the focal length and frame the photograph.
Focal Length
The focal lengths shown on the focal length scale are for a focus distance of infinity. The focal length changes as the focus distance shortens.
Depth of Field
Depth of field can be previewed using the camera’s depth-of-field preview feature.
The Focus Distance Indicator
Note that the focus distance indicator is intended only as a guide and may not accurately show the distance to the subject and may, due to depth of field or other factors, not show when the camera is focused on a distant object.
Aperture
Aperture is adjusted using camera controls. The frame rate may drop at some apertures.
Vibration Reduction (VR)
Vibration reduction (VR)
reduces blur caused by camera shake, allowing shutter speeds up to 4.0 stops (or, if the built-in teleconverter is used, 4.0 stops) slower than would otherwise be the case, increasing the range of shutter speeds available. The effects of VR on shutter speed are measured in NORMAL mode according to Camera and Imaging Products Association (CIPA) standards; FX-format lenses are measured using FX-format digital cameras, DX-format lenses using DX-format cameras. Zoom lenses are measured at maximum zoom.
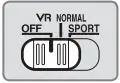
Using the Vibration Reduction Switch
- Select OFF to turn vibration reduction off.
- Select NORMAL for enhanced vibration reduction when photo graphing stationary subjects. Vibration reduction takes effect when the shutter-release button is pressed halfway.
- Select SPORT for photographing athletes and other subjects that are moving rapidly and unpredictably. Vibration reduction takes effect when the shutter-release button is pressed halfway.
Using Vibration Reduction: Notes
- When using vibration reduction, press the shutter-release button halfway and wait for the image in the viewfinder to stabilize before pressing the shutter release button the rest of the way down.
- When vibration reduction is active, the image in the viewfinder may jiggle after the shutter is released. This does not indicate a malfunction.
- SPORT is recommended for panning shots, although NORMAL is also supported.
- In NORMAL and SPORT modes, vibration reduction applies only to motion that is not part of a pan (if the camera is panned horizontally, for example, vibration reduction will be applied only to vertical shake).
- Do not turn the camera off or remove the lens while vibration reduction is in effect. If power to the lens is cut while vibration reduction is on, the lens may rattle when shaken. This is not a malfunction, and can be corrected by reattaching the lens and turning the camera on.
- If the camera is equipped with a built-in flash, vibration reduction will be disabled while the flash charges.
- NORMAL and SPORT vibration reduction can reduce blur when the camera is mounted on a tripod. OFF may however produce better results in some cases depending on the type of tripod and on shooting conditions.
- NORMAL and SPORT are recommended if the camera is mounted on a monopod.
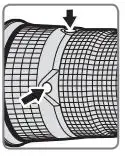
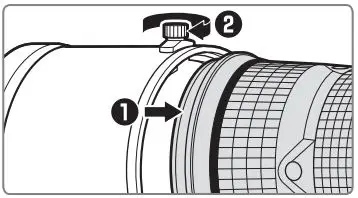
The Built-in Teleconverter
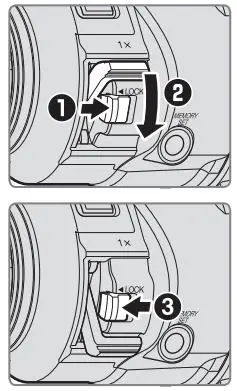
The built-in teleconverter increases focal length by 1.4× and can be used in movie mode and during viewfinder and live view photography. Before shooting, use the teleconverter switch to enable or disable the built-in teleconverter as described below.
- Unlock the teleconverter switch. Slide the teleconverter switch lock in the direction shown (1) to unlock the teleconverter switch.
- Slide the teleconverter switch to 1.4× (2).
- Lock the teleconverter switch. Slide the teleconverter switch lock in the direction shown (3) to lock the teleconverter switch.
To disable the built-in teleconverter, follow the steps above to set the teleconverter switch to 1×.
✓ The Teleconverter Switch Lock
After changing focal lengths, be sure to latch the teleconverter switch lock to prevent unintended operation of the teleconverter switch.
Using the Built-in Teleconverter: Notes
Do not use the teleconverter switch while the shutter is open, during autofocus, vibration reduction, movie recording, or while fine-tuning autofocus. Failure to observe this precaution could interfere with exposure or produce vegetating or other unintended results. Note that incorrect focal length data may be recorded with photographs taken with the built-in or an optional teleconverter.
Focus Position
- Using the teleconverter switch after focusing may cause the focus position to change. When shooting after using the teleconverter switch, be sure to refocus before releasing the shutter.
- The focus position will also change if you use the teleconverter switch after recalling a stored focus position (a warning beep will sound if the beep on/ off switch is in the ♪ position). Store the focus position after operating the teleconverter switch.
Lens Firmware Updates
Before updating the lens firmware, be sure the teleconverter switch is in the 1× position. Firmware cannot be updated with the switch in the 1.4× position. Do not operate the switch during firmware updates.
The Lens Hood
Lens hoods protect the lens and block stray light that would otherwise cause flare or ghosting.
Fully tighten the hood screw (2).
Vigentina may occur if the hood is not correctly attached. The hood can be reversed and mounted on the lens when not in use.
Using a Built-in Rotating Tripod Collar
Attach tripods to the lens tripod collar, not the camera. Note that your hand may come into contact with the tripod if you rotate the camera while holding it by the handgrip.
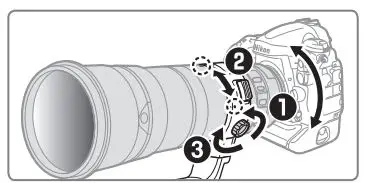
Repositioning the Camera
Loosen the tripod collar ring attachment screw (1), rotate the lens to match the camera orientation (2), and then tighten the screw (3).
The Security Slot
The security slot can be used to attach third-party security cable locks. For more information, see the documentation provided with the security cable lock.
Filters
When taking photographs with the slip-in filter holder, be sure a filter is inserted. The holder comes with a Neutral Color (NC) filter in place.
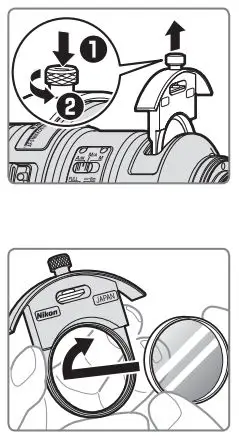
Inserting Filters
- Unlock the holder. Press the slip-in liter holder screw down and rotate counterclockwise until the white line is at a right angle to the axis of the lens.
- Remove the slip-in filter holder.
- Remove the supplied filter.
- Screw a 40.5 mm screw-on filter into the side of the holder marked “Nikon” and “JAPAN”. The holder can then be reinserted facing either the subject or camera.
Using an Optional Slip-in C-PL405 Circular Polarizing Filter
The C-PL405 blocks unwanted reflections from glass, water, and other nonmetallic surfaces. The slip-in filter holder is not required; when using the filter, be sure that it is securely attached and be aware that it is not dust- or splash-proof. Note that using a C-PL405 slightly increases the minimum focus distance and shifts the focus distance from that shown by the focus distance indicator. When using memory recall, be sure to attach the filter before storing the focus position.
Do not leave the C-PL405 for long periods in direct sunlight or in locations that are exposed to excessive humidity or high temperatures.
Lens Care
- The lens returns to maximum aperture when removed from the camera. To protect the interior of the lens, store it out of direct sunlight or replace the lens caps.
- Always support the lens when holding the camera. Failure to observe this precaution could damage the lens mount.
- Do not pick up or hold the lens or camera using only the lens hood.
- Keep the CPU contacts clean.
- Should the rubber lens-mount gasket be damaged, cease use immediately and take the lens to a Nikon-authorized service center for repair.
- Removing dust is normally sufficient to clean the glass surfaces of the lens.
- The fluorine-coated front element can be cleaned simply by wiping it with a dry cloth. Smudges and fingerprints can be removed using a soft, clean cotton cloth or lens cleaning tissue; clean from the center outwards using a circular motion, taking care not to leave smears or touch the glass surface with your fingers. To remove stubborn stains, wipe gently using a soft cloth dampened with a small amount of distilled water, ethanol, or lens cleaner. Drop-shaped stains on the water- and oil-repellent fluorine-coated element can be removed with a dry cloth.
- To remove smudges and fingerprints from the rear element or supplied Neutral Color (NC) filter, apply a small amount of ethanol or lens cleaner to a soft, clean cotton cloth or lens-cleaning tissue and clean from the center outwards using a circular motion, taking care not to leave smears or touch the glass with your fingers.
- Never use organic solvents such as paint thinner or benzene to clean the lens.
- Attach the rear and slip-on front caps before placing the lens in its lens case.
- If the lens will not be used for an extended period, store it in a cool, dry location to prevent mold and rust. Do not store in direct sunlight or with naphtha or camphor moth balls.
- Keep the lens dry. Rusting of the internal mechanism can cause irreparable damage.
- Leaving the lens in extremely hot locations could damage or warp parts made from reinforced plastic.
- Rapid changes in temperature may cause damaging condensation inside and outside the lens. Before taking the lens from a warm to a cold environment or vice versa, place it in its case or a plastic bag to slow the change in temperature.
- Creases will form if the supplied slip-on front cap is folded, but this does not prevent the cap from being used. · Nikon does not accept liability for damage to or theft of devices protected by security cables.
Supplied Accessories
- LC-K103 slip-on Front Lens Cap
- LF-4 Rear Lens Cap
- HK-41 Lens Hood
- Dedicated slip-in Filter Holder*
- 40.5 mm screw-on Neutral Color (NC) filter
- LN-2 Strap
- CL-L2 Lens Case
* Dedicated accessories are not available for general purchase. Contact a Nikon- authorized service representative for spares or replacements.
Compatible Accessories
- 40.5 mm screw-on filters
- C-PL405 slip-in circular polarizing filter
- AF-I/AF-S Teleconverters TC-14E 1 /TC-14E II 1 /TC-14E III 1 /TC-17E II 2 / TC-20E 2 /TC-20E II 2 /TC-20E III 2
- If the teleconverter switch is used to increase focal length by 1.4×, autofocus will be available only with cameras that offer f/8 support.
- Autofocus is not available when the teleconverter switch is used to increase focal length by 1.4×. Autofocus is available with cameras that offer f/8 support when the built-in teleconverter is not in use.
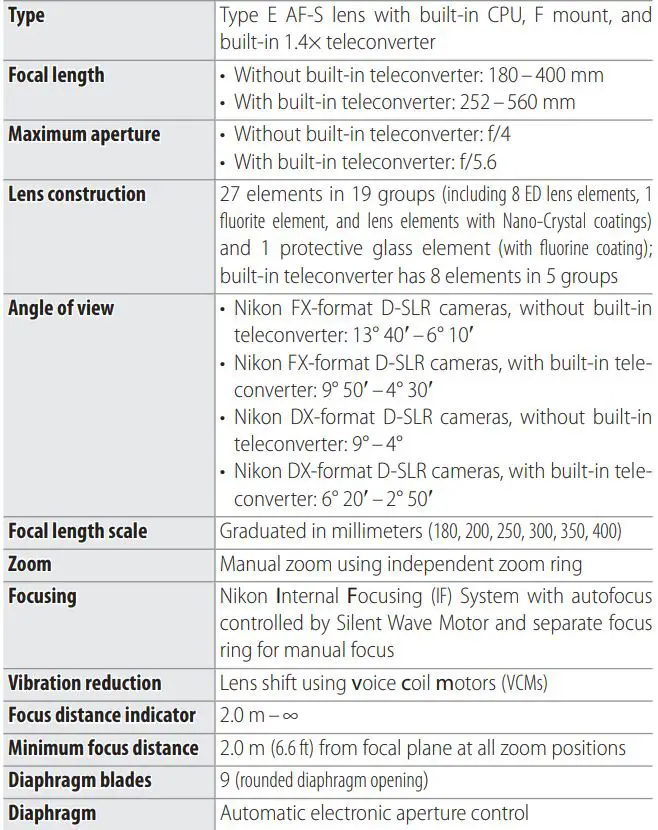
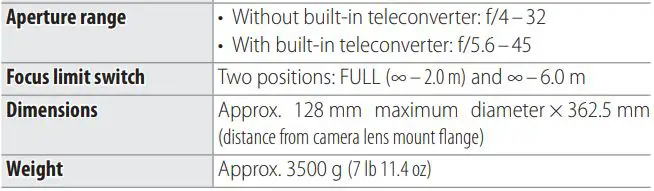
Specifications

Nikon reserves the right to change the appearance, specifications, and performance of this product at any time and without prior notice.
© 2017 Nikon Corporation