NINJA Specialty Coffee System User Guide
BEFORE YOUR FIRST BREW
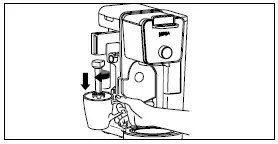
To prime your brewer:
- Plug it into an outlet and turn it on.
- Fill the water reservoir to the Full line with fresh water and place it on the base.
- Remove the Ninja Pod Adapter and slide the Sliding Lid into the closed position.
- Place the empty carafe under the brew basket and run a Full Carafe, Classic brew.
Once the brew is complete, discard the water and you’re ready to go.
If you live in a high-altitude area, running a calibration brew is required. Not running a high-altitude calibration brew in a high-altitude area will result in excessive steaming during brewing. Refer to page 7 of the Owner’s Guide for instructions on running a high-altitude calibration brew
HERE’S WHAT’S IN THE BOX
- NINJA DUALBREW
- NINJA POD ADAPTER
Comes fully installed in the brewer. Always ensure to insert it over the brew basket when brewing pods. - BREW BASKET
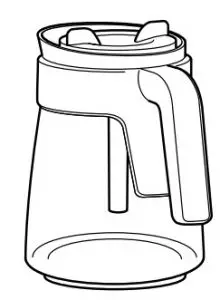
Comes fully installed in the brewer. It must always be inserted when brewing pods or grounds. - 60 OZ. GLASS CARAFE
- FROTHER WHISK
- 60 OZ. REMOVABLE WATER RESERVOIR

- NINJA SMART SCOOP™
Use this to measure coffee grounds. - PAPER FILTER KIT
Fold along the seams before inserting firmly in brew basket
FILLING THE WATER RESERVOIR
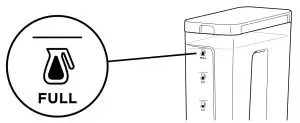
FILL TO THE FULL LINE
Fill up to, but do not exceed, the Full line.
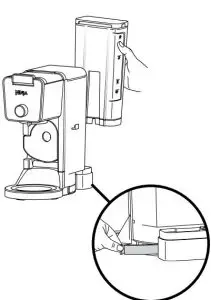
POSITIONING THE WATER RESERVOIR
The water reservoir can be positioned to the right or along the back of the brewer to optimize counter space
STEP 1.
Remove the reservoir from the base. Remove the removable latch from the back of the brewer.
STEP 2.

Swing the reservoir base around the brewer until it clicks into place. You may feel some resistance. Then, rotate the removable latch 180 degrees and reinsert it in the new gap where the base was previously positioned.
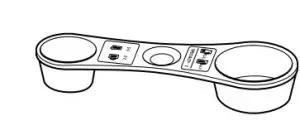
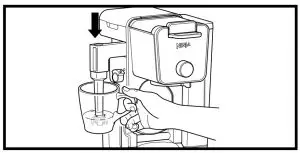
CUP, MUG, OR CARAFE
CUP
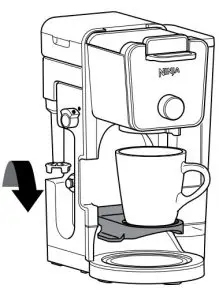
Pull down the cup platform to set a mug on it.
TRAVEL MUG & XL SIZES
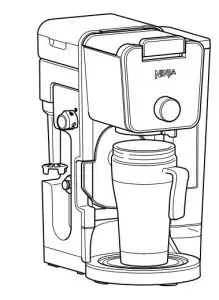
Place an XL Cup, Travel Mug, or XL Tumbler on the base of the brewer.
CARAFE
Place the carafe on the Intelligent Warming Plate.
The Intelligent Warming Plate will turn on only if brewing a carafe size on Classic or Rich brew.
WANT YOUR COFFEE TO STAY HOT LONGER?
The Intelligent Warming Plate will automatically turn on while brewing a Classic or Rich brew on any Carafe size and remain on for 2 hours. To adjust how long the Intelligent Warming Plate remains on (up to 4 hours), refer to the Owner’s Guide.
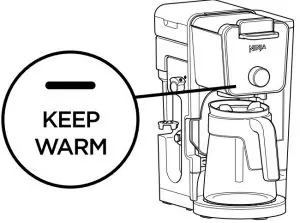
When the Intelligent Warming Plate is on, it can be turned off manually by pressing KEEP WARM.
It can be turned on manually by pressing KEEP WARM while a Classic or Rich brew and any Carafe size is selected.
IMPORTANT: The light on the base of the brewer will illuminate only when the warming plate is hot and will remain illuminated until the plate has cooled down.
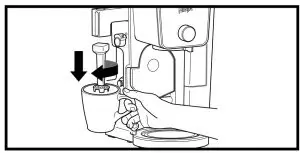
BREW BASKET AND NINJA POD ADAPTER ASSEMBLY
BREW BASKET MUST BE INSERTED WHEN USING GROUNDS OR PODS.
 GROUNDS
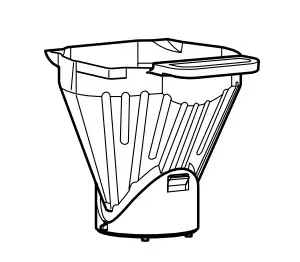
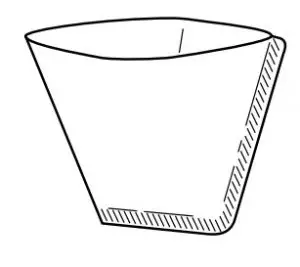
BREW BASKET
Must always be inserted when brewing pods or grounds.
INSERT FILTER
Fold the #4 paper cone filter along the seams, open the top fully, then insert filter firmly into the brew basket
 PODS
PODS
BREW BASKET
Must always be inserted when brewing pods or grounds. Do not insert a filter.
NINJA POD ADAPTER
Ensure adapter is in the REMOVE position before installing. Always insert over the brew basket when brewing pods
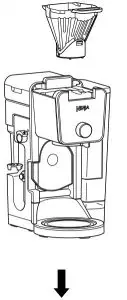
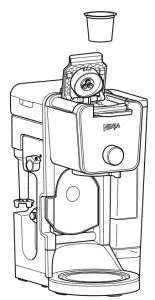
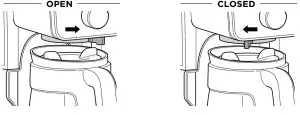
LOCKING AND REMOVING THE NINJA POD ADAPTER
The Ninja DualBrew Pro Coffee System comes with a unique Ninja Pod Adapter already installed on the brewer. Always ensure the adapter is installed over the brew basket.
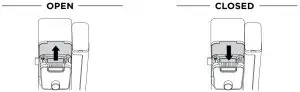
- Once the adapter is installed in the brewer, make sure the position indicator on the left side of the adapter is aligned with LOCK by pulling the handle toward you. Then, lift to open the handle, insert a pod, firmly push down on the handle to pierce the pod, and begin programming your brew
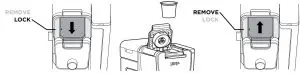
- To uninstall the adapter, remove the used pod and close the handle. Push the handle away from you so the position indicator is in the REMOVE position. Then, using the edges on the left and right, lift the adapter out of the brewer.
NOTE: The Ninja Pod Adapter is compatible only with K-Cup pods. It is not compatible with reusable K-Cup filters. If using ground coffee, use the Grounds mode with a paper or permanent filter (sold separately) to brew a single-serve size.
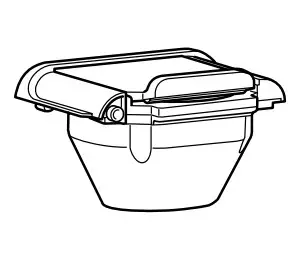
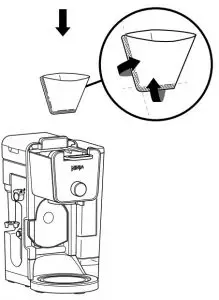
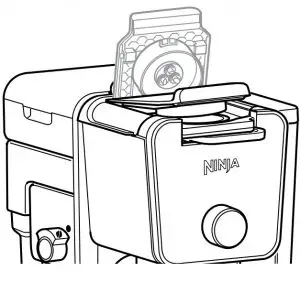
SLIDING LID
The sliding lid is used only when brewing loose coffee grounds. To use it, first remove the Ninja Pod Adapter.
Then, using the handle on top of the brewer, slide the lid toward you until it firmly clicks into place.
NINJA SMART SCOOP™
The Ninja Smart Scoop is used for accurately measuring coffee grounds. The numbers beside the icons show the number of level scoops recommended for each brew size
| SERVING SIZE | NINJA SMART SCOOP |
| GROUND COFFEE | |
 |
2–3 small scoops |
 |
3–5 small scoops |
 |
3–5 big scoops |
 |
4–7 big scoops |
| Specialty 4 oz. | 2 big scoops |
CHOOSE A METHOD
GROUNDS
Ensure the brew basket is installed and the Ninja Pod Adapter is removed. Then, insert a paper filter in the basket (refer to steps on pages 4 and 5)
Use the Ninja Smart Scoop™ to add your desired amount of coffee grounds (refer to the Smart Scoop section on page 5)
Slide the sliding lid forward, ensuring it is completely closed.
PODS
Ensure the brew basket and Ninja Pod Adapter are installed in the brewer (refer to steps on pages 4 and 5)
Lift adapter handle to reveal pod holder and insert a pod.
Firmly push down on the handle to pierce the pod. Some noise and resistance is normal.
HOT WATER
The water outlet is completely separate from the coffee outlet to ensure clean water is dispensed every time.
To enter hot water mode, turn the dial on the left side of the brewer to the water droplet icon, aligning it with the marker. You will see a change in the display.
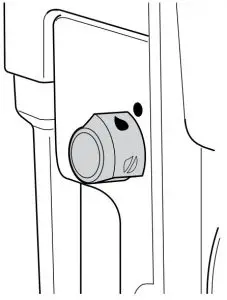
The hot water will dispense next to the coffee outlet.
IMPORTANT: Close the drip stop before brewing hot water to ensure no excessive coffee drips into the vessel (refer to the drip stop section on page 8).
CHOOSE A SIZE
GROUNDS
Approximate brew volumes based on Classic brew. Rich brew will produce slightly less output. Refer to the Approximate Brew Volumes chart in the Owner’s Guide for more information
 8 oz.
8 oz.
 10 oz.
 12 oz.
 15 oz.
 18 oz.
 28 oz.
 37 oz.
 46 oz.
 55 oz.
PODS
Pods cannot brew in carafe sizes.
Approximate brew volumes based on Classic brew. Rich brew will produce slightly less output. Refer to the Approximate Brew Volumes chart in the Owner’s Guide for more information.
 6 oz.
6 oz.
 8 oz.
8 oz.
 10 oz.
 12 oz.
HOT WATER
17 size options ranging from 2 oz. to 60 oz.
NOTE: Make sure to use a vessel that is big enough for the brew size you select.
CHOOSE A BREW
Smooth, wellbalanced flavor.

Specially designed to brew hot over ice for freshly brewed iced coffee that is not watered down.

Always fill your vessel to the top with ice cubes before brewing Over Ice.
NOTE: DO NOT use any glassware except the provided Ninja carafe, which is made of specialized glass that is safe to use.
Richer than classic, with more intense flavor that stands up to milk, cream, or flavoring.

A super-rich concentrate that allows you to make coffee-based drinks like cappuccinos and lattes. Will only brew 4 oz.

HOT WATER MODE ONLY

Two water temperatures for a variety of different foods and beverages.

BREW

Press the START BREW button to start brewing. There will be an illuminating progress bar on the display to track the status of your brew.
THE BREW MAY PAUSE ONCE OR MULTIPLE TIMES DURING THE BREW CYCLE.
THAT’S OK. Pausing allows the coffee grounds to fully extract and unlock the full flavor of the brew style
NOTE: Ensure the drip stop is open before starting your coffee brew
DRIP STOP
The drip stop is used to close off the brew basket to prevent any coffee from dispensing. You will need to manually open and close the drip stop by moving the handle to your desired position. The drip stop can be closed and reopened at any point before, during, or after a brew
CAN’T WAIT FOR THAT FIRST CUP?
Close the drip stop to pause the brew cycle, and pour yourself a cup. Then, reopen the drip stop to continue the brew
STOP THE DRIPS AFTER A BREW
At the end of a brew, close the drip stop to prevent coffee dripping from the brew basket and Ninja® Pod Adapter.
FROTHING
THE INTEGRATED FROTHER DOES NOT HEAT MILK.

- Add milk to your cup until it is about 1 ⁄3 full.
 For cold froth, go to Step 3.
 For hot froth, microwave for 45–60 seconds.
 - Swing the arm of the frother toward the front of the brewer. Install the frother whisk by twisting it to the right.
- Hold the cup under the frother and submerge the whisk just below the surface of the milk. Press and hold the button on top of the frother and froth for 30–45 seconds.
- Remove the frother whisk by twisting it to the left. Keep your cup below the whisk while you carry it to your sink or dishwasher for easy cleaning.
To avoid contact with steam and hot surfaces, DO NOT reach
across top of brewer to froth.
CAPPUCCINO-STYLE COFFEE
Brew: Specialty
Makes: 1 serving (12-ounce cup)
INGREDIENTS
2 Ninja Big Scoops (4 tablespoons) ground coffee 1 ⁄2 cup milk Sweetener, as desired Ground cinnamon, for garnish
DIRECTIONS
- Following the measurement provided, place the ground coffee into the filter.
- Pour milk into a 12-ounce mug. Microwave for 45–60 seconds, then froth for 30 seconds.
- Set the mug containing frothed milk in place to brew.
- Press the BREW STYLE button to select SPECIALTY, then press the START BREW button to begin the brew.
- When brew is complete, sweeten and garnish as desired.
ICED NUTTY COCOA LATTE
Brew: Specialty
Makes: 1 serving (18-ounce cup)
INGREDIENTS
2 Ninja Big Scoops (4 tablespoons) ground coffee 2 tablespoons chocolate syrup, plus more for garnish 1 tablespoon caramel syrup, plus more for garnish
2 cups ice 1 ⁄2 cup milk 1 tablespoon peanut butter
DIRECTIONS
- Following the measurement provided, place the ground coffee into the filter.
- Add chocolate syrup, caramel syrup, and ice to an 18-ounce cup and set in place to brew.
- Press the BREW STYLE button to select SPECIALTY, then press the START BREW button to begin the brew.
- While coffee is brewing, place milk and peanut butter in a large mug, stir to combine, then microwave for 45–60 seconds.
- When brew is complete, stir to combine.
- Froth milk mixture for 30 seconds, then gently pour over coffee. Garnish as desired.
GUIDE TO KEEPING COFFEE HOT
The type of cup you brew into can greatly influence the drinking temperature of your coffee. For a hotter cup, use the hot water mode on BOIL to conveniently pre-warm the cup.
| CERAMIC CUP | PAPER CUP | |||
| Cup Temperature | Room temperature | Pre-warmed with hot water | Pre-warmed in microwave with milk | Room temperature |
| Drinking Temperature | Hot |
Hotter |
Hotter |
Hottest |
| Why is there a difference? | A cold ceramic mug will steal heat from the coffee as it warms itself up. | If the mug is already warm, it will not steal as much heat from the coffee. | Just like your cold mug, cold milk lowers the temperature of your coffee. | Unlike a ceramic mug, a thinner paper cup
does not steal substantial heat from the coffee. |
NOTE: DO NOT put the carafe in the microwave
Costumer support
For questions or to register your product, contact us at
1-877-646-5288 or visit us online at ninjakitchen.com


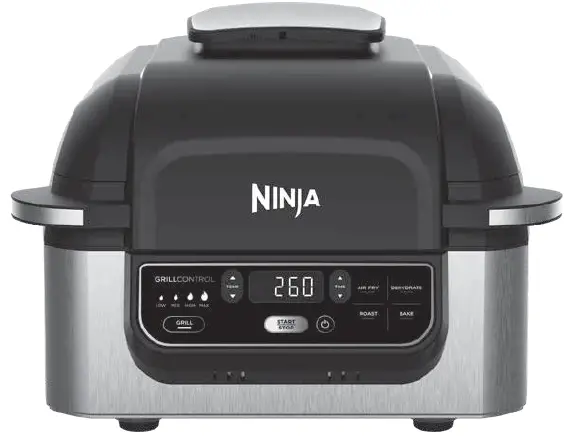
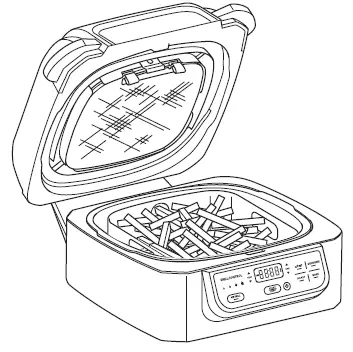
NINJA AG301EU Foodi 5-in-1 Indoor Grill with Air Fryer
Product Information
The product is the AG301EU, a kitchen appliance designed for grilling, air frying, roasting, baking, and dehydrating food. It has a wattage of 1760W and comes with several components including a ceramic grill plate, ceramic grill basket, ceramic coated pot, main unit, suction and exhaust valves, grease collector, kebab skewers, and a control panel.
Product Technical Specifications
- Voltage: 220-240V~, 50-60Hz
- Power: 1760W
Product Important Safety Instructions
Users should not plug the appliance into a socket located under a table surface, move the appliance while in use, or use it for deep frying. More safety instructions can be found in the user manual.
Product Usage Instructions
Before using the appliance, users should read the user manual to ensure they understand the safety instructions and proper usage of the product. The AG301EU can be used for grilling, air frying, roasting, baking, and dehydrating food. The control panel allows users to adjust the cooking time and temperature for each function. The appliance also comes with various components such as a ceramic grill plate and basket, kebab skewers, and a grease collector.
- To grill food, use the Grill function button on the control panel and adjust the cooking time as needed.
- To air fry food, use the Air Fry function button on the control panel and adjust the cooking time and temperature as needed.
- To roast food, use the Roast function button on the control panel and adjust the cooking time as needed.
- To bake food, use the Bake function button on the control panel and adjust the cooking time as needed.
- To dehydrate food, use the Dehydrate function button on the control panel and adjust the dehydrating time as needed.
After using the appliance, users should clean it according to the instructions in the user manual. Additionally, users can register their product for warranty benefits by following the instructions provided in the user manual.
REGISTER YOUR PURCHASE

- Scan QR code using mobile device
RECORD THIS INFORMATION
- Model Number: ___________________
- Serial Number: ____________________
- Date of Purchase: _________________
- (Keep receipt)
- Store of Purchase: _________________
TECHNICAL SPECIFICATIONS
- Voltage: 220-240V~ 50-60Hz
- Watts: 1760W
TIP: You can find the model and serial numbers on the QR code label located on the back of the unit by the power cord.
IMPORTANT SAFEGUARDS
Read all instructions before using your Ninja® Foodi® Grill. When using electrical appliances, basic safety precautions should always be followed, including the following:
WARNING
- Remove and discard the protective cover fitted on the power plug of this appliance.
- This appliance can be used by persons with reduced physical, sensory or mental capabilities or lack of experience and knowledge if they have been given supervision or instruction concerning use of the appliance in a safe way and understand the hazards involved.
- Keep the appliance and its cord out of reach of children. DO NOT allow the appliance to be used by children. Close supervision is necessary when used near children.
- This appliance is for household use only. DO NOT use this appliance for anything other than its intended use. DO NOT use in moving vehicles or boats. DO NOT use outdoors. Misuse may cause injury.
- Ensure the surface is level, clean and dry. DO NOT place the appliance near the edge of a worktop during operation.
- ALWAYS ensure the appliance is properly assembled before use.
- When using this appliance, provide at least 15.25 cm (6 inches) of space above and on all sides for air circulation.
- DO NOT use an extension cord. A short power-supply cord is used to reduce the risk of children grabbing the cord or becoming entangled and to reduce the risk of people tripping over a longer cord.
- To protect against electrical shock DO NOT immerse cord, plugs, or main unit housing in water or other liquid.
- DO NOT use the appliance if there is damage to the power cord or plug. Regularly inspect the appliance and power cord. If the appliance malfunctions or has been damaged in any way, immediately stop use and call Customer Service.
- NEVER use socket below worktop surface.
- NEVER connect this appliance to an external timer switch or separate remote-control system.
- DO NOT place appliance and let cord hang over edges of tables, counters or touch hot surfaces including on or near a hot gas or electric burner, or in a heated oven.
- Only use recommended accessories included with this appliance or authorized by SharkNinja. The use of accessories or attachments not recommended by SharkNinja may cause a risk of fire or injury.
- Before placing any accessory into the cooker, ensure they are clean and dry.
- DO NOT use the appliance without the removable cooking pot and splatter guard installed.
- ALWAYS ensure lid is fully closed before operating.
- DO NOT move the appliance when in use.
- DO NOT cover the air intake vent or air socket vent while unit is operating. Doing so will prevent even cooking and may damage the unit or cause it to overheat.
- DO NOT touch hot surfaces. Appliance surfaces are hot during and after operation. To prevent burns or personal injury, ALWAYS use protective hot pads or insulated oven gloves and use available handles and knobs.
- DO NOT touch accessories during or immediately after cooking. The grill plate and basket becomes extremely hot during the cooking process. Avoid physical contact while removing the accessory from the appliance. To prevent burns or personal injury ALWAYS use care when interfacing with product. Recommend use of long handed utensil and protective hot pads or insulated oven gloves.
- DO NOT use this appliance for deep-frying.
- To prevent possible illness, ALWAYS use a thermometer to check that your food is cooked to the recommended temperatures.
- Should a grease fire occur or the unit emits black smoke, unplug immediately. Wait for smoking to stop before removing any cooking accessories.
- Please refer to the Cleaning & Maintenance section for regular maintenance of the appliance.
- To disconnect, turn any control to “off”, then unplug from socket when not in use and before cleaning.
- Allow to cool before cleaning, disassembly, putting in or taking off parts and for storage.
- DO NOT clean with metal scouring pads. Pieces can break off the pad and touch electrical parts, creating a risk of electric shock.
- Cleaning and user maintenance shall not be made by children.
SYMBOLS
- Indicates to read and review instructions to understand operation and use of product.
- Indicates the presence of a hazard that can cause personal injury, death or substantial property damage if the warning included with this symbol is ignored.
- Take care to avoid contact with hot surface. Always use hand protection to avoid burns.
- For indoor and household use only.
SAVE THESE INSTRUCTIONS
PARTS

NOTE
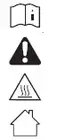
- To order additional parts and accessories, visit ninjakitchen.eu or contact Customer Service.
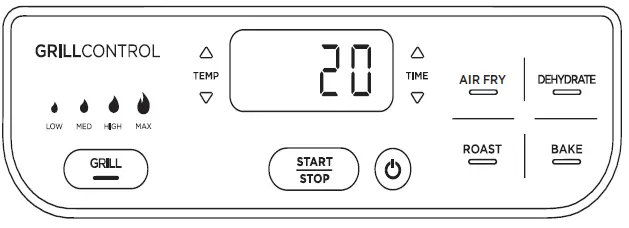
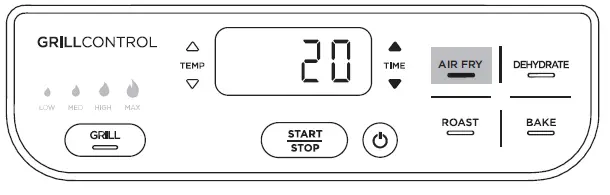
GETTING TO KNOW YOUR GRILL
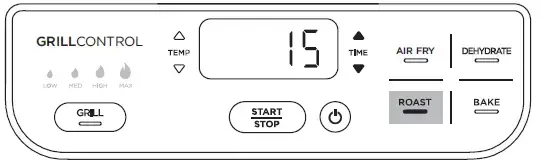
The control panel display shows time in an HH:MM format. The display to the left reads 20 minutes.
FUNCTION BUTTONS
- GRILL Sizzle and sear foods, with chargrilled lines and all round even cooking.
- AIR FRY For crispiness and crunch with little to no oil.
- ROAST Tenderise meats, roast vegetables, and more.
- BAKE Use to bake cakes, treats, desserts and more.
- DEHYDRATE Dehydrate meats, fruitsand vegetables for healthy homemade snacks.
OPERATING BUTTONS
- POWER button Once the unit is plugged in, press the power button
 to turn on the unit. Pressing it during cooking stops the current cooking function and turns off the unit.
 - TEMP arrows Use the up
 and down
 TEMP arrows to adjust the cooking temperature in any function. When using the Grill function, toggle the GRILL button or use the up and down arrows to adjust cooking temperature.
 - TIME arrows Use the up
 and down
 TIME arrows to adjust the cook time in any function.
NOTE: To adjust temperature or time during cooking, press the up and down arrows. The unit will then resume at those settings.
- START/STOP button
- After selecting temperature and time, press the START/STOP button to begin cooking.
- STANDBY MODE
- The unit will power off if cooking is not in process and there has been no interaction with the control panel for 10 minutes.
BEFORE FIRST USE
- Remove all packaging material, promotional labels and tape from the unit.
- Remove all accessories from the package and read this manual carefully. Please pay particular attention to operational instructions, warnings and important safeguards to avoid any injury or property damage.
- Wash the grill plate, splatter guard, crisper basket, cleaning brush and cooking pot in warm, soapy water, then rinse and dry thoroughly. The grill plate, splatter guard, crisper basket, cleaning brush and cooking pot are also dishwasher safe. NEVER clean the main unit in the dishwasher.
USING YOUR GRILL
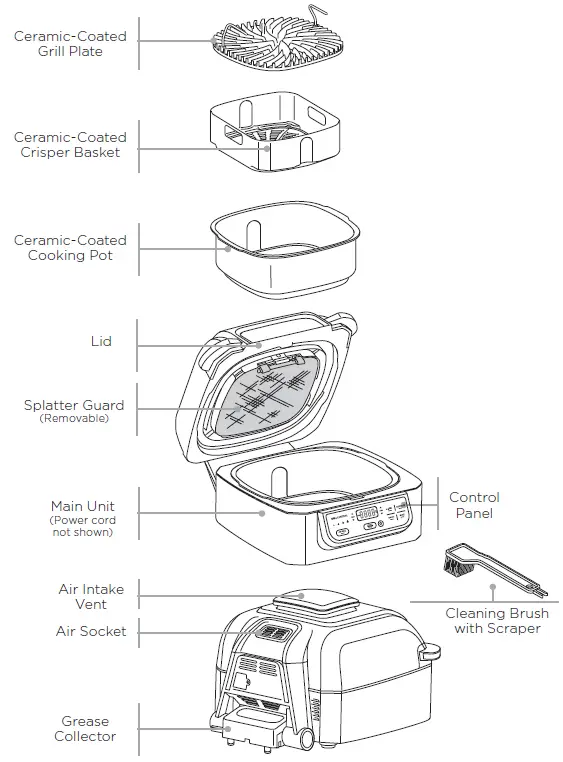
SPLATTER GUARD
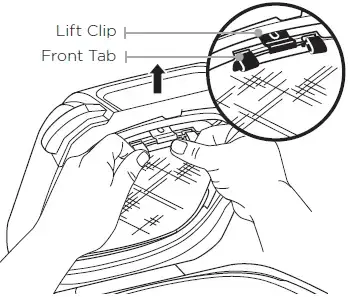
Located on the underside of the lid, the splatter guard keeps the heating element clean and prevents smoking. The splatter guard is removable for cleaning, but we recommend keeping it in place when cooking.
Removing the splatter guard

Remove the splatter guard for cleaning after every use. First allow the splatter guard to cool completely, then remove it by using your thumb to release the front clip by pushing the front clip upward and using your other hand to pull one of the tabs toward you. This will release the splatter guard, allowing you to pull it out of the slot along the back of the lid.
Installing the splatter guard

To install, gently push the splatter guard into the back of the lid. Insert the back tab on guard with the slot on the back of the lid. Then push the splatter guard upward until it clicks into the clip on the front of the lid.
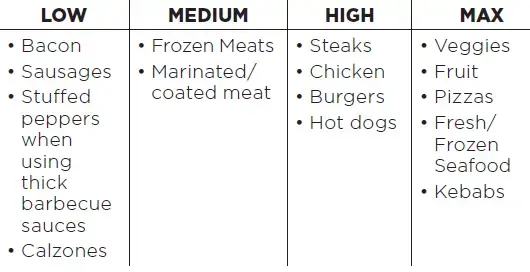
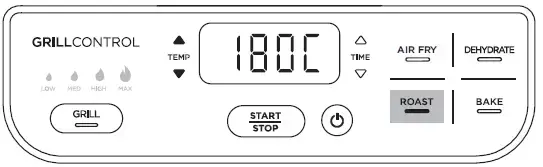
GRILLCONTROL TECHNOLOGY
Our technology allows you to control the temperature of the grill plate for precise cooking and keep smoke out of the kitchen. When using the Grill function, you will need to select the grill plate temperature setting. Below are recommended temperature levels for common ingredients.
NOTE
- The unit could create smoke during the cooking process. For less smoke, we recommend using vegetable oil, coconut, avocado or grapeseed instead of olive oil.
- The unit may produce smoke when cooking meats on a hotter setting than what is recommended. For more cooking charts, refer to your Inspiration Guide or visit ninjakitchen.eu.
Batch grilling
When grilling more than two consecutive batches of food, it is recommended that you empty the fat/oil from the removable cooking pot. This will help prevent grease from burning and causing smoke. We also recommend allowing the grill plate to heat back up for at least 3–5 minutes between batches to ensure consistent grill marks and cooking.
Switching to Grill after using another function
If the unit is already warm from using a different function, and the grill plate is at room temperature when you place it in the unit, “Add Food” may appear on the screen immediately. We recommend allowing the grill grate to heat up for at least 6 minutes before placing ingredients on it. As the unit continues to run and the grill grate heats up, “Add Food” will remain on the screen until you open the lid and place ingredients on the plate.
COOKING FUNCTIONS
Ensure the unit is plugged in before turning it on. Press the power button.
Grill
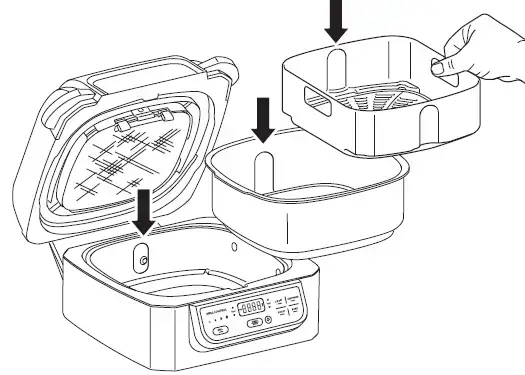
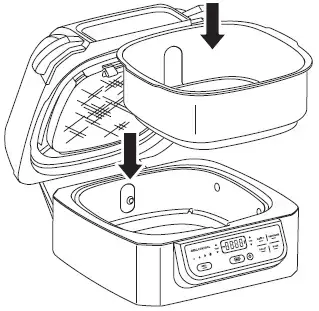
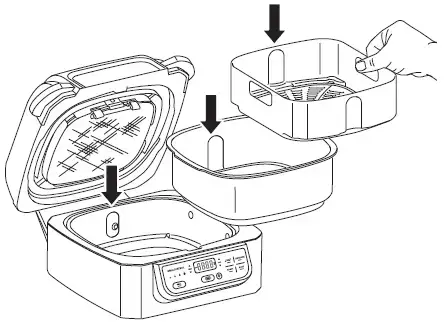
- Place the cooking pot in the unit with the indent on the pot aligned with the rear bump on the main unit. Then place the grill plate in the pot with the handles facing up. Ensure the splatter guard isin place and close the lid.

- Press the GRILL button. The default temperature level will illuminate on the left side of the control panel and the corresponding air temperature will appear on the display screen. Press the Grill button or the up and down TEMP arrows to adjust the temperature setting.
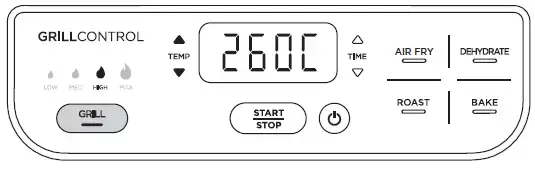
- Press the up and down TIME arrows to set the cooking time in one-minute increments, up to 30 minutes.
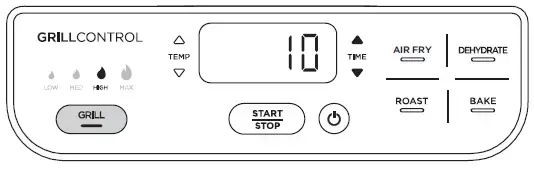
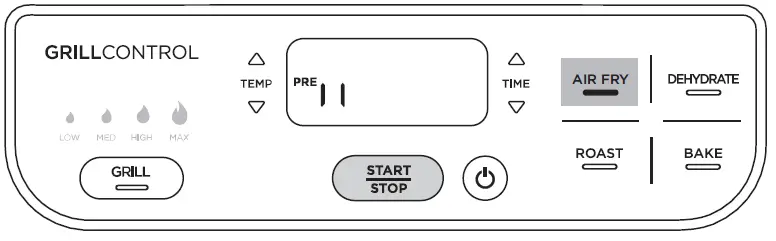
- Press the START/STOP button to begin preheating. PRE will appear on the display screen and the progress bar will begin. It can take about 8 minutes to preheat, depending on the selected temperature setting.
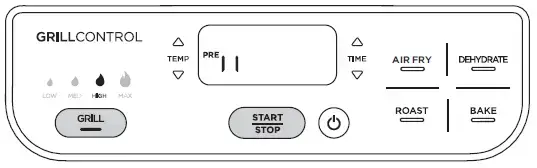
- When preheating is complete, the unit will beep and Add Food will flash across on the display screen.
- Open the lid and place ingredients on the grill plate. Once the lid is closed, cooking will begin and the timer will start counting down.
- NOTE: During cooking, you can open the lid to check on or flip your food. The timer will pause when the lid is opened and then automatically resume after it is closed.
- When cook time is complete, the unit will beep and END will appear on the display screen. Keep the lid open after removing your food so the unit will cool down more quickly. The stainless steel wrap on the exterior of the unit will be hot after cooking. If you need to cook your food longer, simply press the TIME up arrow to add more time, then press the START/STOP button.
- NOTE: If batch cooking, empty the oil from the removable cooking pot after every 2 batches. This will help prevent grease from burning and causing smoke.
Air Fry

- Place cooking pot in the unit with the indent on the pot aligned with the bump on the main unit. Place the crisper basket in the pot, then close the lid.
- Press the Air Fry button. The default temperature setting will display. Use the up and down TEMP arrows to adjust the temperature.
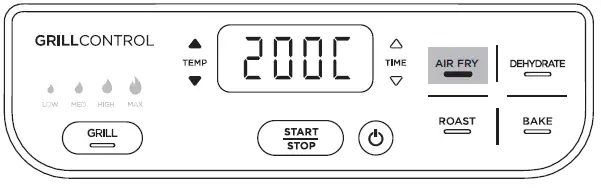
- Use the up and down TIME arrows to set the cook time in 1-minute increments up to 1 hour.
- Press the START/STOP button to begin preheating. PRE will appear on the display screenand the progress bar will begin. It can take up to 3 minutes to preheat, depending on the selected temperature setting.
- NOTE: While preheating is strongly recommended for best results, you can skip it by pressing the Air Fry button again. Add Food will flash across the screen. Open the lid and place ingredients in the crisper basket. Once the lid is closed cooking will begin and the timer will start counting down.Skip to step 7 for further instructions.
- NOTE: While preheating is strongly recommended for best results, you can skip it by pressing the Air Fry button again. Add Food will flash across the screen. Open the lid and place ingredients in the crisper basket. Once the lid is closed cooking will begin and the timer will start counting down.Skip to step 7 for further instructions.
- When preheating is complete, the unit will beep and Add Food will flash across on the display screen.
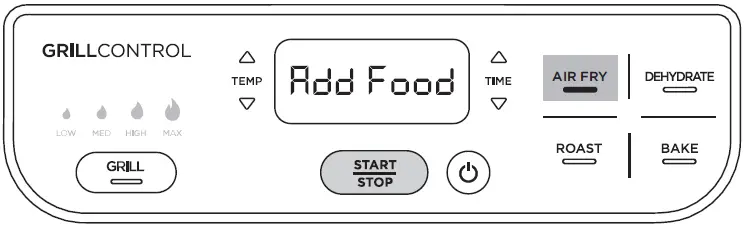
- Open the lid and place ingredients in the crisper basket. Once the lid is closed, cooking will begin and the timer will start counting down.
- For best results, we recommend shaking ingredients frequently. When you open the lid, the unit will pause. Use silicone tipped tongs when tossing your food or oven gloves to shake the basket. When done, replace the basket and close the lid. Cooking will automatically resume after lid is closed.
- When cook time is complete, the unit will beep and END will appear on the display screen. Keep the lid open after removing your food so the unit will cool down more quickly. The stainless steel wrap on the exterior of the unit will be hot after cooking. If you need to cook your food longer, simply press the TIME up arrow to add more time, then press the START/ STOP button.
Roast
- Place cooking pot in the unit with the indent on the pot aligned with the bump on the main unit, then close the lid.
- Press the ROAST button. The default temperature setting will display. Use the up and down TEMP arrows to adjust the temperature.
- NOTE: To convert conventional oven recipes, reduce the temperature by 10°C. Check food frequently to avoid overcooking.
- NOTE: To convert conventional oven recipes, reduce the temperature by 10°C. Check food frequently to avoid overcooking.
- Use the up and down TIME arrows to set the cook time, in 15-minute increments, up to 4 hours.
- Press the START/STOP button to begin preheating. PRE will appear on the display screen and the progress bar will begin. It can take up to 3 minutes to preheat, depending on the selected temperature setting.
- NOTE: While preheating is strongly recommended for best results, you can skip it by pressing the ROAST button again. Add Food will flash across the screen. Open the lid and place ingredients in the crisper basket. Once the lid is closed cooking will begin and the timer will start counting down.
- NOTE: While preheating is strongly recommended for best results, you can skip it by pressing the ROAST button again. Add Food will flash across the screen. Open the lid and place ingredients in the crisper basket. Once the lid is closed cooking will begin and the timer will start counting down.
- When preheating is complete, the unit will beep and Add Food will flash across on the display screen.
- Open the lid and place ingredients in the pot. Once the lid is closed, cooking will begin and the timer will start counting down.
- NOTE: During cooking, you can open the lid to check on your food. The timer will pause when the lid is opened and then automatically resume after it is closed.
- When cook time is complete, the unit will beep and END will appear on the display screen. Keep the lid open after removing your food so the unit will cool down more quickly. The stainless steel wrap on the exterior of the unit will be hot after cooking. If you need to cook your food longer, simply press the TIME up arrow to add more time, then press the START/ STOP button.
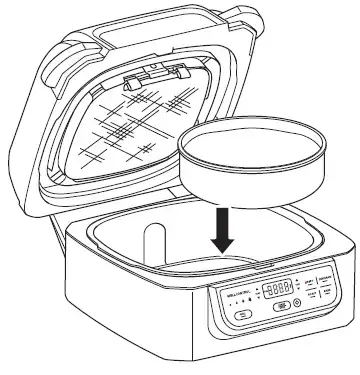
Bake
- Place cooking pot in the unit so the indent on the pot is aligned with the bump on the main unit, then close the lid.
- Press the BAKE button. The default temperature setting will display. Use the up and down TEMP arrows to adjust the temperature.
- NOTE: To convert conventional oven recipes, reduce the temperature by 10°C. Check food frequently to avoid overcooking.
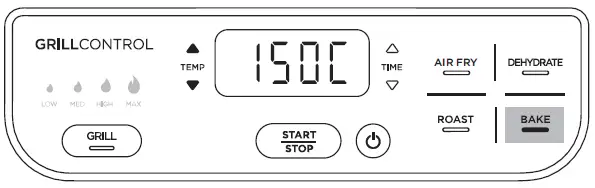
- NOTE: To convert conventional oven recipes, reduce the temperature by 10°C. Check food frequently to avoid overcooking.
- Use the up and down TIME arrows to set the cook time, in 15-minute increments, up to 4 hours.

- Press the START/STOP button to begin preheating. PRE will appear on the display screen and the progress bar will begin. It can take up to 3 minutes to preheat, depending on the selected temperature setting.
- NOTE: While preheating is strongly recommended for best results, you can skip it by pressing the BAKE button again. Add Food will flash across the screen. Open the lid and place ingredients in the crisper basket. Once the lid is closed cooking will begin and the timer will start counting down.
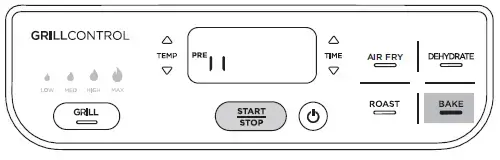
- NOTE: While preheating is strongly recommended for best results, you can skip it by pressing the BAKE button again. Add Food will flash across the screen. Open the lid and place ingredients in the crisper basket. Once the lid is closed cooking will begin and the timer will start counting down.
- When preheating is complete, the unit will beep and Add Food will flash across on the display screen.
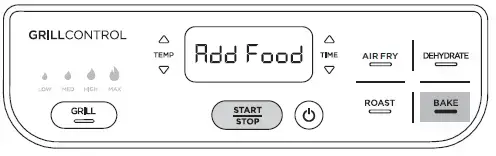
- Open the lid and add ingredients to the pot or set your bake pan directly in the bottom of the potand close the lid to start cooking. Once the lid is closed, cooking will begin and the timer will start counting down.
- NOTE: During cooking, you can open the lid to check on your food. The timer will pause when the lid is opened and then automatically resume after it is closed.
- When cook time is complete, the unit will beep and END will appear on the display screen. Keep the lid open after removing your food so the unit will cool down more quickly. The stainless steel wrap on the exterior of the unit will be hot after cooking. If you need to cook your food longer, simply press the TIME up arrow to add more time, then press the START/ STOP button.
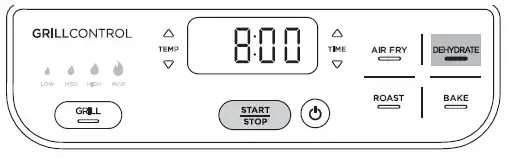
Dehydrate
- Place cooking pot in the unit with the indent on the pot aligned with the bump on the main unit, then add a single layer of ingredients to the bottom of the pot. Place the crisper basket in the pot and add a layer of ingredients to the bottom of the basket. Close the lid.
- Press the DEHYDRATE button. The default temperature setting will display. Use the up and down TEMP arrows to set your desired temperature.
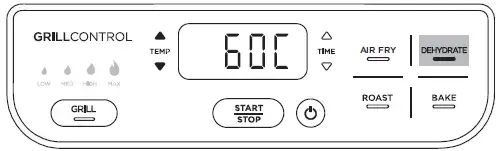
- Use the up and down TIME arrows to set the dehydration time, in 15-minute increments, up to 12 hours.
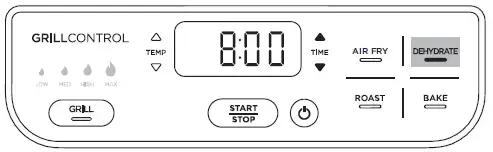
- Press the START/STOP button to begin. The unit does not need to preheat.
- NOTE: During dehydration, you can open the lid to check on your food. The timer will pause when the lid is opened and then automatically resume after it is closed.
- When dehydration time is complete, the unit will beep and END will appear on the display screen. Remove your food and close the lid.
CLEANING YOUR GRILL
The unit should be cleaned thoroughly after every use. Always let the appliance cool before cleaning.
- Unplug the unit from the wall socket before cleaning. Keep the lid open after removing your food so the unit will cool down more quickly.
- To clean the main unit and control panel, wipe them with a damp cloth.
- The cooking pot, grill plate, crisper basket, splatter guard, cleaning brush and any other additional Ninja grill accessories are dishwasher safe.
NOTE: NEVER use abrasive tools or cleaners. NEVER immerse the main unit in water or any other liquid.
- If hand-washing, use the cleaning brush to help wash the parts. Use the opposite end of the cleaning brush as a scraper to assist with releasing baked-on foods. Air-dry or towel-dry all parts after hand-washing.
- If food residue or grease are stuck on the grill plate, splatter guard, or any other removable part, place them in a sink or stack them in the pot and fill with warm, soapy water and allow to soak for a couple hours or overnight. After soaking, use the cleaning brush to clean each part.
- Over time, the splatter guard front tabs and frame may accumulate grease. Soaking the splatter guard overnight will help soften the baked-on grease. After soaking, use the cleaning brush to remove the grease from the stainless steel frame and front tabs.
TROUBLESHOOTING GUIDE
- “Add Food” appears on the control panel display.
- The unit has completed its preheating and it is now time to add your ingredients.
- “Shut Lid” appears on the control panel display.
- The lid is open and needs to be closed for the selected function to start.
- “Add Pot” appears on the control panel display.
- The pot is not installed in the unit.
- “E” appears on the control panel display.
- The unit is not functioning properly. You can find online support at ninjakitchen.eu.
- Why do blinking lights appear after I press the START/STOP button?
- This is a progress bar indicating how far along you are in the preheating cycle.
- Why does the preheat progress bar not start from the beginning?
- When the unit is warm from previously being used, it will not require the full preheating time.
- Should I add my ingredients before or after preheating?
- Let the unit preheat before adding ingredients.
- Why is my unit emitting smoke?
- When using the Grill function, always select the recommended temperature setting. Recommended settings can be found in the Quick Start Guide/ Inspiration Guide.
- Make sure the splatter guard is installed.
- How do I pause the unit so I can check my food?
- When the lid is opened during a cooking function, the unit will automatically pause.
- My food is burned.
- Do not add food until preheating is complete. For best results, check progress throughout cooking and remove food when desired level of brownness has been achieved.
- Remove food immediately after the cook time is complete to avoid overcooking.
- My food didn’t cook when Air Frying.
- For consistent browning, make sure ingredients are arranged in an even layer on the bottom of the crisper basket with no overlapping. Shake loose ingredients during cooking for consistent crispiness.
- Why is my food blowing around when Air Frying?
- Occasionally, the fan will blow lightweight foods around. To prevent this, secure loose food (like the top slice of bread on a sandwich) with cocktail sticks.
- Can I Air Fry fresh battered ingredients?
- Yes, but use the proper breading technique. It is important to coat foods first with flour, then with egg and then with bread crumbs. Be sure to press the bread crumbs onto the food so they stick in place. Loose breading may be blown off by the unit’s powerful fan.
- The control panel display is no longer illuminated.
- The unit is off. Press the power button to turn it back on.
- Can I cancel or override preheating?
- Preheating is highly recommended for best results. skip preheating by selecting the function again after you press the START/STOP button. However, you cannot override preheating when using the Grill function.
- How can I deep clean the splatter guard?
- The splatter guard should be cleaned after each use and is dishwasher safe. Over time, the splatter guard front tabs and frame may accumulate grease buildup. Soaking the splatter guard overnight will help soften the baked-on grease. After soaking, use the cleaning brush to remove the grease from the stainless steel frame and front tabs.
PRODUCT REGISTRATION
TWO (2) YEAR LIMITED GUARANTEE
When you buy a product in Europe as a consumer, you get the benefit of legal rights relating to the quality of the product (your “statutory rights”). You can enforce these statutory rights against your retailer. However, at Ninja we are so confident about the quality of our products (the “Products”) that we give you a manufacturer’s guarantee of two years. This guarantee only applies to the Product if it is bought in new and unused condition. These terms and conditions relate to our guarantees only – your statutory rights as a buyer are unaffected. Please note that the 2 year guarantee is available in all EU countries.
The conditions below describe the prerequisites and scope of our guarantees which are issued by SharkNinja Germany GmbH, c/o Regus Management GmbH, Excellent Business Center 10. + 11/ Stock, Westhafenplatz 1, 60327 Frankfurt am Main (Germany) (“us”, “our” or “we”). They do not affect your statutory rights or the obligations of your retailer and your contract with them. The same applies if you have purchased the product directly from Ninja.
Ninja® Guarantees
A household kitchen appliance constitutes a sizeable investment. Your new machine needs to work properly for as long as possible. The guarantee it comes with is an important consideration – and reflects how much confidence the manufacturer has in its product and manufacturing quality.
You’ll find online support at www.ninjakitchen.eu.
How do I register my guarantee?
You can register your guarantee online within 28 days of purchase. To save time, you’ll need the following information about your machine:
- Model no.
- Serial Number (only if available)
- Date of purchase of the Product (receipt or delivery note)
- To register online, please visit www.ninjakitchen.eu
IMPORTANT
- The guarantee covers your Product for 2 years starting on the date of purchase.
- Please keep the receipt at all times. Should you need to use your guarantee we will need the receipt to verify the information supplied to us is correct. The inability to produce a valid receipt will invalidate your guarantee.
What are the benefits of registering my guarantee?
- When you register your guarantee, you can choose to receive our newsletter containing tips, advice and competitions. Hear the latest news about new Ninja technology and launches. If you register your guarantee online, you’ll get instant confirmation that we’ve received your details.
- For details of our privacy policy please visit www.ninjakitchen.eu
How long are our Products guaranteed for?
- Our confidence in our design and quality control means that your Product is guaranteed for two years.
What is covered by the guarantee?
Repair or replacement (at Ninja’s discretion) of your Product, including all parts and labour in case of any defect in design, materials and workmanship (including transport and shipping costs). Our guarantee is in addition to your legal rights as a consumer.
What is not covered by the guarantee?
- Normal wear and tear.
- Accidental damage, faults caused by negligent use or care, misuse, neglect, careless operation or handling of the kitchen appliance which is not in accordance with the Ninja® Instruction Manual supplied with your machine.
- Use of the kitchen appliance for anything other than normal domestic household purposes.
- Use of parts not assembled or installed in accordance with the operating instructions.
- Use of parts and accessories which are not Ninja® Genuine Components.
- Faulty installation (except where installed by Ninja®).
- Repairs or alterations carried out by parties other than Ninja or its agents, unless you can show that the repairs or alterations carried out by others are not related to the defect for which you exercise the guarantee.
What happens when my guarantee runs out?
Ninja does not design products to last for a limited time. We do appreciate that there may be a desire for our customers to want to repair their kitchen appliances after the guarantee has elapsed. You’ll find more support at ninjakitchen.eu.
Where can I buy genuine Ninja spares and accessories?
- Ninja spares and accessories are developed by the same engineers who developed your
- Ninja kitchen appliance. You’ll find a full range of Ninja spares, replacement parts and accessories for all Ninja machines at www.ninjakitchen.eu
- Please remember that using non-Ninja spares may invalidate your manufacturer’s guarantee. However, your statutory rights are unaffected.
This marking indicates this product should not be disposed of with other household wastes throughout the EU. To prevent possible harm to the environment or human health from uncontrolled waste disposal, recycle it responsibly to promote the sustainable reuse of material sources. To return your used device, please use the return and collection systems or contact the retailer where this product was purchased. They can take this product for environmentally safe recycling.
SharkNinja Europe Limited
- 3150 Century Way, Thorpe Park, Leeds, LS15 8ZB, UK
- ninjakitchen.eu
Illustrations may differ from actual products. We are constantly striving to improve our products, therefore the specifications contained herein are subject to change without notice. FOODI and NINJA are registered trademarks of SharkNinja Operating LLC.
© 2022 SharkNinja Operating LLC.
PRINTED IN CHINA
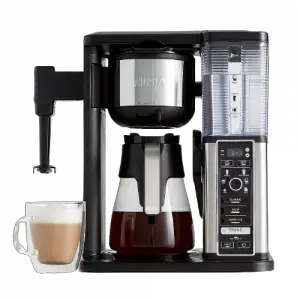
NINJA CFP300 Dual Brew Pro SPECIALTY COFFEE SYSTEM
NINJA CFP300 Dual Brew Pro SPECIALTY COFFEE SYSTEM
THANK YOU for purchasing the Ninja® DualBrew Pro Coffee System
REGISTER YOUR PURCHASE registeryourninja.com 1-877-646-5288 Scan QR code using mobile device. RECORD THIS INFORMATION Model Number: Serial Number: Date of Purchase: (Keep receipt) Store of Purchase
TIP: You can find the model and serial numbers on the QR code label located on the back of the unit by the power cord.
THIS BOOK COVERS MODEL NUMBER: CFP300, CFP301, CFP305
TECHNICAL SPECIFICATIONS
- Voltage: 120V~, 60Hz
- Power: CFP300, CFP301: 1550W
- CFP305: 1500W
- Water Reservoir Capacity: 60 oz.
PLEASE READ CAREFULLY AND KEEP FOR FUTURE REFERENCE
These instructions are designed to help you get a complete understanding of your new DualBrew Pro Coffee System.
If you have any questions, please call our Customer Service line at 1-877-646-5288.
IMPORTANT SAFEGUARDS
READ ALL INSTRUCTIONS BEFORE USE
HOUSEHOLD USE ONLY
Read all instructions before using your NINJA DUAL BREW PRO COFFEE SYSTEM
When using electrical appliances, basic safety precautions should always be followed, including the following:
WARNING
To reduce the risk of fire, electric shock, serious injury, death, or damage when using this appliance, follow these basic safety precautions.
General Precautions
- To eliminate a choking hazard for young children, discard all packaging materials immediately upon unpacking.
- This appliance can be used by persons with reduced physical, sensory or mental capabilities or lack of experience and knowledge if they have been given supervision or instruction concerning use of the appliance in a safe way and understand the hazards involved.
- To reduce the risk of electric shock, this appliance has a polarized plug (one blade is wider than the other). As a safety feature, this plug will fit into a polarized outlet only one way. If the plug does not fit fully into the outlet, reverse the plug. If it still does not fit, contact a qualified electrician. DO NOT force into outlet or try to modify to fit.
- Keep the appliance and its cord out of reach of children. DO NOT allow the appliance to play or be used by children. Close supervision is necessary when used near children.
- To protect against fire, electric shock, and injury to persons, DO NOT immerse cord, plugs, or body of machine in water or other liquid.
- NEVER carry the appliance by the power cord or pull it to disconnect from electrical socket; instead grasp the plug and pull to disconnect.
- DO NOT operate any appliance with a damaged cord or plug, or after the appliance malfunctions, or has been dropped or damaged in any manner. Contact SharkNinja Operating LLC for service.
- For household and countertop use only. DO NOT let the power cord hang over the edge or touch hot surfaces such as the stove.
- NEVER use socket below counter.
- To avoid risk of fire, electrical shock, or damage to the brewer, DO NOT use brewer in an appliance garage or under a wall cabinet.
- To disconnect when not in use and before cleaning, turn off and then unplug from outlet.
- Turn off and allow to cool before putting on or taking off parts, and before cleaning the appliance.
Operating Notice - The use of an accessory not recommended by the manufacturer may create an overflow condition and scalding hazard, or result in fire, electric shock, or personal injury.
- ALWAYS use appliance on a clean, dry, level surface.
- DO NOT place on or near a hot gas or electric burner or in a heated oven.
- DO NOT use this appliance for anything other than its intended use.
- DO NOT use outdoors.
- DO NOT touch hot surfaces. Use handles or knobs.
- To avoid contact with steam and hot surfaces, DO NOT reach across top of brewer to froth.
- ALWAYS place a vessel, carafe or cup beneath the brew basket to receive the brewed coffee.
- DO NOT open brew chambers during brew cycle and cleaning cycle. Scalding may occur.
- DO NOT remove the vessel, carafe or cup while the appliance is running without the Drip Stop in the closed position. Return the vessel, carafe or cup quickly and open the Drip Stop to continue the brew.
- DO NOT fill water reservoir with anything other than water, as other liquids may damage your brewer.
- DO NOT overfill the water reservoir. Fill water only to the Full line.
23 Keep lid on water reservoir when brewing.
24 DO NOT run the appliance without water.
25 DO NOT brew ground coffee without a #4 paper cone filter or a permanent filter installed in the brew basket.
26 Exceeding maximum Coffee Measurement Chart capacity may cause overflow. DO NOT use fine or espresso ground coffee. Ninja® Pod Adapter
27 DO NOT put fingers inside Ninja Pod Adapter. There are three sharp needles that puncture the pod top and one needle that punctures the pod bottom.
28 Only use capsules/pods intended for this appliance. If the capsule/pod does not fit, do not force it into the appliance. Carafe
29 The carafe is designed for use with this appliance only. DO NOT place carafe on or near a hot gas or electrical burner, or in a heated oven.
30 DO NOT use a cracked or scratched carafe or a carafe that has a loose or weakened handle.
31 DO NOT place carafe in microwave.
32 DO NOT drink directly from the carafe. Liquid from the carafe may be very hot.
33 DO NOT use the carafe to store food when not in use.
34 Ensure the carafe is completely empty before starting a cleaning or brewing cycle. Starting a cycle with water, coffee, or tea in the carafe will cause an overflow.
35 DO NOT clean carafe with abrasive cleaners, steel wool pads, or other abrasive materials.
36 DO NOT set a hot carafe on a wet or cold surface.
37 DO NOT expose carafe to extreme temperature changes.
Care & Maintenance
38 Allow the appliance to cool before removing any parts and before cleaning.
39 To prevent illness from bacterial growth in the appliance, follow all cleaning instructions in the Care & Maintenance section of this Owner’s Guide.
40 Clean the system on a weekly basis.
41 If the product is not operating properly, visit ninjakitchen.com or contact SharkNinja Operating LLC for examination, repair, or adjustment.
42 Cleaning and user maintenance shall not be made by children. Cord Statement
43 A short power-supply cord is provided to reduce the risks resulting from becoming entangled in or tripping over a longer cord.
44 DO NOT use extension cords with this product.
WARNING
Risk of fire or electric shock Do not remove bottom cover.
Indicates to read and review instructions to understand operation and use of product.
Indicates the presence of a hazard that can cause personal injury, death or substantial property damage if the warning included with this symbol is ignored. Take care to avoid contact with hot surface. Always use hand protection to avoid burns.
For indoor and household use only.
READ AND SAVE THESE INSTRUCTIONS
ninjakitchen.com 3
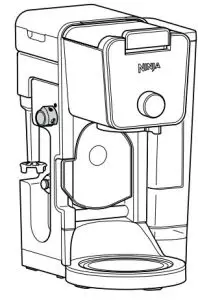
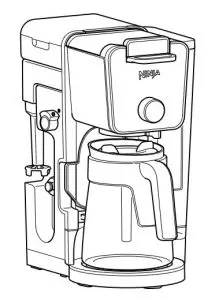
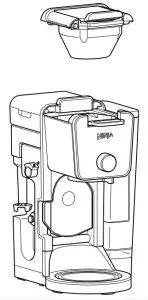
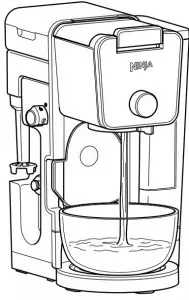
PARTS
A Brewer (Power cord not shown)
B 60 oz. Removable Water Reservoir
C Removable Water Reservoir Lid
D Sliding Lid
E Hinged Hood
F Configurable Water Reservoir Base
G Single-Serve Cup Platform
H Control Panel
I Brew Basket
J Hot Water Dial (Not available on all models)
K Ninja® Pod Adapter
L Frother Whisk
M Brew-Through Lid
N Ninja Glass Carafe (Not available on all models)
O Ninja Smart ScoopTM
P Intelligent Warming Plate (Not available on all models)
Q Configurable Water Reservoir Latch (Back of brewer, not shown)
R Ninja Thermal Carafe (Not available on all models)
S Drip Stop
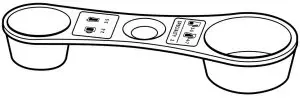
USING THE CONTROL PANEL
- Delay Brew Button
- Water Temperature Button
- Keep Warm Indicator
- Keep Warm Button (Orange)
- Programmable Digital Clock and Ounce Display
- Power Button
- Drip Stop Indicator
- Smart Sensing Mode Indicators
- Multi-Serve Dial and Start/Stop Button
- Brew Style Button
- Intelligent Clean Cycle Indicator (Orange)
- Intelligent Clean Cycle Button
- Hour/Minute Button
Not all functions are available on all models.
SMART SENSING MODE INDICATORS
| MODE INDICATORS | STATE |
|
Grounds: The Sliding Lid is slid all the way forward over the brew basket until it is completely closed and the brewer is ready to brew grounds. |
|
Pods: The Ninja® Pod Adapter is inserted, locked, and shut, and the brewer is ready to brew pods. |
|
Water: The dial on the left side of the brewer is turned to the water droplet icon, and the brewer is ready to dispense hot water (not available on all models). |
|
No State: One of the above criteria has not been met. |
PREPARING FOR USE
- When the brewer is first plugged in, HR/MIN will illuminate to indicate that the time has not been set.
- Press the HR/MIN button to set the clock.
- Use the Multi-Serve Dial to select the correct hour. Then, press the START BREW
button to toggle to minutes. - Use the dial again to select the correct minute, and press the START BREW button
to set the clock at the displayed time. NOTE: At any time, you can set the clock by turning on the brewer, pressing the HR/MIN button, and following steps 34.
NOTE: If you unplug the brewer or in the event of a power loss, you will need to reset the clock the next time the brewer is plugged in.
HIGH-ALTITUDE CALIBRATION BREW
Required for users in high-altitude areas. Not running the high-altitude calibration brew in a high-altitude area will result in excessive steaming during brewing. Because water boils at a lower temperature at higher altitudes, running a calibration cycle before your first brew allows the brewer to detect the boiling point of water at your location. Running a calibration cycle will help deliver a consistent brew each time.
- Fill the water reservoir up to, but not exceeding, the Full line.
- Insert the brew basket and slide the sliding lid closed, then place an empty carafe on the base.
- Press and hold both BREW STYLE and HR/MIN until you hear a confirmation sound.
- A calibration cycle will begin, and the display will count down until the Altitude
calibration is complete. When complete, the brewer will beep and display “End” on the dial. Discard the water in the carafe.
NOTE: This calibration is permanently saved and will not be lost if power is lost or brewer is unplugged. Brewer can be recalibrated at any time if the altitude where it is being used changes.
ninjakitchen.com 7
PRIMING YOUR NINJA® DUALBREW PRO COFFEE SYSTEM
- Clean all accessories before your first brew.
- Plug the brewer in and turn it on by pressing the power button.
- Lift the water reservoir off of its base. Remove the reservoir lid. Add water up to, but not exceeding the Full line. Return the water reservoir to the brewer. DO NOT fill the water reservoir with anything other than water, as other liquids may damage your brewer.
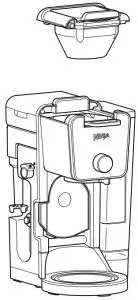
NOTE: We recommend using cool or room temperature water in the reservoir. DO NOT fill with hot or boiling water. - Remove the Ninja Pod Adapter by pushing the handle away from you so that the position indicator is in the REMOVE position. Then, using the handles on the left and right, lift the adapter out of the brewer.
- After the adapter is removed, slide the sliding lid all the way forward over the brew basket until it is completely closed and clicks into place.
NOTE: DO NOT place ground coffee directly in the brew basket without a filter. - Center the carafe with the brew-through lid installed below the brew basket. With everything securely in place and the brewer powered on, turn the dial to select the Full Carafe size and press the BREW STYLE button to select Classic.
- To start, press the START BREW button. When the cycle is complete, discard the water and rinse the carafe. You are now ready to use your Ninja DualBrew Pro Coffee System.
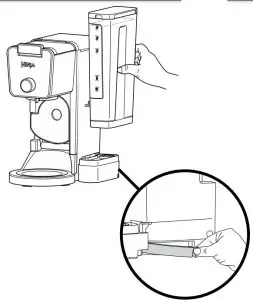
CONFIGURING THE WATER RESERVOIR
The water reservoir can be positioned to the right or along the back of the brewer to optimize counter space. To configure the water reservoir:
1 Remove the reservoir from the base.
2 Remove the water reservoir latch.
3 Swing the reservoir base around the brewer until it clicks into place. You may feel some resistance.
NOTE: Make sure the power cord is not in the way of the reservoir base.
4 Rotate the water reservoir latch 180 degrees and re-insert it in the new gap where the base was previously positioned.
5 Place the water reservoir back on the base.
USING THE NINJA® DUALBREW PRO COFFEE SYSTEM CONT.
BREW VOLUMES AND MEASUREMENTS Each size and brew style produces a different amount of coffee to optimize strength and flavor.
NOTE: The coffee grounds will absorb some of the water that is brewed; this will cause slight variability in brew volumes.
NOTE: Brew volumes may be slightly larger or smaller than what is stated due to various factors in the system.
APPROXIMATE BREW VOLUMES
| GROUNDS | |||
| Size | Classic | Rich | Over Ice (filled with ice) |
| Sm Cup | 8 oz. | 7 oz. | 8 oz. |
| Cup | 10 oz. | 8oz. | 10 oz. |
| XL Cup | 12 oz. | 10 oz. | 12 oz. |
| Travel | 15 oz. | 12 oz. | 14 oz. |
| XL Travel | 18 oz. | 16 oz. | 18 oz. |
| 1/4 Carafe | 28 oz. | 26 oz. | 28 oz. |
| 1/2 Carafe | 37 oz. | 33 oz. | 35 oz. |
| 3/4 Carafe | 46 oz. | 41 oz. | 45 oz. |
| Full Carafe |
55 oz. | 47 oz. | 55 oz. |
NOTE: There may be some water left in the reservoir after your brew. This is normal to keep the brewer from running out of water.
| PODS | |||
| Size | Classic | Rich | Over Ice (filled with ice) |
| 6 oz. | 6 oz. | 6 oz. | 6 oz. |
| 8 oz. | 8 oz. | 8 oz. | 8 oz. |
| 10 oz. | 10 oz. | 9 oz. | 10 oz. |
| 12 oz. | 12 oz. | 11 oz. | 12 oz. |
NOTE: You do not need to adjust the size for Specialty Brew–it always yields approximately 4 oz.
MEASURING YOUR COFFEE GROUNDS
For best results, use the measurements on the Ninja Smart ScoopTM or in the chart to determine how much ground coffee to use for each brew size. The amount of ground coffee for each size will remain the same for any brew type you select. For example, if you select Cup and Classic, you will use the same amount of coffee grounds as if you were to select Cup and Over Ice.
NOTE: Adjust to your preferred taste. More scoops result in stronger coffee but slightly lower volumes, fewer scoops result in weaker coffee and slightly higher volumes. Use fewer scoops of decaffeinated coffee to prevent overflow. Use a medium-sized grind if grinding whole beans. Grinding beans too finely may cause the brew basket to overflow.
| COFFEE MEASUREMENT CHART | ||
| Serving Size | Ninja Smart Scoop |
Tablespoons |
| Sm Cup | 2–3 small scoops |
2–3 tablespoons |
| Cup | ||
| Xl Cup | ||
| Travel | 3–5 small scoops |
3–5 tablespoons |
| Xl Travel | ||
| 1/4 Carafe | 3–5 big scoops |
6–10 tablespoons |
| 1/2 Carafe | ||
| 3/4 Carafe | 4–7 big scoops |
8–14 tablespoons |
| Full Carafe | ||
| Specialty (4 oz.) |
2 big scoops |
4 tablespoons |
USING THE NINJA® DUALBREW PRO COFFEE SYSTEM CONT.
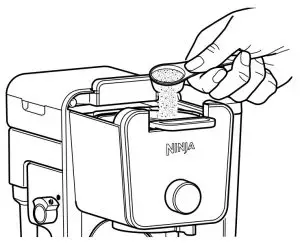
BREWING GROUND COFFEE
USING THE BREW BASKET AND SLIDING LID
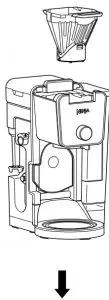
1 To prepare for brewing, open the sliding lid by sliding it back under the hood and ensure the brew basket is installed.
2 Place a #4 paper cone filter or permanent filter (not included on all models, sold separately) in the brew basket.
3 Use the Ninja Smart ScoopTM and follow the measurements on the scoop or on the Coffee Measurement Chart to fill the filter.
4 Return the sliding lid to its closed position by sliding it forwards over the brew basket until it clicks into place.
NOTE: Fold the paper filter along the seams, open the top fully, and firmly press it into the brew basket, making sure it is fully seated.
5 Press the handle down firmly to pierce the pod, and ensure that it is completely closed. There will be an audible click and some resistance when closing the handle as the needles puncture the pod.
BREWING PODS
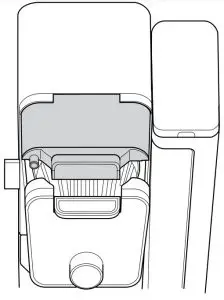
USING THE NINJA POD ADAPTER
1 To prepare for brewing, open the sliding lid by sliding it back under the hood, and ensure the brew basket is installed.
NOTE: The Ninja Pod Adapter comes already installed in the brewer.
2 Ensure the adapter is in the REMOVE position before installing. Then place the adapter over the brew basket and push down firmly so it is fully seated.
NOTE: Make sure the brew basket is clean and free of any filters before inserting the Ninja® Pod Adapter.
3 Slide the Ninja Pod Adapter handle into the LOCK position.
4 Lift the the Ninja Pod Adapter handle to reveal the pod holder. Place a new pod in the holder.
5 Press the handle down firmly to pierce the pod, and ensure that it is completely closed. There will be an audible click and some resistance when closing the handle as the needles puncture the pod.
NOTE: DO NOT remove the top of the K-Cup Pod.
HIGH-ALTITUDE BREWING: Before closing the Ninja Pod Adapter handle to start a brew, Using your fingers, carefully apply pressure on the K-Cup Pod until the bottom of the K-Cup Pod is punctured by the exit needle, and the pod is fully seated in the pod holder. This releases excessive gas built up from the high altitude and prevents pod blowout.
NOTE: Reusable K-Cup Coffee Filters are not compatible with the Ninja Pod Adapter. If using ground coffee, use the grounds mode with a paper or permanent filter (sold separately) to brew a single-serve size.
USING THE NINJA® DUALBREW PRO COFFEE SYSTEM CONT.
BREW STYLES
CLASSIC BREW & RICH BREW
- Use the Multi-Serve dial to select the brew size. Place the empty vessel under the brew basket.
NOTE: If making a single cup, lower the Single-Serve Cup Platform and set your vessel in the center of it to help prevent splashing. This applies to all brew styles. - Press the BREW STYLE button to choose either Classic Brew or Rich Brew.
- Press the START BREW button on the dial to start the brew. To cancel the brew at any time, press the START BREW button on the dial again or press the Power button.
NOTE: The brewing cycle will begin, then pause for a short period before resuming. This process is used to evenly saturate the coffee grounds. This applies to all brew styles. - The brewer will beep to signal the brew has started. The progress bar around the dial will illuminate to indicate the status of the brew. When the brew is finished, the machine will beep again and End will appear on the display.
NOTE: Rich Brew will use slightly less water and yield slightly less brewed coffee than Classic Brew. See Approximate Brew Volume chart for additional information.
OVER ICE BREW
- Fill your desired vessel to the top with ice cubes and place the vessel below the brew basket. Use the Multi-Serve dial to select the brew size.
NOTE: DO NOT add ice to the water reservoir. - Press the BREW STYLE button to choose Over Ice Brew.
- Press the START BREW button on the dial to start the brew. To cancel the brew at any time, press the START BREW button on the dial again or press the Power button.
- The brewer will beep to signal the brew has started. The progress bar around the dial will illuminate to indicate the status of the brew. When the brew is finished, the machine will beep again and End will appear on the display.
NOTE: DO NOT use any glassware except the provided Ninja glass carafe, which is safe to use due to its specialized glass material.
NOTE: Over Ice brew is designed to produce a concentrated brew into a vessel filled with ice. It is normal for some ice in the vessel to melt as the coffee is brewed, and this will produce a cold beverage with the ideal strength and flavor.
SPECIALTY BREW
- Press the BREW STYLE button to choose Specialty. Place the empty vessel you would like to brew into under the brew basket.
NOTE: If brewing an ice blended drink, fill the desired vessel with the amount of ice recommended in the recipe before brewing. - Press the START BREW button on the dial to start the brew. To cancel the brew at any time, press the START BREW button on the dial again or press the Power button.
- The brewer will beep to signal the brew has started. The progress bar around the dial will illuminate to indicate the status of the brew. When the brew is finished, the machine will beep again and End will appear on the display.
NOTE: Specialty brew always yields approximately 4 oz. of coffee.
INTELLIGENT WARMING PLATE
The Intelligent Warming Plate will automatically turn on during Classic or Rich brews when a 1/4, 1/2, 3/4, or full carafe size is selected. The Intelligent Warming Plate is set to a specific temperature setpoint to avoid burning the coffee over time. To turn the warming plate on at any time, turn the dial to one of the carafe sizes, select Classic or Rich, and press the KEEP WARM button.
IMPORTANT: The light on the base of the brewer will illuminate only when the warming plate is hot and will remain illuminated until the plate has cooled down.
TIME ADJUSTMENT
You can adjust how long the Intelligent Warming Plate remains on (up to 4 hours).
By default, the Intelligent Warming Plate is set to remain on for 2 hours. To change the time setting of your warming plate, follow these instructions:
- Press and hold KEEP WARM until the clock begins to flash the current warming time.
- Turn the dial to increase the time in 15 minute increments up to 4 hours or decrease the time to 0 hours. Press START BREW on the dial to set the new time.
NOTE: If you set the warming time to 0 hours, Keep Warm will not automatically activate during or after a carafe brew cycle, but you can still turn it on manually by pressing the KEEP WARM button.
NOTE: The time adjustment setting will be saved and will not reset when the brewer is unplugged or loses power.
NOTE: Thermal carafe (CFP305) does not include a warming plate because of the thermal carafe’s vacuum insulation.
SETTING THE DELAY BREW
- Plug the brewer in and turn it on by pressing the Power button.
NOTE: The clock will remain on even if the brewer is turned off. Ensure the brewer is powered on to set Delay Brew. - After filling the water reservoir and adding ground coffee to the filter or inserting a pod in the Ninja Pod Adapter, close the sliding lid or adapter handle, and place the appropriate-size vessel under the brew basket.
- Press DELAY. DELAY will illuminate and the clock will begin to flash “12:00” or the last time that was set.
- While the clock is flashing, turn the Multi-Serve dial to adjust the hour. The AM or PM indicator will illuminate under the clock display as you are setting the desired time. Press START BREW on the dial and turn the Multi-Serve dial to adjust the minute. Press START BREW on the dial to lock in your time.
- Once the desired time has been set, select the size of the vessel that you would like to brew using the MultiServe dial.
- Press the BREW STLYE button to choose your brew style. If in hot water mode, press WATER TEMP to choose your water temperature.
- Once the time, brew size, and brew style have been set, press the START BREW button to activate. When activated, the brewer will beep and DELAY and your selected options will remain illuminated. To cancel, press DELAY again.
NOTE: The brewer must remain on for the Delay Brew function to work. DO NOT power off or unplug after setting Delay Brew. If the brewer is turned off or unplugged, delay brew will need to be reset.
USING THE DRIP STOP
The drip stop is used to close off the brew basket to prevent any coffee from dispensing. You will need to manually open and close the drip stop by moving the lever to your desired position. It can be closed and reopened at any point before, during, or after a brew.
If you forget to open the Drip Stop, the brewer will pause the brew, and after 30 seconds it will give you a friendly audible reminder. After 5 minutes, the brew will be canceled.
NOTE: If the Drip Stop is closed before you begin a brew, the brewer will notify you with 3 beeps and the Drip Stop indicator will illuminate. Move the Drip Stop to the open position and press the START BREW button to begin your brew.
CLOSING THE DRIP STOP AFTER A BREW
When the brew cycle is complete, set the Drip Stop to the closed position to stop dripping from the brew basket and Ninja Pod Adapter. While the Drip Stop is closed, the Drip Stop indicator will illuminate.
NOTE: Remember to open the Drip Stop when you are ready to brew again. If you forget, your brewer will give you a friendly audible reminder.
DISPENSING HOT WATER
The Ninja DualBrew Pro System has a separate water line completely independent of the line used for brewing coffee. This ensures you get clean water every time with no coffee crosscontamination.
1 To switch to Hot Water Mode, turn the dial on the left side of the brewer to the water droplet icon. You should notice a change on the control panel.
NOTE: If the display is flashing the water droplet icon, make sure the dial is turned completely to one side.
2 Use the Multi-Serve Dial to choose one of 17 sizes between 2 oz. and 60 oz.
3 Press Water Temp to adjust the temperature of the water from BOIL to HOT.
4 Press START BREW on the dial to start the brew.
NOTE: When dispensing hot water, use a vessel that is suitable for high temperatures.
WATER TEMP|EXAMPLES OF USES
Boil – Instant Oatmeal, Instant Mac & Cheese, Instant Soup, Tea
Hot – Hot Cocoa, Hot Water and Lemon
NOTE: The water will cool down once dispensed into vessel.18 1-877-646-5288
Volume 2 oz. 4 oz. 6 oz. 8 oz. 10 oz. 12 oz. 14 oz. 16 oz. 18 oz. 20 oz. 22 oz. 24 oz. 28 oz. 32 oz. 40 oz. 50 oz. 60 oz.
Not all functions are available on all models.
INTEGRATED FROTHER
The Integrated Frother does not heat milk.
1 Add milk to your cup until it is about 1/3 full.
· For cold froth, go to Step 2. · For hot froth, microwave for 4560 seconds.
NOTE: Frother does not heat liquid.
2 Swing the arm of the frother toward the front of the brewer. Install the frother whisk by twisting it to the right.
3 Hold the cup under the frother and submerge the whisk just below the surface of the milk. Press and hold the button on top of the frother and froth for 3045 seconds.
4 Remove the frother whisk by twisting it to the left. Keep your cup below the whisk while you carry it to your sink or dishwasher for easy cleaning.
WARNING: To avoid contact with steam and hot surfaces. DO NOT reach across top of brewer to froth.
CLEANING & MAINTENANCE
CLEANING AFTER A BREW
1 After the brewer has cooled, remove the brew basket. If using pods, remove the Ninja Pod Adapter and brew basket. Wash the used parts thoroughly with soap and warm water.
2 Clean the frother whisk after each use. Hand-wash thoroughly or place on top rack of dishwasher.
3 Wash the carafe and brew-through lid with soap and warm water. Use a bottle brush or cloth to wash the inside of the carafe. DO NOT use a wire brush.
NOTE: For best results, we recommend rinsing the reservoir after brewing and refilling with fresh water for the next brew.
CLEANING THE NINJA POD ADAPTER
Open the handle to reveal the needles and pod holder and hand-wash with warm, soapy water. Take care when cleaning around the needles. Then, close the handle and slide it back into the REMOVE position before reinstalling.
NOTE: DO NOT place the Ninja Pod Adapter in the dishwasher.
CLEANING & DESCALING YOUR BREWING SYSTEM
NOTE: The glass carafe, brew-through lid, permanent filter, brew basket, water reservoir, water reservoir lid, frother whisk, and Ninja Smart ScoopTM are all dishwasher safe.
CLEANING THE WATER RESERVOIR
Empty the reservoir and hand-wash or place in dishwasher. For a better clean, we recommend placing it in the bottom rack of the dishwasher standing upright with the opening facing downward. We recommend doing this weekly.
CLEANING THE CARAFE
We recommend cleaning your carafe after each use with warm, soapy water.
To clean the carafe more thoroughly, we recommend using a soft foam brush. DO NOT use a wire brush.
CLEANING THE SLIDING LID
Open the hinged hood on top of the brewer by pulling up on the left side. Once opened, slide the sliding lid out of the back of the brewer to remove it. Hand-wash the sliding lid with warm, soapy water. Slide the sliding lid back into its tracks and close the hinged hood.
NOTE: DO NOT place the sliding lid in the dishwasher.
Your Ninja DualBrew coffee maker offers multiple modes to choose from, which include Grounds, Pods, and Hot Water (not available on all models). Each mode that you use will eventually need to be cleaned with a clean cycle.
The clean cycle is used for descaling the brewer when calcium scale buildup is affecting the performance of the brewer and/or the flavor of your coffee. The Intelligent Clean Cycle Indicator will automatically illuminate orange when a cleaning cycle is recommended for your brewer. If the indicator is ignored, your brewer may stop mid-brew and display “CLn,” indicating it needs immediate cleaning on the current mode.
NOTE: The clean cycle takes approximately 75 minutes.
20 1-877-646-5288
CHOOSING WHICH MODE TO CLEAN
When the Intelligent Clean Cycle Indicator turns on for the first time, run a clean cycle on the mode you use most. For example, if you primarily brew with grounds, run the clean cycle on the Grounds mode with the Sliding Lid closed. If you primarily use pods, ensure the Ninja® Pod Adapter is installed, and run the clean cycle through the Ninja Pod Adapter. If Hot Water mode is used at all, run an additional clean cycle in Hot Water mode.
The next time the Intelligent Clean Cycle Indicator illuminates orange, run a clean cycle on the remaining way to brew coffee. For example, if you ran a clean cycle on the Grounds mode first, run a clean cycle on the Pods mode next.
NOTE: If the display ever reads “CLn,” it indicates heavy scale buildup on that mode. Run a clean cycle on the current mode.
To clean and descale your Ninja DualBrew Pro Coffee System:
1 Place the empty carafe beneath the brew basket.
2 Use a descaling solution specifically formulated for coffeemaker cleaning and follow the directions on the package. Fill the water reservoir up to, but not exceeding, the Full line.
OR
Fill the water reservoir to the Travel Mug line (16 oz.) with white vinegar, then fill the rest of the reservoir with water up to, but not exceeding, the Full line.
IMPORTANT: Only use white vinegar.
NOTE: Running a water-only clean cycle will not descale the brewer properly.
3 Once the water reservoir is filled with your cleaning solution and water mixture, press the CLEAN button then press the START BREW button to confirm and begin the cleaning cycle.
NOTE: To cancel the clean cycle, press the Power button or CLEAN button once. The brewer will beep and stop brewing through the cleaning mixture. Continue to follow the instructions starting at Step 6.
IMPORTANT: If you cancel the clean cycle, your brewer will not be properly descaled.
4 The clock will display and count down the remaining clean cycle time, which takes approximately 75 minutes to complete. Your brewer will deliver a small amount of cleaning solution to distribute it through the system. It will then pause, deliver additional cleaning solution, and repeat this process for 75 minutes. The extended pauses allow for maximum cleaning and descaling.
IMPORTANT: DO NOT remove the carafe at any time during the clean cycle.
5 Upon completion, the brewer will beep, the clock will display End, and the Intelligent Clean Cycle Indicator will turn off.
6 Empty the contents of the carafe and place it back under the brew basket. Clean the water reservoir with warm, soapy water to remove any cleaning solution that could affect the flavor of your coffee.
7 Fill the reservoir with fresh water up to, but not exceeding, the Full line.
8 Flush the system by running a water-only cycle. If cleaning the Grounds mode, run a Full Carafe Classic brew cycle. If cleaning the Pods mode, run a 12 oz. Classic brew. If cleaning the Hot Water mode, run a Full Carafe on BOIL. Rerun a water-only cycle if taste persists. After the cycle is complete, discard the water and thoroughly clean the carafe and brew basket.
NOTE: Hard water will cause scale buildup faster than soft water and the brewer will indicate it needs cleaning more often.
ninjakitchen.com 21
TROUBLESHOOTING GUIDE
There’s sediment in my coffee.
- If using a permanent filter, this may be due to using finely ground coffee.
- To reduce the amount of sediment in the brewed coffee, use a slightly coarser grind or
use a paper filter.
NOTE: DO NOT use a paper filter in conjunction with a permanent filter, as water and/or coffee can back up and clog the filter basket. Over Ice Brew is not cold. - Ensure your cup, travel mug, or carafe is filled all the way to the top with ice cubes
before brewing. Brewer will brew at elevated temperatures to lock in the best flavor, then the ice will cool the brewed coffee to the perfect temperature. Coffee is too weak. - For stronger coffee, use the Rich brew setting. For an even bolder flavor, you can add more coffee grounds to the filter. Coffee is too strong.
- For milder coffee, use the Classic brew setting. For an even milder flavor, use fewer coffee grounds in the filter. Brew cycle is too slow.
- The brew time will vary based on size and brew style. Full carafe sizes and Rich brews will take longer to brew than single-serve and classic brews. The progress bar on the control panel will indicate brew status. Cup or travel mug overflowed.
- Refer to the Approximate Brew Volumes chart on page 10. Brew basket overflowed.
- The bottom of the brew basket may be clogged. This can happen with finely ground coffee or too many coffee grounds in the filter. Medium-grind coffee is recommended.
- Using both the permanent filter and a paper filter can cause grounds to clog and water to back up in the brew basket. Use only the permanent filter or a paper filter.
- Decaf coffee grounds absorb water differently, so use fewer scoops when using decaf. There is water left in the reservoir.
- When the reservoir is filled to a specific size and then that size is brewed, there will be some water left in the reservoir. This is normal to ensure the reservoir does not run dry for the best performance of the pump and brew system. Brewer is leaking.
- After removing the water reservoir, there may be a small amount of water in the reservoir valve. This can be easily removed with a dry cloth.
- If the leak is coming from above the brew basket, refer to “Brew basket overflowed.” above.
- If the leaking is coming from below the brew basket, close the drip stop. Refer to page 17 for more information.
- If the leak is coming from the bottom of the brewer, call Customer Service at 1-877-646-5288. Intelligent Clean Cycle Indicator is illuminating orange.
- Run a clean cycle. If you have recently completed a clean cycle, you may need to run another cycle to remove additional mineral buildup that occurs naturally over time and is common in hard-water areas. Make sure you are using vinegar or a descaling solution and follow the cleaning instructions on pages 20 and 21.
Brewer is not detecting the Ninja® Pod Adapter.
- Ensure the adapter is fully seated in place over the brew basket with the handle closed.
Pull the handle toward you until it clicks into the LOCK position. Refer to page 12-13 for more information. - Ensure the Hot Water Dial is turned completely to the coffee bean icon. Coffee is splattering.
- Some splatter is normal. Use the cup tray when possible to reduce the distance between the cup and the coffee outlet.
- Ensure the Ninja Pod adapter is installed over the brew basket when brewing pods. Brewer is not displaying sizes or styles to brew.
- Ensure the sliding lid is fully closed or the Ninja Pod Adapter handle is closed and in the LOCK position. Ensure the Hot Water Dial is turned completely to either the coffee bean or water droplet icon. Refer to pages 12-13 and 18 for more information. Water reservoir is unstable.
- Ensure the Configurable Water Reservoir Latch is installed securely. Ensure the water reservoir is properly installed on the hook on the side or back of the brewer and pressed down firmly into the water reservoir base. CLOCK DISPLAY MESSAGES: End
- The brew cycle is complete. Add Wtr
- The system does not have enough water in the reservoir to complete your brew. Add fresh water to the reservoir and then press the START BREW button to resume.
- If the reservoir is filled with water, remove and reseat the reservoir. If the issue persists, contact Customer Service at 1-877-646-5288. CLn
- The system has detected that a clean cycle needs be run immediately to remove calcium scale buildup in the heater. See `Cleaning & Descaling Your Brewing System’ for instructions. STOP · A brew cycle was cancelled. ERROR MESSAGES: Er · If the clock displays “Er” and then a number (ex. “Er 03”), contact Customer Service at 1-877-646-5288.
REPLACEMENT PARTS
To order additional parts and accessories, visit ninjaaccessories.com or contact Customer Service at 1-877-646-5288.
ninjakitchen.com 23
PRODUCT REGISTRATION
Please visit registeryourninja.com or call 1-877-646-5288 to register your new Ninja® product within ten (10) days of purchase. You will be asked to provide the store name, date of purchase, and model number along with your name and address.
The registration will enable us to contact you in the unlikely event of a product safety notification. By registering, you acknowledge you have read and understood the instructions for use and warnings set forth in the accompanying instructions.
ONE (1) YEAR LIMITED WARRANTY
The One (1) Year Limited Warranty applies to purchases made from authorized retailers of SharkNinja Operating LLC. Warranty coverage applies to the original owner and to the original product only and is not transferable.
SharkNinja warrants that the unit shall be free from defects in material and workmanship for a period of one (1) year from the date of purchase when it is used under normal household conditions and maintained according to the requirements outlined in the Owner’s Guide, subject to the following conditions and exclusions:
What is covered by this warranty? 1. The original unit and/or non-wearable components deemed defective, in SharkNinja’s sole
discretion, will be repaired or replaced up to one (1) year from the original purchase date.
2. In the event a replacement unit is issued, the warranty coverage ends six (6) months following the receipt date of the replacement unit or the remainder of the existing warranty, whichever is later. SharkNinja reserves the right to replace the unit with one of equal or greater value.
What is not covered by this warranty?
- Normal wear and tear of wearable parts (including brew basket, permanent filter, frother whisk, carafe and brew-through lid, water reservoir and lid, Ninja Smart ScoopTM, Sliding Lid, and Ninja® Pod Adapter), which require regular maintenance and/or replacement to ensure the proper functioning of your unit, are not covered by this warranty. Replacement parts are available for purchase at ninjaaccessories.com.
- Any unit that has been tampered with or used for commercial purposes
- Damage caused by misuse, abuse, negligent handling, failure to perform required maintenance, or damage due to mishandling in transit.
- Consequential and incidental damages.
- Defects caused by repair persons not authorized by SharkNinja. These defects include damages caused in the process of shipping, altering, or repairing the SharkNinja product (or any of its parts) when the repair is performed by a repair person not authorized by SharkNinja.
- Products purchased, used, or operated outside North America.
How to get service If your appliance fails to operate properly while in use under normal household conditions within the warranty period, visit ninjakitchen.com for product care and maintenance self-help. Our Customer Service Specialists are also available at 1-877-646-5288 to assist with product support and warranty service options, including the possibility of upgrading to our VIP warranty service options for select product categories. - SharkNinja will cover the cost for the customer to send in the unit to us for repair or replacement. A fee of $20.95 (subject to change) will be charged when SharkNinja ships the repaired or replacement unit.
- How to initiate a warranty claim You must call 1-877-646-5288 to initiate a warranty claim. You will need the receipt as proof of purchase. A Customer Service Specialist will provide you with return and packing instruction information.
- How state law applies This warranty gives you specific legal rights, and you also may have other rights that vary from state to state. Some states do not permit the exclusion or limitation of incidental or consequential damages, so the above may not apply to you.
SharkNinja Operating LLC US: Needham, MA 02494 1-877-646-5288 ninjakitchen.com
Illustrations may differ from actual product. We are constantly striving to improve our products, therefore the specifications contained herein are subject to change without notice.
NINJA is a registered trademark of SharkNinja Operating LLC. NINJA SMART SCOOP is a trademark of SharkNinja Operating LLC. All other marks, including KEURIG and K-CUP, are trademarks of their respective owners.
For SharkNinja U.S. patent information, visit sharkninja.com/uspatents.
© 2021 SharkNinja Operating LLC CFP300SeriesIBMPMv17 PRINTED IN CHINA
@ninjakitchen
DOWNLOAD RESOURCES
- NINJA CFP300 Dual Brew Pro SPECIALTY COFFEE SYSTEM [pdf] Owner’s Manual CFP300, Dual Brew Pro, SPECIALTY COFFEE SYSTEM
- Read more: https://manuals.plus/ninja/cfp300-dual-brew-pro-specialty-coffee-system-manual#ixzz7i1gWGXg8
FAQ’S
What is the difference between the CFP300 and CFP301?
The CFP300 is a single brew system. The CFP301 is a dual brew system. Both models make espresso and coffee.
Can you use reusable pods in Ninja dual brew pro?
The fine mesh on the reusable coffee filters increases the extraction time of the coffee, making the coffee more intense and delicious. It is compatible with CFP201, CFP301, CFP400 Dual Brew Pro System.
Can you use Nespresso pods in Ninja Dual Brew?
The Nespresso and Ninja coffee makers are two different types of machines, so you can’t use Nespresso pods in a Ninja. Nespresso pods are designed specifically for use in Nespresso machines, while Ninja coffee makers use ground coffee rather than disposable espresso pods.
Can you use coffee pods in the Ninja specialty coffee maker?
The Ninja® DualBrew Pro Specialty Coffee System delivers Classic, Rich, Over Ice, and Specialty brews from your favorite coffee grounds or coffee pods.
Does the Ninja Dual Brew need a filter?
The Ninja coffee maker comes with a reusable filter, so you don’t need to worry about buying paper filters. The filter is easy to clean – just rinse it under the tap after use. The Ninja Dual Brew Pro has a permanent filter and is compatible with the Ninja CFP 300.
Does the Ninja take K cups?
Ninja® DualBrew Coffee Maker, Compatible with K-Cup Pods, and 12-Cup Drip Coffee Maker.
How many scoops of coffee do you put in a ninja coffee maker?
FULL CARAFE 4-6 Scoops 8-12 Tbsp. Using the provided Ninja scoop, scoop the appropriate amount of ground coffee for your drink size into the filter. Remove the carafe.
Can I make cold brew in my Ninja coffee maker?
With the Ninja Hot & Cold Brewed System™, you can make fresh, 10-minute* cold-brew and authentic iced coffee and tea, as well as Ninja® coffee favorites like frothy specialty drinks, and classic or rich-strength coffee and tea.
What is the specialty button on Ninja coffee maker?
The smallest brew size on a Ninja Coffee Bar is 4 ounces, whereas a shot of espresso is typically 1 ounce. You can get that by pushing the “Specialty Concentrated” button. This setting makes an extra-concentrated cup of coffee perfect for an espresso-like drink.
Can I use tap water in my Ninja coffee maker?
You can use normal tap water but depending upon the hardness and minerals in your area you may need to descale (clean your machine with vinegar) more often. I usually use filtered water from a britta picture but distilled water is recommend.
Why does my Ninja coffee maker stop brewing after a few seconds?
Check your water reservoir.
Some users have reported a flaw in the Ninja’s water reservoir. At the bottom of the tank, there’s a plastic valve that controls water flow into the rest of the machine. If this valve breaks, the machine can’t get enough water flow to brew coffee, causing it to shut off.
Why my coffee maker is not working?
The first thing to do is check the tube within the coffee pot. If there are obstructions here, or if the tube is clogged, water or any other liquid will not be able to pass through. You might also have to check that the machine thermostat and timer are in working order.
VIDEO
NINJA CFP300 Dual Brew Pro SPECIALTY COFFEE SYSTEM
www://ninjakitchen.com.au/
NINJA AF100 Series Air Fryer
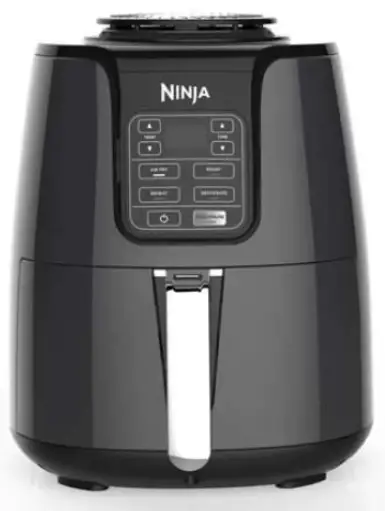
IMPORTANT SAFEGUARDS
Read all instructions before using your Ninja® Air Fryer.
When using electrical appliances, basic safety precautions should always be followed, including the following:
WARNING
- DO NOT use an extension cord.
A short power-supply cord is used to reduce the risk of children grabbing the cord or becoming entangled and to reduce the risk of people tripping over a longer cord. - This appliance has a polarized plug (one blade is wider than the other). To reduce the risk of electric shock, this plug is intended to fit into a polarized outlet only one way. If the plug does not fit fully into the outlet, reverse the plug. If it still does not fit, contact a qualified electrician. DO NOT attempt to modify the plug in any way.
- To eliminate a choking hazard for young children, remove and discard the protective cover fitted on the power plug of this appliance.
- ALWAYS ensure the appliance is properly assembled before use.
- DO NOT touch hot surfaces.
Appliance surfaces are hot during and after operation. To prevent burns or personal injury, ALWAYS use protective hot pads or insulated oven mitts and use available handles and knobs. - Intended for countertop use only. DO NOT place the appliance near the edge of a countertop during operation. Ensure the surface is level, clean, and dry.
- DO NOT place on or near a hot gas or electric burner or in a heated oven.
- Extreme caution must be used when moving an appliance containing hot oil or other hot liquids.
- To protect against electrical shock DO NOT immerse cord, plugs, or main unit housing in water or other liquid.
- Unplug from outlet when not in use and before cleaning. Allow to cool before putting on or taking off parts.
- Extreme caution must be used when the appliance contains hot food. Improper use may result in personal injury.
- Extreme caution must be used when moving an appliance containing hot oil or other hot liquids.
- DO NOT use this appliance for deep-frying with oil.
- ALWAYS ensure basket is properly closed before operating.
- DO NOT allow young children to operate the appliance or use as a toy. Close supervision is necessary when any appliance is used near children.
- Regularly inspect the appliance and power cord. DO NOT use the appliance if there is damage to the power cord or plug. If the appliance malfunctions or has been damaged in any way, immediately stop use and call Customer Service. Return the
appliance to SharkNinja Operating LLC for examination, repair, or adjustment. - The use of accessory attachments not recommended or sold by SharkNinja may cause fire, electric shock, or injury.
- This appliance is for household use only. DO NOT use this appliance for anything other than its intended use. DO NOT use in moving vehicles or boats. DO NOT use outdoors. Misuse may cause injury.
- DO NOT clean with abrasive cleaners, steel wool, or scouring pads.
- Spilled food can cause serious burns. Keep appliance and cord away from children. DO NOT let cord hang over edges of tables or counters or touch hot surfaces. NEVER use an outlet below counter, and NEVER use with an extension cord.
- To prevent food contact with the heating elements, DO NOT overfill the basket.
- DO NOT cover the air intake vent or air outlet vent while unit is operating. Doing so will prevent even cooking and may damage the unit or cause it to overheat.
- The crisper plate becomes extremely hot during the cooking process. Avoid hot steam and air while removing the basket from the appliance. ALWAYS place plate on a heat-resistant surface after removing. DO NOT touch accessories during or immediately after cooking.
- NEVER connect this appliance to an external timer switch or separate remote-control system.
- Should the unit emit black smoke, unplug immediately and wait for smoking to stop before removing the cooking basket.
- Let the appliance cool for approximately 30 minutes before handling, cleaning, or storing.
- When using this appliance, provide adequate space above and on all sides for air circulation.
- Make sure the unit is clean before using.
- Please refer to the Cleaning & Maintenance section for regular maintenance of the appliance. Return the appliance to SharkNinja Operating LLC for any other servicing.
- Outlet voltages can vary, affecting the performance of your product. To prevent possible illness, use a thermometer to check that your food is cooked to the temperatures recommended by the Food and Drug Administration.
- To disconnect, turn any control to “off”, then remove plug from wall outlet.
SAVE THESE INSTRUCTIONS
PARTS & ACCESSORIES
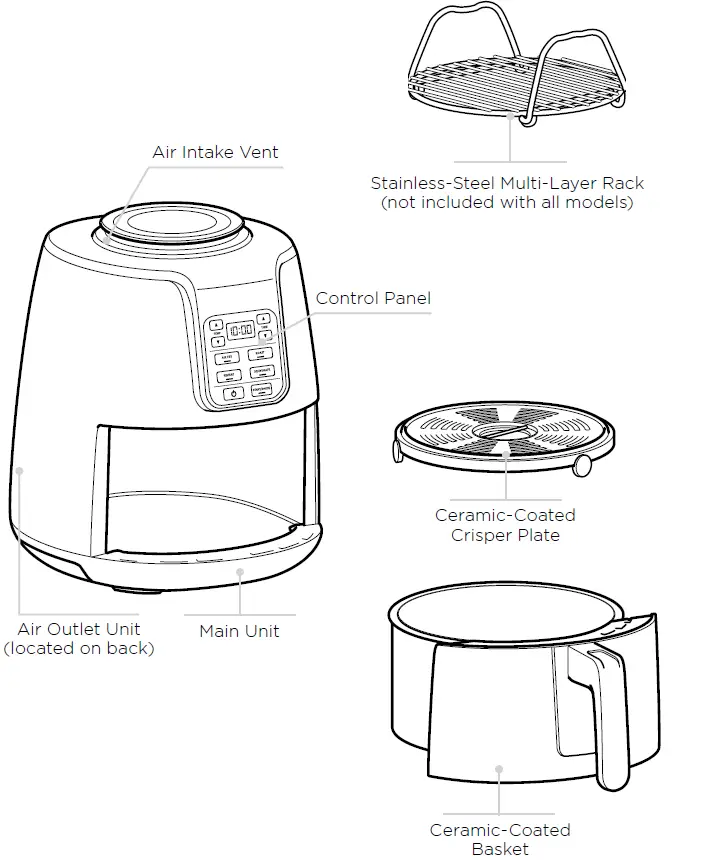
GETTING TO KNOW YOUR AIR FRYER
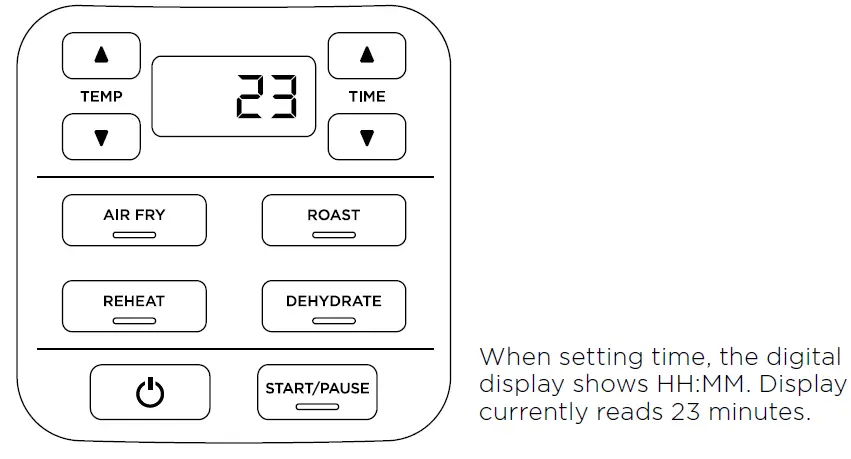
FUNCTION BUTTONS
AIR FRY: Use this function to give your food crispiness and crunch with little to no oil.
ROAST: Use the unit as a roaster oven for tender meats, baked treats, and more.
DEHYDRATE: Dehydrate meats, fruits, and vegetables for healthy snacks.
REHEAT: Revive leftovers by gently warming them, leaving you with crispy results.
OPERATING BUTTONS
TEMP arrows: Use the up and down TEMP arrows to adjust the cook temperature before or during cooking.
TIME arrows: Use the up and down TIME arrows to adjust the cook time in any function.
START/PAUSE button: After selecting the time and temperature, start cooking by pressing the START/PAUSE button. You can stop cooking at any time by pressing this button again.
Power button: The Power button shuts off the unit and stops all cooking modes.
STANDBY MODE
After 10 minutes with no interaction with the control panel, the unit will enter standby mode. The Power button will be dimly lit.
BEFORE FIRST USE
- Remove and discard any packaging material, promotional labels, and tape from the unit.
- Remove all accessories from the package and read this manual carefully. Please pay particular attention to operational instructions, warnings, and important safeguards to avoid any injury or property damage.
- Wash the ceramic-coated basket and crisper plate in hot, soapy water, then rinse and dry thoroughly. NEVER clean the main unit in the dishwasher.
USING YOUR AIR FRYER
USING THE COOKING FUNCTIONS
To turn on the unit, first plug the power cord into a wall outlet. Press the power button.
Air Fry
- Ensure the crisper plate is in the basket.
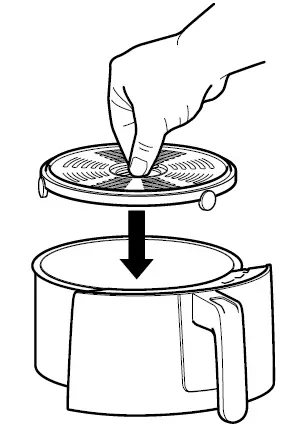
- Press Air Fry button. The default temperature setting will display. Use the TEMP up and down arrows to set your desired temperature.
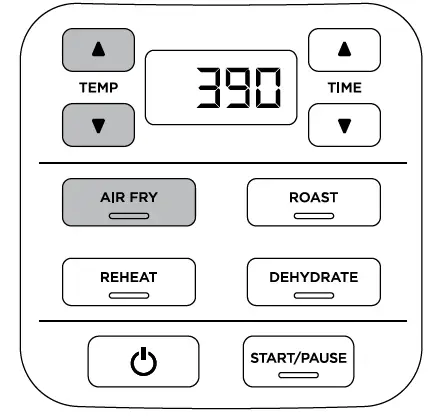 NOTE: It is recommended to let the unit preheat for 3 minutes before adding ingredients. If preheating, skip step 4, insert the basket, and press the START/PAUSE button to begin.
 - Press the TIME up and down arrow buttons to set your desired cook time.
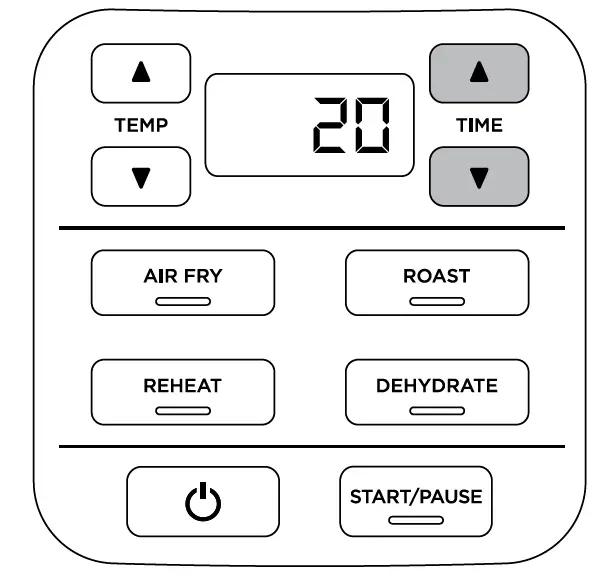
- Place ingredients on the crisper plate that is assembled in the basket. Insert the basket in the unit.
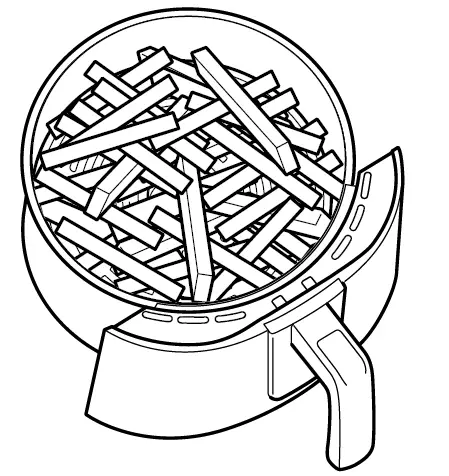
- Press START/PAUSE to begin cooking.
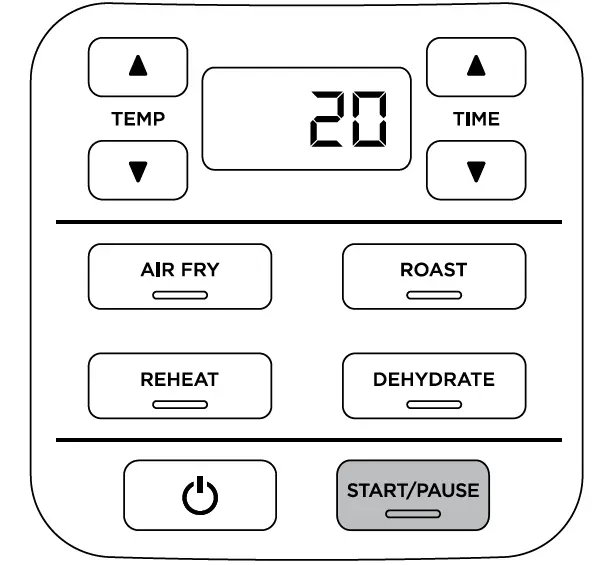 NOTE: To shake or toss ingredients during cooking, press START/PAUSE to pause cooking. Remove basket and shake it back and forth to toss ingredients. Reinsert basket and press START/PAUSE to resume cooking.
 - When cooking is complete, the unit will beep and END will appear on the control panel display.

- Remove ingredients by dumping them out or by using oven mitts or siliconetipped tongs/utensils.
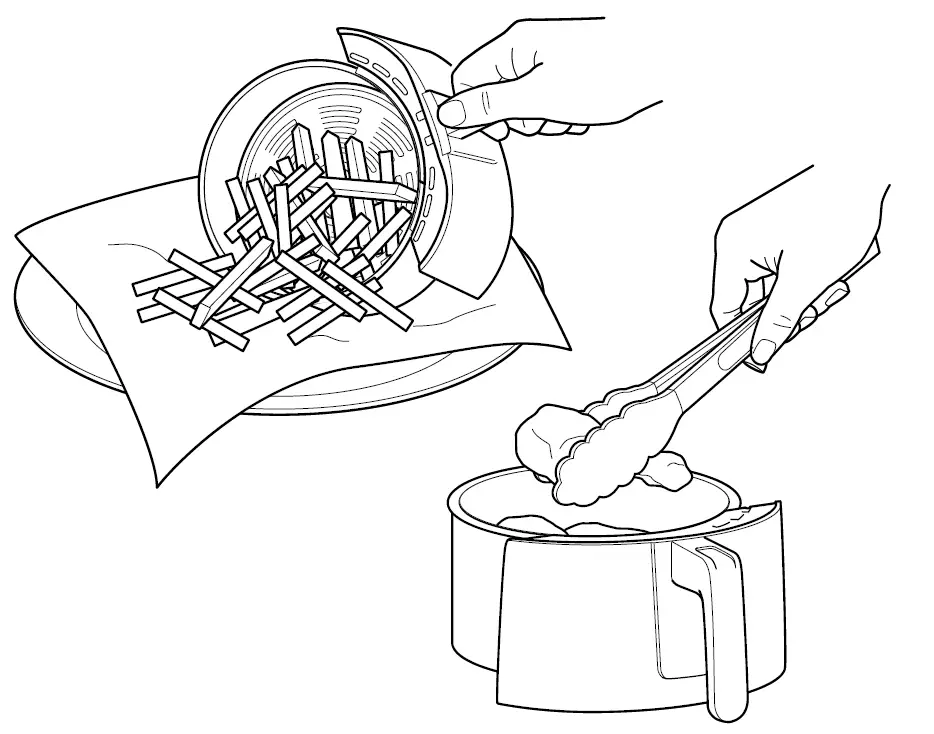
Roast
- Ensure the crisper plate is in place if needed. If you are using a baking dish, the crisper plate is not needed.
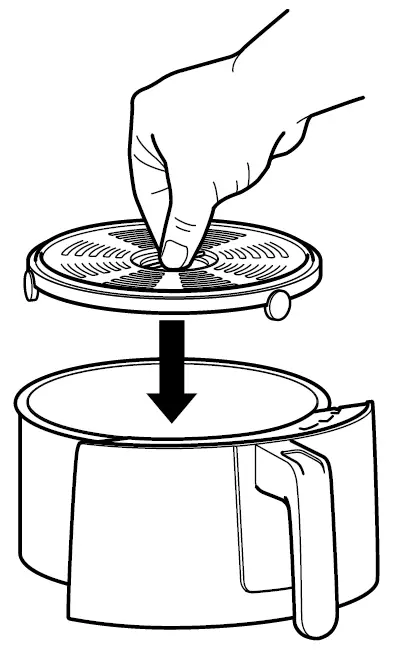
- Press the ROAST button. The default temperature setting will display. Use the TEMP up and down arrow buttons to set your desired temperature.
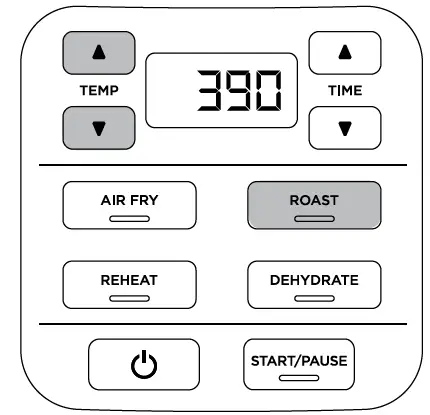 NOTE: It is recommended to let the unit preheat for 3 minutes before adding ingredients. If preheating, skip step 4, insert the basket, and press the START/PAUSE button to begin.
 - Press the TIME up and down arrows to set your desired cook time.
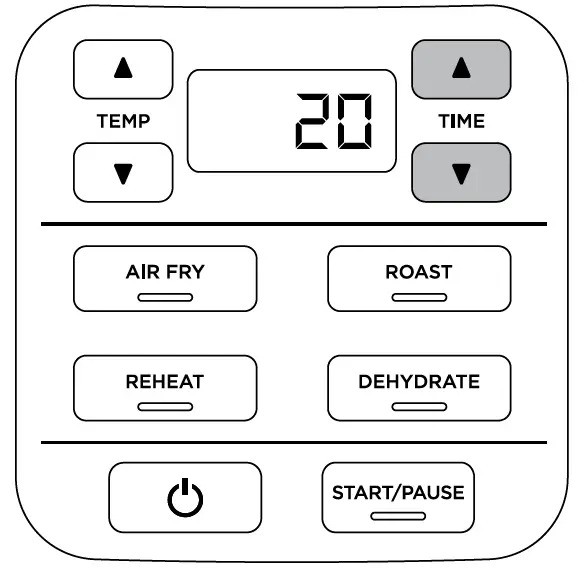
- Add ingredients to the basket. Insert the basket in the unit.
- Press START/PAUSE to begin cooking.
- When cooking is complete, the unit will beep and END will appear on the control panel display.
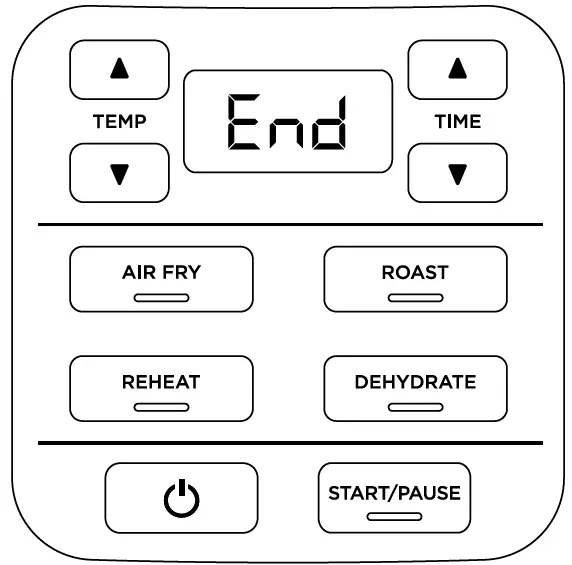
- Remove ingredients by dumping them out or by using oven mitts or siliconetipped tongs/utensils.

Reheat
- Ensure the crisper plate is in the basket.

- Press the REHEAT button. The default temperature setting will display. Use the TEMP up and down arrow buttons set your desired temperature.
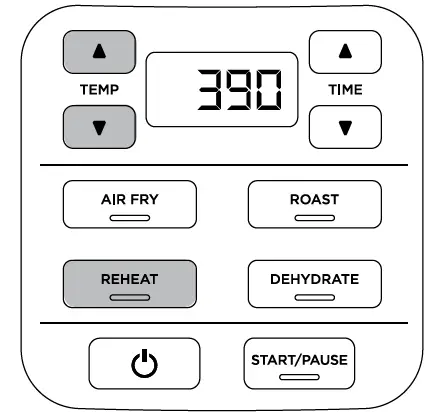 NOTE: It is recommended to let the unit preheat for 3 minutes before adding ingredients. If preheating, skip step 4, insert the basket, and press the START/PAUSE button to begin.
 - Press the TIME up and down arrows to set your desired cook time.
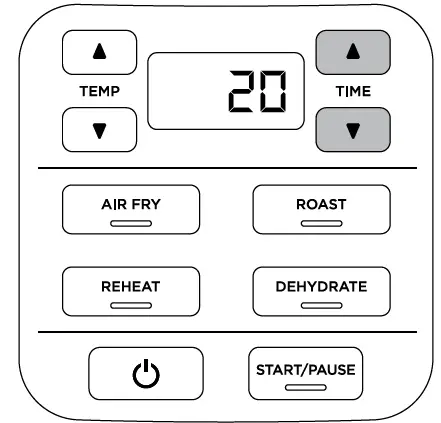
- Add ingredients to the basket. Insert the basket in the unit.
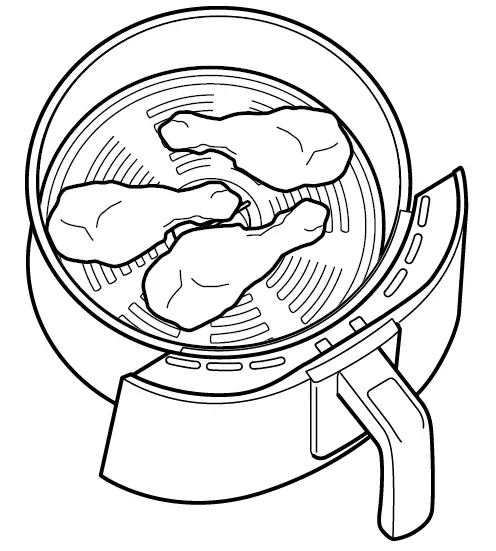
- Press the START/PAUSE button to begin cooking.
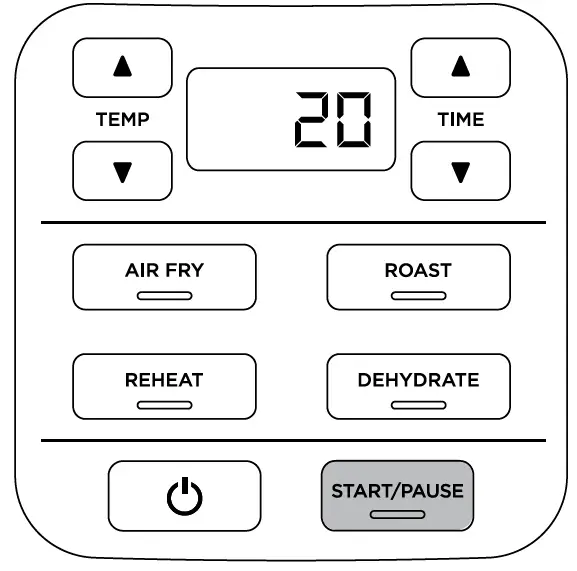
- When cooking is complete, the unit will beep and END will appear on the control panel display.
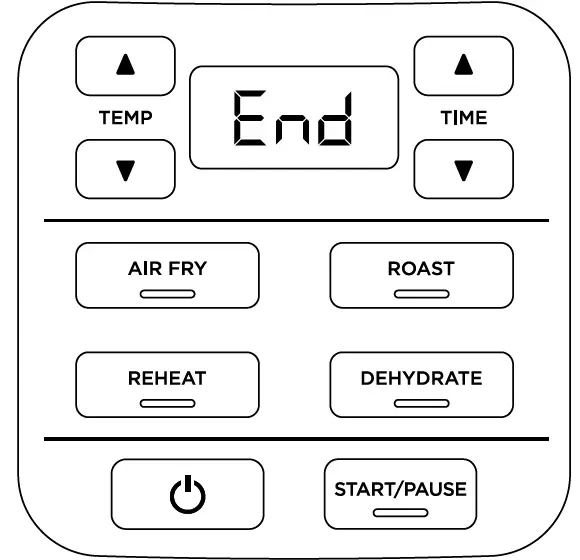
- Remove ingredients by dumping them out or by using oven mitts or siliconetipped tongs/utensils.
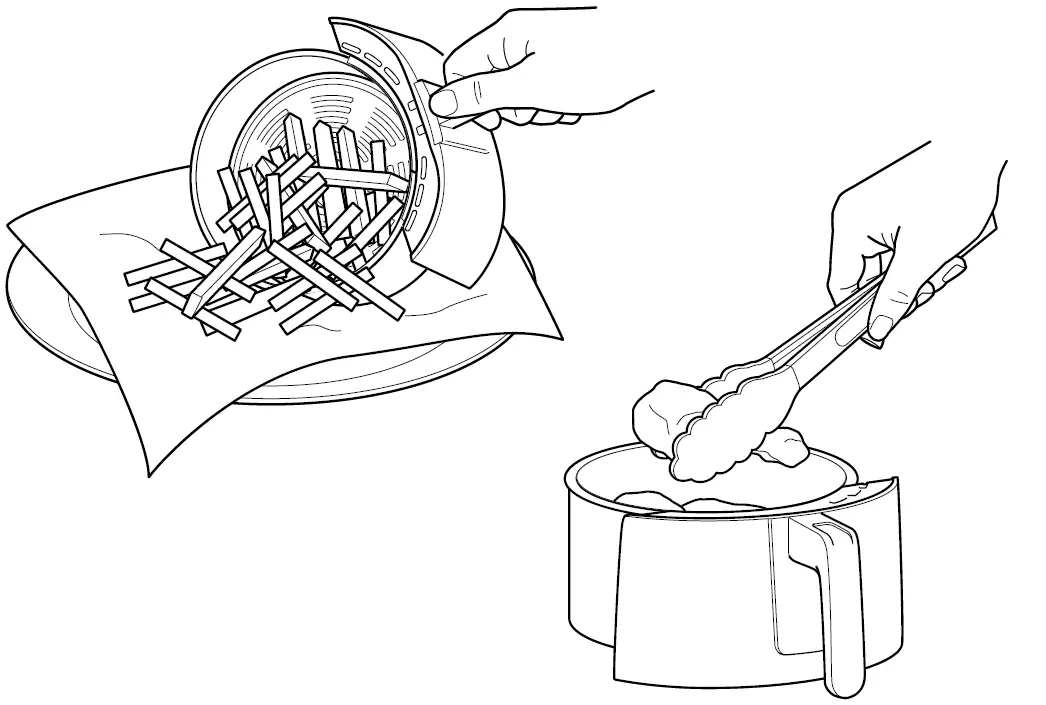
Dehydrate
- Place your first layer of ingredients in the bottom of the basket. Then install the crisper plate inside the basket and set a second layer of ingredients on the crisper plate.
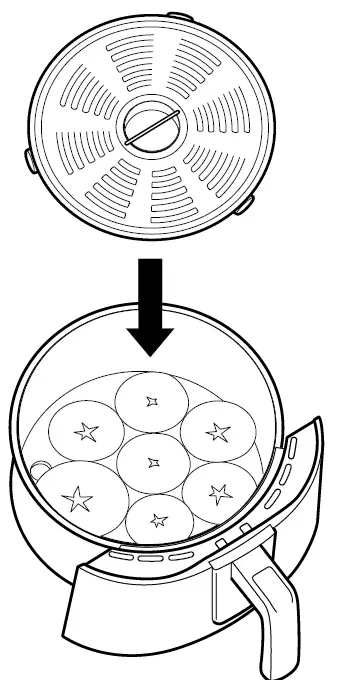
- Insert the basket in the unit.
- Press the DEHYDRATE button. The default temperature will display. Use the TEMP up and down arrow buttons to set your desired temperature.
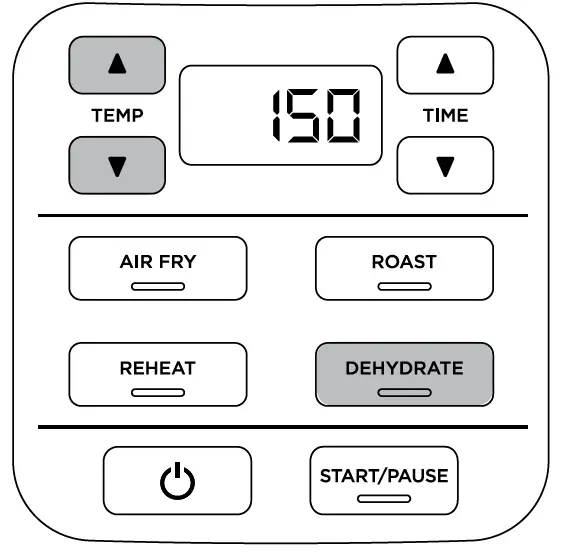
- Press the TIME up and down arrow buttons to set your desired cook time.

- Press the START/PAUSE button to start dehydrating.
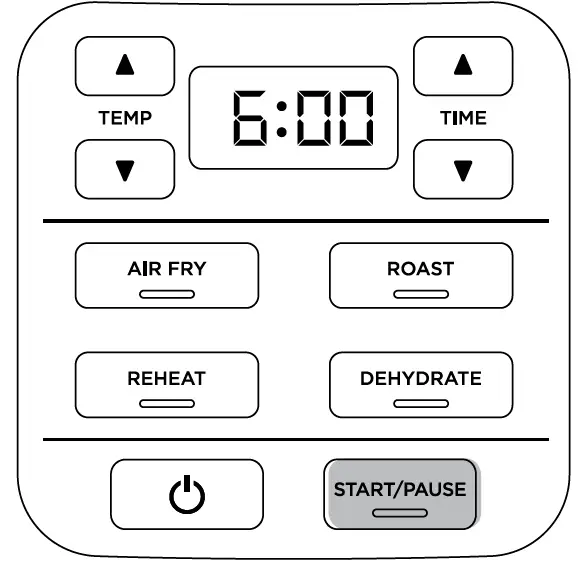
- When dehydrating is complete, the unit will make a beep sound and END will appear on the control panel display.
NOTE: You can increase your dehydrating capacity with the multilayer rack. If the rack is not included with your model, it is available for purchase at ninjaaccessories.com
CLEANING & MAINTENANCE
Cleaning Your Air Fryer
The unit should be cleaned thoroughly after every use.
- Unplug the unit from the wall outlet before cleaning.
NOTE: NEVER immerse the main unit in water or any other liquid. NEVER clean the main unit in a dishwasher. - To clean the main unit and the control panel, wipe them clean with a damp cloth.
- The basket, crisper plate, and any accessories can be washed in the dishwasher.
- If food residue is stuck on the crisper plate or basket, place them in a sink filled with warm, soapy water and allow to soak.
- Air-dry or towel-dry all parts after use.
- Clean the heating element with a cleaning brush to remove any food residues.
HELPFUL TIPS
- For consistent browning, make sure ingredients are arranged in an even layer on the bottom of the basket with no overlapping. If ingredients are overlapping, make sure to shake them halfway through the set cook time.
- Cook time and temperature can be adjusted at any time during cooking. Simply press the up and down TIME or TEMP arrows to adjust the time or temperature.
- To convert recipes from your conventional oven, reduce the temperature of the Air Fryer by 25°F. Check food frequently to avoid overcooking.
- We recommend 3 minutes of preheating. You can use the built-in timer to set a 3-minute countdown.
- Occasionally, the fan from the air fryer will blow lightweight foods around. To alleviate this, secure foods (like the top slice of bread on a sandwich) with toothpicks
- The crisper plate elevates ingredients in the basket so air can circulate under and around them for even, crisp results.
- After a cooking function is selected, you can press the START/PAUSE button to begin cooking immediately. The unit will run at the default temperature and time.
- For best results, remove food immediately after the cook time is complete to avoid overcooking.
- For best results with fresh vegetables and potatoes, use at least 1 tablespoon of oil. Add more oil as desired to achieve the preferred level of crispiness.
- For best results, check progress throughout cooking, and remove food when desired level of brownness has been achieved. We recommend using an instant-read thermometer to monitor internal temp of proteins. After the cook time is complete remove food immediately to avoid overcooking.
REPLACEMENT PARTS
To order additional parts and accessories, visit ninjaaccessories.com or contact Customer Service at 1-877-646-5288.
TROUBLESHOOTING GUIDE
Why won’t my temperature go any higher?
The max temperature is 400˚F.
How long does it take to preheat, and how will I know when it’s done?
We recommend 3 minutes of preheating. You can use the built-in timer to set a 3-minute countdown.
Should I add my ingredients before or after preheating?
It is recommended to let the unit preheat for 3 minutes before adding ingredients.
Do I need to defrost frozen foods before air frying?
It depends on the food! Follow package instructions.
How do I make the countdown pause?
Press START/PAUSE.
Is the basket safe to put on my countertop?
The basket will heat during cooking. Use caution when handling, and place on heat-safe surfaces only.
How do I know when to use the crisper plate?
Use the crisper plate when you want food to come out crispy. The crisper plate allows for food to be elevated in the basket allowing for air to go under the plate and evenly crisp ingredients.
My food didn’t cook.
Make sure the basket is fully inserted during cooking. For consistent browning, make sure ingredients are arranged in an even layer on the bottom of the basket with no overlapping. Shake loose ingredients for even crispiness. Cook time and temperature can be adjusted at any time during cooking. Simply press the up and down TIME or TEMP arrows to adjust the time or temperature.
My food is burned.
For best results, check progress throughout cooking, and remove food when desired level of brownness has been achieved. Remove food immediately after the cook time is complete to avoid overcooking.
Why is my food blowing around when air frying?
Occasionally, the fan from the air fryer will blow lightweight foods around. To alleviate this, secure foods (like the top slice of bread on a sandwich) with toothpicks.
Can I air fry wet battered ingredients?
Yes, but use the proper breading technique. It is important to coat foods first with flour, then with egg, and then with bread crumbs. Be sure to press the bread crumbs onto the food with your hands. Because the air fryer has a powerful fan as part of its mechanism, breading can sometimes be blown off. Pressing the bread crumbs firmly on will help them adhere.
The unit is beeping.
Your food is done cooking.
The screen went black.
The unit is in standby mode. Press the power button to turn it back on.
An “E” message appears on display screen.
The unit is not functioning properly. Please contact Customer Service at 1-877-646-5288.
ONE YEAR LIMITED WARRANTY
The 1-Year Limited Warranty applies to purchases made from authorized retailers of SharkNinja Operating LLC. Warranty coverage applies to the original owner and to the original product only and is not transferable.
SharkNinja warrants that the unit shall be free from defects in material and workmanship for a period of 1 year from the date of purchase when it is used under normal household conditions and maintained according to the requirements outlined in this instruction manual, subject to the following conditions and exclusions.
What is covered by my warranty?
1. The original unit and/or non-wearable components deemed defective, in SharkNinja’s sole discretion, will be repaired or replaced for up to 1 year from the original purchase date.
2. In the rare event that a replacement unit is issued, the warranty coverage ends 6 months after the receipt date of the replacement unit or the remainder of the existing warranty, whichever is greater. If the unit is replaced, SharkNinja reserves the right to replace the unit with one of equal or greater value.
What is not covered by my warranty?
Our Customer Service and Product Specialists are available to provide all the warranty service options available to you, including the possibility of upgrading to our VIP Warranty Service Options for select product categories.
1. Normal wear and tear of wearable parts (including removable basket, crisper plate, racks, and pans) that require regular maintenance and/or replacement to ensure the proper functioning of your unit are not covered by your warranty.
2. Any unit that has been tampered with or used for commercial purposes.
3. SharkNinja will cover the cost for the customer to send the unit to us for repair or replacement. A fee of $19.95 for return shipping costs will be charged at the time of return shipment of the repaired or replacement unit.
4. Damage caused by misuse, abuse, or negligent handling, or damage due to mishandling in transit.
5. Consequential and incidental damages.
6. Defects caused by or resulting from damages from shipping or from repairs, service, or alteration to the product or any of its parts that have been performed by a repair person not authorized by SharkNinja.
7. Products purchased, used, or operated outside of North America.
Problems with your unit/How to get service:
If your appliance fails to operate properly while in use under normal household conditions within the warranty period, visit ninjakitchen.com for product care/maintenance self-help.
Our Customer Service and Product Specialists are also available at 1-877-646-5288 to assist with product support and warranty service options.
How to initiate a warranty claim:
You can call 1-877-646-5288 to have a Customer Service Specialist assist you. Please note, you must call 1-877-646-5288 to initiate a warranty claim. Return and packing instruction information will be provided at that time.
For Customer Service hours, visit ninjakitchen.com
Replacement parts are available for purchase at ninjaaccessories.com. For more information on what are classified as wearable and non-wearable parts, visit ninjakitchen.com/warranty.
This warranty gives you specific legal rights, and you may also have other rights that vary from state to state.
Some states do not permit the exclusion or limitation of incidental or consequential damages, so the above may not apply to you.
SharkNinja Operating LLC
US: Needham, MA 02494
1-877-646-5288
ninjakitchen.com
Illustrations may differ from actual product. We are constantly striving to improve our products, therefore the specifications contained herein are subject to change without notice. NINJA is a registered trademark of SharkNinja Operating LLC.
For SharkNinja U.S. Patent information, visit sharkninja.com/uspatents.
© 2018 SharkNinja Operating LLC
AF100Series_IB_MP_180619
PRINTED IN CHINA
@ninjakitchen
![]()
THANK YOU
for purchasing the Ninja® 2-in-1 Blender with Auto-iQ®
IMPORTANT SAFETY INSTRUCTIONS
FOR HOUSEHOLD USE ONLY
WARNING
To reduce the risk of injury, fire, electrical shock or property damage, basic safety precautions must always be followed, including the following numbered warnings and subsequent instructions. Do not use appliance for other than intended use.
- Read all instructions prior to using the appliance and its accessories.
- Carefully observe and follow all warnings and instructions. This unit contains electrical connections and moving parts that potentially present risk to the user.
- Take your time and exercise care during unpacking and appliance setup. This appliance contains sharp, loose blades that can cause injury if mishandled.
- Take inventory of all contents to ensure you have all parts needed to properly and safely operate your appliance.
- Blades are sharp. Handle carefully.
- This product is provided with a Stacked Blade Assembly and a Chopping Blade Assembly. ALWAYS exercise care when handling blade assemblies. The blade assemblies are sharp and are NOT locked in place in their containers. The blade assemblies are designed to be removable to facilitate cleaning and replacement if needed. ONLY grasp the blade assembly by the top of the shaft. Failure to use care when handling the blade assemblies will result in a risk of laceration.
- ALWAYS exercise care when handling the Pro Extractor Blades® Assembly. The blades are sharp. ONLY grasp the Pro Extractor Blades® Assembly by the outer perimeter of the blade assembly base. Failure to use care when handling the blade assembly will result in a risk of laceration.
- Turn the appliance OFF, then unplug the appliance from the socket when not in use, before assembling or disassembling parts, and before cleaning. To unplug, grasp the plug by the body and pull from the socket. NEVER unplug by grasping and pulling the flexible cord.
- Before use, wash all parts that may contact food. Follow washing instructions covered in this instruction manual.
- Before each use, inspect blade assemblies for damage. If a blade is bent or damage is suspected, contact SharkNinja to arrange for replacement.
- DO NOT use this appliance outdoors. It is designed for indoor household use only.
- DO NOT operate any appliance with a damaged cord or plug, or after the appliance malfunctions or is dropped or damaged in any manner. This appliance has no user-serviceable parts. If damaged, contact SharkNinja for servicing.
- This appliance has important markings on the plug blade. The entire supply cord is not suitable for replacement. If damaged, please contact SharkNinja for service.
- Extension cords should NOT be used with this appliance.
- To protect against the risk of electric shock, DO NOT submerge the appliance or allow the power cord to contact any form of liquid.
- DO NOT allow the cord to hang over the edges of tables or worktops. The cord may become snagged and pull the appliance off the work surface.
- DO NOT allow the unit or the cord to contact hot surfaces, including stoves and other heating appliances.
- ALWAYS use the appliance on a dry and level surface.
- DO NOT allow children to operate this appliance or use as a toy. Close supervision is necessary when any appliance is used near children.
- This appliance is NOT intended to be used by people with reduced physical, sensory, or mental capabilities, or lack of experience and knowledge, unless they have been given supervision or instruction concerning use of the appliance by a person responsible for their safety.
- ONLY use attachments and accessories that are provided with the product or are recommended by SharkNinja. The use of attachments, including canning jars, not recommended or sold by SharkNinja may cause fire, electric shock, or injury.
- NEVER place a blade assembly on the motor base without it first being attached to its corresponding container (Jug or cup) with the lid also in place.
- Keep hands, hair, and clothing out of the container when loading and operating.
- During operation and handling of the appliance, avoid contact with moving parts
- DO NOT fill containers past the MAX FILL or MAX LIQUID lines.
- DO NOT operate the appliance with an empty container.
- DO NOT microwave any containers or accessories provided with the appliance.
- NEVER leave the appliance unattended while in use.
- DO NOT blend hot liquids. Doing so may result in pressure buildup and steam exposure that can pose a risk of the user being burned.
- DO NOT process dry ingredients with the Single-Serve Blending Cup and Pro Extractor Blades® Assembly, the Jug and Stacked Blade Assembly, or the processor bowl and Chopping Blade Assembly.
- To reduce the risk of injury, never place Chopping Blade Assembly or discs on base without first putting bowl properly in place.
- DO NOT perform grinding operations with the Single-Serve Blending Cup and Pro Extractor Blades® Assembly, the Jug and Stacked Blade Assembly.
- EVER operate the appliance without lids and caps in place. DO NOT attempt to defeat the interlock mechanism.
Ensure the container and lid are properly installed before operation. - Before operation, ensure all utensils are removed from containers. Failure to remove utensils can cause containers to shatter and potentially result in personal injury and property damage
- Keep hands and utensils out of containers while chopping to reduce the risk of severe personal injury or damage to the blender/food chopper. A scraper may be used ONLY when the blender or processor is not running. When using the processor, always use food pusher to add food. NEVER add food by hand.
- If you find unmixed ingredients sticking to the sides of the cup, stop the appliance, remove the blade assembly, and use a scraper to dislodge ingredients.
- DO NOT open the Jug’s pour spout cap while blender is operating.
- If you find unmixed ingredients sticking to the sides of the Jug, stop the appliance, remove the lid, and use a spatula to dislodge ingredients. NEVER insert your hands into the Jug, as you may contact one of the blades and experience a laceration.
- DO NOT attempt to remove the container or lid from the motor base while the blade assembly is still spinning.
Allow the appliance to come to a complete stop before removing lids and containers. - If the appliance overheats, a thermal switch will activate and temporarily disable the motor. To reset, unplug the appliance and allow it to cool for approximately 30 minutes before using again.
- DO NOT expose the containers and accessories to extreme temperature changes. They may experience damage
- Upon completion of processing, ensure the blade assembly is removed BEFORE emptying container’s contents. Remove the blade assembly by carefully grasping the top of the shaft and lifting it from the container. Failure to remove the blade assembly before emptying the container results in a risk of laceration.
- If using the Jug’s pour spout, hold the cover in place on the container or ensure lid lock is engaged when pouring to avoid risk of injury.
- Remove the Pro Extractor Blades® Assembly from the Single-Serve Cup upon completion of blending. DO NOT store ingredients before or after blending them in the cup with the blade assembly attached. Some foods may contain active ingredients or release gases that will expand if left in a sealed container, resulting in excessive pressure buildup that can pose a risk of injury. For ingredient storage in the cup, use only Spout Lid to cover.
- The maximum wattage rating for this appliance is based on the configuration of the Pro Extractor Blades® Assembly and Single-Serve Cup. Other configurations may draw less power or current.
- DO NOT submerge the motor base or control panel in water or other liquids.
DO NOT spray motor base or control panel with any liquid. - DO NOT attempt to sharpen blades.
- Turn off the appliance and unplug the motor base before cleaning.
PARTS
There are a variety of accessories that are compatible with this blender series.
| NOTE: The top flap of your box shows the select accessories that are included with your model. |
To purchase more accessories and find great recipes, visit ninjakitchen.co.uk
PARTS
A. Jug Lid
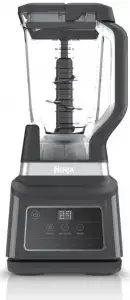
B. 2.1L* Total Crushing® Jug
C. Motor Base (attached power cord not shown)
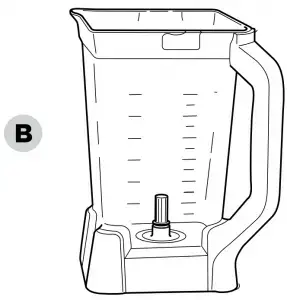
D. Stacked Blade Assembly
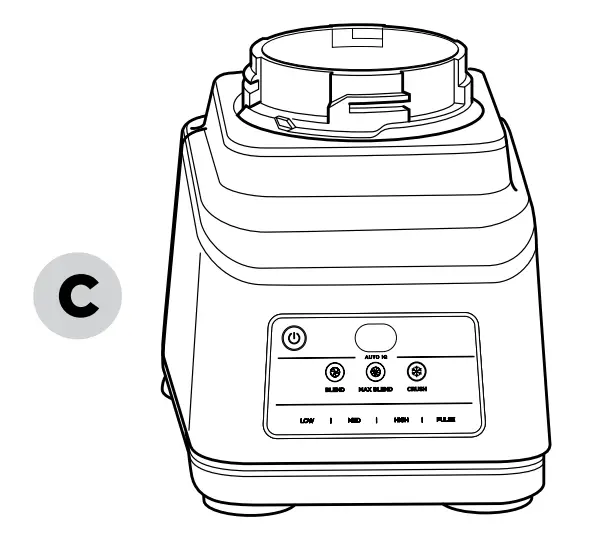
E. Spout Lid
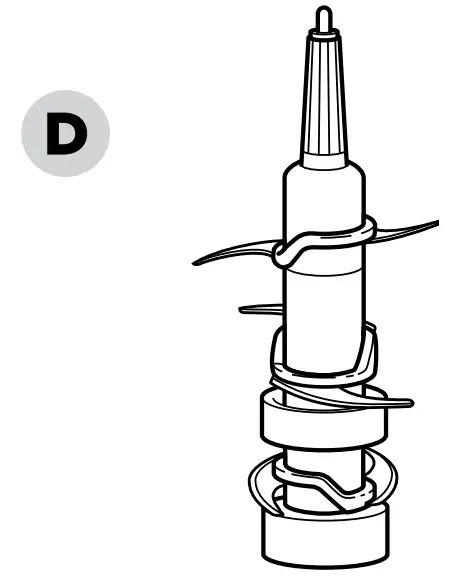
F. Pro Extractor Blades® Assembly

G. 700ml Single-Serve Cup *1.8L max liquid capacity.
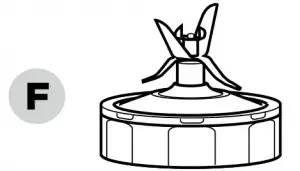
BEFORE FIRST USE
| IMPORTANT: Review all warnings on pages 4–6 before proceeding. |
DID YOU KNOW?
- You can take your drinks on the go using the spout lid.
| NOTE: All attachments are BPA free and dishwasher safe. It is recommended that the containers, lids, and blade assemblies be placed on the top rack of the dishwasher. Ensure blade assemblies and lids are removed from the containers before placing in the dishwasher. Exercise care when handling blade assemblies. |
- Remove all packaging materials from the unit. Exercise care when unpacking blade assemblies, as the blades are sharp.
- The Stacked Blade Assembly is NOT locked in place in their containers. Handle the Stacked Blade Assembly by grasping the top of the shaft.
- Handle the Pro Extractor Blades® Assembly by grasping around the perimeter of the blade assembly base.
- Wash containers, lids, and blade assemblies in warm, soapy, water using a dishwashing utensil with a handle to avoid direct contact with the blades.
Exercise care when handling blade assemblies, as the blades are sharp. - Thoroughly rinse and air-dry all parts.
- Wipe control panel with a soft cloth. Allow it to dry completely before using.
FEATURES
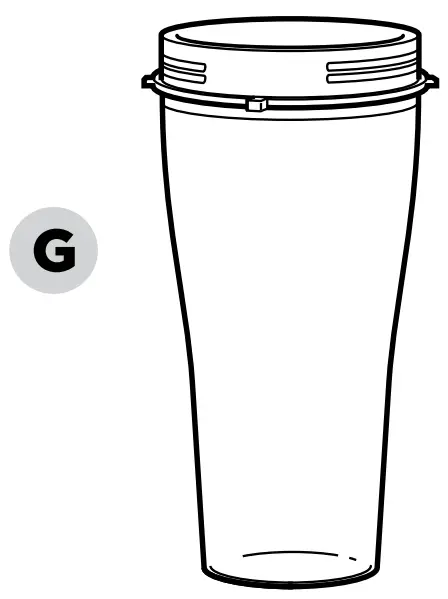 Use the Power button to turn the unit on or off.
AUTO-IQ® PROGRAMS
Intelligent preset programs combine unique blending and pausing patterns that do the work for you. Once a preset program is selected, it will start immediately and automatically stop when blending is complete. To stop blending before the end of the program, press the currently active button again.

BLEND
Make drinks containing fresh or frozen fruit, liquids and ice, or blend together dips, dressings and salsas.
MAX BLEND
Ideal for tougher ingredients including skins, seeds and stems or when you want an even smoother result.
CRUSH
Turn ice and frozen ingredients into blended frozen drinks and desserts.
LOW, MEDIUM, and HIGH
When selected, each of these speeds runs continuously until pressed again to turn off. They do not work in conjunction with any Auto-iQ programs.
PULSE
Offers greater control of pulsing and blending. Operates only when PULSE is pressed. Use short presses for short pulses and long presses for long pulses.
| NOTE: The unit can detect which container is installed on the motor base. Only the functions available for a particular container will illuminate on the control panel. |
USING THE TOTAL CRUSHING® JUG
| IMPORTANT: As a safety feature, if the Jug and lid are not properly installed, the timer will display “… …” and the motor will be disabled. If this happens, repeat step 5 on the following page. When the Jug and lid are properly installed, the program button LEDs will illuminate, indicating the appliance is ready to use. |
| NOTE: Auto-iQ® programs have pauses and changes in speed throughout the cycle. |
| NOTE: DO NOT add ingredients before installing the Stacked Blade Assembly |
| NOTE: If the Stacked Blade Assembly is not fully seated, you will not be able to install and lock the lid. |
| NOTE: The handle on the jug lid will not fold down unless it is attached to the jug. |
- Plug in motor base and place on a clean, dry, level surface such as a worktop or table.
- Lower the Total Crushing Jug onto the motor base. The handle should be aligned slightly to the right and the Jug should be oriented so the LOCK symbols are visible on the motor base. Rotate the Jug clockwise until it clicks into place.
- Exercising care, grasp the Stacked Blade Assembly by the top of the shaft and place it onto the drive gear inside the Jug. Note that the blade assembly will fit loosely onto the drive gear.
- Add ingredients to the Jug. DO NOT add ingredients past the MAX LIQUID line on the Jug.
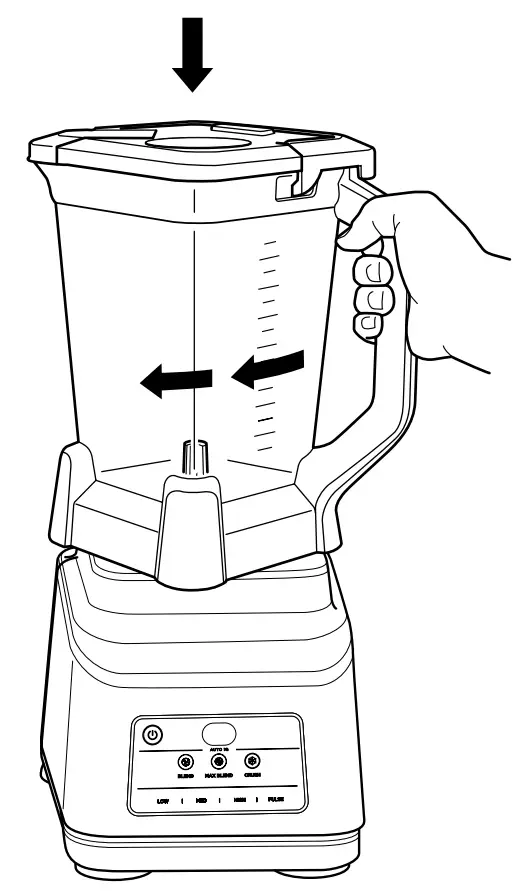
- Place the lid on the Jug, aligning the triangle symbol on the lid with the triangle symbol on the handle. Press down on the handle until it clicks into place. The triangle symbols MUST be aligned for the lid to lock and the unit to operate. Once the lid is locked in place, press the Power button to turn unit on. The available program buttons will illuminate and the unit will be ready for use.
- a If using an Auto-iQ® program, first select the program that best suits your recipe. The preset feature will automatically stop at the end of the program. To stop the unit at any time, press the currently active button again.
6b If using a manual program, select your desired speed. Once the ingredients have reached your desired consistency, press the active button again, and wait for the unit to come to a complete stop.
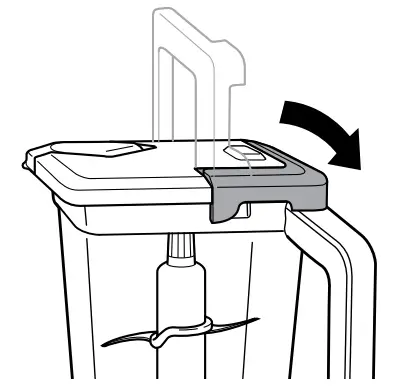
- To remove the Jug from the motor base, turn the Jug anti-clockwise and then lift up.
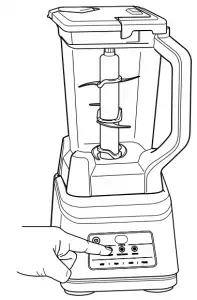
- a. To pour out thinner mixtures, ensure the lid is locked in place, then open the pour spout cap.
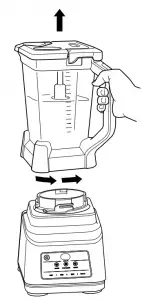
8b. For thicker mixtures that cannot be emptied through the pour spout, remove the lid and Stacked Blade Assembly before pouring. To remove the lid, press the RELEASE button and lift the handle. To remove the blade assembly, carefully grasp it by the top of the shaft and pull straight up.
The Jug can then be emptied.

- Turn the unit off by pressing the Power button. Unplug the unit when finished. Refer to the Care & Maintenance section for cleaning and storage instructions.
USING THE SINGLE-SERVE CUP
| NOTE: Auto-iQ® programs have pauses and changes in speed throughout the cycle. |
- Plug in motor base and place on a clean, dry, level surface such as a worktop or table.
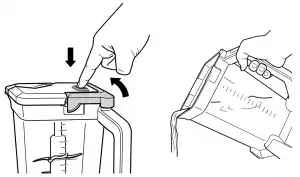
- Add ingredients to the Single-Serve Cup. DO NOT add ingredients past the MAX LIQUID line.

- Install the Pro Extractor Blades® Assembly onto the top of the cup. Twist the lid clockwise until it’s sealed tightly.
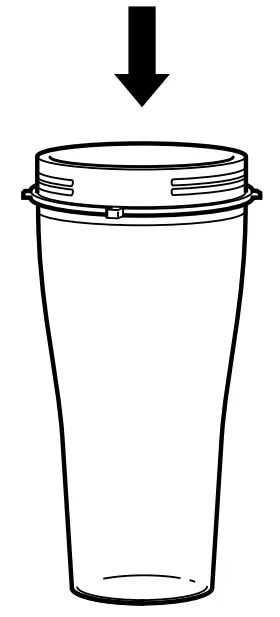
- Turn the cup upside down and install on the motor base. Align the tabs on the cup with the slots on the base, then rotate cup clockwise until it clicks into place. Once the cup is locked in place, press the Power button to turn unit on. The available program buttons will illuminate and the unit will be ready for use.
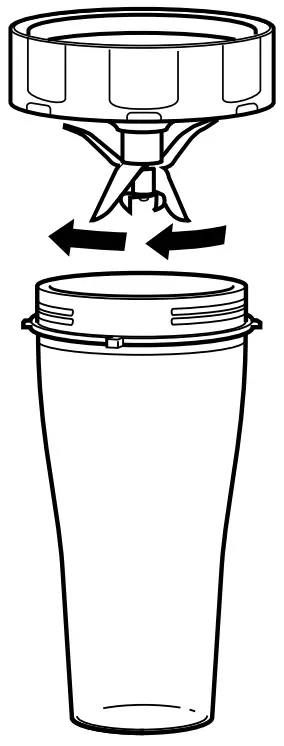
- a. If using an Auto-iQ® program, first select the program that best suits your recipe.
The preset feature will automatically stop at the end of the program. To stop the unit at any time, press the currently active program again.
5b. If using a manual program, select your desired speed. Once the ingredients have reached your desired consistency, press the active button again, and wait for the unit to come to a complete stop.
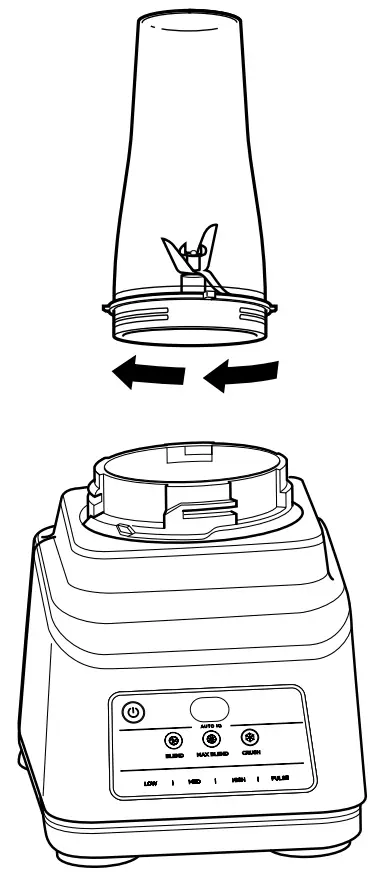
- To remove the cup from the motor base, turn the cup anti-clockwise and then lift up.
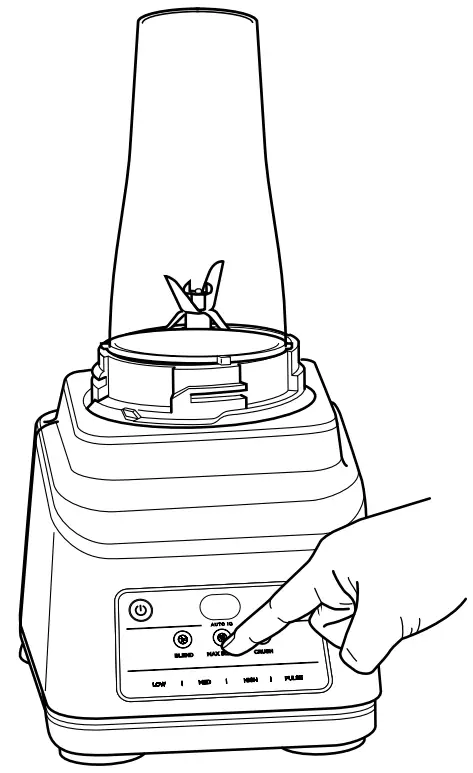
- Remove the Pro Extractor Blades® Assembly by twisting the cap anticlockwise. DO NOT store blended contents with Pro Extractor Blades® Assembly attached. Exercise care when handling the blade assembly, as the blades are sharp.
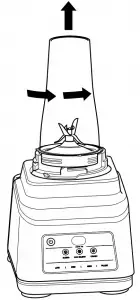
- Turn the unit off by pressing the Power button. Unplug the unit when finished. Refer to the Care & Maintenance section for cleaning and storage instructions.
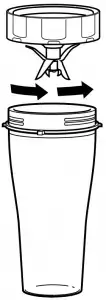
- To enjoy your drink on the go, place the Spout Lid onto the Single-Serve Cup and twist lid clockwise until firmly sealed. For storing ingredients in the cup, use only the Spout Lid to cover.
CARE & MAINTENANCE
CLEANING
Separate all parts. Wash all containers in warm, soapy water with a soft cloth.
• Hand-Washing
Wash blade assemblies in warm, soapy water using a dishwashing utensil with a handle to avoid direct contact with the blades. Exercise care when handling blade assemblies as the blades are sharp.
Thoroughly rinse and air-dry all parts.
• Dishwasher
All attachments are dishwasher safe. It is recommended that the lids, containers, and blade assemblies be placed on the top rack of the dishwasher ONLY. Ensure the blade assemblies are removed from their containers before placing in the dishwasher. Exercise care when handling blade assemblies.
• Motor Base
Turn off the unit and unplug the motor base before cleaning. Wipe motor base with a clean, damp cloth.
DO NOT use abrasive cloths, pads, or brushes to clean the base.
STORING
Wrap the power cord around the cord wrap on the back of the motor base. Store the unit upright and store all blade assemblies inside or attached to their respective containers with their lids locked in place.
DO NOT store blended or unblended ingredients in the Single-Serve Cup with the Pro Extractor Blades® assembly attached.
DO NOT stack items on top of the containers. Store any remaining attachments alongside the unit or in a cabinet where they will not be damaged or create a hazard
RESETTING THE MOTOR
This unit features a unique safety system that prevents damage to the motor and drive system should you inadvertently overload the it. If the unit is overloaded, the motor will be temporarily disabled. Should this occur, follow the reset procedure below.
- Unplug the unit from the socket.
- Allow the unit to cool for approximately 15 minutes.
- Remove the container’s lid and blade assembly. Empty the container and ensure no ingredients are jamming the blade assembly.
IMPORTANT: Ensure that maximum capacities are not exceeded. This is the most typical cause of appliance overload.
ORDERING REPLACEMENT PARTS
To order additional parts and attachments, visit ninjakitchen.co.uk
TROUBLESHOOTING GUIDE
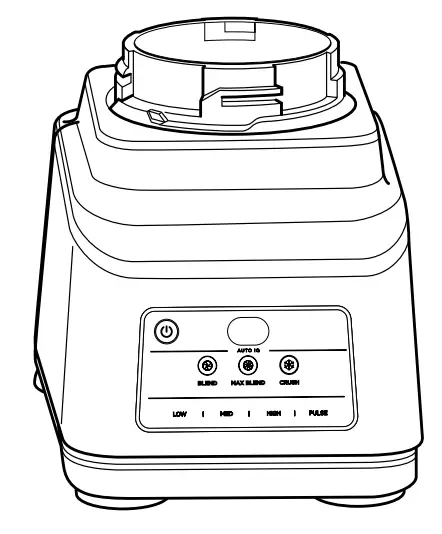 WARNING: To reduce the risk of shock and unintended operation, turn power off and unplug unit before troubleshooting.
Unit doesn’t turn on.
- Make sure unit is plugged in.
Display will read “–” once connected to power.
- Place container on base and rotate it clockwise until container clicks into place. Press the Power button
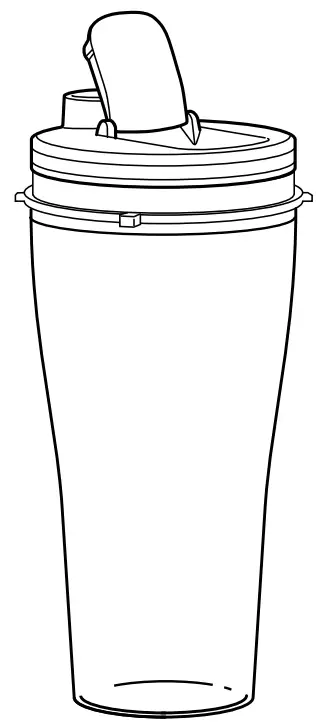 to turn unit on, and the available programs will illuminate indicating the unit is ready for use.
Display reads “Er”.
- If the display reads “Er”, unplug the unit from the socket and allow it to cool for 15 minutes. Remove the container’s lid and blade assembly and empty the contents to ensure no ingredients are jamming the blade assembly.
Lid/Pro Extractor Blades® Assembly is hard to install on the cup.
- Place the cup on a level surface. Carefully place the lid or Pro Extractor Blades® Assembly on the top of the cup and align the threads so the lid/Pro Extractor Blades® Assembly sits flat on the cup. Twist clockwise until you have a tight seal.
Unit doesn’t mix well; ingredients get stuck.
- Using the Auto-IQ® programs is the easiest way to achieve great results. The pulses and pauses allow the ingredients to settle toward the blade assembly. If ingredients are routinely getting stuck, adding some liquid will usually help.
- When filling the cup, start with fresh fruit or vegetables, then leafy greens or herbs. Next add liquids or yoghurt, then seeds, powders, or nut butters. Finally, add ice or frozen ingredients.
Motor base won’t stick to worktop or tabletop.
- Make sure surface and suction feet are wiped clean. Suction feet will only stick to smooth surfaces.
- Suction feet will not stick on some surfaces such as wood, tile, and non polished finishes.
- DO NOT attempt to use unit when the motor base is stuck to a surface that is not secure (cutting board, platter, plates, etc.).
Unit is difficult to remove from worktop for storage.
- Place your hands underneath both sides of the motor base and gently pull the unit up and toward you.
Unit displays a blinking “… …” message.
- The unit can detect which container is on the motor base. You may be trying to use a program that is not designed for the container you have installed. The programs will light up, indicating which programs are available for each container.
The unit doesn’t create snow from solid ice.
- DO NOT use ice that has been sitting out or has started to melt. Use ice straight from the freezer.
- Start with a few pulses and then use a continuous blending cycle.
The jug lid handle will not fold down.
- If not attached to the jug, the handle will not fold down. For storage, place the lid on the jug and press down on the handle until it clicks into place.
- Start with a few pulses and then use a continuous blending cycle.
| NOTE: Auto-iQ® programs have pauses and changes in speed throughout the cycle. |
![]() This marking indicates this product should not be disposed of with other household wastes throughout the EU. To prevent possible harm to the environment or human health from uncontrolled waste disposal, recycle it responsibly to promote the sustainable reuse of material sources. To return your used device, please use the return and collection systems or contact the retailer where this product was purchased. They can take this product for environmentally safe recycling.
This marking indicates this product should not be disposed of with other household wastes throughout the EU. To prevent possible harm to the environment or human health from uncontrolled waste disposal, recycle it responsibly to promote the sustainable reuse of material sources. To return your used device, please use the return and collection systems or contact the retailer where this product was purchased. They can take this product for environmentally safe recycling.

REGISTER YOUR PURCHASE
 ninjakitchen.co.uk/register-guarantee/
 Scan QR code using mobile device
TIP: You can find the model and serial numbers on the QR code label on the back of the unit by the power cord.
Euro-Pro Europe Limited 3150 Century Way
Thorpe Park, Leeds LS15 8ZB, UK
ninjakitchen.co.uk

Ninja Cooking cheat sheet
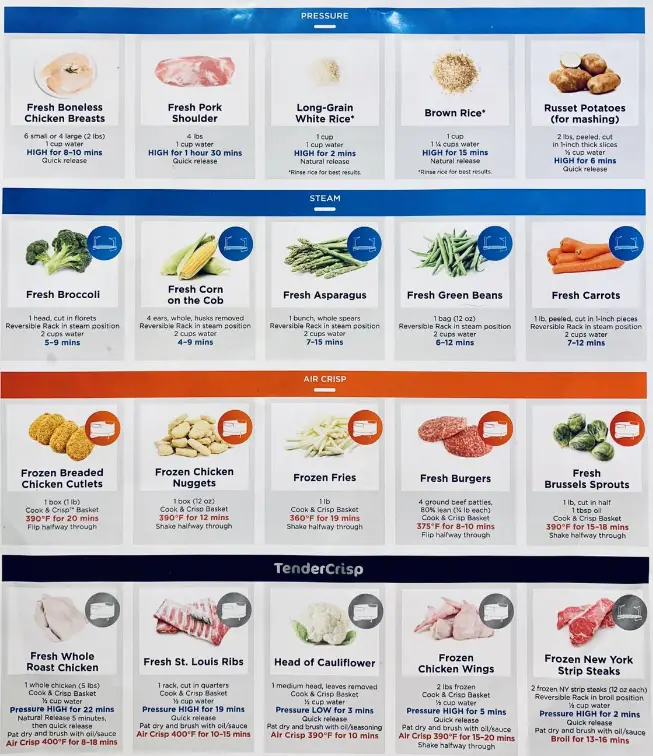
Installing and removing the pressure lid
Place the pressure lid on top of the unit with theon the lid and the on the base lined up evenly. Turn the lid clockwise until it locks in place. To unlock the pressure lid,
turn it anticlockwise. Lift it up and away from you, as some steam will remain in the unit and escape when the lid is opened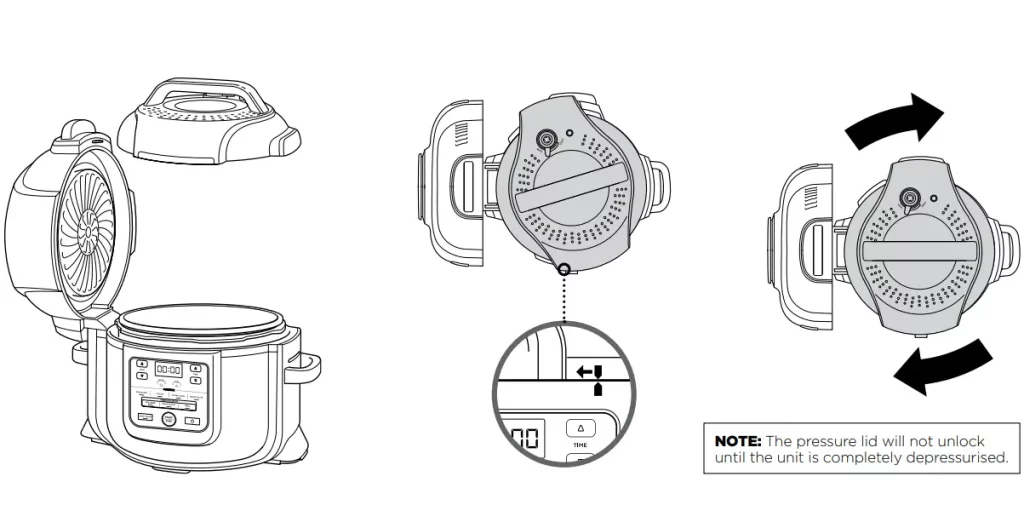
Here’s what’s in the box
Using your Foodi functions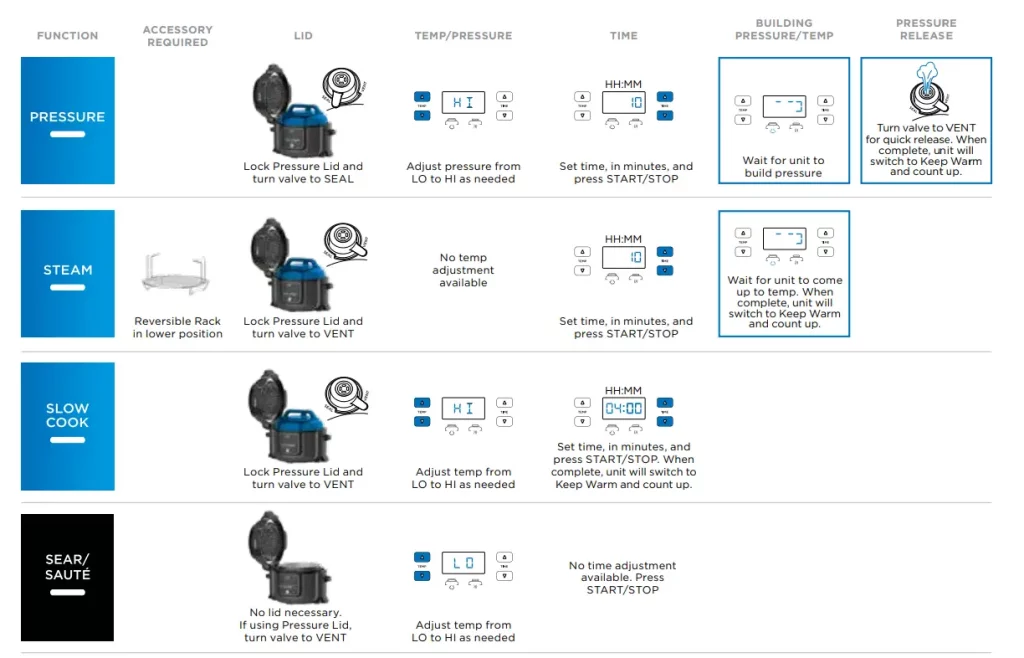
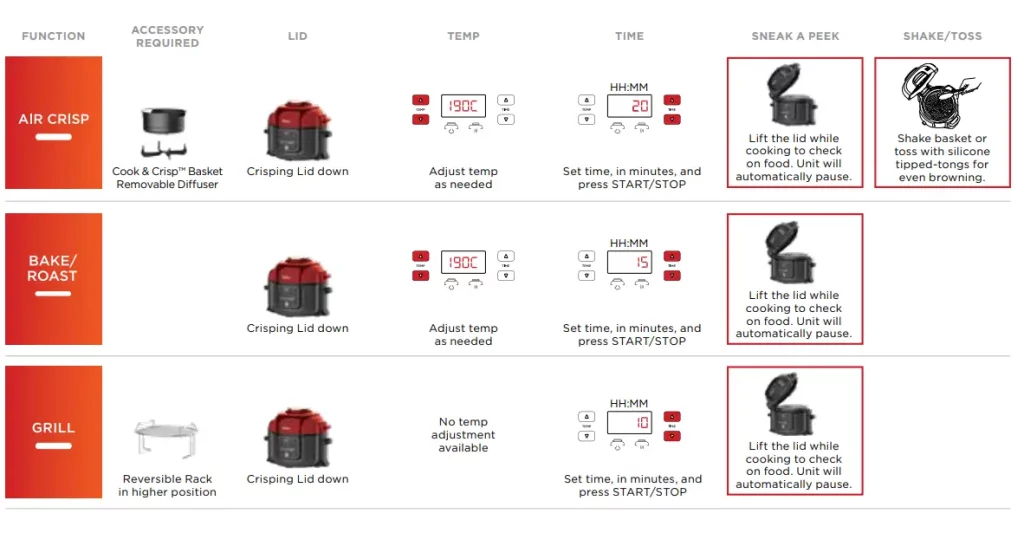
Why are there 2 lids?
- The two-lid design allows you to pressure cook and crisp in the same pot.
- Use both lids to unlock a world of delicious, TenderCrisp meals.
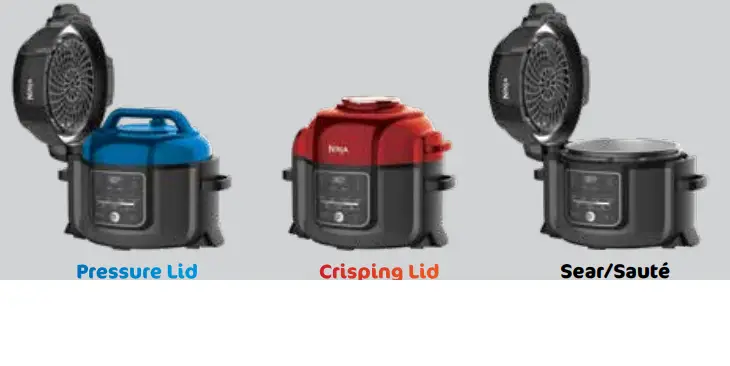
Getting started with pressure cooking? Try this water test to practice with pressure.
- Add 70Oml water to cooking pot.
- Lock Pressure Lid.
- Turn valve to SEAL.
- Push PRESSURE, select high (HI), set time to 2 minutes, and press START/STOP.
- Moving lights and some steam release indicate pressure is building. When pressurized, countdown will begin.
- When the Foodi” beeps, turn valve to VENT for quick release.
Cleaning and Maintenance
Cleaning: Dishwasher & Hand-Washing
The unit should be cleaned thoroughly after every use.
Removing & Reinstalling the silicone Ring
To remove the silicone ring, pull it outward, section by section, from the silicone ring rack. The ring can be installed with either side facing up. To reinstall, press it down into the rack section by section. After use, remove any food debris from the silicone ring and anti-clog cap.
Keep the silicone ring clean to avoid odour.
Washing it in warm, soapy water or in the dishwasher can remove odour. However, it is normal for it to absorb the smell of certain acidic foods. It is recommended to have more than one silicone ring on hand. You can purchase additional silicone rings on ninjakitchen.eu
NEVER pll out the silicone ring with excessive force, as that may deform it and the rack and affect the pressure-sealing function. A silicone ring with cracks, cuts, or other damage should be replaced immediately.
NEVER clean the cooker base or pressure lid in the dishwasher. Inspect the pressure Ilid to ensure there is no debris blocking the valves.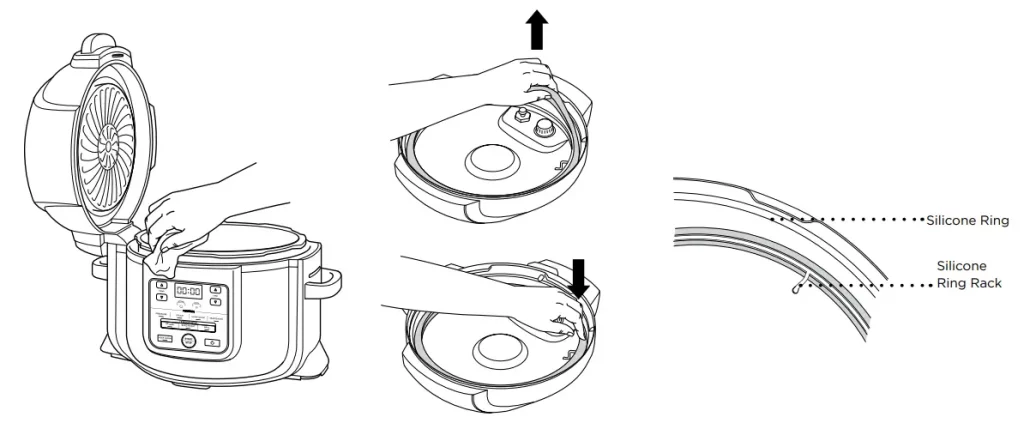
![]()
AG300
___Series___
OWNER’S GUIDE
![]()
GRILL
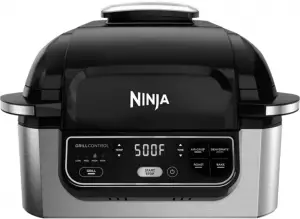

THANK YOU

REGISTER YOUR PURCHASE
 Scan QR code using mobile device
RECORD THIS INFORMATION
Model Number: ___________________
Serial Number: ____________________
Date of Purchase: __________________
(Keep receipt)
Store of Purchase: __________________
TECHNICAL SPECIFICATIONS
Voltage: 120V~60Hz
Watts: 1760W
TIP: You can find the model and serial numbers on the QR code label located on the back of the unit by the power cord.
2
IMPORTANT SAFEGUARDS
HOUSEHOLD USE ONLY • READ ALL INSTRUCTIONS BEFORE USE
 Read and review instructions for operation and use.
 Take care to avoid contacts with hot surface. Always use hand protection to avoid burns.
 For indoor and household use only.
Read all instructions before using your Ninja® Foodi™ Grill.
When using electrical appliances, basic safety precautions should always be followed, including the following:
- Remove and discard the protective cover fitted on the power plug of this appliance.
- This appliance can be used by persons with reduced physical, sensory or mental capabilities or lack of experience and knowledge if they have been given supervision or instruction concerning use of the appliance in a safe way and understand the hazards involved.
- Keep the appliance and its cord out of reach of children. DO NOT allow the appliance to be used by children. Close supervision is necessary when used near children.
- This appliance is for household use only. DO NOT use this appliance for anything other than its intended use. DO NOT use in moving vehicles or boats. DO NOT use outdoors. Misuse may cause injury.
- Ensure the surface is level, clean and dry. DO NOT place the appliance near the edge of a countertop during operation.
- ALWAYS ensure the appliance is properly assembled before use.
- When using this appliance, provide at least 6 inches (15.25 cm) of space above and on all sides for air circulation.
- DO NOT use an extension cord. A short power-supply cord is used to reduce the risk of children grabbing the cord or becoming entangled and to reduce the risk of people tripping over a longer cord.
- To protect against electrical shock DO NOT immerse cord, plugs, or main unit housing in water or other liquid.
- DO NOT use the appliance if there is damage to the power cord or plug. Regularly inspect the appliance and power cord. If the appliance malfunctions or has been damaged in any way, immediately stop use and call Customer Service.
- NEVER use outlet below countertop surface.
- DO NOT place appliance and let cord hang over edges of tables, counters or touch hot surfaces.
- Only use recommended accessories included with this appliance or authorized by SharkNinja. The use of accessories or attachments not recommended by SharkNinja may cause a risk of fire or injury.
- Before placing any accessory into the cooker, ensure they are clean and dry.
- DO NOT use the appliance without the removable cooking pot and splatter shield installed.
- ALWAYS ensure hood is fully closed before operating.
- DO NOT move the appliance when in use.
- DO NOT cover the air intake vent or air outlet vent while unit is operating. Doing so will prevent even cooking and may damage the unit or cause it to overheat.
- DO NOT touch hot surfaces. Appliance surfaces are hot during and after operation. To prevent burns or personal injury, ALWAYS use protective hot pads or insulated oven mitts and use available handles and knobs.
- DO NOT touch accessories during or immediately after cooking. The grill grate and basket becomes extremely hot during the cooking process. Avoid physical contact while removing the accessory from the appliance. To prevent burns or personal injury ALWAYS use care when interfacing with product. Recommend use of long handed utensil and protective hot pads or insulated oven mitts.
- DO NOT use this appliance for deep-frying.
- To prevent possible illness, ALWAYS use a thermometer to check that your food is cooked to the recommended temperatures.
- Should a grease fire occur or the unit emits black smoke, unplug immediately. Wait for smoking to stop before removing any cooking accessories.
- Please refer to the Cleaning & Maintenance section for regular maintenance of the appliance.
- Unplug from outlet when not in use and before cleaning. Allow to cool before cleaning, dissasembly, putting in or taking off parts and storage.
- DO NOT clean with abrasive cleaners, steel wool, or scouring pads.
- Cleaning and user maintenance shall not be made by children.
SAVE THESE INSTRUCTIONS
5
PARTS

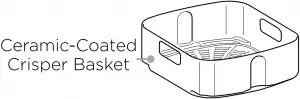

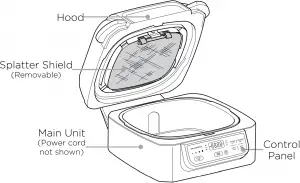
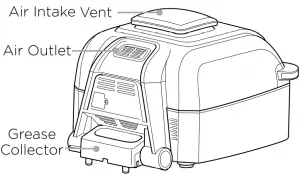


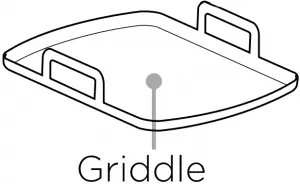

NOTE Additional accessories are available for purchase at ninjaaccessories.com.
6
GETTING TO KNOW YOUR FOODI™ GRILL
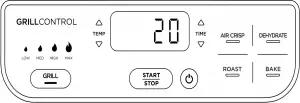
The control panel display shows time in an HH:MM format. The display to the left reads 20 minutes.
FUNCTION BUTTONS
NOTE: Not all functions are included on every model.
GRILL Grill indoors while creating even char, grill marks, and grilled flavor.
AIR CRISP For crispiness and crunch with little to no oil.
ROAST Tenderize meats, roast vegetables, and more.
BAKE Use to bake cakes, treats, desserts, and more.
DEHYDRATE Dehydrate meats, fruits, and vegetables for healthy homemade snacks.
OPERATING BUTTONS
POWER button Once the unit is plugged in, press the power  button to turn on the unit. Pressing it during cooking stops the current cooking function and turns off the unit.
TEMP arrows Use the up ![]() and down
and down ![]() TEMP arrows to adjust the cooking temperature in any function. When using the Grill function, toggle the GRILL button or use the up and down arrows to adjust cooking temperature.
TEMP arrows to adjust the cooking temperature in any function. When using the Grill function, toggle the GRILL button or use the up and down arrows to adjust cooking temperature.
TIME arrows Use the up ![]() and down
and down ![]() TIME arrows to adjust the cook time in any function.
TIME arrows to adjust the cook time in any function.
NOTE: To adjust temperature or time during cooking, press the up and down arrows. The unit will then resume at those settings.
START/STOP button After selecting temperature and time, press the START/STOP button to begin cooking.
STANDBY MODE
The unit will power off if cooking is not in process and there has been no interaction with the control panel for 10 minutes.
BEFORE FIRST USE
- Remove all packaging material, promotional labels, and tape from the unit.
- Remove all accessories from the package and read this manual carefully. Please pay particular attention to operational instructions, warnings, and important safeguards to avoid any injury or property damage.
- Wash the grill grate, splatter shield, crisper basket, cleaning brush, veggie tray, griddle, kebabs, and cooking pot in warm, soapy water, then rinse and dry thoroughly. The grill grate, splatter shield, crisper basket, cleaning brush, veggie tray, griddle, kebabs, and cooking pot are also dishwasher safe. NEVER clean the main unit in the dishwasher.
7
USING YOUR FOODI™ GRILL
SPLATTER SHIELD
Located on the underside of the hood, the splatter shield keeps the heating element clean and prevents smoking. The splatter shield is removable for cleaning, but we recommend keeping it in place when cooking.
Removing the splatter shield
Remove the splatter shield for cleaning after every use. First allow the platter shield to cool completely, then remove it by using your thumb to release the front clip by pushing the front clip upward and using your other hand to pull one of the tabs toward you. This will release the splatter shield, allowing you to pull it out of the slot along the back of the hood.
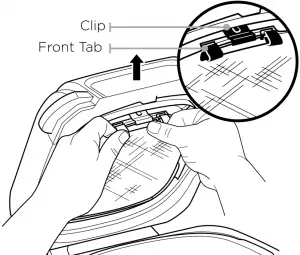
Installing the splatter shield
To install, gently push the splatter shield into the back of the hood. Insert the back tab on shield with the slot on the back of the hood. Then push the splatter shield upward until it clicks into the clip on the front of the hood.

GRILLCONTROL TECHNOLOGY
Our technology allows you to control the temperature of the grill grate for precise cooking and keep smoke out of the kitchen.
When using the Grill function, you will need to select the grill grate temperature setting. Below are recommended temperature levels for common ingredients.
| LOW
400°F |
MEDIUM
450°F |
HIGH
500°F |
MAX
up to 510°F |
| • Bacon
• Sausages • Using thick barbecue sauce • Calzones |
• Frozen Meats
• Marinated/ sauced meat |
• Steaks
• Chicken • Burgers • Hot dogs |
• Veggies
• Fruit • Pizzas • Fresh/ Frozen Seafood • Kebobs |
NOTE: The unit could create smoke during the cooking process. For less smoke, we recommend using canola, coconut, avocado, grapeseed, or vegetable oil instead of olive oil.
NOTE: The unit may produce smoke when cooking meats on a hotter setting than what is recommended. For more cooking charts, refer to your Inspiration Guide or visit ninjakitchen.com
Switching to Grill after using another function
If the unit is already warm from using a different function, and the grill grate is at room temperature when you place it in the unit, “Add Food” may appear on the screen immediately. We recommend allowing the grill grate to heat up for at least 6 minutes before placing ingredients on it. As the unit continues to run and the grill grate heats up, “Add Food” will remain on the screen until you open the hood and place ingredients on the grate.
Batch grilling
When grilling more than two consecutive batches of food, it is recommended that you empty the fat/oil from the removable cooking pot. This will help prevent grease from burning and causing smoke.
We also recommend allowing the grill grate to heat back up for at least 3–5 minutes between batches to ensure consistent grill marks and char.
8
COOKING FUNCTIONS
Ensure the unit is plugged in before turning it on. Press the power button.
Grill
1 Place the cooking pot in the unit with the indent on the pot aligned with the rear bump on the main unit. Then place the grill grate in the pot with the handles facing up. Ensure the splatter shield isin place and close the hood.
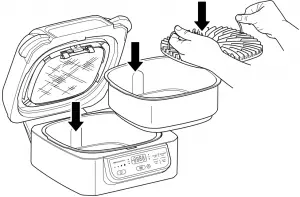
2 Press the GRILL button. The default temperature level will illuminate on the left side of the control panel and the corresponding air temperature will appear on the display screen. Press the Grill button or the up and down TEMP arrows to adjust the temperature setting.
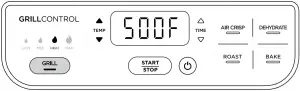
3 Press the up and down TIME arrows to set the cooking time in one-minute increments, up to 30 minutes.
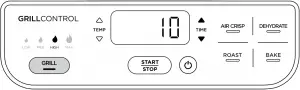
4 Press the START/STOP button to begin preheating. PRE will appear on the display screen, and the progress bar will begin. It can take about 8 minutes to preheat, depending on the selected temperature setting.
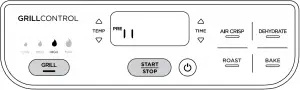
5 When preheating is complete, the unit will beep and “Add Food” will flash across on the display screen.

6 Open the hood and place ingredients on the grill grate. Once the hood is closed, cooking will begin and the timer will start counting down.
NOTE: During cooking, you can open the hood to check on or flip your food. The timer will pause when the hood is opened and then automatically resume after it is closed.
7 When cook time is complete, the unit will beep and END will appear on the display screen. Keep the hood open after removing your food so the unit will cool down more quickly. The stainless steel wrap on the exterior of the unit will be hot after cooking. If you need to cook your food longer, simply press the TIME up arrow to add more time, then press the START/STOP button.
NOTE: If batch cooking, empty the oil from the removable cooking pot after every 2 batches. This will help prevent grease from burning and causing smoke.
9
Air Crisp
1 Place cooking pot in the unit with the indent on the pot aligned with the bump on the main unit. Place the crisper basket in the pot, then close the hood.
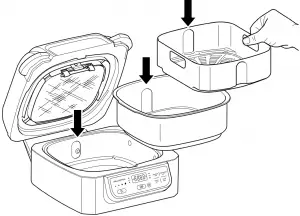
2 Press the AIR CRISP button. The default temperature setting will display. Use the up and down TEMP arrows to adjust the temperature.
3 Use the up and down TIME arrows to set the cook time in 1-minute increments up to 1 hour.
4 Press the START/STOP button to begin preheating. PRE will appear on the display screen, and the progress bar will begin. It can take up to 3 minutes to preheat, depending on the selected temperature setting.
NOTE: While preheating is strongly recommended for best results, you can skip it by pressing the AIR CRISP button again. “Add Food” will flash across the screen. Open the hood and place ingredients in the crisper basket. Once the hood is closed cooking will begin and the timer will start counting down. Skip to step 7 for further instructions.
5 When preheating is complete, the unit will beep and “Add Food” will flash across on the display screen.
6 Open the hood and place ingredients in the crisper basket. Once the hood is closed, cooking will begin and the timer will start counting down.
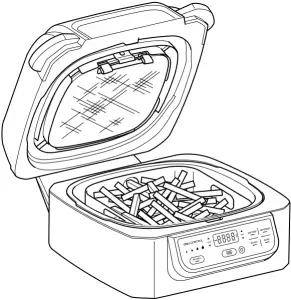
7 For best results, we recommend shaking ingredients frequently. When you open the hood, the unit will pause. Use silicone tipped tongs when tossing your food or oven mitts to shake the basket. When done, replace the basket and close the hood. Cooking will automatically resume after hood is closed.
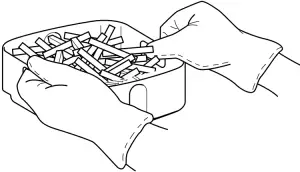
8 When cook time is complete, the unit will beep and END will appear on the display screen. Keep the hood open after removing your food so the unit will cool down more quickly. The stainless steel wrap on the exterior of the unit will be hot after cooking. If you need to cook your food longer, simply press the TIME up arrow to add more time, then press the START/STOP button.
10
Roast
1 Place cooking pot in the unit with the indent on the pot aligned with the bump on the main unit, then close the hood.
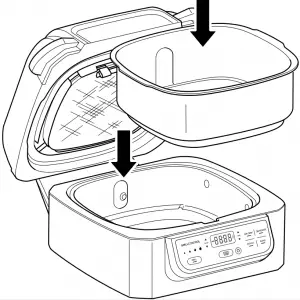
2 Press the ROAST button. The default temperature setting will display. Use the up and down TEMP arrows to adjust the temperature.
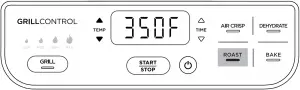
NOTE: To convert conventional oven recipes, reduce the temperature by 25°F. Check food frequently to avoid overcooking.
3 Use the up and down TIME arrows to set the cook time, in 15-minute increments, up to 4 hours.
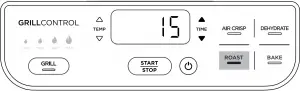
4 Press the START/STOP button to begin preheating. PRE will appear on the display screen, and the progress bar will begin. It can take up to 3 minutes to preheat, depending on the selected temperature setting.
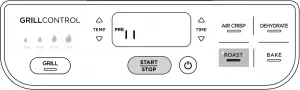
NOTE: While preheating is strongly recommended for best results, you can skip it by pressing the ROAST button again. “Add Food” will flash across the screen. Open the hood and place ingredients in the crisper basket. Once the hood is closed cooking will begin and the timer will start counting down.
5 When preheating is complete, the unit will beep and “Add Food” will flash across on the display screen.
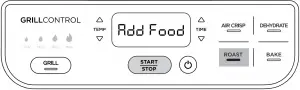
6 Open the hood and place ingredients in the pot.
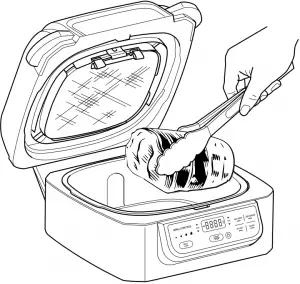
NOTE: During cooking, you can open the hood to check on your food. The timer will pause when the hood is opened and then automatically resume after it is closed.
7 When cook time is complete, the unit will beep and END will appear on the display screen. Keep the hood open after removing your food so the unit will cool down more quickly. The stainless steel wrap on the exterior of the unit will be hot after cooking. If you need to cook your food longer, simply press the TIME up arrow to add more time, then press the START/STOP button.
11
Bake
1 Place cooking pot in the unit so the indent on the pot aligned with the bump on the main unit, then close the hood.
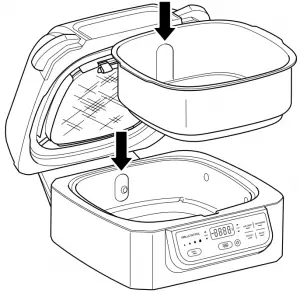
2 Press the BAKE button. The default temperature setting will display. Use the up and down TEMP arrows to adjust the temperature.
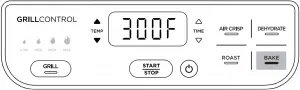
NOTE: To convert conventional oven recipes, reduce the temperature by 25°F. Check food frequently to avoid overcooking.
3 Use the up and down TIME arrows to set the cook time, in 15-minute increments, up to 4 hours.
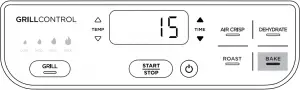
4 Press the START/STOP button to begin preheating. PRE will appear on the display screen, and the progress bar will begin. It can take up to 3 minutes to preheat, depending on the selected temperature setting.
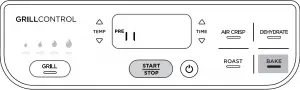
NOTE: While preheating is strongly recommended for best results, you can skip it by pressing the BAKE button again. “Add Food” will flash across the screen. Open the hood and place ingredients in the crisper basket. Once the hood is closed cooking will begin and the timer will start counting down.
5 When preheating is complete, the unit will beep and “Add Food” will flash across on the display screen.
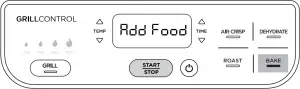
6 Open the hood and add ingredients to the pot or set your bake pan directly in the bottom of the pot, and close the hood to start cooking. Once the hood is closed, cooking will begin and the timer will start counting down.
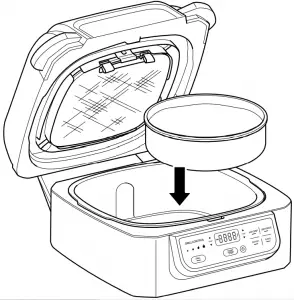
NOTE: During cooking, you can open the hood to check on your food. The timer will pause when the hood is opened and then automatically resume after it is closed.
7 When cook time is complete, the unit will beep and END will appear on the display screen. Keep the hood open after removing your food so the unit will cool down more quickly. The stainless steel wrap on the exterior of the unit will be hot after cooking. If you need to cook your food longer, simply press the TIME up arrow to add more time, then press the START/STOP button.
12
Dehydrate
NOTE: The Dehydrate function is not included on all models.
1 Place cooking pot in the unit with the indent on the pot aligned with the bump on the main unit, then add a single layer of ingredients to the bottom of the pot. Place the crisper basket in the pot and add a layer of ingredients to the bottom of the basket. Close the hood.
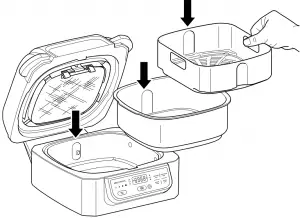
2 Press the DEHYDRATE button. The default temperature setting will display. Use the up and down TEMP arrows to set your desired temperature.
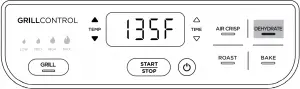
3 Use the up and down TIME arrows to set the dehydration time, in 15-minute increments, up to 12 hours.
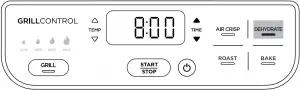
4 Press the START/STOP button to begin. The unit does not need to preheat.
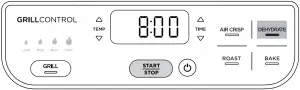
NOTE: During dehydration, you can open the hood to check on your food. The timer will pause when the hood is opened and then automatically resume after it is closed.
5 When dehydration time is complete, the unit will beep and END will appear on the display screen. Remove your food and close the hood.
CLEANING YOUR FOODI™ GRILL
The unit should be cleaned thoroughly after every use. Always let the appliance cool before cleaning.
- Unplug the unit from the wall outlet before cleaning. Keep the hood open after removing your food so the unit will cool down more quickly.
- To clean the main unit, and control panel, wipe them with a damp cloth.
- The cooking pot, grill grate, crisper basket, splatter shield, cleaning brush, and any other included Ninja Foodi Grill accessories are dishwasher safe.
NOTE: NEVER use abrasive tools or cleaners. NEVER immerse the main unit in water or any other liquid.
- If hand-washing, use the cleaning brush to help wash the parts. Use the opposite end of the cleaning brush as a scraper to assist with releasing baked-on sauces or cheese. Air-dry or towel-dry all parts after hand-washing.
- If food residue or grease are stuck on the grill grate, splatter shield, or any other removable part, place them in a sink or stack them in the pot and fill with warm, soapy water and allow to soak for a couple hours or overnight. After soaking, use the cleaning brush to clean each part.
- Over time, the splatter shield front tabs and frame may accumulate grease buildup. Soaking the splatter shield overnight will help soften the baked-on grease. After soaking, use the cleaning brush to remove the grease from the stainless steel frame and front tabs.
13
TROUBLESHOOTING GUIDE
- “Add Food” appears on the control panel display.
The unit has completed its Grill preheating and it is now time to add your ingredients. - “Shut Lid” appears on the control panel display.
The hood is open and needs to be closed for the selected function to start. - “Add Pot” appears on the control panel display.
The pot is not installed in the unit. - “E” appears on the control panel display.
The unit is not functioning properly. Please contact Customer Service at 1-877-646-5288. So we may better assist you, please register your product online at registeryourninja.com and have the product on hand when you call. - Why do blinking lights appear after I press the START/STOP button?
This is a progress bar indicating how far along you are in the preheating cycle. - Why does the preheat progress bar not start from the beginning?
When the unit is warm from previously being used, it will not require the full preheating time. - Should I add my ingredients before or after preheating?
Let the unit preheat before adding ingredients. - Why is my unit emitting smoke?
When using the Grill function, always select the recommended temperature setting. Recommended settings can be found in the Quick Start Guide and in the Inspiration Guide. Make sure the splatter shield is installed. - How do I pause the unit so I can check my food?
When the hood is opened during a cooking function, the unit will automatically pause. - My food is burned.
Do not add food until preheating is complete. For best results, check progress throughout cooking, and remove food when desired level of brownness has been achieved. Remove food immediately after the cook time is complete to avoid overcooking. - My food didn’t cook when air crisping.
For consistent browning, make sure ingredients are arranged in an even layer on the bottom of the crisper basket with no overlapping. Shake loose ingredients during cooking for consistent crispiness. - Why is my food blowing around when air crisping?
Occasionally, the fan will blow lightweight foods around. To prevent this, secure loose food (like the top slice of bread on a sandwich) with toothpicks. - Can I air crisp fresh battered ingredients?
Yes, but use the proper breading technique. It is important to coat foods first with flour, then with egg, and then with bread crumbs. Be sure to press the bread crumbs onto the food so they stick in place. Loose breading may be blown off by the unit’s powerful fan. - The control panel display is no longer illuminated.
The unit is off. Press the power button to turn it back on. - Can I cancel or override preheating?
Preheating is highly recommended for best results. skip preheating by selecting the function again after you press the START/STOP button. However, you cannot override preheating when using the Grill function. - How can I deep clean the splatter shield?
The splatter shield should be cleaned after each use and is dishwasher safe. Over time, the splatter shield front tabs and frame may accumulate grease buildup. Soaking the splatter shield overnight will help soften the baked-on grease. After soaking, use the cleaning brush to remove the grease from the stainless steel frame and front tabs.
REPLACEMENT PARTS
To order additional parts and accessories, visit ninjaaccessories.com or contact Customer Service at 1-877-646-5288.
14
![]()
ONE (1) YEAR LIMITED WARRANTY
The One (1) Year Limited Warranty applies to purchases made from authorized retailers of SharkNinja Operating LLC. Warranty coverage applies to the original owner and to the original product only and is not transferable.
SharkNinja warrants that the unit shall be free from defects in material and workmanship for a period of one (1) year from the date of purchase when it is used under normal household conditions and maintained according to the requirements outlined in the Owner’s Guide, subject to the following conditions and exclusions:
What is covered by this warranty?
- The original unit and/or non-wearable parts deemed defective, in SharkNinja’s sole discretion, will be repaired or replaced up to one (1) year from the original purchase date.
- In the event a replacement unit is issued, the warranty coverage ends six (6) months following the receipt date of the replacement unit or the remainder of the existing warranty, whichever is later. SharkNinja reserves the right to replace the unit with one of equal or greater value.
What is not covered by this warranty?
Our Customer Service Specialists are available to provide all the warranty service options available to you, including the possibility of upgrading to our VIP Warranty Service Options for select product categories.
- Normal wear and tear of wearable parts (including cooking pot, grill grate, crisper basket, splatter shield, etc.), which require regular maintenance and/or replacement to ensure the proper functioning of your unit, are not covered by your warranty. Replacement parts are available for purchase at ninjaaccessories.com.
- Any unit that has been tampered with or used for commercial purposes
- Damage caused by misuse, abuse, negligent handling, failure to perform required maintenance (e.g., failure to keep the splatter shield and grease collector clean), or damage due to mishandling in transit.
- Consequential and incidental damages.
- Defects caused by repair persons not authorized by SharkNinja. These defects include damages caused in the process of shipping, altering, or repairing the SharkNinja product (or any of its parts) when the repair is performed by a repair person not authorized by SharkNinja.
- Products purchased, used, or operated outside North America.
How to get service
If your appliance fails to operate properly while in use under normal household conditions within the warranty period, visit ninjakitchen.com/support for product care and maintenance self-help. Our Customer Service Specialists are also available at 1-877-646-5288 to assist with product support and warranty service options, including the possibility of upgrading to our VIP warranty service options for select product categories. So we may better assist you, please register your product online at registeryourninja.com and have the product on hand when you call.
SharkNinja will cover the cost for the customer to send in the unit to us for repair or replacement. A fee of $19.95 (subject to change) will be charged when SharkNinja ships the repaired or replacement unit.
How to initiate a warranty claim
You must call 1-877-646-5288 to initiate a warranty claim. You will need the receipt as proof of purchase. We also ask that you register your product online at registeryourninja.com and have the product on hand when you call, so we may better assist you. A Customer Service Specialist will provide you with return and packing instruction information.
How state law applies
This warranty gives you specific legal rights, and you also may have other rights that vary from state to state. Some states do not permit the exclusion or limitation of incidental or consequential damages, so the above may not apply to you.
15
SharkNinja Operating LLC
US: Needham, MA 02494
1-877-646-5288
ninjakitchen.com
Illustrations may differ from actual product. We are constantly striving to improve our products, therefore the specifications contained herein are subject to change without notice.
NINJA is a registered trademark of SharkNinja Operating LLC.
FOODI is a trademark of SharkNinja Operating LLC.
For SharkNinja U.S. patent information, visit sharkninja.com/uspatents.
©2019 SharkNinja Operating LLC
PRINTED IN CHINA
AG300Series_IB_EN_FR_SP_MP_Mv9


@ninjakitchen
]]>NINJA Foodi Deluxe Pressure Cooker
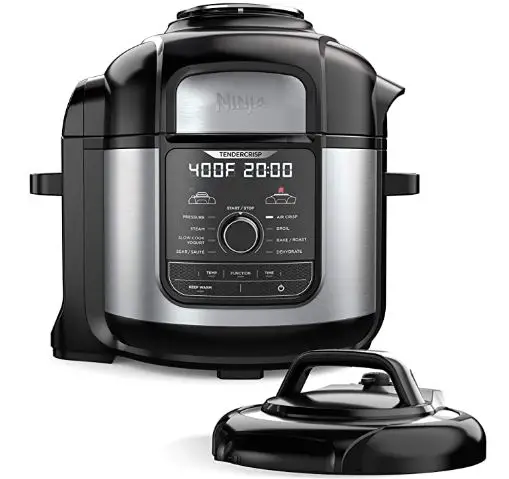
NINJA Foodi Deluxe Pressure Cooker
Getting Started
Get the most out of your Deluxe Reversible Rack
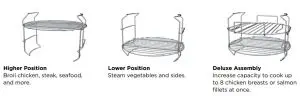
Deluxe Reversible Rack Assembly
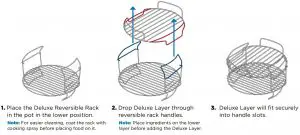
Deluxe Reversible Rack Usage
Create deluxe 360 meals by placing proteins on the Deluxe Layer, sides on the lower layer, and grains on the bottom of the pot.
For best results, use the Deluxe Layer for crisping, lower layer for oven roasting, and bottom of the pot for wetter ingredients.
When air crisping 2 layers, allow 5–15 minutes for the lower layer to crisp before adding the Deluxe Layer.
Basket Assembly, Hints & Tips
Pressure Cooking Tips
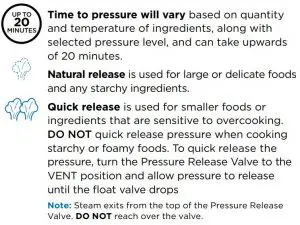
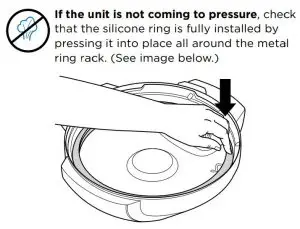
Cook & Crisp Basket Assembly
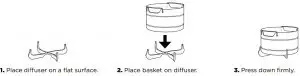
Helpful Hints
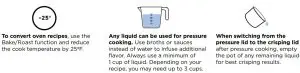
Let’s get cooking & crisping
Why are there 2 lids?
We’re glad you asked. The 2-lid design allows you to pressure cook and crisp in the same pot.
Use both lids to unlock a world of delicious, TenderCrisp meals
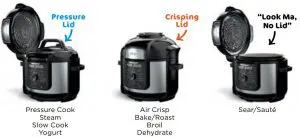
First time pressure cooking?
Try this water test to practice using pressure.


Using the Control Panel

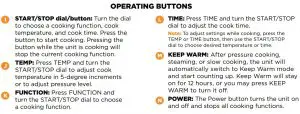
Using the Pressure Lid

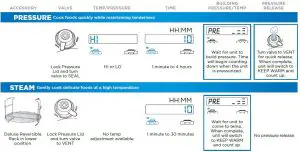
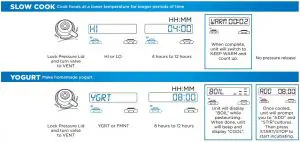

Using the Crisping Lid


Read More About This Manual & Download PDF:
FAQ’S
What is the difference between the Deluxe and the Foodi?
The Foodi is a smaller, more compact version of the Deluxe. The Foodi has a smaller capacity, and does not have a crisping rack.
What is the difference between the Deluxe and the Foodi Deluxe?
The Foodi Deluxe has a crisping rack and a timer. The Foodi does not have a timer or a crisping rack.
What is the difference between the Deluxe and the Ninja Cooking System XL?
The Ninja Cooking System XL is an all-in-one unit. It comes with a steamer basket, roasting pan, baking pan, and lid that doubles as a serving plate. The Ninja Cooking System XL also has a timer and pressure indicator light.
What are the dimensions of this product?
It measures 12″ x 12″ x 14″ (LxWxH).
How much food can be cooked in this pot?
It has a 6-quart capacity. This means that it can hold up to 6 quarts of liquid at one time. That’s enough to cook approximately 8 cups of rice or 16 cups of pasta! It’s also large enough to cook 4 pounds of chicken or 2 pounds of beef!
What are the disadvantages of the Ninja Foodi?
It just kind of sits there, and it’s heavy and awkward while you pressure cook.” Many reviewers also point out that the Ninja Foodi is incredibly bulky, and while it does take the place of multiple appliances, it’s still not a super convenient machine to store.
How much electricity does the Ninja Foodi use?
It will use 500 Wh (or 0.5 kWh) in half an hour. It will use 2 kWh in 2 hours
What are the 8 functions of the Ninja Foodi?
Steam, slow cook, sear, saute, air crisp, roast, boil, and dehydrate all in one pot.
How much water do I put in my Ninja Foodi pressure cooker?
The Ninja Foodi recommends at least ½ cup of liquid in the 6.5 quart and the 8.5 quart.
Why is my Ninja pressure cooker not working?
The first reason could be because the power cord is not properly connected to the wall socket. Alternatively, the Ninja Foodi might not be turning on because the outlet has tripped. These are the two primary reasons why it will not turn on. Of course, there might be more problems that will require solutions.
How do you reset a pressure cooker?
stored once the custom settings are defined, and even after the Instant Pot cooker is unplugged from power. To reset to factory default settings, press and hold the “Adjust” button for 3 seconds, when the Instant Pot cooker is in the Off mode.
What happens if you don’t put water in a pressure cooker?
Not adding any liquid to the Instant Pot.
It’s necessary for steam to build up, ultimately creating a high-pressure environment used for faster cooking. Without sufficient liquid, pressure won’t build — and you’ll likely get the dreaded “burn” error.
NINJA Foodi Deluxe Pressure Cooker
]]>![]()
BL771
OWNER’S GUIDE
Mega Kitchen System®
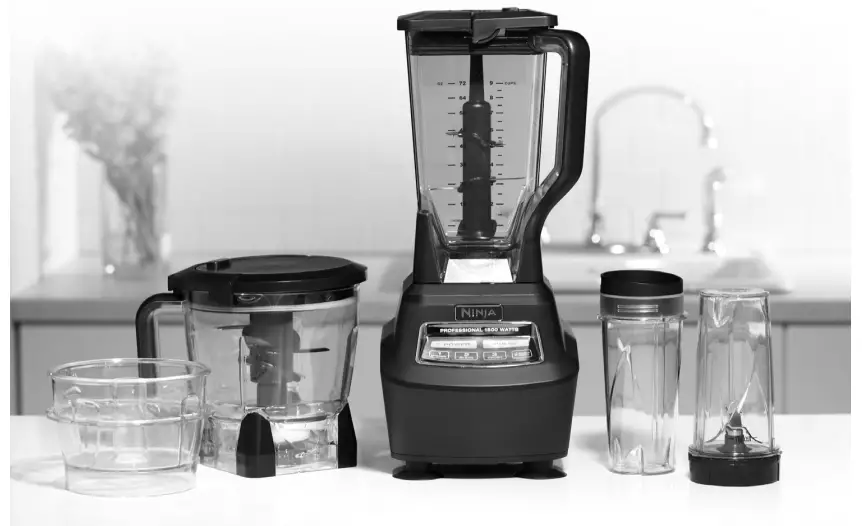
www.ninjakitchen.com
1 877 646-5288
IMPORTANT SAFETY INSTRUCTIONS
For Household Use Only
WHEN USING ELECTRICAL APPLIANCES, BASIC SAFETY PRECAUTIONS SHOULD ALWAYS BE FOLLOWED, INCLUDING THE FOLLOWING: READ ALL INSTRUCTIONS BEFORE USING YOUR NINJA® MEGA KITCHEN SYSTEM®.
POLARIZED PLUG
 WARNING: To reduce the risk of electric shock, this appliance has a polarized plug (one blade is wider than the other). This plug will fit into a polarized outlet only one way. If the plug does not fit fully into the outlet, reverse the plug. If it still does not fit, contact a qualified electrician to install the proper outlet. DO NOT modify the plug in any way.
WARNING: Extension cords are not recommended for use with this product.
WARNING: TO REDUCE THE RISK OF FIRE, ELECTRIC SHOCK OR INJURY:
- WARNING: Remove utensils prior to processing. Failure to remove may cause the jar to be damaged or to shatter which may cause personal injury.
- WARNING: Stacked Blade Assembly is sharp, not locked in place and removable, handle with care. When handling the Stacked Blade Assembly, always hold it by the shaft. Failure to do so will result in a risk of laceration.
- WARNING: Stacked Blade Assembly is sharp and not locked in place. If using the pour spout, ensure the lid is fully locked onto the pitcher. If pouring with the lid removed, carefully remove the Stacked Blade Assembly first, holding it by the shaft. Failure to do so will result in a risk of laceration.
- WARNING: Chopping Blade Assembly and Mini Prep Bowl Blade Assembly are sharp and not locked in place. Before emptying contents carefully remove lid and Chopping Blade Assembly or Mini Prep Bowl Blade Assembly, holding it by the shaft. Failure to do so will result in a risk of laceration.
- CAUTION: Do not blend hot liquids, doing so may cause excessive pressure build-up, resulting in risk of the user being burned.
- CAUTION: We do not recommend grinding in any of our Nutri Ninja™ cups.
- CAUTION: Remove the Nutri Ninja Blade Assembly from the cup upon completion of blending. Some ingredients have the potential to expand after blending resulting in excessive pressure buildup that can pose a risk of injury.
- To protect against electrical shock, do not submerge the appliance or allow the power cord to come into contact with water or any other liquid.
- DO NOT allow the appliance to be used by children. Close attention is necessary when used near children. This is not a toy.
- Never leave an appliance unattended when in use.
- Appliance accessories are not intended to be used in the microwave as it may result in damage to the accessories.
- Turn the appliance Off and remove the power cord from the electrical outlet when not in use, before assembling or disassembling parts and before cleaning. To unplug, grasp the plug and pull from the electrical outlet. Never pull from the power cord.
- DO NOT abuse the power cord. Never carry the appliance by the power cord or yank it to disconnect from electrical outlet; instead grasp the plug and pull to disconnect.
- DO NOT operate any appliance with a damaged cord or plug, or after the appliance malfunctions, has been dropped or damaged in any manner. This appliance has no serviceable parts. Return the appliance to SharkNinja Operating LLC for examination, repair or adjustment.
- DO NOT let the power cord hang over the edge of table or counter or touch hot surfaces such as the stove. 16 Always use appliance on a dry, level surface. 17 Keep hands, hair, clothing, as well as utensils out of container while processing to reduce the risk of severe injury to persons or damage to the appliance. A scraper may be used but only when the appliance is not running.
- Avoid contact with moving parts.
- DO NOT attempt to sharpen blades.
- DO NOT use the appliance if blade assemblies are bent or damaged.
- To reduce risk of injury, never place the blade assemblies on the base without the pitcher or Nutri Ninja® cup properly attached.
- DO NOT operate this appliance on or near any hot surfaces (such as gas or electric burner or in a heated oven).
- The use of attachments or accessories including canning jars, not recommended by the manufacturer may result in fire, electric shock or personal injury.
- DO NOT remove the container from the motor base while the appliance is in operation.
- To reduce the risk of injury, NEVER operate the appliance without the lid in place; DO NOT try to defeat the interlock mechanism; make sure that the attachment is properly installed before operating the appliance.
- DO NOT expose containers to extreme temperature changes.
- DO NOT overfill.
- DO NOT operate the appliance empty.
- If the appliance overheats, a thermal switch will become activated and shut off the motor. To reset, unplug the appliance and let it cool down for approximately 15 minutes before using again.
- THIS PRODUCT IS INTENDED FOR HOUSEHOLD USE ONLY. Do not use this appliance for anything other than its intended use. Do not use outdoors.
- The maximum rating is based on the Stacked Blade Assembly (pitcher) that drives the greatest power and other recommended attachments may draw significantly less power or current.
SAVE THESE
INSTRUCTIONS
THIS BOOK COVERS MODEL NUMBER:
BL771
TECHNICAL SPECIFICATIONS
Voltage: 120V., 60Hz.
Power: 1500 Watts
Pitcher Capacity: 72 oz. (9 cups, 2.15 L)
MAX Liquid Capacity: 64 oz. (8 cups, 1.9 L)
Bowl Capacity: 64 oz. (8 cups, 1.8 L)
Mini Prep Bowl Capacity: 24 oz. (3 cups, 710 ml)
Nutri Ninja® Cup Capacity: 16 oz. (2 cups, 470 ml)
Thank you for purchasing the Ninja® Mega Kitchen System®
Getting To Know Your Ninja® Mega Kitchen System®
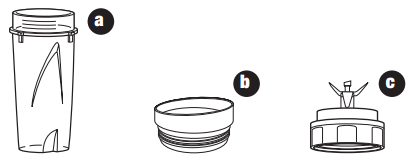
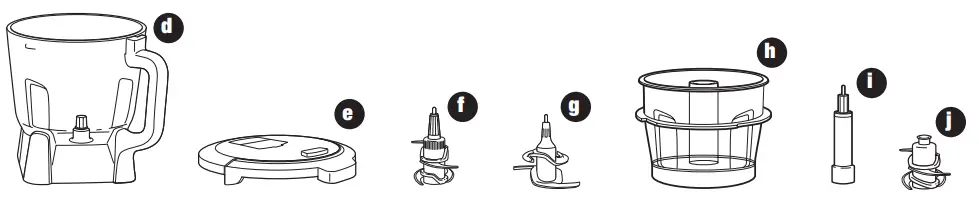
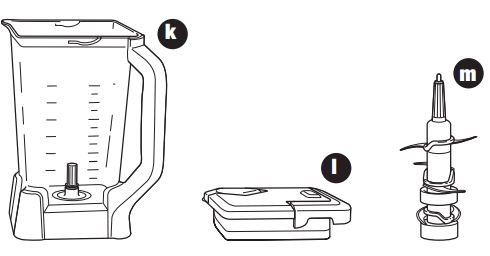
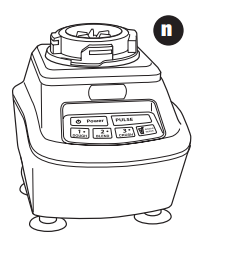
a 16 oz. Nutri Ninja® Cup (x2)
b To-Go Lid (x2)
c Nutri Ninja Blade Assembly
d 64 oz. Food Processor Bowl
e Bowl Lid with Locking Handle
f Chopping Blade Assembly (bowl)
g Dough Blade Assembly (bowl)
h 24 oz. Mini Prep Bowl
i Spindle for Mini Prep Bowl
j Mini Prep Bowl Blade Assembly
k 72 oz. Blender Pitcher
l Pitcher Lid with Locking Handle
m Stacked Blade Assembly (pitcher)
n Motor Base
o Power Cord (not shown)
NOTE: Blade Assemblies are not interchangeable.
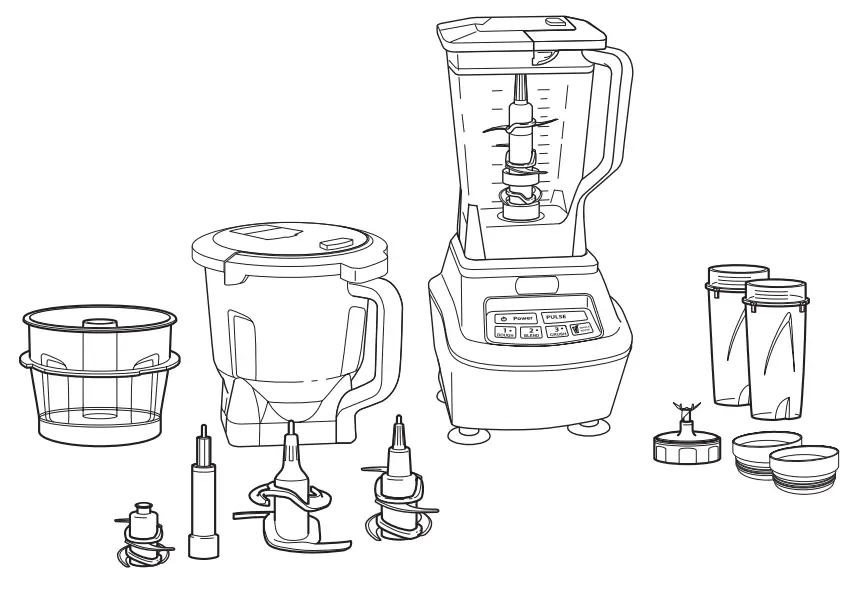
FEATURES:
- Patented Ninja® Technology
- Extra Large, 72 oz. Blender Pitcher (maximum liquid capacity 64 oz.) – BPA Free
- 64 oz. Food Processor Bowl with Drizzle Hole – BPA Free
- 24 oz. Mini Prep Bowl – BPA Free
- Nutri Ninja® Cups – BPA Free
- Lock-In Lid, Featuring Pour Spout
- Easy to Clean Electronic Control Panel
- Sturdy, Non-Slip Base
Before First Use
PLEASE KEEP THESE IMPORTANT SAFEGUARDS IN MIND WHEN USING THE APPLIANCE:
IMPORTANT: Make sure that the motor base is plugged in for use.
IMPORTANT: Never add ingredients into the container before placing the Blade Assembly in first.
IMPORTANT: Blade Assemblies are not interchangeable.
IMPORTANT: DO NOT attempt to operate the appliance without the lid on.
IMPORTANT: Never run the appliance empty.
IMPORTANT: Appliance accessories are not intended to be used in the 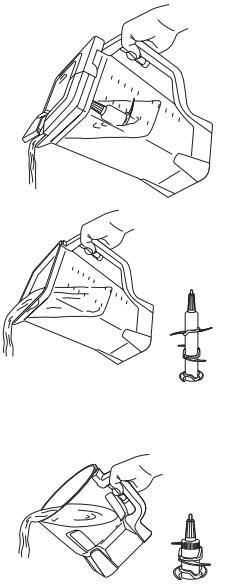 microwave as it may result in damage to the accessories.
WARNING: Stacked Blade Assembly is sharp and not locked in place. If using the pour spout, ensure the lid is fully locked onto the blender pitcher. Failure to do so will result in a risk of laceration
WARNING: Stacked Blade Assembly is sharp and not locked in place. If pouring with the lid removed, carefully remove
the Stacked Blade Assembly first, holding it by the shaft. Failure to do so will result in a risk of laceration.
WARNING: Chopping Blade Assembly is sharp and not locked in place. Before emptying contents carefully remove lid and Chopping Blade Assembly, holding it by the shaft. Failure to do so will result in a risk of laceration.
CAUTION: Do not immerse the motor base into water or any other liquid.
- Remove all packaging material and labels from the appliance. Separate/remove all parts from each other.
- Wash the lids, pitcher, bowls, Nutri Ninja® cups and blade assemblies in warm, soapy water. When washing the blade assemblies, use a dishwashing utensil with a handle to avoid direct hand contact with blades.
WARNING: Handle the Blade Assemblies with care when washing, as the blades are sharp. - Handle blade assemblies with care to avoid contact with sharp edges. Rinse and air dry thoroughly.
- The pitcher, bowls, Nutri Ninja cups, lids and Blade Assemblies are all dishwasher safe. It is recommended that the lids and Blade Assemblies be placed on the top rack. Ensure that the Blade Assemblies are removed from the containers before placing in the dishwasher.
- Wipe the motor base clean with a damp cloth.
Assembly and Use for the Blender Pitcher
WARNING: Handle the Stacked Blade Assembly with care, as the blades are sharp.
WARNING: Remove utensils prior to processing. Failure to remove may cause the pitcher to be damaged or to shatter, which may cause personal injury.
WARNING: Never leave the appliance unattended while in use.
CAUTION: Do not blend hot liquids, doing so may cause excessive pressure buildup, resulting in risk of the user being burned.
IMPORTANT: Make sure that the motor base is plugged in for use.
ASSEMBLY
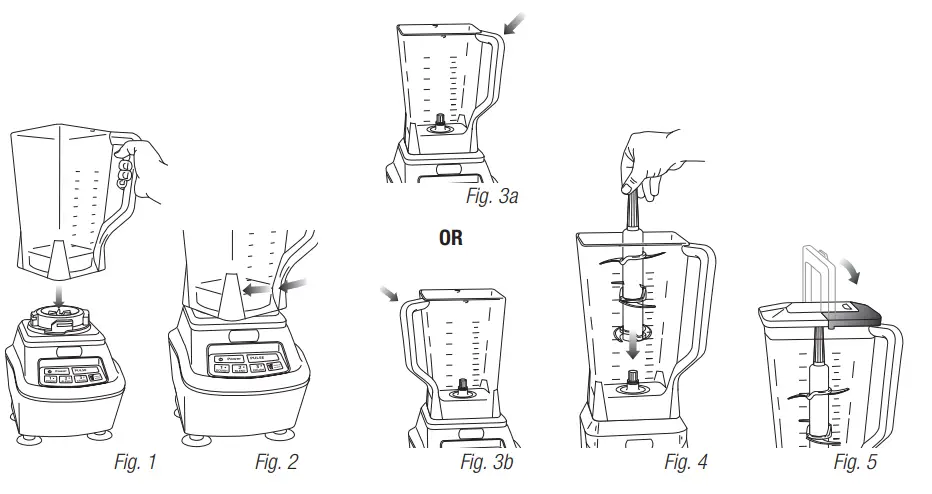
- Review warning and caution statements above before proceeding to number
- Place the motor base on a clean, dry, level surface such as a counter or tabletop.
- Align and lower the Pitcher onto the motor base. (Fig. 1) Handle should be aligned slightly to the right of the “LOCK” symbol on the motor base.
- Rotate the blender pitcher clockwise until it clicks in place. As the pitcher rotates, it will lower and the safety tabs on the bottom of the pitcher will slide under the safety tabs on the top of the motor base. (Fig. 2)
- The pitcher can be placed on the motor base two ways; the handle can be on the front right corner or the front left corner. (Fig. 3a, Fig. 3b)
- Holding the Stacked Blade Assembly by the top of the shaft, place it onto the drive gear inside the pitcher. Ensure that the Stacked Blade Assembly is seated properly and is standing upright. (Fig. 4)
NOTE: The Stacked Blade Assembly will fit loosely on the drive gear. - Add the ingredients to the pitcher, making sure that they do not exceed the highest measured marking line on the side of the pitcher.
NOTE: If you need to add additional ingredients while the appliance is processing, open the pour spout cap and pour the ingredients in through the opening.
NOTE: When blending any kind of liquids, such asmixtures of any drinks or smoothies, do not exceed the“Max liquid” mark (64 ounces) on the pitcher. - Plug the power cord into the electrical outlet and press the power button (
 ).
).
IMPORTANT: As a safety feature, the power button () will flash and the motor will not work if the pitcher and lid are not installed correctly. When the pitcher and lid are installed properly, the power button ( ) will be solid, indicating that
the appliance is ready for use. - Holding the lid by the handle in the upright position, place it on top of the pitcher aligning the arrow ( ∇) located on the lid with the arrow ( Δ) located on the pitcher’s handle. (Fig. 5) Press the handle down until you hear a click.
USE / REMOVAL
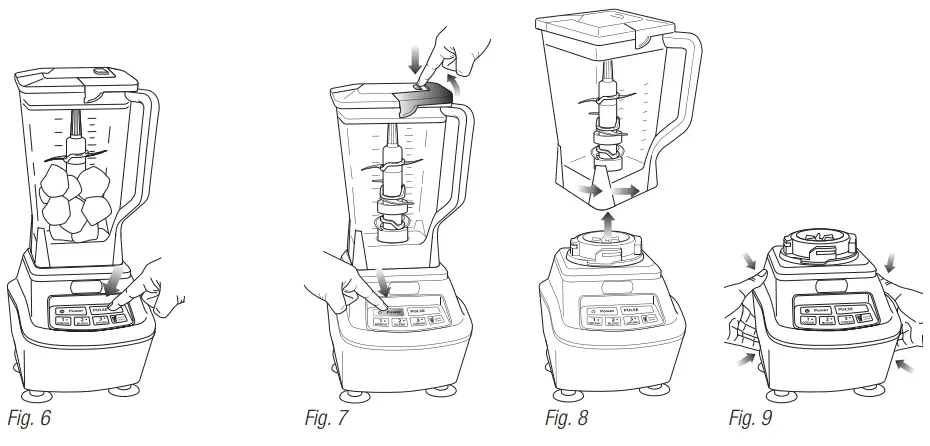
- Review ALL warning and caution statements before proceeding.
- Select the speed that best suits your needs. (Fig. 6)
NOTE: Pulse ingredients for even chopping by pressing down in short intervals. - When you have reached your desired consistency, stop the appliance by pressing the power button ( ) and wait for the blade assembly to stop turning. (Fig. 7)
- To remove the lid, press the release button on the lid, pull the lid handle up to a 90° angle and lift the lid off. Turn the pitcher counterclockwise and then lift off the base. (Fig. 7, Fig. 8)
WARNING: Never insert your hands in the pitcher as the Stacked Blade Assembly is sharp. Always use a spatula to dislodge food that has stuck to the sides of the pitcher.
WARNING: Never insert your hands in the pitcher as the Stacked Blade Assembly is sharp. Always use a spatula to dislodge food that has stuck to the sides of the pitcher. - Open the pour spout cap and use the spout to empty liquid contents.
- For thicker consistencies, first remove the lid by pressing the release button and pulling the lid handle up to a 90-degree angle to lift lid off the pitcher. Then, carefully remove the Stacked Blade Assembly by the top of the shaft. Place Stacked Blade Assembly away from the work area to avoid accidental contact. Finally, empty contents from the pitcher.
- Make sure that the unit is unplugged when not in use.
- To release the motor base from the counter or table top, place your hands underneath both sides of the motor base and gently pull the unit up and towards you. (Fig. 9)
Assembly and Use for the Nutri Ninja® Cup
WARNING: Handle the Nutri Ninja Blade Assembly with care, as the blades are sharp.
WARNING: Remove utensils prior to processing. Failure to remove may cause the Nutri Ninja cup to be damaged or to shatter, which may cause personal injury.
WARNING: Never leave the appliance unattended while in use.
CAUTION: Do not blend hot liquids, doing so may cause excessive pressure buildup, resulting in risk of the user being burned.
CAUTION: Remove the Nutri Ninja Blade Assembly from the cup upon completion of blending. Some ingredients have the potential to expand after blending resulting in excessive pressure buildup that can pose a risk of injury.
IMPORTANT: Make sure that the motor base is plugged in for use.
ASSEMBLY/USE/REMOVAL
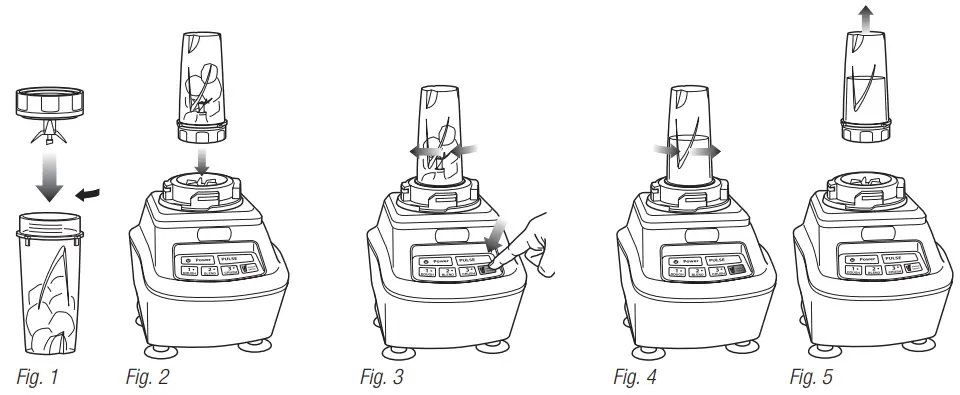
For best results, use short “PULSES”… Practice makes perfect!!
- Review warning and caution statements above before proceeding to number 2
- Place the motor base on a clean, dry, level surface such as a counter or table top.
- Add ingredients to the Nutri Ninja® cup.
- Place the Nutri Ninja Blade Assembly onto the cup and screw it tightly until you have a good seal. (Fig. 1)
- Turn the Nutri Ninja® cup upside down and place it onto the motor base, aligning the tabs on the cup with the motor base. Turn the Nutri Ninja® cup clockwise to lock into place. You will hear a click when the lock is engaged. (Fig. 2) Turn the power button on, the single serve button will illuminate.
- Press down on the Single Serve button in short intervals to activate. (Fig. 3)
- Once you have reached your desired consistency,turn the power button off. Turn the Nutri Ninja® cup counter-clockwise and pull straight up to remove. (Fig. 4, Fig. 5).
NOTE: Do not overfill! To avoid spilling, do not add ingredients past the “Max” fill line. - Turn the cup upright and remove the Nutri Ninja Blade Assembly by twisting the blade assembly counterclockwise.
- Place the To-Go drinking lid onto the Nutri Ninja® cup, twist to seal and enjoy!
- Make sure that the motor base is unplugged when not in use.
- To release the motor base from the counter or table top, place your hands underneath both sides of the motor base and gently pull the unit up and towards you. (Fig. 6)
NOTE: To order additional Nutri Ninja® Cups, please visit our website: www.ninjakitchen.com or feel free to contact customer service: 1-877-646-5288.
Assembly and Use for the Food Processor Bowl
WARNING: Chopping Blade Assembly is sharp and not locked in place. Before emptying contents carefully remove lid and Chopping Blade Assembly, holding it by the shaft. Failure to do so will result in a risk of laceration.
WARNING: Remove utensils prior to processing. Failure to remove may cause the bowl to be damaged or to shatter, which may cause personal injury.
WARNING: Never leave the appliance unattended while in use.
CAUTION: Do not blend hot liquids, doing so may cause excessive pressure buildup, resulting in risk of the user being burned.
CAUTION: Remove the lid from the bowl upon completion of processing. Some ingredients have the potential to expand after blending resulting in excessive pressure buildup that can pose a risk of injury.
IMPORTANT: Make sure that the motor base is plugged in for use.
ASSEMBLY
- Review warning and caution statements above before proceeding to number 2.
- Place the motor base on a clean, dry, level surface such as a counter or tabletop.
- Align and lower the Bowl onto the motor base. (Fig. 1) Handle should be aligned slightly to the right of the “LOCK” symbol on the motor base.
- Rotate the bowl clockwise to lock into place. You will hear a click when the lock is engaged. (Fig. 2)
- The bowl can be placed on the motor base two ways; the handle can be on the front right corner or the front left corner. (Fig. 3a, Fig. 3b)
- Holding the desired Blade Assembly by the top of the shaft, place it onto the drive gear inside the bowl. Ensure that the Blade Assembly is seated properly and is standing upright. (Fig. 4)
NOTE: The Blade Assembly will fit loosely on the drive gear.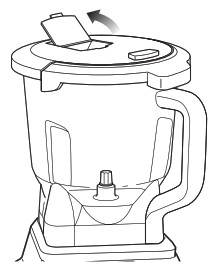
- Add the ingredients to the bowl, making sure that they do not exceed the highest measured marking line on the side of the bowl.
- Holding the lid by the handle in the upright position, place it on top of the bowl aligning the arrow (∇ ) located on the lid with the arrow (Δ ) located on the bowl’s handle. (Fig. 5) Press the handle down until you hear a click.
NOTE: The 64 oz. bowl is not intended for blending drinks. Do not overfill.
NOTE: To add liquids during processing, open the drizzle hole on the top of the lid and pour the liquid slowly into the
mixture. - Plug the power cord into the electrical outlet and press the power button ( ).
IMPORTANT: As a safety feature, the power button () will flash and the motor will not work if the bowl and lid are not installed correctly. When the bowl and lid are installed properly, the power button () will be solid, indicating that the appliance is ready for use.USE CHOPPINGBLADE ASSEMBLY/ REMOVAL / USE DOUGH BLADE ASSEMBLY
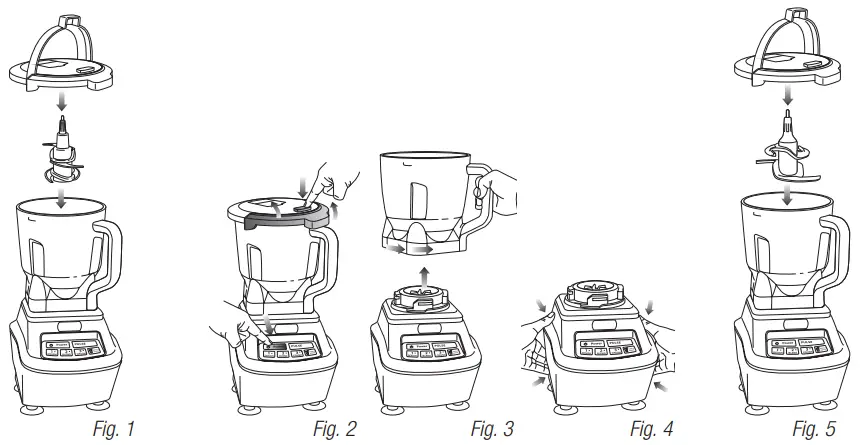
USING THE CHOPPING BLADE ASSEMBLY
- Review warning and caution statements at the top of page 11 before proceeding to number 2.
- Place the motor base on a clean, dry, level surface such as a counter or table top.
- Secure the bowl onto the motor base.
- Holding the Chopping Blade Assembly by the shaft, place it onto the gear shaft inside the bowl. Ensure that the Chopping Blade Assembly fits around the gear shaft and that it is standing straight. (Fig. 1)
- Add the ingredients and secure the bowl lid onto the bowl. (Fig. 1)
- Plug the power cord into the electrical outlet and press on the power button ( ). (Fig. 2) Select the speed that best suits your needs. Pulse ingredients for even chopping by pressing down in short intervals.
NOTE: Please refer to “Speed Settings & Uses” chart for suggested uses and speeds. - When you have reached your desired consistency, stop the appliance by pressing the power button ( ) and wait for the Chopping Blade Assembly to stop turning.
- To remove the lid, press the release button on the lid and pull the lid handle up to a 90° angle. (Fig. 2)
- Turn the bowl counter-clockwise and lift it to remove it from the motor base. (Fig. 3)
- To release the motor base from the counter or table top, place your hands underneath both sides of the motor base and gently pull the unit up and towards you. (Fig. 4)
USING THE DOUGH BLADE ASSEMBLY
IMPORTANT: Use only the “DOUGH” button when using this attachment.
- Review warning and caution statements at the top of page 11 before proceeding to number 2.
- Place the motor base on a clean, dry, level surface such as a counter or tabletop.
- Secure the bowl onto the motor base.
- Holding the Dough Blade Assembly by the shaft, place it onto the gear shaft inside the bowl. Ensure that the Dough Blade Assembly fits around the gear shaft and that it is standing straight. (Fig. 5)
- Add the ingredients and secure the bowl lid onto the bowl. (Fig. 5)
NOTE: For best results add wet ingredients first and then add dry ingredients. - Plug the power cord into the electrical outlet and press on the power button ( ). (Fig. 2)
- To remove the lid, press the release button on the lid and pull the lid handle up to a 90° angle. (Fig. 2)
- Turn the bowl counter-clockwise and lift it to remove it from the motor base. (Fig. 3)
- To release the motor base from the counter or tabletop, place your hands underneath both sides of the motor base and gently pull the unit up and towards you. (Fig. 4)
Assembly and Use for the 24 oz. Mini-Prep Bowl
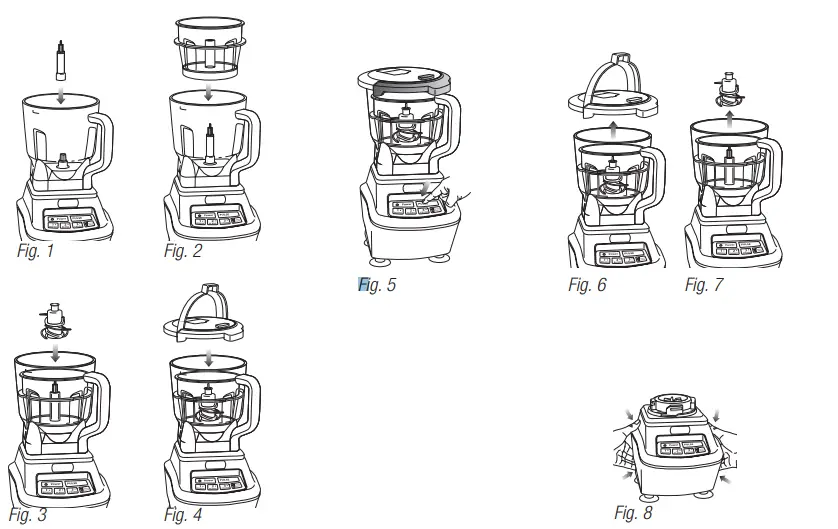
- Review warning and caution statements above before proceeding to number 2.
- Place the 64 oz. bowl onto the motor base. (See assembly instructions on page 11.)
- Holding the spindle by the shaft, place it onto the gear shaft inside the 64 oz. bowl. Ensure that the Mini Prep Bowl Blade Assembly fits around the gear shaft and that it is standing straight. (Fig. 1)
- Place the mini prep bowl aligning the spindle inside the center post. (Fig. 2)
- Hold the Mini Prep Bowl Blade Assembly by the shaft and carefully place it over the center post of the mini prep bowl. (Fig. 3)
- Add ingredients into the mini prep bowl.
NOTE: Do not fill ingredients past the “MAX” fill line. - Holding the lid by the handle in the upright position, place it on top of the 64 oz. bowl aligning the arrow ( ) located
on the lid with the arrow ( ) located on the bowl’s handle. (Fig. 4) Press the handle down until you hear a click. - Plug the power cord into the electrical outlet and press on the power button ( ).
- Select the speed that best suits your needs. For best results, press the Pulse button in short intervals. (Fig. 5)
NOTE: Please refer to “Speed Settings & Uses” chart for suggested uses and speeds. - When you have reached your desired consistency, stop the appliance by pressing the power button ( ) and wait for the Mini Prep Bowl Blade Assembly to stop turning.
- To remove the lid, press the release button on the lid and pull the lid handle up to a 90° angle. (Fig. 6)
- Carefully hold the Mini Prep Bowl Blade Assembly by the shaft and lift it out of the mini prep bowl. (Fig. 7)
- Turn the bowl counter-clockwise and lift it to remove it from the motor base.
- To release the motor base from the counter or table top, place your hands underneath both sides of the motor base and gently pull the unit up and towards you. (Fig. 8)
Speed Setting & Uses
| FUNCTION | CONTAINER | ATTACHMENT | SPEED BUTTON | TYPE OF FOOD |
| Single Serve Blending | Nutri Ninja® Cup | Nutri Ninja Blade Assembly | Single Serve | Smoothies Frappes Milk Shakes |
| Mincing | Nutri Ninja Cup Mini Prep Bowl | Nutri Ninja Blade Assembly Mini Prep Bowl Blade Assembly | Single Serve Pulse | Onion Garlic Herbs |
| Kneading | Bowl | Dough Blade Assembly | 1 | Bread dough Pie dough Pizza dough Pretzel dough |
| Dough Mixing | Bowl | Dough Blade Assembly | 1 | Cookie dough |
| Processing | Pitcher Bowl Nutri Ninja Cup Mini Prep Bow | Stacked Blade Assembly Chopping Blade Assembly Nutri Ninja Blade Assembly Mini Prep Bowl Blade Assembly | 2 Pulse Single Serve | Pâtés Stewed fruits Dips Apple sauce Spreads Soups* Baby food |
| Emulsifying | Bowl Mini-Prep Bow | Chopping Blade Assembly Mini Prep Bowl Blade Assembly | 2 | Salad Dressings Dips Sauces* |
| Grinding | Bowl | Chopping Blade Assembly | 2 | Meat |
| Grating | Bowl Nutri Ninja Cup | Chopping Blade Assembly Nutri Ninja Blade Assembly | 3 or Pulse Single Serve | Grated cheese Bread crumbs Spices |
| Chopping | tri Ninja Cup Mini Prep Bowl Pitcher | Chopping Blade Assembly Nutri Ninja Blade Assembly Mini Prep Bowl Blade Assembly | Pulse Single Serve 3 | Salsa Vegetables Nuts |
| Mixing | Bow | Dough Blade Assembly | 1 | Light cake mixes Batters |
| Ice Crushing | Pitcher Nutri Ninja Cup | Stacked Blade Assembly Nutri Ninja Blade Assembly | 3 Single Serve | Ice |
| Pureeing | Pitcher Nutri Ninja Cup | p Stacked Blade Assembly Nutri Ninja Blade Assembly | 3 Single Serve | Smoothies Smooth soups Milkshakes |
* When blending sauces and soups, make sure they’re cooled to room temperature first – Ninja® containers are not intended for hot blending.
Care & Maintenance
HOW TO CLEAN
CAUTION: Make sure that the motor base is unplugged from the power source before inserting or removing any blade assembly and before cleaning.
CAUTION: DO NOT immerse the motor base into water or any other liquid.
CAUTION: Handle the blade assemblies with care, as the blades are very sharp.
1 Separate/remove all parts from each other.
2 Hand Washing: Wash the lids, pitcher, bowls, Nutri Ninja® cup and blade assemblies in warm, soapy water. When washing the blade assemblies, use a dishwashing utensil with a handle to avoid direct hand contact with blades. Handle blade assemblies with care to avoid contact with sharp edges. Rinse and air dry thoroughly.
Dishwasher: The containers, lids, blade assemblies and attachments are all dishwasher safe. The lids and blade assemblies are top rack dishwasher safe. Ensure that the blade assemblies are removed from the containers before placing in the dishwasher.
WARNING: Handle the Blade Assemblies with care when washing, as the blades are sharp. Contact with the blades’ edges can result in laceration.
3 Wipe the motor base clean with a damp cloth. Please call customer service if any servicing needs to be performed on the appliance at 1-877-646-5288.
HOW TO STORE
1 Store the Ninja® Mega Kitchen System® upright the blade assembly inside the corresponding container with the lid
secured on top. Do not place anything on top. Store the rest of the attachments in a safe place where they will
not be damaged and won’t cause harm. Loosely wrap the power cord around the motor base.
RESETTING THE MOTOR THERMOSTAT
The Ninja Mega Kitchen System features a unique safety system that prevents damage to the unit’s motor and drive system should you inadvertently overload your appliance. If the appliance is being overloaded, the motor will stop. Allow the appliance to cool for approximately 15 minutes. To reset the appliance, follow the resetting procedure below:
1 Unplug the appliance from the electrical outlet.
2 Remove and empty the container and ensure that no food is jamming the Blade Assembly.
3 Allow the appliance to cool for approximately 15 minutes.
4 Re-install the container onto the base and re-plug the appliance into the electrical outlet.
5 Proceed to use the appliance as before making sure not to exceed the recommended maximum capacities.
Troubleshooting Guide
| PROBLEMS | POSSIBLE REASONS & SOLUTIONS |
| Motor Doesn’t Start or Blade Assembly Doesn’t Rotate. | Make sure the container is securely locked on the motor base. Make sure the lid is securely on the container in the correct position (align arrows). The appliance is turned “Off”. Press the power button ( ) to turn “On”. Check that the plug is securely inserted into the electrical outlet. Check the fuse or circuit breaker. The unit has overheated or overloaded. Unplug and wait approximately 15 minutes before using again. Check to make sure the unit is not overloaded |
| Food is Unevenly Chopped. | Either you are chopping too much food at one time, or the pieces are not of even size and processing smaller amounts per batch. |
| Food is Chopped Too Fine or is Too Watery. | The food has been over-processed. Use pulse button for controlled processing. |
| Food Collects On Lid or On the Sides of the Container. | The mixture is too thick. Add more liquid |
| You Cannot Achieve Snow From Solid Ice. | Do not use ice that has been sitting out or has started to melt. Use ice straight from the freezer. Start with a few pulses and then go to a continuous blending cycle |
| Motor Base Won’t Stick to Counter or Table Top. | Make sure surface and suction feet are wiped clean. Suction feet will only stick to smooth surfaces. Suction feet WILL NOT stick on some surfaces such as, wood, tile and non-polished finishes. DO NOT attempt to use appliance when the motor base is stuck to a surface that is not secure, (cutting board, platter, plates, etc.). |
Replacement Parts
ORDERING REPLACEMENT PARTS
To order additional parts and attachments, please visit our website: www.ninjakitchen.com
or feel free to contact customer service: 1-877-646-5288.
Notes:

ONE (1) YEAR LIMITED WARRANTY
SharkNinja Operating LLC warrants this product to be free from material defects and workmanship for a period of one (1) year from the date of purchase when utilized for normal household use, subject to the following conditions, exclusions and exceptions.
The liability of SharkNinja Operating LLC is limited solely to the cost of the repair or replacement of the unit at our option. This Limited Warranty does not cover normal wear of parts and does not apply to any unit that has been tampered with or used for commercial purposes. This Limited Warranty does not cover damage caused by misuse, abuse, negligent handling or damage due to faulty packaging or mishandling in transit. This Limited Warranty does not cover damage or defects caused by or resulting from damages from shipping or repairs, service or alteration to the product or any of its parts, which have been performed by a repair person not authorized by SharkNinja Operating LLC.
If your appliance fails to operate properly while in use under normal household conditions within the Limited Warranty period, you may return the complete appliance and accessories with proof of purchase and date, freight prepaid. For Customer Service support, call 1-877-646-5288 or visit our website www.ninjakitchen.com.
If the appliance is found by SharkNinja Operating LLC to be defective, in SharkNinja Operating LLC’s sole discretion, we will repair or replace it free of charge. Proof of purchase date and a check made payable to SharkNinja Operating LLC in the amount of $19.95 to cover the cost of return shipping and handling must be included.* This Limited Warranty is extended to the original purchaser of the unit and excludes all other legal, implied, and/or conventional warranties. The responsibility of SharkNinja Operating LLC if any, is limited to the specific obligations expressly assumed by it under the terms of this Limited Warranty. In no event is SharkNinja Operating LLC liable for incidental or consequential damages to anyone of any nature whatsoever. Some states do not permit the exclusion or limitation of incidental or consequential damages, so the above may not apply to you. This Limited Warranty gives you specific legal rights, and you may also have other rights which vary from state to state or from province to province.
*IMPORTANT: Carefully pack items to avoid damage in shipping. Be sure to include proof of purchase date and to attach tag to item before packing with your name, complete address and phone number with a note giving purchase information, model number, and what you believe is the problem with the item. We recommend you insure the package (as damage in shipping is not covered by your Limited Warranty). Mark the outside of your package “ATTENTION CUSTOMER SERVICE”.
PRODUCT REGISTRATION
Please visit www.ninjakitchen.com or call 1-877-646-5288 to register your new Ninja® product within ten (10) days of
purchase. You will be asked to provide the store name, date of purchase, and model number along with your name and address. The registration will enable us to contact you in the unlikely event of a product safety notification. By registering you acknowledge to have read and understood the instructions for use, and warnings set forth in the accompanying instructions.
SharkNinja Operating LLC
US: Newton, MA 02459
CAN: Ville St-Laurent, QC H4S 1A7
1-877-646-5288
www.ninjakitchen.com
Mega Kitchen System, Ninja, and Nutri Ninja, are registered trademarks of SharkNinja Operating LLC.
Illustrations may differ from actual product. We are constantly striving to improve our products, therefore the specifications contained herein are subject to change without notice.
For SharkNinja U.S. Patent information visit www.sharkninja.com/USPatents.
© 2016 SharkNinja Operating LLC
BL771_30_E_16014_3
PRINTED IN CHINA
ninjacoffeebar.com
1-877-646-5288
IMPORTANT SAFEGUARDS
For Household Use Only
READ ALL INSTRUCTIONS BEFORE USING YOUR NINJA COFFEE BAR ® .
Safety Signal Words
This manual and the safety labels attached to this appliance utilize signal words that signify safety hazards with different levels of severity.
Below are the words used and the definitions for these words:
- WARNING indicates a hazardous situation which, if not avoided, could result in death or serious injury.
- CAUTION indicates a hazardous situation which, if not avoided, could result in minor or moderate injury.
- NOTICE is used to address practices not related to physical injury.
The words “WARNING” and “CAUTION” are preceded by a triangle signifying that these are safety-related.
The terms “IMPORTANT” and “NOTE” are also used to describe good ideas for better and more efficient equipment use.
THIS BOOK COVERS MODEL NUMBERS:
CF090A
CF090CO
CF091
CF092W
TECHNICAL SPECIFICATIONS
Voltage: 120V~, 60Hz.
Power: 1450 Watts
Water Reservoir Capacity: 50 Ounces
Ninja and Ninja Coffee Bar are registered trademarks of SharkNinja Operating LLC.
 WARNING:
To reduce the risk of fire, electric shock, serious injury, death or damage when using this appliance, follow these basic safety precautions.
General Precautions
- DO NOT allow young children to operate the appliance or use as a toy. Close supervision is necessary when any appliance is used near children.
- To reduce the risk of electric shock, this appliance has a polarized plug (one blade is wider than the other). As a safety feature, this plug will fit into a polarized outlet only one way. If the plug does not fit fully into the outlet, reverse the plug. If it still does not fit, contact a qualified electrician. DO NOT force into outlet or try to modify to fit.
- To protect against electrical shock, DO NOT submerge the appliance or allow the power cord to come into contact with water or any other liquid.
- Allow the appliance to cool before taking off parts and before cleaning.
- NEVER carry the appliance by the power cord or yank it to disconnect from electrical outlet; instead grasp the plug and pull to disconnect.
- DO NOT operate any appliance with a damaged cord or plug, or after the appliance malfunctions, or has been dropped or damaged in any manner.
- DO NOT let the power cord hang over the edge of table or counter or touch hot surfaces such as the stove.
- Extension cords are not recommended for use with this product.
- DO NOT remove the brew basket or carafe while the appliance is brewing. Scalding may occur if any of these parts are removed during brewing cycles.
- The use of an accessory not recommended by the manufacturer may create an overflow condition and scalding hazard, or result in fire, electric shock, or personal injury.
- DO NOT operate your appliance in an appliance garage or under a wall cabinet. When storing in an appliance garage always unplug the unit from the electrical outlet. Not doing so could create a risk of fire, especially if the appliance touches the walls of the garage or the door touches the unit as it closes.
Operating Notice - DO NOT use well water, use tap water.
- Clogging and backing up of water and/or coffee in the filter basket can occur under any of the following conditions: The use of coffee that is too finely ground; using two or more paper filters; using a permanent filter in conjunction with a paper filter; not cleaning coffee grounds from a permanent filter; or allowing coffee grounds to spill over the filter.
- ALWAYS use appliance on a dry, level surface.
- DO NOT place on or near a hot gas or electric burner, or in a heated oven.
- DO NOT use this appliance for anything other than its intended use. DO NOT use outdoors.
- DO NOT touch hot surfaces. Use handles or knobs.
- DO NOT touch warming plate while the brewer is in use.
- DO NOT reach across top of brewer to froth during brewing. Steam is released from vent on top of brewer and can result in a steam burn.
Glass Carafe - The carafe is designed for use with this appliance. It must never be used on a range top.
- DO NOT set a hot carafe on a wet or cold surface.
- DO NOT use a cracked or scratched carafe or a carafe that has a loose or weakened handle.
- DO NOT clean carafe with abrasive cleansers, steel wool pads, or other abrasive material.
- DO NOT place carafe in microwave.
- DO NOT expose carafe to extreme temperature changes.
- DO NOT place on or near a hot gas or electrical burner, or in a heated oven.
- DO NOT use for carbonated beverages.
- DO NOT drink directly from the carafe. Liquid from the carafe may be very hot.
- DO NOT use the carafe to store any other type of food when not in use.
- Ensure that the carafe is completely empty before starting a cleaning or brewing cycle. Starting a cycle with water or coffee in the carafe will cause an overflow.
- To prevent illness from bacterial growth in the appliance, follow all cleaning instructions in the “Care & Maintenance” section of this owner’s guide.
Maintenance - Remove the power cord from the electrical outlet and allow unit to cool before removing brew basket, water reservoir, or filters before surface cleaning.
- If the product is not operating properly contact SharkNinja Operating LLC at 1-877-646-5288 or ninjacoffeebar.com for examination, repair or adjustment.
- Clean the system on a weekly basis. Cord Statement
- A short power-supply cord is provided to reduce the risks resulting from becoming entangled in or tripping over a longer cord.
- DO NOT use extension cords with this product.
SAVE THESE INSTRUCTIONS
Thank you for purchasing the Ninja Coffee Bar®
Getting To Know Your Ninja Coffee Bar ®
CAUTION: DO NOT reach across top of brewer to froth during brewing. Steam is released from vent on top of brewer and can result in a steam burn.
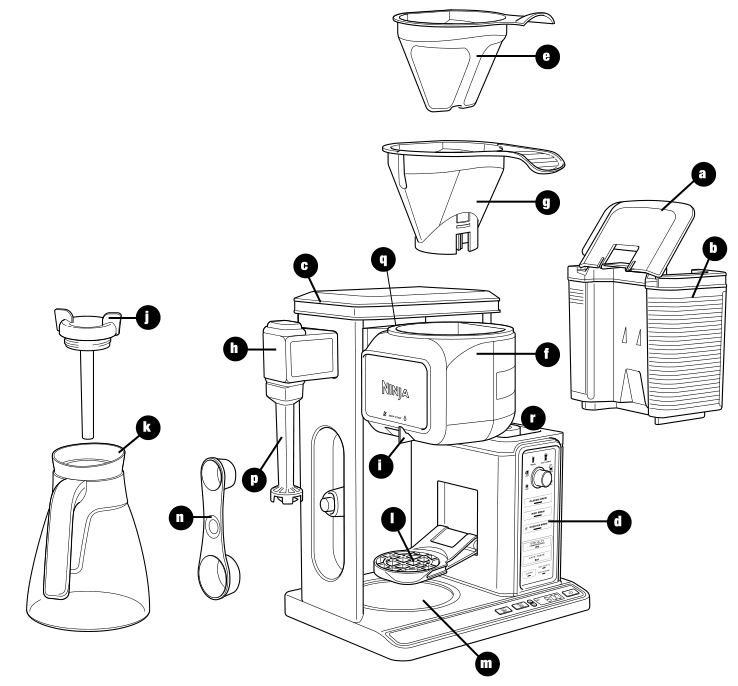
- a Flip-Top Water Reservoir Lid
- b Removable Water Reservoir
- c Brewer
- d Control Panels
- e Permanent Filter
- f Swinging Brew Basket
- g Removable Filter Holder
- h Integrated Frother
- i Drip Stop Toggle
- j Brew-through Carafe Lid
- k Glass Carafe
- l Multi-Serve Cup Platform
- m Intelligent Warming Plate
- n Double-Sided Scoop: Carafe Side and Single Serve Side
- o Power Cord & Wrap (not shown)
- p Frother Whisk
- q Showerhead
- r Water Tank Shelf
Control Panel

Features of the Ninja Coffee Bar ®
- Thermal Flavor Extraction ® Technology – Blends Precision Water Delivery with automated controls for Calibrated Temperature, Pre-infusion, Coffee Saturation, and Flavor Richness. Ninja’s Advanced Thermal Flavor Extraction technology can truly unlock the full flavor potential of your coffee.
- Custom Brews – Ability to brew directly into your favorite cup, travel mug, or carafe.
- Brew Types – Control the strength and style of your coffee:
- a. Classic Brew for smooth, balanced flavor from your favorite coffee.
- b. Rich Brew for a richer, never-bitter coffee flavor that stands up to milk, cream, or flavoring.
- c. Over Ice Brew for a smooth, rich, freshly brewed iced coffee that’s not watered down.
- d. Specialty Brew to create a super-rich concentrate to use as a key ingredient in all kinds of hot milk-based, iced, and frozen coffeehouse-style drinks.
- e. Cafe Forte for deep, full-bodied, and complex flavor that is so rich and drinkable, it tastes great
black—no milk or sweeteners needed.
- Multi-Serve Cup Platform – Pull it down, place your favorite cup on it and brew directly into it.
- Removable Water Reservoir with Easy Access Flip-Top Lid – For quick and easy filling.
- Auto-iQ ™ – The Ninja Coffee Bar knows how much water to use for each size and brew type.
- 50 oz. Glass Carafe
- LED Control Panels with Programmable Digital Clock
- 24-Hour Programmable Delay Brew Button – Set it to automatically brew the following morning.
- Drip Stop – Stops the flow of coffee from the brew basket, allowing you to pour a cup mid-brew; switch toggle to the closed position to prevent dripping once the brew cycle is finished.
- Clean Function – It illuminates when your Ninja Coffee Bar senses that there is hard water calcium buildup in your brewer which can affect the flavor of your coffee. When it illuminates, follow the cleaning instructions in the Care & Maintenance section or printed on the back of your brewer.
- Stay Warm Button – Your warming plate will automatically turn on after brewing a carafe and turn off after 2 hours. The Stay Warm button allows you to manually turn the warming plate off.
- Intelligent Warming Plate – Automatically adjusts the temperature of the warming plate to keep your coffee at the ideal drinking temperature without burning it.
- Audible Ready Signal – Alerts you that your coffee is ready.
- 2 hour shut off – Automatically turns off the warming plate two hours after you brew coffee.
- Permanent Filter – The permanent filter is a reusable filter that preserves the natural coffee oils and small coffee particles to provide a robust flavor, similar to what you would experience when using a French press.
- Pre-Heat – After plugging in or turning your brewer on from Power Save mode, allow 3 minutes for your brewer to pre-heat. When plugged in, your Ninja Coffee Bar will stay ready in pre-warmed mode unless you put the brewer into power save mode.
Go to ninjacoffeebar.com for more information and how-to videos.
Brew into a cup or travel mug
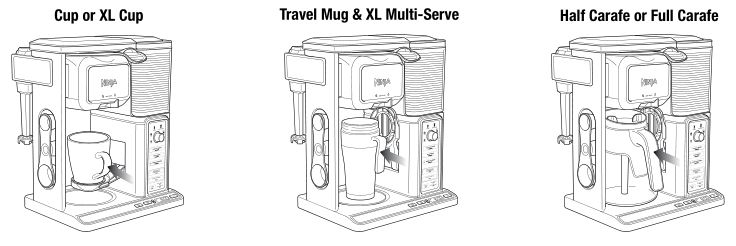
Before First Use
PLEASE KEEP THESE IMPORTANT SAFEGUARDS IN MIND WHEN USING THE APPLIANCE:
CAUTION: APPLIANCE CREATES HOT LIQUID. HANDLE WITH CARE.
CAUTION: DO NOT remove the vessel while the appliance is running without the Drip Stop in the closed position. Return the vessel quickly and open the Drip Stop to continue the brew.
CAUTION: Never open the brew basket when the coffeemaker is in use.
CAUTION: Please ensure that you are using at least a 12 oz. cup for the cup size, 14 oz. cup for the tall cup size, 16 oz. travel mug for the travel mug size and 20 oz. travel mug for the XL Multi-Serve size to prevent overflow and a scalding injury.
IMPORTANT: DO NOT run the appliance without water.
IMPORTANT: Always place a vessel beneath the brew basket to receive the brewed coffee.
IMPORTANT: DO NOT overfill the water reservoir. Fill water only to the Max Fill line.
- Remove all packaging material, stickers and labels from the brewer.
NOTE: The glass carafe is dishwasher safe. Place on top rack only. - Wash the water reservoir, permanent filter, glass carafe and brew basket in warm, soapy water with a soft cloth.
- Rinse and dry thoroughly.
- Wipe the intelligent warming plate with a damp cloth.
- Before first use, prime the system by running two full carafe cycles with water only. After each cycle is complete, discard the brew.
Setting the Clock & Delay Brew
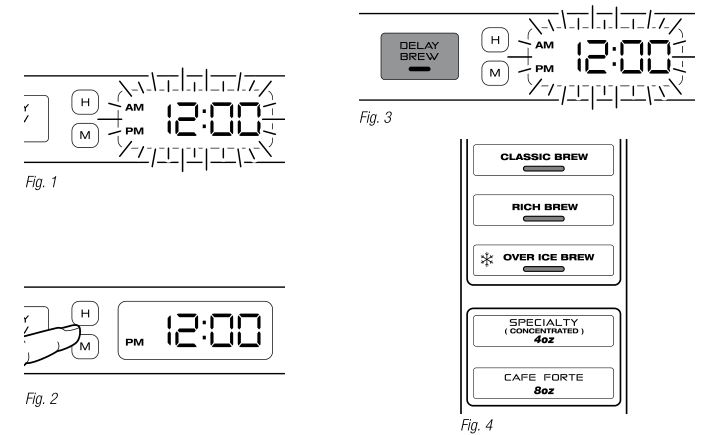
TO SET THE CLOCK
- Plug the power cord into an electrical outlet. The clock will flash on the control panel to indicate that the time has not been set. (Fig. 1)
- Press the H (hour) or M (minute) button until you reach the current time. The AM or PM indicator will illuminate on the left side of the display as you are setting the time. (Fig. 2)
- After 5 seconds the clock will stop flashing and the clock will be set.
NOTE: If the clock stops flashing and does not display the correct time of day, pressing the H (hour) or the M (minute) button at any time will cause the clock to flash again. You can now re-program the correct time of day by following the steps above.
NOTE: If you unplug the brewer or in the event of an extended power loss, you will need to reset the clock the next time the brewer is plugged in.
TO SET THE DELAY BREW TIME
- Press Delay Brew. The Delay Brew button will illuminate and the clock will begin to flash “12:00” or the last delay brew time that was set. (Fig. 3)
- While the clock is flashing, press the H (hour) or M (minute) button to set the time that you would like the delay brew to begin. The AM or PM indicator will illuminate on the left side of the display as you are setting the desired time. Setting the Clock & Delay Brew
- Once the proper time has been set, select the size of the vessel that you would like to brew.
- Select the Brew Type that you desire from the 5 flashing buttons. The selected brew type will be lit. (Fig. 4)
- Once the time, brew size, and brew type have been set, allow the Delay Brew to flash and lock in or press the Delay Brew button to activate the Delay Brew. When the Delay Brew is activated, the light on the Delay Brew button will illuminate and an audible signal will play to verify the Delay Brew is set.
- The Delay Brew time is now set and your Ninja Coffee Bar ® will automatically brew at the time you programmed.
NOTE: To deactivate the Delay Brew cycle, press the Delay Brew button once more and the light on the Delay Brew button will turn off. Any change to the selected brew size or starting any other brew will cancel the programmed Delay Brew. - Place the appropriate-sized vessel under brew basket for the selected size.
IMPORTANT: Make sure the Drip Stop is in the open position.
Go to ninjacoffeebar.com for more information and how-to videos.
Assembly

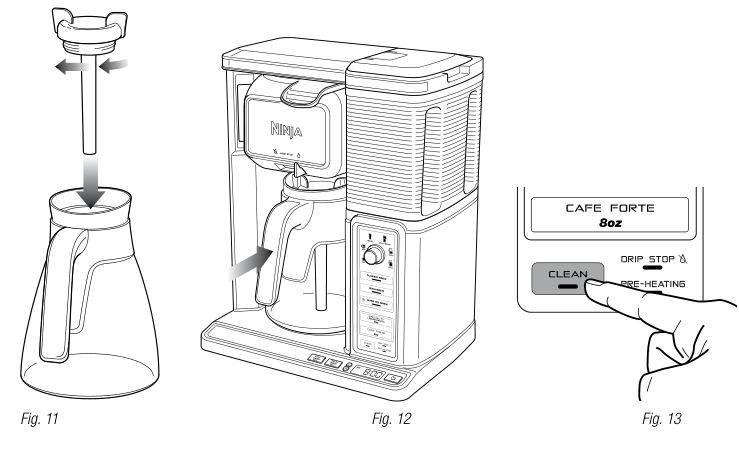
- Place the brewer on a dry, clean and level surface.
- To easily fill the water reservoir, use the hand grips to lift it straight up off the brewer. (Fig. 5) The water reservoir lid flips open for easy filling, and the entire lid is easily removable for quick cleaning. Add fresh, filtered water at or above the minimum fill line for your desired beverage size (Fig. 6), then return the water reservoir to the brewer and lock into place. (Fig. 7) Do not fill water reservoir with any other liquids such as brewed coffee, carbonated beverages, etc. as other liquids may damage your brewer.
- Slide brew basket out (Fig. 8) and lift both the permanent filter and Filter Carrier Insert from the brew basket to remove. (Fig. 9) To reinsert, set the permanent filter and Filter Carrier Insert back into the brew basket. (Fig. 10) When cleaning, you can remove the permanent filter from the brew basket.
- Once the filter is in place, slide the brew basket all the way in until you hear a slight click.
- Twist the brew-through lid clockwise onto the glass carafe to lock into place. (Fig. 11)
- Center the carafe below the brew basket. (Fig. 12)
NOTE: Do not use any coffee for the first two brew cycles in order to clean the brewer. - Plug the brewer into an electrical outlet.
- Once all parts are securely in place, press the Power Save button then press the CLEAN button to thoroughly clean the machine before first use. (Fig. 13)
- Discard the water in the carafe and repeat, beginning with step 2, with one more Clean Cycle of water before first use.
Preparing and Using the Ninja Coffee Bar ®
HOW MUCH COFFEE DO YOU GET IN YOUR CUP?
CAUTION: Please ensure that you are using at least a 12 oz. cup for the cup size, 14 oz. cup for the XL Cup size, 16 oz. travel mug for the travel mug size and 20 oz. travel mug for the XL Multi-Serve size to prevent overflow and a scalding injury.
Each size and brew type produces a different amount of coffee to optimize strength, taste, and size.
NOTE: The coffee grounds will absorb some of the water that is brewed, resulting in slightly less brewed coffee than water used.
APPROXIMATE BREW VOLUME
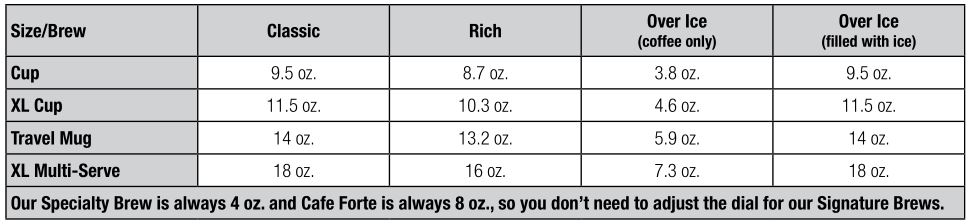
WOULD YOU LIKE A HOTTER COFFEE?
Have you ever wondered why coffee is served in paper cups when you order it to go? The type of cup you brew into can drastically influence the drinking temperature.
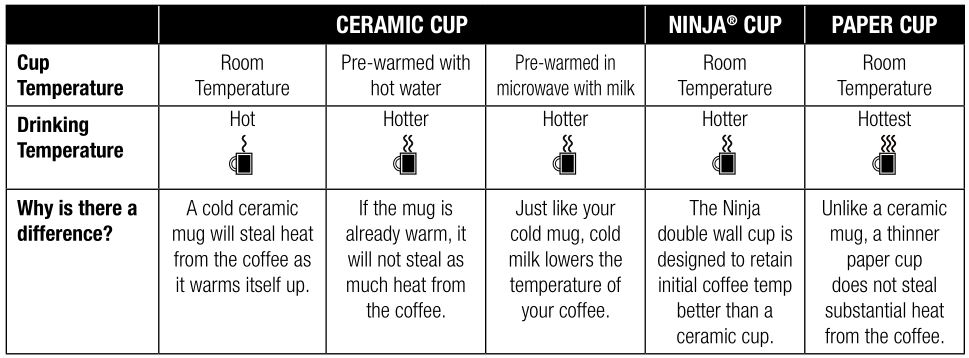
PRE-HEATING
- After plugging in or turning your brewer on from Power Save mode, press the Power Save button to initiate Pre-heating. You will see your pre-heat LED turn on.
- Allow 3 minutes for your brewer to pre-heat.
- After 3 minutes, the light will turn off. Your brewer has now pre-heated.
- Your Ninja Coffee Bar will in stay pre-warmed mode unless you put the brewer into power save mode by pressing the Power Save Button.
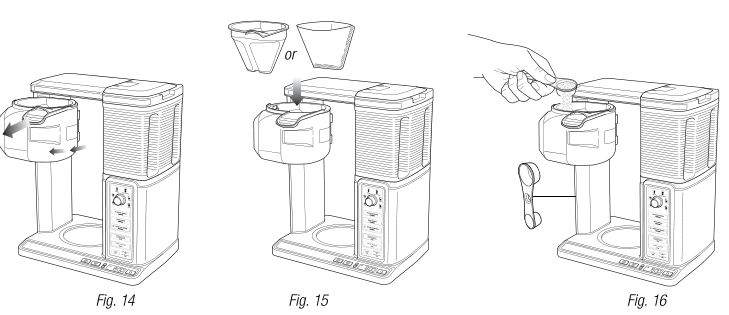
FILLING THE BREW BASKET WITH COFFEE
For best results, use the below measurements of ground coffee for each size brew–the amount of ground coffee for each size will remain the same for any brew type that you select. For example, if you select Cup and Classic Brew, you will use the same amount of coffee grounds as if you select Cup and Over Ice Brew.
CAUTION: The maximum capacity for ground coffee is 12 rounded tablespoons or 6 Ninja Big Scoops. Exceeding this amount or using fine ground coffee may cause overflow.
- Open the brew basket by sliding it out of the brewer. (Fig. 14)
NOTE: Check for any loose grounds that may be left in the brew basket. Remove and rinse the brew basket if needed. - Place the permanent filter or a #4 paper cone filter in the brew basket. If using a paper filter, first ensure the permanent filter is removed from the brew basket. Then fold a #4 paper cone filter along the seams and insert firmly into the brew basket. (Fig. 15)
- Use the Ninja Scoop and follow the measurements in the chart to fill the filter. These measurements are based on level scoops—adjust to your preferred taste. (Fig. 16) We suggest using a medium grind size if grinding whole beans.
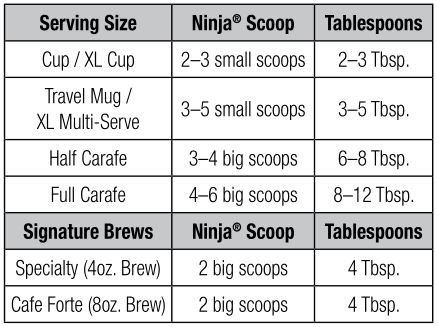 NOTE: Exceeding the recommended medium grind size for whole beans may cause the brew basket to overflow.
 - Slide the brew basket back into the brewer and click in place.
CAUTION: HOT WATER Do not remove the brew basket or vessel while brewing.
CAUTION: STEAM Do not touch steam vents or the top of the brewer while brewing.
CAUTION: The brew basket is hot after brewing. Always allow the brewer to cool down before cleaning.
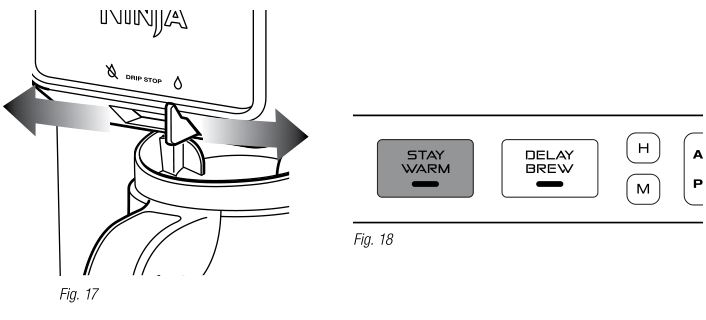
DRIP STOP
NOTE: If the Drip Stop is closed before you begin a brew, the brewer will notify you with 5 beeps and the Drip Stop light will be illuminated. Set the Drip Stop to the open position and select your brew concentration level.
CAN’T WAIT FOR THAT FIRST CUP TO BE READY?
When brewing a carafe, close the Drip Stop to pause the brew cycle and pour a cup. Remember to reopen the Drip Stop to complete the brew. (Fig. 17)
NOTE: If you forget to open the Drip Stop, the Ninja Coffee Bar will pause the brew, and after 20 seconds it will give you a friendly audible reminder. After 6 minutes the brew will be canceled.
CAN’T WAIT FOR THE LAST FEW DROPS?
When the brew cycle is complete, set the Drip Stop to the closed position to stop dripping from the brew basket.
NOTE: While the Drip Stop is closed the Drip Stop indicator will light up in the bottom right hand corner of the control panel.
NOTE: Remember to open the Drip Stop when you’re ready to brew again. If you forget, your Ninja Coffee Bar will give you a friendly audible reminder.
INTELLIGENT WARMING PLATE
The Intelligent Warming Plate will automatically turn on after a full or half carafe size of Classic or Rich brew. The Intelligent Warming Plate will adjust the heat it produces in order to avoid burning the coffee over time.
CAUTION: The HOT SURFACE light will illuminate when the warming plate is hot. Do not touch the surface when this light is illuminated.
STAY WARM BUTTON
Press the Stay Warm Button after the brew to turn the Intelligent Warming Plate off. You can turn the Intelligent Warming Plate back on within 2 hours of the brew by pressing the stay warm button again if desired. (Fig.18)
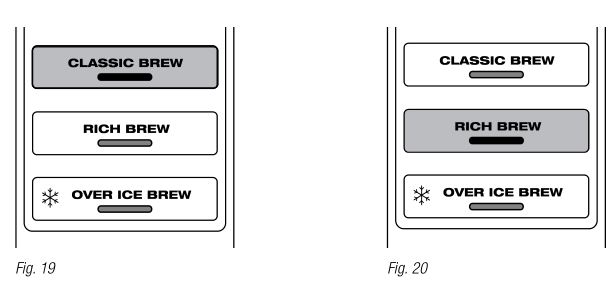
BREWING COFFEE
NOTE: Each brew has a pre-infusion cycle with varying times. The brew will begin, stop, and be quiet for a short period of time before it begins again. This process is used to evenly saturate your coffee grounds.
NOTE: For a hotter coffee, rinse the coffee cup, mug or glass carafe with hot water prior to brewing.
CAUTION: Ensure the coffee cup, mug or glass carafe is completely empty before starting a brewing cycle. Starting a brewing cycle with coffee in the vessel will cause an overflow.
CUSTOM BREWS: CLASSIC, RICH OR OVER ICE BREW
Classic Brew – For a smooth, balanced flavor.
Rich Brew – For a coffee that is richer than Classic Brew and still smooth, with more room for milk and cream.
- After filling the water reservoir and adding ground coffee to the filter, be sure that the Drip Stop is open and the reservoir, basket, and filter are securely in place.
- Use the Multi-Serve dial to select the size of coffee you would like to brew. Place the empty vessel that you would like to brew into underneath the brew basket.
NOTE: If making a single cup, lower the Multi-Serve Cup Platform down and center the cup or mug on the cup platform. Please ensure that you are using at at least a 12 oz. cup for the cup size, 14 oz. cup for the tall cup size, 16 oz. travel mug for the travel mug size and 20 oz. travel mug for the XL Multi-Serve size. - Press the CLASSIC BREW or RICH BREW button and the brew will begin. (Fig. 19, Fig. 20) Press the CLASSIC BREW or RICH BREW button again to cancel the brew.
NOTE: The brew will begin, stop, and be quiet for a short period of time before it begins again. This process is used to evenly saturate your coffee grounds.
NOTE: If brewing a half carafe or a full carafe, the Stay Warm indicator and Intelligent Warming Plate will automatically turn on. (Fig. 19, Fig. 20) This can be turned off by pressing the Stay Warm button once illuminated. The Intelligent Warming Plate will turn off automatically after 2 hours.
NOTE: Do not remove water reservoir, brew basket, or vessel while brewing. - The Ninja Coffee Bar ® will beep to signal a completed brew.
NOTE: Rich Brew will use slightly less water and yield slightly less brewed coffee than Classic Brew.
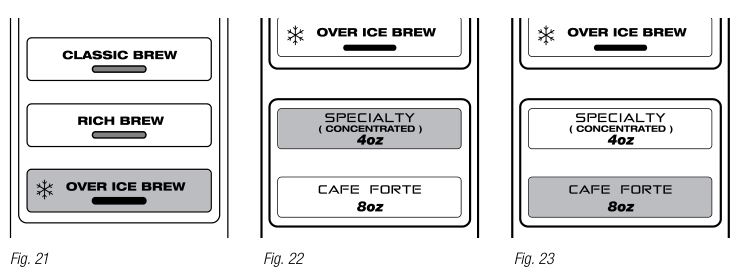
OVER ICE BREW
Designed to brew hot coffee over ice to lock in the flavor for a rich, freshly brewed, smooth iced coffee without becoming watered down. Be sure your vessel is filled with ice before brewing.
CAUTION: DO NOT USE GLASSWARE. However, the provided glass carafe is safe to use due to the specialized glass material.
- After filling the water reservoir, add ground coffee to the filter (feel free to add more coffee if you like a stronger taste.) Be sure that the Drip Stop is open and the reservoir, basket and filter are in place.
- Use the Multi-Serve dial to select the size of coffee that you would like to brew.
- Before brewing, fill the desired vessel to the top with ice cubes and place the vessel below the brew basket. Press the OVER ICE BREW button and the brew will begin. (Fig. 21) Press the OVER ICE BREW button again to cancel the brew.
IMPORTANT: Always fill the desired vessel to the top with ice before placing it below the brew basket. Do not add ice to the water reservoir.
NOTE: The brew will begin, stop, and be quiet for a short period of time before it begins again. This process is used to evenly saturate your coffee grounds.
NOTE: If making a carafe of Over Ice Brew, fill the carafe with ice and brew without the brew-through lid. - The Ninja Coffee Bar will beep to signal a completed brew. Stir to cool coffee completely.
CAUTION: Make sure to use the proper cup size, to prevent coffee overflowing the cup.
Go to ninjacoffeebar.com for more information and how-to videos.
NINJA BREWS
Specialty and Cafe Forte brews deliver a specific amount of concentrated coffee for the perfect brew every time. Specialty delivers approximately 4 oz. and Cafe Forte delivers approximately 8 oz.
SPECIALTY OR CAFE FORTE BREW
The Specialty Brew produces a strong coffee concentrate perfect for an iced blended coffee drink or milk-based specialty drink.
Cafe Forte has a deep, full-bodied, and complex flavor that is rich and drinkable. It tastes great black—no milk or sweeteners needed. Refer to the Inspiration Guide for recipes.
- After filling the water reservoir and adding ground coffee to the filter, be sure that the Drip Stop is open and that the reservoir, basket and filter are securely in place.
Note: If brewing an iced blended drink, fill the desired vessel with the amount of ice recommended in the recipe before brewing. - Place the vessel that you would like to brew into underneath the brew basket. Press the SPECIALTY BREW button or CAFE FORTE button and the brew will begin. (Fig. 22, 23) Press the SPECIALTY BREW button or CAFE FORTE button again or press the Power Save button to cancel the brew.
NOTE: The brew will begin, stop, and be quiet for a short period of time before it begins again. This process is used to evenly saturate your coffee grounds.
NOTE: No matter which size is selected on the Multi-Serve dial, Specialty will always brew 4 oz. and Cafe Forte will always brew 8 oz. - The Ninja Coffee Bar will beep to signal a completed brew.
CAUTION: DO NOT reach across the top of the brewer to froth during brewing. Steam is released from vent on top of brewer and can result in a steam burn.

FROTHING YOUR MILK
- Pour milk into cup, until it is about one-third full. (Use more or less milk depending on your preference.) Microwave for 45-60 seconds for hot milk.
- Move the frother into the ready position by swinging the arm toward the front.
- Hold cup under the frother and submerge the whisk just below the surface of the milk. This allows air to fold into the milk, for the frothiest results. (Fig. 24)
- Press and hold the frothing button for 30 to 45 seconds. (Fig. 25)
- You can easily remove the frother whisk by twisting it clockwise. Keep your cup below the whisk and carry it to your sink or dishwasher for cleaning. (Fig. 26)
Care & Maintenance
CLEANING AFTER A BREW
CAUTION: Make sure that the brewer is unplugged from the power source before cleaning.
CAUTION: Be sure to allow the brewer to cool before cleaning.
IMPORTANT: Discontinue use if the glass carafe is scratched or handle is loose or damaged.
NOTE: Do not leave coffee in the glass carafe for an extended period of time after a brew.
NOTE: Do not leave water in or underneath the water reservoir unused for multiple days. Rinse and replace with fresh water.
- Before cleaning, close the Drip Stop.
- After each brew is complete and the coffee grounds have cooled, carefully remove the permanent filter and wash. If using a paper filter, simply discard. Remove brew basket from the brewer, rinse and wash with soap and warm water.
- After each froth, rinse thoroughly or place the frother whisk on top rack of dishwasher.
NOTE: The swinging brew basket is not dishwasher safe.
Note: The flip-top reservoir lid is not dishwasher safe.
NOTE: If coffee grounds spilled over into the brew basket or in the overflow channels, remove and rinse under water until grounds are removed. - Wash the carafe and brew-through lid with soap and warm water. Use a bottle brush or a cloth to wash the inside of the carafe.
NOTE: The brew-through lid, glass carafe, permanent filter and water reservoir are top shelf dishwasher safe.
IMPORTANT: Clean the glass carafe with a soft brush or sponge. Do not use a wire brush. - Wipe machine down with a warm cloth with soap and water. Let the warming plate cool before cleaning with a wet cloth and soap and water. Clean shower head, the water reservoir shelf, the water reservoir, flip-top water reservoir lid, the removable filter carrier and Filter Carrier Insert with soap and water. Do not immerse the base in water.
NOTE: For best results, use a bottle brush. This will allow you to scrub all of the inside with soap and hot water.
CLEANING YOUR CARAFE
We recommend rinsing your carafe with warm soapy water, or placing in the top shelf of your dishwasher.
If you want to clean the carafe more thoroughly, we recommend using a soft foam brush such as the one shown.
CLEANING YOUR WATER RESERVOIR
- Empty the water reservoir.
- Hand wash with dish soap and rinse, or place on the top rack of your dishwasher.
- Clean the water reservoir shelf with cloth and warm soapy water.
HOW TO CLEAN & DESCALE THE BREWING SYSTEM
CAUTION: Be sure to allow the brewer to cool before cleaning.
CAUTION: DO NOT immerse the coffeemaker into water or any other liquid.
The CLEAN button will illuminate when there is a calcium buildup on your Ninja ® Coffee Bar that could be affecting the flavor of your coffee. If you do not clean your brewer when instructed to do so, eventually the CLEAN light will flash and an urgent “Clean” message will appear on the clock display. The cleaning cycle is a two stage process, the reservoir is first filled with cleaning solution and later with clean water to flush the system.
To clean and descale your Ninja Coffee Bar:
- Select the Carafe size and set the carafe beneath the brew basket.
- Use a descaling solution and follow the directions on the package. Fill the water reservoir up to but not exceeding the Max Fill line (43 oz.)
OR - Fill the water reservoir to the Travel Mug line (16 oz.) with white vinegar, then fill the rest of the reservoir with water up to but not exceeding the Max Fill line (43 oz.)
IMPORTANT: Use only white vinegar. - Once the water reservoir is filled with your cleaning solution and water mixture, press the CLEAN button. (Fig. 27)
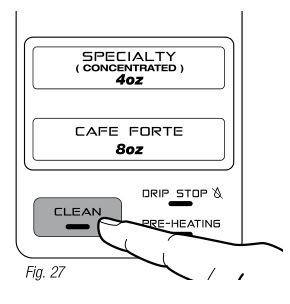
- Your Ninja Coffee Bar will deliver a small amount of water to distribute the cleaning mixture through the system. It will then pause for one hour as the clock display counts down. Do not remove the carafe from the base during this period, as there will be additional water delivered.
- After one hour, your Ninja® Coffee Bar will discharge the remainder of the cleaning mixture into the carafe. Upon completion, the Ninja Coffee Bar will beep, and a “Flush” message will appear on the clock screen.
- Empty and thoroughly clean the carafe and water reservoir to remove any cleaning solution that could affect the flavor of your coffee.
- Fill the reservoir with fresh water up to but not exceeding the Carafe line (43 oz. Max Fill line) and set the carafe beneath the brew basket.
- Press the CLEAN button to begin the Flush stage. (The Flush stage takes approximately 8 minutes.)
- Upon completion of the Flush stage, the CLEAN light will turn off. Discard the water in the carafe.
NOTE: If the CLEAN light illuminates again, then calcium buildup is still present. Repeat the steps above and the CLEAN light will automatically shut off when your brewer is clean.
Please call Customer Service at 1-877-646-5288 to purchase descaling solution or if the brewer needs any servicing.
Troubleshooting Guide
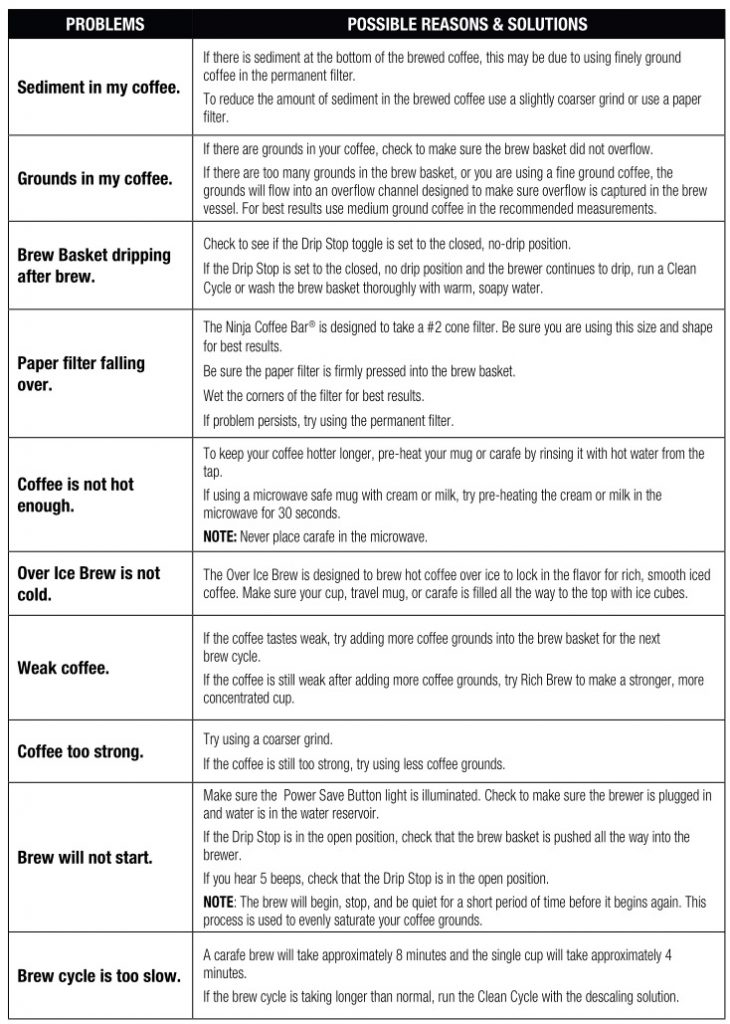
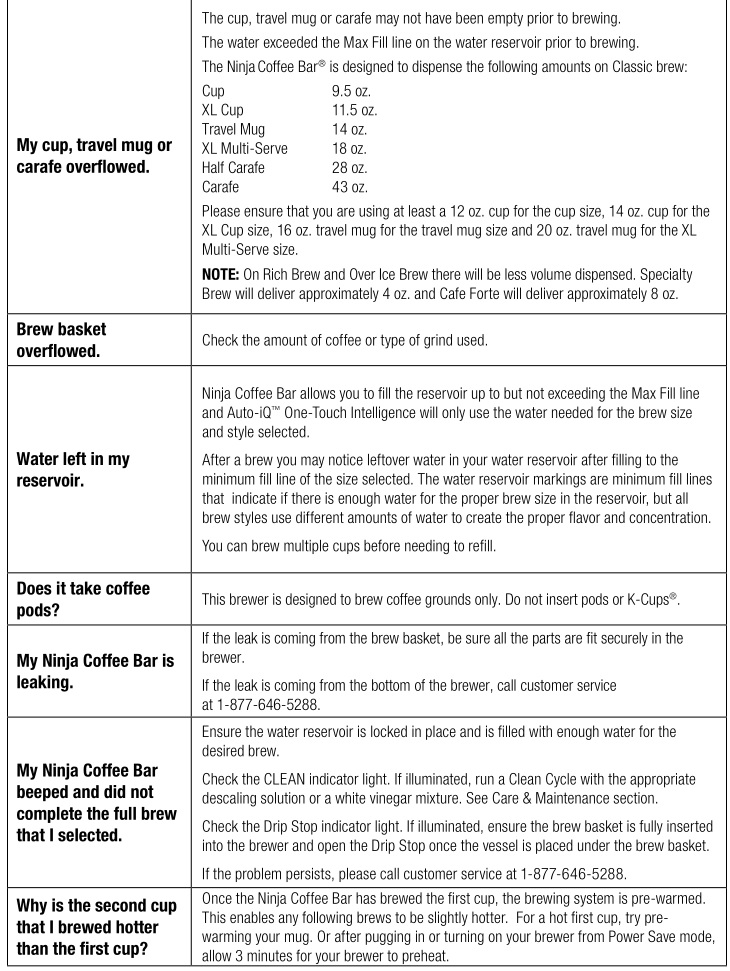
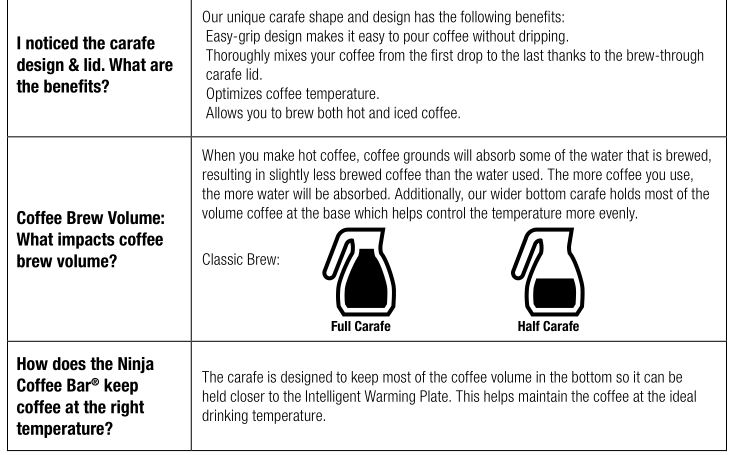
Go to ninjacoffeebar.com for more information and how-to videos.
Replacement Parts
ORDERING REPLACEMENT PARTS
To order additional parts and attachments, please visit ninjacoffeebar.com or feel free to contact customer service: 1-877-646-5288.
![]()
ONE (1) YEAR LIMITED WARRANTY
SharkNinja Operating LLC warrants this product to be free from material defects and workmanship for a period of one (1) year from the date of purchase when utilized for normal household use, subject to the following conditions, exclusions and exceptions.
The liability of SharkNinja Operating LLC is limited solely to the cost of the repair or replacement of the unit at our option. This Limited Warranty does not cover normal wear of parts and does not apply to any unit that has been tampered with or used for commercial purposes. This Limited Warranty does not cover damage caused by misuse, abuse, negligent handling or damage due to faulty packaging or mishandling in transit. This Limited Warranty does not cover damage or defects caused by or resulting from damages from shipping or from repairs, service or alteration to the product or any of its parts, which have been performed by a repair person not authorized by SharkNinja Operating LLC.
If your appliance fails to operate properly while in use under normal household conditions within the warranty period, return the complete appliance and accessories, freight prepaid. For assistance with warranty service options or customer support, please call our customer care and product specialists at 1 (877) 646-5288 or visit our website ninjacoffeebar.com.
If the appliance is found to be defective in material or workmanship, SharkNinja Operating LLC will repair or replace it free of charge. Proof of purchase is required and a fee of $19.95 will apply to cover the cost of return freight.*
This Limited Warranty is extended to the original purchaser of the unit and excludes all other legal, implied and/or conventional warranties. The responsibility of SharkNinja Operating LLC, if any, is limited to the specific obligations expressly assumed by it under the terms of this Limited Warranty. In no event is SharkNinja Operating LLC liable for incidental or consequential damages to anyone of any nature whatsoever. Some states do not permit the exclusion or limitation of incidental or consequential damages, so the above may not apply to you.
This Limited Warranty gives you specific legal rights, and you may also have other rights which vary from state to state or from province to province.
*IMPORTANT: Carefully pack item to avoid damage in shipping. Be sure to include proof of purchase date and to attach tag to item before packing with your name, complete address and phone number with a note giving purchase information, model number and what you believe is the problem with the item. We recommend you insure the package (as damage in shipping is not covered by your Limited Warranty). Mark the outside of your package “ATTENTION CUSTOMER SERVICE”.
Product Registration
Please visit ninjacoffeebar.com or call 1-877-646-5288 to register your new Ninja ® product within ten (10) days of purchase. You will be asked to provide the store name, date of purchase and model number along with your name and address.
The registration will enable us to contact you in the unlikely event of a product safety notification. By registering, you acknowledge to have read and understood the instructions for use and warnings set forth in the accompanying instructions.
SharkNinja Operating LLC
US: Newton, MA 02459
CAN: Ville St-Laurent, QC H4S 1A7
1-877-646-5288
ninjacoffeebar.com
Copyright © 2016 SharkNinja Operating LLC
For SharkNinja U.S. Patent information visit sharkninja USPatents
Ninja, Ninja Coffee Bar and Thermal Flavor Extraction are registered trademarks of SharkNinja Operating LLC.
Auto-iQ is a trademark of SharkNinja Operating LLC.
Printed in China
Illustrations may differ from actual product. We are constantly striving to improve our products, therefore the specifications contained herein are subject to change without notice.