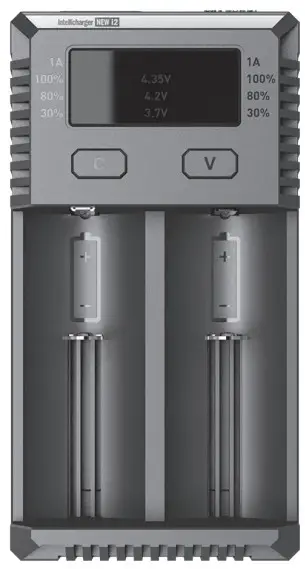
Intellicharger NEW i2
User Manual

IMPORTANT NOTICE CONCERNING WARRANTY SERVICE
Thank you for purchasing! Before using this charger, please find your verification code on the package box, and go to http://charger.nitecore.com/validation (or scan the QR code beside the verification code to visit on your mobile phone). Type in your verification code and personal information as required, and submit the page. After verification, Nitecore will send you a warranty service email. This email and your registration email address are essential to your possible warranty application. Before you complete the warranty service registration, you cannot enjoy our warranty service for your purchase.
Features
- Twice the charging speed of the i2 charger
- Active Current Distribution (ACD) Technology
- Compatible with 1.2V, 3.N, 4.2V, 4.35V batteries
- Charging program optimized for IMR batteries
- Automatic current selection based on battery capacity
- Capable of charging two batteries
- Two charging slots charge and control independently
- Automatically detects battery power status and displays charging progress
- Automatically stops charging upon charging completion
- Reverse polarity protection and short circuit prevention
- Over-discharged battery activation
- Overtime charging protection
- Designed for optimal heat dissipation
- Made from fire-resistant, flame retardant PC material
- Certified by RoHS, CE, FCC, and CEC
- Insured worldwide by Ping An Insurance (Group) Company of China, Ltd.
Specifications
Input Voltage: AC 100~240V 50/60Hz 0.25A(max) 8W
DC 9~12V
Output voltage: 4.35V±1%/4.2V±1%/
3.7V±1%/1.48V±1%
Output current: 500mA×2/1000mA ×1
Compatible with: 10340, 10350, 10440, 10500, 12340, 12500, 12650, 13450, 13500, 13650, 14350, 14430, 14500, 14650, 16500, 16340(RCR123), 16650, 17350, 17500, 17650, 17670, 18350, 18490, 18500, 18650, 22500, 22650, 25500, 26500, 26650
Flat-topped Batteries: 18700, 20700, 21700
Li-ion/IMR/LiFePO4:
Ni-MH(NiCd): AA,AAA,AAAA,C,D
Dimensions: 132mm×70mm×35mm
Weight: 126g (without batteries and power cord)
Operating Instructions
Connect to a power source: Connect the NEW i2 to an external power source (such as a car adaptor, power socket) via its charging cable. Install batteries: Put one or two batteries in each independently-controlled slot according to the polar mark on the charger.
Battery identification: Four LEDs go up over the slot a Lithium battery is inserted in; two lower LEDs go up over the slot a Ni-MH battery is inserted in. Charging begins in two seconds.
Other features: The New i2 has reverse polarity protection and anti-short circuiting protection incorporated.
| Battery Activation and Inspection | Error Report |
| Batteries inserted with polar reversed | Four LEDs on the screen blink to notify the user of an error. |
| Batteries short-circuited | |
| The NEW i2 will charge normal batteries upon inspection. | |
Smart charging: The NEW i2 can choose to charge currents based on intelligent detection about battery types and capacities. The manual charging current selection is also available. The NEW i2 is compatible with:
- 3.7V Li-ion rechargeable batteries
- 3.8V Li-ion rechargeable batteries
- 1.2V Ni-MH/Ni-Cd rechargeable batteries
- 3.2V LiFePO4 batteries
During charging, the three indicator LEDs indicate the batteries’ status and charging percentages.
Charging Current Settings
Install the batteries into the NEW i2, and press the button over the battery’s slot after automatic detection to enter Manual Settings mode. Press and hold the C button to enter Current Selection to manually select 1A or 500mA charging current when a large capacity battery (>1200mAh). When the appropriate current setting is highlighted, release the C button and press the button over the slot again to exit Manual Settings mode and begin charging.
| Battery Types and Capacity | Default Current | Manual Setting to lA Available |
||
| 1 battery | 2 batteries | |||
| Lithium | >1200 mAh | IA | 0.5A | Yes |
| <1200 mAh | 0.5A | 0.5A | No | |
| NI-MH | 0.5A | 0.5A | No | |
| Active Current Distribution (ACD) | |||
| lA Set | Left slot | lA Set | Right slot |
| Yes | Charges at lA with priority | Yes | Holds while Left is charging; Charges at 500mA while Left is close to completion; Charges at lA while Left is complete. |
| Yes | Charges at lA with priority | No | Holds while Left is charging; Charges at 500mA while Left is close to completion; Charges at 500mA for the small capacity battery while Left is complete; Charges at lA for the large-capacity battery while Left is complete. |
| No | Holds while Right is charging; Charges at 500mA while Right is close to completion; Charges at 500mA for the small capacity battery while Right is complete; Charges at lA for the large-capacity battery while Right is complete. |
Yes | Charges at lA with priority |
Note:
- When 1A charging current is selected, the LED next to the 1A mark goes on.
- For small capacity batteries (<1200mAh, such as 10440, 16340), 500mAh charging current is automatically selected.
- For Ni-MH batteries and 3.7V Li-ion batteries, the NEW i2 automatically selects proper charging modes. For LiFePO4 batteries, a manual setting is required.
Charging Voltage Settings
For LiFePO4 batteries:
Insert the batteries into the NEW i2’s charging slots. After battery inspection, press the button over the battery’s slot to enter Manual Settings mode. Press and hold the V button to enter Voltage Selection. Before the button is released, three settings of charging cut-off voltages will cycle every second (highlighted with an LED). When the desired setting is highlighted, release the V button, and press the button over the slot again to exit Manual Settings mode and begin charging. For 3.8V Li-ion batteries: Follow the above setting method.
Battery Activation
The NEW i2 is capable of activating depleted Li-ion batteries with a protective circuit. After battery installation, the NEW i2 will test and activate the battery before charging. A battery detected as damaged cannot be activated, and the three LEDs above its slot will go on to notify the user.
Lithium Battery Recovery
Upon insertion of a 0V IMR battery, all four LEDs over its slot will blink to indicate that it is not ready for charging. Press and hold both buttons until its power indicator blinks to enter the Recovery mode. Nitecore recommends abandoning this battery if it fails to be recovered after several attempts. NOTE: Do not conduct battery activation operation when batteries are inserted with reversed polarity. Doing so may cause fire or explosion of the batteries.
Overtime Charging Protection
The NEW i2 will separately calculate the charging time of each battery. When the overall charging time exceeds 20 hours, the NEW i2 will automatically stop charging and display a fully charged status. This is to prevent possible overheat or even explosion due to battery quality issues.
Precautions
- The charger is restricted to charging Li-ion, IMR, LiFePO4, Ni-MH/Ni-Cd rechargeable batteries only. Never use the charger with other types of batteries as this could result in battery explosion, cracking, or leaking, causing property damage, and/or personal injury.
- The safe operating temperature for the charger is between -10-40°C, and the safe storage temperature is -20-60°C.
- Please charge batteries in accordance with the specifications on the back. Do not charge a battery pack with the charger.
- Observe polarity diagrams located on the charger. Always place the battery cells with a positive tip facing the top.
- Do not leave a working charger unattended. If any malfunction is found, please terminate operation immediately, and turn to the user manual for instruction.
- The charger is designed for adults. Use of the charger by kids under age must be under supervision. The operation, using, or cleaning of the charger may NOT be done by kids aged 8 years or younger.
- This appliance is not intended for use by persons (including children) with reduced physical, sensory or mental capabilities, or lack of experience and knowledge unless they have been given supervision or instruction concerning the use of the appliance by a person responsible for their safety. Children should be supervised to ensure that they do not play with the appliance.
- Please make sure the correct program and settings are chosen and set. Incorrect program or setting may damage the charger, or cause fire or explosion.
- Never attempt to charge primary cells such as Alkaline, Zinc-Carbon, Lithium, CR123A, CR2, or any other unsupported chemistry due to the risk of explosion and fire.
- Do not charge a damaged IMR battery as doing so may lead to charger short-circuit or even explosion.
- Never charge or discharge any battery having evidence of leakage, expansion/swelling, damaged outer wrapper or case, color-change or distortion.
- Use the original adapter and cord for the power supply. To reduce the risk of damage to the power cord, always pull by the connector rather than the cord. Do not operate the charger if it appears damaged in any way.
- DO NOT store or use the product in an environment where the temperature is extremely high/low or changes rapidly, or in a confined area with a high
temperature. - Please operate the charger in a well-ventilated area. Do not operate or store it in damp areas. Keep all the inflammable volatile substances away from the operating area.
- Avoid mechanical vibration or shock as these may cause damage to the device.
- Do not short-circuit slots or other parts of the device. Do not allow metal wires or other conductive material into the charger.
- Do not touch hot surfaces. The rechargeable batteries or the device may become hot at full load or high power charging/discharging.
- Do not overcharge or over-discharge batteries. Recharge drained batteries as soon as possible.
- Remove all batteries and unplug the charging unit from the power source when not in use.
- Opening, disassembling, modifying, tampering with the unit may invalidate its guarantee, check warranty terms.
- Do not misuse in any way! Use for intended purpose and function only.
Disclaimer
This product is globally insured by Ping An Insurance (Group) Company of China, Ltd. Nitecore shall not be held responsible or liable for any loss, damage or claim of any kind incurred as a result of the failure to obey the instructions provided in this user manual.
Warranty Details
Our authorized dealers and distributors are responsible for warranty service. Should any problem covered under warranty occur, customers can contact their dealers or distributors in regards to their warranty claims, as long as the product was purchased from an authorized dealer or distributor? NITECORE’s Warranty is provided only for products purchased from an authorized source. This applies to all NITECORE products. Any DOA / defective product can be exchanged for a replacement through a local distributor/dealer within 15 days of purchase. After 15 days, all defective/malfunctioning NITECORE® products can be repaired free of charge for a period of 12 months (1 year) from the date of purchase. Beyond 12 months (1 year), a limited warranty applies, covering the cost of labor and maintenance, but not the cost of accessories or replacement parts. The warranty is nullified if the product(s) is/are 1. broken down, reconstructed, and/or modified by unauthorized parties 2. damaged from wrong operations (i.e. reserve polarity installation, installation of non-rechargeable batteries), or 3. damaged by batteries leakage. For the latest information on NITECORE® products and services, please contact a local NITECORE® distributor or send an email to [email protected]. All images, text, and statements specified herein in this user manual are for reference purposes only. Should any discrepancy occurs between this manual and information specified on www.nitecore.com, information on our official website shall prevail. SYSMEX Innovations Co., Ltd. reserves the right to interpret and amend the content of this document at any time without prior notice.
Safety Instruction for Lithium-ion Batteries
- Charging Voltage
Lithium-ion (Li-ion) batteries have strict requirements for voltage control. Charging Li-ion batteries with electric voltage beyond safety standards can lead to battery damage and explosion.
(1) 4.2V Li-ion Batteries/ IMR Batteries 4.2V Li-ion batteries are the most common rechargeable Lithium batteries. The skins of these batteries are often marked with 3.6V/3.7V signs. If our chargers judge that an inserted battery is a Li-ion battery, the battery will be automatically charged in 4.2V standard charging mode. You do not need extra voltage settings for these types of batteries.
(2) 4.35V Li-ion Batteries 4.35V Li-ion batteries are comparatively rare. It usually has a 3.7V mark on its skin. Normally its seller will inform its buyer that it needs to be charged with 4.35V power. When charging this type of battery, please manually set the charging voltage to 4.35V, otherwise, the charger will charge at 4.2V by default, and cannot provide adequate charging voltage.
(3) 3.7V LiFePO4 Batteries 3.7V LiFePO4 batteries have LiFePO4 and/or 3.2V marks on the skin. Be careful with this type of battery. Without manual setting, our chargers will charge this type of battery with 4.2V voltage and will damage or even explode the battery with excessive charging voltage. You need to manually set the charging voltage to 3.7V for safe charging. - Charging Current
For all rechargeable Lithium batteries (including Li-ion, IMR, and LiFePO4 batteries), we suggest not using current larger than 1C* for charging. For small-capacity batteries, the charging current must be smaller than 1C.
*C=Capacity of a battery. For example, 1C in a 2600mAh rechargeable Lithium battery is 2.6A. 1C in a 3400mAh rechargeable Lithium battery is 3.4A. Excessively large charging current will lead to a great amount of heat, and consequently battery damage and explosion. Warning: Our chargers automatically judge and select charging current by the batteries’ length. For some long but small capacity batteries (i.e. 12650, 13650, 14650, 16650), please manually set the appropriate charging current (smaller than 1C). - Precautions
(1) Do not short circuit the battery in any way. (2) Do not use a 4.2V/4.3V Lithium battery when its voltage is lower than 2.8V, otherwise, it can be over-discharged, and/or prone to an explosion at the next charging. (3) We strongly recommend batteries with protective circuits. For batteries without protective circuits (such as IMR batteries), please stay alert for over-discharge and short circuits.
(4) Do not discharge a battery with a discharging current larger than its maximum rated current. - Long-term Storage
The best storage voltage for 4.2V/4.35V rechargeable Lithium batteries is 3.7V. Voltage too low or too high can damage your battery during storage. You can discharge a battery to 3.7V, or charge it to 3.7V in a charger before you keep it in long-term storage. The validation code and QR code on the package can be verified on the Nitecore web
 1. The charger must be used with Nitecore’s official cords. During charging, third-party cords can cause malfunction, overheat and even fire on the charger. Damages from using unofficial cords cannot be covered by an official warranty.
2. The NEW i2 is restricted to charging Li-ion, IMR, 3.7V LiFePO4, Ni-MH/Ni-Cd rechargeable batteries only. Never use the NEW i2 with other types of batteries as this could result in battery explosion, cracking or leaking, causing property damage, and/or personal injury.
SYSMEX Innovations Co., Ltd.
TEL: +86-20-83862000
FAX: +86-20-83882723
E-mail: [email protected]
Web: www.nitecore.com
Address: Rm 2601-06, Central Tower, No.5 Xiancun Road,
Tianhe District, Guangzhou, 510623, Guangdong, China
Manufacturer: SYSMEX Power Technology, LLC
![]()
Made in China
 please find us on Facebook: nitecorecharger
NITECORER
NU10/NUIO CRI
User Manual
Red Light Illumination With the light turned off, press the R switch to turn the red light (13 lumens) on, pressing the R switch again repeatedly within 3 second to cycle through Red illumination-Red flashing-standby, press the R switch when no action is taken after 3 second will turn the red light off.
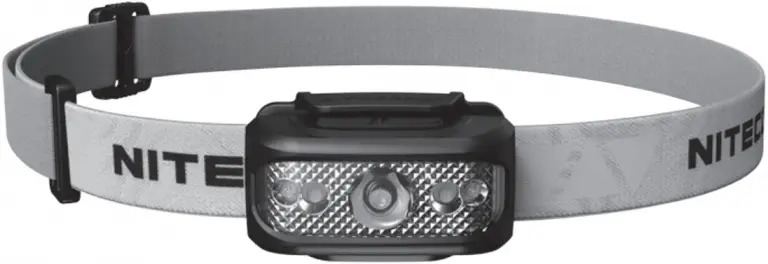
Features
- Lightweight portable headlamp
- NU10: Fitted with 5 high performance LEDs
- NU10 CRI: High colour rendering capability, CR1290
- White and red dual outputs
- Built-in Li-ion battery provides runtime up to 150 hours
- Onboard USB charging circuit
- Dual switch design for easy one-handed operation
- 3 brightness levels and 2 special modes (SOS, location beacon)
- Built-in power indicator (Patent No. ZL201220057767.4)
- Flood-illumination with 60° adjustable angle
- Made from durable PC materials
- Impact resistant to 1 metre
Lockout/Unlock
Hold down both the power switch and R switch until the built-in power indicator blinks once to enter lockout mode, all 5 main LEDs will be rendered inoperative in lockout mode, to unlock, hold down both switches until the power indicator blinks once again.
Dimensions
Size: 2.38″ *1.38″ *1.15% Weight: 2.29oz(with battery)
Accessories
USB cord, head band, holder
Power Tips
The built-in power indicator is designed to provide an approximation for remaining battery level, with the light turned off, hold down the power switch for 1 second, the power indicator under the power switch will blink to indicate battery level: 3 blinks represent battery level above 50%, 2 blinks represent battery level below 50%, 1 blink represents battery level below 10%. Note: Recharge the NU10 when output appears to be dim or unresponsive.
Output & Runtime
NU10

NOTICE: Stated data has been measured in accordance with the international flashlight testing standards ANSI/NEMA FL1 using an integrated and fully charged 3.7V 900mAh rechargeable Li-ion battery under laboratory conditions. End-user results may vary due to individual usage habits and environmental conditions.
NOTICE: Stated data has been measured in accordance with the international flashlight testing standards ANSI/NEMA FL1 using an integrated and fully charged 3.7V 900mAh rechargeable Li-ion battery under laboratory conditions. End-user results may vary due to individual usage habits and environmental conditions.
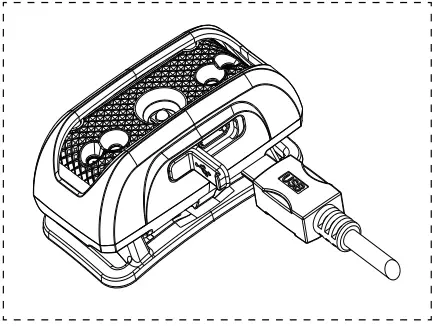
Recharge
The NU10 comes with a USB cord included. Raise the micro-USB port cover on the NU10 to expose the charging port, connect the port to a power supply with the USB cord provided. Fully charges the product take approximately 2 hours.
Note: The built-in power indicator will be lit to indicate charging in progress, and will turn green I when the process is completed.
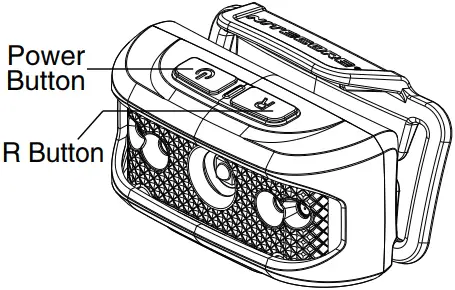
Operating Instructions
Dual Switch The power  switch controls the white light, and the R switch
White Light Illumination
With the light turned off, press the power switch to turn the white light on:
- Within 3 second from the white light activation, pressing the power switch repeatedly will cycle through Low-Mid-High-Standby.
- Pressing the power switch after the white light has been left on in any setting for more than 3 second will turn the light off.
Note: The NU10 will step down from “High” to the next available output after it has been on that mode for 45 minutes, this is designed to prevent overheating.
Special Modes(SOS mode / Location Beacon)
With the light turned off, hold down the power switch for 3 second to enter SOS mode, press the power switch again within 3 second interval switches the NU10 from SOS-Beacon-Standby (pressing the power switch again when no action is taken after 3 second turns the light off).
Warranty Details
All NITECORE products are warranted for quality. Any defective /malfunctioning NITECORE Tube can be repaired free of charge for a period of 12 months from the date of purchase. Beyond 12 months, a limited warranty applies, covering the cost of labor and maintenance, but not the cost of accessories or replacement parts. The warranty is nullified in either or both of the following situations:
- The product(s) is/are broken down, reconstructed and/or modified by unauthorized parties.
- The product(s) is/are damaged through improper use. For the latest information on NITECORE® products and services, please contact a local NITECORE® distributor or send an email to [email protected]. controls the red light.
All images, text and statements specified herein this user manual are for reference purpose only. Should any discrepancy occurs between this manual and information specified on www.nitecore.com, information on our official website shall prevail. SYSMAX Innovations Co., Ltd. reserves the rights to interpret and amend the content of this document at any time without prior notice.
Please find us on facebook: SYSMAX Innovations Co., Ltd. NITECORE Flashlight
TEL:+86-20-83862000
FAX: +86-20-83882723
E-mail: [email protected] Web:
www.nitecore.com Address: Rm 2601-06, Central Tower, No.5 Xiancun Road, Tianhe District,
Guangzhou 510623, Guangdong, China
NUO7031018
Made In China
Thanks for purchasing NITECORE!
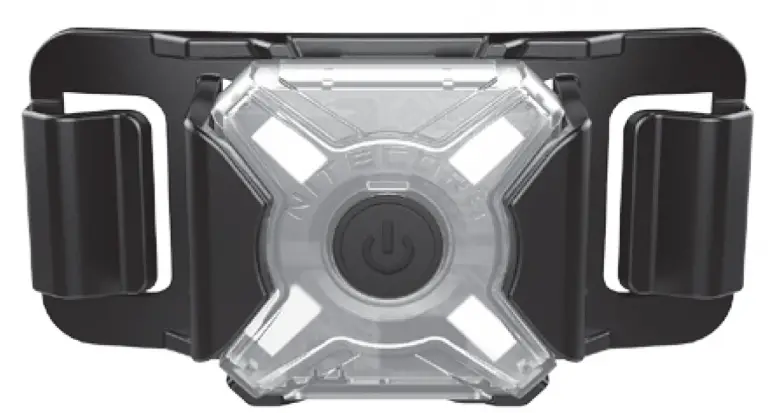
]]>NITECORE Mini Signal Headlamp

Features
- Utilizes 4 x high performance LEDs
- Available with 4 colors of flashing and Red/Blue Police Warning Flashing
- Powered by the built-in Li-ion battery with a max runtime of 18 hours
- Built-in Li-ion battery charging circuit with a Micro-USB port
- One hand operable single switch design
- A power indicator within the body indicates the remaining battery power (Patent No. ZL201220057767.4)
- Lightweight bracket included with Velcro hooks on the back
- Made from durable PC materials
- Ultra light and portable design
- Impact resistant to 1 meter
Specifications
Dimensions: 67.33mm×34mm×25.9mm (2.65”×1.34”×1.02”) (Bracket Included)
Weight: 22g (0.78oz) (Bracket Included) 10.5g (0.37oz) (Bracket Not Included)
Accessories: Bracket, USB Charging Cable
Technical Data
| Red
Flashing |
Green Flashing | Blue
Flashing |
White Flashing | Red/Blue Police
Warning Flashing |
|
| Output | 12
Lumens |
17
Lumens |
2
Lumens |
20
Lumens |
─ |
| Runtime | 15h | 15h | 15h | 18h | 18h |
| Impact
Resistance |
1m | ||||
| Water
Resistance |
IP66 | ||||
Note: The stated data is measured using the built-in Li-ion battery (120mAh) under laboratory conditions. The data may vary in real world use due to different battery usage or environmental conditions.
Warranty Service
All NITECORE® products are warranted for quality.
Any DOA / defective product can be exchanged for a replacement through a local distributor/dealer within 15 days of purchase. After that, all defective / malfunctioning NITECORE® products can be repaired free of charge within 24 months from the date of purchase.
Beyond 24 months, a limited warranty applies, covering the cost of labor and maintenance, but not the cost of accessories or replacement parts.
The warranty will be nullified if
- the product(s) is/are broken down, reconstructed and/ or modified by unauthorized parties;
- the product(s) is/are damaged due to improper use.
For the latest information on NITECORE® products and services, please contact a local NITECORE® distributor or send an email to [email protected]
- All images, texts and statements specified herein this user manual are for reference purposes only. Should any discrepancy occur between this manual and information specified on www.nitecore.com, Sysmax Innovations Co., Ltd. reserves the rights to interpret and amend the content of this document at any time without prior notice.
Charging Function
NU05 LE is equipped with an intelligent charging system.
Please charge the battery before the first use. Connecting to the External Power: As illustrated, uncap the charging port and use the USB cable to connect an external power supply (e.g. a USB adapter, a computer or other USB charging device) to the Micro- USB port to begin the charging process.
Charging Indicator: While charging, the built-in charging indicator will be steadily glowing red. The battery is fully charged when the charging indicator turns green.
- The charging time is approx. 1.5h.
- The standby time is up to 12 months if the battery has been fully charged.
Operating Instructions
On / Off
On: When the light is off, long press the Power Button for over 1 second to turn it on.
Off: When the light is on, long press the Power Button to turn it off.
Mode Switching
NU05 LE is available with 4 colors of flashing and Red/Blue Police Warning Flashing
When the light is off, keep holding the Power Button for over 5 seconds after turning on the light to cycle through “Red Flashing – Green Flashing – Blue Flashing -White Flashing – Red/Blue Police Warning Flashing – Standby”. Release to select the current mode.
(NU05 LE has mode memory. When reactivated, the light will automatically access the previous memorized mode.)
Power Indication
When the light is off, short press the Power Button and the power indicator will flash to indicate the remaining power of the battery:
- Flashing three times indicates that the power is above 50%;
- Flashing twice indicates that the power is below 50%;
- Flashing once indicates that the power is below 10% and near depletion.
Cautions
- Please charge the battery before the first use.
- Please recharge the product every 3 months when left unused for a prolonged time.
- The product contains small assembly parts. Please keep it away from children to avoid danger of choking or suffocation.
- DO NOT disassemble, modify or reconstruct the product, otherwise the warranty will be nullified, and the product might be damaged.

NU17
Ultra Lightweight
Beginner Headlamp
- 180° Wide Range Flood Beam
- 60° Adjustable Bracket
- Micro-USB Rechargeable
NU17 User Manual
Features
- Utilizes a primary CREE XP-G2 S3 LED with a max output of 130 lumens
- Equipped with auxiliary high CRI white LEDs (CRI90, Color Temperature: 4500K) and auxiliary red LEDs
- The primary white light utilizes a total reflective optic lens for uniform and soft beam
- Max peak beam intensity of 460cd and max throw of 43 meters
- Built-in 580mAh Li-ion battery
- High efficiency constant circuit provides a stable output for a max runtime of 150 hours
- 3 brightness levels, 3 light sources and 2 special modes available
- Built-in Li-ion battery charging circuit via a Micro-USB port
- The built-in power indicator indicates the remaining battery power
(Patent No. ZL201220057767.4) - Wide range flood optic system of 180° illumination angle specially designed for outdoor applications
- 60° adjustable angle
- Body constructed from durable PC materials
- Waterproof in accordance with IP66
- Impact resistant to 1 meter
Specifications
Dimensions: 53.2mm×30.2mm×27.4mm (2.09″ ×1.19″ ×1.08″) (Bracket Included)
Weight: 46g (1.62oz) (Bracket and Headband Included)
33.5g (1.18oz) (Bracket Included, Headband Not Included)
Accessories
Headband, USB Charging Cable

Charging Function
NU17 is equipped with an intelligent charging system. Please charge the battery before the first use. As illustrated, use the USB charging cable to connect a USB charging device to the Micro-USB port to begin the charging process.
- During the charging process, the charging indicator
will be steadily glowing red. When the battery is fully charged, it will automatically cease charging and the charging indicator will turn green. - The charging time is approx. 2h.
- The standby time is up to 12 months if the battery has been fully charged.
Operating Instructions
NU17 has dual switches as illustrated.
Primary White Light
On/Off
On: When the light is off, short press the Power Button to access the LOW Level of the primary light.
Off: When no action is taken in 3 seconds after the light is turned on, short press either button to turn it off.
When the light is on, long pressing the R Button can also turn it off.
Brightness Levels
Within 3 seconds after the light is turned on, short press the Power Button repeatedly to cycle through LOW-MID-HIGH-OFF.
Note: NU17 will regulate its output to avoid overheating and prolong the lifespan of the product when accessing the HIGH Level for a long time.
Auxiliary White Light
On/Off
On: When the light is off, long press the Power Button for 1 second to turn on the auxiliary white light.
Off: When no action is taken in 3 seconds after the light is turned on, short press either button to turn it off.
When the light is on, long pressing the R Button can also turn it off.
Auxiliary Red Light
On/Off
On: When the light is off, short press the R Button to access the LOW level of the auxiliary red light.
Off: When no action is taken in 3 seconds after the light is turned on, short press either button to turn it off.
When the light is on, long pressing the R Button can also turn it off.
Mode Switching
Within 3 seconds after accessing the RED LOW Level, short press the R Button repeatedly to cycle through RED LOW-RED HIGH-RED WARNING FLASHING-OFF.
Direct Access to HIGH Level of the Primary Light
When the light is on, long press the Power Button for 1 second to directly access the HIGH Level of the primary white light.
Special Modes (SOS / BEACON)
When the light is on/off, long press the Power Button for 3 seconds to access the SOS Mode. Short press the Power Button again within 3 seconds to switch to the BEACON Mode. Short press the Power Button again to turn it off.
When no action is taken in 3 seconds in either special mode, short pressing either button can also turn it off.
Power Indicator
When the light is off, long press the R Button and the built-in red power indicator will flash to indicate the remaining power of the battery:
- Flashing three times indicates that the power is above 50%;
- Flashing twice indicates that the power is below 50%;
- Flashing once indicates that the power is below 10%.
Note: The product needs to be recharged when the output appears to be dim or when the product becomes unresponsive due to low power.
Cautions
- Please charge the battery before the first use.
- Please recharge the product every 3 months when left unused for a prolonged time.
- DO NOT direct the beam towards naked eyes.
- DO NOT disassemble, modify or reconstruct the product, otherwise the warranty will be nullified, and the product might be damaged.
Technical Data
| FL 1 STANDARD | HIGH | MID | LOW | AUXILIARY HIGH CRI WHITE LIGHT | RED LOW | RED HIGH | RED WARNING FLASHING | SOS | BEACON |
 |
130 Lumens | 28 Lumens | 1 Lumens | 50 Lumens | 1 Lumens | 23 Lumens | 23 Lumens | 130 Lumens | 130 Lumens |
 |
6h | 10h | 150h | 4h | 80h | 3h | 6h | – | – |
 |
43m | 20m | 4m | 15m | 2m | 11m | – | – | – |
 |
460cd | 100cd | 4cd | 55cd | 1cd | 30cd | – | – | – |
 |
1 m (Impact Resistant) | ||||||||
 |
IP66 Rated | ||||||||
Note: The stated data is measured in accordance with the international flashlight testing standards ANSI/NEMA FL1, using the built-in rechargeable Li-ion battery (580mAh) under laboratory conditions. The data may vary in real world use due to different battery usage or environmental conditions.
Warranty Service
All NITECORE® products are warranted for quality. Any DOA / defective product can be exchanged for a replacement through a local distributor/dealer within 15 days of purchase. After that, all defective / malfunctioning NITECORE® products can be repaired free of charge within 24 months from the date of purchase. Beyond 24 months, a limited warranty applies, covering the cost of labor and maintenance, but not the cost of accessories or replacement parts.
The warranty will be nullified if
- the product(s) is/are broken down, reconstructed and/or modified by unauthorized parties;
- the product(s) is/are damaged due to improper use.
For the latest information on NITECORE® products and services, please contact a local NITECORE® distributor or send an email to [email protected]
 All images, texts and statements specified herein this user manual are for reference purposes only. Should any discrepancy occur between this manual and information specified on www.nitecore.com, Sysmax Innovations Co., Ltd. reserves the rights to interpret and amend the content of this document at any time without prior notice.
SYSMAX Innovations Co., Ltd.
TEL: +86-20-83862000
FAX: +86-20-83882723
E-mail: [email protected]
Web: www.nitecore.com
Address Rm 2601-06, Central Tower, No.5 Xiancun
Road, Tianhe District, Guangzhou,510623,
Guangdong, China


Made in China
Thanks for purchasing NITECORE!
 Please find us on facebook : NITECORE Flashlight
NU14061719
]]>
Features
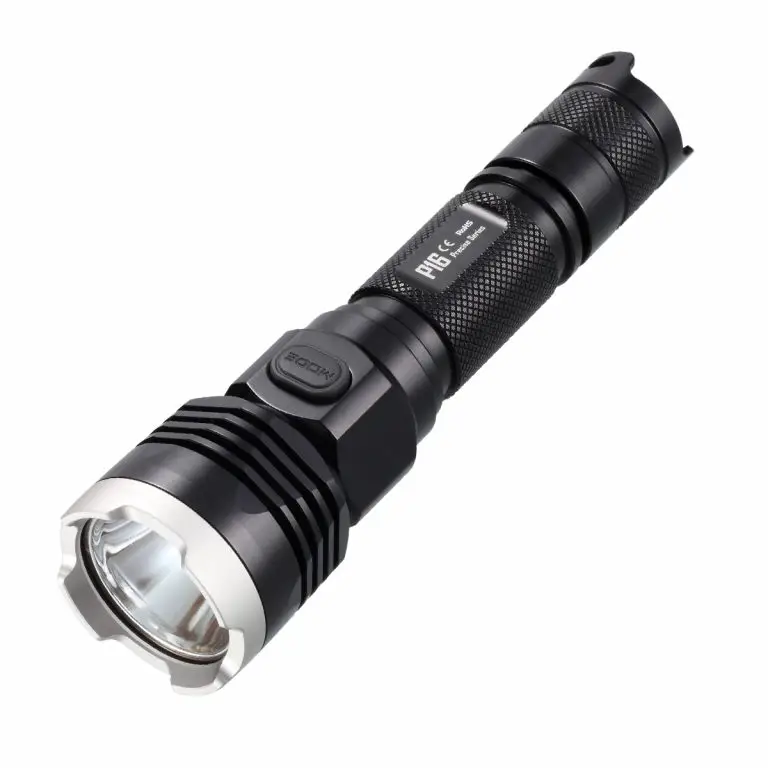
- Premium CREE XM-L2 (U2) LED
- Maximum output of 960 lumens
- Integrated “Precision Digital Optics Technology” provides extreme reflector performance
- Boasts a peak beam intensity of 20,900cd and a throw distance of up to 289 meters
- High efficiency circuit board provides up to 520 hours runtime
- Side switch interface provides one-handed operation and easy access to all flashlight functions
- Side switch features a power indicator light displays remaining battery power (Patent No.ZL201220057767.4)
- Power indicator’s secondary function displays battery voltage (accurate to 0.1V)
- Intelligent memory function stores preferred brightness setting
- Integrated impact resistance mechanism with reverse polarity protection (patented)
- Flashlight head retaining ring protects the core components from damage
- Toughened ultra-clear mineral glass with anti-reflective coaling
- Constructed from aero grade aluminum alloy with HAIII military grade hard anodized finish
- Waterproof in accordance with IPX8 (two meters submersible)
- Impact resistant to 1 meter
- Stainless steel titanium-plated two-way clip included
- Tail stand capability
Dimensions
- Length: 151 mm (5.94″)
- Head Diameter: 40mm (1.57″)
- Tail Diameter: 25.4mm (1 “)
- Weight: 136grams (4.80oz)(without battery)
Accessories
- Quality holster
- Clip
- Tactical ring
- Lanyard
- Spare tail cap
- Spare 0-ring
Battery Options
| SIZE | Nominal voltage | Compatible | |
| Primary Lithium battery | CR123 | 3V | Y (Recommended) |
| 18650 Rechargeable Li-ion battery | 18650 | 3.7V | Y (Recommended) |
| Rechargeable Li-ion battery | RCR123 | 3.7V | y |
Brightness & Runtime
| FL 1 STANDARD | HIGH | MID | LOW | LOWER | STROBE | SOS | Location Beacon |
 |
960 LUMENS |
230 LUMENS |
65 LUMENS |
1 LUMEN |
960 LUMENS |
960 LUMENS |
960 LUMENS |
 |
1h45min | 5h30min | 26h | 520h | – | – | – |
 |
289m | 137m | 64m | 9m | – | – | – |
 |
20900cd | 4710cd | 1000cd | 23cd | – | – | – |
 |
1m (Impact Resistant) | ||||||
 |
IPX8, 2m (Waterproof AND Submersible) | ||||||
NOTICE
The above data has been measured in accordance with the international flashlight testing standards ANSI/NEMA FL 1 using one x 3. 7V 2600mAh 18650 battery under laboratory conditions. The data may vary slightly during real-world use due to battery type, individual usage habits and environmental factors.
Operation instructions
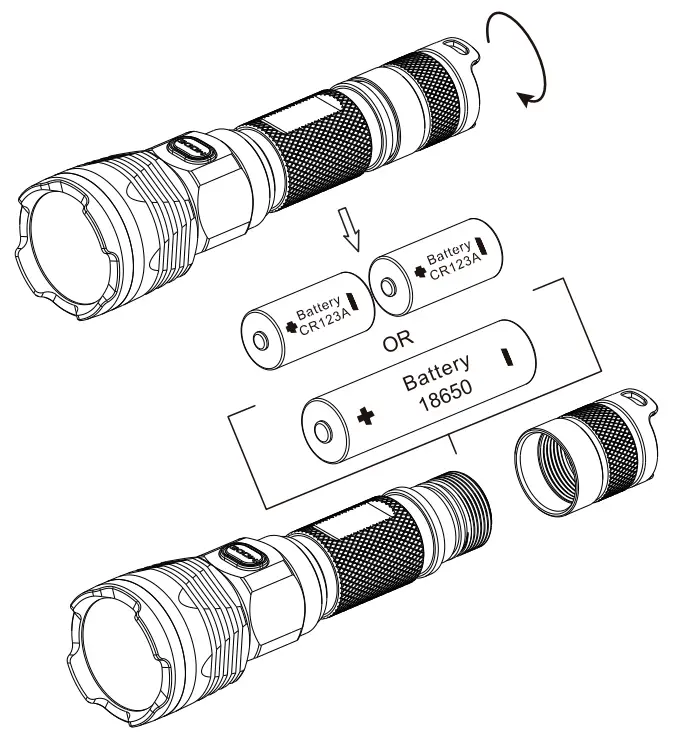
Battery installation
Insert one 18650 battery or two CR123 batteries with the positive pole pointing forward (toward the light head).

WARNING
- Ensure batteries are inserted with the positive ( +) end pointing to the head. The P16 will not operate with incorrectly inserted batteries.
- Ensure when turning the P16 on, the beam is directed away from the eyes of people or animals.
Switching ON/OFF
To switch ON: Press the button on the tailcap until a “click” is heard.
To switch OFF: Press the button on the tailcap a second lime until a “click” is heard.
General Operations
With the light turned on, press the side switch in quick succession to cycle through the following brightness levels: ultra-low, low, medium and high. Once a desired setting is displayed, ii may be saved by turning the light off at the tail switch.
Note: For user safety and to prevent overheating/ failure, the P16 will automatically switch to a lower mode after three minutes of use at its highest level of output.
Special Modes
With the light turned on, press and hold the side switch lo activate Strobe mode. Press and hold once again to access Location Beacon mode and repeat once more for SOS mode. To exit any one of these modes simply press the side switch lo be returned lo your previously used brightness level.
NB: Strobe mode is the default special mode and is the only special mode that has a memory function. If the light is turned off at the tail switch while in strobe mode, strobe will resume when the light is next turned on. SOS and Location Beacon modes have no memory function.
Power Tips
- With the light switched on, the power indicator will blink once every two seconds when power levels reach 50%.
- With the light switched on, the power indicator will blink rapidly when power levels are low.
- With the light turned off, press and hold the side switch while simultaneously pressing the tail switch lo display the battery voltage (accurate lo ±0.1V) with a series of blinks. For example, when the battery voltage is at a maximum charge of 4.2V, the power indicator will blink 4 times in quick succession, followed by a one second pause and two more blinks, indicating a total battery voltage of 4.2V.
Changing Batteries
When the power indicator blinks rapidly this indicates the batteries need to be replaced. Alternatively if the light becomes dim or unresponsive to adjustment this also indicates batteries need to be replaced.
Maintenance
Every 6 months, threads should be wiped with a clean cloth followed by a thin coating of silicon-based lubricant.
Warranty Details
Our authorized dealers and distributors are responsible for warranty service. Should any problem covered under warranty occurs, customers can contact their dealers or distributors in regards to their warranty claims, as long as the product was purchased from an authorized dealer or distributor. NITECORE’s Warranty is provided only for products purchased from an authorized source. This applies to all NITECORE products.
Any DOA/ defective product can be exchanged for a replacement through a local distributor/dealer within the 15 days of purchase. After 15 days, all defective / malfunctioning NITECORE® products can be repaired free of charge for a period of 60 months (5 years) from the date of purchase. Beyond 60 months (5 years), a limited warranty applies, covering the cost of labor and maintenance, but not the cost of accessories or replacement parts.
The warranty is nullified if the product(s) is/are broken down, reconstructed and/or modified by unauthorized parties, or damaged by batteries leakage.
For the latest information on NITECORE® products and services, please contact a local NITECORE® distributor or send an email to [email protected].
AII images, text and statements specified herein this user manual are for reference purpose only. Should any discrepancy occurs between this manual and information specified on www.nitecore.com. Sysmax Industry Co., Ltd. reserves the rights to interpret and amend the content of this document at any time without prior notice.
SYSMAX Industry Co., Ltd. TEL: +86-20-83862000
FAX: +86-20-83882723
E-mail: [email protected]
Web: www.nitecore.com
Address: Rm 2601-06, Central Tower, No.5 Xiancun Road, Tianhe District, Guangzhou, 510623, Guangdong, China
Thanks for purchasing NITECORE!


Features
- Multi-purpose utility light
- High-performance LED emits up to 45 Lumens in brightness
- Built-in rechargeable Li-ion battery provides a maximum runtime up to 21 hours
- Integrated intelligent Li-ion battery charging circuit (micro USB charging port)
- Single switch offers access to all functions via one-handed operation
- Three brightness levels to select from
- Signal light with three flashing frequencies
- Magnetic pedestal
- Innovative spherical joint design for full-angle illumination
- Features extremely wide 100°beam spread to light up peripheral vision
- Constructed from durable Polycarbonate materials
- Extremely lightweight, compact and portable
- Impact resistant to 1 meter
Dimensions
Size (without pedestal): 2.31″ x 0.95″ x 0.53″ (58.7mm x 24.2mm x 13.5mm)
Pedestal diameter: 1.37″(35mm)
Weight(with battery and pedestal): 0.76oz (21.5g)
Output & Runtime
| FL 1 STANDARD | HIGH | MID | LOW | SIGNAL FLASHES |
|
45 LUMENS |
15 LUMENS |
2 LUMENS |
45 LUMENS |
| 45 min | 1h 45 min |
21 h | – | |
 |
30m | 10m | 3m | – |
 |
230cd | 30cd | 2.5cd | – |
 |
1 m (Impact Resistant) | |||
|
IP65 (Dust & Water Resistant) | |||
NOTICE: Stated data has been measured in accordance with the international flashlight testing standards ANSI/NEMA FL1 using an integrated and fully charged 3.7V 100mAh rechargeable Li-ion battery under laboratory conditions. End-user results may vary due to individual usage habits and environmental conditions.
Operating Instructions
On/Off Operations
To switch on: Press the on/off button for more than one second;
To switch off: Press the on/off button again for more than one second.
Brightness Levels
With the light turned on, click the on/off button repeatedly to cycle through brightness levels from ultralow, medium, and high.
Note: The T360M has no memory effect for brightness levels. It starts with 2 lumens by default.
Signal/Alarm Flashes
With the light turned off, click the on/off button twice in quick succession. The T360M will enter 1Hz low frequency flash mode. Click the on/off button to switch between low frequency flash (1Hz)-medium frequency flash (2Hz)-High frequency flash (10Hz). To exit, press the on/off button for more than one second to turn the light off.
Note: In standby mode, T360M can stand by for approximately 80 days.
T360M User Manual
Angle Adjustment

The body and pedestal of the T360M are connected via a spherical joint. Rotate the light body to adjust illuminating angles.
Magnetic Pedestal
Magnetic pedestal design allows the TM360M to attach to any iron surface.
Charging
- Connect to power source. Connect the charging port of the T360M with power source (adaptor, computer, etc.) through a USB cord. The normal charging time is two hours.
- Charging indication: A red indicator stays on to indicate charging in progress; a green indicator turns on upon charging completion.
Note: Recharge the T360M when output appears to be dim or unresponsive.
Warranty Details
All NITECORE products are warranted for quality. Any defective /malfunctioning NITECORE Tube can be repaired free of charge for a period of 12 months from the date of purchase. Beyond 12 months, a limited warranty applies, covering the cost of labor and maintenance, but not the cost of accessories or replacement parts. The warranty is nullified in either or both of the following situations:
- The product(s) is/are broken down, reconstructed and/or modified by unauthorized parties.
- The product(s) is/are damaged through improper use.
For the latest information on NITECOREO products and services, please contact a local NITECORE® distributor or send an email to [email protected].
 All images, text and statements specified herein this user manual are for reference purpose only. Should any discrepancy occurs between this manual and information specified on www.nitecore.com, information on our official website shall prevail. Sysmax Industry Co., Ltd. reserves the rights to interpret and amend the content of this document at any time without prior notice.

SYSMAX Industry Co., Ltd.
TEL: +86-20-83862000
FAX: +86-20-83882723
E-mail: [email protected]
Web: www.nitecore.com
Address: Rm 2601-06, Central Tower, No.5 Xiancun Road, Tianhe District, Guangzhou, 510623, Guangdong, China
 Please find us on facebook:
NITECORE Flashlight


Made in China
Thanks for purchasing NITECORE!
]]>
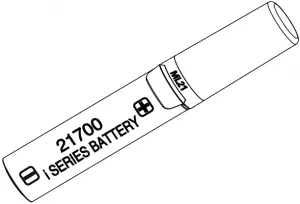
21700
Intelligent Battery System
User Manual
The 21700 Intelligent Battery System is an innovative power solution. The standard package includes a NITECORE 21700 i Series Battery, an ML21 Magnetic Light and an MPB21 Magnetic Power Bank. Designed to offer a consistent power source and to minimize the burden in the outdoor activities, it can easily provide the necessary light source and transfer power between different devices on the go.

(1)
(2) 
![]()

Technical Data
ML21 Magnetic Light
| Brightness | 80 Lumens |
| CRI | ≥90 |
| Color Temperature | 4000-4500K |
| Runtime | 19h |
| Beam Diameter | 12m |
| Peak Beam Intensity | 9cd |
Note: The stated data is measured using 1×5,000mAh 21700 i Series Li-ion battery under laboratory conditions. The data may vary in real world use due to different battery usage or environmental conditions.
MPB21 Magnetic Power Bank
Input: 5V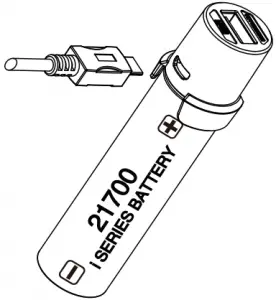 2A (MAX)
Output Voltage: 4.2V±1% (Battery) / 5V±5% (USB)
Output Current: 2A (MAX)
Specifications
ML21 MPB21
Diameter: 26mm (1.02″) Diameter: 26mm (1.02″)
Height: 59.5mm (2.34″) Height: 29.5mm (1.16″)
Weight: 12.8g (0.45oz) Weight: 10.8g (0.38oz)
21700 i Series Battery
As a patent product developed by NITECORE, the 21700 i Series Battery is a proprietary 21700 rechargeable Li-ion battery featuring dual way output with positive and negative polarities at both ends and a high energy density, including NL2140i, NL2150HPi and more. Thanks to the groundbreaking technology and techniques, it enables a highly efficient output by minimizing the loss of power due to internal resistance. Combined with other accessories in the 21700 Intelligent Battery System, it aims to provide a unique user experience in the outdoor environment.
ML21 Magnetic Light
Operating Instructions
As shown in Diagram (1), attach the ML21 to the end marked with (+) of the i Series Battery to activate the light. Detach to deactivate it.
Warnings:
- CAUTION! Possible dangerous radiation! Don’t look into the light! May be dangerous for your eyes.
- The product is only functional when combined with a NITECORE 21700 i Series Battery.
- The product contains strong magnetic components.
DO NOT put it close to objects that tend to suffer from magnetic interference. - The product will not work if attached to the end marked with (-) of the battery.
- Please keep the connectors clean to avoid malfunctions due to an unstable contact .
MPB21 Magnetic Power Bank
Operating Instructions
As shown in Diagram (2), attach the MPB21 to the end marked with (+) of the i Series Battery and the blue indicator will be steadily turned on. (Please recharge the battery first if the blue indicator flashes to indicate a low power.)
Battery Charging: After attaching the product to the battery, use the USB cable to connect an external power supply (e.g. a USB charging device) to the input port to begin the charging process.
- During the charging process, the red indicator will flash to indicate this process.
- When the battery is fully charged, the red indicator will be steadily turned on.
- The max charging current is 2A.
- The MPB21 is available for battery charging and USB output simultaneously. It will automatically adjust the charging current accordingly when the external power is insufficient.
USB Output: When the MPB21 is disconnected from an external power supply, it can be used as a power bank combined with a 21700 i Series Battery to charge an external USB device. After attaching the product to the battery, use the USB cable to connect an external USB device to the output port to begin the charging process.
- During the charging process, the blue indicator will be steadily turned on to indicate a sufficient battery power. It will start to flash when the battery power is low. The MPB21 will automatically cease the output process to protect the battery when the battery voltage is below 3V.
Warnings:
- Please ensure that the product is attached to the battery first before connecting to an external device. Otherwise the indicators will not function correctly.
- The product is only functional when combined with a NITECORE 21700 i Series Battery.
- When the MPB21 is attached to the battery without connecting to an external power source or a USB device, the blue indicator will be turned off automatically in approx. 40 seconds to access Hibernation Mode. Connecting to an external power source or a USB device will exit Hibernation Mode.
- The product contains strong magnetic components. DO NOT put it close to objects that tend to suffer from magnetic interference.
- The product will not work if attached to the end marked with (-) of the battery.
- Please keep the connectors clean to avoid malfunctions due to an unstable contact.
Warranty Details
Our authorized dealers and distributors are responsible for warranty service. Should any problem covered under warranty occurs, customers can contact their dealers or distributors in regards to their warranty claims, as long as the product was purchased from an authorized dealer or distributor. NITECORE’s Warranty is provided only for products purchased from an authorized source. This applies to all NITECORE products. Any DOA / defective product can be exchanged for a replacement through a local distributor/dealer within the 15 days of purchase. After 15 days, all defective / malfunctioning NITECORE® products can be repaired free of charge for a period of 12 months (1 year) from the date of purchase. Beyond 12 months (1 year), a limited warranty applies, covering the cost of labor and maintenance, but not the cost of accessories or replacement parts.
The warranty is nullified if the product(s) is/are:
- broken down, reconstructed and/or modified by unauthorized parties
- damaged from wrong operations
For the latest information on NITECORE® products and services, please contact a local NITECORE® distributor or send an email to [email protected].
 All images, text and statements specified herein this user manual are for reference purpose only. Should any discrepancy occur between this manual and information specified on www. nitecore.com, information on our official website shall prevail. SYSMAX Innovations Co., Ltd. reserves the rights to interpret and amend the content of this document at any time without prior notice.
SYSMAX Innovations Co., Ltd.
TEL: +86-20-83862000
FAX: +86-20-83882723
E-mail: [email protected]
Web: www.nitecore.com
Address: Rm 2601-06, Central Tower, No.5 Xiancun Road, Tianhe District, Guangzhou,510623, Guangdong, China


 Made in China
Thanks for purchasing NITECORE!
Please find us on facebook : NITECORE Flashlight
21700170720SET
]]>Features
- Highly portable headlamp
- Multiple colour temperature options available
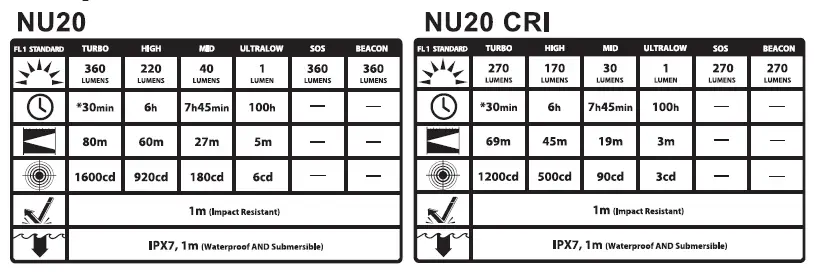
- NU20: Fitted with a CREE XP-G2 S3 LED
- NU20 CRI: Fitted with a Nichia 219B LED, CRl>90
- Built-in Li-ion battery provides runtime up to 100 hours
- Onboard USB charging circuit
- Single switch user interface design offers easy one-handed operation
- Built-in power indicator (Patent No. ZL201220057767.4)
- 4 brightness level and 2 special modes available
- Unique switch guard to prevent accidental activation
- Textured reflector
- 52°adjustable Illumination angle
- Made from durable PC materials
- Lightweight and compact dimensions
- Impact resistant to 1 metre
Dimensions
Size: 2.18″x1 .29″x0.82″(with bracket)
Weight: 1.66oz(with battery and bracket)
Accessories
USB cord, head band, holder
Output & Runtime
NOTICE:
Stated data has been measured in accordance with the international flashlight testing standards ANSI/NEMA FL 1 using an integrated and fully charged 3. 7V 600mAh
rechargeable Li-ion battery under laboratory conditions. End-user results may vary due to individual usage habits and environmental conditions. * The runtime for Turbo mode is the testing result before starting temperature regulation.
Operating Instructions ON/OFF
Draw out the NU20/NU20 CRI to expose the switch from the switch guard as illustrated in the diagram below, press the switch to turn the light on, pressing the
switch again after 3 second to turn the light off.

Note: Pressing the switch again within 3 1 second from when the light is turned on will
1 switch output to the next available brightness.
Brightness Adjustment
Press the switch repeatedly within 3 second from the initial activation will switch output from ultralow-mid-high-off. Pressing the switch again after 3 second from
initial activation turns the light off.
Access to Turbo
With the light turned on, hold down the switch for more than 1 second to enter turbo mode (360 lumens for NU20 and 270 lumens for NU20 CRI).
Note: The turbo mode will run for 30 second before stepping down to the next available output to prevent overheating.
Special Modes (SOS/Location Beacon)
With the light turned off, hold down the switch for over 3 second to enter SOS, pressing the switch again within a 3 second interval to switch to location beacon. To exit special mode, press the switch in location beacon mode, alternatively, cease any operation for 3 second then press the switch again.
Power
With the light turned off, hold down the switch for over 3 second to enter SOS, pressing the switch again within a 3 second interval to switch to location beacon. To exit special mode, press the switch in location beacon mode, alternatively, cease any operation for 3 second then press the switch again.
Power Tips
With the light turned off, hold down the switch for 1 second, the power indicator will blink to indicate remaining battery power upon the release of the switch: 3 blinks represent battery power above 50%, 2 blinks represent battery power below 50%, 1 blink represents battery power below 10%.
Note: Recharge the product when output appears to be dim and/or unresponsive.
Recharging
- This product is USB rechargeable. Raise the micro-USB port cover to exposethe charging port, connect the port to a power supply with a USB cord to initiate the charging process. Fully charges the battery take approximately 2 hours.
Charging Tip: A red light under the switch will be lit to indicate charging in progress, and it will turn green upon charging completion.
Warranty Details
All NITECORE products are warranted for quality. Any defective /malfunctioning NITECORE product can be repaired free of charge for a period of 12 months from
the date of purchase. Beyond 12 months, a limited warranty applies, covering the cost of labor and maintenance, but not the cost of accessories or
replacement parts. The warranty is nullified in either or both of the following situations
- The product(s) is/are broken down, reconstructed and/or modified by unauthorized parties.
- The product(s) is/are damaged through improper use. For the latest information on NITECORE® products and services, please contact a local NITECORE® distributor or send an email to [email protected].¼All images, text and statements specified herein this user manual are for reference purpose only. Should any discrepancy occurs between this manual
and information specified on www.nitecore.com, information on our official website shall prevail. SYSMAX Innovations Co., Ltd. reserves the rights to
interpret and amend the content of this document at any time without prior notice.
NITECORE Wireless Charging Flashlight
Warranty Service
All NITECORE® products are warranted for quality. Any DOA / defective product can be exchanged for a replacement through a local distributor/dealer within 15 days of purchase. After that, all defective / malfunctioning NITECORE® products can be repaired free of charge within 60 months from the date of purchase. Beyond 60 months, a limited warranty applies, covering the cost of labor and maintenance, but not the cost of accessories or replacement parts.
The warranty will be nullified if
- the product(s) is/are broken down, reconstructed and/or modified by unauthorized parties;
- the product(s) is/are damaged due to improper use; (e.g. reversed polarity installation)
- the product(s) is/are damaged due to battery leakage.
For the latest information on NITECORE® products and services, please contact a local NITECORE® distributor or send an email to [email protected]
All images, text and statements specified herein this user manual are for reference purpose only. Should any discrepancy occur between this manual and information specified on www.nitecore.com, Sysmax Innovations Co., Ltd. reserves the rights to interpret and amend the content of this document at any time without prior notice.
Features
- Utilizes a CREE XP-L HI V3 LED with a max output of 1,000 lumens
- Maximum peak beam intensity of 67,700cd and maximum throw of 520 meters
- An optical system combined with crystal coating and “Precision Digital Optics Technology” (PDOT)
- Highly efficient constant current circuit provides a stable output up to 1,200 hours
- NITECORE proprietary 21700 Li-ion battery included available with reversible insertion (NL2150DW 5,000mAh)
- Dual side switches control 5 brightness levels and 3 special modes
- Triple charging ways available
- Wall mount cradle and desktop cradle included for inductive wireless charging
- Intelligent Li-ion battery charging circuit with a USB-C port
- A power indicator beneath the side switches indicates the remaining battery power (Patent No. ZL201220057767.4)
- The power indicator can display the battery voltage (±0.1V)
- Incorporated Advanced Temperature Regulation (ATR) module (Patent No. ZL201510534543.6)
- Optical lenses with double-sided scratch resistant coating
- Constructed from aero grade aluminum alloy
- HA III military grade hard-anodized finish
- Rating in accordance with IP68 (2 meters submersible)
- Impact resistant to 1 meter
- Tail stand capability
Specifications
Length: 159mm (6.26”)
Head Diameter: 40mm (1.57”)
Tail Diameter: 38.6mm (1.52”)
Weight: 211g (7.44oz)
Accessories
- NITECORE 21700
- Rechargeable Li-ion Battery (NL2150DW 5,000mAh)
- Holster
- Lanyard
- Spare O-ring
- AC Adapter
- Wall Mount Cradle
- Desktop Cradle
- Car Adapter
- USB-C Charging Cable
Charging Cradles Specifications
Input: DC 12-24V 1A (MAX)
Output: 5V 1A (MAX)
Wall Mount Cradle Dimensions: 94mm×53.5mm×57mm (3.7” ×2.11” ×2.24”)
Desktop Cradle Dimensions: 58mm×58mm×38mm (2.28” ×2.28” ×1.5”)
Battery Options
NITECORE proprietary 21700 Li-ion battery (NL2150DW 5,000mAh) which is designed for R40 V2 only.
* The R40 V2 can only be powered by the NL2150DW. It is NOT compatible with conventional flat-topped or button-topped 21700 batteries.
Note: The stated data is measured in accordance with the international flashlight testing standards ANSI/PLATO FL 1-2019, using 1 x NITECORE proprietary 21700 Li-ion battery (5,000mAh) under laboratory conditions. The data may vary in real world use due to different battery usage or environmental conditions.
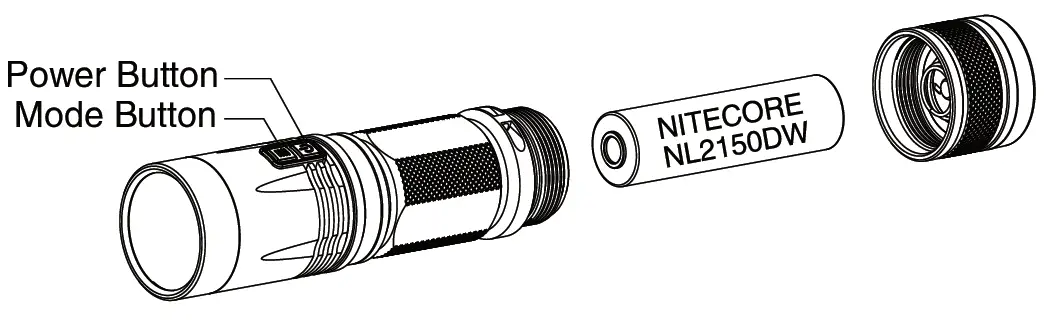
Battery Installation
Charging Function
Operating Instructions
Battery Installation
Insert the NL2150DW battery available with reversible insertion as illustrated, and screw to tighten the tail cap.
Note: After the battery insertion, the power indicator beneath the side switches will flash to indicate the battery voltage. Please refer to the “Power Indication” section of this manual for more details.
Warnings:
- CAUTION! Possible dangerous radiation! Don’t look into the light! May be dangerous for your eyes.
- When the power level is low, please stop using the product and replace or recharge the battery to prevent damage to the battery.
- When the product is kept in a backpack or left unused for prolonged time, please remove all batteries to prevent accidental activation or battery leakage.
On / Off
On: When the light is off, short press the Power Button to turn it on.
Off: When the light is on, short press the Power Button to turn it off.
Brightness Levels
When the light is on, short press the Mode Button to cycle through the following brightness levels: ULTRALOW – LOW – MID – HIGH – TURBO.
(This access has memory function. When reactivated, the flashlight will automatically access the previous memorized brightness level.)
Direct Access to TURBO
When the light is off, long press the Mode Button to directly access TURBO.
Direct Access to ULTRALOW
When the light is off, long press the Power Button to directly access ULTRALOW.
Special Modes (STROBE / BEACON / SOS)
- When the light is on, long press the Mode Button to access the STROBE Mode. After the STROBE Mode is on, long press the Mode Button each time to cycle through the following special modes: BEACON – SOS – STROBE. When one of the special modes is on, short press the Mode Button to exit special modes and return to the previous brightness level; or short press the Power Button to turn off the light.
- When the light is off, double press the Mode Button to access the STROBE Mode. Short press either button to exit special modes and turn off the light.
Lockout / Unlock
Lockout: When the light is on/off, press and hold both buttons until the flashlight flashes once to access Lockout Mode. In this status, both buttons are unavailable to activate the flashlight.
Unlock: In Lockout Mode, press and hold both buttons to exit Lockout Mode and return to the previous brightness level.
Charging Function
The R40 V2 has multiple charging ways including the USB charging port, wall mount cradle and desktop cradle
- USB Charging: After inserting the battery and tightening the tail cap, use the USB cable to connect an external power supply (e.g. a USB adapter or other USB charging devices) to the charging port located on the tail to begin the charging process.
- Cradle Charging: Inductive coils concealed both in the cradle and the tail cap allow wireless power transfer through an electromagnetic field. Secure the R40 V2 onto the cradle and connect the cradle to a power outlet or a cigarette lighter port to begin the charging process.
Note:
- The included AC / car adapters are designed to work with power sources with an output current of 1A or more.
- The included car adapter is compatible with cigarette lighter ports with an output voltage of 12V or 24V.
- During the charging process, the power indicator will flash slowly. When the battery is fully charged, the power indicator will be steadily turned on.
- If no battery or a damaged battery is inserted in the flashlight during the charging process, the power indicator will be turned off.
- If an unstable contact occurs (e.g. the flashlight is detached from the cradle), the power indicator will flash to show the battery voltage and then become turned off.
- The charging time for a 21700 Li-ion battery (5,000mAh) is approx. 6 hours.
- Power Indication
Power Indication
After the battery insertion, or the Mode Button is pressed when the light is off, the power indicator beneath the side switches will flash to show the battery voltage (±0.1V). For example, when the battery voltage is at 4.2V, the power indicator will flash 4 times followed by a 1.5-second pause and 2 more flashes. Different voltages represent the corresponding remaining battery power levels:
Location Indication
When the light is on, long press the Power Button to turn off the light and access Location Indication. With this function turned on, the indicator will flash once every 3 seconds to indicate its location. Reactivating the flashlight will turn off this function. The standby time is approx. 6 months with Location Indication turned on, and approx. 12 months with this function turned off.
ATR (Advanced Temperature Regulation)
The integrated ATR technology regulates the output of the R40 V2 according to the working condition and ambient environment to maintain the optimal performance.
Changing Batteries
The batteries should be replaced when the output appears to be dim or the flashlight becomes unresponsive due to low power.
Maintenance
Every 6 months, threads should be wiped with a clean cloth followed by a thin coating of silicon-based lubricant.
![]()
Features
- Spotlight/Floodlight Adjustable Dual Output USB Powered Headlamp
- The spotlight utilizes 4 x CREE XP-G3 S3 LEDs with a max output of 1,600 lumens, a max peak beam intensity of 6,570cd and a max throw of 162 meters
- The floodlight utilizes a CREE XHP35 HD E2 LED with a wide range optic system of 170° illumination angle
- 5 brightness levels available with adjustable spotlight/floodlight output ratio (Patent No. ZL201820778007.X)
- Wristband remote included for wireless control (Patent No. ZL201520717872.X)
- 100° tilt angle for different illumination needs
- Highly efficient constant current circuit provides a stable output
- Convenient USB-A plug compatible with universal USB power sources
- Incorporated Advanced Temperature Regulation (ATR) module (Patent No. ZL201510534543.6)
- Lightweight and breathable headband included
- Constructed from aero grade aluminum alloy
- HA III military grade hard-anodized finish
- Rating in accordance with IP67
- Impact resistant to 1 meter
Specifications
| Dimensions | 47.6mm×43.2mm×42.1mm (1.87″×1.7″×1.66″) |
| Head Diameter | 40mm (1.57″) |
| Weight | 117.5g (4.14oz) (Bracket Included, Headband and Power Source Not Included) 142.5g (5.03oz) (Bracket and Headband Included, Power Source Not Included) |
Accessories
2 x USB Cable Clips, Headband, Wristband Remote (Remote Control + Hook-and-loop Wristband), Spare O-ring (for the Remote Control)
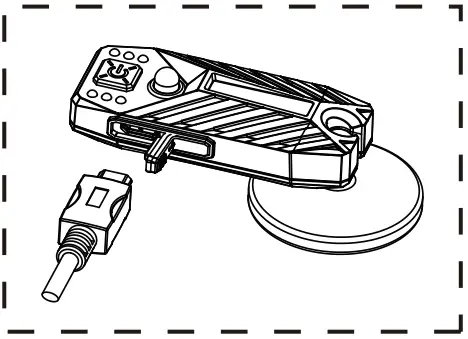
Connecting a Power Source

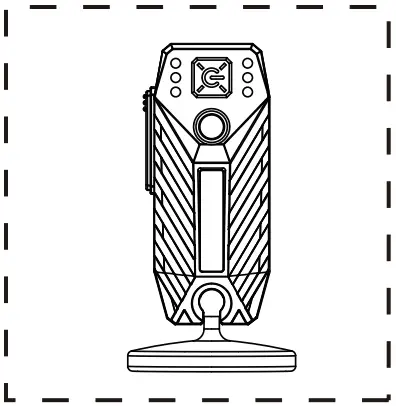
Remote Control


Warranty Service
All NITECORE® products are warranted for quality. Any DOA / defective product can be exchanged for a replacement through a local distributor/dealer within 15 days of purchase. After that, all defective / malfunctioning NITECORE® products can be repaired free of charge within 60 months from the date of purchase. Beyond 60 months, a limited warranty applies, covering the cost of labor and maintenance, but not the cost of accessories or replacement parts.
The warranty will be nullified if
- the product(s) is/are broken down, reconstructed and/or modified by unauthorized parties;
- the product(s) is/are damaged due to improper use; (e.g. reversed polarity installation)
- the product(s) is/are damaged due to using an unofficially recommended power source.
For the latest information on NITECORE® products and services, please contact a local NITECORE® distributor or send an email to [email protected] All images, text and statements specified herein this user manual are for reference purpose only. Should any discrepancy occur between this manual and information specified on www.nitecore.com, Sysmax Innovations Co., Ltd. reserves the rights to interpret and amend the content of this document at any time without prior notice.
Technical Data
| FL1 STANDARD | 100% Spotlight | 100% Floodlight | ||||||||
| TURBO | HIGH | MID | LOW | ULTRALOW | TURBO | HIGH | MID | LOW | ULTRALOW | |
 |
*1,600 Lumens | 480 Lumens | 200 Lumens | 50 Lumens | 5 Lumens | *1,200 Lumens | 480 Lumens | 200 Lumens | 50 Lumens | 5 Lumens |
 |
1h 30min | 5h | 9h 30min | 23h | 45h | 1h | 4h 30min | 7h 30min | 21h | 45h |
 |
162m | 88m | 56m | 28m | 9m | 37m | 24m | 15m | 7m | 2m |
 |
6,570cd | 1,940cd | 790cd | 200cd | 22cd | 348cd | 149cd | 60cd | 15cd | 1cd |
 |
1m (Impact Resistance) | |||||||||
 |
IP67 | |||||||||
Note: The stated data is measured in accordance with the international flashlight testing standards ANSI/PLATO FL 1-2019, using a 5,000mAh power bank under laboratory conditions. The data may vary in real world use due to different battery usage or environmental conditions. * It is recommended to use a power source available with 18W or above QC output. Otherwise the TURBO Level is not accessible.
Power Source Options
| Compatibility | |
| NITECORE NPB Series Power Bank | Y (Recommended) |
| USB Power Source (18W or Above QC Output Available) | Y (Recommended) |
| USB Power Source (5V/2A or Above Output Available) | Y (Compatible) |
Note:
- The NITECORE NPB Series Power Bank is recommended as it is available with QC2.0/3.0 output and has a cable lock on the output ports specially designed for the USB cable of the HU60 to prevent accidental disconnection from the power source.
- The TURBO Level is not accessible if the output of the USB power source is below 18W.
- Please use a USB power source made by professional manufacturers or sold by authorized dealers to avoid the risk of accidents.
Operating Instructions
Connecting a Power Source
Use the USB cable of the HU60 to connect an external power source, and the indicator beneath the Power Button on the headlamp will fade in/out constantly for notification. The NITECORE NPB Series Power Bank is recommended as it has a cable lock on the output ports specially designed for the USB cable of the HU60 as illustrated to prevent accidental disconnection from the power source.
Warnings:
- CAUTION! Possible dangerous radiation! Don’t look into the light! Maybe dangerous for your eyes.
- When the product is kept in a backpack, please disconnect it from the power source to prevent accidental activation.
- When the product is left unused for a prolonged time, please disconnect it from the power source to save power.
Remote Control
The HU60 is designed with a wristband remote for wireless control. After pairing, the buttons on the remote control have the same functions as those on the headlamp as illustrated. The pairing is already factory preset before packaging.
- The remote control is powered by a 3V CR2025 Button Cell Battery which enables approx. 10,000 presses. The standby time is approx. 12 months if the battery is inserted with full power.
- The effective remote distance is approx. 2m (6.56ft) if there are no obstructions between the headlamp and the remote control.
- When the battery of the remote control needs to be replaced, please use a screwdriver or a coin to unscrew the cover counterclockwise until one of the dots on the cover is aligned with the unlock symbol, insert the battery with the positive end outwards, and then screw the cover clockwise until one of the dots is aligned with the lock symbol.
Please follow the steps below for re-pairing if either the remote control or the headlamp is replaced:
- After the headlamp is connected to the power source, press and hold both the Power Button and the T Button on the headlamp for over 3 seconds until the indicator beneath the Power Button flashes quickly to indicate that the headlamp is in the pairing status. (This status will last for approx. 30 seconds)
- When the headlamp is in the pairing status, press and hold both the Power Button and the T Button on the remote control until the headlamp is turned on to indicate that the pairing is complete.
Note:
- When the headlamp is in the pairing status but the pairing procedure is not complete in 30 seconds, the headlamp will automatically return to the standby status.
- When the headlamp is turned on in the pairing status, it will automatically exit the pairing status.
- During the pairing procedure, please ensure that the headlamp and the remote control are kept within 30cm (11.8″).
- Please replace the battery of the remote control when its power is low. Battery replacement will not cause re-pairing of the devices.
On / Off
On: When the light is off, long press the Power Button to turn it on.
Off: When the light is on, long press the Power Button to turn it off. (The HU60 has memory function. When reactivated, it will automatically access the previous using status.)
Brightness Levels
When the light is on, short press the Power Button to cycle through the following brightness levels: ULTRA LOW LOW MID HIGH TURBO.
Spotlight/Floodlight Adjustment
The HU60 has a spotlight/floodlight adjustment function. The output ratio of the spotlight and floodlight is stepped or stepless adjustable on a certain brightness level.
- Stepped Adjustment : 5 modes of the output ratio are preset in the Stepped Adjustment.
M1 100% Floodlight M2 75% Floodlight + 25% Spotlight M3 50% Floodlight + 50% Spotlight M4 25% Floodlight + 75% Spotlight M5 100% Spotlight
When the light is on, short press the W Button each time to increase the floodlight output and decrease the spotlight output until it reaches M1; or short press the T Button each time to increase the spotlight output and decrease the floodlight output until it reaches M5.
- Stepless Adjustment : When the light is on, press and hold the W Button to increase the floodlight output and decrease the spotlight output until it reaches M1; or press and hold the T Button to increase the spotlight output and decrease the floodlight output until it reaches M5. Release to select the desired status.
Note: Only M1 and M5 are available on the ULTRALOW Level. When the output is on the ULTRALOW Level, short press the W Button to switch to M1; or short press the T Button to switch to M5.
ATR (Advanced Temperature Regulation)
The integrated ATR technology regulates the output of the HU60 according to the working condition and ambient environment to maintain the optimal performance.
]]>