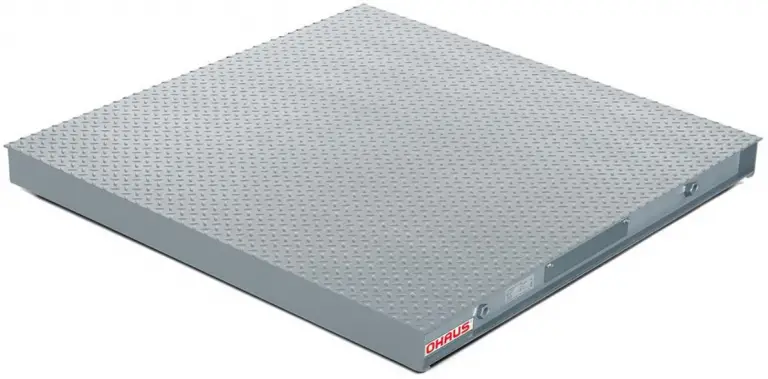
OHAUS VX Series Floor Scale
INTRODUCTION
This manual contains installation, operation and maintenance instructions for the VX Series Floor Scale.
SAFETY PRECAUTIONS
 Please follow these safety precautions:
- Never operate in hazardous areas.
- The VX Series platforms may be used in dry environments only.
- The foundation at the installation site must be capable of safely supporting the weight of the floor scale plus the weight of the maximum load.
- Ensure that vibrations near the installation site are kept to a minimum. This applies also when the floor scale is integrated into conveying systems.
INSTALLATION
 CAUTION: THE FLOOR SCALE PLATFORM IS VERY HEAVY. ALWAYS USE APPROPRIATE HOISTING EQUIPMENT TO LIFT IT FROM THE PACKAGING AND TO MOVE IT INTO THE REQUIRED POSITION
Unpacking
- Remove the outer packing materials from the top and sides of the Floor Scale.
- Carefully lift the Floor Scale from the packing material, see caution notice above.
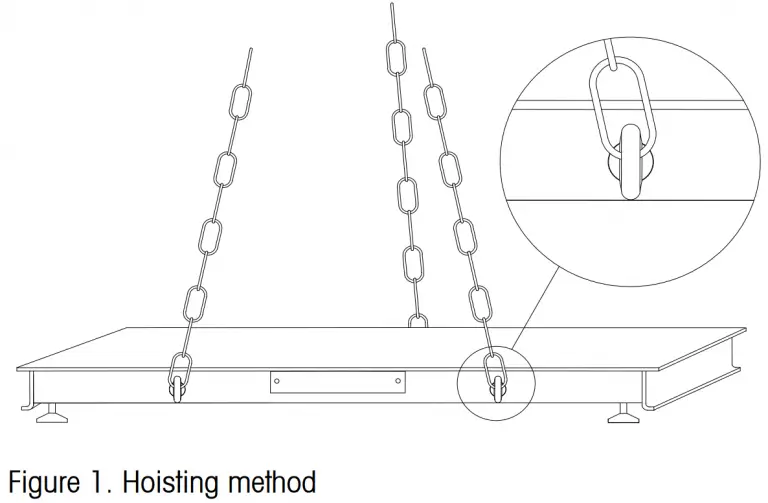
- Available hoisting methods include the use of eye bolts and chains (not included). All models have unthreaded holes at 3 locations, two 3/4”-10 holes on the front panel and one 3/4”-10 hole on the back panel. See figure 1.
Foot Adjustment
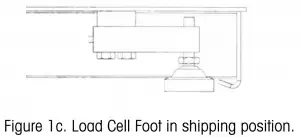
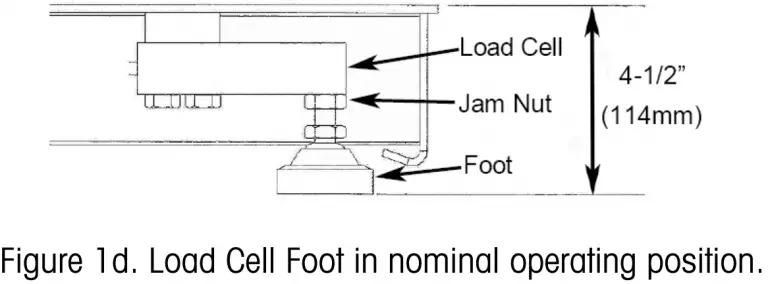
- The four feet must be adjusted out of the shipping position and into the operating position. Use a 7/8” wrench to loosen each foot and extend them to 4-1/2” (114mm) measured from the top surface of the platform.
- At this position use a 3/4” wrench to rotate the jam nuts until they lock against the load cell. See figures 1c and 1d.
Positioning
- Ensure the surface is flat in the area where the scale will be positioned, especially in the region of the load cell feet.
- If an Indicator is included with the floor scale, ensure that it is kept with the floor scale during positioning as there may be an attached connecting cable.
- Position and lower the scale on to the final work area.
- If floor plates or ramps are to be installed, these must be installed before final set up.
- Check that the floor scale is level and check that all 4 feet are in full contact with the floor, use an external level on the top surface. If an adjustment is needed, first loosen the 3/4” jam nut near the top of the foot and rotate the bottom section of the foot. After adjusting, retighten the jam nuts. Recheck that all 4 feet are still in full contact with the floor.
- Do not adjust the feet fully inward as this could cause interference with the top surface and result in weighing errors.
- Ensure that the floor scale’s output cable does not become trapped or crushed during lifting or positioning.
Foot Plates
Foot Plates (included) may be mounted around the feet to help prevent movement of the platform. Installation of the Foot Plates must be done before final placement of the scale (refer to the section 4.6 for Foot Plate installation).
Cable Installation
If the Floor Scale system was received with a pre-attached cable connected between the platform and Indicator components this section can be skipped over. If the components were purchased separately or if a cable was not attached to either component follow the steps below to make the proper cable connections.
Disconnect all power sources before making cable connections to the Floor Scale platform or Indicator. Cable Connections should only be made by authorized and qualified personnel, such as an Electrical
Technician.
Connecting the Platform Cable
- Remove the two fasteners on the junction box access cover located on the side panel of the platform.
- Slide the junction box forward and out of the compartment. Remove the plastic top cover from the junction box.
- Loosen the water-tight gland that does not have a cable inserted. Insert about 6” (150mm) of the cable through the gland and into the junction box.
- At the junction box end strip the outer jacket of the cable 1.5” (40mm) then strip 0.25” (6mm) from each single wire end.
- On the cable determine which wire connects to the cable’s shielding. This is normally a Bare wire. Optionally the shield may be twisted into a pig-tail. This shield connection must always be connected to the point marked “SHIELD” or “GND”.*
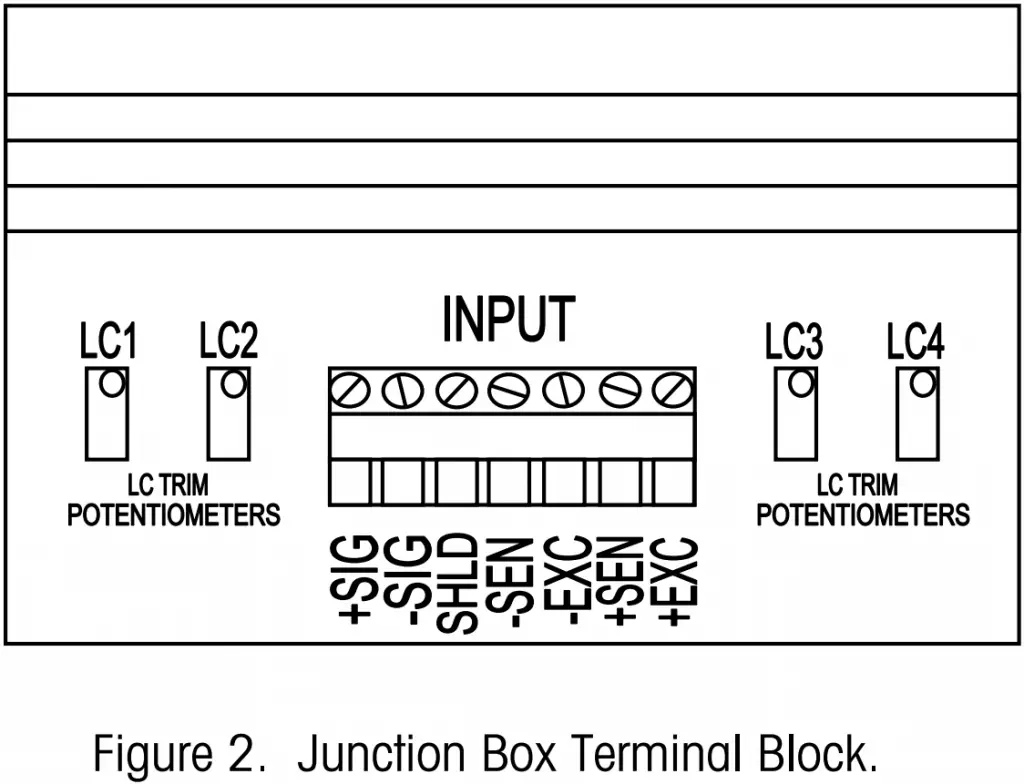
- Connect the wire ends to the “INPUT” terminal block inside the junction box, see Figure 2. The Shield wire must be connected to the connection marked “SHIELD”. The remaining wire colors may be connected to the terminal block in any arrangement though a recommended color chart is shown below in Table 1. If a label is attached to the cable follow the color code listed on the label instead.
- After making all connections make a record of the wire color to signal names. This information will be needed when connecting the Indicator to the other end of the cable.
- Route the other end of the cable into the platform’s junction box compartment and pass it out through the rear opening.
- Reinstall the plastic top to the junction box, tighten the water-tight gland around the cable, return the junction box to the internal compartment, reinstall the external cover and fasteners.
- Route the cable out from under the platform to the location where the Indicator will be mounted. Ensure that the cable will be protected against possible damage when routed to the Indicator.
- The cable near the platform must lie free without tension. Excessive tension may result in weighing errors.
TABLE 1. RECOMMENDED WIRE COLOR TO SIGNAL NAME CONNECTIONS
| Function | Indicator Cable Wire Colors | Load Cell Wire Color |
| – Signal | Black | White |
| + Signal | Green | Green |
| – Sense | Red | Not used |
| – Excitation | Blue | Black |
| + Sense | Yellow | Not used |
| + Excitation | White | Red |
| Shield | Orange | Braided |

*Note: The standard cable included with the VX Floor Scale will have either a Bare wire or a Yellow wire connected to the Shield. On some cable assemblies a label may be attached listing the Shield wire and the recommended wire color connections.
Connecting the Indicator Cable
- Route the cable from the platform to the location where the Indicator will be mounted.
- The cable near the platform must lie free without tension. Excessive tension may result in weighing errors.
- Ensure that the cable will be protected against possible damage when routed to the Indicator.
- Consult the installation instructions of the Indicator to properly connect the cable wires to the Indicator.
- Use the recorded wire color information from the platform connections to make the proper wire connections.
Legal for Trade Sealing
If required the junction box may be sealed as shown in Figure 3. The junction box is accessed by removing the cover plate on the FRONT side panel of the platform.
Consult the instructions of the Indicator to properly seal the Indicator component for Legal for Trade applications.
OPERATION
For setup, calibration, and proper operation, refer to the instruction manual supplied with the indicator. Refer also to Section 4.3 below for floor scale capacity and readability information.
Operating Limits
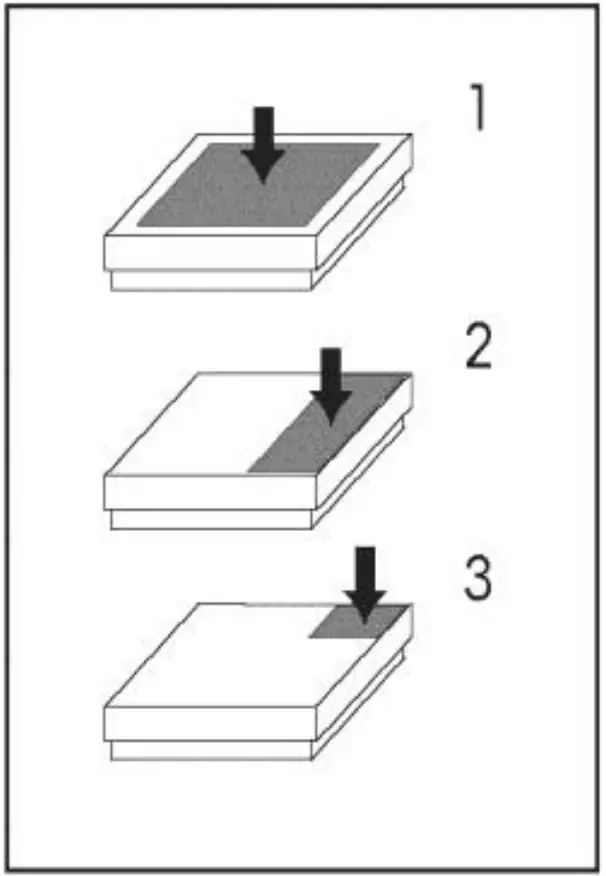
Although the floor scales have extremely rugged construction, certain load limits must not be exceeded. The maximum admissible loading is shown in Table 2
TABLE 2. MAXIMUM ADMISSIBLE LOADING
| Model | Maximum Central load1 (80% Surface Area) | Maximum Side load2 (30% Surface Area) | One Side Corner Load3 (10% Surface Area) | 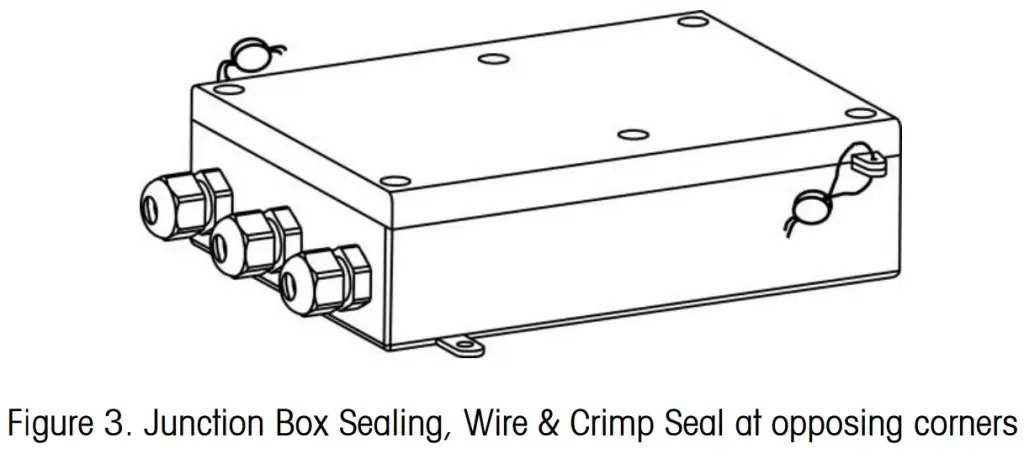 |
| VX2500L | 2,500 lb / 1,130 kg | 2,500 lb / 1,130 kg | 1,250 lb / 565 kg | |
| VX5000L VX5000X | 5,000 lb / 2,265 kg | 5,000 lb / 2,265 kg | 2,500 lb / 1,130 kg | |
| VX10000L VX10000X | 10,000 lb / 4,530 kg | 10,000 lb / 4,530 kg | 5,000 lb / 2,265 kg |
MAINTENANCE
Daily Checks
- Check that the feet are properly seated in the holes of each load cell.
- Check that the 4 feet are in full contact with the floor.
- Check that the scale is free from debris, especially under and around the edges of the scale.
- Check that there is no damage to the connecting cable.
Cleaning
Disconnect the power source before cleaning the scale with any liquids.
Exterior maintenance of the floor scale is limited to regular cleaning.
– Wipe surfaces with a damp cloth.
– Use only common household cleaning agents.
– Never use water spray or high pressure cleaners.
– Keep the air gap at the edge of the platform free of debris.
TECHNICAL DATA
Specifications
TABLE 3. FLOOR SCALE SPECIFICATIONS
| Platform Models | VX2500L | VX5000L | VX10000L | VX5000X | VX10000X |
| Platform Dimensions (W x D x H) | 4’ x 4’ x 4.5” / 1,219 x 1,219 x 114 mm | 5’ x 5’ x 4.5” / 1,524 x 1,524 x 114 mm | |||
| Capacity x emin | 2,500 lb x 0.5 lb / 1,000 kg x 0.2 kg | 5,000 lb x 1 lb / 2,200 kg x 0.5 kg | 10,000 lb x 2 lb / 4,500 kg x 1 kg | 5,000 lb x 1 lb / 2,200 kg x 0.5 kg | 10,000 lb x 2 lb / 4,500 kg x 1 kg |
| NTEP resolution | 5000d | 5000d | N/A | N/A | N/A |
| Material | Epoxy painted carbon steel, treaded surface, fixed top plate, thickness 3/16” (up to 5000lb), 1/4” (10,000lb) | ||||
| Load Cell | 4 x Shear Beam, IP67, Nickel plated alloy steel, NTEP C3 | ||||
| Load Cell Output Impedance | 350 Ω ± 3 Ω | ||||
| Load Cell Excitation Voltage | 5V ~15V DC/AC | ||||
| Junction Box | Side panel access, IP65 plastic case, 25’ (7.6m) cable length | ||||
| Feet | 4 x Ball-in-cup design, adjustable height | ||||
| Operating Temperature | 14°F to 104°F / -10°C to 40°C | ||||
| Net Weight | 220 lb / 100 kg | 320 lb / 145 kg | 335 lb / 152 kg | 485 lb / 220 kg | |
| Shipping Weight | 285 lb / 129 kg | 383 lb / 174 kg | 395 lb / 179 kg | 545 lb / 247 kg | |
| Shipping Dimensions (W x D x H) | 5’ x 4’ x 1’ / 1,524 x 1,219 x 305mm |
6’ x 5’ x 1’ / 1,524 x 1,829 x 305mm |
|||
Accessories
TABLE 4. LIST OF ACCESSORIES
| Item | Part Number |
| Ramp, 4’, Painted Steel, for VX2500L / VX5000L | 80252766 |
| Ramp, 5’, Painted Steel, for VX5000X | 80252767 |
| Ramp, 4’, Painted Steel, for VX10000L | 80252795 |
| Ramp, 5’, Painted Steel, for VX10000X | 80252796 |
| Ball-in-cup Feet, Set of 4 | 80252833 |
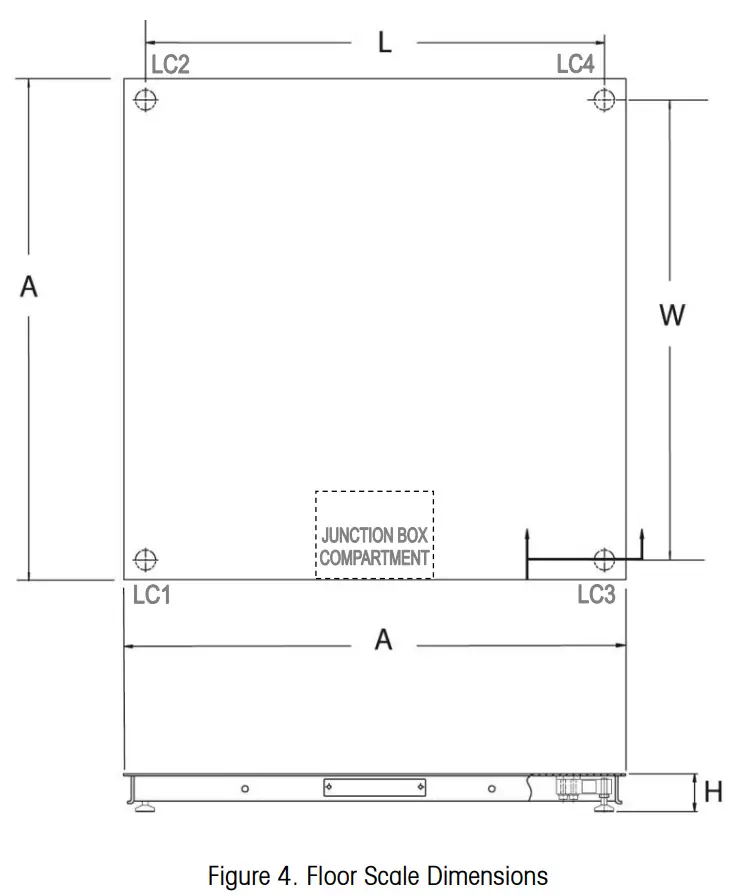
Dimensions
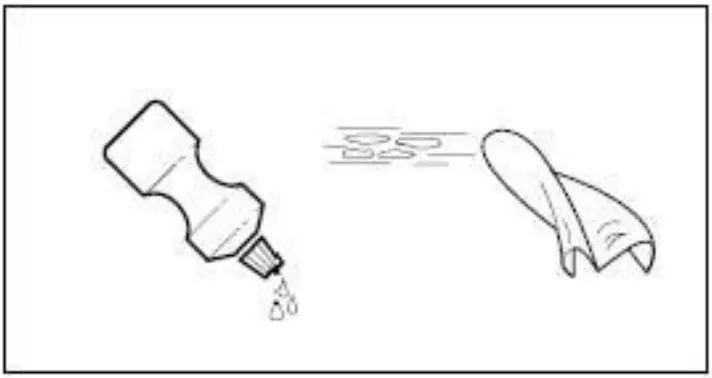
TABLE 5. FLOOR SCALE DIMENSIONS
| MODELS | DIMENSIONS | |||
| FLOOR SCALE PLATFORM | FOOT CENTERS | |||
| A | H (nominal) | W | L | |
| VX2500L / VX5000L | 4’ / 1,219 mm | 4.5” / 114 mm | 42.5” / 1,080 mm | 42.5” / 1,080 mm |
| VX5000X | 5’ / 1,524 mm | 4.5” / 114 mm | 54.5” / 1,384 mm | 54.5” / 1,384 mm |
| VX10000L | 4’ / 1,219 mm | 4.5” / 114 mm | 42.5” / 1,079 mm | 42.5” / 1,079 mm |
| VX10000X | 5’ / 1,524 mm | 4.5” / 114 mm | 54.5” / 1,384 mm | 54.5” / 1,384 mm |
Conformance
ISO 9001 Registration
In 1994, Ohaus Corporation, USA, was awarded a certificate of registration to ISO 9001 by Bureau Veritus Quality International (BVQI), confirming that the Ohaus quality management system is compliant with the ISO 9001 standard’s requirements. On May 21, 2009, Ohaus Corporation, USA, was re-registered to the ISO 9001:2008 standard.
LIMITED WARRANTY
Ohaus products are warranted against defects in materials and workmanship from the date of delivery through the duration of the warranty period. During the warranty period Ohaus will repair, or, at its option, replace any component(s) that proves to be defective at no charge, provided that the product is returned, freight prepaid, to Ohaus.
This warranty does not apply if the product has been damaged by accident or misuse, exposed to radioactive or corrosive materials, has foreign material penetrating to the inside of the product, or as a result of service or modification by other than Ohaus. In lieu of a properly returned warranty registration card, the warranty period shall begin on the date of shipment to the authorized dealer. No other express or implied warranty is given by Ohaus Corporation. Ohaus Corporation shall not be liable for any consequential damages.
As warranty legislation differs from state to state and country to country, please contact Ohaus or your local Ohaus dealer for further details.
Ohaus Corporation
7 Campus Drive
Suite 310
Parsippany, NJ 07054 USA
Tel: (973) 377-9000
Fax: (973) 944-7177
www.ohaus.com
