![]()
OLIGHT PL-Mini Valkyrie 2 User Manual
Thank you for purchasing this Olight Product. Before use, please read the manual carefully!
INSIDE THE BOX
- PL-MINI VALKYRIE 2
- T6/T8 Socket Head Wrench
- Picatinny (Mil-std-1913) Rail Mount
- MCC Special (Magnetic Charging Cable)
- User Manual
SPECIFICATIONS
Material: 6061-T6 aluminum alloy, Type Ⅲ hard anodizing.
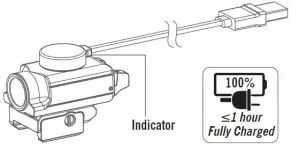
CHARGING
Before your first use, fully charge the light with the supplied magnetic charging cable. When the battery level is low while turned on, the side indicator will turn red. Please charge again at that time.

- Connect the provided magnetic charging cable to a USB power source or any USB port.
- Connect the round magnetic end of the charger to the magnetic port on the bottom of the PL-Mini 2.
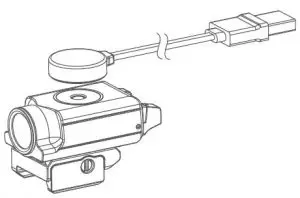
- The indicator on the charging cable is red while charging and will turn green when fully charged.
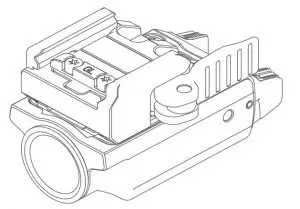
LIGHT INSTALLATION
Check your rearm compatibility and choose the correct sized rail adapter:
This light can be installed on a MIL-STD-1913 or Glock style rail with an available notch. The Glock adapter labeled GL is already installed, which can be immediately used on all Glock sized rails. For firearms using Picatinny (mil-std-1913) rails, the user must replace the GL adapter with the included 1913 adapter using the screws and socket head wrench provided in the package.
OPERATION
The ambidextrous switch on the PL-MINI 2 can only be pressed down to activate the light. Pressing the side or front of the switch will not turn it on.
Momentary ON: Press and hold down either switch for momentary on. The light will stay on until the switch is released.
On/Off: Single click either switch for constant on. Single click again to turn the light off.
 DANGER
- Do not shine the light directly into human eyes. This may cause temporary blindness or even permanent damage to the eyes.
- Do not charge this product with other charging cables except the one included in the original packaging.
NOTICE
- Fully charge the battery before storing the light for a long period of time.
- Please keep the charging port clean. Wipe any dust off before the charge.
- The LED light will work for one minute at the top output mode and gradually step down to 60 lumens within 10 minutes.
- The two triggers can only be activated by pushing downward. Pushing forward or on the side of the switch will not activate the light.
- Always keep the LED light firmly attached to the firearm to protect from any damage or misuse.
- The PL-MINI 2 can only charge using the included magnetic charging cable (The same magnetic charging cable as PL-MINI). This cable is proprietary for this LED light and cannot be used with any other Olight products.
- The Glock adapter labelled GL is already installed, which can be directly installed on Glock handguns. For firearms using Picatinny (mil-std-1913) rails, the user needs to replace the GL adapter with the included 1913 adapter using the screws and socket head wrench provided in the package.
EU-Declaration of Conformity

EU-Declaration of Conformity can be found here CE:
https://olightworld.com/ec-declaration
WARRANTY
Within 30 days of purchase: Return to the original seller for repair or replacement.
Within 2 years of purchase: Return to Olight for repair or replacement.
This warranty does not cover normal wear and tear, modifications, misuse, disintegrations, negligence, accidents, improper maintenance, or repair by anyone other than an Authorized retailer or Olight itself.
USA Customer Support
[email protected]
Global Customer Support
[email protected]
Visit www.olightworld.com to see our complete product line of portable illumination tools.
![]()
Olight Technology Co., Limited
5th Floor, Building A2, Fuhai Information Harbor, Fuhai Subdistrict,
Bao’an District, Shenzhen, China 518103
Made In China

Read More About This Manual & Download PDF:
]]>Olight Baton 3 Premium Edition User Manual
Baton 3 Premium Edition
Thank you for purchasing this Olight Product. Please read this manual carefully before use and keep it for future reference!
IN THE BOX
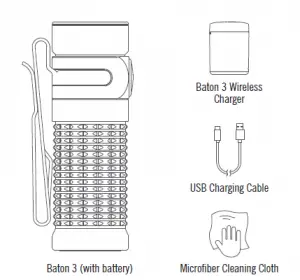
SPECIFICATIONS (Baton 3)
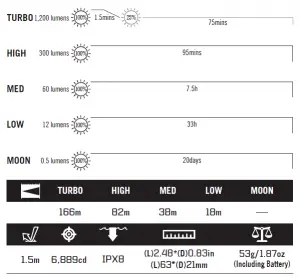
* All above specifications are test results based on ANSI/NEMA FL1-2009 Standard. The tests are performed using the battery included in the flashlight.
Baton 3 Wireless Charger
Parameter |
Specification |
| Main Body | Plastics |
| Dimensions | 62*30*83.5mm / 2.44*1.18*3.29in |
| Weight | 114g / 4.02oz (Battery Included) |
| Battery Capacity | 3.6V 3500mAh |
| Input | 5V 2A (MAX) Input power will be adaptive |
| Output | 4.2V 1A |
| Time to Charge Baton 3 | 1h |
| Time to Charge the Charger | 2.5h (Requiring a 5V 2A (10W) power source. When the power source capacity is insufficient, the charging time will be longer) |
PRODUCT OVERVIEW
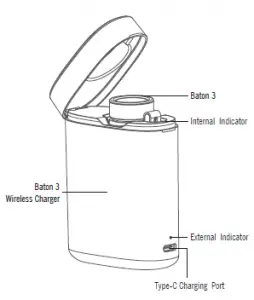
BEFORE USE THE WIRELESS CHARGER
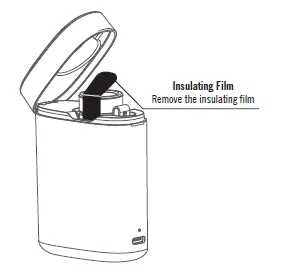
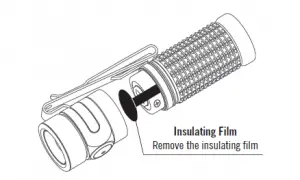
Please open the lid of the wireless charger and remove the insulating film between the charger and the flashlight.
BATTERY INSTALLATION
Before first use, please unscrew the body and remove the insulating film. If the battery needs to be replaced, make sure that the positive end of the
new battery faces the flashlight head when you put it in.
AVAILABLE BATTERIES
- 1 x customized 550mAh 3.7V IMR16340 rechargeable battery, not compatible with any other batteries
BATTERY LEVEL INDICATOR (Baton 3)
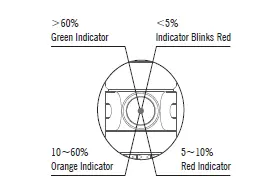
NOTE: If using moonlight mode, the battery indicator will only display when the battery level is below 5%.
BATTERY LEVEL INDICATOR (Baton 3 Wireless Charger)
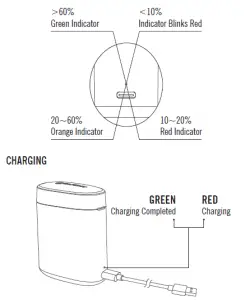
* Before first use please fully charge the product.

- DO NOT separate the battery from the flashlight. The rechargeable IMR battery included comes with a strong discharge current. If any external conductor causes a battery short circuit to occur, it will become hot or burn itself and could potentially cause an unpredictable disaster.
- DO NOT cover the light head when the flashlight is on, or place the flashlight head on the ground. The radiation energy of the flashlight may cause damage to the flashlight itself, or even result in burning to other materials.
- DO NOT shine the light directly into human eyes. This may cause temporary blindness, or permanent damage to the eyes.
- DO NOT remove or replace the built-in battery of the charger.
- DO NOT put the charger into fire or heat it.
WARNING
- Keep out of reach of children. When the flashlight is working on the high mode, the surface temperature can reach 50°C. Please switch off the flashlight temporarily or turn it to low mode.
- Please use turbo mode with caution. Turbo greatly reduces the runtime and leads to high temperature on the flashlight surface.
- DO NOT use the turbo mode continuously when the environmental temperature is high in case the flashlight body is too hot to hold.
- If the product is left unused or carried and transported, please lock the button to avoid accidentally activating the flashlight.
- Please keep the front lens clean. Due to radiation energy, it may heat up foreign matter on the lens which can potentially cause damage.
- The battery can only be stored inside the product and charged with the included specified charger.
- Store the battery with care. Please store the battery in a dedicated box after being taken out of the product if the battery needs to be changed. Keep it in a cool and dry place.
- DO NOT short-circuit the charger’s magnetic charging port with any conductors.
- DO NOT forcefully press the elastic contact inside the charger to avoid damage.
NOTICE
- When the flashlight is turned off, the current mode will be memorized. The modes that can be memorized are: moonlight, low, medium, and high mode (after the
light is turned off, the high mode will be memorized for 10 minutes before reverting to medium mode. If the light is turned off on turbo mode, the high mode
will be memorized instead and will also revert to medium mode after 10 minutes (turbo mode can not be memorized). - Turbo will stay on for 1 minute and then step down to high mode within half a minute.
- Moonlight and turbo mode are not the normal brightness levels (low, medium, and high mode). Under moonlight and turbo mode, press and hold the switch to enter the normal brightness level cycle.
- When the product is used in a low-temperature environment, please try and keep it warm. If the temperature is too cold, it may not reach the highest output.
- DO NOT short-circuit the copper pole in the center of the tailcap with the flashlight’s metal housing. The short circuit in this case will result in an electric discharge of below 3mA between them, and may lead to a complete battery drain if it is in this state for too long.
- If you charge the wireless charger with a flashlight inserted, the power source will charge the flashlight first when its capacity is below 5V 1A. In this case, the external indicator will indicate the charger’s remaining power instead of the charging status.
- When the charger’s power runs low while charging a flashlight, the internal indicator will flash red as the external indicator does.
- The smart deactivation function is not compatible with the S1R II.
- The internal indicator will blink red if the wireless charger cannot charge the flashlight inside properly. This may happen when the flashlight’s battery housing is not screwed on tightly or when the charger’s power is extremely low.

- DO NOT put a turned-on S1R II into the charger and close its lid. The charger may be damaged by overheating.
- Please keep the magnetic charging port of the charger and the tailcap of the flashlight clean. Otherwise, it may fail to charge the flashlight or to deactivate the powered-on Baton 3.
HOW TO OPERATE
Baton 3
ON/OFF: Single click the side switch to turn the light on/off. When the light is turned on, it will return to the previous brightness level selected before the light was turned off.
CHANGE BRIGHTNESS LEVEL:
When the flashlight is on, press and hold the side switch and it will, starting from the present brightness level, automatically cycle through Low, Medium, and High mode. The mode is selected when the side switch has been released. (Please note: moonlight and turbo are not in the automatic cycle ).
MOONLIGHT:
When the flashlight is off, press and hold the side switch for over one second to access the moonlight mode.
DIRECT ACCESS TO TURBO:
Quickly double press the side switch to activate the turbo mode.
STROBE:
When the flashlight is on, triple-click the side switch to activate strobe mode. To quit this mode, single click or press and hold the switch.
TIMER:
The Baton 3 has a long (9 minutes) and short (3 minutes) timer when the light needs to be automatically turned off. When the flashlight is on, double click and hold the side switch under the current brightness level to access the timer settings. A single blink accesses the short timer while two blinks accesses the long timer. The flashlight will automatically turn off when the timer is up. After the timer is set, double click and hold the side switch to shift the timer settings. When the timer is up and the user is about to enter the timer again, the light will return to the last timer setting.
LOCKOUT/UNLOCK:
When the flashlight is off, press and hold the side switch (for about 2 seconds) to access the button lockout mode (the flashlight will enter the moonlight mode first and will then switch off to signal the lockout mode). Under the lockout mode, press and hold the switch for less than one second without releasing it. The red indicator below the switch will be on for a short time to signal that the light is still in a lockout mode. To unlock it, keep holding switch for over one second until the moonlight mode is on again.
Baton 3 Wireless Charger
CHARGING THE WIRELESS CHARGER:
The external indicator above the type-c port of the wireless charger will light up red to indicate charging and turn green to
indicate that charging is complete.
Note: If you charge the wireless charger with a flashlight inside, the USB power source will charge the flashlight first when its capacity is below 5V 1A and will
charge both simultaneously when its capacity is above 5V 1A.
CHARGING A FLASHLIGHT WITH THE WIRELESS CHARGER:
The internal indicator of the wireless charger will light up red to indicate charging and turn green for 10 seconds to indicate that charging is completed before turning off.
SMART DEACTIVATION OF BATON 3:
When the wireless charger is closed with a powered-on Baton 3 inside, it will shut down the Baton 3 automatically. To ensure this works, please keep the tailcap of the Baton 3 and the magnetic charging port of the charger clean. This function is not compatible with the S1R II.
LOW VOLTAGE ALERT:
When charging the flashlight, the external indicator will flash red to alert the user if the power level of the wireless charger is below 10%.

EU-Declaration of Conformity can be found here: https://olightworld.com/ec-declaration
WARRANTY
Within 30 days of purchase: Contact the original seller for repair or replacement.
Within 5 years of purchase: Contact Olight for repair or replacement.
Battery warranty: Olight offers a one year warranty for all rechargeable batteries.
Baton 3 Wireless Charger: Two Years
For any of the fragile or low-value fittings not covered above, like lanyard and clip, you can contact the post-sale within 30 days of the purchase, if it has any quality drawback or damage under normal use condition. If such drawback or damage occurs after 30 days of the purchase or under abnormal use condition, we will only offer conditional quality assurance as appropriate.

Dongguan Olight E-Commerce Technology Co., Ltd
4th Floor, Building 4, Kegu Industrial Park, No 6 Zhongnan Road, Changan Town, Dongguan City, Guangdong, China.
]]>OLIGHT M1T RAIDER PLUS User Manual

M1T RAIDER PLUS
Thank you for purchasing this Olight Product. Before use, please read the manual carefully!
INSIDE THE BOX
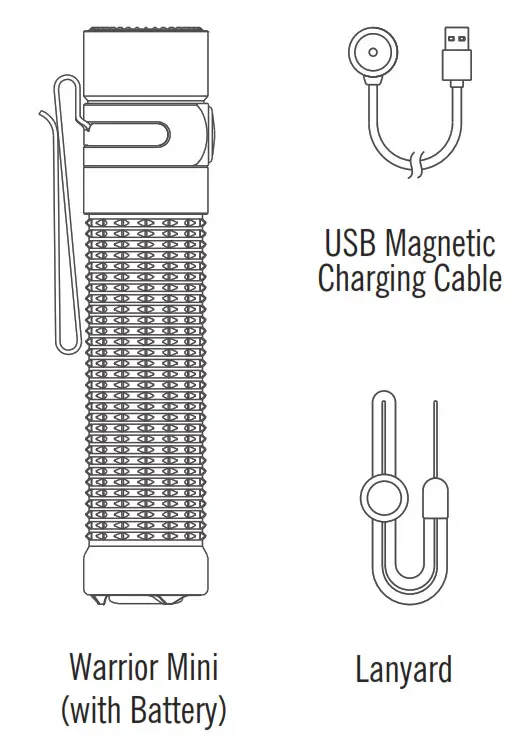
M1T RAIDER PLUS(with battery), Lanyard, User Manual
SPECIFICATIONS
*All above specifications are test results based on ANSI/NEMA FL1-2009 Standard. The tests are performed using the battery included in the flashlight.
BATTERY INSTALLATION
If the battery needs to be changed, make sure that the positive polarity side of the battery faces toward the direction of the flashlight head (the side of the LED).
AVAILABLE BATTERIES
- 2 x CR123A Lithium BATTERY
- When the flashlight is turned on, it will default on high mode. Soft press without fully clicking the switch for momentary on. Fully
press and click for constant on. - Quickly double half press the switch to activate low mode and quickly triple half press for strobe mode.
![]()
DANGER
- Do NOT throw the light directly into human eyes. This may cause temporary blindness, or permanent damage to the eyes.
- Do NOT cover the light head when the flashlight is on, or place the flashlight head on the ground. The radiation energy of the flashlight may cause damage to the flashlight itself, or even result in burning to flammable objects.
- Do NOT use rechargeable lithium battery without protection circuit which could lead to the damage of the battery or unexpected danger.
- Do NOT mix new and old batteries, mix non-rechargeable and rechargeable batteries, or use batteries which are incompatible with this product.
WARNING
- Keep out of reach of children.
- When the flashlight is working on the high mode, the surface temperature can reach 50°C. Please switch off the flashlight temporarily or turn it to low mode.
- If the light is about to be put aside for a long time or be transported, please unscrew the tail cap for half a circle to cut off the circuit.
NOTICE
- Ensure battery is inserted with the positive (+) end pointing to the head of the flashlight (LED side).
- When the flashlight is turned on, it will default on high mode. Turn it on again within 2 seconds after turning it off, to enter low mode. Turn it on again after turning it off for over 2 seconds to return to high mode.
- When high mode (800 lumens) has been on for 5 minutes (but not more than 5 minutes) after turning it on, the output will gradually lower around 50% within the following first minute.
- When the battery voltage is too low and cannot support high mode(800 lumens), it will automatically enter low mode. This allows the flashlight to still turn on even when the batteries are very low.
- It is normal for the flashlight to blink when the battery is running out.
WARRANTY
Within 30 days of purchase: Return to the original seller for repair or replacement.
Within 5 years of purchase: Return to Olight for repair or replacement.
Battery Warranty: Olight offers a one year warranty for all rechargeable batteries.
This warranty does not cover normal wear and tear, modifications, misuse, disintegrations, negligence, accidents, improper maintenance, or repair by anyone other than an Authorized retailer or Olight itself.
USA Customer Support
Global Customer Support
Visit www.olightworld.com to see our complete product line of portable illumination tools.
EU-DECLARATION OF CONFORMITY

EU-Declaration of Conformity can be found here CE:
https://olightworld.com/ec-declaration
![]()
Dongguan Olight E-Commerce Technology Co., Ltd
4th Floor, Building 4, Kegu Industrial Park,No 6 Zhongnan Road,
Changan Town, Dongguan City, Guangdong, China.
Made in China
![]()
V2. 07, 07, 2020
3.0025.6010.9001
![]() M2R Pro Warrior
M2R Pro Warrior
USER MANUAL
Thank you for purchasing this Olight Product. Please read this manual carefully before use and keep it for future reference!
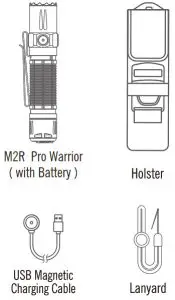
IN THE BOX
SPECIFICATIONS
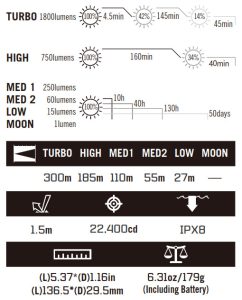
* All above specifications are test results based on ANSI/NEMA FL1-2009 Standard. The tests are performed using the battery included in the flashlight.
Note: The maximum output brightness will decrease as the battery voltage decreases.
BATTERY INSTALLATION
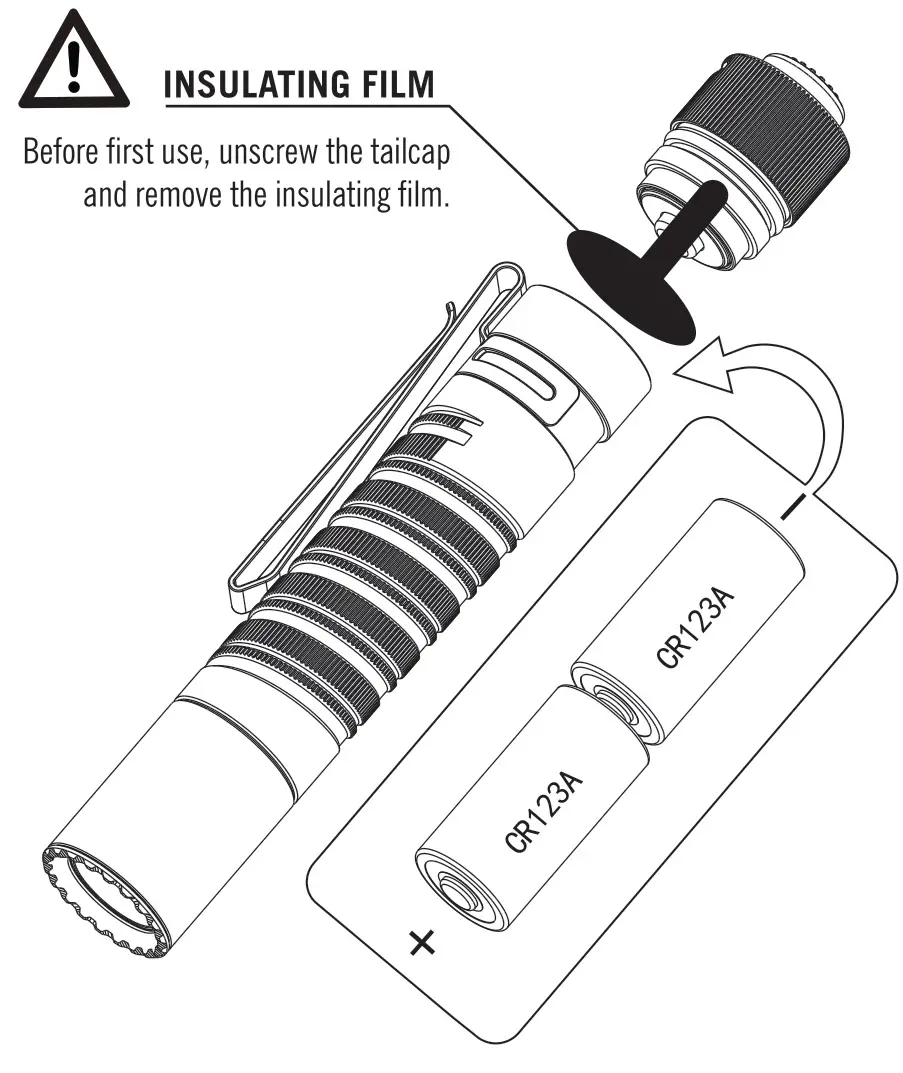
Before first use, unscrew the tailcap and remove the insulating film within the battery compartment before screwing the tailcap back on tightly. If the battery needs to be changed, make sure that the positive polarity side of the battery faces toward the direction of the flashlight head ( the side of the LED ).
AVAILABLE BATTERIES
- 1 x customized 5000mAh 21700 rechargeable lithium battery
BATTERY LEVEL INDICATOR
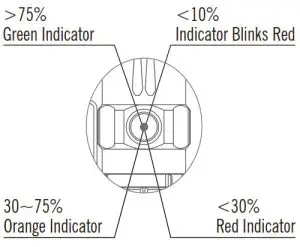
NOTE: Under Moonlight mode, no instruction.
USB MAGNETIC CHARGING CABLE — MCC
| Parameters | Specification |
| Charge cable | USB type-A – magnetic charge connector, length: 0.5m |
| Input | USB A – Type DC 5V 2A |
| Charging pattern | CC&CV |
| Maximum charging current | 2A |
| Full-charged voltage | 4.2V-0.05V |
| Full-charged time | 5 hours ( For reference only. When the USB the power supply is insufficient to provide 5V 2A power capacity, the charging time will be longer ) |
| Charge indication | Red: charging Green: full ( over 95% ) or disconnect with flashlight |
CHARGING
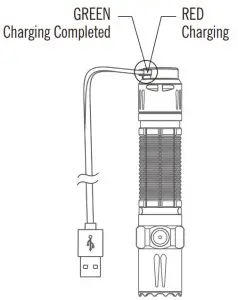
* Before the first use please fully charge the product.
* Connect the magnetic USB end of the charging cable to an external USB power source, then attach the other end of the magnetic charging cable to the charging port(best charging efficiency with more than 10W ( 5V 2A ) USB power source ). The red indicator means charging, green indicator means charging completed (battery power > 95%).
* Only charge with standard MCC, not compatible with other MCC.
 DANGER
- Do not throw the light directly into human eyes.
This may cause temporary blindness or permanent damage to the eyes. - Do not cover the light head when the flashlight is on, or place the flashlight head on the ground. The radiation energy of the flashlight may cause damage to the flashlight itself, or even result in burning to flammable objects.
WARNING
- Do not activate turbo mode repeatedly under high temperatures to prevent the flashlight body from overheating and hurting the user’s hand.
- The tail switch may not work while immersed in seawater or other conductive media. Please try to keep it clean and dry.
- Do not use Non-protected rechargeable batteries.
- If the product is left unused or carried and transported, please lock the button to avoid accidentally activating the flashlight.
NOTICE
- When the flashlight is turned off, moonlight, low, med1, med2, or high mode will be memorized and become the default mode when the light is turned on again (high mode will only be memorized for 10 minutes. After that, the memorized mode will revert to the med1 setting).
- The flashlight has a standby current below 40µA. If the flashlight is to be put away for a long time, please loosen the tail cap by unscrewing it to cut off the current circuit and charge it before use again.
- The turbo mode will slowly step down to high mode in 4.5 minutes at a normal temperature.
- Do not short circuit the switch cap with the ring outside it for a prolonged period. The short circuit in this case will result in a loss of current below 6mA and may lead to a complete battery drain if it is in this state for too long.
HOW TO OPERATE
SIDE SWITCH
ON/OFF: Single-click the side switch to turn the light ON/OFF. When the light is turned on again, it will return to the previously memorized mode.
CHANGE BRIGHTNESS LEVEL: When the flashlight is on, press and hold the side switch and it will start from the resent brightness level, automatically cycle through low, med2, med1, and high mode. The mode is selected when the side switch has been released. ( Please note: moonlight and turbo are not in the automatic cycle ).
MOONLIGHT MODE: When the flashlight is off, press and hold the side switch for over one second to access the moonlight mode. If the memorized mode is moonlight, simply click the switch to access it.
TURBO AND RETURN fast double click on the side switch to enter into Turbo, double click again to return. If memory mode were High or Med 1, the output is Med 1; if memory mode were Med 2、low or Moonlight, the output is memory mode.
STROBE: Quickly triple-click the side switch to enter the strobe mode. To quit this mode, single click or press and hold the side switch.
LOCKOUT/UNLOCK: When the flashlight is off, press and hold the side switch ( for about 2 seconds ) to access the button lockout mode ( the flashlight will enter the moonlight mode first and will then switch off to signal the lockout mode ). Under the lockout mode, press and hold the side switch for less than one second. The red indicator below the side switch will be on for two seconds to signal that the light is still in lockout mode. To unlock it, keep holding the side switch for over one second until the moonlight mode is on again.
TAIL SWITCH
The M2R Pro produces different output settings by pressing lightly or hard on the tail switch (please refer to the following program configurations).
TWO DIFFERENT PROGRAM CONFIGURATIONS CONFIGURATION 1 (FACTORY DEFAULT SETTING) :
Half-press for Med 1, hard press for Turbo;
Single press the tail switch (press and release quickly) to turn the flashlight on or off;
Press and hold the tail switch for momentary-on. Release to turn off.
CONFIGURATION2: Half-press for Turbo, hard press for Strobe, release switch to turn the flashlight off.
SWITCH BETWEEN DIFFERENT PROGRAM CONFIGURATIONS
Switch between configuration 1 and configuration 2 by pressing hard then holding the tail switch and single press on the side switch at the same time; when you release the tail switch, the Configuration will be selected.
WARRANTY
Within 30 days of purchase: Contact the original seller for repair or replacement.
Within 5 years of purchase: Contact Olight for repair or replacement.
Battery warranty: Olight offers a one-year warranty for all rechargeable batteries.
MCC magnetic USB charging cable: 1 year The other no warranty fragile or low-value fittings like lanyard and clip, you can contact post-sale in 30 days after purchase if it has quality drawback or damage under normal use condition. Over 30 days or damage under abnormal use conditions, conditional quality assurance will be provided as appropriate.
EU- DECLARATION OF CONFORMITY
 https://olightworld.com/ec-declaration
EU-Declaration of Conformity can be found here CE: https://olightworld.com/ec-declaration
USA Customer Support
[email protected]
Global Customer Support
[email protected]
Visit www.olightworld.com to see our complete product line of portable illumination tools.

![]()
Dongguan Olight E-Commerce Technology Co., Ltd
4th Floor, Building 4, Kegu Industrial Park, No 6 Zhongnan Road, Changan Town, Dongguan City, Guangdong, China.
Made in China
D. 05, 09, 2020
3.0038.6010.9003
THANK YOU!
USER MANUAL
WARRIOR
Thank you for purchasing this Olight Product. Please read this manual carefully before use and keep it for future reference!
IN THE BOX
SPECIFICATIONS
* All above specifications are test results based on ANSI/NEMA FL1-2009 Standard. The tests are performed using the battery included in the flashlight.
BATTERY INSTALLATION
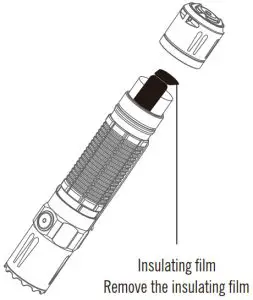
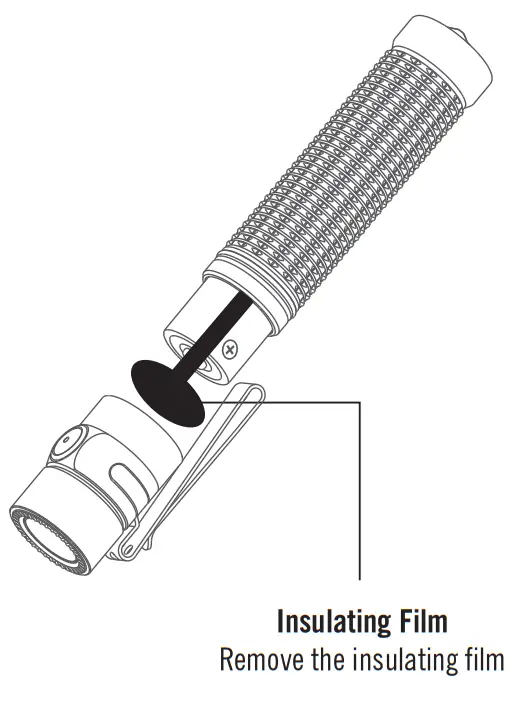
Before first use, please unscrew the body and remove the insulating film. If the battery needs to be replaced, make sure that the positive end of the new battery faces the flashlight head when you put it in.
AVAILABLE BATTERIES
1 x customized 3500mAh 18650 rechargeable lithium battery
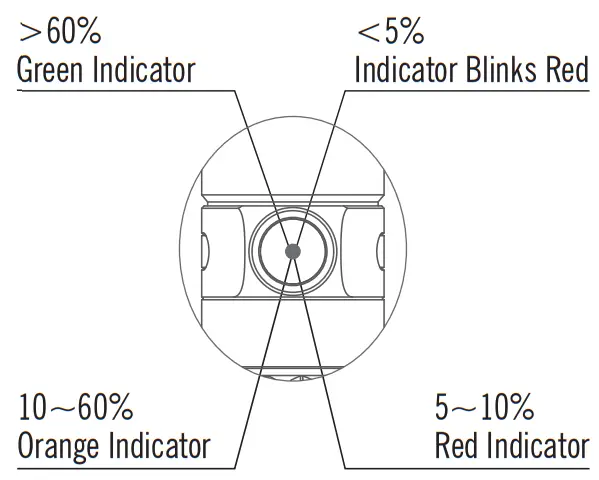
BATTERY LEVEL INDICATOR
NOTE: If using moonlight mode, the battery indicator will only display when the battery level is below 5%.
USB MAGNETIC CHARGING CABLE — MCC3
| Parameter | Specification |
| Charging cable | USB type-A – magnetic charging connector, length: 0.5m |
| Input | USB A – Type DC 5V 2A |
| Charging pattern | CC&CV |
| Maximum charging current |
1.5A |
| Voltage of fully charged battery |
4.2V±0.05V |
| Time to fully charge | 3.5 hours (For reference only. When the USB power source is insufficient to provide 5V 1.5A power capacity, the charging time will be longer) |
| Charge indication | Red: charging Green: full (over 95%) or disconnected with a flashlight |
CHARGING
* Before the first use please fully charge the product.
* Connect the USB end of the magnetic charging cable to an external USB power source, then attach the other end of the cable to the charging port of the light (best charging efficiency with a 7.5W (5V 1.5A) USB power source). The red indicator means charging, while the green indicator means charging completed (battery level>95%).
* Only charge with standard MCC3, not compatible with other MCC.
![]() DANGER
DANGER
- DO NOT throw the light directly into human eyes. This may cause temporary blindness or permanent damage to the eyes.
- DO NOT cover the flashlight’s head or stand the flashlight on its head when it is on. The radiation energy may cause damage to the flashlight itself, or even result in the burning of flammable objects nearby.
![]() WARNING
WARNING
- DO NOT activate turbo mode repeatedly under high temperature to prevent the flashlight body from overheating and hurting the user’s hand.
- The tail switch may not work while immersed in seawater or other conductive media. Please try to keep it clean and dry.
- DO NOT use non-protected rechargeable batteries.
- If the product is left unused or carried and transported, please lock the button to avoid accidentally activating the flashlight.
![]() NOTICE
NOTICE
- When the flashlight is turned off, moonlight, low, medium, or high mode will be memorized and become the default mode when the light is turned on again (high mode will only be memorized for 10 minutes. After that, the memorized mode will revert to the medium setting).
- The turbo mode will slowly step down to high mode in 4 minutes in normal temperature.
- DO NOT short-circuit the tail switch cap with the ring surrounding it. The short circuit in this case will result in an electric discharge of below 3mA between them and may lead to a complete battery drain if it is in this state for too long.
HOW TO OPERATE
SIDE SWITCH
ON/OFF: Single-click the side switch to turn the light ON/OFF. When the light is turned on again, it will return to the previously memorized mode.
CHANGE BRIGHTNESS LEVEL: When the flashlight is on, press and hold the side switch and it will start from the present brightness level, automatically cycle through Low, Medium, and High mode. The mode is selected when the side switch has been released. ( Please note: moonlight and turbo are not in the automatic cycle ).
MOONLIGHT MODE: When the flashlight is off, press and hold the side switch for over one second to access the moonlight mode. If the memorized mode is moonlight, simply click the switch to access it.
TURBO AND RETURN: fast double click on the side switch to enter into Turbo, double click again to return. If memory mode were High or Medium, the output is Medium; if memory mode were Low or Moonlight, the output is memory mode.
STROBE: Quickly triple-click the side switch to enter the strobe mode. To quit this mode, single click or press and hold the side switch.
LOCKOUT/UNLOCK: When the flashlight is off, press and hold the side switch ( for about 2 seconds ) to access the button lockout mode ( the flashlight will enter the moonlight mode first and will then switch off to signal the lockout mode ). Under the lockout mode, press and hold the side switch for less than one second. The red indicator below the side switch will be on for two seconds to signal that the light is still in lockout mode. To unlock it, keep holding the side switch for over one second until the moonlight mode is on again.
TAIL SWITCH
The flashlight produces different output settings by pressing lightly or hard on the tail switch (please refer to the following program configurations).
TWO DIFFERENT PROGRAM CONFIGURATIONS
CONFIGURATION 1 (FACTORY DEFAULT SETTING) : Half-press for Medium, hard press for Turbo; Single press the tail switch (press and release quickly) to turn the flashlight on or off;
Press and hold the tail switch for momentary-on. Release to turn off.
CONFIGURATION2: Half press for Turbo, hard press for Strobe, release switch to turn the flashlight off.
SWITCH BETWEEN DIFFERENT PROGRAM
CONFIGURATIONS
Switch between configuration 1 and configuration 2 by pressing hard then holding tail switch and single press on side switch at the same time; when you release tail switch, the Configuration will be selected.
WARRANTY
Within 30 days of purchase: Contact the original seller for repair or replacement.
Within 5 years of purchase: Contact Olight for repair or replacement.
Battery warranty: Olight offers a one year warranty for all rechargeable batteries.
MCC magnetic USB charging cable: One year.
For any of the fragile or low-value fittings not covered above, like lanyard and clip, you can contact the post-sale in 30 days after the purchase, if it has any quality drawback or damage under normal use conditions. If such drawback or damage occurs 30 days after the purchase or under abnormal use conditions, we will only offer conditional quality assurance as appropriate.
EU-DECLARATION

https://olightworld.com/ec-declaration
EU-Declaration of Conformity can be found here:
https://olightworld.com/ec-declaration
USA Customer Support [email protected]
Global Customer Support
Customer-[email protected]
Visit www.olightworld.com to see our complete product line of portable illumination tools.
![]()
 Dongguan Olight E-Commerce Technology Co., Ltd
4th Floor, Building 4, Kegu Industrial Park, No 6
Zhongnan Road, Changan Town, Dongguan City,
Guangdong, China.
THANK YOU!
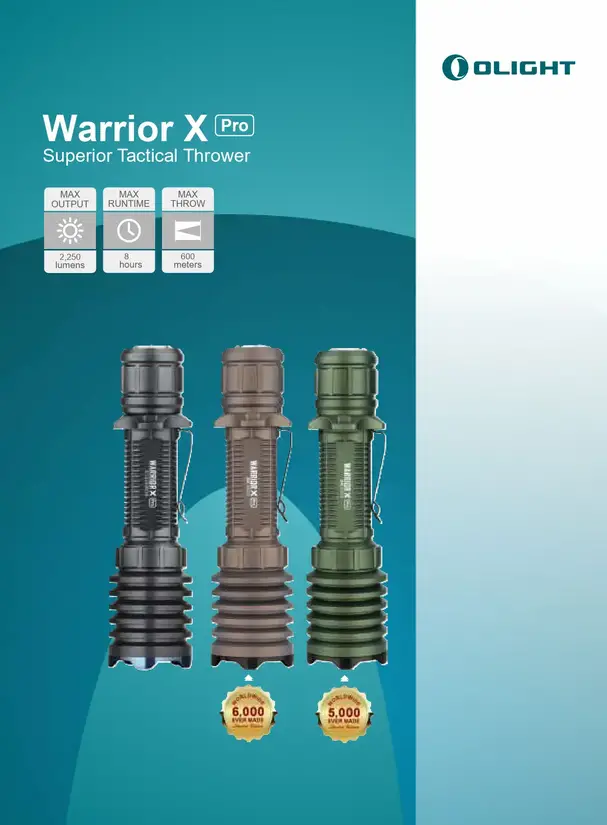
Warrior X Pro
Superior Tactical Thrower
MARKET APPLICATIONS
Hunting, search and rescue, law enforcement, etc.
UPC: Black 697237812071 7
Desert Tan 697237812078 6
OD Green 697237812079 3
DESCRIPTION
The Warrior X Pro is the upgraded version of Olight’s revolutionary Warrior X. Using an updated high discharge 5000mAh 21700 lithium battery, the Warrior X Pro is capable of producing a maximum of 2,250 lumens for up to 600 meters of throw and delivering a 2A current for 100% faster charging than Warrior X. While retaining the classic features of the Warrior X’s sturdy, aggressive appearance, as well as the vibration battery indicator, silicone tactical ring, and optional magnetic remote switch, the Warrior X Pro features a redesigned raised tail switch for an unprecedented intuitive operation experience. The IPX8-rated aluminum alloy body sports a pronounced knurling pattern for a better grip. With unbeatable performance and indestructible build, the Warrior X Pro is ideal for the professional choice of hunting, search and rescue, or while on duty. 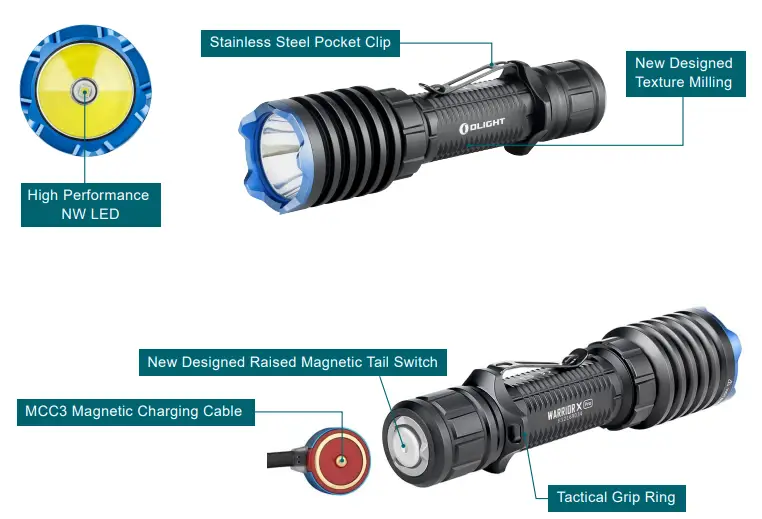
FEATURES
- Using a customized 5000mAh 21700 lithium battery, the Warrior X Pro produces an incredible 2,250-lumen output and 600-meter throw allowing you to see in any harsh situation.
- The redesigned raised tactical tail switch comes with stronger magnetism, and aggressive body knurling for a firmer grip, giving you a simpler interface and operation experience than ever.
- Quickly get back in action with the super-efficient MCC3 charging cable which holds a 2A current for 100% doubled faster charging than Warrior X.
- Sturdy Heavy-duty build with a thick IPX8-rated aluminum alloy body, making it tough enough to endure a harsh 3-meter drop test.
- All tactical classics in one: vibration battery indicator, silicone tactical ring, etc. Just feel the sensation of absolute robustness in your hand.
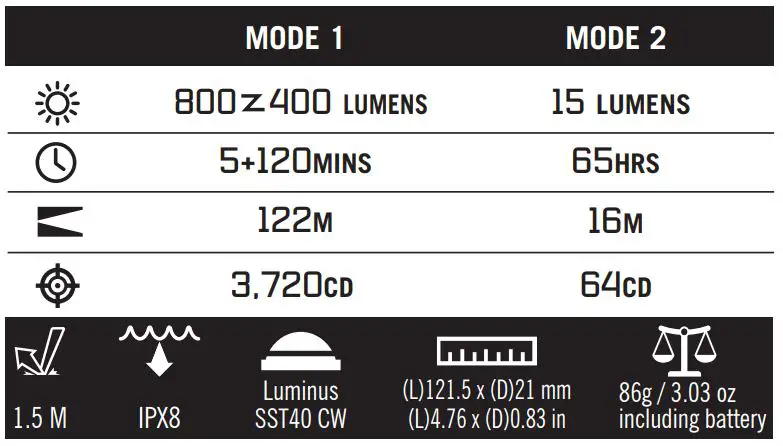
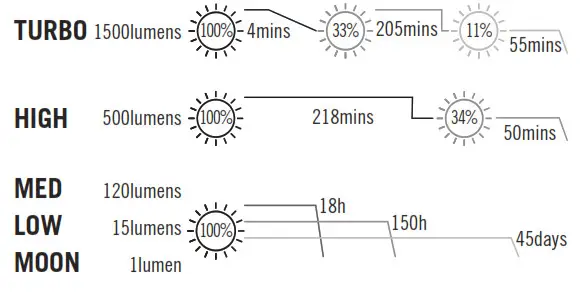
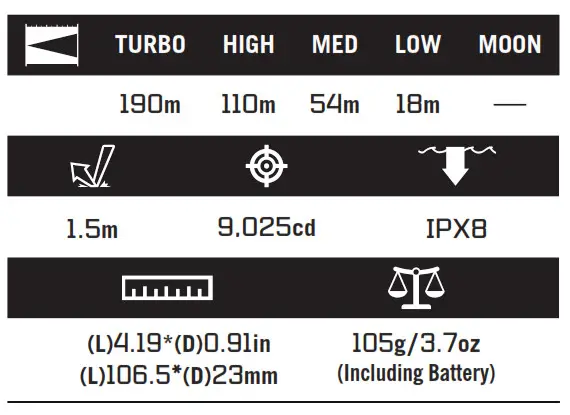
OUTPUT
| SPECIFICATION | Mode 1 | Mode 2 |
 |
2,250 z 1,000 z 300 lumens |
300 lumens |
 |
2+100+23 minutes |
8 hours |
 |
600 meters | 220 meters |
 |
90,000 cd | 12,100 cd |
Note:
- All data above are test results according to ANSI NEMA FL 1-2009
standards. - The data above uses the standard 5000mAh 21700 rechargeable battery and is measured indoors under a room temperature of 25 degrees Celsius with windless conditions.
 LIGHT SOURCE
High-Performance Neutral White LED
DIMENSIONS
Length: 5.87in/149mm
Head Diameter: 1.54in/39mm
Body Diameter: 1.03in/26.2mm
WEIGHT
8.43oz/239g (including battery)
BODY MATERIAL
Aluminum Alloy(main body)
POWERED BY
Customized 5000mAh 21700 Battery (included)
WARRANTY
Olight’s 5 Years Warranty
(1 year for the battery&charging cable)
Visit: https://olightworld.com/olight-warranty
IN THE BOX
Warrior X Pro(Battery Included) x 1
Stainless Steel Pocket Clip x 1
MCC3 Magnetic Charging Cable x 1
Tactical Grip Ring x 1
Lanyard x 1
User Manual x 1
Holster x 1
OPTIONAL ACCESSORIES
RWX07 Remote Switch(For Rifle)
RWX Remote Switch(For Shotgun)
E-WM25 Flashlight-Weapon Mount
olightworld.com © OLIGHT 01/13/20 V3
Made in China
Note:There are slight differences between the picture and the real item caused by light color temperature. All the pictures are for reference only.