Olight Baton 3 Premium Edition User Manual
Baton 3 Premium Edition
Thank you for purchasing this Olight Product. Please read this manual carefully before use and keep it for future reference!
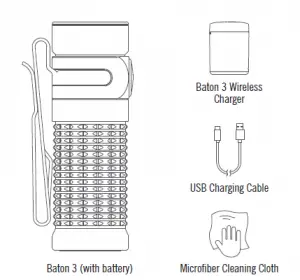
IN THE BOX

SPECIFICATIONS (Baton 3)
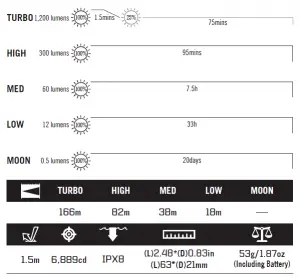
* All above specifications are test results based on ANSI/NEMA FL1-2009 Standard. The tests are performed using the battery included in the flashlight.
Baton 3 Wireless Charger
Parameter |
Specification |
| Main Body | Plastics |
| Dimensions | 62*30*83.5mm / 2.44*1.18*3.29in |
| Weight | 114g / 4.02oz (Battery Included) |
| Battery Capacity | 3.6V 3500mAh |
| Input | 5V 2A (MAX) Input power will be adaptive |
| Output | 4.2V 1A |
| Time to Charge Baton 3 | 1h |
| Time to Charge the Charger | 2.5h (Requiring a 5V 2A (10W) power source. When the power source capacity is insufficient, the charging time will be longer) |
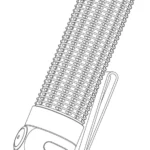
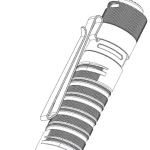
PRODUCT OVERVIEW
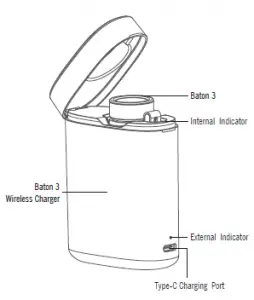
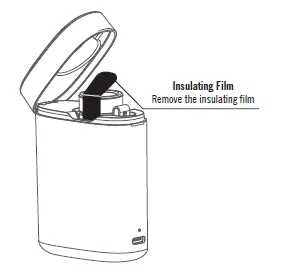
BEFORE USE THE WIRELESS CHARGER
Please open the lid of the wireless charger and remove the insulating film between the charger and the flashlight.
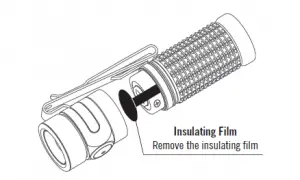
BATTERY INSTALLATION
Before first use, please unscrew the body and remove the insulating film. If the battery needs to be replaced, make sure that the positive end of the
new battery faces the flashlight head when you put it in.
AVAILABLE BATTERIES
- 1 x customized 550mAh 3.7V IMR16340 rechargeable battery, not compatible with any other batteries
BATTERY LEVEL INDICATOR (Baton 3)
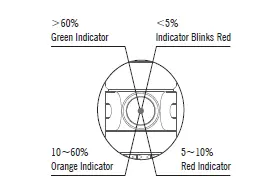
NOTE: If using moonlight mode, the battery indicator will only display when the battery level is below 5%.
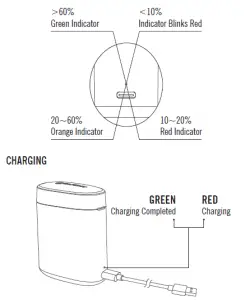
BATTERY LEVEL INDICATOR (Baton 3 Wireless Charger)
* Before first use please fully charge the product.

- DO NOT separate the battery from the flashlight. The rechargeable IMR battery included comes with a strong discharge current. If any external conductor causes a battery short circuit to occur, it will become hot or burn itself and could potentially cause an unpredictable disaster.
- DO NOT cover the light head when the flashlight is on, or place the flashlight head on the ground. The radiation energy of the flashlight may cause damage to the flashlight itself, or even result in burning to other materials.
- DO NOT shine the light directly into human eyes. This may cause temporary blindness, or permanent damage to the eyes.
- DO NOT remove or replace the built-in battery of the charger.
- DO NOT put the charger into fire or heat it.
WARNING
- Keep out of reach of children. When the flashlight is working on the high mode, the surface temperature can reach 50°C. Please switch off the flashlight temporarily or turn it to low mode.
- Please use turbo mode with caution. Turbo greatly reduces the runtime and leads to high temperature on the flashlight surface.
- DO NOT use the turbo mode continuously when the environmental temperature is high in case the flashlight body is too hot to hold.
- If the product is left unused or carried and transported, please lock the button to avoid accidentally activating the flashlight.
- Please keep the front lens clean. Due to radiation energy, it may heat up foreign matter on the lens which can potentially cause damage.
- The battery can only be stored inside the product and charged with the included specified charger.
- Store the battery with care. Please store the battery in a dedicated box after being taken out of the product if the battery needs to be changed. Keep it in a cool and dry place.
- DO NOT short-circuit the charger’s magnetic charging port with any conductors.
- DO NOT forcefully press the elastic contact inside the charger to avoid damage.
NOTICE
- When the flashlight is turned off, the current mode will be memorized. The modes that can be memorized are: moonlight, low, medium, and high mode (after the
light is turned off, the high mode will be memorized for 10 minutes before reverting to medium mode. If the light is turned off on turbo mode, the high mode
will be memorized instead and will also revert to medium mode after 10 minutes (turbo mode can not be memorized). - Turbo will stay on for 1 minute and then step down to high mode within half a minute.
- Moonlight and turbo mode are not the normal brightness levels (low, medium, and high mode). Under moonlight and turbo mode, press and hold the switch to enter the normal brightness level cycle.
- When the product is used in a low-temperature environment, please try and keep it warm. If the temperature is too cold, it may not reach the highest output.
- DO NOT short-circuit the copper pole in the center of the tailcap with the flashlight’s metal housing. The short circuit in this case will result in an electric discharge of below 3mA between them, and may lead to a complete battery drain if it is in this state for too long.
- If you charge the wireless charger with a flashlight inserted, the power source will charge the flashlight first when its capacity is below 5V 1A. In this case, the external indicator will indicate the charger’s remaining power instead of the charging status.
- When the charger’s power runs low while charging a flashlight, the internal indicator will flash red as the external indicator does.
- The smart deactivation function is not compatible with the S1R II.
- The internal indicator will blink red if the wireless charger cannot charge the flashlight inside properly. This may happen when the flashlight’s battery housing is not screwed on tightly or when the charger’s power is extremely low.

- DO NOT put a turned-on S1R II into the charger and close its lid. The charger may be damaged by overheating.
- Please keep the magnetic charging port of the charger and the tailcap of the flashlight clean. Otherwise, it may fail to charge the flashlight or to deactivate the powered-on Baton 3.
HOW TO OPERATE
Baton 3
ON/OFF: Single click the side switch to turn the light on/off. When the light is turned on, it will return to the previous brightness level selected before the light was turned off.
CHANGE BRIGHTNESS LEVEL:
When the flashlight is on, press and hold the side switch and it will, starting from the present brightness level, automatically cycle through Low, Medium, and High mode. The mode is selected when the side switch has been released. (Please note: moonlight and turbo are not in the automatic cycle ).
MOONLIGHT:
When the flashlight is off, press and hold the side switch for over one second to access the moonlight mode.
DIRECT ACCESS TO TURBO:
Quickly double press the side switch to activate the turbo mode.
STROBE:
When the flashlight is on, triple-click the side switch to activate strobe mode. To quit this mode, single click or press and hold the switch.
TIMER:
The Baton 3 has a long (9 minutes) and short (3 minutes) timer when the light needs to be automatically turned off. When the flashlight is on, double click and hold the side switch under the current brightness level to access the timer settings. A single blink accesses the short timer while two blinks accesses the long timer. The flashlight will automatically turn off when the timer is up. After the timer is set, double click and hold the side switch to shift the timer settings. When the timer is up and the user is about to enter the timer again, the light will return to the last timer setting.
LOCKOUT/UNLOCK:
When the flashlight is off, press and hold the side switch (for about 2 seconds) to access the button lockout mode (the flashlight will enter the moonlight mode first and will then switch off to signal the lockout mode). Under the lockout mode, press and hold the switch for less than one second without releasing it. The red indicator below the switch will be on for a short time to signal that the light is still in a lockout mode. To unlock it, keep holding switch for over one second until the moonlight mode is on again.
Baton 3 Wireless Charger
CHARGING THE WIRELESS CHARGER:
The external indicator above the type-c port of the wireless charger will light up red to indicate charging and turn green to
indicate that charging is complete.
Note: If you charge the wireless charger with a flashlight inside, the USB power source will charge the flashlight first when its capacity is below 5V 1A and will
charge both simultaneously when its capacity is above 5V 1A.
CHARGING A FLASHLIGHT WITH THE WIRELESS CHARGER:
The internal indicator of the wireless charger will light up red to indicate charging and turn green for 10 seconds to indicate that charging is completed before turning off.
SMART DEACTIVATION OF BATON 3:
When the wireless charger is closed with a powered-on Baton 3 inside, it will shut down the Baton 3 automatically. To ensure this works, please keep the tailcap of the Baton 3 and the magnetic charging port of the charger clean. This function is not compatible with the S1R II.
LOW VOLTAGE ALERT:
When charging the flashlight, the external indicator will flash red to alert the user if the power level of the wireless charger is below 10%.

EU-Declaration of Conformity can be found here: https://olightworld.com/ec-declaration
WARRANTY
Within 30 days of purchase: Contact the original seller for repair or replacement.
Within 5 years of purchase: Contact Olight for repair or replacement.
Battery warranty: Olight offers a one year warranty for all rechargeable batteries.
Baton 3 Wireless Charger: Two Years
For any of the fragile or low-value fittings not covered above, like lanyard and clip, you can contact the post-sale within 30 days of the purchase, if it has any quality drawback or damage under normal use condition. If such drawback or damage occurs after 30 days of the purchase or under abnormal use condition, we will only offer conditional quality assurance as appropriate.

Dongguan Olight E-Commerce Technology Co., Ltd
4th Floor, Building 4, Kegu Industrial Park, No 6 Zhongnan Road, Changan Town, Dongguan City, Guangdong, China.