![]()
![]()
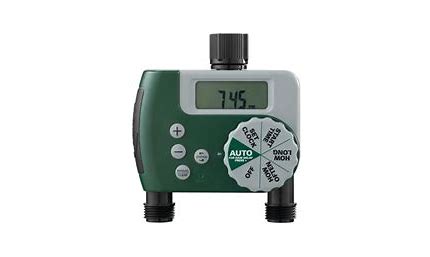
HOSE FAUCET TIMER
QUICK START GUIDE
HT32BT

Write down the MAC address: 12 digit alphanumeric code located on the bottom of the timer.
Timer MAC Address: __ __ :__ __ :__ __ :__ __ :__ __ :__ __
Installing the Batteries
Insert two AA (1.5V) alkaline batteries (not included) and replace the tray.
Note: Firmly replace the battery tray to ensure water resistance and increase battery life. You will know the battery tray is fully inserted if it does not pull out easily.
![]()

PROGRAMMING THE TIMER WITH BLUETOOTH®
Open the B-hyve® App
Log into your B-hyve account and tap “My B-hyve”. Go to “Devices” then “add device”. Select the B-have XD timer with two outlets. The app will walk you through the rest of the process.
![]()
![]()
![]()
![]()
Note: Your LCD will show Lock Icon to indicate that the timer is using the B-have app to program your timer.

Note: When the display shows a full screen of symbols releases the dial. The display will show 12:00 pm in the AUTO/MANUAL mode verifying the reset has been completed. Resetting the timer will erase all programs and it will have to be reprogrammed to your desired watering schedule.
PROGRAMMING THE TIMER AT THE FAUCET
Set Clock
- Turn the dial so the arrow is pointing to SET CLOCK.
- Press the dial to select, the hour will begin to flash.
- Turn the dial until the current hour is displayed including the correct AM or PM, then press the dial to confirm. The minutes will begin to flash, indicating the next step.
- Turn the dial until the current minutes are displayed, then press the dial to confirm.
Start Time
- Turn the dial so the arrow is pointing to START TIME.
- Zone [1] is automatically selected 9noted by the box around it.)
- Press the dial to select, the hour will begin to flash.
- Turn the dial until the desired start time hour is displayed including the correct AM or PM, then press the dial to confirm. The minutes will begin to flash, indicating the next step.
- Turn the dial until the desired minutes are displayed, then press the dial to confirm.
How Long
- Turn the dial so the arrow is pointing to HOW LONG, zone [1] is automatically selected.
- Press the dial to select, the minutes will begin to flash.
- Turn the dial until the desired number of minutes is displayed. Select between 1 to 360 minutes then press dial to confirm
How Often
- Turn the dial so the arrow is pointing to HOW OFTEN, zone [1] is automatically selected.
- Press the dial to select, the number will begin to flash.
- Turn the dial until the desired number of hours or days is displayed, then press to confirm. You may choose to water every 1 hour, 3 hours, 6 hours, 12 hours, or from 1 to 7 days.
Note: 1 is every day, 2 is every other day, etc.
Congratulations!
Zone 1 is now programmed. Turn your dial to AUTO to allow your timer to water according to programmed time and frequency, or complete the steps to program zone 2.
Programming Zone 2
- Turn the dial so the arrow is pointing to START TIME.
- Press the ZONE button to select zone [2], this will set Zone 2 as the default station.
- With Zone 2 now selected, repeat the steps for Start Time, How Long, and How Often.
Congratulations!
Zone 2 is now programmed. Turn your dial to AUTO to allow your timer to water according to programmed time and frequency.
more information on the back![]()
ADDITIONAL FEATURES
Rain Delay
Rain delay allows you to postpone watering for a set period of time. To access the rain delay, follow the steps below.
- With the timer in the AUTO/MANUAL mode, press and hold the dial for 3 seconds.
- The rain delay symbol will appear and the number of days will begin to flash.
- Turn the dial until the desired number of days is displayed, then press to confirm. You may select a delay of 12 hours, 24 hours, or from 2 to 7 days.
- The screen will flash between the clock and the remaining time before the programmed cycle resumes.
![]()
Manual/Hand Watering
This feature allows you to water without interrupting your set schedule. To access this feature, follow the steps below.
- With the arrow pointing to AUTO/MANUAL, press the dial to select.
- Manual will appear and minutes will begin to flash.
Zone [1] is automatically selected, press the ZONE button if you want to manually water from Zone [2] - Turn the dial until the desired number of minutes is displayed. Select between 1 to 360 minutes then press the dial to confirm.
- The manual icon will appear and the screen will flash between clock and time remaining before the programmed cycle resumes.
Note: There may be a slight delay between the time the dial is pressed and when watering begins.
![]()
![]()
Timer
Range: 150 ft without interference
Pressure Operating Range: 10-100 PSI
Temperature Operating Range: 35°F-122°F (2-50°C)
For Outdoor Use With Cold Water Only Not For Use With Appliances
FCC Statement: FCC ID: ML6-HT32BT
This device complies with Part 15 of the FCC Rules. Operation is subject to the following two conditions:
(1) This device may not cause harmful interference, and (2) this device must accept any interference received, including interference that may cause
undesired operation.
FCC Warning: Any changes or modifications not expressly approved by the party responsible for compliance could void the user’s authority to operate this equipment.
Note: This equipment has been tested and found to comply with the limits for a Class B digital device, pursuant to Part 15 of the FCC Rules.
These limits are designed to provide reasonable protection against harmful interference in a residential installation. This equipment generates, uses,
and can radiate radio frequency energy and, if not installed and used in accordance with the instructions, may cause harmful interference to radio communications. However, there is no guarantee that interference will not occur in a particular installation.
If this equipment does cause harmful interference to radio or television reception, which can be determined by turning the equipment off and on,
the user is encouraged to try to correct the interference by one of the following measures:
- Reorient or relocate the receiving antenna.
- Increase the separation between the equipment and the receiver.
- Connect the equipment into an outlet on a circuit different from
that to which the receiver is connected. - Consult the dealer or an experienced radio/TV technician for help.
This device meets the FCC and IC requirements for RF exposure in public or controlled environments. The end-user is advised to maintain a distance of 20 cm from the timer and any personnel to ensure compliance with RF exposure regulations.
IC Statement: IC: 3330A-HT32BT
This device complies with Industry Canada license-exempt RSS standard(s). Operation is subject to the following two conditions: (1) This device may not cause harmful interference, and (2) this device must accept any interference received, including interference that may cause undesired operation. This Class B digital apparatus complies with Canadian ICES003.
Need Help?
If you encounter a problem, please use the following resources before returning your B-have to the store.
Scan the QR Code to access the help page online.
![]()
801-905-8260

[email protected]

1-801-299-5555

![]()