
Quick Start Guide
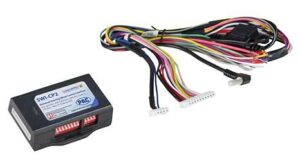
SWI-RC-1
Steering Wheel Control Interface
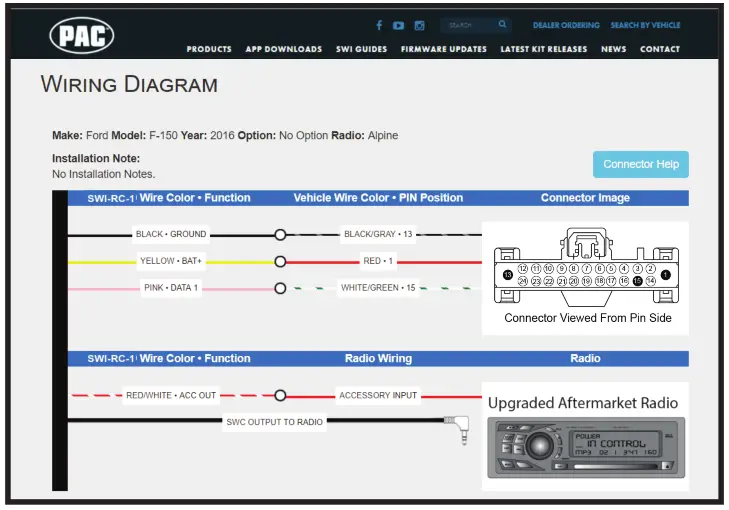
Simple, clear, and specific installation information is provided through the SWI-RC-1 Web APP!
SWI-RC-1 Steering Wheel Control Interface

Step 1:
Go to: pac-audio.com/swi-rc-1 on your PC or mobile device and select your device, vehicle, and radio.
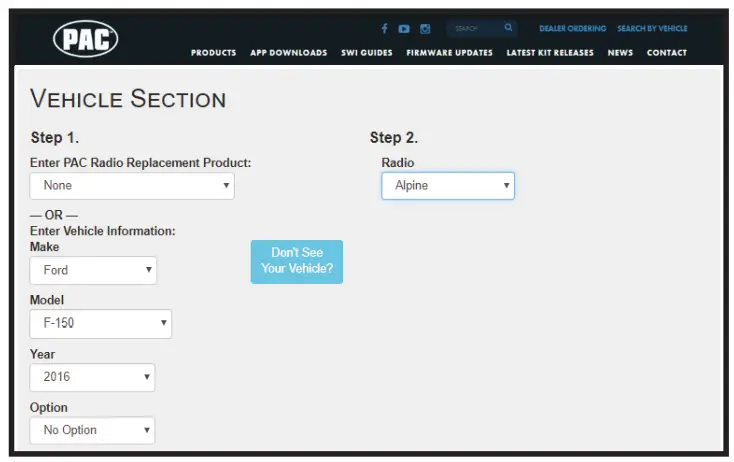
Step 2:
Set the DIP switches
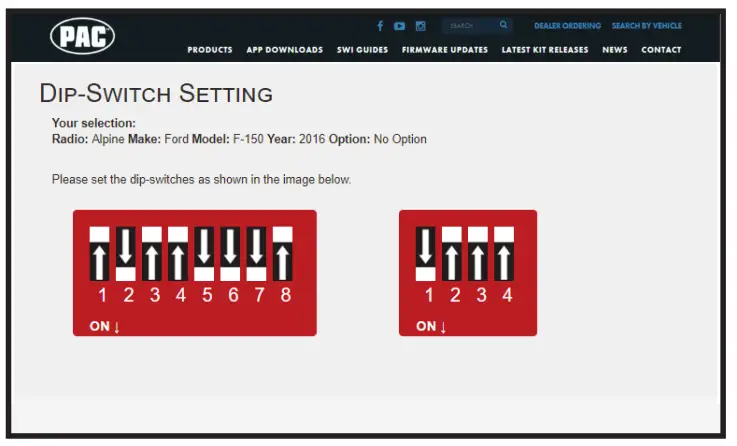
Step 3:
Wire up the module according to the diagram
You’re finished!!
© 2019 AAMP Global. All rights reserved. PAC is a Power Brand of AAMP Global. PAC-audio.com
Manual Programming
With this method, the SWC values must be manually programmed into the SWI-RC-1 by using the programming button. The vehicle dipswitches on the side of the interface must all be set to the up (off) position. The radio dipswitches must be set to the proper radio configuration (see below). PLEASE NOTE: This mode is only compatible with vehicles with both analog SWC and a discrete 12v Accessory wire. Vehicles with CAN-Bus buttons cannot be manually programmed.
- Set the radio dipswitches according to the chart below.
- Wire up the interface according to the installation instructions in the application.
- Connect the SWI-RC-1 to the vehicle.
- You can now follow the programming instructions below.
Please read each of the following steps to familiarize yourself with the process before beginning. The interface must be programmed in the specific order shown in the chart below
- Turn the key to the ignition position. The LED will illuminate red.
- Press and hold the programming button on the side of the interface until the LED illuminates green. Release the programming button.
- Within 7 seconds, press the button that is to be learned on the steering wheel. At this point you have two options:
a. For short press functionality: Hold the button on the steering wheel until the LED changes from green to red.
Release the button.
b. For long press functionality: Continue to hold the button until the LED flashes between red and amber once.
Release the button. - If you need to program more buttons, repeat step 3 for each additional audio function on the steering wheel.
- If you come across a function in the chart that your steering wheel does not have, or you do not want to program, press and release the program button on the side of the interface to skip that function. The LED will turn off and then back on when the skip has been done successfully.
- Once programming is completed, wait seven seconds. The LED will flash green 3 times indicating the end of programming.
- Test the interface for proper functionality. Whenever an SWC button has pressed the LED on the interface should blink green.
If any function does not work, repeat the programming steps.
Radio Function Mapping Order
| Alpine | JVC | Kenwood /Lightning Audio | Clarion /Nakamichi | 2-Wire Resistive | Pioneer | Other * | Sony | Fusion | |
| 1 | Volume + | Volume + | Volume + | Volume + | No specific programming order. Please refer to the
owners manual of your particular radio for programming instructions. |
Volume + | Volume + | Volume + | Volume + |
| 2 | Volume – | Volume – | Volume – | Volume – | Volume – | Volume – | Volume – | Volume – | |
| 3 | Mute | Mute | Mute | Mute | Mute | Mute | Mute | Mute | |
| 4 | Preset + | Source | Source | Source | Preset + | Preset + | Preset + | Source | |
| 5 | Preset – | Track + | Play | Search + | Preset – | Preset – | Preset – | Track + | |
| 6 | Source | Track – | Track + | Search – | Source | Source | Source / End Call | Track – | |
| 7 | Track + | Band / Disc + | Track – | Band | Track + | Track + | Track + | Audio | |
| 8 | Track – | Preset / Disc – | Disc / FM + | Send / End | Track – | Track – | Track – | Power | |
| 9 | Power | Select | Disc / AM – | Send | Band | Band | Band | ||
| 10 | Enter / Play | Attenuation | Answer | End | Phone Menu | Answer ** | Power / End Call | ||
| 11 | Band / Program | Phone Receive | Voice Dial | VR | Answer Call | End ** | Voice Dial / Answer / End Call | ||
| 12 | Receive | Phone Reject | On Hook | End Call | PTT ** | VR (Android Auto & Car Play) Answer / End Call*** | |||
| 13 | End | Voice Dial | Off Hook | VR | |||||
| 14 | VR | Power | Mute | ||||||
| 15 | Preset + | ||||||||
| * Advent, Boyo, Dual, Lightning Audio, Jensen, Rockford Fosgate & Visteon | ** Jensen & Advent ONLY | *** XAV-AX100 Only | |||||||
| Please Note: On any entry with multiple commands, the commands shown are source-dependent. |
Button Re-assignment Procedure
Please read each of the following steps to familiarize yourself with the process before beginning. The buttons must be programmed in the specific order shown in the chart below.
- Turn the key to the ignition position. The LED will illuminate red.
- Press and hold the programming button on the side of the interface until the LED illuminates green.
Release the programming button. - Within 7 seconds, press the button that is to be learned on the steering wheel. The LED will turn red when the steering wheel button is pressed. At this point you have two options:
a. For short press functionality: Release the button on the steering wheel. The LED will change back to green.
b. For long press functionality: Continue to hold the button until the LED flashes between red and amber. Release the button and the LED will change back to green. - Repeat step 3 for each additional button on the steering wheel.
- If you come across a function in the chart that your steering wheel does not have, or you do not want to program, press and release the program button on the side of the interface to skip that function. The LED will turn off and back on when the skip has been done successfully.
- Once programming is completed, wait seven seconds. The LED will flash green 3 times indicating the end of programming.
- Test the interface for proper functionality. Whenever an SWC button has pressed the LED on the interface should blink green. If any function does not work, repeat the programming steps.
The SWC can always be restored to default settings by pressing and holding the programming button on the side of the interface until the LED illuminates green. Release the programming button, then wait for 7 seconds for the LED to flash 3 times.
| Alpine | JVC | Kenwood / Lightning Audio | Clarion / Nakamichi | 2-Wire Resistive | Pioneer | Other * | Sony | Fusion | |
| 1 | Volume + | Volume + | Volume + | Volume + | No specific programming order. Please refer to the owner’s manual of your particular radio for programming instructions. | Volume + | Volume + | Volume + | Volume + |
| 2 | Volume – | Volume – | Volume – | Volume – | Volume – | Volume – | Volume – | Volume – | |
| 3 | Mute | Mute | Mute | Mute | Mute | Mute | Mute | Mute | |
| 4 | Preset + | Source | Source | Source | Preset + | Preset + | Preset + | Source | |
| 5 | Preset – | Track + | Play | Search + | Preset – | Preset – | Preset – | Track + | |
| 6 | Source | Track – | Track + | Search – | Source | Source | Source / End Call | Track – | |
| 7 | Track + | Band / Disc + | Track – | Band | Track + | Track + | Track + | Audio | |
| 8 | Track – | Preset / Disc – | Disc / FM + | Send / End | Track – | Track – | Track – | Power | |
| 9 | Power | Select | Disc / AM – | Send | Band | Band | Band | ||
| 10 | Enter / Play | Attenuation | Answer | End | Phone Menu | Answer ** | Power / End Call | ||
| 11 | Band / Program | Phone Receive | Voice Dial | VR | Answer Call | End ** | Voice Dial / Answer / End Call | ||
| 12 | Receive | Phone Reject | On Hook | End Call | PTT ** | VR (Android Auto & Car Play) Answer / End Call*** | |||
| 13 | End | Voice Dial | Off Hook | VR | |||||
| 14 | VR | Power | Mute | ||||||
| 15 | Preset + | ||||||||
| * Advent, Boyo, Dual, Lightning Audio, Jensen, Rockford Fosgate & Visteon | ** Jensen & Advent ONLY | *** XAV-AX100 Only | |||||||
| Please Note: On any entry with multiple commands, the commands shown are source-dependent. |
Troubleshooting and FAQ
| LED Legend | |||
| Color | During Normal Operation | During Manual Programming Mode | During Optional Programming |
| Solid Red | Accessory on | Waiting on the short press button release | Waiting on the short press button release |
| Solid Green | N/A | Waiting on the button to be pressed | Waiting on the button to be pressed |
| Solid Amber | Update Required ‐ Please call tech support | N/A | N/A |
| Flashing Green | The button is being pressed | N/A | N/A |
| Flashing Amber every 5 seconds | The module is connected to the PC via USB | N/A | N/A |
| Flashing Red/Amber | Error ‐ Dipswitch setting on the vehicle switches set to unknown config | Long Press Button detected | Long Press Button detected |
| Flashing Green/Red | Error ‐ Dipswitch setting on radio switches set to unknown config | N/A | N/A |
| Flashing Green/Amber/Red | Error ‐ Button not pressed long enough or value of the button is too close to rest value | N/A | N/A |
Q. Where can I find the wiring info to connect the SWI-RC-1 to my vehicle?
– A. The wiring info can be found on our website @ www.pac-audio.com/swi-rc-1
Q. Where can I find info on setting the DIPswitches on the side of the module?
– A. The DIPswitch settings can be found on our website @ www.pac-audio.com/swi-rc-1
Q. The module’s LED is flashing a pattern that is not consistent with normal operation.
– A. Please reference the LED legend above for your specific case.
Q. Is there a way to perform a master reset to the module?
– A. The interface can be reset, when not connected via USB, by pressing and holding the programming button on the side of the interface for seven seconds until the LED turns amber. This reset can only be done while the module is connected to the vehicle.
Q. I have connected all of the wires and set the DIPswitches as instructed. I am having an issue where some or all of the buttons are not functioning correctly or at all.
– A. Verify that all of the ground wires (Radio, SWI-RC-1, and steering wheel circuit) are connected at the same place. In some vehicles, the factory ground may not be sufficient ground for all of these wires. In this case please make all ground connections to chassis ground.
Q. I’m looking at your website and I don’t see my radio listed (Advent, Boyo, Dual, Lightning Audio, Rockford Fosgate, or Visteon).
– A. When installing any of these brands you will need to select Pioneer as your radio

© 2019 AAMP Global. All rights reserved. PAC is a Power Brand of AAMP Global.
PAC-audio.com
