![]()
DELTA RADIO
Licence-free PMR Radio
Contains:
2 x Radio Handsets, 2 x Drop-in Chargers, 2 x USB Cables, 2 x Belt Clips & 2 x Lanyards
PRODUCT FEATURES
|
|
RADIO CONTROLS AND INDICATORS

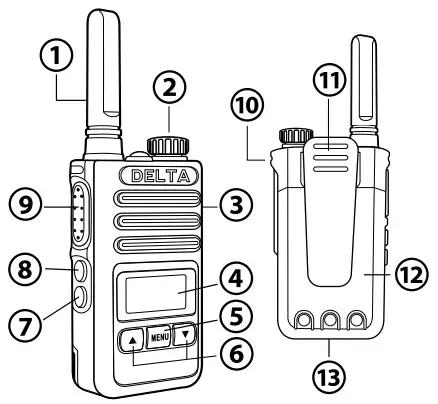
| 1. Antenna 2. Power and Volume Dial 3. Speaker/Microphone 4. Backlit LCD Display 5. Menu Button 6. Channel Up/Down Buttons 7. Personal Alarm Button |
8. LED Flashlight Button 9. Call/Talk Button 10.Wrist Strap Connection 11. Belt Clip 12.Battery 13.Battery Door Latch |
LCD DISPLAY
| 1. Menu/Features 2. Key Lock 3. CTCSS Privacy 4. DCS Privacy 5. Busy 6. Power Saver 7. Battery Level Indicator |
8. Menu Number 9. Receiving 10. Transmitting 11. VOX Mode 12. Channel Numbers 13. Signal Strength |
PRODUCT INFORMATION
Thank you for choosing the DELTA PMR Radio, which is free to use in most European countries. For further information, please contact your local radio licensing authority.
Use and Care
Use a soft damp cloth to clean the radio. Do not use alcohol or cleaning solutions. Do not immerse the radio in water or leave it in damp places. Turn off the radio and remove the battery during long-term storage. Avoid exposure to extreme temperatures.
TECHNICAL SPECIFICATIONS
- Channels: 1-8 PMR
- CTCSS (Continuous Tone Coded Squelch System) provides 38 privacy codes and DCS (Digitally Coded Squelch) provides 83 privacy codes. This provides a total of 121 Privacy Codes per PMR channel.
- Frequency range: 446MHz (PMR)
- Operating temperature: -20° to +45° (While charging, be sure the environmental temperature is lower than 40°C)
- Output power (ERP): s500 mW
OPERATION
TO REMOVE THE BATTERY:
- Remove the belt clip by pulling back the release latch at the top of the clip and pulling the belt dip up.
- Pull-on the battery door latch (located at the bottom of your radio) and slide the battery down.
 Caution-Do not throw batteries into fire or place siem near heat, as this may cause explosions or personal injuries. Dispose of the batteries according to procedures set out by local regulations.
TO CHARGE BATTERY:
- Check to see that the battery is correctly installed and locked into the device.
- Turn the radio off before charging. 3. Insert the USB charge cable into the drop-in charger.
- Put the radio unit into the drop-in charger.
- Plug the cable into a USB-compatible power port.
Use only the supplied rechargeable battery and charger for recharging your DELTA radio. The radio is not intended to be used while being charged.
USING YOUR RADIO
QUICK START
- Rotate the power and volume dial clockwise to turn the radio on and adjust the volume.
- Use the
 or
or buttons to select your preferred channel. The receiving radio must be on the same channel.
 - Press and hold the Call/Talk Button while speaking into the microphone.
- When finished, release the Call/Talk Button and wait for a response.
DELTA PERFORMANCE
The DELTA radio range is dependent on many factors. The maximum range is most prevalent in a clear, open space. The range of the DELTA radio is subject to radio propagation and terrain. Factors such as tall buildings and poor weather conditions will decrease performance.
EXTERNAL SPEAKER/MICROPHONE/CHARGE JACK
Your DELTA radio can be fitted with an optional external speaker/microphone (not included), freeing your hands for other tasks.
USING YOUR RADIO
TO ATTACH AN EXTERNAL SPEAKER/MICROPHONE:
- Open the tab on the right side of the radio.
- Insert the jack plug into the relevant socket.
Excessive sound pressure from earphones and headphones can cause hearing loss.
LED FLASHLIGHT OPERATION
Press the LED flashlight button (see radio controls diagram) once to turn the LED light on, twice for continuous LED flash, three times to turn the LED light off.
ACTIVATE ALARM SOUND
Press and hold the personal alarm button (see radio controls diagram) for 2 seconds to activate an alarm. Press the call/talk button to deactivate the alarm.
MENU OPTIONS
No. 00 SCAN Channel Scan Function
No. 01 SQL Squelch Noise Level
No. 02 VOC Voice Control Level
No. 03 VOT Voice Control Delay
No. 04 BEP Beep Prompt Function
No. 05 SAV Power Saving Settings
No. 06 TOT Transmit Over Time
No. 07 SCA Scanning Mode
No. 08 LED Backlight Selection
No. 09 BCL Busy Log Out
No. 10 RC CTCSS Privacy Codes
No. 11 TC CTCSS Privacy Codes
No. 12 RD DCS Privacy Codes
No. 13 TD DCS Privacy Codes
No. 14 LOC Key Lock Setting No.
15 PON Startup Display Setting No.
16 VIB Radio Vibration Mode Setting
TO ACCESS MENU OPTIONS: Press the (MENU] button and scroll through the menu options using the or  buttons, then press the [MENU] button again to select the menu option you want (menu option will then be static). Use or button to scroll options in the secondary menu. When the selection is made, press [MENU] button to confirm and save.
MENU FUNCTIONS
No. 00: SCAN Channel Scan Function Once in the scanning menu option, press (MENU] button to begin scanning (the scanning mode is determined by menu option 7). To end the scanning function press (MEND) button to exit.
No. 01: SQL Squelch Noise Level Level Options – 0, 1,2,3,4,5,6, 7, 8,9 Level 0= lowest setting. Level 9 = highest setting. Excessive selection of noise level may cause weak signal( to be inadequately received and low selection may disturb you by noise or other irrelevant signals.
No. 02 VOC Volga Control Level (V010 Options -OFF, 1, 2,3,4,5,6, 7. 8, 9 The lower the level of VOX selected, the higher the speech volume required to access the voice control.
No. 03: VOT Voice Control Delay Options -OF, 05, 10, 15, 20, 30 OF = Yoke control delay off. All other settings refer to the number of seconds the delay lasts, OS = 0.5 seconds, 10 = 1.0 seconds, etc. The voice control delay function prevents the speaker from speaking slowly and causing the problem of intermittent emission when pausing.
No. 04: BEP Beep Prompt Function Options — On/Off
No. 05: SAV Power Saving Settings Options — On/Off
No. 06: TOT Transmit Over Time Options — OF, 60, 120, 180 OF = transmit overtime function off. 60/120/180 = time in seconds. The purpose of the launch timeout is to limit the continuous and long-term transmission of the intercom.
No. 07: SCA Scanning Mode Options —TO / CO/ SE TO – After searching for a signal, if there is inactivity after S seconds, the unit stops scanning CO – Search signal stops scanning — signal disappears and continues scanning SE – Search signal stops scanning
No. 08: LED Backlight Selection Options — OF /ON / AO OF — backlight off, ON — backlight on, AO— automatic
No. 09: BCL Busy Log Out Options – On/Off When busy log out is enabled it prevents interference with other communication stations.
No. 10: RC CTCSS Privacy Codes Options – Off/38 Sub-Channel Options Each channel also has 38 CTSS sub-channels to let you set up a group of users within the same channel for more private communication. If you have set the sub-channel you can only communicate with other PMR users tuned to the same channel and sub-channel.
No. 11:TC CTCSS Privacy Codes Options – Off/38 Sub-Channel Options Each channel also has 38 CTSS sub-channels to let you set up a group of users within the same channel for more private communication. If you have set the sub-channel you can only communicate with other PMR users tuned to the same channel and sub-channel.
No. 12: RD DCS Privacy Codes Options – Off/83 Sub-Channel Options Each channel also has 83 DCS sub-channels to let you set up a group of users within the same channel for more private communication. If you have set the sub-channel, you can only communicate with other PMR users tuned to the same channel and sub-channel.
No. 13: TD DCS Privacy Codes Options – Off/83 Sub-Channel Options Each channel also has 83 DCS sub-channels to let you set up a group of users within the same channel for more private communication. If you have set the sub-channel, you can only communicate with other PMR users tuned to the same channel and sub-channel.
No. 14: LOC Key Lock Setting Options – Manual Mode or Automatic Mode AN = Manual mode. Whilst in manual mode, press & hold (MENU) to lock and unlock front buttons. AO = Automatic mode. Whilst in automatic mode, inactivity for 10 seconds will automatically lock the front buttons. Press & hold (MENU) button to unlock.
No 15: PON Start-Up Display Setting Options – Full-screen DisplayNoltage Display Both are displayed during boot-up. AL = full screen display. AD = voltage display.
No 16: VW Radio Vibration Mode Setting Options — Vibration On/Vibration Off When vibration mode is on, the DELTA radio alerts you when there is an incoming signal by vibrating for 3 seconds (unless the signal is interrupted). The vibration will start again after 10 seconds if no action is taken.
For the latest up-to-date information, visit: www.pama.com/wholesale/PMRDELTA
PMRDELTA 07/2019411
©2019 Pama England – E&OE All trademarks owned & operated by their respective companies.
Made In China
www.pama.com
Helpline+44(0)161 494 4200