PELONIS Swing Ceramic Tower Heater with FAN User Manual
IMPORTANT INSTRUCTIONS
When using electrical appliances,basic precautions should always be followed to
reduce the risk of fire, electric shock, and injury to persons, including the following:
- Read all instructions before using heater.
- This heater is hot when in use. To avoid burns, do not let bare skin touch hot
surface. If provided, always use handles when moving this heater. Keep
combustible materials such as furniture, pillows, bedding, papers, clothes and
curtains at least 3 feet (0.9m) from the front of the heater and keep them away from the sides and rear. - Extreme caution is necessary when any heater is used by or near children or invalids and whenever the heater is left operating and unattended.
- Always unplug the heater when not in use.
- Do not operate any heater with a damaged cord or plug or after the heater
malfunctions, has been dropped or damaged in any manner. Discard heater or
return heater to authorized service facility for examination, electrical or mechanical adjustment, or repair. - Do not use the heater outdoors.
- This heater is not intended for use in bathroom, laundry areas and similar moist
indoor locations. Never locate heater where it may fall into a bathtub or other water container. - Do not run cord under carpeting. Do not cover cord with throw rugs, runners, or similar coverings. Do not route cord under furniture or appliances. Arrange cord away From traffic area and where it will not be tripped over.
READ AND SAVE THESE INSTRUCTIONS!
 WARNING: Use this heater only for its intended purpose. Do not use the heater for a purpose which is not recommended by the manufacturer, as doing so may cause fire, electric shock, personal injury or damage to properly.
 - CAUTION: This appliance has a polarized plug (one blade is wider than the other). To reduce the risk of shock, this plug is intended to fit only one way in a polarized outlet. If the plug does not fit fully in the outlet, reverse the plug. If it still does not fit, contact a qualified electrician. DO NOT attempt to defeat this safety feature. To do so could result in an electric shock hazard.
- This heater draws 12.5 amps during operation. To prevent overloading a circuit, do not plug the heater into a circuit that already has other appliances working.
- CAUTION: It is normal for the plug to feel warm to the touch; however, a loose fit between the AC outlet (receptacle) and plug may cause overheating and is tortoni of the plug. Contact a qualified electrician to replace loose or worn outlet.
- To disconnect the heater, first turn controls to o, then remove plug from outlet. Never pull by the cord.
- Do not insert or allow foreign objects to enter any ventilation or exhaust opening as this may cause an electric shock or fire, or damage the heater.
- To prevent a possible fire, do not block air intakes or exhaust in any manner. Do not use on soft surface, like a bed, where openings may become blocked.
- A heater has hot and arcing or sparking parts inside. Do not use it in the areas where gasoline, paint, or flammable liquids are used or stored.
- Use this heater only as described in this manual. Any other use not recommended by the manufacturer may cause fire, electric shock, or injury to persons.
NOTE: The heater’s plug and power cord will be warm to the touch after use. This is normal and does not affect the heater’s performance in any way.
WARNING
In order to avoid overheating, do not cover the heater.
The heater must not be located immediately below a socket outlet.
Do not use this heater in the immediate surroundings of a bath, a shower or a swimming pool. - CAUTION: Always plug heaters directly into a wall outlet/receptacle. Never use with an extension cord or reloadable power tap (outlet/power strip).
- The output of this heater may vary and its temperature may become intense enough to burn exposed skin. Use of this heater is not recommended for persons with reduced sensitivity to heat or an inability to react to avoid burns. “SAVE THESE INSTRUCTION”
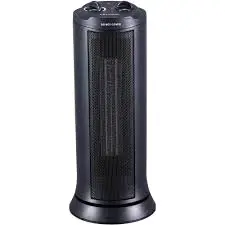
Heater
- Control panel
- Safety grill
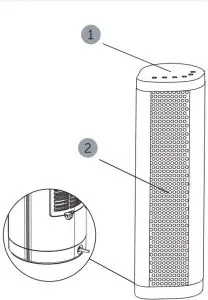
Know your Heater
Before Using this product familiarize yourself with all operation features and safety rules.
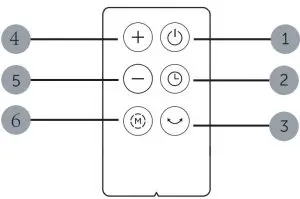
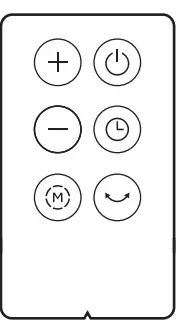
REMOTE CONTROL
- ON/off Button
- Timer Button
- Swing Button
- Up Button
- Down Button
- Mode Button
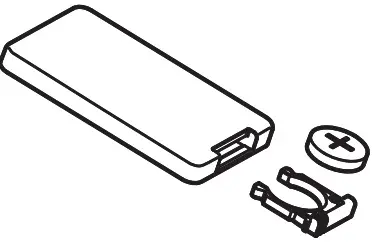
BATTERIES INSTRUCTIONS (included)
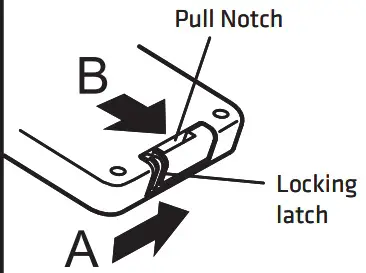
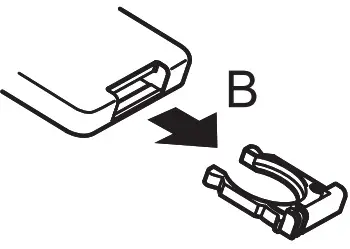
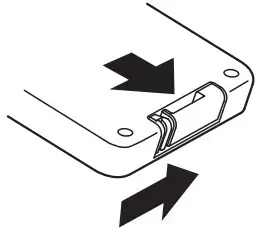
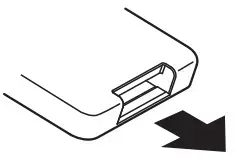
- Please push locking latch in the direction of Arrow A, and pull out the pull notch in the direction of Arrow B at the same time.
- Use 1 “CR2032” lithium battery (included)
- Insert the batteries, making sure that the positive terminals are facing the proper way.
- Replace the cover.
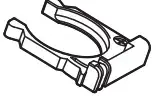
Battery installation
BATTERY WARNING
- Do not dispose of batteries in fire, batteries may explode or leak.
- Do not mix old and new batteries.
- Do not mix alkaline, standard (carbon-zinc) or rechargeable (nickel-cadmium) batteries.
- Non-rechargeable batteries are not to be recharged.
- Batteries are to be inserted with the correct polarity.
- Exhausted batteries are to be removed from the product.
- The batteries must be removed from the remote controller before it is scrapped
and that they are disposed of safely
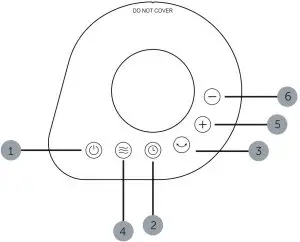
CONTROL PANEL
- ON/off Button
- Timer Button
- Swing Button
- Up Button
- Down Button
- Mode Button
FEATURES
- Mode button:This button is used to set the heater in different power ratings.
- ON/OFF button :I his button is used to turn on and turn off the heater.
- Up/Down Button :These buttons are used to increase or decrease the operating temperature or the timer hours of the heater.
- Timer button:The timer button can be set to turn on the heater during stand-by mode and to turn off the heater during operation.
- Swing button :Press this button to oscillate the heater left and right. To stop the heater from swing in the position desired, press this button again.
SAFETY FEATURES
Thermal cut-off
This feature shuts down the heater if it gets overheated. If this happens. the heater will shut off permanently Don’t repair the heater by yourself; contact the number listed in the manual.
Automatic turn on/off
When the heater is plugged in, push the timer button and adjust with “+”/”-” button, the heater will be automatically turned on at desired time. When the heater is plugged in and working, push the timer button and adjust with “+”/”-“button the heater will be automatically turned off at desired time.
Package Contents
Remote control Quantity 1
This heater works either vertically or horizontally, depending on the working condition and consumers’ preferred way.
TURNING ON/OFF THE HEATER:
- Place the heater on a firm, level surface free from obstructions, and at least 3’ (90 cm) away from any wall and any other objects such as furniture, curtains, plants or combustible materials.
- Make sure to plug the power cord of the heater into a grounded 120 V AC, 60 Hz power outlet.
- Press the ON/OFF button to turn on the heater. When the ON/OFF button is first pressed, the unit will run at high power setting, and temperature setting at 95°F.
SETTING THE MODE
Press the MODE button repeatedly to select desired operating modes in a circular sequence HIGH-LOW-FAN ONLY-ECO-HIGH.
SETTING THE TEMPERATURE
When the heater is working, press the UP button or DOWN button to set the desired temperature between 40 and 95°F. Once the room temperature reaches the Temperature adjustment interval is 5°F. set temperature, the LED display will flash for 10 seconds and the heating element will stop heating and turn to Stand B status. When the room temperature falls below the set temperature, the unit will resume heating.
SETTING THE TIMER TO TURN OFF THE HEATER
When the heater is in operation, press the heater in a specific number of hours set in a sequence from 0 ─ 24 hours. Press the UP button to increase 1 hour each time, and DOWN button to decrease 1 hour each time
SETTING THE TIMER TO TURN ON THE HEATER
When the heater is in stand-by mode, press the timer button to automatically turn on the heater in a specific number of hours set in a sequence from 0 ─ 24 hours. Press the UP button to increase 1 hour each time, and DOWN button to decrease 1 hour each time.
SETTING THE SWING
The heater will swing internally by pressing the swing button once To stop the swing, press the button again. This button only works when the heater is in HIGH or LOW mode.
MEMORY FUNCTION
it will resume operation in the mode it is unplugged then plugged back in again, it will default to the original settings: HIGH mode and a temperature setting of 95°F.
SETTING THE AUTOMATIC DISPLAY-OFF FUNCTION
When the unit is working and no button is automatically. Only the heating symbol is function, press the UP and DOWN buttons at the same time for 2 seconds. To allow resume, again press the UP and DOWN buttons for 2 seconds.
TEMPERATURE SENSOR SHORT CIRCUIT PROTECTION
When the temperature sensor triggers the short circuit protection, the display screen will show E1 or E2 and flash. None of the buttons will work, and the buzzer rings 10 times. When this occurs, please contact a qualified electrician.
SAFETY PROTECTION
When the unit is in operation, and the room temperature reaches 122°F, the heater will shut down, and the digital display will show “FF” and flash once per second 75 times. None of the buttons will work and the heater must be unplugged to reset this safety device.
SETTING ECO FUNCTION
The heater is automatically select the working setting to maintain the desired temperature by comparing the room temperature and the setting temperature.
REMOTE CONTROL
The buttons on the remote control works the same as the buttons on the control panel.
WARNING. The heater is equipped with a polarized, alternating-current line plug (a plug having one blade wider than the other). This is a safety feature. If the plug does not insert fully into the outlet, try inserting the plug inverted. If the plug still does not fit, contact your electrician to replace the outlet.
It is recommended to clean the heater regularly.
- After use, always turn oft the heater and allow the heater to cool.
- Use a dry cloth to clean the external surfaces of the heater. Do not use water. wax. Wish or any chemical solutions.
- Never immerse the heater in water.
- If the heater is not in use for a certain period, wind the power cord around the cord holder and store the heater in a dry place
NOTE The heater is designed only as a supplementary heating source and cannot replace the main heat source during the winter.
WARNING
Before cleaning the heater, always unplug the heater. Please do not attempt to open or repair the heater by yourself. Doing so may void the warranty and could cause damage or personal injury.
| Problem | Reason | Solution |
| The heater Shuts off unexpectedly or fails to operate | There is no power | Be sure that the heater is plugged in and that the electrical outlet is functioning |
| The set temperature is lower than the current room temperature | Set the desired temperature higher than the current temperature. | |
| One of the safety features has been activated to prevent overheating. | Check for any obstructions. If an obstruction is found, turn off the heater and remove it. | |
| Unplug the heater and wait for at least 10 minutes until it has cooled | ||
| Carefully remove the obstruction. Ptug the heater in and restart it. | ||
| If the problem still exists. remove the plug from the outlet and have the heater checked by an authorized service person. |