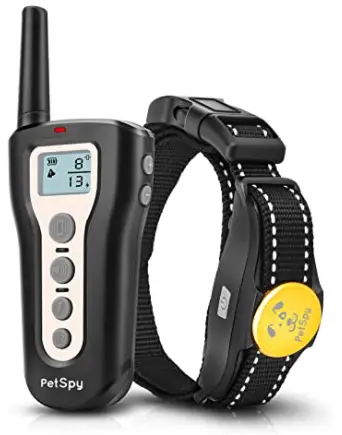
PetSpy Remote Training Coller
Thank You
Dear Customer, thank you very much for choosing PetSpy! It’s our pleasure to serve you and your beloved dog. Our mission is to ensure your pet’s safety and happiness by providing you with the tools and techniques to successfully train your dog. If you have any questions, please visit our website or contact PetSpy Customer Service at [email protected] – we will be happy to assist you.
Warranty
PetSpy e-collars are covered by the 1-YEAR WARRANTY. You can register your product warranty at www.petspy.com. If your purchased item malfunctions or breaks within 1 year, we will send you a free replacement. No more than one replacement per purchased item. Replacement warranty does not apply to promotional orders with total discount greater than 30%. The warranty begins from the date of purchase. A purchase confirmation such as amazon order id is required for a claim. The warranty does not cover products with physical damage or when product is lost. PetSpy does not offer warranty for products purchased from unauthorized resellers such as online auctions. PetSpy products are exclusively sold on PetSpy.com, Amazon.com and Chewy.com. Any other sources are considered as unauthorized resellers. The refund period is strictly limited to 30-days starting from the date of purchase. Restrictions apply.
Contacts
Website: www.petspy.com
Customer Support: [email protected]
Social Media: @petspybrand
Warning
Not for use with aggressive dogs. Do not use this Product if your dog is aggressive, or if your dog is prone to aggressive behavior. Aggressive dogs can cause severe injury and even death to their owner and others. If you are unsure whether this product is appropriate for your dog, please consult your veterinarian or certified trainer.
Caution
Safety during on-leash training. It is vitally important that you and your dog remain safe while learning during on-leash training. Your dog should be on a strong leash, long enough for him to attempt to chase an object, but short enough for him not to reach a road or other unsafe area. You must also be physically strong enough to restrain your dog when he tries to chase.
Risk of skin damage. Please read and follow the instructions in this manual. Proper fit of the collar is important. A collar worn for too long or made too tight on the pet’s neck may cause skin damage. Ranging from redness to pressure ulcers; this condition is commonly known as bed sores.
- Avoid leaving the collar on the dog for more than 12 hours per day.
- When possible reposition the collar on the pet’s neck every 1 to 2 hours.
- Check the fit to prevent excessive pressure; follow the instructions in this manual.
- Never connect a lead to the electronic collar; it will cause excessive pressure on the contacts.
- When using a separate collar for a lead, don’t put pressure on the electronic collar.
- Wash the dog’s neck area and the contacts of the collar weekly with a damp cloth.
- If a rash or sore is found, discontinue use of the collar until the skin has healed.
- If the condition persists beyond 4 ours, see your veterinarian.
These steps will help keep your pet safe and comfortable. Millions of pets are comfortable while they wear stainless steel contacts. Some pets are sensitive to contact pressure. You may find after some time that our pet is very tolerant of the collar. If so, you may relax some of these precautions. It is important to continue daily checks of the contact area. If redness or sores are found, discontinue use until the skin has fully healed.
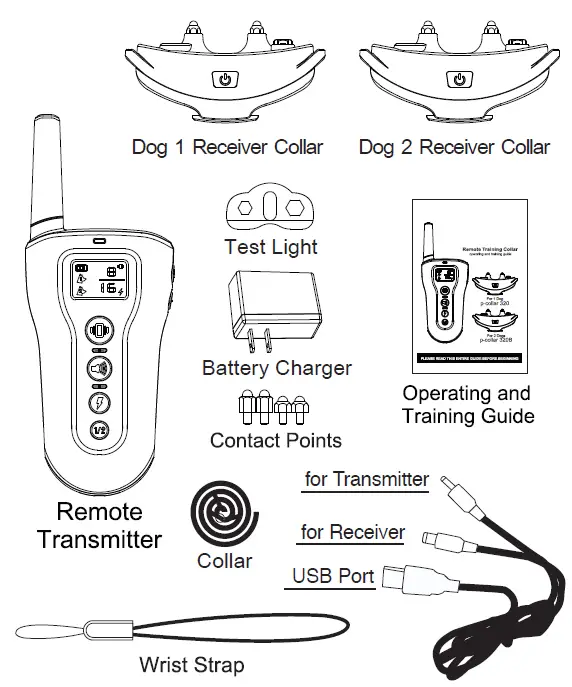
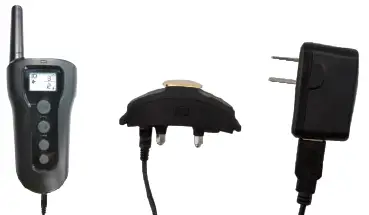
Components

Other Items You May Need
- Screwdriver
- Scissors
- Lighter
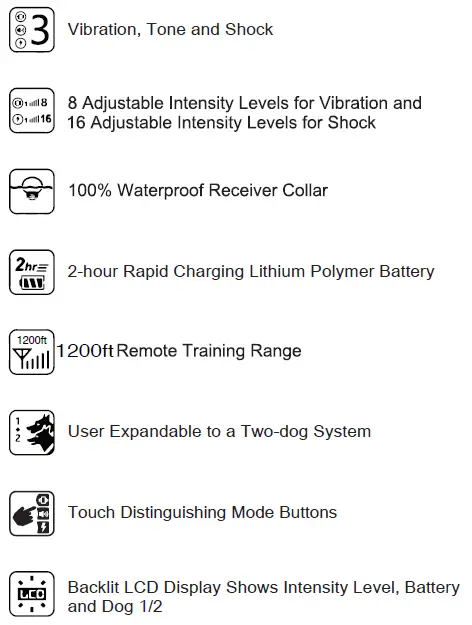
Main Features
Overview
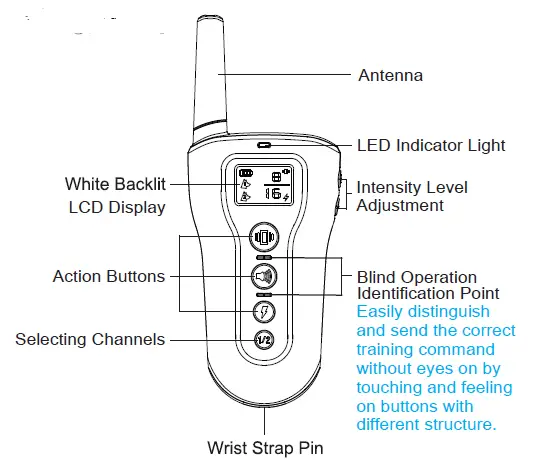
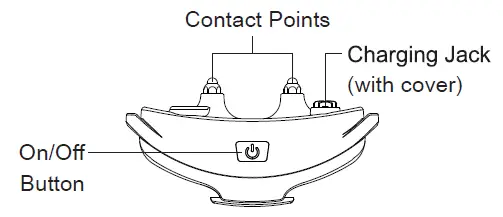
Transmitter
Receiver Collar
Operating Guide
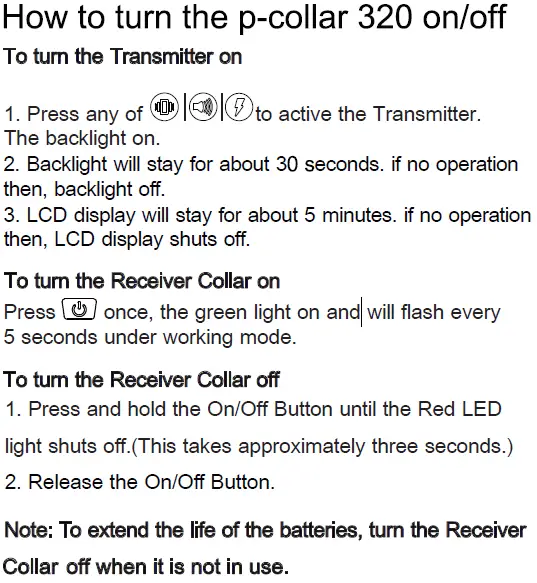
How to Turn the p-collar 320 on/off
How the Transmitter Buttons Work
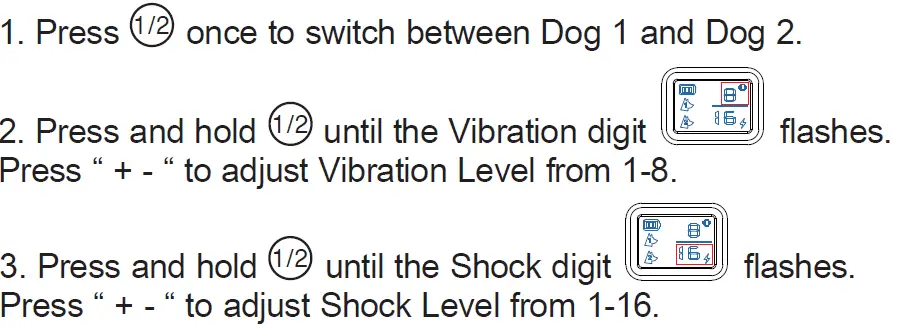
Dog 1/2 Button
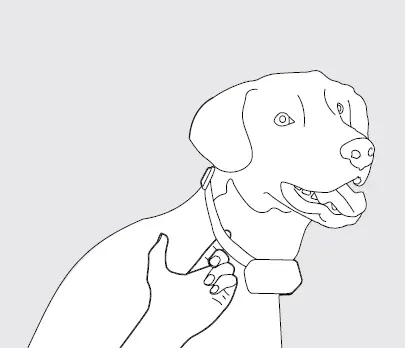
Collar Fitting
The Receiver/Collar should be fitted so that the surgical stainless steel contact points press firmly against the dog’s skin. When properly fitted, you should be able to fit a finger or two snugly in between the collar and you dog’s skin. When properly fitted, the Receiver/Collar should not move on the dog. The best location for the Receiver/Collar box is either side of the dog’s windpipe. A loose fit can allow the Receiver/Collar to move around on the dog’s neck. When this happens, the contact points may rub the skin and cause irritation. If the Receiver/Collar is too tight, the dogs may have difficulty breathing.
How to Find the best Vibration/Shock Level
The unit comes with Up and Down buttons to control the Vibration/Shock Level, with Level 1 being the lowest level for Both Vibration and Shock, Level 8 being the highest for Vibration and Level 16 being the highest for Shock. The level of Vibration/Shock best suited for your dog depends on your dog’s temperament and threshold for Vibration/Shock. Always start at the lowest level and work your way up. The appropriate level can be found when the dog responds to the Vibration/Shock with a mild reaction, such as a tensing of the neck muscles. The Vibration /Shock Level may vary depending on the training situation. When highly distracted, dogs will require a higher level of Vibration/Shock.
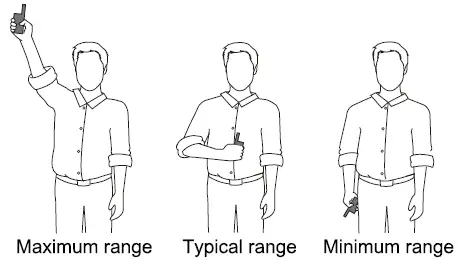
To Maximize the Distance
The unit has a 1200ft range. The range may vary depending on the way the Transmitter is held. Hold the Transmitter away from your body to receive the greatest range. For maximum signal strength, keep the device properly charged.
Avoid touching the antenna or the range may decrease substantially.
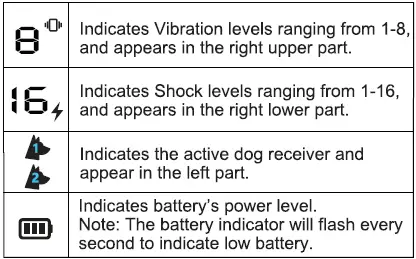
The LCD and LED Indicator
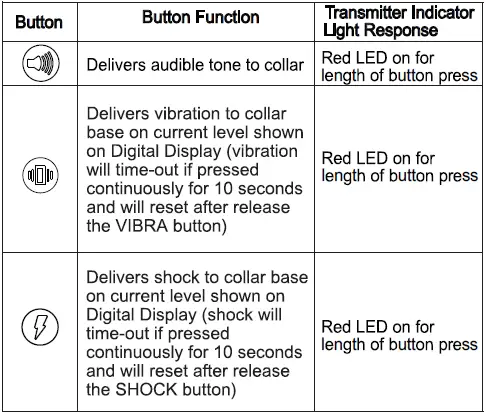
Transmitter LED Indicator Light – Function and Response
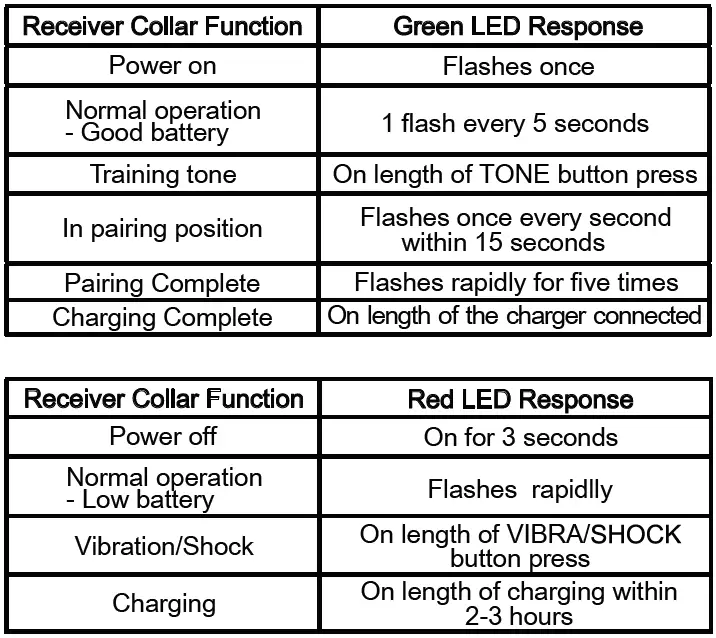
Receiver Indicator Light – Function and Response
Charging the Unit
The unit uses Lithium-Polymer batteries.
- Charge the unit before using the unit for the first time.
- Do not charge the unit near any flammable substances.
- Fully charge if the unit is to be stored without use for a period of 3 months or more.
Recharge the unit if:
The indicator light on the collar is emitting a red color and flashes rapidly.
The 3 bar indicator on the Transmitter LCD shows just 1 bar.
The indicator light on the Transmitter or Receiver will not come on. The indicator light on the Transmitter or Receiver comes on momentarily when any of the Mode Buttons is pushed.
Battery Charging Procedure
NOTE: The unit has a partial charge when it leaves our facility, upon receipt of the collar, be sure to give it a 4-hour initial charge before the first use.
- Plug the charger into a standard wall outlet.
- Lift the rubber covers protecting the Transmitter/Receiver
- Connect the charger connectors to the Transmitter and
- Connect the USB port to the Charging Adapter.
- Charge the unit for 4 hours for the first charge. Recharges take only 2-3 hours.
Note: The Battery Indicator on the Transmitter will scroll and Indicator will become steady, and the LED Indicator Light flashes when fully charged. The indicator light on the Receiver Collar will be in steady red while charging and green light turned on when fully charged. - When charging is completed, remove the charger connector.
How to pair the Remote Transmitter and Receiver Collar
If your Receiver Collar does not beep when the TONE Button of the Remote Transmitter is pushed, or if you feel the Receiver Collar is not responding to the Remote Transmitter, follow these steps to pair:
- With the Receiver Collar off your pet, turn the Receiver Collar off. Restart, press and hold the On/Off Button until the Green LED flashes every second on within which pairing should be completed.
- Press and hold the TONE , VIBRA or Shock Button of the Remote Transmitter until the Green LED Light on the Receiver Collar flashes rapidly for 5 times, indicating pairing is completed.
Two Dog System
NOTE: If you wish to add another Receiver Collar to the training system, extra Receiver Collars are available where you bought your unit.
Remote Transmitter
- Switch Dog1 to Dog2 by pressing and releasing the Dog 1/2 Button.
- Turn on the Receiver Collar for Dog 2, press any Mode Buttons to verify function.
- If Dog 2 Receiver Collar does not respond. Pairing may be needed. Repeat steps in How to pair the Remote Transmitter & Receiver Collar above.
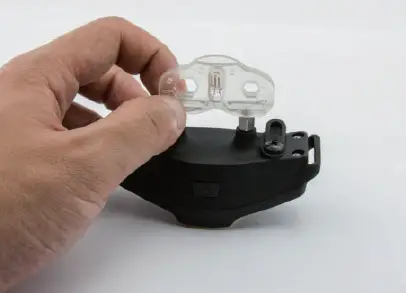
How to use the Test Light
- Turn the Receiver Collar on.
- Hold the Test Light Contacts to the Contact Points.
- Press the SHOCK Button on the Remote Transmitter.
- The Test Light will flash.
Note: At higher Shock Levels, the Test Light will flash brighter. - Turn the Receiver Collar off.
Save the Test Light for future testing.
Note: If the Test Light does not flash, recharge the Receiver and re-test. If Test Light still does not flash, contact us for Customer Service.
Training Guide
General Tips
- Eliminate one misbehavior or teach one obedience command at a time. If you move too fast with training, your pet may become confused.
- Be consistent. Correct your pet every time he misbehaves.
- Unless you can supervise him, it is recommended that you restrict your pet from situations in which he has a history of misbehaving. However, setting up a situation as a training session can dramatically improve your chances of success.
- If your pet reacts to the tones by hiding or acting fearful, redirect his attention to a simple and appropriate behavior, such as the “sit” command.
- Pets should be at least 6 months old before using the Training Collar.
- Only let responsible family members use the Training Collar. It is not a toy!
- Other pets in hearing range will be affected by the training tones. Therefore, training sessions should be conducted out of hearing range of other pets.
Warning
Never use the Remote Training Collar to correct or eliminate any form of aggressive behavior. We recommend you contact your local veterinarian or professional trainer to determine if your pet might be aggressive. See page 3 for more information.
Frequently Asked Questions
| Is the Vibration/Shock safe for my pet? | While the Vibration/Shock is unpleasant, it is harmless to your pet. Electronic training devices require interaction and training from the owner to achieve desired results |
| How old does my pet have to be before
using the Remote Training Collar? |
Your pet should be able to recognize basic obedience commands such as “Sit” or “Stay”. Pets should be at least 6 months old before using the Training Collar. |
| Once my pet is trained and has been obeying
my commands, will he have to continue to wear the Receiver Collar? |
Probably not. You may need to reinforce training with the Receiver Collar from time to time. |
| Is the Receiver Collar waterproof? | Yes |
| Will I get exactly 1200ft of range with the Remote Training Collar? | The range of the Remote Training will vary according to terrain, weather, vegetation, as well as transmission from other radio devices. See “To maximize the distance” for tips on maximizing your range. |
| How long can I continuously deliver Vibration/ Shock to my pet? | The maximum amount of time you can press the Vibration/Shock Button and deliver Vibration/Shock to your pet continuously is 10 seconds. After this, Vibration/Shock cannot be delivered until You release and press the button again. |
Troubleshooting
Warranty and repair information
1-Year Limited Lifetime Warranty
The original purchaser for this unit is provided with 1-YEAR WARRANTY. The warranty begins from the date of purchase. For the first year, coverage is for both Parts and Labor on warranty repair services.
Accessories such as chargers, splitter cables, antennas, straps, and batteries are covered for the first year only. After the first year, the Limited Lifetime Warranty covers Parts only and does not cover Labor Fees and Accessories. All shipping fees incurred, the cost of Accessories after the first year, and Labor fees associated with out of warranty repair work, are the
customer’s responsibility. Labor fees will be variable depending on the extent of the work required. The Limited Lifetime Warranty expires 5 years after a model is discontinued from production.
To Qualify for the Warranty
All products must provided a proof of purchase is required to initiate repair work under warranty. We strongly recommend keeping the original receipt. If a proof of purchase is not available at the time of service, we will estimate the age of unit by the serial number. Serial number estimates can differ from the actual purchase date. A serial number estimate is the only method of determining an approximate date of purchase without a proof of purchase.
![]()