PHILIPS Avent Fast Bottle Warmer

PHILIPS Avent Fast Bottle Warmer
Important
Read this user manual carefully before you use the appliance and save it for future reference.
Danger
– Do not immerse the cord, plug or appliance in water or other liquid.
Warning
– Only use the appliance indoors.
– Do not let the power cord hang over the edge of a table or worktop. Store excess cord in the base of the bottle warmer.
– Keep the power cord away from hot surfaces.
– Only connect the appliance to a grounded wall socket. Always make sure that the plug is inserted into the wall socket properly.
– Before you connect the appliance, check that the voltage indicated on the bottom of the appliance corresponds to the local voltage.
– If you need to use an extension cord, make sure it is a grounded extension cord with a rating of at least 13 amperes.
– Do not use the appliance if the plug, the power cord, or the appliance itself is damaged. If the power cord is damaged, you must have it replaced by Philips, a Philips authorized service center, or similarly qualified persons in order to avoid a hazard.
– Do not place the appliance on or near a hot gas or electric cooker, or in a heated oven. – This appliance can be used by persons with reduced physical, sensory or mental capabilities or lack of experience and knowledge if they have been given supervision or instruction concerning the use of the appliance in a safe way and understand the hazards involved.
– This appliance can be used by children aged 8 years and above if they have been given supervision or instruction concerning the use of the appliance in a safe way and if they understand the hazards involved. Cleaning and user maintenance shall not be made by children unless they are older than 8 and supervised. Keep the appliance and its cord out of reach of children aged less than 8 years.
– Children must not play with the appliance.
– Do not spill water on the power plug.
– Only use the appliance as described in the user manual to avoid injury due to misuse.
– Do not preheat the appliance.
– Always place a fully assembled bottle with a cap in the bottle warmer before you add water.
– Make sure you add water before you switch on the bottle warmer.
– Hot water can cause serious burns. Be careful when the
bottle warmer contains hot water.
– The accessible surfaces of the appliance may become hot during use and are subject to residual heat after use.
– Do not move the appliance when it contains hot water.
– When the food or milk has reached the required
temperature, remove the bottle or container from the bottle warmer. If you leave food or milk in the bottle warmer, the temperature of the food or milk increases.
Caution
– This appliance is intended for use in household and similar applications such as farmhouses, bed and breakfast accommodations, staff kitchen areas in stores, offices, and other work environments, and by guests in hotels, motels, and other residential type environments.
– The food should not be heated for too long.
– Always check the food temperature before you feed your child. Gently swirl the bottle and check by sprinkling a few drops on the inside of your wrist. (Follow the instructions in section “Feed your baby the milk”.)
– Unplug the appliance when it is not in use.
– The surface of the heating element is subject to residual heat after use.
– Let the appliance cool down before you clean it.
– Follow the descaling instructions to avoid irreparable damage.
– Do not try to open or repair the appliance yourself. Contact the Philips Consumer Care Centre in your country (see www.philips.com/support).
The production date code YYWW is located in the cord storage compartment at the base of the bottle warmer.
Electromagnetic fields (EMF)
This Philips appliance complies with all applicable standards and regulations regarding exposure to electromagnetic fields.
Introduction
Congratulations on your purchase and welcome to Philips Avent! To fully benefit from the support that Philips Avent offers, register your product at www.philips.com/welcome. With this bottle warmer, you can safely warm and defrost milk in Philips Avent and other most common branded feeding bottles and baby food in containers. To help preserve the quality of your breast milk, it is important to warm the milk in a safe and controlled way. The built-in sensor tracks the temperature to avoid overheating.
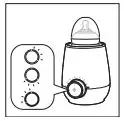
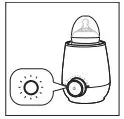
General description
Product overview
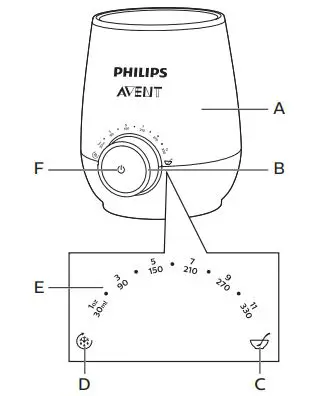
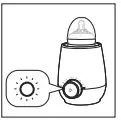
A Bottle warmer
B Progress indicator
C Baby food warming setting
D Keep warm/defrost setting
E Milk volume setting
F On/off button
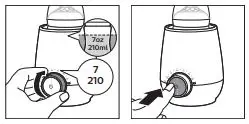
Explanation of settings
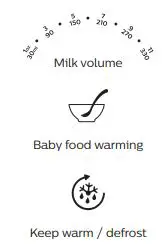 Select the milk volume you warm. You can set from 30 ml / 1 oz up to 330 ml / 11 oz. The bottle warmer warms the milk to approximately body temperature. It then goes to keep warm mode automatically for about 60 minutes.
- Select this setting to warm baby food.
- The built-in sensor detects the milk/baby food temperature to switch to the optimal setting. If the milk/baby food is warm, it will be warmed gradually and kept at the right temperature. If the milk/baby food is frozen, it will be defrosted to a liquid state and then warmed to the right temperature.
When the entire progress indicator is on but not flashing, the milk/food is ready for feeding. Feed your baby when the milk/food is warmed. Do not rewarm the milk/food after it has cooled down, as bacteria may start to develop in it.
Warm milk
- Place the bottle in the bottle warmer. Fill with drinking water to the level of
the milk. If you have a large volume of milk, fill with water to approximately 1 cm below the top of the bottle warmer.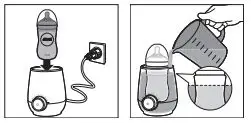
- Select the desired setting based on the milk volume and press the on / off button to switch it on.
- The progress indicator flashes gradually to show the progress of milk warming.
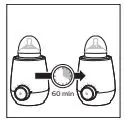
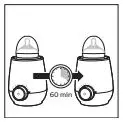
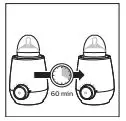
- When the entire progress indicator lights up continuously, the milk is ready for feeding and the bottle warmer automatically switches to keep warm mode.
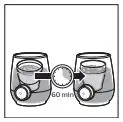
- The bottle warmer switches off automatically after about 60 minutes, including warming time. The progress indicator turns off.
Tip
• If you want the milk warmer, keep the bottle in the appliance until it reaches the desired temperature after the entire progress indicator lights up.
• If you are using a milk bag, select the keep warm / defrost setting because it takes less power to warm milk bags.
• If you are using a silicone bottle, it takes a longer time to warm milk. Keep it in the bottle warmer for 3-4 minutes after the entire progress indicator lights up.
Recommended setting for different containers
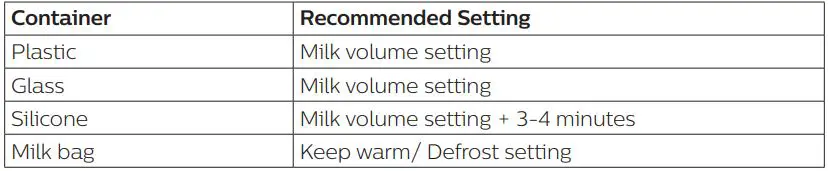
Check the instructions of your milk bag and make sure it can be warmed in a bottle warmer.
![]() Note
Note
• The time to warm milk depends on the volume, initial temperature, and milk bottle material.
Feed your baby the milk
Press the on/off button to switch off the appliance and take out the milk bottle.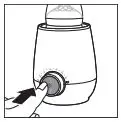
![]() Note
Note
• If you are using a small milk bottle, such as a 2 oz milk bottle, be careful of the hot water when you take out the bottle.
Always check the temperature of the milk before you feed your baby. Gently swirl the bottle and check by sprinkling a few drops on the inside of your wrist.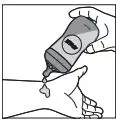
Reuse the bottle warmer right away for another bottle
If you want to warm another bottle, let the bottle warmer cool down for a few minutes. To speed up, fill the bottle warmer with fresh cold water. When you switch on the bottle warmer, the progress indicator flashes gradually to indicate that the appliance is warming again.
![]() Note
Note
• If the progress indicator is on but not flashing, the bottle warmer is still too hot to warm another bottle. Switch off the bottle warmer and let it cool down for a few minutes.
Warm baby food
- Place the baby food container in the bottle warmer. Fill with drinking water
to the level of the baby food. If you have a large volume of baby food, fill with water to approximately 1 cm below the top of the bottle warmer.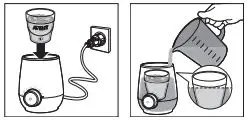
- Select the baby food warming setting and press the on / off button to switch
on.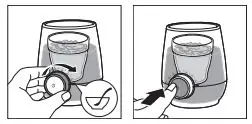
- The progress indicator flashes to show it is in the warming process.
 Note
Note
• Due to variations in baby food consistency, it is not possible for the appliance to detect
precisely how long the baby food should be warmed. - Stir the baby food while the jar or container is in the bottle warmer. For
optimal results, check its temperature while it is warming up. » Be careful not to burn your fingers when holding the container or jar while stirring.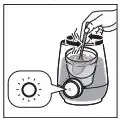
- When the entire progress indicator lights up continuously, the baby food
is ready for feeding and the bottle warmer automatically switches to keep warm mode. - The bottle warmer switches off automatically after about 60 minutes, including warming time. The progress indicator turns off. 60 min
Feed your baby the baby food
Press the on/off button to switch off the appliance and take out the food container or jar.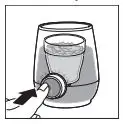
Always check the temperature of the baby food before you feed your baby. Gently stir the baby food in the food container or jar and taste it to make sure it is not too hot.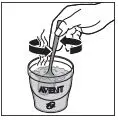
Reuse the bottle warmer right away for another container of baby food
Follow the same steps as indicated in the section “Warm milk”
Keep warm milk
With this setting, the built-in sensor detects the milk temperature to switch to the optimal setting. If you put warm milk, it is warmed gradually and kept at the right temperature.
- Place the bottle in the bottle warmer. Fill with drinking water to the level of
the milk. If you have a large volume of milk, fill with water to approximately 1 cm below the top of the bottle warmer.
- Select the keep warm / defrost setting and press the on/off button to
switch on.
- The progress indicator flashes to show that milk is warming.
- When the entire progress indicator lights up continuously, the milk is ready
for feeding and the bottle warmer keeps the milk at this temperature. - The bottle warmer switches off automatically after about 60 minutes, including warming time. The progress indicator turns off.
![]() Note
Note
· The time may vary depends on the milk volume and starting temperature.
Defrost milk
With this setting, the built-in sensor detects the milk/food temperature to switch to the optimal setting. If you put frozen milk/baby food, the bottle warmer defrosts the milk/baby food to a liquid state and then warms it to the right temperature.
- Place the bottle in the bottle warmer. Fill with drinking water to the level of
the milk. If you have a large volume of milk, fill with water to approximately 1 cm below the top of the bottle warmer.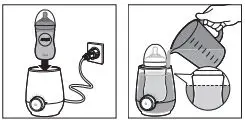
- Select the keep warm / defrost setting and press the on/off button to
switch on.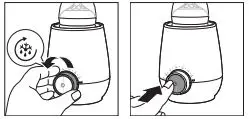
- The progress indicator flashes to show that milk is defrosting and warming.
- When the entire progress indicator lights up continuously, the milk/baby food is ready for feeding.
- The bottle warmer switches off automatically after about 60 minutes, including defrosting and warming time. The progress indicator turns off.
You can also defrost baby food in the Philips Avent food container with this setting. Due to variations in baby food consistency, it is strongly recommended to continuously stir and check the baby food while you are defrosting it for optimal results.
Cleaning and descaling
Cleaning
- Unplug and let it cool down.
- Pour out water sideways rather than forwards or backward to keep water
from spilling onto the knob or main plug.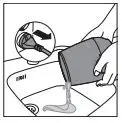
- Wipe with a moist cloth. » Do not use abrasive, antibacterial cleaning agents, chemical solvents, or sharp tools to clean the bottle warmer.

![]() Note
Note
• If you used the bottle warmer to warm baby food, make sure that no spilled baby food remains at the bottom of the bottle warmer.
Descaling
It is recommended to descale the bottle warmer every four weeks to ensure it works efficiently.
To descale, mix 60 ml / 2 oz of white vinegar with 120 ml / 4oz of cold water. Switch on and select the milk warming setting for contents under 180 ml / 6 oz and let the appliance operate for 10 minutes. Leave the solution in the bottle warmer until all scale has dissolved.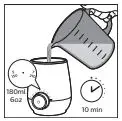
![]() Note
Note
• You can also use citric acid-based descalers.
• Do not use other types of descalers.
Empty the bottle warmer and rinse the inside thoroughly. If you still see traces of scale, repeat the descaling procedure.
Recycling
![]()
This symbol means that this product shall not be disposed of with normal household waste (2012/19/EU).
Follow your country’s rules for the separate collection of electrical and electronic products. Correct disposal helps prevent negative consequences for the environment and human health.
Guarantee and service
If you need information or if you have problems, please visit the Philips website at www.philips.com/avent or contact the Philips Customer Care Center in your country (refer to the enclosed worldwide guarantee leaflet for details). If there is no
Customer Care Center in your country, go to your local Philips dealer.
Troubleshooting
This chapter summarizes the most common problems you could encounter with the appliance. If you are unable to resolve the problem with the information below, contact the Consumer Care Center in your country.
Problem After switching on the bottle warmer, the entire progress indicator blinks fast and switches off.
Cause
• The temperature of water in the bottle warmer is too hot or too cold.
• The boil-dry protection is activated.
Solution
• Switch off and unplug. Let it cool down for a few minutes. Make sure you fill it with fresh room temperature water.
• The bottle warmer automatically switches off if it is on and there is no water or not enough water in it. Switch off and unplug. Let it cool down first. Make sure you fill it with enough fresh room temperature water. The bottle warmer is ready to use again.
Problem The milk is too hot.
Cause • You may have selected an incorrect setting or are using a milk bag.
Solution • Select the milk volume set based on the milk volume, not the bottle size.
• If you are using a milk bag, select the keep warm / defrost setting.
Problem
The milk is still cold.
Cause • You may have selected an incorrect setting, are using a silicone bottle, or have filled the bottle warmer with warm water.
Solution • Select the milk volume set based on the milk volume, not the bottle size.
• If you are using a silicone bottle, select the milk volume set based on the milk volume. When the entire progress indicator is on, wait for 3-4 minutes for the milk to warm.
• Fill the bottle warmer with fresh room temperature water. Do not
use warm water.
Problem After switching on the bottle warmer, the entire progress indicator is
on but not flashing.
Cause • The bottle warmer is still too hot to warm another bottle. You may
have just finished warming a bottle. Switch off and let it cool down
for a few minutes.
Solution • To speed up, refill the bottle warmer with fresh cold water. When you switch on the bottle warmer, the progress indicator fills up gradually to indicate that the appliance is warming again.
Problem The entire progress indicator flashes when warming baby food.
Cause • Due to variations in baby food consistency, it is not possible for the appliance to detect precisely how long the baby food should be warmed.
Solution • Stir the baby food while the jar or container is in the bottle warmer. For optimal results, check its temperature while it is warming.
• When the entire progress indicator lights up continuously, the baby food is ready for feeding.
FAQ’S
Is it safe to use the Philips Avent Fast Bottle Warmer?
Yes, it is safe to use the Philips Avent Fast Bottle Warmer. It is made of high quality material and has been tested for safety and durability.
Is it easy to use the Philips Avent Fast Bottle Warmer?
Yes, it is very easy to use the Philips Avent Fast Bottle Warmer. It can be used by all moms, dads, grandparents and babysitters. Just follow the instructions in this user manual and you will be able to use it in no time.
How do I clean the Philips Avent Fast Bottle Warmer?
You can clean the Philips Avent Fast Bottle Warmer by hand washing with warm soapy water or placing in the dishwasher.
Does the Philips Avent Fast Bottle Warmer have a timer?
No, there is no timer on the Philips Avent Fast Bottle Warmer. You just need to set your desired temperature and then place your bottle inside and wait for your bottle to warm up.
Is Philips Avent bottle warmer compatible with other bottles?
The bottle warmer is compatible with any Philips Avent bottles (except the Philips Avent 2oz/60ml bottles), storage cups, food jars/tins as well as any other brand of baby bottles which fit in the bottle warmer. You can put polypropylene, glass or silicone bottles in the bottle warmer.
Can Avent bottle warmer overheat?
The exact time depends on several factors like the starting temperature and volume of the water or milk, if the bottle is made out of glass or plastic, size of the bottle, etcetera. If you leave the milk for a longer time in the bottle warmer, milk can overheat.
How much water do you put in a bottle warmer?
Fill the warmer with water to approximately 10mm below the rim of the warmer. Never let the water overflow or rise above the neck of the bottle. For larger bottles, fill to 12mm below the rim of the warmer
Do you put water in Avent bottle warmer?
For 125ml/4oz bottles, fill the warmer with water to just above the level of the milk in the bottle. For 260ml/9oz bottle, fill the warmer to 15 mm (1/2 inch) below the rim of the warmer. Never let water level rise above the neck of the bottle or spill over the edge of the warmer.
Can you leave the Avent bottle warmer on?
Not only does this bottle warmer detect the milk’s initial temperature and warm it to the ideal temperature, it also keeps it at that temperature for up to 60 minutes.
Is it safe to use bottle warmer?
Are bottle warmers safe? Yes, bottle warmers are safe to use as they heat a bottle quickly, but shouldn’t make it too hot. A good bottle warmer will evenly heat your baby’s milk and ensure that there are no hot spots that can scald your baby’s mouth.
How quickly does a bottle warmer work?
Most bottles will fit inside the warmer, along with baby food jars, and it can warm up milk in just four minutes or keep items warm once they’ve been heated. Simply pour water into the warmer and adjust the dial for the temperature. Four minutes later, the bottle is ready to serve.
Does a warm bottle help baby sleep?
So giving your baby a warm bottle every night may be a little boost of tryptophan and a comforting sleep cue signaling to them that it’s time for bed.” Plus, it’s good for them. “We pediatricians recommend about 16 ounces of milk daily for important nutrients such as calcium, vitamin D, and protein,” says Dr. Segura.
VIDEO
PHILIPS Avent Fast Bottle Warmer
www://philipsaventpakistan.com/philips-avent-fast-bottle-warmer-SCF358-00