PHILIPS DE5205 Air Dehumidifier

Overview
Important
Safety
Read this user manual carefully before you use the dehumidifier, and save it for future reference.
Danger
- Do not spray any flammable materials such as insecticides or fragrances around the dehumidifier to avoid electric shock and/or a fire hazard.
- Do not drink the accumulated water, use
- it to feed animals, or to water plants. Empty the water tank, and pour the water down the drain.
Warning
- Check if the voltage indicated on the bottom or indicated at the rear of the appliance corresponds to the local power voltage before you connect the appliance.
- Connect the dehumidifier to the power socket exclusively, and do not connect it through an extension cord to prevent fire hazards and/ or electric shock.
- If the power cord is damaged, you must have it replaced by Philips, a service center authorized by Philips, or similarly qualified persons in order to avoid a hazard.
- Do not use the appliance if the plug, the power cord, or the appliance itself is damaged.
- This appliance is not intended for use by persons (including children) with reduced physical sensory or mental capabilities, or lack of experience and knowledge unless they have been given supervision or instruction concerning the use of the appliance by a person responsible for their safety.
- Children should be supervised to ensure that they do not play with the appliance.
- Do not start or stop the dehumidifier by plugging and unplugging the power cord.
- Do not block the air inlet and outlet, e.g. by placing items on the air outlet or in front of the air inlet.
- Do not insert your fingers or objects into the air inlet and outlet to prevent physical injury or product malfunction.
Caution
- Do not turn the appliance on and off frequently.
- If the power socket used to power the dehumidifier has poor connections, the plug of the dehumidifier becomes hot. Make sure you plug the dehumidifier into properly connected power socket.
- Always place and use the dehumidifier on a dry, stable, level, and horizontal surface.
- Leave at least 40 cm free space behind and on both sides of the dehumidifier and leave at least 60 cm free space above it. Insufficient ventilation may cause overheating or fire hazards.
- Do not use this dehumidifier when you have used indoor smoke-type insect repellents or in places with oily residues, burning incense, or chemical fumes.
- Do not operate or store the dehumidifier under direct sunlight.
- Do not use the dehumidifier near gas appliances, heating devices, or fireplaces.
- Do not use the dehumidifier in a bathroom, laundry, or other places where it is likely to come into contact with water or wash it with water.
- When you use the dehumidifier for drying laundry, hang your clothes from a distance where water droplets will not drip onto the dehumidifier.
- The dehumidifier is only intended for household use under normal operating conditions (5°C – 35°C).
- Do not use the dehumidifier in a room with major temperature changes.
- The body for a prolonged period of time, especially where there is someone who is unable to adjust the humidity. For instance: an infant, child, or elderly person. This may harm the physical condition and lead to dehydration.
- Use the dehumidifier with cautions where the walls, furniture, and artworks are vulnerable to dry air.
- Do not place the appliance directly below an air conditioner to prevent condensation from dripping onto the appliance which will cause short circuits and leakage of electricity.
- Only use the original Philips filters specially intended for this appliance. Do not use any other filters.
- Burning the filter may cause irreversible damage to humans or other creatures. Do not use the filter as fuel or for similar purposes.
- Always lift or move the appliance by the handle at the top of the appliance.
- Do not use the dehumidifier in a room with major temperature changes, as this may cause condensation inside the dehumidifier.
- To prevent interference, place the appliance at least 2m away from electrical appliances that use airborne radio waves such as TVs, radios, and radio-controlled clocks.
The appliance does not remove carbon monoxide (CO) or radon (Rn). It cannot be used a safety device in case of accidents with combustion processes and hazardous chemicals. - Never move the appliance by pulling the power cord.
- This appliance is not a substitute for proper ventilation, regular vacuum cleaning, or the use of an extractor hood or fan while cooking.
- If the appliance is not used for a long period of time, remove the filter from the dehumidifier and store it separately in a cool, dry place.
- Do not sit or stand on the appliance. The appliance is equipped with unilateral rotating wheels. Sitting or standing on the appliance may lead to potential injury.
Fuse Specification
- T2.0A 250V
- T5.0A 250V
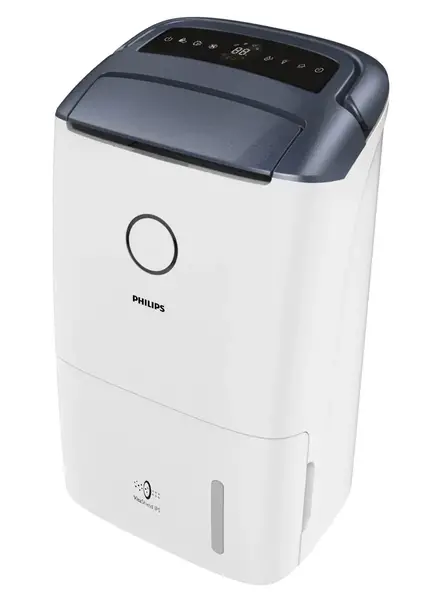
Your Philips 2-in-1 Air Dehumidifier and Purifier
Congratulations on your purchase, and welcome to Philips!
To fully benefit from the support that Philips offers, register your product at www.Philips.com/welcome
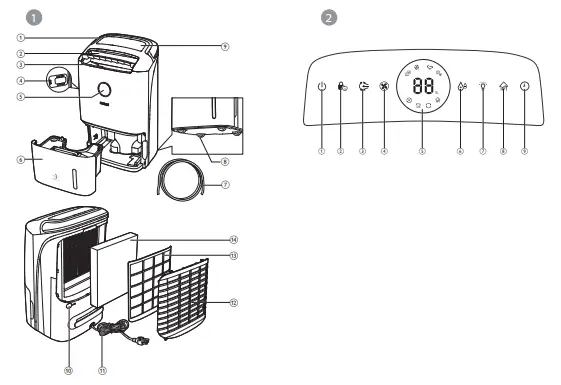
Product Overview
| a | Handle | h | Unilateral rotating wheels |
| b | Louver | i | Display panel |
| c | Air outlet | j | Continuous drainage outlet |
| d | Air quality sensor | k | Power cord |
| e | Air quality light | l | Rear cover with air inlet |
| f | Water tank | m | Pre-filter |
| g | Hose | n | NanoProtect filter HEPA Series 1 (FY1119) |
Controls Overview
| a | On/off button | f | Humidity level setting button |
| b | Child lock button | g | Light on/off button |
| c | Auto swing button | h | Purification ONLY button |
| d | Fan speed button | i | Timer button |
| e | Display screen |
Display panel
| Filter replacement alert | Auto mode icon | ||
| Auto defrosting indicator | Laundry drying mode icon | ||
| Water tank full alert | Continuous mode icon | ||
| Pre-filter cleaning alert | Purification ONLY mode icon |
Getting started
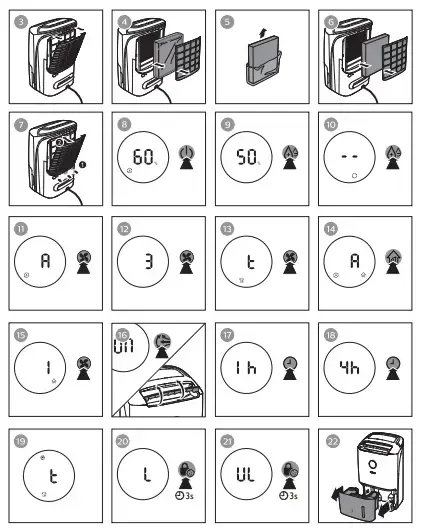
Installing the filter
- Make sure that the appliance is unplugged before installing the filter.
- Before using the appliance, remove all packaging materials from the filter and place the filter into the appliance as described as follows.
- Pull the top part of the rear panel to remove it from the appliance
- Take out the HEPA filter and the pre-filter
- Remove all packaging materials from the HEPA filter
- Place the HEPA filter into the
- dehumidifier and then the pre-filter
- Make sure that the HEPA filter and the pre-filter are properly attached to the dehumidifier.
- 5 Reattach the rear cover by pressing
- the bottom part of the rear cover onto the appliance first (1). Then, gently push the rear cover against the body of the appliance (2)
- 6 Wash your hands thoroughly after
- Installing filters.
The air quality light
| Color of the air quality light | Air quality level |
| Blue | Good |
| Blue-violet | Fair |
| Red-purple | Unhealthy |
| Red | Very unhealthy |
The air quality light automatically goes on when the appliance is switched on and lights up all colors in sequence. In a short time, the air quality sensors select the color that corresponds to the surrounding air quality of airborne particles.
Turning on and off
- For optimum performance, close doors, and windows.
- Keep curtains away from the air inlet or air outlet.
- For optimum dehumidification efficiency, place the dehumidifier on a flat, stable surface.
- Before turning on the dehumidifier, check if the power voltage corresponds to the voltage printed on the dehumidifier.
- 1 Put the plug of the dehumidifier in the wall outlet.
- The dehumidifier beeps.
- Touch the button once to turn on the appliance
- The current humidity level is displayed on the screen. After measuring the air quality for a short time, the air quality the sensor automatically selects the color of the air quality light. The dehumidifier goes to combi AUTO mode. 3 Touch and hold for 3 seconds to turn off the appliance
Setting the humidity level
- You can set the desired humidity level to 40, 50, 60, 70, or 80 percent. 1 Touch the button one or more times to set the desired humidity level, and the humidity indicator lights up (fig.i).
- When the humidity is decreased to the selected level, the dehumidifier automatically stops dehumidifying the air, but the fan will continue working.
- If you do not set the humidity level, the default humidifier is 60%.
- You can touch the button for 5 seconds to display the current ambient temperature.
- A comfortable humidity level is from 40RH% to 60RH%.
Continuous mode
In continuous mode, the appliance constantly works with the optimal dehumidifying settings. 1 Touch the button repeatedly to select the continuous mode The and display on the screen.
Changing the fan speed
You can select the desired fan speed (Auto,1, 2,3, and 4), or clothes dry mode.
Auto
- Touch the fan speed button repeatedly to select the auto mode
- You can adjust the humidity settings manually by touching the button
Manual
- Touch the fan speed button repeatedly to select the fan speed you need
Laundry drying mode
- Touch the button until is displayed to select the laundry drying mode (fig.m). » The dehumidifier goes to laundry drying mode. » The dehumidifier operates under the highest fan speed. » and display on the screen. Do not point the airflow of the dehumidifier directly at the body for a prolonged period of time, especially where there is someone who is unable to adjust the humidity.
- When you use the dehumidifier for laundry drying, hang your clothes from a distance where water droplets will not drip onto the dehumidifier.
- Make sure the air inlet and outlet are not blocked by the clothes.
- Make sure that you dry the clothes in a safe and secure place from dropping to block the air inlet and outlet.
- Direct the louver until air flows directly onto the clothes to dry your clothes more efficiently.
Using the purification only mode
- The appliance can be used in purification-only mode.
- Touch the button to access purification only mode The appliance operates under auto mode by default. » The dehumidifier will stop dehumidifying the air. » The and the display on the screen.
- Touch the fan speed button to select the desired fan speed The fan speed and display on the screen. 3 Touch the button again to exit the purification-only mode. » The dehumidifier goes to combi AUTO mode.
- Whenever the current mode of appliance works, it goes to purification only mode when touching the button.
Humidity setting and laundry drying mode are off in the purification-only mode.
Using the swing function
- The louver is able to swing up to 90 degrees. Use the swing function to direct the airflow.
- 1 Touch the button to activate the swing function. 2 Touch the button again to deactivate the swing function. After the appliance is turned on, turn the louver upward to increase the dehumidifying efficiency.
Setting the Timer
- With the timer function, you can let the dehumidifier operate for a set number of hours. When the set time has elapsed, the dehumidifier automatically turns off. The timer is available from 1 to 9 hours.
- 1 Touch the button to activate the timer
- 2 Touch the button repeatedly to choose the number of hours you want the dehumidifier to operate
- To deactivate the timer function, touch the button repeatedly until is displayed on the screen.
Defrosting the D
- The defrosting function is enabled only when the dehumidifier operates under dehumidifying mode.
- The dehumidifier is equipped with a defrosting sensor to make sure it is in optimal condition when being used in cold weather. The dehumidifier automatically detects if defrosting is required.
- When defrosting is required: » The indicator is on (fig.s). » Defrosting will begin defrosting and continue until the dehumidifier is completely defrosted
- During defrosting, the dehumidifier operates in clothes dry mode. The dehumidifier will resume working and operate the previous settings after defrosting is completed.
Setting the child lock
Touch and hold the child lock button for 3 seconds to activate the child lock “L” displays on the screen for 3 seconds. » When the child lock is on, all the other buttons are not responsive. 2 Touch and hold the child lock button for 3 seconds again to deactivate child lock “UL” displays on the screen for 3 seconds.
Using the light on/off function
With the light on/off button, you can switch on or off the air quality light, the display screen, and the function indicators if desired.
- Touch the light on/off button once, the air quality light will go off.
- Touch the light on/of the button again, the display screen will be dimmed.
- Touch the light on/off button for the third time, all lights will be on the gain.
Emptying the water tank
When the water tank is full
- The appliance beeps and the indicator is on. The appliance goes to purification only mode automatically.
- Place your fingers in the side recess of the dehumidifier and gently pull the water tank out. Hold the sides of the water tank, and remove it from the dehumidifier
- Empty the water into a sink
- Wipe the outside of the water tank dry with a clean cloth
- Put the water tank back into the dehumidifier
- The dehumidifier will resume working after the water tank is emptied.
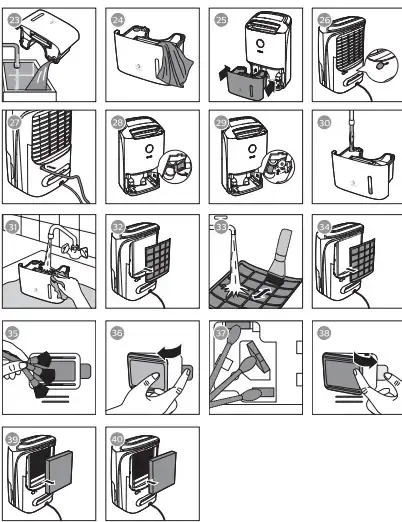
Using the continuous drainage
The dehumidifier can also drain excess water by attaching a hose. This allows you to operate the dehumidifier without emptying the water tank.
- Turn off the dehumidifier and unplug from the wall outlet.
- The open protective cover of the drainage hole Remove the water tank from the dehumidifier
- Insert the Philips provided hose into the drainage hole
- Push the protective cover of the drainage outlet rightwards to open it
- Connect the hose to the drainage outlet
- Put the water tank back into the dehumidifier
- Put the water tank back into the dehumidifier even using continuous drainage, or the dehumidifier can not operate normally.
- Make sure the hose fits tightly so that no water leaks from the dehumidifier.
- When using continuous drainage, make sure the hose is laid flat and not knotted.
- Make sure the hose is not immersed in water, nor raised higher than the continuous drainage hole.
- Place the outlet of the hose in somewhere it can easily drain.
- Check the dehumidifier once a week when draining water continuously or left unattended for an extended period of time.
Cleaning
- Always turn the appliance off and unplug the appliance from the electrical outlet before cleaning.
- Never immerse the appliance in water or any other liquid.
- Never use abrasive or aggressive cleaning agents such as bleach or alcohol to clean any part of the appliance.
- Only the pre-filter is washable. The air purification filter is not washable.
- Do not attempt to clean the filter or air quality sensor with a vacuum.
Cleaning the body of the Dehumidifier
- Regularly clean the inside and outside of the dehumidifier to prevent dust from collecting.
- Use a soft, dry cloth to clean both the interior and exterior of the appliance.
- The air outlet can also be cleaned with a dry, soft cloth.
Cleaning the water tank
- Clean the water tank every day to keep it clean.
- Switch off the dehumidifier and unplug from the electrical outlet.
- Remove the water tank from the dehumidifier
- Fill the water tank for 1/3 with water
- Add some mild washing-up liquid to the water in the water tank.
- Wash the water tank under running tap water and clean the insides of it with a soft clean cloth
- Wipe the outside of the water tank dry with a clean cloth
- Put the water tank back into the dehumidifier
Cleaning the pre-filter
- Clean the pre-filter when F0 is displayed on the screen.
- Switch off the dehumidifier and unplug from the electrical outlet. 2 Hold the dehumidifier and pull the top part of the rear cover towards you
- Detach the pre-filter from the appliance (fig.€).
- If the pre-filter is very dirty, use a soft brush to brush away the dust. Wash the pre-filter under running tap water
- Allow the pre-filter to air dry thoroughly before placing back in the dehumidifier.
- To optimize the lifetime of the pre-filter, make sure it dries completely after cleaning.
- Wash your hands after handling the filter
- Put the pre-filter back into the appliance (fig.‚).
- Reattach the rear panel by pressing the bottom part of the rear panel onto the appliance first (1). Then, gently push the panel against the body of the appliance (2) (fig.g).
- Put the plug of the dehumidifier in the wall outlet.
- Touch and hold the timer button for 3 seconds to reset the pre-filter.
- Wash your hands thoroughly after cleaning the filter.
Cleaning the air quality Sensor
- Clean the air quality sensor every
- month for optimal functioning of the dehumidifier.
- If the humidity level in the room is very high, condensation may develop on the air quality sensor and the air quality light may indicate a more poor air quality even though the air quality is actually good. If this occurs, clean the air quality sensor or use the dehumidifier on a manual speed setting.
- If the dehumidifier is used in a dusty environment, it may need to be cleaned more often.
- Switch off the dehumidifier and unplug from the wall outlet.
- Clean the air quality sensor inlet and outlet with a soft brush
- Remove the air quality sensor cover
- Clean the air quality sensor, the dust inlet, and the dust outlet with a damp cotton swab (fig.…).
- Dry all parts thoroughly with a dry cotton swab.
- Reattach the air quality sensor cover
Replacing the
HEPA filter replacement indicator
This dehumidifier is equipped with a HEPA filter replacement indicator to make sure that the air filter is in optimal condition when the dehumidifier is operating. When the HEPA filter needs to be replaced, the filter replacement alert displays on the screen. If the HEPA filter is not replaced in 14 days, the dehumidifier will stop operating and automatically lock. You need to replace the HEPA filter immediately.
Replacing the HEPA filter
- The HEPA filter is not washable nor reusable.
- Always turn off the dehumidifier and unplug from the electrical outlet before replacing the HEPA filter.
- Do not clean the HEPA filter with a vacuum.
- Replace the HEPA filter when A5 and display it on the screen.
- Switch off the dehumidifier and unplug from the wall outlet.
- 2 Take out the used HEPA filter according to the filter alert light status displayed on the screen.
- Discard used filters
- Do not touch the pleated filter surface, or smell the filters as they have collected pollutants from the air.
- Remove all packaging material from the new HEPA filter (fig.e).
- Place the new HEPA filter into the appliance
- Put the plug of the dehumidifier into a wall outlet.
- Touch and hold the timer button for 3 seconds to reset the HEPA filter lifetime counter.
- Wash your hands thoroughly after changing the HEPA filter.
Storage
- Turn off the dehumidifier and unplug from the wall outlet.
- Clean the dehumidifier, air quality sensor, empty the water tank and wash the pre-filter (see chapter ‘Cleaning’).
- Let all parts dry thoroughly before storing.
- Wrap the filter and pre-filter separately in airtight plastic bags.
- Store the dehumidifier, filters, and pre-filter in a cool, dry location.
- Always thoroughly wash your hands after handling filters.
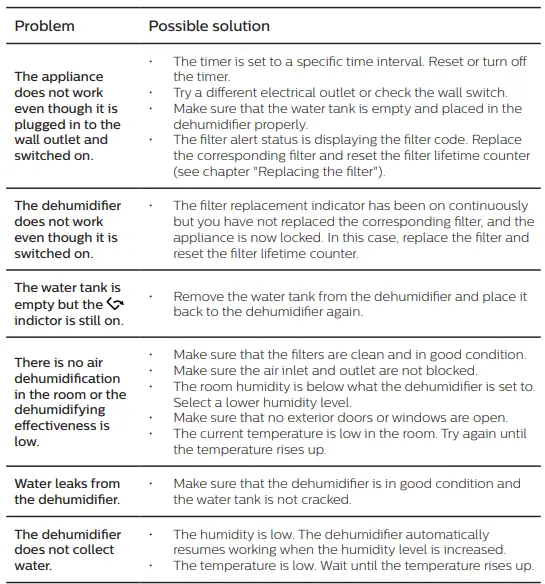
Troubleshooting
This chapter summarizes the most common problems you could encounter with the dehumidifier. If you are unable to solve the problem with the information below, visit www.philips.com/support or contact the Consumer Care Center in your country for assistance.
Guarantee and Service
If you need information or if you have a problem, please visit the Philips website at www.philips.com or contact the Philips Consumer Care Center in your country (you can find its phone number in the worldwide guarantee leaflet). If there is no Consumer Care Center in your country, go to your local Philips dealer.
Order parts or accessories
If you have to replace a part or want to purchase an additional part, go to your Philips dealer or visit www.philips.com/ support. If you have problems obtaining the parts, please contact the Philips Consumer Care Center in your country (you can find its phone number in the worldwide guarantee leaflet).
Notices
Electromagnetic fields (EMF)
This Philips appliance complies with all applicable standards and regulations regarding exposure to electromagnetic fields.
Compliance with EMF
Philips Domestic Appliances Holding B.V. manufactures and sells many products targeted at consumers, which, like any electronic apparatus, in general, have the ability to emit and receive electromagnetic signals. One of Philips’ leading Business Principles is to take all necessary health and safety measures for our products, to comply with all applicable legal requirements, and to stay well within the EMF standards applicable at the time of producing the products. Philips is committed to developing, producing, and marketing products that cause no adverse health effects. Philips confirms that if its products are handled properly for their intended use, they are safe to use according to scientific evidence available today. Philips plays an active role in the development of international EMF and safety standards, enabling Philips to anticipate further developments in standardization for early integration in its products.
Recycling
Do not throw away the product with the normal household waste at the end of its life, but hand it in at an official collection point for recycling. By doing this, you help to preserve the environment.