PHILIPS Steam generator iron PerfectCare
Elite Plus User Manual

IMPORTANT: Perform descaling regularly for great steam and prolonged life.
Introduction
This iron has been approved by The Woolmark Company Pty Ltd for the ironing of wool only products provided that the garments are ironed according to the instructions on the garment label and those issued by the manufacturer of this iron. R1703. The Woolmark symbol is a certification mark in many countries.
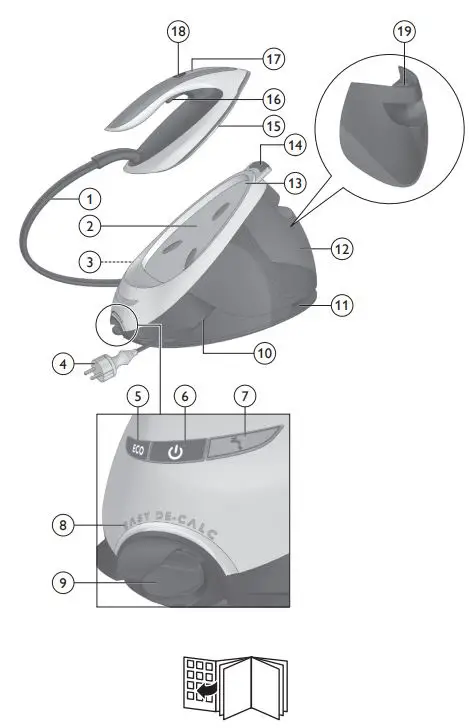
Product overview (Fig. 1)
- Steam supply hose
- Iron platform
- First supply hose storage compartment
- Mains cord with plug
- ECO button with light
- On/off button with light and MAX setting
- `Water tank empty’ light
- EASY DE-CALC light
- EASY DE-CALC knob
- Cord storage compartment
- Second supply hose storage compartment
- Detachable water tank
- Carry lock
- Carry lock release button
- Soleplate
- Steam trigger
- `Iron ready’ light
- Intelligent automatic steam button with light
- Filling hole
Important
Read the separate important information leaflet and the user manual carefully before you use the appliance. Save both documents for future reference.
Using your appliance
Optimal TEMP technology
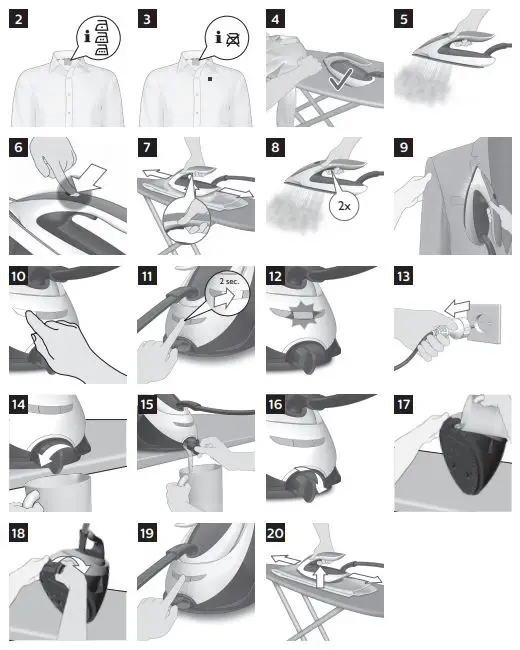
The Optimal TEMP technology enables you to iron all types of ironable fabrics, in any order, without adjusting the iron temperature setting. Fabrics with these symbols are ironable, for example, linen, cotton, polyester, silk, wool, viscose, and rayon (Fig. 2).
Fabrics with this symbol are not ironable. These fabrics include synthetic fabrics such as Spandex or elastane, Spandex-mixed fabrics, and polyolefins (e.g. polypropylene), but also prints on garments (Fig. 3). During ironing, you can place the iron either on the iron platform or horizontally on the ironing board. Thanks to the Optimal TEMP technology, the soleplate will not damage the ironing board cover (Fig. 4).
Ironing
Read this user manual, the important information leaflet, and the quick start guide carefully before you use the appliance. Save them for future reference.
(1) Press and hold the steam trigger to start ironing (Fig. 5).
Note: For best results on tough fabrics such as cotton, linen and jeans, keep the steam trigger pressed continuously when you move the iron over the fabric. Then move the iron over the same area a few more times without steam to dry the fabric.
Note: For the best results on silk and shiny synthetic fabrics, it is recommended to keep the steam trigger pressed continuously while ironing.
DynamiQ sensor and intelligent automatic steam mode
The intelligent DynamiQ sensor inside your iron knows exactly when and how your iron is moving. When you activate the intelligent automatic steam mode, the DynamiQ sensor will start recognizing the movements of your iron and will enable your iron to release the right amount of steam automatically without you having to press the steam trigger. This will help you to get great results faster and easier.
- To activate the intelligent automatic steam mode, press the intelligent automatic steam button on top of the iron handle. The intelligent automatic steam light turns on (Fig. 6).
- The `iron ready’ light moves back and forth when the iron is moving.
Note: in intelligent automatic steam mode, steam comes out automatically when you move the iron and stops when you stop moving the iron (Fig. 7). You can still press the steam trigger in this mode to activate the steam when the iron is not moving.
- You can use the intelligent automatic steam mode in all steam settings, including ECO and MAX.
Note: for your safety, in intelligent automatic steam mode, the steam stops when the soleplate is tilted.
- To exit the intelligent automatic steam mode, press the intelligent automatic steam button. The intelligent automatic steam light turns off. You need to press the steam trigger to continue your ironing.
Steam boost function
The steam boost function is designed to help tackle difficult creases.
– Press the steam trigger twice quickly to activate the steam boost function. The appliance releases 3 powerful shots of steam (Fig. 8).
Vertical ironing
Hot steam is emitted from the iron. Never attempt to remove creases from a garment that someone is wearing. Do not apply steam near your or someone else’s hand. You can use the iron in a vertical position to remove wrinkles from hanging fabrics.
(1) Hold the iron in a vertical position, press the steam trigger and touch the garment slightly with the soleplate (Fig. 9).
Note: for your safety, the intelligent automatic steam mode is not available for vertical ironing.
By using the ECO setting (reduced amount of steam), you can save energy without compromising on the ironing result.
– Press the ECO button. The green ECO light turns on (Fig. 10).
– To deactivate the ECO setting, press the ECO button again. The green ECO light goes off.
MAX setting
For faster ironing and a higher amount of steam, you can use the MAX setting.
- Press and hold the on/off button for 2 seconds until the light turns white (Fig. 11).
- To deactivate the MAX setting, press and hold the on/off button again for 2 seconds until the white light turns blue
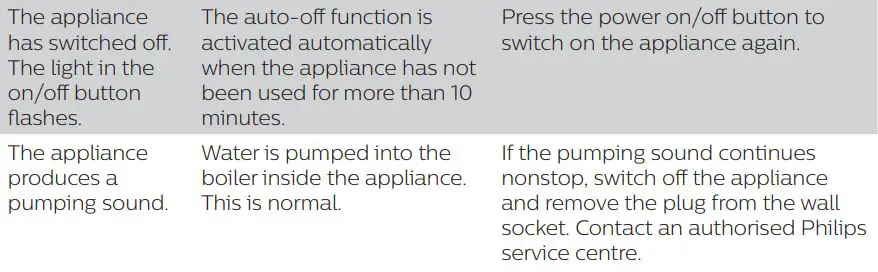
Auto shut-off
– The appliances enter the standby mode if it has not been used for 10 minutes. The light in the on/ off button starts to flash (Fig. 12).
– To activate the appliance again, press the on/off button. The appliance starts to heat up again.
– The appliance switches off automatically if it has not been used for another 10 minutes after it enters the standby mode. The light in the on/off button goes off.
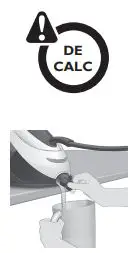
IMPORTANT – EASY DE-CALC
It is very important to use the EASY DE-CALC function as soon as the EASY DE-CALC light starts to flash and the appliance beeps continuously.
The EASY DE-CALC light flashes and the appliance beeps continuously after about a month or 10 ironing sessions to indicate that the appliance needs to be descaled. Perform the following EASY DE-CALC procedure before you continue ironing.
To avoid the risk of burns, unplug the appliance and let it cool down for at least two hours before you perform the EASY DE-CALC procedure.
- Remove the plug from the wall socket (Fig. 13).
- Place the appliance on the edge of the tabletop.
- Hold a cup (with a capacity of at least 350ml) under the EASY DE-CALC knob and turn the knob anticlockwise (Fig. 14).
- Remove the EASY DE-CALC knob and let the water with scale particles flow into the cup (Fig. 15).
- When no more water comes out of the appliance, reinsert the EASY DE-CALC knob and turn it clockwise to fasten it (Fig. 16).
- You can continue using your iron immediately after completing the EASY DE-CALC procedure.
IMPORTANT Descaling the soleplate
If you do not use the EASY DE-CALC function regularly, scale particles may build up in the soleplate and brown stains may come out of the soleplate during ironing. In this situation, you need to descale the soleplate by following the procedure below. We advise you to repeat the procedure twice to better clean the soleplate.
To avoid the risk of burns, unplug the appliance and let it cool down for at least two hours before you descale the soleplate.
- Remove the plug from the wall socket (Fig. 13).
- Place the appliance on the edge of the tabletop.
- Make sure that the water tank is empty.
- Hold a cup (with a capacity of at least 350ml) under the EASY DE-CALC knob and turn the knob anticlockwise (Fig. 14).
- Remove the EASY DE-CALC knob and let the water with scale particles flow into the cup (Fig. 15).
- Hold the appliance in the position that the EASY DE-CALC opening is facing up and pour 900ml distilled water into the opening (Fig. 17).
Note: Be mindful of the heavyweight of the appliance when you tilt it. - Keep the EASY DE-CALC opening facing up, reinsert the EASY DE-CALC knob, and turn it clockwise to fasten it (Fig. 18).
- Put the appliance back on a stable and even surface. Plugin the appliance and switch it on (Fig. 19).
- Wait for 5 minutes for the appliance to heat up.
- Keep the steam trigger pressed continuously while you move the iron on a piece of thick cloth for 3 minutes (Fig. 20).
Warning: hot, dirty water comes out of the soleplate. - Stop moving the iron when no more water comes out or when steam starts coming out.
- You can continue to use the appliance immediately. Otherwise, unplug the appliance after the descaling is completed.
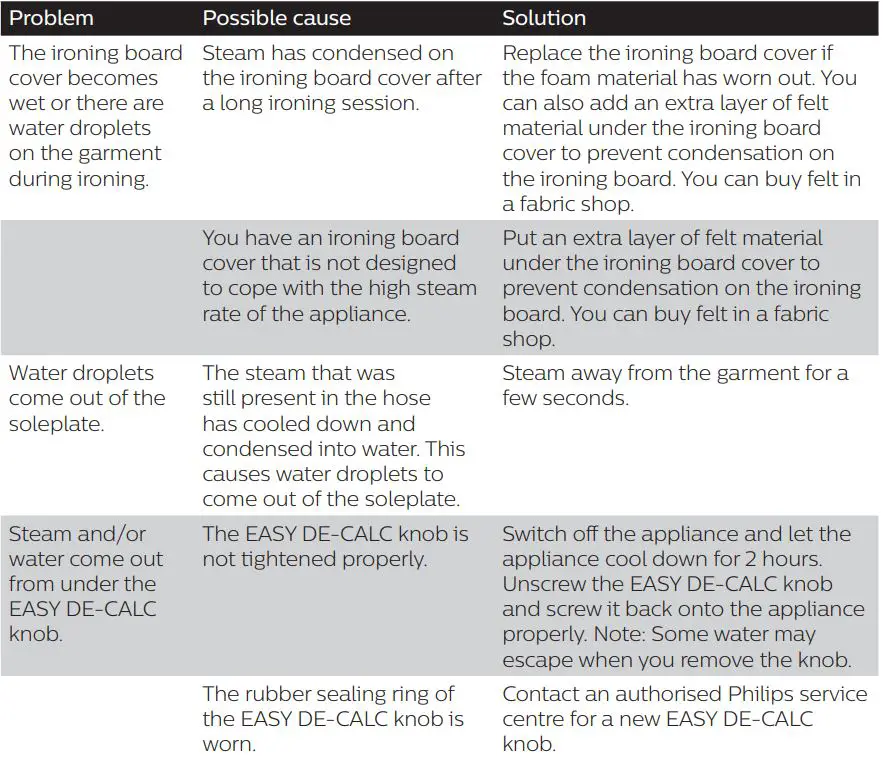
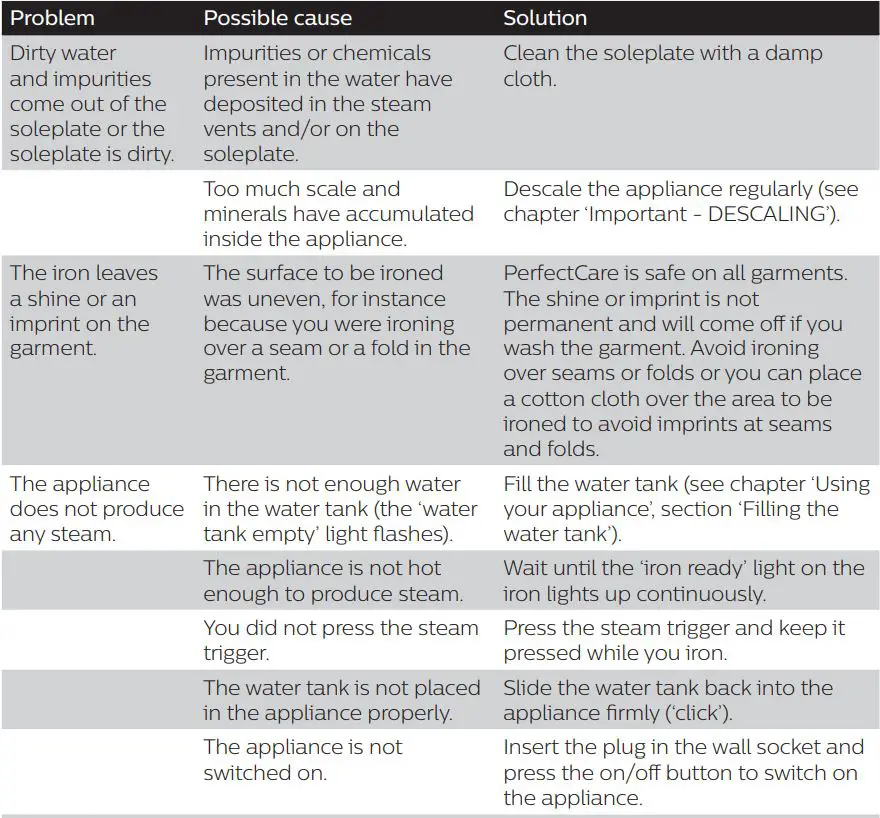
Troubleshooting
This chapter summarises the most common problems you could encounter with the appliance. If you are unable to solve the problem with the information below, visit www.philips.com/support for a list of frequently asked questions or contact the Consumer Care Centre in your country.
![]()
![]()