![]()
© 2020 Koninklijke Philips N.V.
All rights reserved
xxxx.yyy.zzzz.a (3/2/2020)
![]()
 |
 |
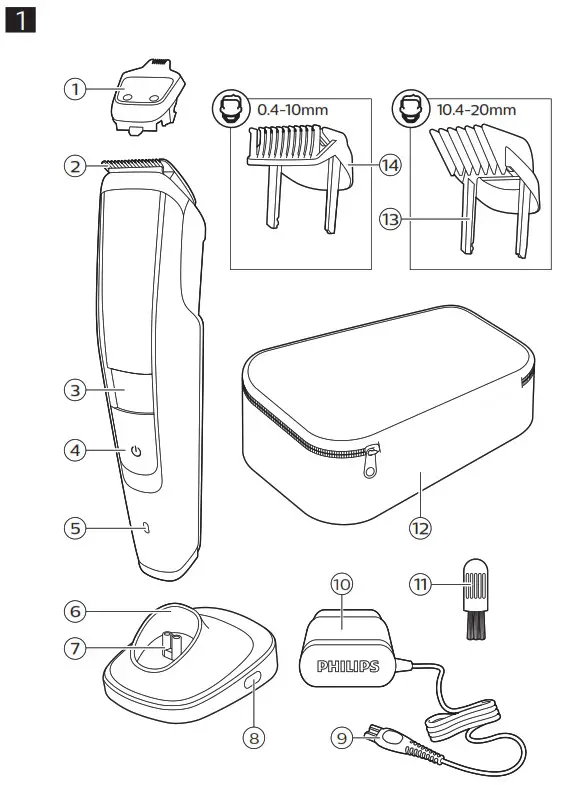
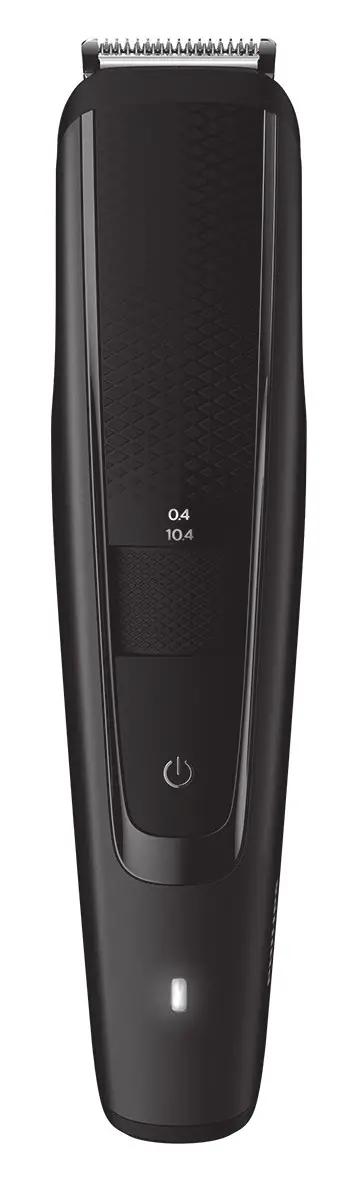
General description (Fig. 1)
| 1. Click-on precision trimmer attachment 2. Cutting unit 3. Length setting zoom wheel 4. On/off button 5. Battery charge indicator 6. Charging stand 7. Plug of charging stand 8. Small plug socket |
9. Small plug 10. Supply unit 11. Cleaning brush 12. Pouch 13. Long beard comb 14. Short beard comb |
Important safety information
Read this important information carefully before you use the appliance and its accessories and save it for future reference. The accessories supplied may vary for different products.
Danger
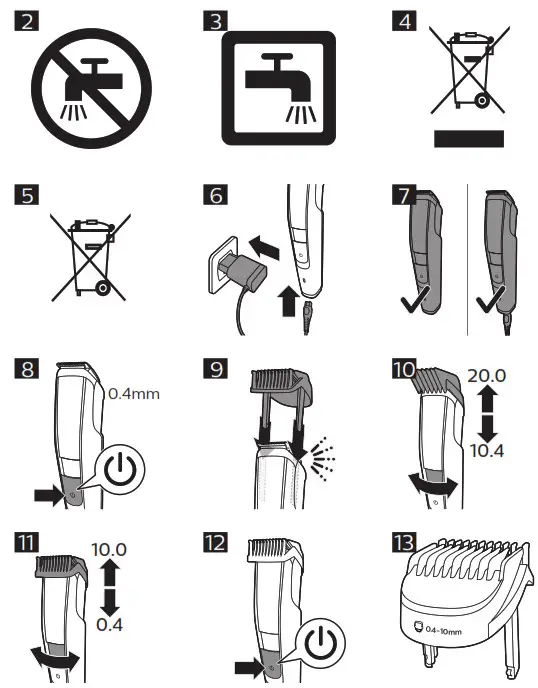
– Keep the supply unit dry (Fig.2).
Warning
– To charge the battery, only use the detachable supply unit (HQ8505) provided with the appliance.
– The supply unit contains a transformer. Do not cut off the supply unit to replace it with another plug, as this causes a hazardous situation.
– This appliance can be used by children aged from 8 years and above and persons with reduced physical, sensory or mental capabilities or lack of experience and knowledge if they have been given supervision or instruction concerning the use of the appliance in a safe way and understand the hazards involved. Children shall not play with the appliance. Cleaning and user maintenance shall not be made by children without supervision.
– Always unplug the appliance before you clean it under the tap.
– Always check the appliance before you use it. Do not use the appliance if it is damaged, as this may cause injury.
Always replace a damaged part with one of the original types.
– This appliance contains
batteries that are nonreplaceable.
– Do not open the appliance to replace the rechargeable battery.
Caution
– Never immerse the charging stand in water and do not rinse it under the tap (Fig. 2).
– Never immerse the appliance in water. Do not use the appliance in the bath or shower.
– Never use water hotter than 60 °C to rinse the appliance.
– Only use this appliance for its intended purpose as shown in the user manual.
– For hygienic reasons, the appliance should only be used by one person.
– Do not use the supply unit in or near wall sockets that contain an electric air freshener to prevent irreparable damage to the supply unit.
– Never use compressed air, scouring pads, abrasive cleaning agents or aggressive liquids such as petrol or acetone to clean the appliance.
Electromagnetic fields (EMF)
This Philips appliance complies with all applicable standards and regulations regarding exposure to electromagnetic fields.
General
– This appliance can be safely cleaned under the tap (Fig. 3).
– The supply unit is suitable for mains voltages ranging from 100 to 240 volts.
– The supply unit transforms 100-240 volts to a safe low voltage of less than 24 volts.
– Maximum noise level: Lc = 69 dB(A)
Introduction
Congratulations on your purchase and welcome to Philips! To fully benefit from the support that Philips offers, register your product at www.philips.com/welcome.
Charging
Battery status indicator
– When the battery is almost empty, the battery charge indicator flashes orange.
– When the appliance is charging, the battery charge indicator flashes white.
– When the appliance is fully charged, the battery charge indicator lights up white continuously.
Note: After approx. 30 minutes, the light goes out automatically.
It takes approximately 1 hour to fully charge the appliance. When it is fully charged, the appliance has a cordless operating time of up to 90 minutes.
- Make sure the appliance is switched off.
- Insert the small plug into the appliance and put the supply unit in the wall socket (Fig. 6).
- After charging, remove the supply unit from the wall socket and pull the small plug out of the appliance.
Using the appliance
– Note: This appliance can be used without a cord or when it is connected to the wall socket (Fig. 7).
Switching the appliance on and off
– Press the on/off button once to switch the appliance on or off (Fig. 8).
Beard trimming
Trimming with comb
Note: When you trim for the first time, start at a length setting that is longer than what you are used to, to familiarize yourself with the appliance.
– The appliance comes with two combs: a long beard comb and a short beard comb.
– Use the trimming comb attached to the cutting element to trim your beard and mustache in your preferred style. Turn the zoom wheel to choose from 20 length settings ranging from 10.4 mm to 20 mm (Fig. 10) (for the long beard comb) and 0.4 mm to 10 mm (Fig. 11) (for the short beard comb). The length settings are mentioned at the back of the combs.
- Make sure the appliance is switched off.
- Slide the comb into the guiding grooves on both sides of the appliance (‘click’) (Fig. 9).
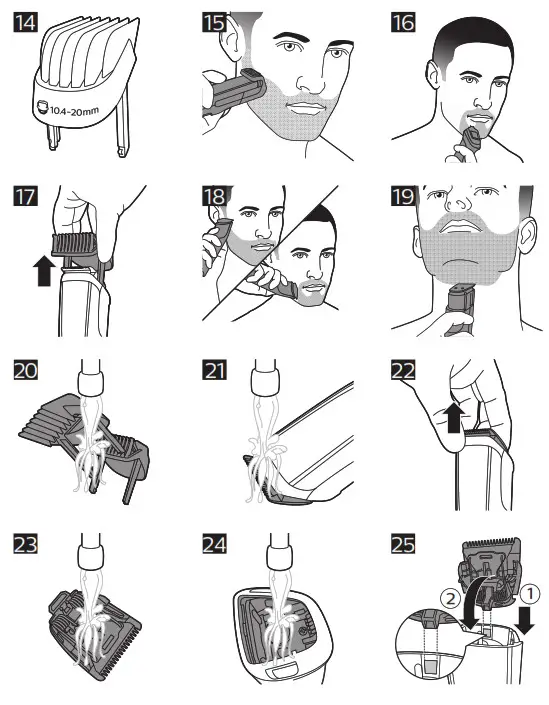
- Turn the zoom wheel to select the desired length setting (Fig. 10). The selected length setting is shown on the front of the appliance. The blue color refers to length settings ranging from 10.4 mm to 20 mm (Fig. 14) and the silver refers to length settings ranging from 0.4 to 10 mm (Fig. 13).
- Switch on the appliance (Fig. 12).
- To trim most effectively, move the appliance against the hair growth direction. Make sure that the surface of the comb always stays in contact with the skin (Fig. 15).
Since all hairs do not grow in the same direction, you may want to try different trimming positions (i.e. upwards, downwards, or across). Practice is best for optimum esults. - If a lot of hair has accumulated in the comb, remove it from the appliance and blow and/or shake out the hairs. Regularly remove cut hair from the comb. The selected hair length setting does not change when the comb is removed.
- Switch off and clean the appliance and attachments after each use.
Trimming without comb
If you trim without the comb, your hair is cut off close to the skin (0.4mm). You can use the trimming head without the comb to:
– Define hairline
– Trim nape of the neck
– Remove single unwanted hairs
- Make sure the product is switched off.
- Pull the comb off the product (Fig. 17).
– Never pull at the flexible top of the comb.
Always pull at the sides. - Turn on the product.
- Make well-controlled movements. Touch the hair lightly with the trimmer.
– For a comfortable trim close to your skin, place the flat side of the trimming head against your skin and make strokes in the desired direction (Fig. 18).
– For contouring, hold the trimming head perpendicular to the skin and move the trimming head upwards or downwards with gentle pressure (Fig. 19). - Turn off and clean the product after each use (see ‘Cleaning’).
Precision trimmer
Use the precision trimmer to create fine lines and contours around your facial style, close to the skin (to a length of 1/32in./0.5mm).
- Hold the precision trimming head perpendicular to the skin and move the trimming head upwards or downwards with gentle pressure (Fig. 16).
Cleaning
Never use scouring pads, abrasive cleaning agents or aggressive liquids such as petrol or acetone to clean the appliance.
Clean the appliance after each use.
- Switch off the appliance and disconnect it from the wall socket.
- Wipe the housing of the appliance with a dry cloth.
- Remove the comb (Fig. 17) and clean it with the cleaning brush and/or rinse it under the tap (Fig. 20).
- Clean the cutting unit with the cleaning brush and/or rinse it under the tap (Fig. 23Fig. 21).
- Carefully shake off excess water and let the appliance air dry completely.
Never dry the trimmer teeth with a towel or tissue, as this may damage the trimmer teeth. - After cleaning, reattach the comb (Fig. 9) to the appliance.
Every 3 months: cleaning trimming head connector
- Turn off the product and disconnect it from the wall outlet.
- Remove the comb (Fig. 17).
- Pull the cutting unit off the appliance (Fig. 22).
- Clean the trimming head connector and hair chamber with the cleaning brush and/or rinse them under the tap (Fig. 24).
- Clean the inside of the trimming head with the cleaning brush and/or rinse it under the tap (Fig. 23).
- Carefully shake off excess water and let all parts dry completely.
- Press the trimming head back on the appliance.
Make sure the projection on the back of the trimming head fits exactly onto the notch in the hair chamber (Fig. 25).
Ordering accessories
To buy accessories or spare parts, visit www.philips.com/parts-and-accessories or go to your Philips dealer. You can also contact the Philips Consumer Care Center in your country (see the international warranty leaflet for contact details).
Storage
– Store the product in the pouch supplied. Make sure the product is dry before you store it in the pouch.
Ordering accessories
To buy accessories or spare parts, visit www.philips.com/parts-and-accessories or go to your Philips dealer. You can also contact the Philips Consumer Care Center in your country (see the international warranty leaflet for contact details).
Recycling
– This symbol means that this product shall not be disposed of with normal household waste (2012/19/EU) (Fig. 4).
– This symbol means that this product contains a built-in rechargeable battery which shall not be disposed of with normal household waste (Fig. 5) (2006/66/EC). Please take your product to an official collection point or a Philips service center to have a professional remove the rechargeable battery.
– Follow your country’s rules for the separate collection of electrical and electronic products and rechargeable batteries. Correct disposal helps prevent negative consequences for the environment and human health.
Removing the rechargeable battery
Only remove the rechargeable battery when you discard the product. Before you remove the battery, make sure that the product is disconnected from the wall socket and that the battery is completely empty.
Take any necessary safety precautions when you handle tools to open the product and when you dispose of the rechargeable battery.
- Take the comb and the cutting element from the handle and remove the deco panel above the zoom wheel by using a flathead screwdriver.
- Remove one screw above the zoom wheel and one screw on the bottom of the appliance.
- Remove the frame by placing the flathead screwdriver on the top.
- Remove two screws from the front top of the appliance.
- Insert the screwdriver in-between the zoom wheel and the front shell and twist the screwdriver to release the click. Do this on both sides.
- Remove two screws on the top of the appliance.
- Take out the inner body and slide off the motor cover and zoom wheel construction.
- Break six clicks with a flathead screwdriver and lift the cover with a flat head screwdriver.
- Take out the circuit board with a flathead screwdriver.
- Break the battery tags and remove the batteries.
Warning: The battery tags can be very sharp.
Warranty and support
If you need information or support, please visit
www.philips.com/support or read the international warranty leaflet. Warranty restrictions Cutting units are not covered by the terms of the international warranty because they are subject to wear.