Important: Do not make any adjustments and modifications that are not described in this manual. Follow all safety instructions to ensure proper operation of the device. The manufacturer assumes no liability for damages resulting from non-compliance with the safety instructions
Safety instructions
- Protect the device from rain and liquids to prevent damage to the device or a short circuit.
- Do not expose the device to excessive heat caused by placing it on a heating device or in direct sunlight.
- Protect the cables from damage by being trapped, particularly at the plugs and where cables exit the housing.
- Do not perform any maintenance operations that are not described in this user manual. Do not disassemble the device into its component parts to carry out repairs. The device may only be repaired in authorized service centers.
- All wireless devices may be susceptible to interference, which could affect performance.
- Back up your data and recordings. The manufacturer’s warranty does not cover loss of data resulting from user actions
Rechargeable built-in battery
- This device contains a built-in Li-polymer battery which should not be replaced by the customer. The battery may only be replaced in authorized service centers or by an authorized Philips partner for dictation equipment.
- Batteries contain substances that may pollute the environment. Used batteries should be disposed of at an official collection point
Data reset
Philips VoiceTracer has an internal memory with 8 GB built-in storage. If you want to perform a factory data reset, observe the following cautions:
- Back up your data and recordings. Performing a factory data reset will delete all data on your device.
- Formatting the memory on a computer may cause incompatibilities with your device. Format the memory only on the device.
Hearing protection
Observe the following guidelines when you use headphones:
- Set the volume to a moderate level and don’t use headphones to listen for excessively long periods of time.
- Be particularly careful to avoid adjusting the volume to a level that your hearing can’t deal with.
- Don’t turn the volume up so high that you can’t hear what is going on around you.
- In potentially dangerous situations, be particularly careful or temporarily discontinue use.
- Don’t use headphones while you are operating a motorized vehicle, cycling, skateboarding, and so on. You could be a hazard to yourself and other road users, and possibly be breaking the law
Small children
Your device and its enhancements may contain small parts. Keep them out of the reach of small children.
Legal restrictions on recording
- The use of the device’s recording function is subject to the legal restrictions that may apply in your country. You should also respect the privacy and personal rights of third parties if you record talks or lectures.
- If you want to record telephone calls, check if this is legal in your country. In certain countries, you may be legally required to inform the person you are conversing with on the telephone that you are recording the conversation.
Cleaning and disinfection
Before cleaning, disconnect all cables from the device.
- To clean the device, use a soft dry cloth.
- To disinfect the device, use products for disinfection of surfaces in clinical areas and patient care equipment, such as surface disinfectant wipes.
- Do not use harsh chemicals or strong detergents.
- Avoid getting moisture in openings.
- Do not rub or strike the surface with anything hard or sharp as this may scratch or damage the surface permanently.
Disposal of your old product
Europe
A crossed-out wheeled bin symbol attached to a product indicates that the product is covered by the European Directive 2011/65/EU. Please get informed about the local separate collection system for electrical and electronic products. Please act according to your local rules and don’t dispose of your old products with your normal household waste. Correct disposal of your old product helps to prevent potential negative consequences for the environment and human health.
United States
Rechargeable Li-ion battery:
- Your product is designed and manufactured with high quality materials and components, which can be recycled and reused. For recycling information, please contact your local waste management facilities or visit www.recycle.philips.com.
- This appliance contains a rechargeable lithium-ion battery which must be disposed of properly.
- Contact your local town or city officials for battery disposal information. You can also call 1-800-822-8837 or visit www.call2recycle.org for battery drop-off locations.
- For assistance, visit our website www.philips.com/support or call 1-800-243-3050 toll free
Rechargeable NiMH battery:
• Your product is designed and manufactured with high quality materials and components, which can be recycled and reused. For recycling information, please contact your local waste management facilities or visit www.recycle.philips.com.
• This appliance contains a rechargeable NiMH battery which must be disposed of properly.
• Contact your local town or city officials for battery disposal information. You can also call 1-800-822-8837 or visit www.call2recycle.org for battery drop-off locations.
• For assistance, visit our website www.philips.com/support or call 1-800-243-3050 toll free.
Canada
Rechargeable Li-ion battery:
• Your product is designed and manufactured with high quality materials and components, which can be recycled and reused. For recycling information, please contact your local waste management facilities or visit www.recycle.philips.com.
• This appliance contains a rechargeable lithium-ion battery which must be disposed of properly.
• Contact your local town or city officials for battery disposal information. You can also call 888-224-9764 or visit www.call2recycle.ca for battery drop-off locations.
• For assistance, visit our website www.philips.com/ support or call 1-800-243-7884 toll free.
Rechargeable NiMH battery:
• Your product is designed and manufactured with high quality materials and components, which can be recycled and reused. For recycling information, please contact your local waste management facilities or visit www.recycle.philips.com.
• This appliance contains a rechargeable NiMH battery which must be disposed of properly.
• Contact your local town or city officials for battery disposal information.
• You can also call 888-224-9764 or visit www.call2recycle.ca for battery drop-off locations.
• For assistance, visit our website www.philips.com/support or call 1-800-243-7884 toll free
About this user manual
Find a quick overview of your device on the next pages. For detailed description, see the following chapters of this user manual. Read the instructions carefully
Symbols used:
Tip: This symbol identifies information that helps you to use your device more efficiently and simply
Note: This symbol indicates notices which you should observe when handling or operating the device.
Caution: This symbol warns of damage to the device and possible data loss. Damage can be caused by improper handling.
Your Voice Tracer audio recorder
We are delighted that you have chosen a Philips device. Visit our website for comprehensive support, such as user manuals, software downloads, warranty information and more: www.philips.com/dictation.
Product highlights
Superior recording quality
- Audio scenes
- Voice-activated recording
- MP3 and PCM recording
- Large color display
- 8 GB internal memory
- Long-lasting battery
What’s in the box
Overview of your audio recorder
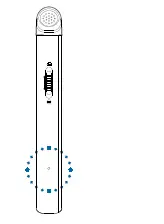
- Microphone
- Record/Status LED
- Display
- Left function button
- Middle function button
- Right function button
- Up button
- Backward button
- Record button
- Down button
- Forward button
- File list/Back button
- Play/Stop button
- Power/Lock switch
- Reset button
- Headphones jack
- Speaker
- USB Type-C port
- Eye for wrist strap
Get started
Caution: Before you connect your VoiceTracer, first read the safety instructions (see Safety instructions).
Charging the battery
Charge the built-in battery before you use the device for the first time or if you haven’t used it for an extended time period. If the battery is completely discharged and your device turns off, allow the battery to charge for a while before you turn on the device.
Note:
- A complete charging cycle takes about 3 hours.
- Before you charge the battery via computer, make sure that your computer is turned on.
- While the device is connected to a computer, it can’t be operated manually.
- When the low battery icon is displayed, charge the device promptly.
- If you charge your device via computer instead of using a power supply unit, the charging speed might slow down due to a lower charging current. For fast charging, use a USB power supply unit (not included).
A charging battery icon appears on the screen and the Record/Status LED flashes orange for a few seconds.
Turn the device on and off
To turn the device on or off:
- Slide and hold the Power switch on the right side of the device downwards for three seconds

Key lock
You can lock your device when it’s active to prevent any unwanted device operations or access.
To lock the device:
- Slide the Power switch on the right side of the device upwards towards the lock symbol. X The lock symbol appears on the screen for a moment. X All buttons are locked now.
To unlock the device: - Slide the Power switch downwards. X The unlock symbol appears on the screen for a moment
Connect to a computer
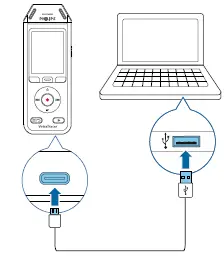
You can use your recorder as a USB mass storage to conveniently store, back up and move files. Link the device to a computer with a USB cable. Your recorder will automatically be recognized as a mass storage device. You don’t need to install any software. For more information on how to connect your device to a computer, see the illustration in Charging the battery
Caution
- Don’t disconnect the USB cable from the device while you are transferring files. This might cause data loss.
Note - While the device is connected to a computer, it can’t be operated manually
Set the date and time
You can always change the date and time as well as the time format on your device.
- In stop mode, press the Right function button to open the settings panel.
- Press the Record button to select All settings.
- Press the Right function button to enter the Device settings.
- Press the Down button to navigate to Date & time and then press the Record button to confirm.
- Press the Up/Down buttons to navigate to your desired setting Date, Date format, and Time. Use the Forward and Backward buttons to change your desired setting.
- Press the Record button to confirm your settings.
- Press the Back button to return to the stop mode screen
Set the device language
You can always change the language of your device.
- In stop mode, press the Right function button to open the settings panel.
- Press the Record button to select All settings.
- Press the Right function button to enter the Device settings.
- Press the Record button to select Language.
- Press the Up/Down buttons to navigate to your desired language, and then press the Record button to confirm your selection.
- Press the Back button to return to the stop mode screen
Recording
Record a file
Note:
- Be careful not to cover the microphones while recording. This might result in a lower recording quality.
- If the recording time of your current recording exceeds the available storage capacity, the recording will stop. In this case, delete files from your device to make more storage available. Before you start recording:
- Make sure your device has enough battery power left. When your battery is almost discharged, you will see a battery low icon . X The device will turn off and your current recording will automatically be saved.
- First select the folder you want your recording to be saved in. For more information, see Start a new recording. You can store 100 files in each of the folders A, B, C, and D. If one of the folders is full, your subsequent recordings will automatically be stored in the next folder.
- We recommend that you make a test recording in order to find the most suitable presets for your recording and achieve the best recording results.
Start a new recording
- In stop mode, press the Left function button to start a new recording. The new file mode screen is displayed.
- Press the Right function button to open the settings panel .
To select a folder for your recording to be saved in: Press the Up/Down buttons to navigate to Folder and then press the Record button to confirm your selection. Press the Up/Down buttons to navigate to the folder you want your new recording to be saved in and then press the Record button to confirm your selection.. To return to the stop mode screen, press the Back button.
To adjust the settings for your recording: Press the Up/Down buttons to navigate to your desired setting and then press the Record button to confirm your selection. To return to the stop mode screen, press the Back button.
3. Press the Record button to start recording. The recording screen is displayed. The Record/Status LED illuminates red.
4. Press the Record button again to stop recording. The recording is saved to the preselected folder.
Edit a file
You can edit existing recordings in stop mode by appending or overwriting a recording.
Append: Add additional recording parts at the end of an existing recording.
Overwrite: Overwrite an existing recording part starting from any point within the recording.
To append a recording part: In stop mode of an existing file, press the Record button.
- If the cursor of the audio progress bar is at the end of the recording: The recording screen is displayed and a new recording part is added at the end of your file.
- If the cursor of the audio progress bar is at the beginning of the recording: The editing panel opens. Press the Up/Down buttons to select Append and then press the Record button to confirm your selection. The recording screen is displayed and new recording part is added at the end of your file. To overwrite a recording part:
In playback mode, press the Play/Stop button to stop playback at your desired part.
- Press the Record button. The editing panel opens.
- Press the Up/Down buttons to select Overwrite and then press the Record button to confirm your selection. The recording screen is displayed and a new recording starts from where you stopped playback.
Tip: If you always want to either append or overwrite a recording part and don’t want the editing panel to open each time, press the Right function button to open the settings panel . Press the Down button to navigate to Edit mode and then select Append or Overwrite.
Playback
Play back files
Note: If you have connected headphones to your VoiceTracer, the built-in speakers are disabled
Start and stop playback
- In stop mode, press the Previous track or Next track button to navigate to your desired recording. To start playback, press the Play/Stop button. The Record/Play indicator illuminates green. Alternatively, press the File list button and then press the Up/Down buttons to navigate to your desired recording. To start playback, press the Play/Stop button.
- To adjust the volume, press the Up/Down buttons.
- To stop playback, press the Play/Stop button.
- To continue playback, press the Play/Stop button again.
Fast rewind or fast forward
In playback mode or stop mode, press and hold the Backward or Forward button to jump to the desired part of the recording. Release the switch when you have reached your desired playback part.
Note: If you have set bookmarks and press the Backward or Forward button shortly, the audio progress indicator will jump to the next or previous bookmark. If you have not set bookmarks and press the Backward or Forward button shortly, you will jump to the previous or next file.
Play back files from a selected folder:
- In stop mode, press the File list button. All voice recordings are displayed.
- Press the Left function button to open the folder panel.
- Press the Up/Down buttons to navigate to your desired folder and then press the Record button to confirm your selection. Only the files in the selected folder are displayed now.
Delete files
You can delete individual files from your device.
- In stop mode or playback mode, press the Right function button to open the settings panel.
- Press the Up/Down buttons to navigate to Delete and then press the Record button to confirm your selection
Settings
Settings mode
In the settings mode, you can change and adjust various settings according to your own preferences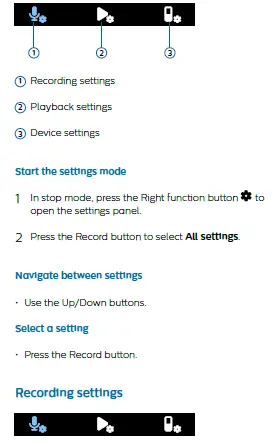 Scene
Scene
Select a scene according to specific recording situations, e.g. a lecture or an interview. Every scene has predefined settings, such as the format or the microphone sensitivity, that cannot be changed. If you would like to change the settings of a scene, you need to select the scene Custom where you can define each setting according to your own preferences
Format
Select the format of your recording according to specific recording situations.
Mic sensitivity
Adjust the microphone sensitivity of your VoiceTracer. Select the sensitivity according to the background noise, number of recorded sound sources and distance between sound source and microphones.
Limiter
Activate this function to prevent recordings from being oversteered by sound input over the maximum sound level. If the recording suddenly exceeds the maximum sound level, the microphone sensitivity is automatically reduced.
Noise cut
Turn the Noise cut feature on in order to reduce background noise while recording. This way, especially audio recordings sound clearer.
Wind filter
Activate the wind filter to reduce wind noise when you are recording in a very windy environment.
Folder
Select the folder you want your recording to be saved in.
Voice activation
Use voice activation to start recording when you begin speaking. When you stop speaking, the device will automatically pause recording after three seconds of silence. It will resume only when you begin speaking
Edit mode
Select what should happen when you edit a recording.
Pre-recording
When the pre-recording function is enabled, the device will start recording some seconds prior to the event.
Timer
Use the timer function to automatically start recording on a preset date and at a preset time. You can also select when the recording should stop again.
Auto divide
During recording, the auto divide feature will automatically split the current recording and save a new file every 15, 30 or 60 minutes.
Auto bookmark
Use the Auto bookmark funktion to automatically set bookmarks at preset time intervals.
External input
Choose between various input sources to guarantee the best recording quality for specific recording situations.
Playback settings
Play mode
Choose between various playback options.
Equalizer
Choose between the equalizer music options Classical, Jazz, Pop, or Rock.
ClearVoice
Activate the ClearVoice function for better playback quality. Dynamic emphasis on quiet passages improves the intelligibility of quiet voices
Device settings
Language
Select your desired device language from the language list. You can change the language whenever you want.
Brightness
Adjust the brightness of your screen acccording to your own requirements.
Backlight
To save your VoiceTracer’s battery power, you can reduce the backlight time. If you don’t operate your device for the preset time, the backlight turns off automatically.
Date & time
You can always change the system date and time on your device. Use the Backward, Forward, Up, and Down buttons to set the date and time.
Recording light
If you turn on the recording light, the Record/Status LED will illuminate red when recording.
Auto Off
Select a time for your device to automatically turn off when you don’t operate it.
Device sounds
Select if you want the device sounds, such as key tone and power on/off sound, to be turned on or off.
Format storage
Use this function to format your device’s internal storage and delete all data. For more information, see Reset data.
Reset settings
You can reset your menu settings to their default state—the way they were when you first purchased your device and turned it on. For more information, see Reset settings.
Information
See various information about your device, such as the available memory space or the firmware version.
Device and data management
Transfer data to the computer
You can quickly and conveniently move files from your VoiceTracer to your computer. Link the device to a computer with a USB cable. Your recorder will automatically be recognized as a mass storage device. You don’t need to install any software. For more information on how to connect your device to a computer, see the illustration in Charging the battery
Caution: Don’t disconnect the USB cable from the device while you are transferring files. This might cause data loss.
Note: While the device is connected to a computer, it can’t be operated manually
Transfer data from VoiceTracer to the computer
- Connect the device to the computer via the supplied USB cable. A charging battery icon appears on the screen and the Record/Status LED flashes orange for a few seconds.
- Open Windows Explorer on a Windows computer, or open Finder on a Mac computer. Your VoiceTracer is recognized as an external drive.
- Double-click the VoiceTracer drive. The content of your VoiceTracer is displayed in a new window.
- Select the desired files from one of the folders and copy, cut or drag them to the desired location on your computer.
Reset your device and data
Device reset
If you should encounter problems with your device software, for example, the software freezes, the device works slowly or apps don’t respond, you can reset your device and restart it.
- Press and hold the reset button on the right side of your device by using a small, pointed object, for example, a paper clip.
- To restart the device, slide and hold the Power switch on the right side of the device downwards for three seconds.
Reset data
You can format your device’s internal storage and delete all data from your device.
Caution
- Formatting your VoiceTracer will delete all data on your device. Before you perform a data reset, back up any important data saved on your device.
Note - Your menu settings won’t be deleted and are still available after resetting the data.
To reset your data:
- In stop mode, press the Right function button to open the settings panel.
- Press the Record button to select All settings.
- Press the Right function button to enter the Device settings.
- Use the Up/Down buttons to navigate to Format storage and then press the Record button to confirm your selection.
- Select Delete. All data is deleted from the internal storage
Reset settings
You can reset your menu settings to their default state— the way they were when you first purchased your device and turned it on.
Caution: Resetting your menu settings will delete all settings you have made on your device. After a reset, you will have to adjust all settings again.
Note: Your data won’t be deleted and is still available after resetting the menu settings.
To reset your settings:
- In stop mode, press the Right function button to open the settings panel.
- Press the Record button to select All settings.
- Press the Right function button to enter the Device settings.
- Use the Up/Down buttons to navigate to Reset settings and then press the Record button to confirm your selection.
- Select Reset. All settings on your device are reset to their default state.
Updating your device
Your device is controlled by an internal program called firmware. As a part of ongoing product maintenance, the firmware is upgraded and errors are corrected. It is possible that a newer version (an ‘update’) of the firmware has been released since you purchased the device. In this case, you can easily update your device to the latest version.
Caution
- Before you update the firmware, make sure that your device has at least 30% battery power left. This helps to prevent the power supply being interrupted during the update.
- Don’t disconnect the USB cable from the device while you are transferring files. This might cause data loss.
Note: To find out about new firmware versions, regularly check the product website for your model at www.voicetracer.com/help.
Update your VoiceTracer
- Connect the device to the computer via the supplied USB cable. A charging battery icon appears on the screen and the Record/Status LED flashes orange for a few seconds.
- Download the firmware update file for your model from the product website www.voicetracer.com/help.
- Open Windows Explorer on a Windows computer, or open Finder on a Mac computer.
- Double-click the VoiceTracer drive. The content of your VoiceTracer is displayed in a new window.
- Copy the firmware update file to the root directory of the device. During this process, the Record/Status LED flashes orange. When the process is complete, the Record/Status LED stops flashing.
- Disconnect the device from the computer. The firmware is automatically updated. The Firmware update window is displayed. When the update is complete, the device will automatically switch off.
Troubleshooting
Find the most common problems you could encounter with the VoiceTracer in the following table. If you are unable to solve the problem with the information below, contact the supporting Philips partner you purchased the device from.
| Problem | Cause | Solution |
| The device doesn’t turn on. | • The battery has run out of power. | • Charge the device for a while and then turn it on again. |
| I can’t record with the device. | • You have reached the
maximum file number or the device’s memory is full. |
• Delete some files or move them to an
external device. |
| The device doesn’t respond. | • There is a problem with the | • Try to turn the device off and then |
| software. | restart it. | |
| • If you can’t turn the device off, reset | ||
| the device by pressing the Reset | ||
| button. For more information, see | ||
| Device reset. Resetting the device | ||
| won’t delete any settings or data. | ||
| The device doesn’t play back recordings. | • The volume is off or too low. | • Turn on or turn up the volume. |
| I can’t hear anything from the speakers. | • The headphones are | • Unplug the headphones. |
| connected to the device. | ||
| • Turn on or turn up the volume. | ||
| • The volume is off or too low. | ||
| I can’t hear anything from the | • The volume is off or too low. | • Turn on or turn up the volume. |
| headphones. | ||
| • The headphones aren’t | • Disconnect the headphones and | |
| connected properly. | connect them to the headphones | |
| jack again. | ||
| • The headphones are | ||
| connected to the wrong jack | • Disconnect the headphones and | |
| (i.e. external microphone jack). | connect them to the headphones | |
| jack. | ||
| The quality of audio recordings is too low | • The microphone sensitivity is | • Change the microphone sensitivity to |
| or there’s too much background noise in | set too high. | medium or low. For more information, |
| my audio recordings. | see Mic sensitivity. |
Technical data
Connectivity
- Headphones: stereo jack, 3.5 mm, impedance 16 Ohm or more
- USB: type C, high-speed 2.0
Audio recording
- Built-in microphone: 2 omni-directional microphones
- Recording formats: MPEG1 layer 3 (MP3), PCM (WAV)
- Recording quality: MP3 (8, 32, 64, 96, 128, 192,256, 320 kbps), PCM (22 kHz/16 bit, 44.1/16 bit, 48 kHz/16 bit)
- Audio scenes: Note, Speech recognition, Interview, Lecture, Meeting, Music, Custom
- Recording time (built-in memory): 2147 h (MP3, 8 kbps), 536 h (MP3, 32 kbps), 268 h (MP3, 64 kbps), 178 h (MP3, 96 kbps), 134 h (MP3, 128 kbps), 89 h (MP3, 192 kbps), 67 h (MP3, 256 kbps), 53 h (MP3, 320 kbps), 24 h (PCM, 22 kHz/16 bit), 12 h (PCM, 44.1 kHz/16 bit), 11 h (PCM, 48 kHz/16 bit)
- Pre-recording mode: 5, 10, 15 seconds buffer
- File editing function: overwrite, append
- Auto-divide function: 15, 30, 60 minutes
- Auto-bookmark function: 5, 10, 15, 30, 60 minutes
- Bookmark function: up to 32 per file
- Voice-activated recording: 25 levels
- Instant one-touch recording
- Record monitor function
- Recording timer
- Wind filter
- Limiter (attack time/decay time): slow (32/128 ms), medium (16/64 ms), fast (8/16 ms)
- Noise-cut
Speaker
- Speaker output power: 200 mW
- Speaker size: 11 × 15 mm
Storage media
- Built-in memory capacity: 8 GB
- Mass storage class compliant
Music playback
- Sound enhancement: ClearVoice
- Equalizer: Classic, Jazz, Pop, Rock
- Playback mode: Repeat file, Repeat all, Random
- ID3 tag support
- Supported file formats: MP3, WMA
Power
- Battery type: built-in rechargeable Li-ion polymer battery
- Battery lifetime: up to 36 hours of recording (MP3, 8 kbps)
- Battery capacity: 1000 mAh
- Rechargeable: yes
- Charging time (full charge): 3 hours
Design and finishing
- Color(s): black/chrome
Display
- Type: LCD color display
- Backlight
- Diagonal screen size: 2 in/5 cm
- Resolution: 240 × 320 pixels
Product dimensions
- 4.7 × 12.8 × 1.6 cm / 1.9 × 5.0 × 0.6 in
- Weight: 79 g/2.7 oz
Convenience
- Firmware upgradeable
- Keypad lock
- Multi language: English, French, German, Spanish, Italian, Russian, Polish System requirements
- Free USB port
- Operating system: Windows 10/8/7, macOS, Linux
Green specifications
- Compliant to 2011/65/EU (RoHS)
- Lead-free soldered product
Operation conditions
- Temperature: 1° – 45° C / 34° – 113° F
- Humidity: 10% – 90%
Open source software
Products mentioned in this manual may contain open source software. Speech Processing Solutions GmbH hereby offers to deliver, upon request, a copy of the complete corresponding source code for the copyrighted open source software packages used in this product for which such offer is requested by the respective licenses. This offer is valid up to three years after product purchase. To obtain the source code, please write in English to: [email protected].
FCC Warning Statement
Changes or modifications not expressly approved by the party responsible for compliance could void the user’s authority to operate the equipment. This equipment has been tested and found to comply with the limits for a Class B digital device, pursuant to Part 15 of the FCC Rules. These limits are designed to provide reasonable protection against harmful interference in a residential installation. This equipment generates uses and can radiate radio frequency energy and, if not installed and used in accordance with the instructions, may cause harmful interference to radio
communications. However, there is no guarantee that interference will not occur in a particular installation. If this equipment does cause harmful interference to radio or television reception, which can be determined by turning the equipment off and on, the user is encouraged to try to correct the interference by one or more of the following measures:
- Reorient or relocate the receiving antenna.
- Increase the separation between the equipment and receiver.
- Connect the equipment into an outlet on a circuit different from that to which the receiver is connected
- Consult the dealer or an experienced radio/TV technician for help.
- Neither Speech Processing Solutions GmbH nor its affiliates shall be liable to the purchaser of this product or third parties with respect to claims for damages, losses, costs or expenses incurred by purchaser or third parties as a result of an accident, misuse or abuse of this product or unauthorized modifications, repair, modification of the product or failure to meet the operating and maintenance instructions provided by the manufacturer.
- This user manual is a document with no contractual nature. We accept no liability for changes, mistakes or printing errors.
FAQS
How can I transfer my voice recordings from the Voice Tracer to my computer?
Connect the device to your computer using a USB cable. The device will appear as an external drive. Copy the files from the device to your computer.
How can I delete voice recordings on the Voice Tracer?
Select the voice recording you want to delete, and press Delete.
How can I change the folder where my voice recordings are stored?
Select Settings > Storage location, and then select a new location for your recordings.
How can I adjust the volume of my recordings?
Select Settings > Volume, and then adjust the volume level.
Is there a free voice recording app?
No limitation, Completely FREE! Voice Record Pro is a professional voice recorder. It allows you to record voice memos and on-site sounds at unlimited length with configurable quality. Voice Record Pro can record directly in MP4 (AAC), MP3 (MPEG) and WAV (PCM) formats plus convert function for all supported formats.
What audio recorder do YouTubers use?
Bandicam has earned its reputation as the best game capturing and video recording software for YouTubers.
Is there a voice recorder on my phone?
Some Android™ devices, like the Samsung Galaxy S20+ 5G, come with a voice recording app pre-installed. Hit the red record button when you want to start the recording, and then once again to stop it. From here, you can hit the button again to continue recording, or save the file to your recording archive.
Where is the voice recorder on my phone?
Swipe down from the top of the phone screen twice to open the Quick Settings menu. You may need to swipe left to locate the Screen Recorder app. Tap on it and then tap Start now. The Screen Recorder menu will come up on the screen with the buttons for Record, Settings, and Close/Stop.
How do YouTubers mics sound so good?
For voice recording, lavalier mics, either wired or wireless, are pretty much an industry standard. Other mics for recording good audio for YouTube are cardioid mics on a mount like the OctoPad or an on camera shotgun mic. Lavalier mics are preferred by many YouTubers for voice recording.
Where do YouTubers get their audio from?
The reality is that most YouTubers will use stock, library or non-commercial royalty free music for their videos. With this content, licensing is made as easy and hassle-free as possible.
Is Audacity A free software?
Audacity is an easy-to-use, multi-track audio editor and recorder for Windows, macOS, GNU/Linux and other operating systems. Audacity is free, open source software.
What is the default voice recorder for Android?
Every Android phone will have a voice recording app already installed on it called Recorder. The appearance and quality of the app may vary depending on the model of the phone and the version of Android you have, but it is easy to use.
Does Google have a voice recorder app?
The lack of a native audio recording app built into Google’s lean Android software has always brought a chuckle from people who use iOS. Google finally introduced the Google Recorder app with the Pixel 4, and it has now brought that app to a few older Pixel phones (via Android Police).
Does Windows 11 have an audio recorder?
As with Windows 11’s new Media Player app, if you type in the old app name, in this case “Voice Recorder,” the new one, Sound Recorder, opens and updates itself. (The Media Player behaves similarly when you type “Groove” in the Start menu.)
How Long Can Windows 10 voice recorder record?
Keep in mind that the limit for a recording is 2hours 59 minutes and 59 seconds, according to our tests. Your audio recording is saved under the default name Recording. The date and time when the recording was saved are displayed underneath, followed by the duration of the recording.
How do singers edit their voice?
The use of autotune, pitch correction, vocoders, talk boxes, vocals chops, and other various techniques have inspired entirely new music genres and new ways of recording and processing vocals.
VIDEO
![]()