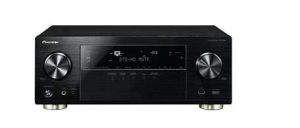

VSX-924-K/-S
AV Receiver
Quick Start Guide
EAC
Thank you for buying this Pioneer product. This Quick Start Guide includes instructions for basic connections and operations to allow simple use of the receiver. For detailed descriptions of the receiver, see the “Operating Instructions” provided on the included CD-ROM ( ).
).
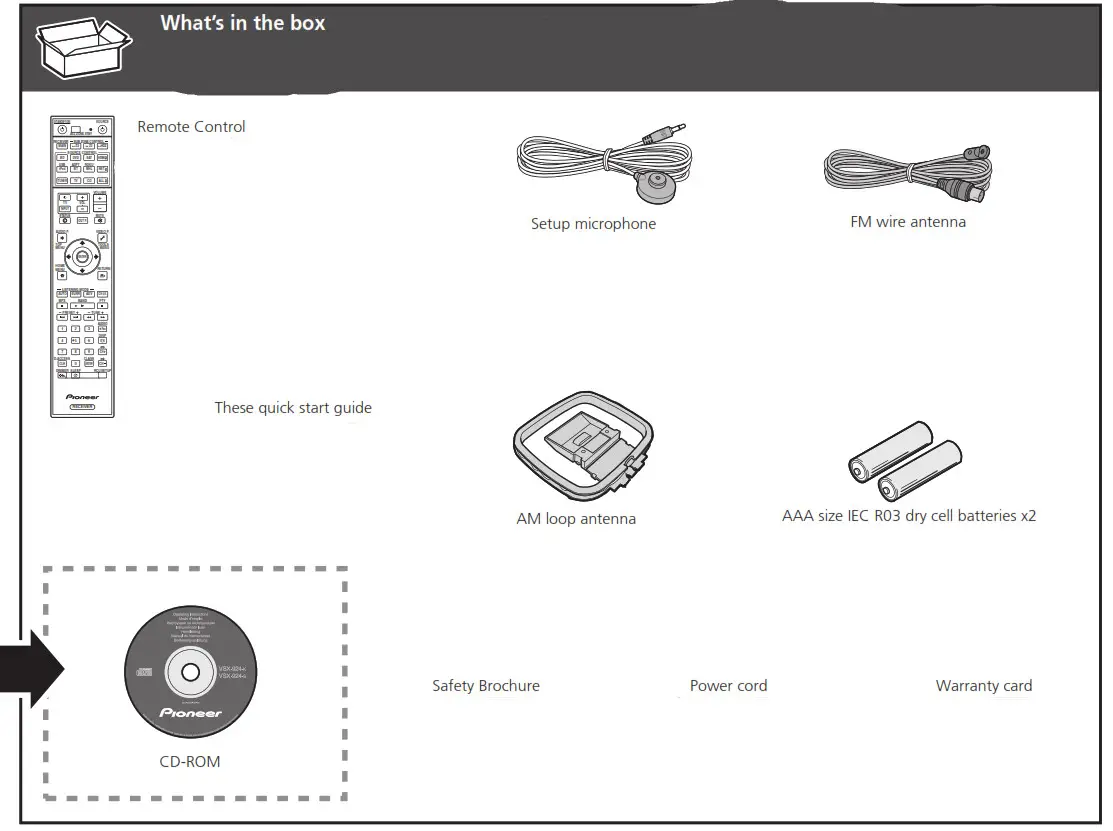
Enjoy easy multichannel playback with this unit in 3 steps: Connecting up → Initial setup → Basic playback.
Connection and initial setup can be performed by referring to this Quick Start Guide, but it is easier when using the Wiring Navi in AVNavigator.
Perform connection and initial setup with either method according to the circumstances in which you are using AVNavigator.
Additionally, using the Interactive Operation Guide in AVNavigator allows you to learn basic operations effectively.

Using Built-in AVNavigator
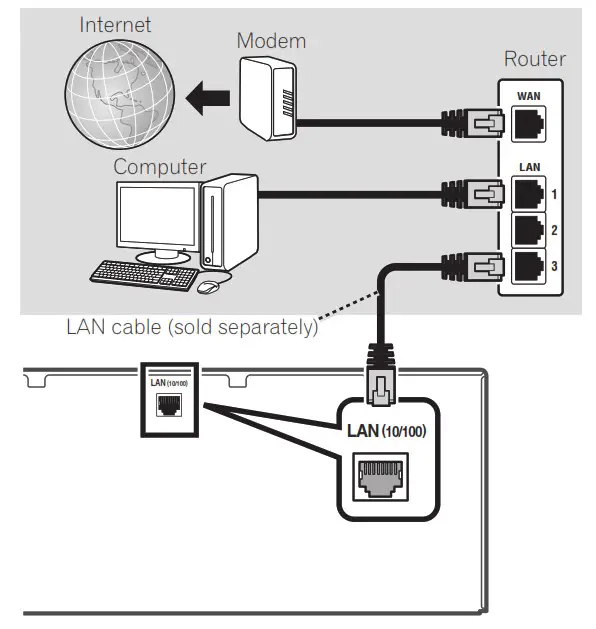
Connecting to the network through LAN interface
Connecting to a wireless LAN
Wireless connection to the network is possible through a wireless LAN connection. Use the separately sold AS-WL300 for connection.
• Use only the furnished accessory connecting cable.
• Certain settings are required to use a wireless LAN converter (AS-WL300). For instructions on making these settings, see the operating instructions included with the wireless LAN converter (AS-WL300).

Plugging in the receiver
After connecting to a LAN, connect the power cord of the receiver to a power outlet.

- Handle the power cord by the plug part. Do not pull out the plug by tugging the cord, and never touch the power cord when your hands are wet, as this could cause a short circuit or electric shock. Do not place the unit, a piece of furniture, or other objects on the power cord or pinch the cord in any other way. Never make a knot in the cord or tie it with other cables. The power cords should be routed so that they are not likely to be stepped on. A damaged power cord can cause a fire or give you an electric shock. Check the power cord once in a while. If you find it damaged, ask your nearest Pioneer authorized independent service company for a replacement.
- Do not use any power cord other than the one supplied with this unit.
- Do not use the supplied power cord for any purpose other than that described below.
- The receiver should be disconnected by removing the mains plug from the wall socket when not in regular use, e.g., when on vacation.
- Make sure the blue
 STANDBY/ON light has gone out before unplugging.
1 Plug the supplied power cord into the AC IN socket on the back of the receiver.
2 Plug the other end into a power outlet.
Turning the power on
Press  STANDBY/ON to switch on the receiver and your computer.
Wait a few minutes after turning the power on before performing the following operation.

Launching the built-in AVNavigator
Operate AVNavigator by following the screen prompts of your computer, etc.
Operating environment
- AVNavigator can be used in the following environments.
-Windows PC: Microsoft® Windows® XP/Windows Vista’/ Windows® 7/VVi ndows® 8/Windows 8.1
-Mac OS: Mac OSX (10.7, 10.8 or 10.9)
– i Pad/i Phone/i Pod touch: iOS 7
-Android device: Android 4.0.4 - Some AVNavigator functions use an Internet browser. The following browsers are supported:
-Windows PC: Internet Explorer® 8, 9, 10, 11 -Mac OS/iPad/iPhone/iPod touch: Safari 6.0
-Android device: Android browser - To use certain AVNavigator functions, you must install the latest Adobe® Flash® Player. For details, visit the following website. http://www.adobe.com/downloads/
- Depending on the computer network setting or security setting, AVNavigator may not operate.
Using Windows PC
- Launch Internet Explorer and enter the IP address of this unit in the address field of Internet Explorer. (Access the IP address“http://(the receiver’s IP address)” from a web browser.) You can display the IP address of the unit on the unit’s front panel display by pressing the STATUS button on the remote control.
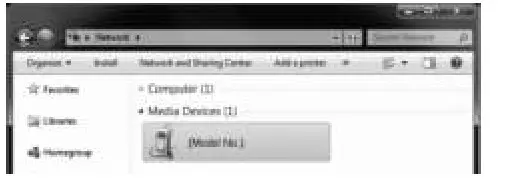
- With a Windows PC other than Windows XP, you can use the following method to launch AVNavigator.
Launch Explorer and then right-click <VSX-924>displayed in the ‘Network’ folder, then click ‘View device webpage’.
Using Mac
Launch Safari and click <VSX-924> displayed in ‘Bonjour’ on the Bookmarks bar.

• If ‘Bonjour’ is not displayed, tick the ‘Include Bonjour in the Favorites bar’ check box on the ‘Advanced’ tab in the Safari ‘Preferences…’ menu.

Using iPad/iPhone/iPod touch
Download a free application, iControlAV5, from the App Store. After launching iControlAV5, follow the instructions on the screen. After that, on the Home screen, press ‘AVNavigator’or the icon.
iPad

■ Using iPad
On an iPad, you can operate AVNavigator for iPad. Download AVNavigator for iPad from the App Store. After launching AVNavigator for iPad, follow the instructions on the screen.
Using Android device
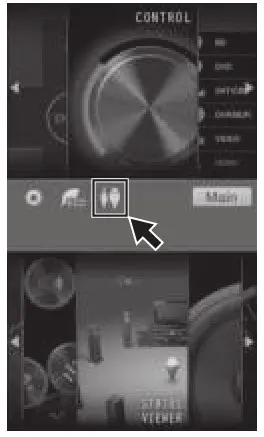
Download a free application, iControlAV5, from the Google PlayStore. After launching iControlAV5, follow the instructions on the screen. After that, on the Home screen, press the icon.
About using Wiring Navi
Wiring Navi starts when ‘Wiring Navi’ is pressed on the AVNavigator screen.

• When connection navigation is finished, proceed to STEP 3.
STEP 1 Connecting up
Connecting the speakers
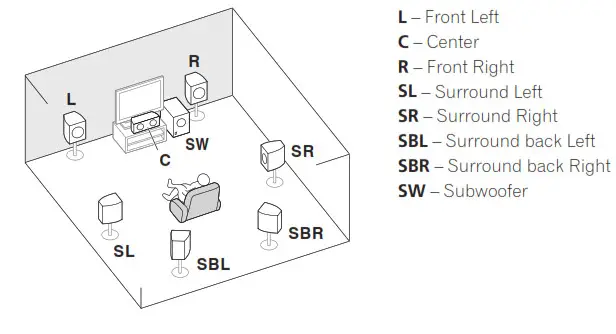
The receiver will work with just two stereo speakers (the front speakers in the diagram) but using at least five speakers is recommended, and a complete setup is best for surround sound.
To achieve the comfortable surround sound, install your speakers as shown below. 7.1 channel surorund system:
Note
- There are also other speaker connection patterns (front height, front wide, etc.). For details, see “Connecting your equipment” of the operating instructions.
Connecting the speaker cables
Make sure you connect the speaker on the right to the right (R) terminal and the speaker on the left to the left (L) terminal. Also make sure the positive and negative (+/–) terminals on the receiver match those on the speakers.
1 Twist exposed wire strands together.
2 Loosen terminal and insert exposed wire.
3 Tighten terminal.


• Before making or changing connections, switch off the power and disconnect the power cord from the AC outlet.
• These speaker terminals carry HAZARDOUS LIVE voltage. To prevent the risk of electric shock when connecting or disconnecting the speaker cables, disconnect the power cord before touching any uninsulated parts.
After installing the speakers, connect them as shown below.

Note
• When only connecting one surround back speaker, connect it to the SURROUND BACK L (Single) terminals.
• This unit supports speakers with a nominal impedance of 6 W to 16 W.
Connecting a TV and playback components
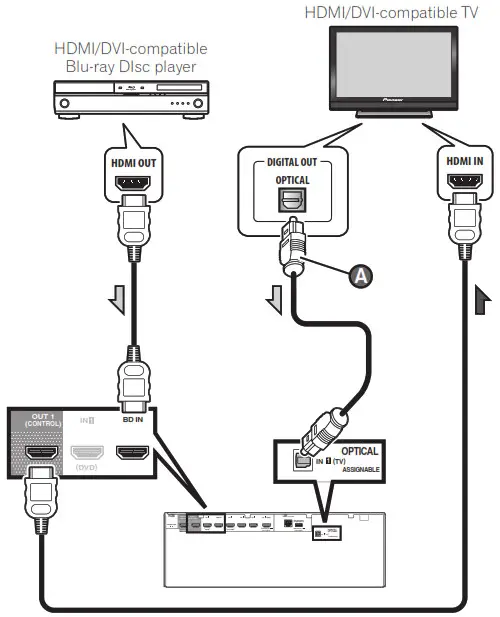
- If the TV does not support the HDMI Audio Return Channel function, optical digital cable ( A ) connection is required to listen to the TV sound over the receiver.
- If the TV supports the HDMI Audio Return Channel function, the sound of the TV is input to the receiver via the HDMI terminal, so there is no need to connect an optical digital cable ( A ). In this case, set ARC at HDMI Setup to ON. For details, see “HDMI Setup” of the operating instructions.
- Please refer to the TV’s operation manual for directions on connections and setup for the TV.
- With factory default settings, video from the video cable or component cable will not be output from the HDMI terminal. To output video, you must switch video input to the device connected with the video cable or component cable and set V.CONV to ON. For details, see “Setting the Video options” of the operating instructions.
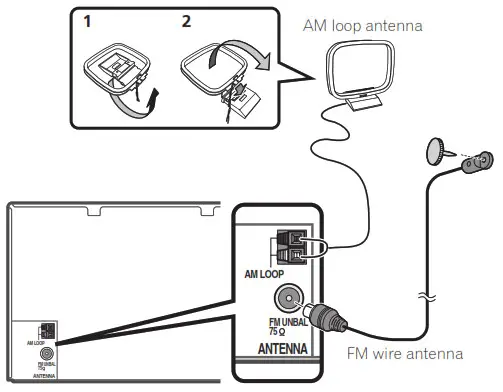
Connecting antennas
Note
- Refer to the operating instructions in the included CDROM if you wish to connect a TV or playback component in a method other than an HDMI connection.
- Refer to the operating instructions in the included CDROM for other device connections.
Plugging in the receiver
Only plug in after you have connected all your components to this receiver, including the speakers.

• Handle the power cord by the plug part. Do not pull out the plug by tugging the cord, and never touch the power cord when your hands are wet, as this could cause a short circuit or electric shock. Do not place the unit, a piece of furniture, or other objects on the power cord or pinch the cord in any other way. Never make a knot in the cord or tie it with other cables. The power cords should be routed so that they are not likely to be stepped on. A damaged power cord can cause a fire or give you an electric shock. Check the power cord once in a while. If you find it damaged, ask your nearest Pioneer authorized independent service
company for a replacement.
• Do not use any power cord other than the one supplied with this unit.
• Do not use the supplied power cord for any purpose other than that described below.
• The receiver should be disconnected by removing the mains plug from the wall socket when not in regular use, e.g., when on vacation.
• Make sure the blue  STANDBY/ON light has gone out before unplugging.
1 Plug the supplied power cord into the AC IN socket on the back of the receiver.
2 Plug the other end into a power outlet.
VENTILATION CAUTION
When installing this unit, make sure to leave space around the unit for ventilation to improve heat radiation (at least 40 cm at top, 10 cm at rear, and 20 cm at each side).
WARNING
Slots and openings in the cabinet are provided for ventilation to ensure reliable operation of the product, and to protect it from overheating. To prevent fire hazards, the openings should never be blocked or covered with items (such as newspapers, tablecloths, curtains) or by operating the equipment on thick carpet or a bed.
STEP 2 Initial Setup
Before you start
1 Put the batteries in the remote control.

The batteries included with the unit are to check initial operations; they may not last over a long period. We recommend using alkaline batteries that have a longer life
2 Switch on the receiver and your TV.

3 Switch the TV input so that it connects to the receiver.
4 Turn the subwoofer on and turn up the volume.

• Do not use or store batteries in direct sunlight or other excessively hot places, such as inside a car or near a heater. This can cause batteries to leak, overheat, explode or catch fire. It can also reduce the life or performance of batteries.

• When inserting the batteries, make sure not to damage the springs on the battery’s (–) terminals. This can cause batteries to leak or overheat.
• When disposing of used batteries, please comply with governmental regulations or environmental public institution’s rules that apply in your country/area.
Automatically setting up for surround sound (MCACC)
The Auto Multi-Channel ACoustic Calibration (MCACC) setup uses the supplied setup microphone to measure and analyze the test tone that is outputted by the speakers. This setup enables automatic high precision measuring and settings; utilizing it will create an optimum user listening environment.
Important
• Measure in a quiet environment.
• If you have a tripod, use it to place the microphone so that it’s about ear level at your normal listening position.
Otherwise, place the microphone at ear level using a table or a chair.
• Accurate measurements may not be possible if there are obstacles between the speakers and the listening position (microphone).
• When measuring, step away from the listening position, and operate using the remote control from the external side of all the speakers.
1 Connect the supplied setup microphone.
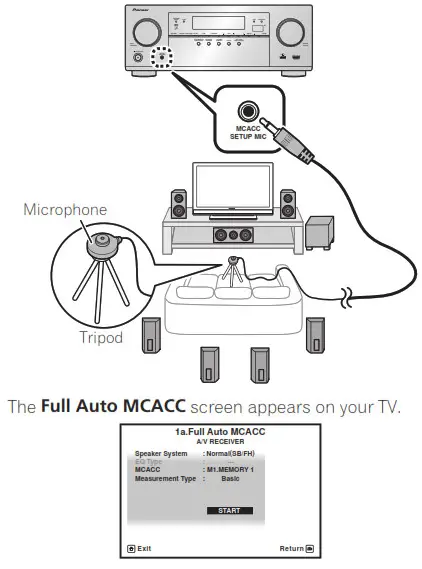
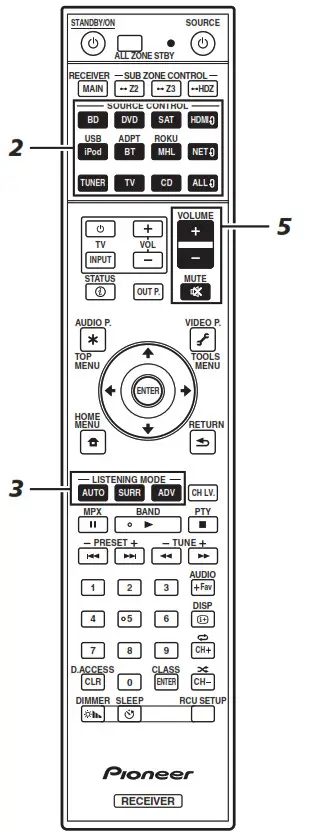
2 Press MAIN RECEIVER on the remote control and operate.
• When the cursor is brought to Measurement Type and Basic is selected, the Speaker Setting/Channel Level/Speaker Distance is adjusted automatically. Selecting
Expert allows you to automatically adjust Standing Wave/Acoustic Cal EQ (frequency characteristics) as well.
3 Bring the cursor to START and press the ENTER button.
• Automatic measuring will start.
• Measuring will take about 3 to 12 minutes.
4 Follow the instructions on-screen.
• Automatic setting is complete when the Home Menu screen appears.

• If Reverse Phase is displayed, the speaker’s wiring (+ and –) may be inverted. Check the speaker connections. Even if the connections are correct, Reverse Phase may be displayed, depending on the speakers and the surrounding environment. This does not affect measurements, however, so select Go Next.
• If the power cuts out, the core of the speaker cable may be in contact with the rear panel, or the (+) and (–) cores may be touching, causing the protection circuits to activate. Re-twist the core of the speaker cable, and connect it so that it does not protrude from the speaker terminal.
5 Make sure the setup microphone is disconnected.
STEP 3 Basic playback
Multichannel playback
1 Switch on the playback component.
E.g.) Turn the Blu-ray Disc player connected to the HDMI BD IN terminal on.
2 Switch the input of the receiver.
E.g.) Press BD to select the BD input.
3 Press AUTO to select ’AUTO SURROUND’.
Also press SURR or ADV for multichannel playback. Select your preferred listening mode.
4 Start the playback component’s playback.
E.g.) Start playback of the Blu-ray Disc player.
5 Use VOLUME +/– to adjust the volume level.
• When a sound can not be heard from center and rear speakers, press SURR or ADV to change listening modes.
E.g.) Press the ADV button for several times to select EXT.STEREO.
• When there is no sound from the subwoofer Cause – The front speaker is set to LARGE.
When a 2-channel audio source is input, the low-frequency component is not output from the subwoofer but is output
from the front speaker.
Solution – To output from the subwoofer, change the speaker setting.
Method 1: Change the front speaker setting to SMALL.
The low-frequency component is not output from the front speaker but is output from the subwoofer. When the low frequency playback capability of the front speaker is high, we recommend the setting not be changed.
Method 2: Change the subwoofer setting to PLUS.
The low-frequency component is output from the front speaker and subwoofer. For that reason, low sounds are sometimes output too much. In such a case, we recommend not to change or to change to Method 1.
• For details, see “Speaker Setting” of the operating instructions.
• When no sound is emitted, increase the volume to approximately –30 dB.
Note
• When the remote control cannot be used to operate the unit
– When operating the receiver, press MAIN RECEIVER before using it.
– When operating functions such as the network, TUNER, or iPod, press the appropriate function button (NET, TUNER, iPod, etc.) before using.
Listening to the radio
1 Press TUNER to select the tuner.
If necessary, press BAND to change the band (FM or AM).
2 Press TUNE +/– to tune to a station.
• Press and hold TUNE +/– for about a second. The receiver will start searching for the next station.
• If you’re listening to an FM station but the reception is weak, press MPX to select FM MONO and set the receiver to the mono reception mode.
Saving station presets
If you often listen to a particular radio station, it’s convenient to have the receiver store the frequency for easy recall whenever you want to listen to that station.
1 Press TOOLS while receiving a signal from the station you want to store.
The preset number is blinking.
2 Press PRESET +/– to select the station preset you want, then press ENTER.
The preset number stop blinking and the receiver stores the station.
Listening to station presets
You will need to have some presets stored to do this.
• Press PRESET +/– to select the station preset you want.
Playing an iPod
• About one minute is required between turning the power on and completion of startup.
1 Connect your iPod.
An iPod/iPhone can be connected to the receiver.

2 Press iPod USB to select the iPod/USB input.
When the display shows the names of folders and files, you’re ready to play music from the iPod.
3 Use ↑/↓ to select a category, then press
ENTER to browse that category.
• To return to the previous level any time, press RETURN.
4 Use ↑/↓ to browse the selected category (e.g.,albums).
• Use ←/→ to move to previous/next levels.
5 Continue browsing until you arrive at what you want to play, then press ⇒ to start playback.
Listening to Internet radio stations
• About one minute is required between turning the power on and completion of startup.
Important
- When using a broadband Internet connection, a contract with an Internet service provider is required. For more details, contact your nearest Internet service provider.
- To listen to Internet radio stations, you must have high-speed broadband Internet access. With a 56 K or ISDN modem, you may not enjoy the full benefits of Internet radio.
- Access to content provided by third parties requires a high-speed internet connection and may also require account registration and a paid subscription. Third-party content services may be changed, suspended, interrupted, or discontinued at any time without notice, and Pioneer disclaims any liability in connection with such occurrences. Pioneer does not represent or warrant that content services will continue to be provided or available for a particular period of time, and any such warranty, express or implied, is disclaimed.
1 Press NET repeatedly to select the INTERNET RADIO input.
It may take several seconds for this receiver to access the network.
2 Use ↑/↓ to select the Internet radio station to play back, and then press ENTER.
To enjoy the many functions of the unit to the fullest extent
↓ Launch AVNavigator, and use the “Interactive Operation Guide”.
↓ Load the CD-ROM into your computer and download the “Operating Instructions” (PDF) from the menu screen to read.
Functions
# Playing a USB device
# Music playback using Bluetooth wireless technology
# Playback with NETWORK feature
# Setting the Audio options
# Setting the Video options
# Using the MULTI-ZONE controls
FAQ
Glossary
Features index
Note
• This unit supports AirPlay. For details, see “Using AirPlay on iPod touch, iPhone, iPad, and iTunes” of the operating instructions and the Apple website (http://www.apple.com).
• This unit’s software can be updated (“Software Update” of the operating instructions). With Mac OS, it can be updated using Safari (“Using Safari to update the firmware” of the operating instructions).
© 2014 PIONEER HOME ELECTRONICS CORPORATION.
All rights reserved.


