
PlasmaCar Assembly Instructions Manual
![]()
Small parts.
Choking and suffocation hazard.
Not recommended for children under 36 months.
![]()
Adult assembly required.
Keep away from children until assembled.
ASSEMBLY VIDEO/VIDEO ASSAMBLAGE: www.PlasmaCar.com
How it works
The only power source the PlasmaCar requires is the seemingly limitless energy of a child. The PlasmaCar can reach an exhilarating 10 km/hour (6 mph).
Note: The PlasmaCar is not recommended for use on wooden floors.
The wheels may damage some floors.
- Place the PlasmaCar on a smooth, flat surface.
- Sit with the feet on the footrests, lean slightly forward, and grip the steering wheel.
- To propel the car forward, turn the steering wheel back and forth continuously.
To go in reverse, rotate the steering wheel 180 degrees. - To bring the PlasmaCar to a stop, stop turning the wheel, wait for the car to slow, and put your feet on the ground.
Safety Guidelines
![]() The PlasmaCar meets or exceeds all International safety standards including EN71, ASTM F963 and US CPSC.
The PlasmaCar meets or exceeds all International safety standards including EN71, ASTM F963 and US CPSC.
Follow these safety guidelines:
- When unpacking the PlasmaCar, properly dispose of all plastic wrappings.
- Adult supervision is strongly recommended at all times.
- Never use the PlasmaCar near steps, swimming pools, or vehicle traffic.
- Never use the PlasmaCar on a hill, steep slope, or over rough or uneven surfaces.
- To prevent falls, the child should sit leaning slightly forward.
- Protective equipment, such as a helmet, recommended.
- The maximum load should not exceed 55 kg (120 lbs) on uneven surfaces, or 100 kg (220 lbs) on smooth surfaces.
- Please keep all relevant information for future reference.

![]()
Small parts.
Choking and suffocation hazard.
Not recommended for children under 36 months.
![]()
Adult assembly required.
Keep away from children until assembled.
Assembly
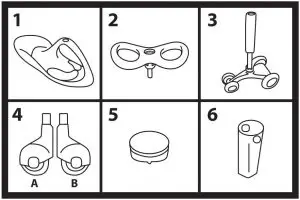
Included:
- Body
- Steering wheel assembly
- Front wheel assembly with foam sheath
- 4a. Right rear wheel 4b. Left rear wheel
- Steering wheel cap
- Hex key
Tools required: Rubber mallet, screwdriver or 17mm socket wrench.
ASSEMBLY VIDEO: www.PlasmaCar.com
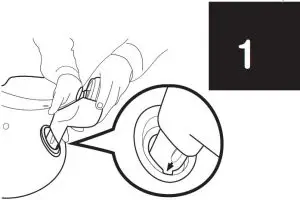
Fit the notch on each rear wheel housing into the body. Push the wheels in at a 45 degree angle. When installed correctly, the rear wheels flare out from the body. Warning: The rear wheel housing cannot be removed once locked into place.
Strike the rear wheels with a rubber mallet to secure them in place.
Note: To use a steel hammer, place a small block of wood on the area to be struck.
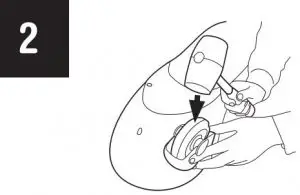
Remove the foam sheath from the front wheel assembly.
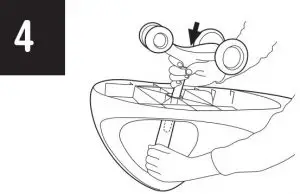
Guide the front wheel shaft through the body, into the foam sheath, and through the hole at the top of the body. Important: Make sure it is inserted as far as it will go; it must be flush with the body. Wiggle into place if necessary.
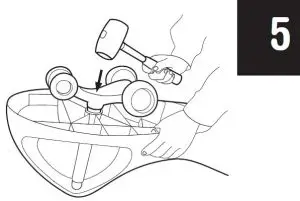
Strike the base of the front wheel assembly with a rubber mallet. The metal bearing should be seated securely in the body.
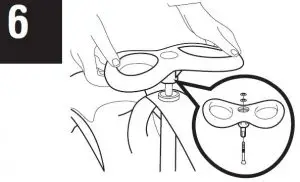
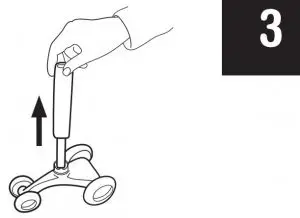
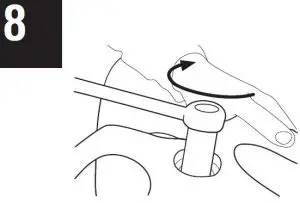
Fit the steering wheel into the top of the front wheel assembly.
Note: Ensure that the bolt is attached to the steering wheel as shown.
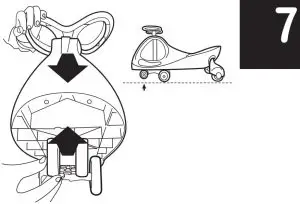
Align the steering wheel with the smaller front wheels, so that the wide end of the steering wheel faces forward. Note: When the front wheels are assembled and resting on a flat surface, the smaller front wheels do not contact the ground.
IMPORTANT!
This step is critical to the performance of your PlasmaCar. Use a 17mm socket wrench to tighten the nut in the steering column AS TIGHT AS POSSIBLE. Fit the wrench onto the nut and turn until very tight. Alternately, use the enclosed hex key and a screw driver to tighten the nut AS TIGHT AS POSSIBLE.
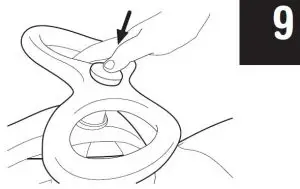
Push the cap into the steering wheel.
Troubleshooting
The rear wheels may detach from their housing if the PlasmaCar is subjected to overloading or impact. Fit the wheel into its housing so that the flat sides of the white clips contact the wheel housing. Snap the wheel back into place. If the steering wheel becomes loose or fails to propel the PlasmaCar, the steering wheel nut may not have been tightened enough during assembly. Remove the cap from the steering wheel with a slot screwdriver and loosen the nut with the hex key. Repeat steps 7 and 8, securing the nut as tightly as possible.

www.plasmarttoys.com | www.plasmacar.com
©2013 PlaSmart Inc.
All Rights Reserved
Manufactured at Huangyan, Zhejiang, 318020, China
Retain instructions for future reference
RECOGNIZED BY
- Platinum Award – Oppenheim Toy Portfolio
- Seal of Approval – National Parenting Center
- Toy of the Year Nominations – Toy Industry Association
- Top Toy Award – TD Monthly
- Most Innovative New Product – Learning Express Stores
- Gold Award – Oppenheim Toy Portfolio
- Top Toy List – Today’s Parent
- Gold Star Toy Awards – Nets
- Best Vacation Products – Dr. Toy
- Gold Medal, International Patent Fair – Hong Kong
- Seal of Excellence – Creative Child
- iParenting Media Toy Awards
- No Batteries, Gears or Pedals
- Sleek, Innovative Design
- Great Exercise Indoors or Outdoors
Made in China