
![]()
Please read this User Instruction Manual in detail before use. Use correctly and maintain properly.
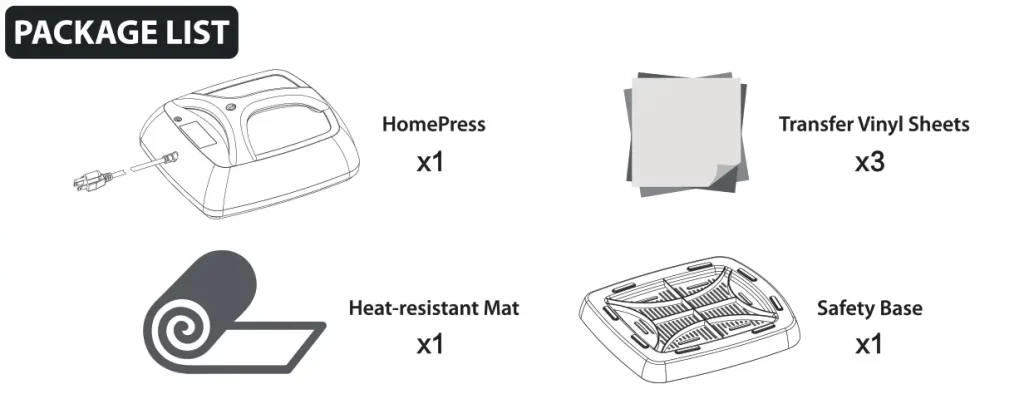
 Thank you for choosing PowerPress HomePress Machine. We promise to provide the after-sale service at any time if needed. Please check the machine first upon receipt to check if it is in perfect condition. If there is any scratches or damage to the product, please contact us without any hesitation at: [email protected]

- The socket must be able to support 40A current, in addition, please be sure that it has a protective device. Always use a sufficient source of power to accommodate the voltage of 110V.
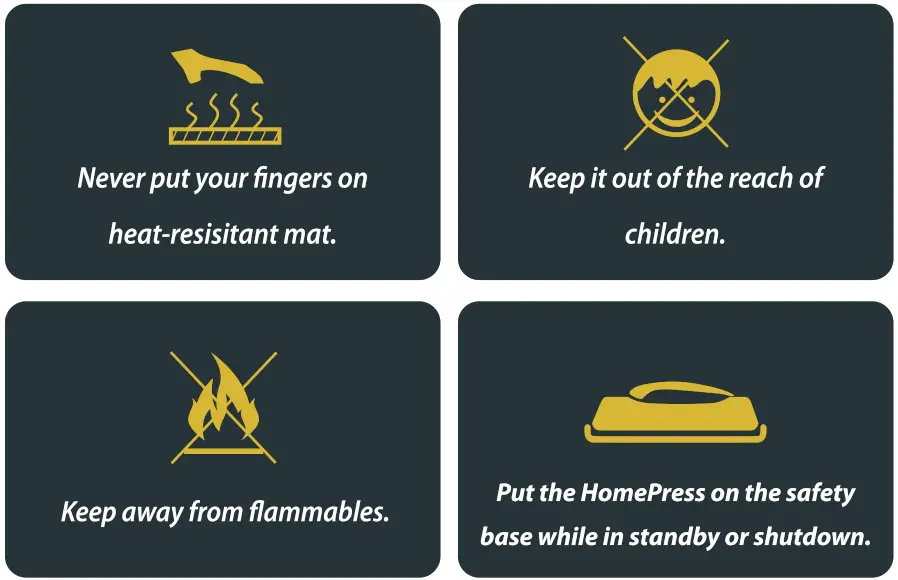
- Always turn off the heat press machine when it is not being used.
- Never leave the heat press machine unattended when in use.
- Close supervision Is required when this product is used near children.
- Don’t touch the heating plate while it is in operation.
- The heating plate needs 2-3 hours to cool down.
Make it last
Maximize the life of your iron-on projects after washing with these suggestions.
- Before iron-on application
For awesome results, always pre-wash and thoroughly dry your fabrics. When washing, do not use a fabric softener. If you have no time for washing, you’ll still get pretty great results. - During iron-on application
Just before the transfer, preheat your base fabric for 3-5 seconds to remove wrinkles and moisture. After adhering to your design, flip your fabric and repeat on the other side. Use the same settings. - After iron-on application
Wait at least 24 hours before washing, Always wash inside-out. Do not bleach. Wash only in cool water, then tumble dry low or lay flat to dry. For foil iron-on, hand-wash in cold water only.
Product Information
Technical Data/Specs
- Power Input: 110v/60Hz
- Power: 1000W
- Transfer Element: 10″x 12″
- Temperature Range: 0-355°F
- Timer Control: 0-120 seconds
- Temperature Error Rand: +/- 5°F
Tips
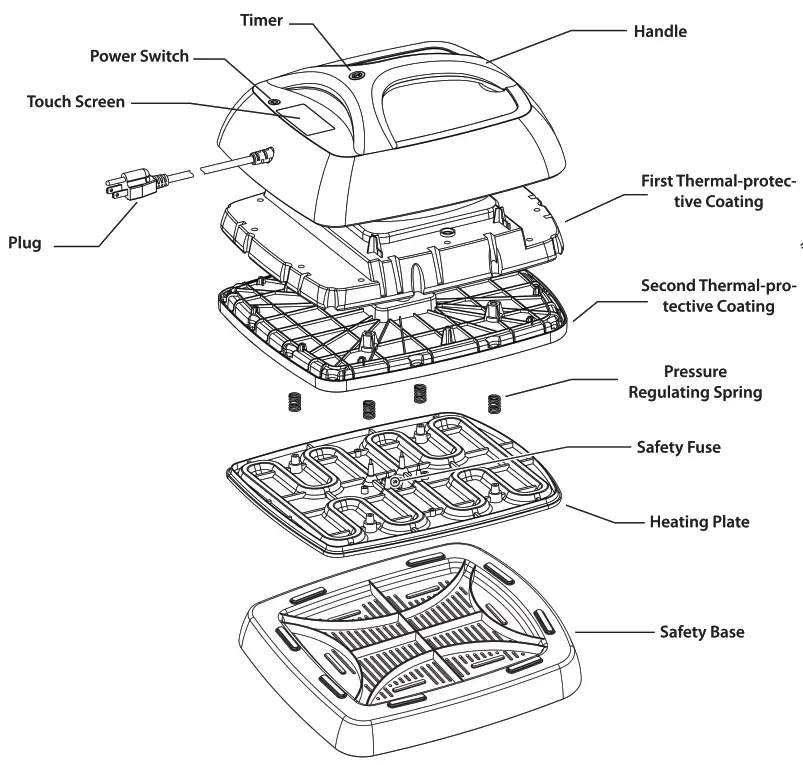
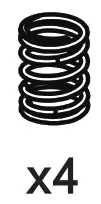 Pressure Regulating Spring
Spring can perfect your pressing by distributing the pressure on the handle evenly to transfer materials.
Safety Base
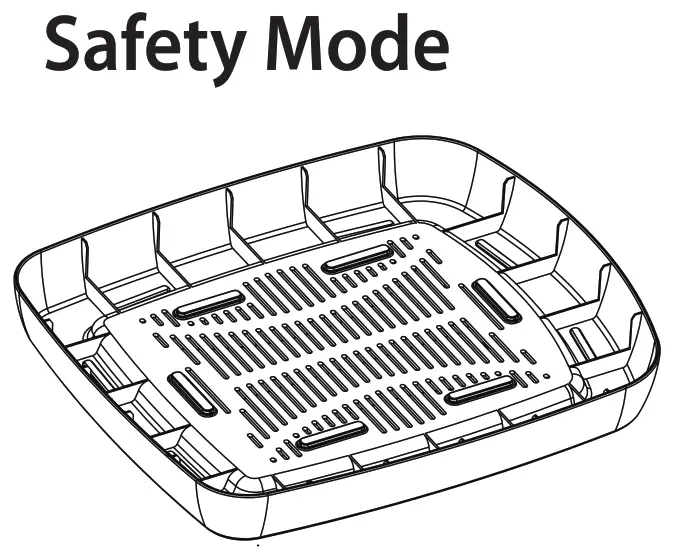 Put the HomePress in the bowl-shaped safety base during shutdown;
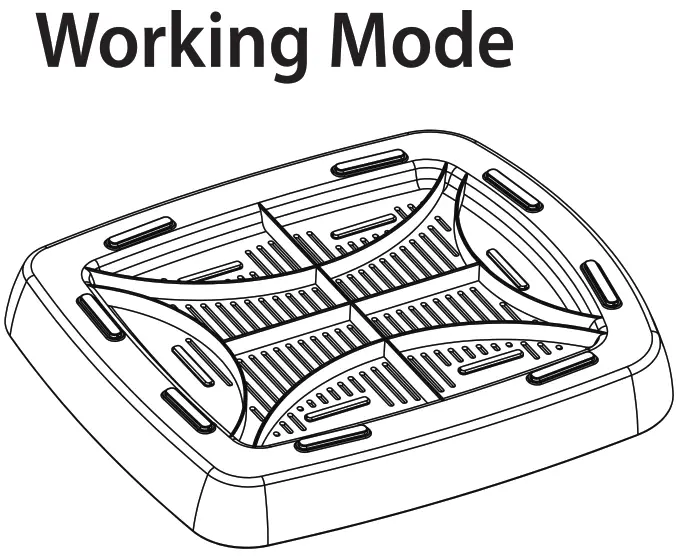
Put the HomePress on the safety base while in standby.
Time and Temperature Suggestion
| Iron-on type | |||||
| Material | Foil | Lite/Metallic | Glitter | Holographic | Sublimation Paper |
| Pure cotton | 295°F/35 sec | 305°F /30sec | 340°F /20sec | 330°F /20sec | 350°F/60sec |
| Cotton/poly blend | 285°F/30sec | 305°F /20sec | 320°F /15sec | 330°F /30sec | 350°F/60sec |
| Polyester | 265°F/30sec | 285°F/30sec | 285°F /20sec | 285°F /30sec | 350°F/60sec |
| Cotton canvas | 270°F/40 sec | 270°F/40sec | 270°F/40sec | 275°F /40sec | |
| Burlap | 305°F /30sec | 305°F/30sec | 305°F/30sec | 305°F/30sec | |
| Felt | 275°F/20sec | 275°F/20sec | 285°F/20sec | 285°F/20sec | |
Note: It is general data above, exact data depends on your materials.
Warranty Statement
- Technical support is provided for any issue at any time.
- Faulty parts can be replaced within three years since the date of purchase.
- Replacement is available within one year since the date of purchase.
- The following conditions are not covered by the free warranty:
(1) The damage caused by improper use.
(2) The damage caused by unauthorized or inappropriate disassembling of the machine.
(3) The damage due to abnormal voltage and external causes such as fire.
(4) The damage due to failure to use the machine in accordance with the instructions and precautions. - Use of this power press in a manner other than intended will void the warranty and might damage the machine.
- Please feel free to contact us at: [email protected]
Diagram of Operation Panel and Operation Notic
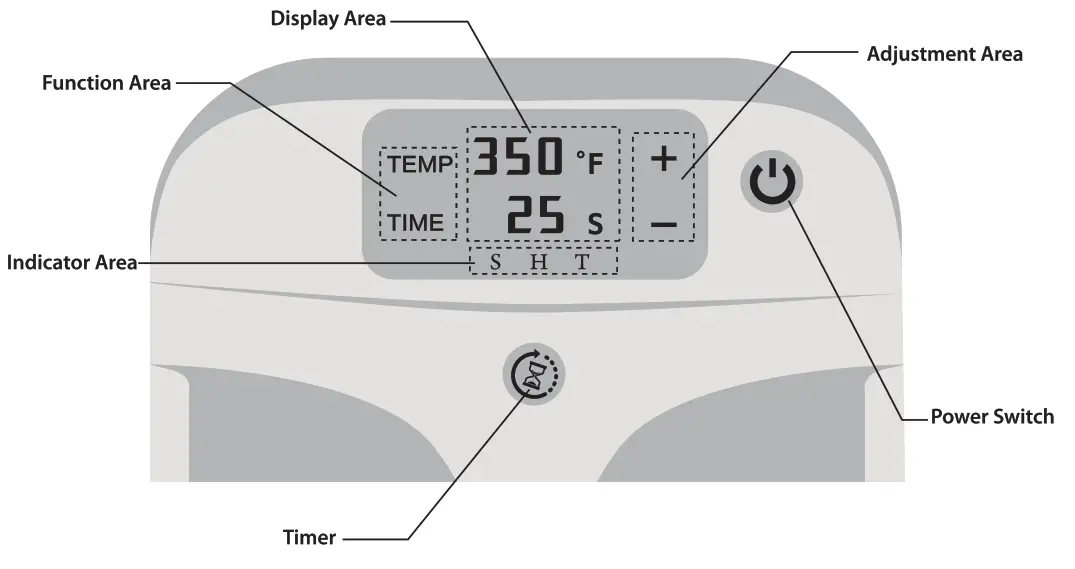
- Power Switch: Light up once powered on;; light off once pressed
- Timer: Press it to start the timing and the light blinks; press it again to stop the timing, and the light goes out.
 A Note: Touch Screen
Please touch the screen with a quick click as slow click is likely to fall.
- Function Area: Set Target Temperature and Time
TEMP: Set the target temperature: press “TEMP” for 2 seconds to enter the setting mode; press “TEMP” for 2 seconds again to save the setting and exit.
TIME: Set the target time: press”TIME” for 2 seconds to enter the setting mode; press “TIME” for 2 seconds again to save the setting and exit. - Adjustment Area: Adjust The Setting Numerical Value.
- Indicator Area: Display Current Working Status
[S] : on : Setting mode.
off: Working mode.
[H]: on : Heating with full power. It usually occurs when the actual temperature is well below the target temperature.
blink: Heating with lower power. It usually occurs when the actual temperature is close to the target temperature.
off: Heat preservation when the heating is over.
[T) : blink: Timing mode.
off: Non-timing mode.
- Display Area:
300° F: Display the target temperature in setting mode; display the actual temperature in working mode
20s: Display the target time in setting mode; display the actual time in working mode.
Operating Instructions
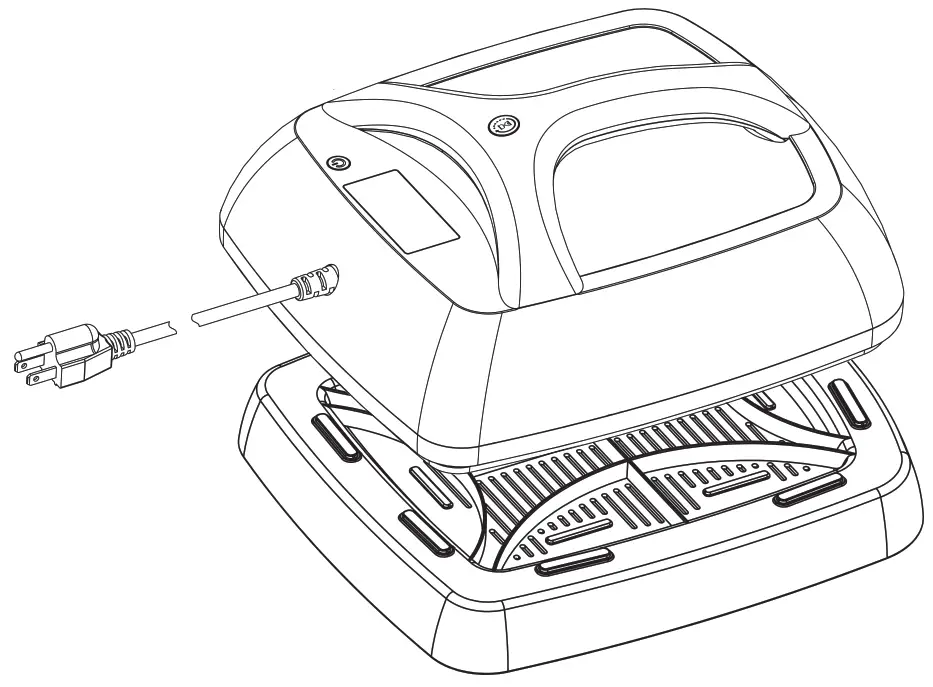
- Power on: Place safety base in working mode and put HomePress on it to power on. The power switch wil light up indicating that the circuit is functional.
- Turn on the HomePress by pressing the power switch. The power switch will light off while the display screen lights up.
Note: a. The default setting is 210°F, 10s.
b. The HomePress heats up the moment it’s turned on. Be careful do not burn yourself! - Set the temperature and time.
Note: a. Please refer to the diagram of the operation panel ( part 6 ) for operation.
b. Please refer to Time and Temperature Sug-gestion ( part 4 ) to determine the settings. - Wait for the HomePress to heat up to the target temperature.
- Place the cloth and vinyl sheets ready for transfer on the heat-resistant mat ( included in the package ) .
Note: Please bear in mind the mirror image rule. - Place the HomePress on the prepared materials with gentle pressure and press the timer.
Note: a. It is normal that the displayed temperature may drop 5 – 10°F because the temperature of the materials is far below that of the heating plate which leads to the minor temperature drop.
b. Only normal pressure required. No extra strength needed. - Press the timer again once the timing is over, and place the HomePress on the safety base so that you may enjoy your own masterpiece!
Note: The timer will beep once the timing is over. - Please power off the HomePress after use and wait for 2-3 hours to cool down. Place the safety base in safety mode to house the HomePress.
Your Practice Project
Follow these simple steps with the included transfer vinyl sheets to make your first project.
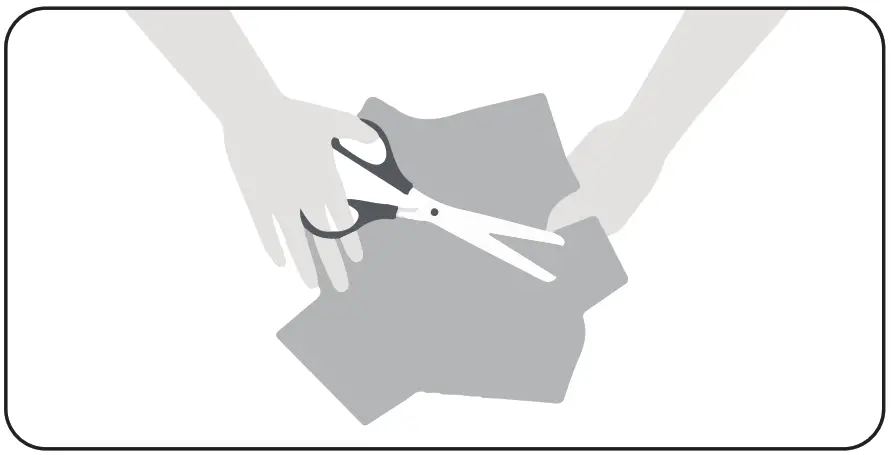
- Cut & Weed
Create a mirror image of your design and cut it on the backside of the heat transfer vinyl sheet.
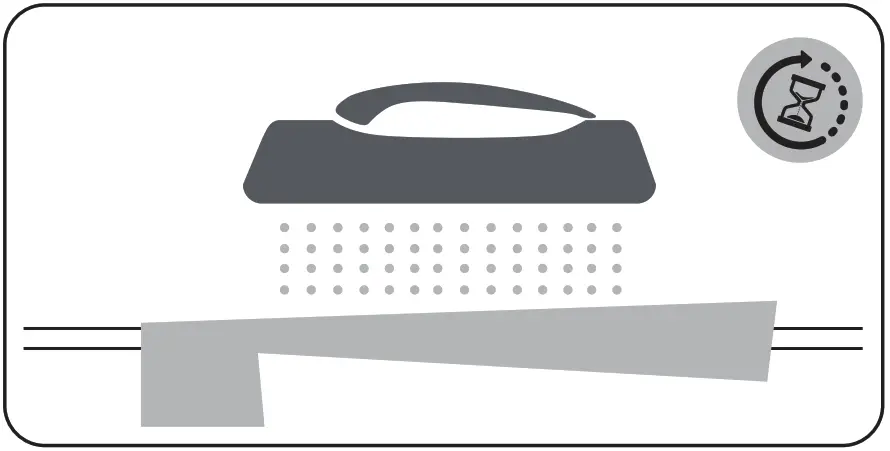
- Heat & Transfer
Set Temp to 320°F and Timer for 15 seconds. Place the transfer vinyl sheet on your fabric, then on top of the heat-resistant mat. Note: Please place the filmed side of the vinyl sheet faceup on the fabric.
- Enjoy Your New Design!
Apply gentle pressure with HomePress. Press the Timer to start the timing. Remove when the timer beeps. Once it cools to room temperature, peel off clear adhesive film from the fabric. That’s it!

FAQ
Q: Why thermometer could not be used for detecting the temperature of the heating plate?
A: Due to the sliver Teflon coating on the heating plate, the thermometer is inapplicable to it.
Q: Why the touch screen doesn’t work?
A: Please touch the screen with a quick click as a slow click is likely to fail.
Q: Why temperature jump would occur on the touch screen?
A: It is normal that the displayed temperature may rise or drop within 5°F because the temperature varies in accordance with ambient temperature.