
POWERFIT PL-1911 Power LEGS Owner’s Manual
Save These Instructions – For Household/Residential Use Only
MODEL: PL-1911
POWER: Adaptor Input 100-240V~50/60Hz, PowerLegs Unit 24VDC, 30W
When using electrical devices, basic safety precautions should always be followed. Do not use the PowerLegs until you have read this manual thoroughly
Visit TristarCares.com for tutorial videos, product details, and more. Guarantee Information Inside
BEFORE YOU BEGIN
It is very important that you read this entire manual, making certain that you are completely familiar with this device’s operation and precautions.
| Model Number | Supply Power | Rated Power | Maximum Weight |
| PL-1911 | 24VDC | 30W | 33 lb. (15 kg) Each Pad, Total 66 lb. (30 kg) |
Important Safety Instructions
When using an electrical device, basic precautions should always be followed, including the following:
READ ALL INSTRUCTIONS BEFORE USING THIS DEVICE.
CONSULT YOUR DOCTOR BEFORE BEGINNING ANY NEW HEALTH REGIMEN.
Always unplug this device from the electrical outlet immediately after using and before cleaning.
- This device should never be left unattended when plugged in. Unplug from the power outlet when not in use and before putting on or taking off parts.
- DO NOT operate under a blanket or pillow. Excessive heating can occur and cause fire, electric shock, or injury to persons.
- This device is not intended for use by persons with reduced physical, sensory, or mental capabilities or lack of experience and knowledge unless they are under supervision or have been instructed how to use the device by a person responsible for their safety. Keep children under the age of 13 away from this device.
- Use this device only for its intended use as described in this manual. Do not use attachments not recommended by the manufacturer.
- Never operate this device if it has a damaged cord or plug, if it is not working properly, if it has been dropped or damaged, or if it has been dropped into water. Return the device to a service center for examination and repair.
- DO NOT carry this device by its power cord or use the power cord as a handle.
- Keep the power cord away from heated surfaces.
- DO NOT use outdoors.
- DO NOT OPERATE WHERE OXYGEN IS BEING ADMINISTERED or where aerosol (spray) products are being used.
- To disconnect, turn all controls to the off position and then remove the plug from the outlet.
- WARNING: Do not use the device in close proximity to loose clothing or jewelry.
- WARNING: Keep long hair away from massager while in use.
- If you experience pain or any abnormal sensation when using the product, discontinue use immediately and consult your doctor.
- Only use the device on a flat surface. If it is not stable it may overturn and cause injury.
- Store it in a cool, moisture-free space after use.
- Do not stack other objects on top of the massager.
- The silicon pads can be removed for cleaning. Dry completely before reattaching the pads.
- Do not connect the device to an adaptor or current converter. Do not use an extension cord.
- Do not use a damaged power cord. This could cause a short circuit, which is a fire risk.
- Do not let the device get wet. This could cause a short circuit, which is a fire risk.
- This device should only be used by one person at a time. To prevent accidents or injuries, the device should not be used while holding an infant.
- Do not stand on the device.
- Do not hit or drop the device. Doing so could cause accidents, device failure, or injury to users.
- Do not try to repair this device yourself. Please contact Customer Service using the contact information on the back of this manual.
- Do not use PowerLegs for purposes other than those expressed in this manual.
- Exhausted batteries are to be removed from the remote. Never drop or insert any object into any opening.
SAVE THESE INSTRUCTIONS. FOR HOUSEHOLD USE ONLY.
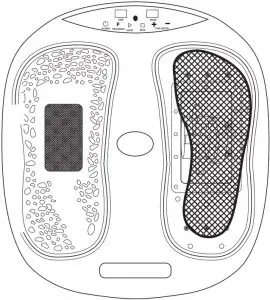
Parts and Accessories
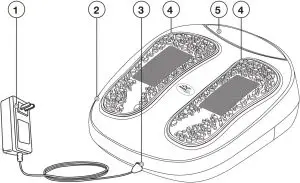
- AC ADAPTER
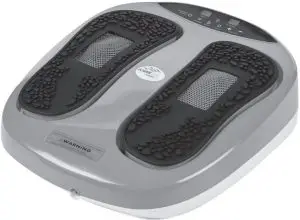
- POWERLEGS MAIN BODY
- POWER PLUG
- SILICON PADS
- DISPLAY
- REMOTE CONTROL
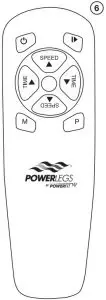
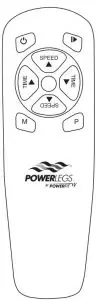
Remote Control Buttons
 POWER BUTTON: Press to turn the device ON or OFF. When the device is first turned ON, it enters standby mode. In standby mode, the program time may be adjusted using the Time +/– Buttons.
 P BUTTON (Programs): Press to cycle between automatic mode, three preset programs (P1, P2, and P3), and manual mode (H0).
 M BUTTON (Manual Mode): Press to set the device to manual mode. When this button is pressed, “H0” appears on the display. In manual mode, the oscillation and massage functions run continuously and the speed is customizable using the Speed +/– Buttons.
 START/STOP: Press to begin the selected program with your chosen time and speed settings. When the device is running a program, press this button to stop the program.
 TIME +/–: Press to increase or decrease the program time. (Default: 10 minutes; Max: 10 minutes). The time can only be changed when the device is in standby mode.
 SPEED +/–: Press to increase or decrease the program speed (Range: 1–10 [low–high]). The speed can only be changed when the device is running a program.
- Non-rechargeable batteries are not to be recharged.
- Rechargeable batteries are only to be charged under adult supervision.
- Rechargeable batteries are to be removed from the device before being charged.
- Different types of batteries or new and used batteries are not to be mixed.
- Batteries are to be inserted with the correct polarity.
- Exhausted batteries are to be removed from the remote.
Never drop or insert any object into any opening.
Remote uses two AAA batteries (not included)
Features and Benefits

Modes of Use
STANDBY MODE: The device is on but is not running any program.
MANUAL MODE: The device is running the oscillation and massage functions continuously. The speed of these functions can be adjusted by using the Speed +/– Buttons. “H0” appears on the display.
AUTOMATIC MODE: The device is running one of the three preset programs (P1, P2, or P3). Use the Program Button to cycle between the three preset programs. The selected preset program appears on the display.
| AUTO-MODE P1: | Vibration Only | Manually set the speed/intensity to your preference. |
| AUTO-MODE P2: Vibration & Massage | ||
| DEFAULT TIME Total 10 Minutes |
FUNCTION | SPEED RANGE (Speed changes per one second, Total 60 Seconds |
| 1st Minute | Vibration Only | 1, 1, 2, 3, 4,
5, 6, 7, 8, 9, 10, 9, 8, 8, 9, 9, 10, 10, 9, 8, 9, 10, 9, 8, 8, 9, 10, 10, 9, 8, 8, 9, 10, 10, 9, 8, 8, 9, 10, 10, 9, 8, 8, 9, 10, 10, 9, 8, 8, 7, 7, 6, 6, 5, 4, 3, 2, 1, 0, 0. |
| 2nd Minute | Vibration & Massage | |
| 3rd Minute | Vibration Only | |
| 4th Minute | Vibration & Massage | |
| 5th Minute | Vibration Only | |
| 6th Minute | Vibration & Massage | |
| 7th Minute | Vibration Only | |
| 8th Minute | Vibration & Massage | |
| 9th Minute | Vibration Only | |
| 10th Minute | Vibration & Massage | |
| AUTO-MODE P3: Vibration & Massage | ||
| DEFAULT TIME Total 10 Minutes |
FUNCTION | SPEED RANGE (Speed changes per one second, Total 60 Seconds |
| 2 Minutes | Vibration Only | 1, 1, 2, 3, 4,
5, 6, 7, 8, 9, 10, 9, 8, 8, 9, |
| 3 Minutes | Vibration & Massage | 9, 10, 10, 9, 8,
9, 10, 9, 8, 8, 9, 10, 10, 9, 8, |
| 2 Minutes | Vibration Only | 8, 9, 10, 10, 9,
8, 8, 9, 10, 10, 9, 8, 8, 9, 10, |
| 3 Minutes | Vibration & Massage | 10, 9, 8, 8, 7,
7, 6, 6, 5, 4, 3, 2, 1, 0, 0. |
General Operating Instructions
Instructions for Use
- Press the Power Button to turn the device ON.
- Press the Program Button to cycle through the preset programs or manual mode (NOTE: The M Button can only be used to set the device to manual mode when the device is first set to automatic mode).
- Press the Start/Stop Button to begin the selected program.
- Press the Time +/– and Speed +/– Buttons to adjust the program’s time and speed (NOTE: Certain programs will only allow you to adjust either the time or the speed).
- If you want to stop the selected program while the program is running, press the Start/Stop Button again to return the device to standby mode.
- When you are done using the device, ensure that the device is in standby mode. Then, press the Power Button to turn the device OFF.
Operating Notes
- Remote control range: about 8 feet (2.5 meters).For optimum signal transmission, ensure that no obstacles are placed between the device and the remote control. Point the remote control at the infrared receiver on the device.
- When the device is in manual mode, you can set the time before the massage starts and adjust the speed during the massage.
- When the P3 program is selected, you can set the time before the program begins. You can adjust the speed while the program is running.
- When the P1 program is selected, the rotating acupressure heads will stop operating as soon as you place your feet on the device. This is not a defect.
Correct Use Positions
Place the foot arch or calf on the machine. To use it on your back, place it on the back, rest and lean on it.
- FEET/CALF: Place the arch of your foot or your calf on the machine.
- BACK: Place the device on the back of a chair, lean against the device, and activate the device. Ensure that your hair is not touching the device. Do not wear loose clothing when using this device on your back.
Program for Beginners (Vibration Only)
- Turn on the device by pressing the Power Button on the remote.
- Select the P1 program by pressing the P Button on the remote once. The vibration speed will start at level 1 (the lowest level).
- Use this program for 10 minutes per day for three consecutive days.
- On the fourth day, increase the vibration speed to level 2 by pressing the Speed + Button once after setting the device to the P1 program.
- Use this program for 10 minutes a day for three or more consecutive days.
- Continue increasing the vibration speed of the program once every few days until you have built up your foot strength enough to be comfortable on speed level 10. If you feel discomfort at any point, stop and lower the speed level until you are strong enough to endure the program for 10 minutes. Then, continue increasing the speed level once every few days.
Adding Massage
After completing the Program for Beginners, your feet should be strong enough to introduce the massage feature used by programs P2 and P3. Follow the same gradual increase in vibration speed as with the Program for Beginners.
- When using programs P2 and P3, be sure to place your feet in the correct position (see Correct Use Positions, p. 8).
- Align the highest part of the arches of your feet with the massage wheel in the device (see Fig. 1).
- You can control the strength of the massage by exerting more or less pressure on the arches of your feet. Begin by applying only a little pressure on your arches and gradually increase pressure over time as your feet grow stronger
TIP: Wearing thicker socks on your feet will give you more padding, which will reduce the pressure on your feet.
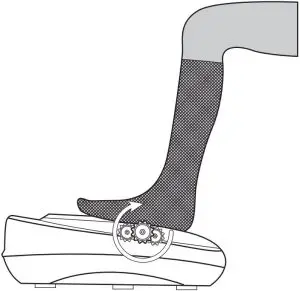
Fig. 1. Aligning the massage wheel with the arches of your feet.
Maintenance and Cleaning
Cleaning
- Before cleaning the device, make sure that the Power Switch is off and that the Power Cord is unplugged from the outlet.
- Clean the device and the silicone pads with a damp cloth and mild detergent. Do not use abrasive or corrosive cleaning agents.
- The silicone pads can be removed to make cleaning easier.
- Never allow the device to come into contact with water or other liquids.
- Do not clean the device with corrosive substances because you can damage the device.
- Clean the remote control with a clean cloth.
- If you are not using the device for a long time, put it in its packaging box and store the box in a cool, dry place. Remove the batteries from the remote control.
- If the device presents any issues that cannot be solved using the solutions in the Troubleshooting section, please contact Customer Service using the contact information in the back of this manual.
Storage
When the device is not in use, store in a cool, moisture-free environment.
Troubleshooting
| Issue | Cause | Fix |
| The device does not work. | The Power Cord is not plugged into a power outlet. | Connect the Power Cord to a power outlet |
| The Power Switch is in the Off position. | Place the Power Switch in the On position. | |
| The Remote Control does not work. | The Remote Control’s batteries are dead. | Replace the batteries. |
| The remote control is too far away from the device’s Infared Receptor. | The effective distance of the Remote Control is 6.56 feet (2 m). | |
| The machine stopped working suddenly. | The programmed exercise time ended. | Reset the exercise time. |
| The device is not responding. | Too many commands were input at once and the device cannot respond to all of them. | Turn off the device, wait 1 minute, and turn the device back on again. |
Frequently Asked Questions
- How often should PowerLegs be used?
The recommended routine is 10 minutes a day, 3 times each week – total 30 minutes per week. Review the instruction manual for more options. - Are there programs available for massaging?
Yes, the unit has options for vibration and massaging. - What is the length of the power cord?
The power cord length is 52 inches (132 cm). - Can I use the PowerLegs while pregnant?
Using PowerLegs during pregnancy is not recommended. - Can I use PowerLegs after a recent surgery?
If you have any known health concerns or have recently had surgery, It is recommended that you consult your doctor or physician before using PowerLegs.
90-Day Money-Back Guarantee
The PowerLegs is covered by a 90-day money-back guarantee. If you are not 100% satisfied with your product, return the product and request a replacement product or refund. Proof of purchase is required. Refunds will include the purchase price, less processing and handling. Follow the instructions in the Return Policy below to request a replacement or refund.
Replacement Guarantee Policy
Our products, when purchased from an authorized retailer, include a 1-year replacement guarantee if your product or component part does not perform as expected, the guarantee extends only to the original purchaser and is not transferable. If you experience an issue with one of our products within 1 year of purchase, return the product or the component part for replacement with a functionally equivalent new product or part. The original proof of purchase is required, and you are responsible to pay to return the appliance to us. In the event a replacement appliance is issued, the guarantee coverage ends six (6) months following the receipt date of the replacement appliance or the remainder of the existing guarantee, whichever is later. Tristar reserves the right to replace the appliance with one of equal or greater value.
Return Policy
If, for any reason, you would like to replace or return the product under the money back guarantee, your order number can be used as the return merchandise authorization number (RMA). If the product was purchased in a retail store, return the product to the store or use “RETAIL” as the RMA. Return your product to the address provided below for a replacement, which will incur no additional processing and handling fees, or for the refund of your purchase price, less processing and handling. You are responsible for the cost of returning the product. You can locate your order number at www.customerstatus.com. You can call customer service at 973-287-5172 or email [email protected] for any additional questions. Pack the product carefully and include in the package a note with (1) your name, (2) mailing address, (3) phone number, (4) email address, (5) reason for return, and (6) proof of purchase or order number, and (7) specify on the note whether you are requesting a refund or replacement. Write the RMA on the outside of the package.
Send the product to the following return address:
PowerLegs
Tristar Products
500 Returns Road
Wallingford, CT 06495
If the replacement or refund request has not been acknowledged after two weeks, please contact Customer Service at 973-287-5172.
Refund
Refunds requested within the money-back guarantee timeframe will be issued to the payment method used at purchase if the item was purchased directly from Tristar. If the item was purchased from an authorized retailer, proof of purchase is required, and a check will be issued for the item and sales tax amount. Processing and handling fees are non-refundable.
CONTACT US
We are very proud of the design and quality of our PowerLegs® This product has been manufactured to the highest standards. Should you have any questions, our friendly customer service staff is here to help you.
Visit us at www.TristarCares.com,
email us at [email protected],
or call us at 973-287-5172
Distributed by:
Tristar Products, Inc.
Fairfield, NJ 07004
© 2021 Tristar Products, Inc.
Made in China
PF_PL-1911_IB_TP_ENG_V2_210503
