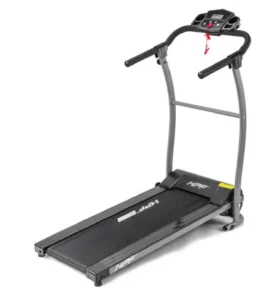
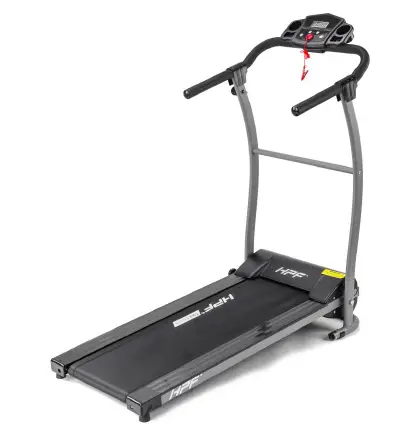
PROFLEX Elite Electric Treadmill User Manual
Safety
Basic precautions, including the following important safety instructions should always be followed when using the treadmill. Read all instructions before use.
To reduce the risk of electric shock, always unplug the treadmill from the electrical outlet after use and before cleaning, assembling, or servicing. Failure to follow these instructions may lead to personal injury and cause damage to the treadmill.
Before beginning any exercise program, consult your physician. This is especially important for people over 35 years of age or who have pre-existing health problems. Read all instructions before using any fitness equipment. Do not operate this exercise equipment without properly fitted guards, as the moving parts can present a risk of serious injury if exposed.
WARNING! To reduce the risk of burns, fire, electric shock or injury, read the following:
- Use this product for its intended use only as described in this user manual. Do not use attachments not recommended by the
- Never operate the unit with a damaged cord or plug, or if it is not working properly. If it has been dropped, damaged or exposed to water, have the unit inspected/repaired by an authorized service
- Caution – To avoid injury, use caution when stepping on to or off of a moving treadmill
- Maximum weight capacity = 100 kg.
- Do not attempt any maintenance or adjustments other than those described in this user manual. Should any problems arise, discontinue use and consult an authorized service centre or personnel.
- Never operate the appliance with the air openings blocked. Keep the air openings free of lint, hair, and other obstructions.
- Do not use the unit
- Do not pull the unit by its power cord or use the cord as a
- Keep children and pets away from the equipment while in
- Elderly or disabled users should only use the unit in the presence of an adult who can provide assistance if
- Do not operate where aerosol (spray) products are in use or where adequate oxygen is not
- Keep dry – do not operate in wet or moist
- The motor cover can become hot while the unit is in use. Do not place the unit on a flammable surface as this can create a fire
- Keep electrical cord away from hot
- Keep the unit on a solid, level surface with a minimum safety area clearance of two meters around it. Be sure the area around the treadmill remains clear of any obstructions during
- The treadmill is for domestic household use
- Only one person should use the treadmill at a
- Wear comfortable and suitable clothing when using the treadmill. Do not use the treadmill barefoot or in Always wear appropriate, enclosed athletic footwear. Never wear loose or baggy clothing as it can become caught on the treadmill and create a hazard.
- Always hold on to the handrails while using the
- Always ensure the spring loaded pin and locking screw are in place when folding and moving the
- Do not leave children unsupervised near or on the
- Children should not be allowed to play or operate the treadmill at any
To disconnect, turn all controls to the OFF position, then remove plug from the wall outlet.
- This appliance is not intended for use by persons (including children) with reduced physical, sensory or mental capabilities, or lack of experience and knowledge, unless they have been given supervision or instruction concerning use of the appliance by a person responsible for their safety.
- Remove the safety tether for emergency
- This unit must be plugged into a nominal 240 VAC/50 Hz outlet which has been
- Keep hands clear of all moving Never place hands or feet under the treadmill while in use.
- Do not use the treadmill on high-pile carpet greater than 3 cm in height.
- Before using the treadmill, check that the belt is aligned and centred on the running deck and all visible fasteners on the treadmill are sufficiently tightened and
- If the supply cord is damaged, it must be replaced by the manufacturer, its service agent or similarly qualified persons in order to avoid a
- Never operate this treadmill when
- Allow the running belt to fully stop and unplug the power cord from the wall outlet before folding the
- Always face towards the computer console and do not run backwards on the running
Setting Up the Treadmill
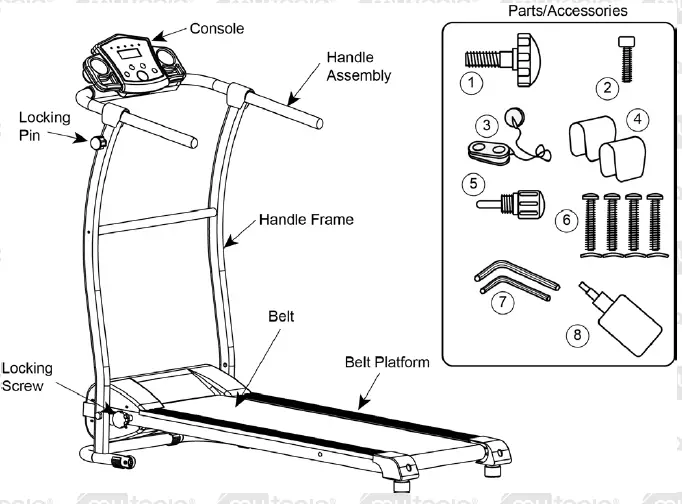
The TRX1 Elite treadmill comes partially assembled. The unit comes with the following parts. Ensure that all parts are included before assembly.

| No. | Qty. | Description | No. | Qty. | Description | |
| 1 | 1 | M12x50 locking screw and nut | 5 | 1 | Spring loaded locking pin | |
| 2 | 1 | M6x40 console screw | 6 | 4 | M8x50 handle screw and shaped washer | |
| 3 | 1 | Safety tether | 7 | 2 | 5 mm and 6 mm Allen key | |
| 4 | 2 | Handle screw covers | 8 | 1 | Belt Lubricant |
Assembly
- Take all parts out of the carton and place them on a firm, flat Remove all packing materials around the parts.
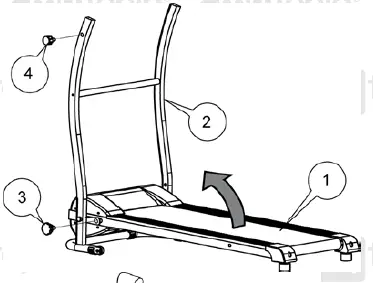
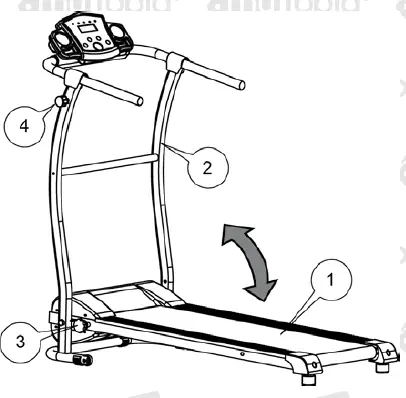
- With the treadmill flat, lift the handle mounting frame (2) so that it is upright, then secure it to the belt platform (1) using the locking screw (3). Insert the locking screw and firmly tighten by hand (rotate right) against the handle mounting

- Insert the spring loaded pin (4) into the handle mounting frame (2) and tighten firmly by hand (rotate right).
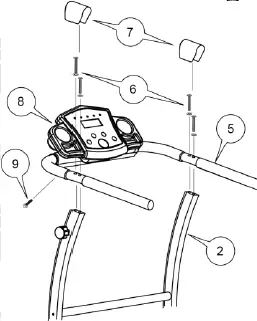
- Place the handle assembly (5) on to the handle mounting frame (2), then secure it using the handle screws and shaped washers (6). Ensure the washers follow the shape
of the tube when installed. Tighten the screws (rotate right) using the supplied Allen key. When the screws are installed, clip the covers (7) to the handle over the screw heads.
- Plug the handle assembly electrical connector (right hand side handle) into the socket on the handle mounting frame.
- Rotate the console (8) to the desired position, then secure it using the console screw (9). Tighten the screw (rotate right) using the supplied Allen
Once assembled, the machine ready for use
- Remove the locking screw (3). The screw can be stored in the bracket next to where it
- Hold the handle assembly and gently lift the end of the belt platform (1) up toward the handle frame (2).
Pull the spring loaded locking pin (4) out so the belt platform is fully in the folded position, then release the pin so that it enters the hole in the belt platform.
- With the treadmill upright, hold the belt platform (1) steady then pull the spring loaded locking pin (4) out from the handle frame (2).
- Gently lower the belt platform down so it rests on the floor.
- Secure the belt platform to the handle assembly using the locking screw (3) and firmly tighten by hand (rotate right), against the handle mounting frame.
Note: Always set-up the equipment on a flat and level surface. If the equipment “rocks”, (if applicable) rotate
feet under front of machine to move up or down as needed so equipment is steady
The unit can be tilted onto its wheels for easy moving and storage. With the treadmill in the folded and locked position, firmly grasp the handlebar with both hands. Next, carefully tilt the treadmill back until it rolls freely on the transport wheels.
Caution: Do not attempt to move the treadmill while it is in the unfolded position. • Be careful when moving the treadmill to avoid scratching floor surfaces
Operating the Treadmill
Safety Tether and Emergency Stop
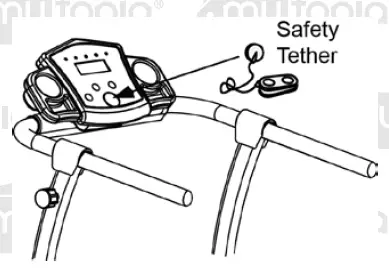
The treadmill comes equipped with a “safety tether”. The safety tether must be attached to the console in order for the treadmill to run. It is designed to attach to your clothing so that if you leave or fall from the treadmill it will stop automatically, helping prevent injury.
Before beginning a workout session ensure that the safety tether is properly placed onto the console and that the clip is securely attached to your clothing.
Note: If the treadmill is on, but the safety tether is not attached, “_._._._.” is shown on the console display and the treadmill cannot be started.
Program and Manual Modes
The treadmill features two basic operating modes
Note: The treadmill must not be running in order change/select modes.
- Manual Mode – The treadmill is being used, but not running a preset program (see Program mode, below). In this mode, the treadmill can be set to stop automatically at a pre-set session duration. To enter Manual mode, press Mode
Note: You can also press Start to use the treadmill without setting a duration. In this mode, the treadmill will stop automatically after 60 minutes
- Program Mode – The treadmill runs through a preset routine where it will apply a particular speed for a period of time. There are 8 preset routines to choose from (“P1” to “P8”). In Program mode, the unit automatically changes speeds. At each speed change, the unit beeps for 3 seconds before changing speed, as a warning. To enter Program mode, press Mode when the treadmill is on but not running – the display flashes “_._._._.”. Use the + or – buttons to select the required program
Treadmill Console and Functions
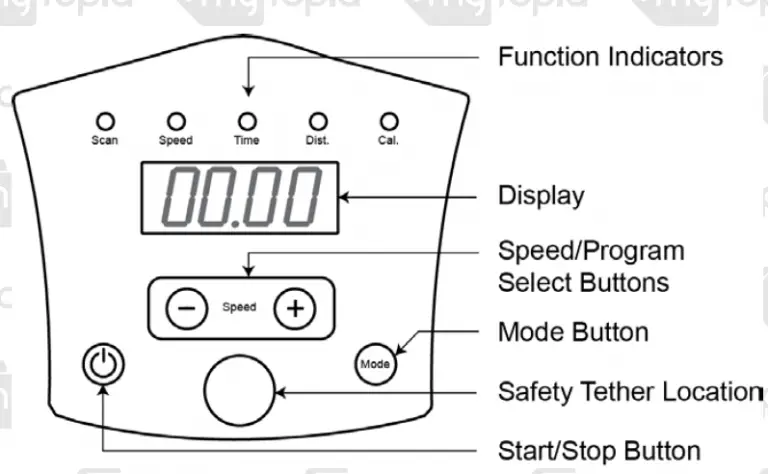
The treadmill features a computerized display that provides you with controls for operating the unit as well as workout information, such as duration, speed, distance travelled etc.
To use the treadmill:
- Plug the treadmill into the electrical
- Place the power switch, located at the front of the unit, in the “ON” (“I”)

- Attach the safety tether to the safety tether location on the
- Operate the treadmill as desired
Always stand on the side rails when starting the treadmill. Never stand on the belt then start the machine.
| Console Button | Description |
| Start/Stop | Press to start or stop the treadmill. |
| Safety Tether Location | Holds the safety tether in position (magnetically). The treadmill cannot be started unless the safety tether is in position. The console display shows “_._._._.” if the treadmill is on but without the safety tether. |
| Mode | When the treadmill is running, press to switch between display modes (speed, time etc). For each mode, the function indicator for it illuminates when selected and the display shows the applicable information. Display modes include:
· Speed – The current speed in km/h. · Time – The time since the treadmill was started in Manual mode. In Program mode, the time remaining. · Dist. (Distance) – The distance travelled during the current session. The distance is measured in 0.1km increments. This means that “0.0” will show until at least 100m is travelled. · Cal. (Calories) – The number of calories used during the current session. To approximately convert calories to kilojoules, multiply the number of calories by 4. · Scan – The display switches between display modes every 5 seconds. When the treadmill is on but not running, press to enter Program mode. In Program mode, the display flashes “_._._._.”. After selecting a program, press again to enter program duration setting. |
| Speed +/– | When the treadmill is running, press + to increase speed. Press – to reduce speed. Each press changes speed by 0.1 km/h. Hold the button down to more quickly change speed. The speed range is 1.0 to 10.0 km/h. Speed can also be adjusted using the right-hand handle mounted + and – buttons.
When in Manual mode and the treadmill is not running, press + or – to adjust duration. When in Program mode and in the program duration mode and the treadmill is not running, press + or – to adjust the program duration. |
| Display | Shows current information, such as speed, time etc. |
| Function Indicator | Illuminates to show which mode or information is currently being displayed. |
Manual Mode Training
The TRX1 Elite has a “manual” mode of operation, which gives you the freedom to adjust the treadmill
operation as desired at any time. In this mode, once started, the treadmill runs until you stop it
- Turn on the
- Press Start. The treadmill counts down 3 seconds, then the belt starts running at the slowest speed
- Adjust speed using + and – as
- When finished, press Stop
Program Mode Training
The TRX1 Elite has 8 automatic training programs, “P1” to “P8”. Each program has a standard duration of 10 minutes (you can change this from 5 to 30 minutes ) and applies differing speeds up to 20 times per program (for example, if the duration is 20 minutes, the speed changes every 1 minute). To access the programs:
- Turn on the treadmill, press Mode and when “_._._.” is flashing on the display, press + to select program 1 (“P1” displays). To select other programs, keep pressing + as required.
Optionally, to set program duration, press Mode, then use +/– to set the duration in minutes.
- Press Start. The treadmill counts down 3 seconds, then the belt starts
- When the treadmill changes speed, a beep sounds 3 times before the
- When completing the program, a beep sounds 3 times before the treadmill
Programs P1 – P8
Program speeds and durations are shown below:
| Program | Speed (km/h) | |||||||||||||||||||
| P1 | 1.0 | 3.0 | 5.0 | 7.0 | 5.0 | 3.0 | 1.0 | |||||||||||||
| P2 | 2.0 | 3.0 | 4.0 | 5.0 | 6.0 | 5.0 | 4.0 | 3.0 | 2.0 | 3.0 | 4.0 | 5.0 | 6.0 | 5.0 | 4.0 | 3.0 | 2.0 | |||
| P3 | 3.0 | 5.0 | 8.0 | 5.0 | 8.0 | 5.0 | 8.0 | 5.0 | 8.0 | 5.0 | 8.0 | 5.0 | 8.0 | 5.0 | 8.0 | 5.0 | 8.0 | 5.0 | 8.0 | 5.0 |
| P4 | 2.0 | 6.0 | 9.0 | 6.0 | 9.0 | 6.0 | 9.0 | 6.0 | 9.0 | 6.0 | 9.0 | 6.0 | 9.0 | 6.0 | 9.0 | 6.0 | 9.0 | 6.0 | 9.0 | 3.0 |
| P5 | 1.0 | 5.0 | 8.0 | 5.0 | 2.0 | 5.0 | 8.0 | 5.0 | 2.0 | 5.0 | 8.0 | 5.0 | 2.0 | 5.0 | 8.0 | 5.0 | 2.0 | 5.0 | 8.0 | 3.0 |
| P6 | 2.0 | 4.0 | 6.0 | 8.0 | 6.0 | 4.0 | 2.0 | 4.0 | 6.0 | 8.0 | 6.0 | 4.0 | 2.0 | 4.0 | 6.0 | 8.0 | 6.0 | 4.0 | 2.0 | 4.0 |
| P7 | 3.0 | 5.0 | 7.0 | 9.0 | 7.0 | 5.0 | 3.0 | 5.0 | 7.0 | 9.0 | 7.0 | 5.0 | 3.0 | 5.0 | 7.0 | 9.0 | 7.0 | 5.0 | 3.0 | 5.0 |
| P8 | 2.0 | 5.0 | 8.0 | 2.0 | 5.0 | 8.0 | 2.0 | 5.0 | 8.0 | 2.0 | 5.0 | 8.0 | 2.0 | 5.0 | 8.0 | 2.0 | 5.0 | 8.0 | 2.0 | 5.0 |
Care, Troubleshooting and Maintenance
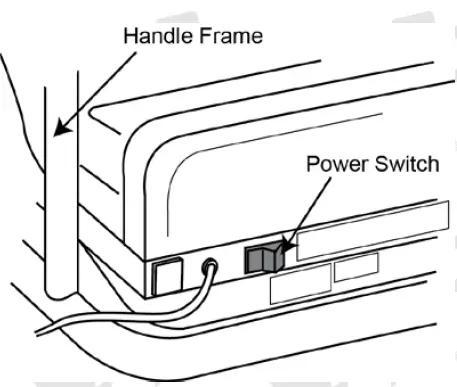 To prevent electrical shock, please turn off and unplug the treadmill before cleaning or performing routine maintenance. Before each use, check the running belt for wear
Cleaning
The treadmill can be cleaned with a soft cloth and mild detergent. Do not use abrasives or solvents. Be careful not to get excessive moisture on the display panel as this may damage it and create an electrical hazard.
After each use, wipe the unit of any sweat, dirt or liquids.
Keep the treadmill, especially the display console, out of direct sunlight to prevent damage to the screen.
Storage
Store the treadmill in a clean and dry indoor environment. Never leave or use the unit outdoors. Ensure the master power switch is OFF (“O”) and the power cord is un-plugged from wall outlet.
Troubleshooting
| Problem | Potential Reason | Correction |
| Treadmill will not start. | A. Treadmill not plugged in.
B. Safety tether not in place. C. Treadmill circuit breaker tripped. |
A. Plug power cord to electrical outlet and switch ON.
B. Place safety tether in correct location on console. C. Wait 5 minutes and then try to restart the treadmill. |
| No console display | No connection. | Check electrical cables are in good condition and properly connected. |
| Belt slips. | Belt loose. | Adjust belt tension. |
| Belt hesitates when stepped on. | A. Not enough lubrication on running deck.
B. Belt too tight. |
A. Lubricate running deck.
B. Adjust belt tension. |
| Belt is not centred. | Running belt tension not even across the rear roller. | Adjust belt alignment. |
| Equipment unsteady | Surface not flat. | Set-up equipment on a flat surface.
• If applicable, rotate feet under front of machine to move up or down as needed so equipment is steady. |
When to Call for Help
This treadmill is designed with user safety as a priority. In the event of electrical failure, the treadmill will shut off automatically to prevent injury and damage to the unit. If you encounter unusual behaviour from the treadmill, turn the power switch off and on to reset the treadmill. This should ready the treadmill for normal operation again. If after you have reset the treadmill that it is still not operational, call an authorized service centre or technician for servicing.
Belt Lubrication
Lubricating the running belt helps maintain performance and extends service life. Lubricate the belt after the first 25 hours of use (or 2 to 3 months), then every 50 hours of use (or 5 to 8 months, or more frequently under extended usage
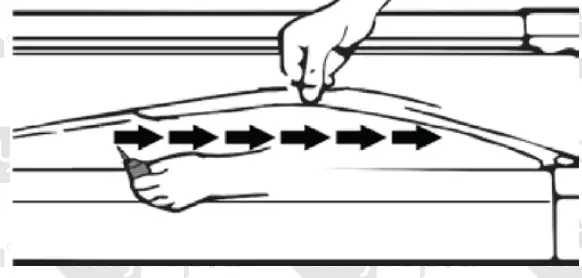
To check if the belt requires lubrication, lift each side of it and feel the top surface of the running deck. If the deck is slick to the touch, no lubrication is required; if it is dry, lubricate. To apply lubricant
- Lift the edge of the running belt so the running deck is
- Place several drops of the supplied lubricant along the centre of the running
- Run the equipment at a slow speed for 3 to 5 minutes to evenly distribute the lubricant
Note: Do not over lubricate. Wipe away any excess lubricant from the running belt. • All-purpose household oil or sewing machine oil can also be used.
Belt Alignment and Tension Adjustment
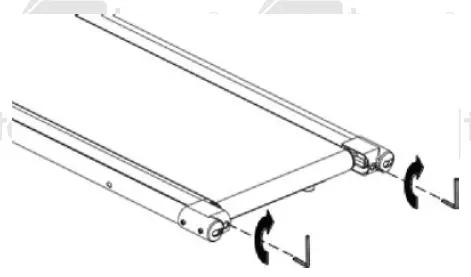
The running belt is pre-adjusted to the running deck at the factory, but after prolonged use it can stretch and require re-tensioning. To adjust the belt, turn on the main power switch of the treadmill and let the belt run at a speed of 6km/h. Use the Allen key provided to turn the rear roller adjustment bolts in order to center the belt. If the running belt is shifting to the left, turn the left adjustment bolt 1/4 turn to the right, and the running belt should start to correct itself.
If the running belt is shifting to the right, then turn the right adjustment bolt 1/4 turn to the left, and the belt should start to correct itself. Keep turning the adjustment bolts until the running belt is properly centered.

If the running belt is slipping during use, turn off and unplug the treadmill. Using the Allen key provided, turn both left and right rear roller adjustment bolts 1/4 turn to the right, then turn the main power switch back on and run the treadmill at a speed of 6km/h. Run on to the running belt to determine if the belt is still slipping. Repeat this procedure until the belt no longer slips
Warm-Up and Cool-Down Routine
The warm-up routine is an important part of any workout. The purpose of warming up is to prepare your body for exercise and to minimize injuries. Warm up for two to five minutes before aerobic exercising. It should begin every session to prepare your body for more strenuous exercise by heating up and stretching your muscles, increasing your circulation and pulse rate, and delivering more oxygen to your muscles.
Always perform a cool-down routine after your workout, repeat these exercises to reduce soreness in tired muscles. The purpose of cooling down is to return the body to its resting state at the end of each exercise session. A proper cool-down slowly lowers your heart rate and allows blood to return to the heart
Head Roll
Rotate your head to the right for one second, you should feel a stretching sensation up the left side of your neck. Then rotate your head back for one second, stretching your chin to the ceiling and letting your mouth open. Rotate your head to the left for one second, then drop your head to your chest for one second

Shoulder Lift
Lift your right shoulder toward your ear for one second. Then lift your left shoulder up for one second as you lower your right shoulder.
Side Stretche
Open your arms to the side and lift them until they are over your head. Reach your right arm as far toward the ceiling as you can for one
second. Repeat this action with your left arm

Quadriceps Stretch
With one hand against a wall for balance, reach behind you and pull your right foot up. Bring your heel as close to your buttocks as possible. Hold for 15 seconds and repeat with left foot.

Inner Thigh Stretch
Sit with the soles of your feet together and your knees pointing outward. Pull your feet as close to your groin as possible, then gently push your knees toward the floor. Hold for 15 seconds.

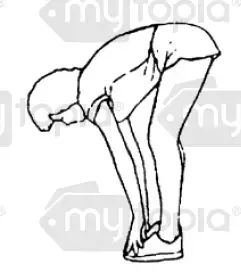
Toe Touch
Slowly bend forward from your waist, letting your back and shoulders relax as you stretch toward your toes. Reach as far as you can and hold for 15 seconds

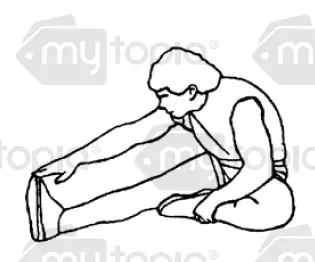
Hamstring Stretch
Extend your right leg. Rest the sole of your left foot against your right inner thigh. Stretch toward your toe as far as possible. Hold for 15 seconds. Relax and then repeat with left leg

Calf/Achilles Stretch
Lean against a wall with your right leg in front of the left and your arms forward. Keep your left leg straight and the right foot on the floor; then bend the right leg and lean forward by moving your hips toward the wall.
Hold, then repeat on the other side for 15 seconds.
 |
Some experts believe the incorrect or prolonged use of almost any product could cause serious injury or death. For information that may reduce your risk of serious injury or death, consult the points below and additionally, the information available at www.datastreamserver.com/safety | |
|
|
|
©2017 HPF and Proflex. All rights reserved. No part of this document, including descriptive content, concepts, ideas, diagrams or images may be reproduced or transmitted in any form or by any means, electronic or mechanical, including photocopying, scanning or recording, or any information storage and retrieval system, without express permission or consent from the publisher.