PROMNICO Money Counter User Manual
Product Overview
Phone support available Mon-Sat 9am-5pm EST @ 1 (844) 382-8549
Make counting and bundling money easier than ever with the Promnico Mixed Value Bill Counter. This reliable high-speed counting
machine delivers rapid, error-free sorting and valuation results that save you time and effort when it comes to your cash flow.
Choose between multiple modes as you count and bundle banknotes in five of the largest world currencies. Engineered for your monetary security with a Best-In-Class built-in counterfeit detection & alert system.
PRODUCT FEATURES:
Mixed Value Counting of Multi Currency
Auto Currency Identification
Auto Mixed Currency Identification
Serial Number Identification
CIS/UV/MG/IR Counterfeit Detection
LCD (TFT) Screen Display
Easy Updates Via USB/SD Card
Optional Printer and PC Connection
Unlike most money counters on the market, our business-ready version determines not just the number but the VALUE of the bills you put through it, eliminating the risk of human error and freeing up your focus for other tasks.
COUNTERFEIT AND FRAUD PROTECTION
Featuring a combination of CIS, ultraviolet, magnetic and infrared technologies that offer the most thorough counterfeit detection and fraud protection on the market.
AUTO CURRENCY IDENTIFICATION
The machine automatically detects the currency of the bills, including detecting and counting mixed currencies in the same feed. Or simply count any one of them. Choose from USD, EUR, GBP, CAD and MEX.
MULTIPLE HIGH-SPEED COUNTING MODES
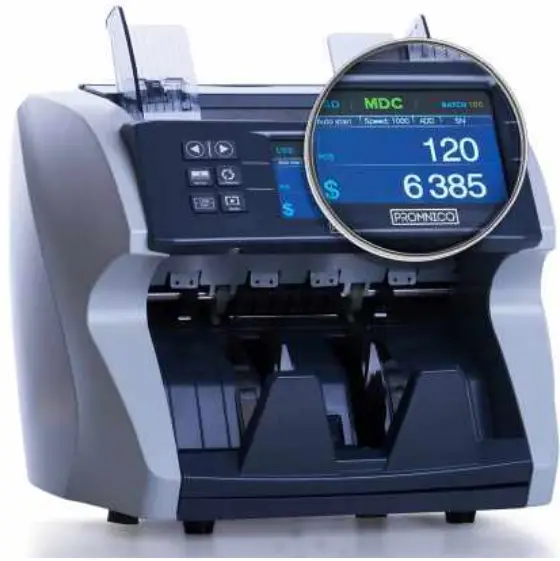
- MDC Mode: Counts mixed denomination bills
- SDC Mode: Counts first note read as benchmark, then stops when a different bill has been detected
- CNT Mode: Only reads number of bills
TECHNICAL SPECIFICATIONS:
- Feeder Capacity: 500 bills
- Carrier Capacity: 200 bills
- Power Supply: 110~200V AC. 50/60 Hz
- Dimensions: 11.2” L x 9.9” x W x 11.4” H Weight: 15.9 lbs.
Box Contents
- Promnico Money Counter
- Power Cable
- User Manual
Power On/Off
Make sure the unit is plugged into an active outlet securely on both sides. After doing so, to turn on the unit, press the power toggle switch near the power plug port.
Frequently Asked Questions
Q) Does the machine add (e.g. if I put 20 $20 bills, will the machine give a count of 20, or indicate a total of $400)?
A) Yes, this machine scans and gives the total value of the bills, along with a count of the bills too, which is a feature many of our competitors do not offer. In your example, the machine screen would read “COUNT 20 AMOUNT $400”. Afterwards, there is also a reporting panel that will display the # of each bill that was scanned, along with serial numbers (if available) on another report as well.
Q) Does this machine count up to a certain number for easy bundling? For example, would I be able to put in 100 bills and have it shoot out 50 at a time to bundle?
A) Yes, simply turn on the BATCH mode and select the amount you would like to bundle.
Q) How many bills can you put in at one time?
A) Up to 500 in the hopper, and the output tray will hold up to 200 bills at a time.
Q) Does it work for bills other than US Dollars?
A) Yes. Our machine can count USD (United States Dollar), EUR (Euro), GBP (British pound), CAD (Canadian Dollar), and MXN (Mexican Peso)
Q) Can this machine detect counterfeit bills?
A) Yes. Our machine uses CIS/UV/MG/and IR for the most thorough
counterfeit detection on the market.
Product Tips
Calibrating your machine is upon delivery is very important and ensures that you have the most hassle-free experience when reading bills.
Please follow our helpful video online on how to do so by visiting: video.promnico.com
Other important product tips:
- Turn off the machine if you are not using it.
- Regularly cleaning of the sensors is not required but may help if they have become dirty from use. Please see the “maintenance” section for more details.
- Make sure to select MDC mode if you are dealing with mixed denominations, which is not on by default.
- Make sure to select CNT mode if you are only interested in the number of bills or are bundling cash.
- SDC will take the first note read as the benchmark, and then stop when a different bill has been detected – use this to help sort your cash or to be sure you aren’t bundling mixed bills.
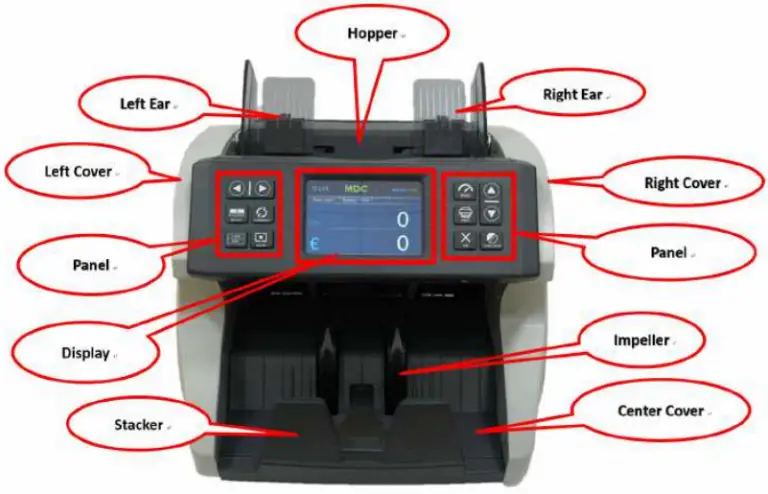
Product Part Diagram (Front)

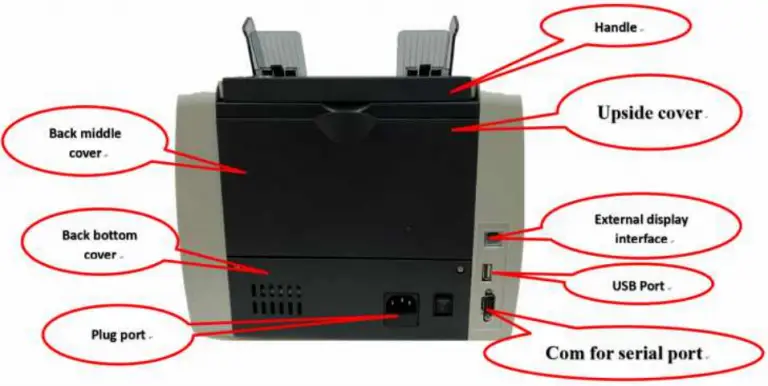
Product Part Diagram (Back)
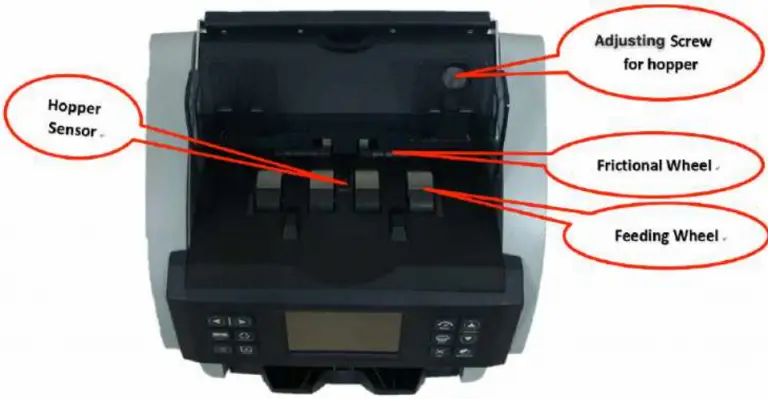
Product Part Diagram (Top)
Technical Specifications
| Unit Dimensions: | 28CM(W)*26CM(D)*27CM(H) / 11”(W)*10.2”(D)*10.6”(H) |
| Unit Package: | N.Weight: 6.5KGS G.Weight: 7.5KGS |
| Counting Speed: | 800/1000/1200/1500notes/min for CNT mode, 800/1000/1200 notes/min for SDC & MDC modes |
| Size of Countable notes: | Minimum 110×60 mm, Maximum 185×90 mm Thickness 0.08~0.12 mm |
| Feed system: | Roller Friction System |
| Hopper Capacity: | 400-500 notes |
| Stacker Capacity: | 200 notes |
| Power Supply: | AC 100~240V ±10%, 50/60 Hz |
| Current: | Maximum 1.8A (100~240 VAC) |
| Power Consumption: | <50 Watts |
| Ambient Temperature: | 0℃~35℃ (Operating) |
| Working Environment: | -10℃~60℃ (Stocking) |
| Ambient Humidity: | 20%~90% (no condensation) |
| Connection Port: | USB, RS232, LAN |
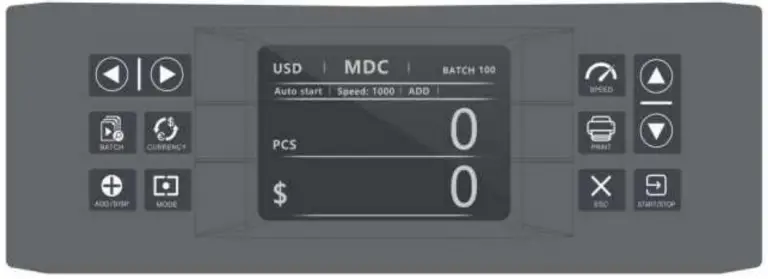
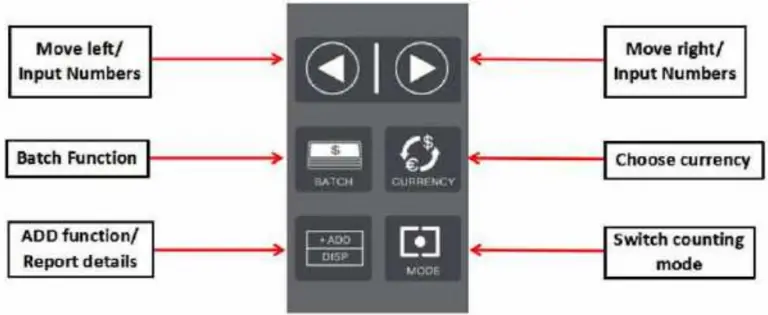
Control Panel Overview
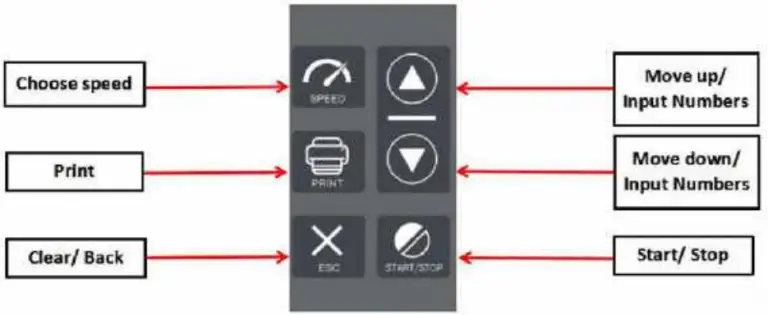
Operation Modes
MDC Mode (Most Popular): Counts mixed denomination bills. Press REPORT button to check the bill details when finished.
CNT Mode: Only reads number of bills. In this mode, you can switch on ADD or BATCH or ADD+BATCH.
SDC Mode: Counts first note read as benchmark, then stops when a different bill has been detected. Useful for sorting bills.
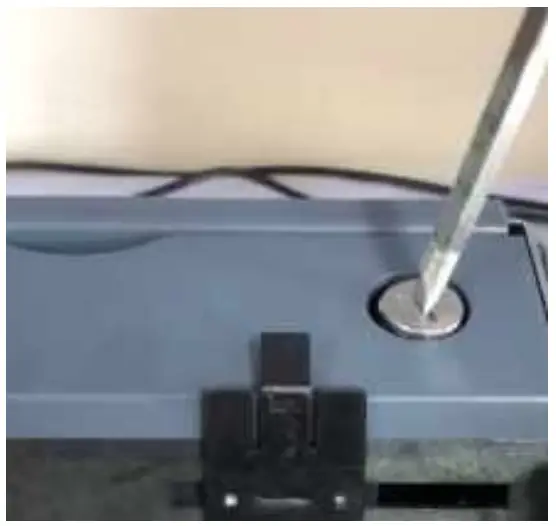
Maintenance
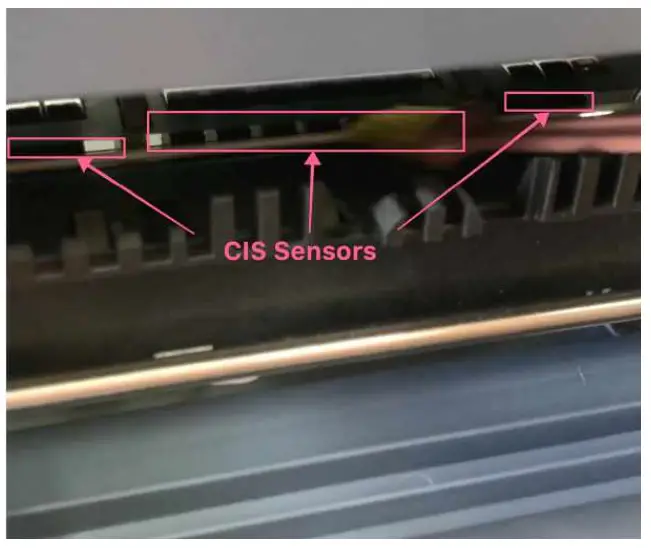
Please turn off the machine and unplug the power cord when the machine is not in use. To clean the sensors (note-feeding sensor, note-receiving sensor, and counting sensors located in the back-middle cover), please use a dry soft nylon brush. A brand new, soft unused paintbrush from a local craft-store works best to clean the sensors.
Resolving “CHAIN ERROR” Message
If your machine reads bills and outputs a “CHAIN ERROR” message, please follow the instructional video at the following link to calibrate your machine: video.promnico.com
Software Update Instructions
There may be times where you are required to update your machine’s software. Follow these instructions to make the update process go as smoothly as possible.
- Please download the latest money counter software at download.promnico.com
- Save the file to your computer (IMPORTANT! DO NOT RENAME THE FILE!)
- Insert a removable flash drive into your computer
- Make sure the flash drive is formatted as FAT32(Default) with allocation size of 4096bytes
(You can do this on Windows by right clicking the USB drive in ‘My Computer’, and selecting the ‘Format’ option)
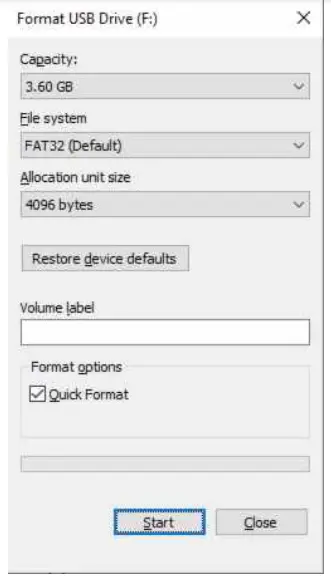
(You can do this on MacOS by opening disk utility, and using the ‘Erase’ button on the USB drive) - Transfer the file to the USB drive (should be named something like
PROMNICO-29USD_EUR_GBP_MXN_CAD_xxxxxxxx_202817I.APPU) – Again, do not rename the file! - Connect the USB drive to your money counter through the back USB port
- Power on the machine – it will automatically update the software
- When it shows ‘update finished’, turn off the machine and remove the USB drive, and you will be good to go!
Resolving “Check Stacker Sensor” Error
To resolve this issue, please follow the ‘Software Update Instructions’ above.
How to Enable/Disable Auto-Start Mode
Your money counter may by default have auto-start mode enabled. Autostart mode simply means that the counter will begin reading bills when it has detected new bills in the hopper.
If you’d like to turn off this feature, and only have the machine start when the “START/STOP” button is pressed, simply press and hold the Up arrow on the money counter. To revert back to auto-start mode, repeat these steps.
Changing Counterfeit Detection Level
There are 4 modes of intensity regarding counterfeit detection. Each one is represented by a bar as shown below on the top right of the money counter display:

- 0 bars = No Detection
- 1 bar = Low Detection
- 2 bars = Moderate Detection (default)
- 3 bars = High Detection
You can change the level of detection by pressing and holding the left and right arrows