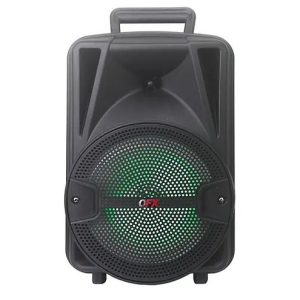
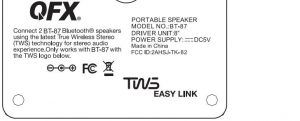
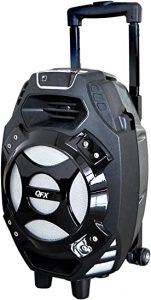
QFX BT-87 Portable Speaker
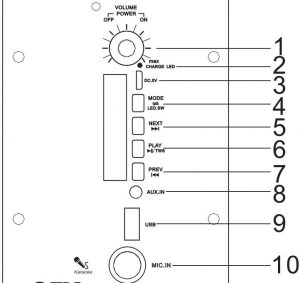
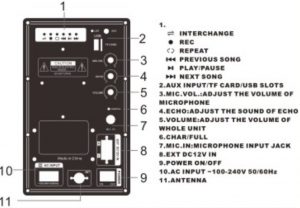
BACK PANEL
- Power / VOLUME – & +
- Charging Indicator
RED = Charging
Light off = Fully Charged - DC interface (5V)
- MODE/LED.SW (Long press to turn on/off light; Lightly press to enter into selection for Bluetooth, FM Radio, AUX Input, USB)
- Next track
- Play/Pause & TWS (Wireless Bluetooth Connection: under Bluetooth mode, press TWS button for around 3 seconds to pairing another TWS speaker; Under FM mode, lightly press Play/Pause & TWS to enter into automatic scan and all the scanned radio stations will be saved automatically.)
- Previous track
- AUX input
- USB input
- MIC input
POWER SOURCE
- Please charge the unit at least 4 hours before first time using.
- Twist the dial clock wise fanticlockwise to switch on/off the unit.
CHARGE THE BATTERY
When the battery is charging, the CHARGE STATUS lights shows on the LED display is red.
After the battery has fully charged, the light turns off.
- Connect the USB charge cable to the DC5V interface of the speaker firmly.
- When the battery is fully charged, please disconnect the USB charge cable from the speaker.
- The speaker works normally when charging.
POWER / VOLUME
Twist the dial clockwise fanticlockwise to increase / decrease the volume.
PREVIOUS / NEXT BUTTON
Under playing status, press PREVIOUS/NEXT button to get back to a previous or next song.
PAUSE/PLAY BUTTON
To stop playing the current track, please press PAUSE / PLAY button on the control panel.
Press it once again to continue playing.
MODE/LED.SW
Long press to tum on/off light. Lightly press to enter into playing mode selection
(Bluetooth, FM Radio, AUX Input, USB).
AUX IN JACK
- Connect an audio cable to the AUX IN JACK of the speaker and to the audio output socket on the external audio devices such as MP3 player, discman, etc, then select LINE by pressing the MODE/LED.SW button on the control panel.
- Play from an external audio device.
MIC IN JACK
Plug in microphone directly for playing.
USB JACK
Insert USB card directly for playing.
FM FUNCTION
Lightly press MODE/LIGHT button to switch to FM mode. Press PLAY/PAUSE button on control panel for automatic searching and saving the radio stations, by pressing PREVIOUS or NEXT you can select a previous or next radio station.
Bluetooth:
Lightly press MODE/LIGHT button on control panel to select Bluetooth mode. Simultaneously open the Bluetooth setting on your phone, tablet or any other Bluetooth enabled audio device and select “BT-87” (no need to match code),the unit and device will then connected via Bluetooth. Press the “NEXT SONG” and “PREVIOUS SONG” button on the control panel to select the song, press “PLAY / PAUSE” button to control the playing status.
TWS (TRUE WIRELESS STEREO) PARING 2 BT-87
Step 1 : Push the Mode button on both speaker until both speaker are in Bluetooth Mode. Display will show Bluetooth.
Step 2: When both speakers are in Bluetooth Mode. Push and hold the TWS button one of the
speakers for 3 seconds. You will hear a beep. The speakers will connect together. Next time you put both speakers in Bluetooth mode at the same time, they will connect automatically.
Step 3: On your Bluetooth settings on your device, find “QFX BT-87”. If your TWS speaker paring was successful you should only see one ·aFX BT-87″ to choose from.
Select the “FX BT-87”. Enjoy True Wireless Stereo (TWS) sound from your phone via Bluetooth.
]]>
QFX Portable Speaker Model #PBX-61081BT
Carefully read operating manual to operator this unit properly, and keep this manual for further reference.
INSTRUCTION
- THIS UNIT HAS RECHARGEABLE BATTERY. WHEN THE BATTERY POWER IS
FINISH, KINDLY PLUG THE SWITCH TO ELECTRIC SOCKET ACCORDING TO INPUT VOLTAGE. - PLEASE NOTE IF VOLTMETER IS GOING BELLOW 12V WHICH SHOWS BATTERY 1S GETTING LOW. IT MEANS THE UNIT NEEDS CHARGE, WHEN THE UNIT IS CHARGING. PLEASE MAKE SURE AC/DC SWITCH SHOULD BE ON, ONCE CHANGED PLEASE UNPLUG THE SOCKET FA.OM ELECTRICITY SAFELY. YOU HAVE TO CHARGE THE BATTERY FOR 10 TO 12 HOURS FOR THE FIRST USE. NEXT TIME ONWARD YOU HAVE TO RECHARGE THE BATTERY FOR 8 TO 10 HOURS BATTERY NORMAL WORKING TIME IS 5 TO 6 HOURS ACCORDING TO THE VOLUME OF SPEAKER.
- WHEN CHANGE THE FUSE, PLEASE USE ONLY 10 AMP FUSE.
ATTENTION
- IN ORDER TO KEEP BATTERY LIFE LONGER. KINDLY CHARGE THE
BATTERY EVERY TIME AFTER THE BATTERY POWER IS FINISH, OR IT WILL
DAMAGE THE BATTERY IF YOV KEEP IT LONG TIME WITHOUT CHARGE OR
NOT USING IT FOR LONG PERIOD OF TIME, SO KINDLY USE IT AFTER
REGULAR INTERVAL OF TIME. - OUR COMPANY RESERVE RIGHT TO BRING CHANGES IN PRODUCT WITHOUT ANY NOTICE.
- IF A N Y ISSUE WITH THE PRODUCT KINDLY CONTACT THE PROFESSIONAL PERSON TO HANDLE AS THIS UNIT IS HIGH POWER• SO PLEASE DO NOT OPEN THE UNIT,
- KEEP IT AWAY FROM CHILDREN.
PANEL FUNCTION DECLARATION
REC FUNCTION DECLARATION
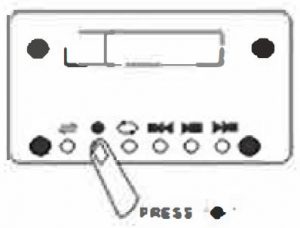
How to use REC?
Step 1: Make sure the unit is working, put USB or SD card into the slot.
Step 2: Inserting the wired microphone, make sure it is working normally by speaking some words, e.g. ‘hello’. If you can hear the voice which means wired microphone is ready to rec.
Step 3:
- Long press the button Short press the button
 then to start recording, you are freely to ree what you want.
 - Short Press the button to play recording when you finish recording
REMOTE FUNCTION DECLARATION
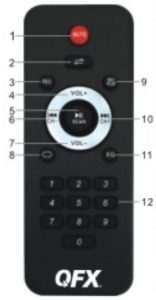
- MUTE:Press this button to mute the unit
- Press this button to toggle between the various inputs( AUX, USB, SD, FM,BLUETOOTH). Long press this button to turn on/turn off the voice prompt
- Press this button to start recording
- press this button to increase the master volume for the unit
- press this button to pause or play the unit when it is on the mode of USB. When it is on the mode of FM. press this button to auto scan all channels. Long press to change language to Chinese/English for the voice prompt
- Press this button to select the previous song/channel
- Press this button to reduce the master volume for the unit
- Press this button to repeat one/repeat all
- Press this button to play the recording
- Press this button to select the next song/channel
- Press this button to select the EQ mode of Normal, Jazz, Rock, Pop, Classical
- 0-9, Key number for selecting the certain songs in the USB/SD/TF Card.
Bluetooth Pairing
STEP 1: Press the mode button on front panel to launch the bluetooth application Then you will see that “Bluetooth” logo show on the screen.
STEP 2: Slide the Bluetooth switch to “on’. Your others devices with Bluetooth function, like smart phone, computer or others, then it automatically begins scanning for nearby Bluetooth devices.
STEP 3: Tap the entry for Bluetooth accessory when it is detected by the smart phone or computer and displayed on the screen. Then it can use Bluetooth to operate in conjunction with accessory.
]]>REM-20 4 In 1 Universal Smart TV Remote Control
User Manual

Your Universal Remote
Introduction
With the universal remote, you can operate up to 4 different devices.
Overview of the Universal Remote
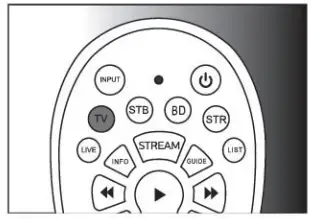
- INPUT: select available source inputs (antenna, cable, etc.).
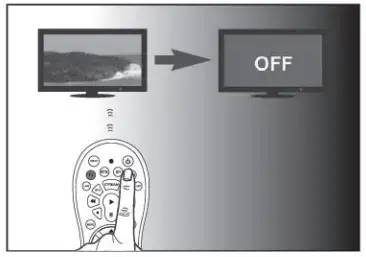
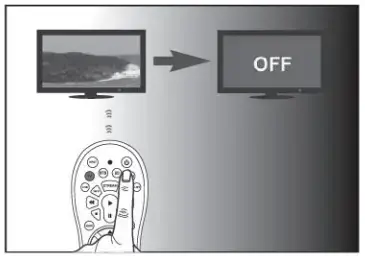
: power on or off.
 : LED indicator
 - Device selection buttons
- LIVE: displays live TV programs.
LIST: displays a list of recorded programs.
INFO: displays on-screen channel information.
STREAM: shortcut to the Neat
GUIDE: displays the program guide.
►: play
 : fast forward
 : rewind
 : pause
 : stop
: record  : scroll the menu up / down / left ./ right.
OK: confirm your selection.
MENU: menu on or off.
BACK: go back one menu level or exit.- : mute
LAST: return to the previously tuned channel.
CHNCH-: go to the next/previous channel.
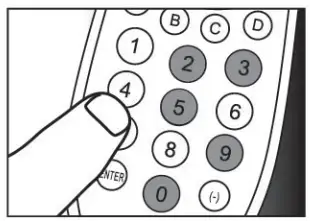
VOL: adjust the volume. - AlEI/C/D: context sensitivity buttons (A- yellow, B – blue, C- red. D – Green).
- Digit buttons
ENTER: confirm the digit button selection. (-): selects between one and two-figure channel numbers.
Note: The button 5TREAM” is pre-programmed as a shortcut to Netflix. All other streaming services such as Vudu, Amazon, YouTube and Hulu Plus, etc may be accessed through navigation.
Supported Devices
| Device name | Description |
| TV | TV, DTV |
| BD | DVD player/recorder, Blu-ray player |
| STB | Cable box, satellite receiver, IPTV, DVR, HDTV decoder and TiVo |
| STR | Streaming devices, Apple TV, Roku, Sony, WD TV, Netgear |
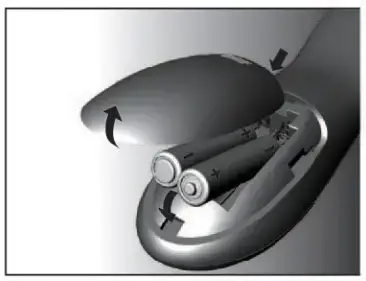
Get started
Insert Batteries (not included)
 Warning: Check the battery polarity when inserting in the battery compartment. Incorrect polarity may damage the product.
Caution:
- Risk of explosion! Keep batteries away from heat, sunshine or fire. Never discard batteries in fire.
- Risk of decreased battery life! Never mix different brands or types of batteries.
Note: When you replace the batteries, all user settings will be retained in the memory of the universal remote for 5 minutes.
Set up the Universal Remote
You must first set up the universal remote before operating your devices.
Manual Registration
- Switch on your device.
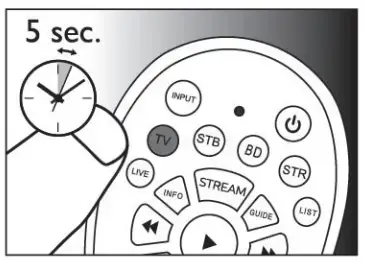
- Press and hold the device selection button (e.g.TV) for 5 seconds until the blue LED is on.
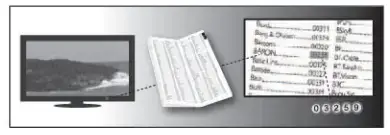
- Look up the 5-digit code for your brand in the code list. Codes are listed by device type and brand name. The most popular code is listed first.
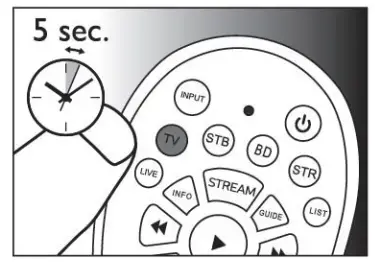
- Enter the first 5-digit code using the digit buttons.
- If the light is off, a valid code is saved. Otherwise, the light will flash once and then remains on for code re-entry.
- Operate the device with the universal remote. If your device responds correctly, it means you have entered the right code. Otherwise, repeat step 2, and enter the second code on the list.
 Note: It is possible sometimes that your device only responds to some of the buttons. In such a case, set up the next code in the code list, and try operating your device again.
Auto Registration
- Switch on your device.
- Press and hold the device selection button (e.g.TV) for 5 seconds until the blue LED is on.
- The point at your device with the universal remote. Press the (!) button repeatedly (up to 300 times) to start searching the code for your brand. With each continuous press, the blue indicator flashes.
- When the device turns off, immediately press and release OK to save the code. The blue LED indicator will turn off.
- Operate the device with the universal remote. If your device responds correctly, it means you have saved the right code.
LIMITED PRODUCT WARRANTY POLICY
Before returning ya.r Product for service under this Warranty, please (i) reach the Istnction manual carefully and visit our website at whivw.qfiLsa.com for Product updates and extended support docarnertation (e.g., Common Troubleshooting Gicies); (ii) if you are so.] having trouble with your Product, please contact the QFX Customer Support Department.
Subject to the terms and conditions herein, (R Inc (hereinafter called “M”) warrants to the Orig nal purchaser of the Product (“Customer) that for the applicable Warranty Period fisted below, the Product will be free from defects n material or walananship under normal, noncommercial use (“Defects’
Warranty Period encompasses, as listed below, separate “Coverage Periods” for Parts and Labor, each Coverage Period to perform the original date of Customer purchase. If the Customer returns a defective Product (or any component thereof) during the applicable Warranty Period, QFX will, at its option, during the specified Coverage Periods for Parts and labor (as applicable either (i) repair the Product (or, as applicable, a component thereof) or (I) replace the Product (or, as applicable, any component thereof) with a new or refurbished Product (or, as applicable, any component thereof), in either case, free of charge to Customer for Parts arid/or Labor (as applicable) during the specified Cower-age Pociad only, and reducing applicable shipping charges (noted below), for which the Customer is responsible. The foregoing gates the Customer’s desired remedy and QFX’s sole lability for breach of it warranty contained herein.
This warranty covers only normal use. This warranty is not transferable. QFX is not responsible for warranty replacement should the QFX label or to be red-nosed or should the product fail to be properly maintained or fail to lunatic) properly as a result of misuse, abuse, immersicc in liquids, Improper istilatto, improper shipping, damage caused by triers such as fire, flood, or senice toiler than by OfX In addition, this warranty excludes any Product (cc as apphcab e, any component thereof) that has been subject to a Defects resulting from: (a) any neglect or nisuse by a Customer, an accident, improper application, violation of operating ingructions for the Product, wry other Customer-:educed damage, or the aeration or removal of any Product serial rumber; (b) any modification or repair to Product (or, as applicable, any component thereof) by any party other than OfX or on party authorized in writing by OR (c) any damage to Product (a, as applicable, any component thereof) the to power surges, incorrect electrical voltage, misconnection to any device, or malfunction of any deice used with the Product (or, as applicable, arty component thereof); (d) cosmetic damage to the Product (or, as appkabie, any component thereof) caused by motel wear and tear, (e) Awing damage that owls vAile the Product is n transit; (f) damage caused by heat sures, sunlight, electromagnet conditions, or other dimatic conditions or (g) any acts of God.
Product is sold to Customer fa personal, non-camierdal use only. Product is rat warranted fa Customers commercial a rental use. In addition, Product is not warranted /and fake, and should not be used by Customer fa any am: ration where (i) there is a risk that any data stored on Product will be breached an otherwise compromised or ci) the data stored on Product is relied upon for medical an Irfesaing applications. QFX disdains any Warranty fa any of the foregoing uses to the fulk5t anent permitted by law. The customer assumes any and all risks associated with such uses of the Product and agrees to indemnify QFX for/ damages darned against 05X fa such uses.
RCEPT FOR EXPRESS WARRANTIES STATED ABOVE AND TO THE MAXIMUM EXTENT PERMUTED BY LAW, THE PRODUCTS ARE PROVIDED “AS 6” AND QFX D6CIAIMS All OTHER WARRANTIES, INO.USING WITHOUT UM inflation ANY IMPLIED WARRANTY (i) Of MERCHANTABILITY, (ii) Of FINES FOR A PARTICULAR PURPOSE, OR (0 Of NON INFRINGEMENT OF THIRD PARTY RIGHTS. TO THE MAXIMUM EXTENT PERMITTED BY APPLICABLE LAW, IN NO EVENT, WILL QFX BE LIABLE TT) CUSTI3MER OR ANY THIRD PARTY FORAM’ INDIRECT, SPECIAL, INCIDENTAL, CONSEQUENTIAL, EXEMPLARY OR PU MINE DAMAGES, INCTUOINS, WNW UMITATTON, ANY LOST PROFITS OR REVENUES, LOSS OR INACCURACY OF ANY DATA OR COST Of SUBSTITUTE GOODS, REGARDLESS OF THE THEORY OF LIABILITY (INCA DOC NEGUGE NCI) AND EVEN IF QFX HAS BEEN ADV6ED OF TIE POSSIBILITY OF SUCH DAMAGES, QFX AGGREGATE LIABILITY TO CUSTOMER FOR ACTUAL DIRECT DAMAGES FOR ANY CAUSE WHATSOEVER SHALL BE UNITED TO THE CUMULATIVE PRODUCT FEES PAID BY THAT CUSTOMER FOR THE PRODUCTS CAUSING TIE DAMAGES, If ANY
This Warranty gives the Customer specific rights, and the Customer may also have other rights that vary from jurisdiction to jurisdiction. Warning: Some Predicts may contain components that are small enough to be swallowed. Please keep it out of reach of children. In order br the retail to be processed, you must send the Product PREPAID to the address below in the original packaging as a reasonable substitute to prevent damage and include: (1) a dated sales receipt (which must have a purchase date that fats in the Warranty Period specified in the table below) that indicates the place of purchase, model number of Product, and amount paid, (2) a detailed description of Customers problem with Product, (3) Customers full name, phone number, and return address, (3) all of the accessories that came with the Pit package must be sent along with the main Product, (4) a cashier’s check or money cider payable to QFX, and., in the amount specified for die item in the product table below for return shipping and hang. If b this case you cannot provide a money order or a cashier’s check, you can contact The (X Customer Support Representative to arrange payment via ore* card. No returned Product will be shipped back< to a PO BOX. If a returned Product is found to have no problem and does not dude All of the requirements indicated above, it may be returned badly to the customer and will mat be processed.
All onus and details beim are `or US Des nations exdt.d rHawaii, Alaska and Puerto Rico. For (“elided destinations and NON-US destinations, please contact The QFX Customer Support Department directly for additional shipping fees and return instructions.
if you do not find your Product below, yo• Product model conflicts with multiple categories, and/or are unsure of which category the Product you have purchased will fall under, please contact our Customer Support Department for further instruction.
In order to determine the exact shipping cost that must be included with your product or paid for the product berg relined, please refer to the tat* below. Please find the product you wish to return by category cs model number prefix OR will not Kw& any return or refund to any customer for merchandise and will only honor the tinted Warm*/ restrictions mentioned in this document
Please make? ale to follow all directions prior to shipping bath your item. If you are not sure what the shipping cost for your item is, or if your item category conflicts in the table below, please feel free to contact the QFX Support Department for further assistance.
| PRODUCT CATEGORY | HANDLING | LABOR | PARTS |
| Earphones, Headphones, Pcu, & Srrel Ebetootth speaker | $5.00 | 1Year | 1Year |
| Personal Stereos | $10.00 | 1 Year | 1 Year |
| Portable Radio/Cassette | $00,15. | 1 Year | 1 Year |
| large Portable Radio Cassette | $00,20. | 1 Year | 1 Year |
| Mode Audio | $00,10. | 1 Year | 1 Year |
| Pro Au& SU Systems | $00,75. | 1 Year | 1 Year |
| Pro Ado PEG( Systems | $00,75. | 1 Year | 1 Year |
| Televisions | $25.00 | 11tar | 1 Year |
| Telephones | $10.0) | 1 Year | 1 Year |
THE WARRANTY AND REMEDY PROVIDED ABOVE ARE MUSH AND IN LIEU OF ALL OTHER DRESSED OR IMPLIED WARRANTIES INCLUDING, BUT NOT UM [TED TO, THE IMPLIED WARRANTIES OF MERCHANTABLE, NON-INFRINGEMENT OR FITNESS FOR A PARTICULAR PURPOSE. SOME LAWS DO NOT ALLOW THE EXCLUSION OF IMPLIED WARRANTIES. IF THESE LAWS APPLY, THEN ALL EXPRESSED OR IMPLIED WARRANTIES ARE LIMITED10 THE WARRANTY PERIOD IDENTIFIED ABOVE. UNLESS STATED HEREIN, ANY STATEMENT OR REPRESENTATIONS MADE BY ANY OTHER PERSONS OR ARM ARE VOID. EXCEPT AS PROVIDED IN THIS WRITTEN WARRANTY, OfX SHALL NOT BE UABLE FOR ANY LOSS, INCONVENIENCE, OR DAMAGE, INCLUDING DIRECT, SPECIAL INCIDENTAL OR CONSEQUENTIAL DAMAGES, RESULTING FROM THE USE OR INABILITY TO USE THE OfX PRODUCT, WHETHER RESULTING FROM BREACH OF WARRANTY OR ANY OTHER LEGAL THEORY
Some jurisdictions do not allow Imitations on how long an implied warranty lasts, and some jurisdictions do not allow the exclusion or kitty) of incidental I or consequential damages, so the above limitations and cousins may not apply to you. This warranty gives you special legal rights at you may have other rights which vary from jurisdiction to jurisdiction
Copyright Protected 2020 9
OfX UMO, Inc.
RMA Processing
Customer Support Department
2957 E. 46th Street I Vemon, CA 90058
![]() [email protected].
[email protected].
![]() (800) 864-CLUB (2582) or (323)864-6900
(800) 864-CLUB (2582) or (323)864-6900
![]() qfxusa.com
qfxusa.com
Hours of Operation: Monday – Friday, 9 am – 5 pm PST

http://www.qfxusa.com