
Ralink Wireless Lan Interface Installation Guide
WIRELESS LAN INTERFACE MAIN UNIT
- This INSTALLATION MANUAL can also be viewed on the home page of MITSUBISHI HEAVY INDUSTRIES THERMAL SYSTEMS, LTD.
- Please download USER’S MANUAL (including the guarantee form) via the QR code or from the home page described later.

Safety precautions
Please read these safety precautions carefully before installing and using this product.
- Be sure to follow these precautions because they describe important safety-related information.
- WARNING: Failure to follow warnings may cause serious consequences such as death or severe injury.
- CAUTION: Failure to follow cautions may cause injury and/or property damage. Depending on the situation, failure to follow cautions may lead to serious consequences.
- The “graphic symbols” in this document have the following meanings.
- Prohibited.
- Be sure to follow instructions.
- After the installation work is completed, check the installation according to the installation work check items. Request your customer to keep this installation manual at the customer’s site.
Warning
- Do not bundle, roll, or step on connection cables to prevent cables from becoming deformed. (Deformation may cause heat generation, fire, or electric shocks due to loose connection, insulation failure, current exceeding the allowable limit, etc.)
- Do not install this product near automatic control equipment such as an automatic door or fire-alarm device. (Such improper installation may cause an accident due to malfunction of equipment.)
- Do not install this product at a location in a hospital, etc. where the use of wireless devices is prohibited. (Such improper installation may cause malfunction of medical equipment due to a wireless device.)
- Do not use this product near a person with a cardiac pacemaker or implanted defibrillator. (Such improper use may cause malfunction of a medical device.)
- Do not disassemble, modify, or repair this product. (Such an activity may cause an electric shock, fire, or any injury.) For installation work, request the sales outlet for the product or an authorized dealer to install the product. (Improper installation may cause a water leakage, electric shock, or fire.)
- In the installation work, install the product securely according to this installation manual, and be sure to use accessories and specified parts for installation.
(Improper installation may cause a water leakage, electric shock, or fire.) - The electrical engineering work must be performed by a qualified electrical worker according to the technical standards concerning electrical equipment, interior wiring regulation, and installation manual.
(Improper work may cause an electric shock or fire.) - For wiring, use the specified cable, and connect the cable securely. Then, fix the terminal connection part securely to prevent external force from being transmitted to the connection part through the cable.
(Improper connection may cause any failure, heat generation, or fire.) - Before installation, unplug the main unit of the air-conditioner. (Installation work without unplugging the equipment may cause an electrical shock.)
- When you unplug the connection cable, hold the connector to unplug the cable.(Improper work may cause an electric shock or fire.)
CAUTION
- Do not use the product near another wireless device, microwave, cordless phone, fax machine, etc.
(Improper use may cause malfunction.) - To prevent any failure due to electrical discharge, touch your hand with metal around you to remove static electricity from your body before you touch this product.
(Improper operation may cause any failure.)
● Be sure to keep dry because the product is not waterproof.
(Improper connection may cause any failure, heat generation, or fire.)
Selecting the installation location and installing the main body
<Selecting the installation location>
Install this product in a location that satisfies the following conditions with the agreement of your customer.
- A location where this product is not exposed to direct sunlight.
- A location where this product is not influenced by a heating device such as a stove.
- A location with no moisture, and where this product is not exposed to water.
- A location where this product is not exposed directly to oil droplets or steam.
- A location without projections or depressions on the installation surface.
- A location at least 1 m away from a TV set, stereo, or radio (the image may be disturbed, and noise may be generated.)
- A location where this product is not influenced by a high-frequency or electrical device.
<Cautions for installation>
- Do not mount the holder and main unit inside the indoor unit.
- Fix the holder on a wall, pillar, etc. securely with attached screws. (Do not mount it on a clay wall, etc.)
- Install the connection cable securely by sliding the main unit from above to prevent the cable from being trapped in the holder.
- Install the main unit within the range where the connection cable can reach the indoor unit.
(The length of the connection cable is about 1.3 m.) - Never extend the connection cable because this product may fail to operate normally if the cable is extended.
- Is it possible to remove the main unit and holder?
<When installing the holder and main unit inside an indoor unit in which they can be included>
- Do not install them inside an indoor unit, except when a unit can include them.
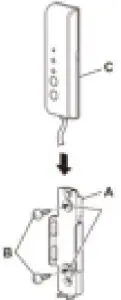
Holes for mounting the unit on a wall
| Accessories supplied with this product Check the accessories supplied with this product. | ||
| Symbol | Part name | Quantity |
| A | Holder | 1 |
| B | Holder mounting screw | 2 |
| C | Main uni | 1 |
| D | Installation manual (this document) | 1 |
Connecting this product with the indoor unit
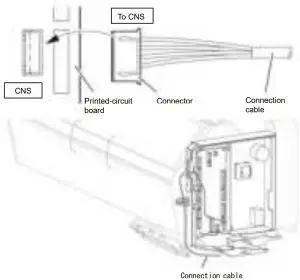
Connect the indoor unit connection cable to the indoor control printed-circuit board.
-
- For the connection of the indoor unit, refer to the “description for connecting the interface kit” in the installation manual of the indoor unit.
- Connect the connector of the indoor unit connection cable to the terminal (CNS) on the indoor control board by installing the cable along the wiring route from below.
- Securely connect the connector of the indoor connection cable to the CNS terminal on the indoor control board.
- About the handling of the connection cable If the connection cable is too long, the redundant cable section should be stored loosely in a space on the back of the indoor unit.
After the installation work is completed, be sure to check the following.
Installation work check items
- Is the holder fixed securely?
- Is the cable trapped? Is the connection cable under a load?
- Is the connector connected properly and securely?
- Did you forget to tighten a screw on the main body of the indoor unit?
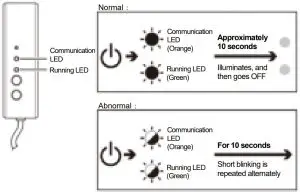
- Turn ON the power to the indoor unit. After that, do the Communication LED and Running LED become ON for about 10 seconds and then OFF? (If the Communication LED and Running LED blink alternately at intervals of 10 seconds, check the connection.)
- Did you pass the installation manual to your customer and request the customer to thoroughly read and store the manual?
If you have any question on the installation, please contact us at the URL on the last page for inquiry.
Notes for users
- Before using the product, the user needs to install the dedicated application.
The user needs to install the smartphone application and then set up a connection with the interface. Set up a connection with the interface according to the user’s manual downloaded via the following QR code or from the URL. - The application is free. Communications charges are applied to downloading and operation.
- The application name “Smart M-Air” and download service names “Google Play” and “App Store” may be changed in the future.
How to install the “Smart M-Air” smartphone application
For Android
- Open [Google Play].
- Search for [Smart M-Air].
- Install the application according to the instructions on the screen.
For iOS (iPhone)
- Open [App Store].
- Search for [Smart M-Air].
- Install the application according to the instructions on the screen.
User’s Manual
Refer to the home page of MITSUBISHI HEAVY INDUSTRIES THERMAL SYSTEMS, LTD.
http://www.mhi-mth.co.jp/en/products/detail/air-conditioner_
users_manual.html

CE Marking
Refer to the home page of MITSUBISHI HEAVY INDUSTRIES THERMAL SYSTEMS, LTD.
MITSUBISHI HEAVY INDUSTRIES THERMAL SYSTEMS, LTD.
2-3, Marunouchi 3-chome, Chiyoda-ku, Tokyo, 100-8332, Japan
Visit: http://www.mhi-mth.co.jp/en/
MITSUBISHI HEAVY INDUSTRIES AIR-CONDITIONING EUROPE, LTD.
5 The Square, Stockley Park, Uxbridge, Middlesex, UB11 1ET, United Kingdom
Tel: +44-333-207-4072
Fax: +44-333-207-4089
Visit: http://www.mhiae.com/
MHIAE SERVICES B.V.
Herikerbergweg 238, Luna ArenA, 1101 CM Amsterdam, Netherlands
P.O.Box 23393 1100 DW Amsterdam, Netherlands
Tel : +31-20-40-64-535
MITSUBISHI HEAVY INDUSTRIES AIR-CONDITIONERS AUSTRALIA, PTY. LTD.
Block E, 391 Park Road, Regents Park, NSW, 2143 PO BOX 3167, Regents Park, NSW, 2143
Tel : +61-2-8774-7500
Fax: +61-2-8774-7501
Visit: https://www.mhiaa.com.au