![]()
ULTIMATE SERIES Rx5
To register your product go to
www.remington-products.com.au
www.remington.co.nz
2 YEAR WARRANTY HC7000AU
IMPORTANT SAFETY INSTRUCTIONS
When using electrical appliances, basic precautions should always be observed, including the following.
READ ALL INSTRUCTIONS BEFORE USING
DANGER: As with most electrical appliances, electrical parts are electrically live even when the switch is off.
For additional protection, the installation of a residual current device (rcd) having a rated residual operating current not exceeding 30 mA is advisable in the electrical circuit supplying the bathroom. Ask your installer for advice.
WARNING: TO REDUCE THE RISK OF BURNS, ELECTROCUTION AND FIRE OR INJURY TO PERSONS
- The appliance should never be left unattended when plugged into a power outlet, except when charging the appliance.
- This appliance should not be used by children or other persons with reduced physical, sensory or mental capabilities or lack of experience and knowledge unless they have been given supervision or instruction concerning use of the appliance in a safe way and understand the hazards involved.
- Children shall not play with the appliance.
- Cleaning and user maintenance shall not be made by children without supervision.
- Never operate this appliance if it has a damaged cord or plug, if it is not working correctly, if it has been dropped or damaged, or dropped into water. If the supply cord or plug of the appliance is damaged it must be replaced by the manufacturer, its service agent or similarly qualified persons in order to avoid a hazard. It cannot be repaired.
- Keep the cord away from heated surfaces.
- Charge, use and store the product at a temperature between 0°C and 32°C.
- Do not use outdoors or where aerosol (spray) products are being used, or where oxygen is being administered.
- Do not use this appliance with damaged or broken tracks, foils or cutters, as injury may occur.
- For use on head hair only. Not intended for shaving the hair on your face.
2
- Do not plug or unplug the appliance with wet hands.
- For household use only.
- Do not place or store the appliance or charging adaptor where it can fall or be knocked into a sink or bath.
- Do not place in or drop into water or any other liquid for extended periods of time.
- If an appliance falls into water, “unplug it” immediately. Do not reach into the water.
- Unplug the charging adaptor from the electrical outlet immediately after fully charging.
- Unplug the power adaptor from the appliance before cleaning the appliance in water.
- Use this appliance only for its intended use as described in this manual.
- Do not use attachments not recommended by Remington.
- Never drop or insert any object into any opening of this appliance.
- Always store the charging adaptor in a moisture-free location.
- Do not use on people who are asleep.
- Do not use an extension cord or a voltage converter with this appliance.
- Do not wrap the cord around the appliance.
- Remington strongly recommends that an approved Safety Switch (Residual current device) be installed to protect all bathroom power outlets. Ask an electrical contractor for advice.
SAVE THESE INSTRUCTIONS
3
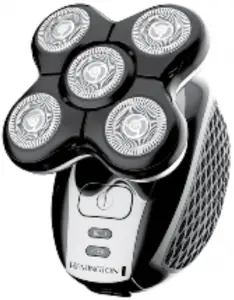
HC7000AU ULTIMATE SERIES Rx5 HEAD SHAVER
Thank you for purchasing your new Remington® Ultimate Series Rx5 head shaver. Inside this manual you will find tips on using and caring for your shaver.
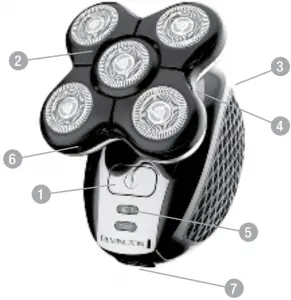
KEY PARTS
- On/Off Switch
- Shaving Head
- Pop Up Trimmer (not shown)
- 360° Pivoting Neck
- LED Battery Indicators
- Hair Pocket
- Charging Pins
Also Includes:
- Head Guard
- Storage Bag
- Cleaning Brush
- Power Adaptor
4
| HC7000AU SPECIFICATIONS | |
| Power System | Cordless (Rechargeable) |
| Initial Charge Time | 4 Hours |
| Full Charge Time | 4 Hours |
| Cordless Run Time | Up to 50 Minutes |
| Indicators | 2 LEDs (Low / Charging / Full Charge) |
| Voltage Type | Worldwide 100 – 240V |
| Waterproof | Yes |
| Replacement Head & Cutters | SP-HC7000AU |
Power System: Cordless – shaver can only be used when disconnected from the charging adaptor. The shaver will not run while it is charging.
Indicators:
- Low Charge: Flashes red when the shaver needs to be recharged.
- Charging: When plugged in, the charging indicator will light up green.
- Full Charge: Green LED indicator will turn off.
Note: Some countries will require the use of a plug adaptor that is not included with your shaver.
CHARGING
Before using, read the important safety instructions in this manual.
- Ensure the product is switched off. Connect the shaver to the adaptor
- Connect to the mains and charge for 4 hours when using for the first time. This first charge is important to the shaver’s battery life.
- When plugged in, the charging indicator will light up green.
- When empty, the battery should be charged for 4 hours for a full charge and will provide up to 50 minutes of shaving time.
- To preserve the life of the battery do not charge the battery after each use. Best practice is to use the shaver until the red low charge indicator appears and then recharge.
Caution:
- Make sure the shaver and your hands are dry when charging the shaver.
- Always charge the shaver in a cool, dry place.
5
SHAVING YOUR HEAD
- Hold the head shaver body in the palm of your hand. Press the On / Off switch to turn the head shaver on.
- Press the five cutting heads against your scalp. It is not necessary to press hard to shave. Pressing hard does not cut closer and could increase irritation. The cutting head will flex to follow the contours of your head.
- Move the shaver slowly around your head. You may use linear strokes, or rotating motion, whichever you feel is most effective picking up and cutting your hair.
- Use a hand held mirror to check the back of your head to confirm a complete and thorough shave. You may also use your other hand to feel for complete and consistent cutting.
- It is not recommended to use the head shaver for facial hair.
- When finished turn the shaver off. Check for the red low charge indication.
SHAVING TIPS
- Do not attempt to shave head hair that is longer than 4 days growth or 2.0 mm. The Ultimate Series Rx5 head shaver is intended to maintain the shaved look and can be used daily or every two or three days.
- The Ultimate Series Rx5 head shaver cannot shave long hair down to the shaved length. If your hair is longer than 2.0 mm you should trim it down with a hair clipper first before using the head shaver.
- The Ultimate Series Rx5 head shaver can be used dry or it can be used with shaving cream or gel in the shower.
TRIMMING
Pop-up Trimmer:
The pop-up trimmer is located at the back of the shaver handle. It can be used for trimming edges of beards, sideburns or ears.
- To activate the trimmer, turn the shaver on. Slide down the release button for the trimmer to pop the trimmer up.
- Use cutting strokes in the direction opposite of the trimmer’s spring release.
- When finished press the trimmer down and snap it back into the stored position.
Note: Lubricate teeth with oil every 6 months.
6
CLEANING & MAINTENANCE
- The Ultimate Series Rx5 head shaver is designed to collect all the hair clippings while it cuts. This avoids clippings spilling onto bathroom counters or shower stalls making clean up easy.
- When cleaning your shaver, make sure it is turned off and disconnected from the charging adaptor cord.
- The shaver is washable and can be cleaned by rinsing under warm water.
- When using shaving creams or gels with the shaver it is especially important to clean after each use to prevent the gel from drying and clogging the cutters.
- When cleaning the external surfaces of the shaver, do not use strong detergents or other chemicals.
- To dry, wipe the surface of the shaver with a dry towel. Do not use a hair dryer or heater to dry the shaver.
- The shaver head and neck assembly is designed to be detachable from the shaver body. Simply pull upwards from the neck of the shaver for easy release. To reattach the neck, align it with the neck attachment cavity so that it clips back into position.
7
PLEASE USE BLOCK LETTERS *INDICATES REQUIRED INFORMATION
*NAME:
*ADDRESS:
*CITY:
*STATE: *POSTCODE:
*CONTACT NUMBER: AREA CODE Ph:
*PAYMENT INSTRUCTIONS:
❑ I enclose my cheque/money order (make payable to Spectrum Brands Australia Pty Ltd or Spectrum Brands New Zealand Limited)
❑ Please charge this purchase to my credit card account: ❑ Mastercard ❑ Visa
Card Number
Expiry Date /
CARD HOLDER NAME:
ADDRESS:
CITY:
STATE:
POSTCODE: SIGNATURE:
ACCESSORY ORDER FORM
| Article | Part No. | Price each AUD | Price each NZD | Qty | Amount |
| Replacement Shaving Head & Cutters for HC7000AU | SP-HC7000AU | $39.95 AUD | $44.95 NZD | $ | |
| Shaver Saver: Aerosol Spray Cleaner | SP4 | $11.95 AUD | $14.95 NZD | $ | |
| Sub Total | $ | ||||
| Postage & handling | $ 7.50 | ||||
| TOTAL | $ | ||||
IMPORTANT: Pricing in effect at time of publication, inclusive of GST. Subject to change without notice. Postage & handling $7.50 standard for Australia & New Zealand.
For help or to place an order on the phone call Remington Customer Service:
 Australia: 1800 623 118 (toll free)
New Zealand: 0800 736 776 (toll free)
![]()
Remington is a Registered Trademark of Spectrum Brands, Inc., or one of its subsidiaries.

AUSTRALIAN RESIDENTS:
Spectrum Brands Australia Pty Ltd
Locked Bag 3004
Braeside, VIC 3195
Australia
NEW ZEALAND RESIDENTS:
Spectrum Brands New Zealand Pty Ltd
PO BOX 9817
Newmarket, 1149, Auckland
New Zealand
CLEANING YOUR SHAVER
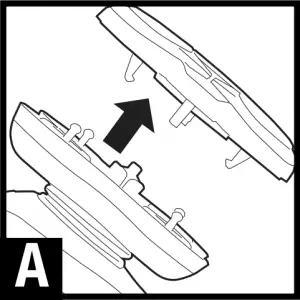
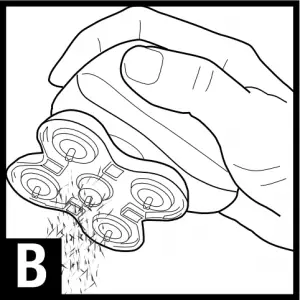
- After every use, hold the shaver over the bin and remove the top of the cutting head. Remove the head by gripping in the areas between the four outer cutters and pulling up and away from the handle. (Diagram A)
- Tap the excess clippings that have been collected inside the hair pocket into the bin. (Diagram B)
- Rinse the cutting head thoroughly by running water through the cutters from both sides of the head.
- Rinse the hair pocket under running water.
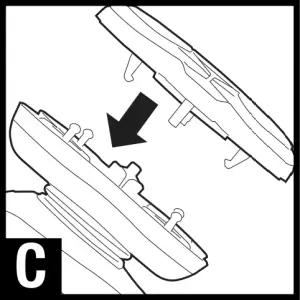
- Leave the cutting head detached and let it air dry. Reattach the shaving head when dry and you are ready for the next use. (Diagram C)
- Lubricate the cutters on the inside surface once a week using Remington Shaver Saver (SP4) to maximise performance.
10
REPLACING SHAVING HEADS & CUTTERS
Please refer to the specifications’ table on page 5 of this manual that lists the correct replacement part number for your shaver.
It is very important to replace the shaving heads and cutters when necessary to ensure a close, comfortable shave without irritation. We recommend they be replaced every 12 months. Here are some signs of head and cutter wear, indicating that replacement is needed:
- Irritation: As the heads get excessively worn you may experience some skin irritation. This would be especially noticeable when you apply moisturising lotion.
- Pulling: When the cutters wear you may feel a sense of pulling and a loss of closeness when you shave. This is an indication that it is time to replace the shaving heads and cutters.
Replacement heads & cutters may be obtained from your local retailer, or directly from Remington®. Simply fill out the enclosed accessory order form – refer to page 8 & 9, or alternatively your order can be processed over the phone via the Remington® Service Hotline.
BATTERY DISPOSAL
Note: The battery is not intended to be removed or replaced under normal use. The only time the battery should be removed or the unit opened or disassembled, is at the end of the product’s useful life before it is discarded.
- The HC7000AU contains a nickel cobalt manganese battery. Once the shaver has reached the end of its life, to ensure proper disposal of the product, please take the appliance to a recycling centre, where the internal rechargeable battery should be removed by a professional and recycled separately.
- For more information about recycling of electrical and battery operated appliances, please contact your local council office or your household waste disposal service.
Caution: Do not put in the fire or mutilate your batteries when disposing as they may burst and release toxic materials. Do not short circuit as it may cause burns.
We suggest you use local waste management centres to recycle this product at end of life.
11

Suitable for use in bath and shower.
This product conforms to radio frequency interference requirements.
Any product purchased and used commercially carries a limited 90 Day Warranty.
12
Spectrum Brands Australia Pty Ltd and Spectrum Brands New Zealand Limited
WARRANTY AGAINST DEFECTS
In this warranty:
Australian Consumer Law means the Australian consumer law set out in Schedule 2 to the Competition and Consumer Act 2010;
CGA means the New Zealand Consumer Guarantees Act 1993;
Goods means the product or equipment which was accompanied by this warranty and purchased in Australia or New Zealand, as the case may be;
Manufacturer, We or us means:
- for Goods purchased in Australia, Spectrum Brands Australia Pty Ltd ACN, 007 070 573; or
- for Goods purchased in New Zealand, Spectrum Brands New Zealand Limited, as the case may be, contact details as set out at the end of this warranty;
Supplier means the authorised distributor or retailer of the Goods that sold you the Goods in Australia or in New Zealand; and
You means you, the original end-user purchaser of the Goods.
1. Our goods come with guarantees that cannot be excluded under the Australian Consumer Law, or the CGA. You are entitled to a replacement or refund for a major failure and compensation for any other reasonably foreseeable loss or damage. You are also entitled to have the goods repaired or replaced if the goods fail to be of acceptable quality and the failure does not amount to a major failure.
2. The benefits provided by this Warranty are in addition to all other rights and remedies in respect of the Goods which the consumer has under either the Australian Consumer Law or the CGA. The original purchaser of the Goods is provided with the following Warranty subject to the Warranty Conditions:
3. We warrant the Goods for all parts defective in workmanship or materials for the period of two (2) years from the date of purchase (Warranty Period). If the Goods prove defective within the Warranty Period by reason of improper workmanship or material, we may, at our own discretion, repair or replace the Goods without charge.
Warranty Conditions
4. The Goods must be used in accordance with the manufacturer’s instructions. This Warranty does not apply should the defect in or failure of the Goods be attributable to misuse, abuse, accident or non-observance of manufacturer’s instructions on the part of the user. As far as the law permits, the manufacturer does not accept liability for any direct or consequential loss, damage or other expense caused by or arising out of any failure to use the Goods in accordance with the manufacturer’s instructions.
5. Consumable parts (such as shaver heads, cutters and foils) of the Goods are included under this Warranty only where there is a defect in workmanship or materials used.
6. The warranty granted under clause 3 is limited to repair or replacement only.
7. Any parts of the Goods replaced during repairs or any product replaced remain the property of the manufacturer. In the event of the Goods being replaced during the Warranty Period, the warranty on the replacement Goods will expire on the same date as for the Warranty Period on the original Goods which are replaced.
13
8. In order to claim under the warranty granted under clause 3 you must:
(a) Retain this warranty with your receipt/proof of purchase; and
(b) Return the Goods to us at the relevant address below or to the Supplier by prepaid freight within the Warranty Period accompanied with (i) the legible and unmodified original proof of purchase, which clearly indicates the name and address of the Supplier, the date and place of purchase, the product name or other product serial number and (ii) this warranty.
9. This warranty is immediately void if:
(a) Any serial number or appliance plate is removed or defaced;
(b) The Goods have been serviced or otherwise repaired by a person not authorised to do so by us or where non approved replaced parts are used.
10. The Goods are designed for domestic use only. A limited 90-day Warranty applies to any industrial or commercial use of the Goods. The Goods must be connected to the electrical voltage requirements as specified in the ratings label located on the Goods.
11. This warranty does not cover the cost of claiming under the warranty or transport of the Goods to and from the Supplier or us.
12. This warranty is only valid and enforceable in Australia against Spectrum Brands Australia Pty Ltd and in New Zealand against Spectrum Brands New Zealand Limited.
Contact us or the Supplier for further details.
Spectrum Brands Australia Pty Ltd
Locked Bag 3004
Braeside, VIC 3195
AUSTRALIA
Customer service in Australia: 1800 623 118
E-mail: [email protected]
Website: www.remington-products.com.au
Spectrum Brands New Zealand Limited
PO Box 9817
Newmarket, Auckland 1149
NEW ZEALAND
Customer service in New Zealand: 0800 736 776
E-mail: [email protected]
Website: www.remington.co.nz
![]()
REMINGTON SERVICE HOTLINE
Australia 1800 623 118 (toll free)
New Zealand 0800 736 776 (toll free)
AUTHORISED REPAIR CENTRES
Visit www.remington-products.com.au for Authorised repair centre details.
® Registered Trade Mark of Spectrum Brands Inc., (SBI) or one of its subsidiaries
© 2019 Spectrum Brands Inc.
Rev. 07/19
Part No. T22-7001005
Type: R17A

14
]]>STRAIGHTENER

USE & CARE MANUAL
PLEASE READ PRIOR TO USE
To register your product go to www.remington-products.com.au
www.remington.co.nz
5 YEAR WARRANTY
IMPORTANT SAFEGUARDS
Warning: When the appliance is used in a bathroom, unplug it after use since the proximity of water presents a hazard even when the appliance is switched off.
When using electrical appliances, especially when children are present, basic safety precautions should always be followed, including the following:
READ ALL INSTRUCTIONS BEFORE USING KEEP AWAY FROM WATER
DANGER – As with most electrical appliances, electrical parts are electrically live even when the switch is off.
To reduce the risk of death by electric shock:
- Always unplug it immediately after using.
- Do not place or store an appliance where it can fall or be pulled into a bath or sink.
WARNING: Do not use this appliance near bathtubs, showers, basins, or other vessels containing water.
- Do not place or drop into water or other liquid.
- If an appliance falls into water, “unplug it” immediately. Do not reach into the water.
For additional protection, the installation of a residual current device (RCD) with a rated residual operating current not exceeding 30mA is advisable in
the electrical circuit supplying the bathroom. Ask your electrical contractor for advice.
WARNING – TO REDUCE THE RISK OF BURNS, ELECTROCUTION, AND FIRE, OR INJURY TO PERSONS.
- Your appliance must never be left unattended when plugged into a power outlet.
- Burn Hazard. Keep the appliance out of reach of young children, particularly during use and cool down.
- This appliance is not intended for use by persons (including children) with reduced physical, sensory or mental capabilities, or lack of experience and knowledge unless they have been given supervision or instruction concerning the use of the appliance by a person responsible for their safety.
- Keep the appliance and the power cord away from the edge of the table or countertops and out of reach of children and persons with reduced physical, sensory or mental capabilities.
- This appliance is not a toy. Children shall be supervised to ensure they do not play with the appliance.
- Use this appliance only for its intended use as described in this manual. Do not use attachments not recommended by Remington.
- If the supply cord is damaged, it must be replaced by the manufacturer, its service agents, or similarly qualified persons in order to avoid a hazard.
- Do not use it on people who are asleep.
- Never drop or insert any object into any opening of this appliance.
- Do not use outdoors or where aerosol (spray) products are being used or where oxygen is being administered.
- Do not let bare skin touch heated surfaces.
- Never place the appliance on any soft surface such as a bed, carpet, or towel. Place only on a hard, flat, heat-resistant surface.
- Do not use on dripping wet hair.
- This appliance is not recommended for use on heavily treated/bleached hair, synthetic wigs, or hair extensions.
CAUTION: The appliance will remain hot for some time after being switched off. Do not touch the plates or surrounding areas or set the appliance down onto surfaces that may be affected by heat until it has cooled.
SAVE THESE INSTRUCTIONS
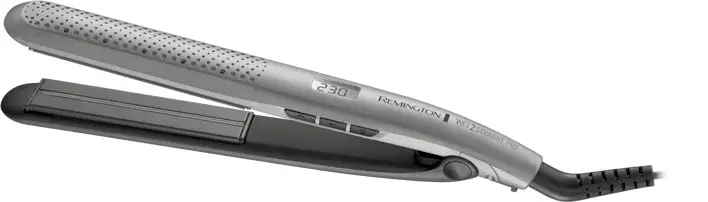
S7970AU WET 2 STRAIGHT PRO STRAIGHTENER USE AND CARE INSTRUCTION MANUAL
Thank you for purchasing your Remington® Wet 2 Straight PRO
Straightener. Achieve healthy straight results without the need to blow dry*
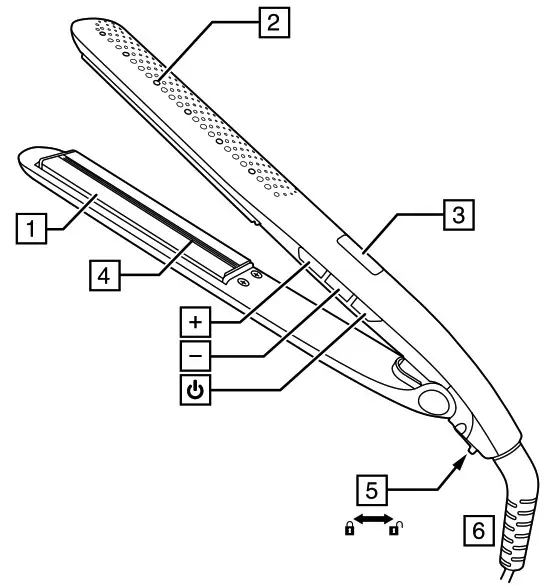
KEY PARTS
- Advanced ceramic coated plates
- Vents
- Display
- Moisture sensor
- Hinge lock
- Swivel cord
Controls:
C On/off button
+/– Temperature/mode functions
Accessories (not shown):
- Storage pouch
*Vs standard drying and styling with Remington tools in lab tests
BASIC HAIR CARE INSTRUCTIONS
The Wet 2 Straight PRO Straightener is designed with an Advanced Wet 2 Straight Technology, which combines an exclusive venting system and a moisture sensor, to style your hair in half the time with 3x more protection*.
- For optimal results, shampoo and condition your hair prior to styling.
- For extra protection use a heat protection spray.
- Hairsprays contain flammable material – do not use while using this product.
Note: This appliance is not recommended for use on synthetic wigs or hair extensions.
WET 2 STRAIGHT PRO TECHNOLOGY: MOISTURE SENSOR & EXCLUSIVE VENTING SYSTEM
- The moisture sensor adjusts the temperature of the plates on each pass to ensure the optimum temperature is delivered – preventing damage.
- Meanwhile, the vents allow to quickly remove excess water, meaning you can skip the time-consuming step of blow-drying.
USE YOUR WET 2 STRAIGHT PRO SAFELY ON DRY & WET HAIR
This straightener is safe for use on dry and wet hair, using either dry or wet mode.
DRY MODE – USE ON DRY HAIR
- Dry mode is the default setting when the styler is turned on, the backlight on the display is white.
- To use on wet hair see ‘WET MODE’ below.
- Select the appropriate temperature for your hair using the +/- controls on the side of the product. Start styling on the lower temperatures first.
- The ‘+’ button will increase the temperature the ‘-‘ button will decrease the temperature.
- The temperature shown on the display will stop flashing and the device will beep three times when it is ready to use.
- Working on one section at a time, run the straightener through the entire length of the hair without stopping.
- After use, press and hold the on/off (
 ) button for two seconds to turn off then unplug the appliance.
RECOMMENDED TEMPERATURES
| Temperature | Hair type |
| 140°C – 160°C | Thin/fine, damaged, or bleached hair |
| 170°C – 190°C | Normal, healthy hair |
| 200°C – 230°C | Thick, very curly, and difficult to style hair |
CAUTION: the hottest temperatures should only be used by experienced stylers.
WET MODE – USE ON TOWEL-DRIED HAIR
Note: Do not use on dripping wet hair.
- Press and hold the ‘+’ button for 2 seconds to activate the wet mode.
- The device will beep, the display will turn blue and the (
 ) symbol will appear.
Note: The moisture sensor rapidly adjusts the temperature of the plates during each straightening pass based on how wet the hair is. This ensures that the plates are always at the optimum temperature preventing damage. These temperature changes are not displayed by the straightener but happen automatically during styling.
CAUTION: In use, ensure the vent holes are directed away from the face, neck, and scalp (Fig A). When straightening wet hair you will hear a hissing sound and the unit will steam. This is a good thing – it is the sound of excess water in your hair evaporating and this is not harmful to the condition on your hair.
- Working on one section at a time, run the straightener through the entire length of the hair without stopping. If necessary repeat until the section is dry.
- To de-activate Wet Mode hold the ‘+’ button for 2 seconds.

TEMPERATURE CONTROL LOCK FUNCTION
This straightener has a temperature lock to prevent the selected temperature from being accidentally altered during use.
- When the selected temperature has been reached, simply press and hold the ‘–’ temperature decrease button for 2 seconds. This will lock the current heat setting and a padlock icon (
 ) will appear on the digital display.
 - To unlock the temperature lock, simply press and hold the ‘–’ temperature button for 2 seconds.
AUTOMATIC SAFETY SHUT OFF
If the straightener is not used for a period of 60 minutes (temperature is constant) it will automatically shut off.
AUTOMATIC WORLDWIDE VOLTAGE
This product is ‘multi-voltage, for use at home and abroad, and is designed to operate on voltages from 120V~ to 240V~. At 120V~, the times and temperatures stated in this booklet may vary.
Note: Some countries will require the use of a plug adaptor (not included).
STORAGE, CLEANING, AND MAINTENANCE
Let the straightener cool down before cleaning and storing away.
- Safely store the straightener with the plates locked together.
- To lock, slide the hinge lock towards the straightener.
- To unlock, slide the hinge lock towards the cord.
Note: Do not heat the straightener in the locked position.
DISPOSAL/RECYCLING
Legislation in some localities mandates that e-waste (anything with a plug, battery, or cord) is disposed of through controlled recycling facilities and must not be disposed of in the general household waste. For more information about the recycling of electrical and battery-operated appliances, please contact your local council or your local household waste disposal service.
 WARNING: Do not use this appliance near bathtubs, showers, basins, or other vessels containing water.
As with all electrical appliances, the power cord must be regularly checked for wear and tear. Immediately cease using this product if the power cord shows any signs of damage.
This product conforms to radio frequency interference requirements.
Any product purchased and used commercially carries a limited 90 Day Warranty. We suggest you use local waste management centers to recycle this product at end of life.
Spectrum Brands Australia Pty Ltd and Spectrum Brands New Zealand Limited
WARRANTY AGAINST DEFECTS
In this warranty:
Australian Consumer Law means the Australian consumer law set out in Schedule 2 to the Competition and Consumer Act 2010;
CGA means the New Zealand Consumer Guarantees Act 1993;
Goods mean the product or equipment which was accompanied by this warranty and purchased in Australia or New Zealand, as the case may be; Manufacturer, We or us means:
- for Goods purchased in Australia, Spectrum Brands Australia Pty Ltd ACN, 007 070 573; or
- for Goods purchased in New Zealand, Spectrum Brands New Zealand Limited, as the case may be, contact details as set out at the end of this warranty;
Supplier means the authorized distributor or retailer of the Goods that sold you the Goods in Australia or in New Zealand; and
You mean you, the original end-user purchaser of the Goods.
- Our goods come with guarantees that cannot be excluded under the Australian Consumer Law, or the CGA. You are entitled to a replacement or refund for a major failure and compensation for any other reasonably foreseeable loss or damage.
You are also entitled to have the goods repaired or replaced if the goods fail to be of acceptable quality and the failure does not amount to a major failure. - The benefits provided by this Warranty are in addition to all other rights and remedies in respect of the Goods which the consumer has under either the Australian Consumer Law or the CGA. The original purchaser of the Goods is provided with the following Warranty subject to the Warranty Conditions:
- We warrant the Goods for all parts defective in workmanship or materials for the period of five (5) years from the date of purchase (Warranty Period). If the Goods prove defective within the Warranty Period by reason of improper workmanship or material, we may, at our own discretion, repair or replace the Goods without charge.
Warranty Conditions - The Goods must be used in accordance with the manufacturer’s instructions. This Warranty does not apply should the defect in or failure of the Goods be attributable to misuse, abuse, accident, or non-observance of manufacturer’s instructions on the part of the user. As far as the law ermits, the manufacturer does not accept liability for any direct or consequential loss, damage, or other expense caused by or arising out of any failure to use the Goods in accordance with the manufacturer’s instructions.
- Consumable parts (such as shaver heads, cutters, and foils) of the Goods are included under this Warranty only where there is a defect in workmanship or materials used.
- The warranty granted under clause 3 is limited to repair or replacement only.
- Any parts of the Goods replaced during repairs or any product replaced remain the property of the manufacturer. In the event of the Goods being replaced during the Warranty Period, the warranty on the replacement Goods will expire on the same date as for the Warranty Period on the original Goods which are replaced.
- In order to claim under the warranty granted under clause 3 you must:
(a) Retain this warranty with your receipt/proof of purchase; and
(b) Return the Goods to us at the relevant address below or to the Supplier by prepaid freight within the Warranty Period accompanied with (i) the legible and unmodified original proof of purchase, which clearly indicates the name and address of the Supplier, the date and place of purchase, the product name or other product serial number, and (ii) this warranty. - This warranty is immediately void if:
(a) Any serial number or appliance plate is removed or defaced;
(b) The Goods have been serviced or otherwise repaired by a person not authorized to do so by us or where non-approved replaced parts are used. - The Goods are designed for domestic use only. A limited 90-day Warranty applies to any industrial or commercial use of the Goods. The Goods must be connected to the electrical voltage requirements as specified in the rating label located on the Goods.
- This warranty does not cover the cost of claiming under the warranty or transport of the Goods to and from the Supplier or us.
- This warranty is only valid and enforceable in Australia against Spectrum Brands Australia Pty Ltd and in New Zealand against Spectrum Brands New Zealand Limited.
Contact us or the Supplier for further details.
Spectrum Brands Australia Pty Ltd
Locked Bag 3004
Braeside, VIC 3195
AUSTRALIA
Customer service in Australia: 1800 623 118
E-mail: [email protected]
Website: www.remington-products.com.au
Spectrum Brands New Zealand Limited
PO Box 9817
Newmarket, Auckland 1149
NEW ZEALAND
Customer service in New Zealand: 0800 736 776
E-mail: [email protected]
Website: www.remington.co.nz
REMINGTON SERVICE HOTLINE
![]() Australia 1800 623 118 (toll-free)
Australia 1800 623 118 (toll-free)
![]() New Zealand 0800 736 776 (toll-free)
New Zealand 0800 736 776 (toll-free)
AUTHORISED REPAIR CENTRES
Visit www.remington-products.com.au for Authorised repair center details.
® Registered Trade Mark of Spectrum Brands Inc., (SBI) or one of its subsidiaries
©2021 Spectrum Brands Inc.
Rev. 10/20
Part No. T22-7001823
Type: S27A
![]()
IMPORTANT SAFETY INSTRUCTIONS
When using electrical appliances, especially when children are present, basic safety precautions should always be followed, including the following:
READ ALL INSTRUCTIONS BEFORE USING.
DANGER
To reduce the risk of electric shock:
- Do not place or drop into liquid. This is a dry-only handle.
- Except when charging, always unplug this appliance from the electrical outlet immediately after using.
- Unplug this appliance before cleaning it.
- Do not charge product while wet.
- Do not charge in shower or sink. The charger should not be exposed to water.
WARNING
To reduce the risk of burns, fire, electric shock or injury to persons:
- This appliance is for household use only.
- An appliance should never be left unattended when it’s plugged in, except when charging a rechargeable appliance.
- Close supervision is necessary when this appliance is used by, on, or near children or persons with special needs or certain disabilities.
- Use this appliance only for its intended use as described in this manual.
- Do not use attachments not recommended by Spectrum Brands, Inc.
- Keep the cord away from heated surfaces.
- Never operate this appliance if it has a damaged cord or plug, if it is not working properly, or if it has been dropped or damaged.
- Never drop or insert any object into any of the appliance’s openings.
- Do not use outdoors or operate where aerosol (spray) products are being used, or where oxygen is being administered.
- Always store this appliance and cord in a moisture-free area. Do not store it in temperatures exceeding 140°F (60°C).
- Make sure the cord is disconnected from the trimmer when storing.
- Do not use this appliance with a damaged or broken cutter unit, as injury may occur. Always make sure blades are aligned properly.
- Always attach plug to appliance, then USB cable to computer or USB plug adaptor in an electrical outlet. To disconnect, turn all controls to OFF, then remove USB cable from power source, then detach cord from the clipper for storage.
- Do not use an extension cord or a voltage converter with this appliance.
- Do not wrap the cord around the appliance.
- Do not allow product to come in contact with water.
KEEP AWAY FROM CHILDREN
SAVE THESE INSTRUCTIONS
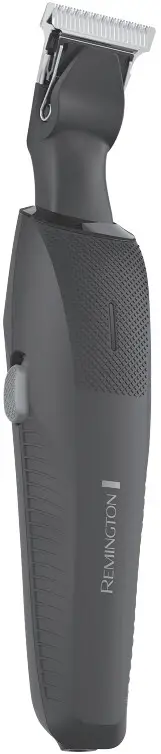
Product Features

Feature Checklist
- Reversible, Full Size T-Blade Trimmer Head
- On/Off Slide Switch
- 10-Length Adjustable Comb (1mm to 5mm)
- 1.5mm (1/16″)
- 2.0mm
- 2.5mm
- 3mm (1/8″)
- 4.5mm
- 6mm (1/4″)
- 9mm (3/8″)
- 12mm (1/2″)
- 15mm
- USB Cable (not shown)
- Storage Pouch (not shown)
Before Using
CHARGING
- Before using your trimmer for the first time, fully charge the unit for 16 to 18 hours.
- Run time from fully charged is up to 60 minutes.
- Ensure the product is turned off.
- Connect the USB charging cable to the product. Plug into a USB port on a computer or a USB plug adaptor in an electrical outlet.
- Typical charging will take 16 hours.
Note: To preserve the life of your batteries, let them run out every 6 months then recharge for 16 to 18 hours.
WARNING: Do not charge the trimmer near water.
Instructions for Use
Note: This product is for cordless use only.
- Switch the product on by pushing up the on/off button. To turn it off push down the on/off button.
To Attach And Remove the Trimming Head
Note: Always ensure the trimmer is switched off before changing any attachments
The trimmer comes with the Precision T-Blade attached.
- To remove the T-Blade, pull upwards.
- The Precision T-Blade can be used facing forward or away from you for enhanced visibility and control (Reference image below).
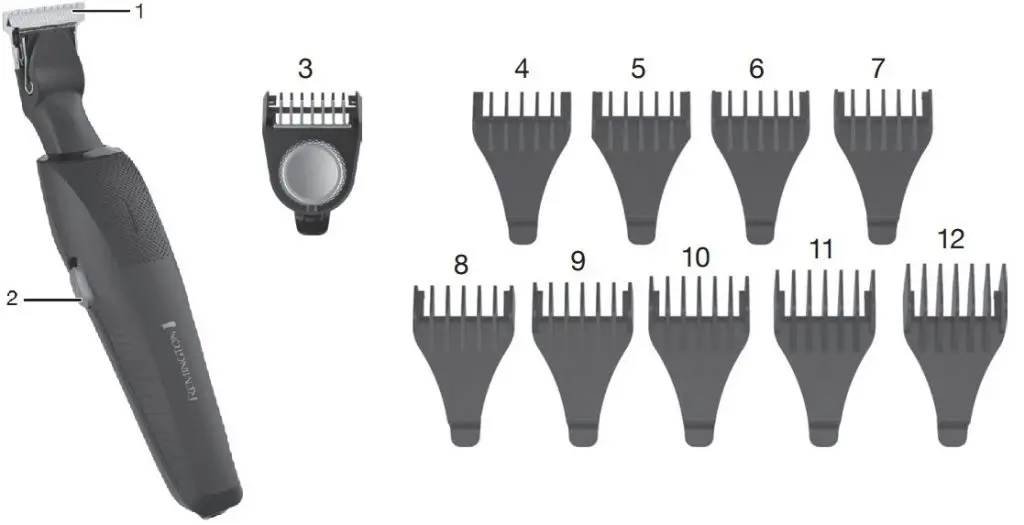
Attaching and Removing Combs
- To attach, with the trimmer blade facing away from you, hook the guide comb on the front of the trimmer blade and push down to click into position.
- To remove, pull the tab on the back of the guide comb upwards and away from the trimmer blade.
- Use the trimmer without a comb for trimming hair close to the skin.
Before You Begin
- Ensure that blades are clean and oiled before each use.
- Comb facial hair with a fine comb before you start trimming.
- For best results, hairs should be dry and free of waxes or lotions before trimming.
To Thin and Taper the Beard/Moustache
- Attach a comb to the trimmer blade. If you are trimming for the first time start with the maximum trimming length.
- Turn the unit on.
- Place the flat top of the trimmer comb against the skin.
- Slowly slide through the hair. Repeat from different directions as necessary.
- If hair builds up in the trimmer comb during the trimmer process, switch the unit off, pull the comb and brush the hair off.
Trimming Edge of Sideburns
- Hold the trimmer with the trimmer blade facing you.
- Start with edge of sideburn and with the trimmer blades resting lightly against your skin, use motions towards edge of sideburn line to trim the desired locations in facial area.
Cleaning and Maintenance
After Each Use
- Turn the trimmer off.
- Release the head assembly from the trimmer body.
- Gently brush the remaining hairs away from the guide comb and trimmer blade.
- Rinse trimmer blade.
- Completely dry and oil trimmer blade.
Cleaning Cautions
- Do not use harsh or corrosive cleaners on the unit or their blades.
- At regular intervals, put a drop of lubricant onto the main trimmer head.
Storage
- Store this appliance and cord in a moisture-free area. Do not store it in temperatures exceeding 140°F (60°C).
- Do not wrap the cord of the charging adaptor around the appliance.
Troubleshooting
- The trimmer does not work when turned on:
- Trimmer must be charged for a full 16 to 18 hours initially.
- Trimmer cutters do not move:
- The cutting unit may be dirty and clogged. Clean the unit as directed in Cleaning and Maintenance section.
- Trimmer does not hold charge:
- Fully discharge battery by running trimmer until it stops; then follow recharging instructions (see section on “Operating Your Trimmer”).
Product Disposal
Battery Disposal
The PG3160 contains a NiMh battery. To ensure proper disposal of the product, please refer to the battery removal instructions below.
When your rechargeable trimmer reaches the end of its useful life, the battery must be removed from the product and be recycled or disposed of properly in accordance with your state and local requirements. If this is not required by law, you may elect to dispose of the product with batteries.
CAUTION! Do not put in the fire or mutilate your batteries when disposing as they may burst and release toxic materials. Do not short circuit as it may cause burns. Dispose of properly in accordance with your local and state requirements.
To Remove the Rechargeable Battery:
- The battery must be removed from the appliance before it is scrapped.
- Ensure the trimmer is discharged of all power.
- With the back side of the trimmer facing upwards, pry the panel off the unit to expose the fasteners.
- Remove the screws and pull the internal cover off the trimmer.
- Pry the small circuit board at the end of the trimmer out of the body.
- Pry up the main circuit board to expose the batteries.
- Pry the batteries from the trimmer body.
- Cut the leads which connect the batteries to the main circuit board and dispose of them properly.
At the end of this product’s life, you can mail it to Spectrum Brands at 507 Stokely Drive, Deforest, WI 53532 marked “Product Takeback: Please Recycle!”
To order accessories call 800-392-6544, visit your local retailer, or visit RemingtonProducts.com
Warranty
Limited Five-Year Warranty
Spectrum Brands, Inc. warrants this product against any defects that are due to faulty material or workmanship for a five-year period from the original date of consumer purchase. This warranty does not include damage to the product resulting from accident or misuse.
If the product should become defective within the warranty period, we will replace it free of charge. Return your product and sales receipt with your name, address and day time phone number to: Remington Returns Center, 507 Stokely Dr., P.O. Box 1, Deforest, WI 53532. For more information call 800-736-4648 in the U.S. or Canada or visit RemingtonProducts.com.
KEEP ORIGINAL SALES RECEIPT AS PROOF OF PURCHASE FOR WARRANTY PURPOSES.
This warranty does not cover products damaged by the following:
- Accident, misuse, abuse or alteration of the product
- Servicing by unauthorized persons
- Use with unauthorized accessories
- Connecting it to incorrect current and voltage
- Wrapping cord around appliance causing premature wear and breakage
- Any other conditions beyond our control
No responsibility, obligations, or liability is assumed for the installation or maintenance of this product.
SPECTRUM BRANDS, INC. SHALL NOT BE RESPONSIBLE FOR ANY INCIDENTAL, SPECIAL OR CONSEQUENTIAL DAMAGES RESULTING FROM THE USE OF THIS PRODUCT. ALL IMPLIED WARRANTIES, INCLUDING BUT NOT LIMITED TO IMPLIED WARRANTIES OF FITNESS AND MERCHANTABILITY, ARE LIMITED IN DURATION TO FIVE YEARS FROM DATE OF ORIGINAL PURCHASE.
This warranty gives you specific legal rights and you may also have other rights which vary from state to state or province to province. Some states do not allow the exclusion or limitation of incidental, special or consequential damages.
This warranty shall not be valid where it is contrary to U.S. and other applicable laws, or where the warranty would be prohibited under any economic sanctions, export control laws, embargos, or other restrictive trade measures enforced by the United States or other applicable jurisdictions. This includes, without limitation, any warranty claims implicating parties from, or otherwise located in, Cuba, Iran, North Korea, Syria and the disputed Crimea region.
Spectrum Brands, Inc. Money-back Offer
If within 30 days after you have purchased your Remington® branded product from an authorized source, you are not satisfied and would like a refund, return it with the sales receipt indicating purchase price and date of purchase to the retailer from whom it was purchased. Spectrum Brands, Inc. will reimburse all retailers who accept the product within 30 days from the date of purchase. If you have any questions concerning the money-back guarantee, please call 800-736-4648 in the U.S. or Canada.
Remington Guarantees Satisfaction After 30 Days!
Remington 60-Day Money Back Guarantee*
If within 60 days after purchasing any Remington® product, you are not completely satisfied and would like a refund, return it with the original dated sales receipt directly to Remington and receive a full refund.** For questions concerning the money-back guarantee, please call 800-736-4648 in the U.S. or Canada.
- Applies to U.S. and Canadian customers’ returns only.
- Terms and conditions apply.
- Refund will be in the form of a check issued in U.S. Dollars and will be provided only if all Terms and Conditions are met.
- The following items must be returned to Remington and postmarked no later than 60 days after purchase of the Remington® product:
- The Remington® product;
- The original sales receipt indicating price and date purchased; and
- The completed 60-day money back guarantee form located at
RemingtonProducts.com/60day.
- In addition, Remington, in its discretion, must determine that the returned product was used in accordance with the instruction booklet (included with the product at the time of purchase).
- Returns should be mailed prepaid (no collect returns accepted) to:
Remington 60-Day MBG
507 Stokely Drive, Box 1
DeForest, WI 53532 - Refund does not include postage costs for the return of the product, but will include applicable taxes paid by customer, if any.
- No responsibility will be accepted for late, lost, stolen, misdirected or damaged product.
- Please allow 4–6 weeks to receive your refund by check.
CONTACT US
5VDC TYPE: RG001A
Questions or comments: Call 800-736-4648 in the U.S. or visit RemingtonProducts.com.
Dist. by: Spectrum Brands, Inc., Middleton, WI 53562
®/TM are owned by Spectrum Brands, Inc.
© 2020 Spectrum Brands, Inc. 7/20 27980
Made in China.
T22-7001687-A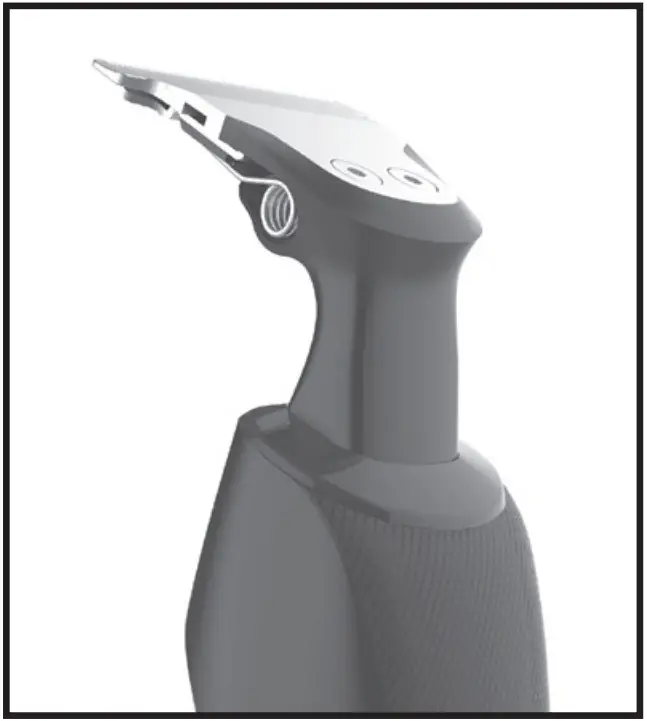
BARBER’S BEST PERSONAL GROOMER
USE & CARE MANUAL
PLEASE READ PRIOR TO USE
To register your product go to www.remington-products.com.au
www.remington.co.nz
3 YEAR WARRANTY
IMPORTANT SAFETY INSTRUCTIONS
When using electrical appliances, basic precautions should always be observed, including the following.
READ ALL INSTRUCTIONS BEFORE USING
DANGER: As with most electrical appliances, electrical parts are electrically live even when the switch is off.
For additional protection, the installation of a residual current device (rcd) having a rated residual operating current not exceeding 30 mA is advisable in the electrical circuit supplying the bathroom. Ask your installer for advice.
KEEP AWAY FROM WATER
WARNING: TO REDUCE THE RISK OF BURNS, ELECTROCUTION AND FIRE OR INJURY TO PERSONS
- Do not place or store the appliance or charging adaptor where it can fall or be knocked into a sink or bath.
- Do not place in or drop into water or any other liquid.
- If an appliance falls into water, “unplug it” immediately. Do not reach into the water.
- Unplug the charging adaptor from the electrical outlet immediately after fully charging.
- Do not use while bathing or in the shower.
- Unplug and switch off this appliance before cleaning it.
- Use this appliance only for its intended use as described in this manual.
- Do not use attachments not recommended by Remington.
- Never drop or insert any object into any opening of this appliance.
- Keep the cord away from heated surfaces.
- Do not use this appliance with a damaged or broken trimming unit as injury may occur.
- Always store the charging adaptor in a moisture-free location.
- For household use only.
- This appliance should not be used by children or other persons with reduced physical, sensory or mental capabilities or lack of experience and knowledge unless they have been given supervision or instruction concerning use of the appliance in a safe way and understand the hazards involved.
- This appliance is not a toy. Children shall be supervised to ensure they do not play with the appliance. Cleaning, use, and maintenance shall not be made by children without supervision.
- Keep the appliance and the power cord away from edge of tables or countertops and out of reach of children and persons with reduced physical, sensory or mental capabilities.
- Do not use on people who are asleep.
- Never operate this appliance if it has a damaged cord or plug, if it is not working correctly, if the charging adaptor has been damaged or dropped into water.
- Do not use an extension cord or a voltage converter with this appliance.
- Do not wrap the cord around the appliance.
- This appliance should be supplied with approved safety isolating adaptor SA050035D(AUS version) with the output capacity of 5V AC; 350mA (adaptor output).
WARNING – KEEP THE APPLIANCE DRY
Remington strongly recommends that an approved Safety Switch (residual current device) be installed to protect all bathroom power outlets. Ask an electrical contractor for advice.
SAVE THESE INSTRUCTIONS
PG6200AU BARBER’S BEST PERSONAL GROOMER
USE & CARE INSTRUCTION MANUAL Thank you for purchasing your Remington® Barber’s Best Personal Groomer. Inside this manual you will find tips on using and caring for your groomer.
1,2,6 


 5
5 7
7


KEY PARTS
1. 30mm Trimmer Head
2. On/Off Switch
3. 3x Clip On Comb Guides (1.5, 3, 6mm)
4. 3 Length Body Hair Comb (3, 6, 9mm)
5. Body Hair Trimmer Head
6. Charging Indicator Light
7. Mini Foil Shaver Head
8. Nose, Ear, Eyebrow Trimmer Head
9. Adjustable Beard &
Moustache Comb (2-20mm) Also Includes: · Power Adaptor · Storage Stand
Note: The Adjustable Comb Attachments have various length settings. When first becoming familiar with your Barber’s Best Personal Groomer, begin with a higher numbered setting. Adjust cutting length, as desired.
ABOUT YOUR GROOMER
|
|
|
|
|
|
|
|
|
|
|
|
|
|
|
Voltage Type: Worldwide Voltage – groomer automatically adapts to and outlet voltage between 100V and 240V.
Note: Some countries will require the use of a plug adaptor that is not included with your groomer.
CHARGING
- Before using your groomer for the first time, charge it for 24 hours. The groomer will be fully charged in 18 hours.
- Plug the adaptor into your groomer and then plug the charging adaptor unit into a 100-240 volt domestic power outlet. Check to ensure that the groomer On/Off switch is OFF. The Charging Indicator Light will illuminate to indicate that it is charging. When the battery is full the Charging Indicator will remain illuminated until disconnected from the power outlet.
- The batteries cannot be overcharged, but it is recommend that charging be discontinued and the groomer stored away if it will not be used for an extended period of time (2-3 months).
- To preserve the life of the batteries, discharge them by running the groomer until the blades move slowly. Switch off and recharge for 18 hours. Do this every 6 months.
- Use the groomer only with the charging adaptor supplied.
HOW TO USE YOUR PERSONAL GROOMER
| Nose, Ear, Eyebrow Trimmer | Clip On Combs | Mini Foil Shaver | Adjustable Beard Comb | Body Hair Trimmer & Comb | |
| Beard | X | X | |||
| Beard Line | X | X | |||
| Ear | X | ||||
| Eyebrow | X | ||||
| Moustache | X | X | X | ||
| Nape of Neck | X | ||||
| Nose | X | ||||
| Sideburns | X | X | X | ||
| Body | X | X | |||
| Back | X | ||||
| Hair | X | X |
ATTACHING THE GROOMING ATTACHMENTS
- The trimmer attachments are removed by rotating anticlockwise and lifting off.
- Insert the required attachment and rotate clockwise to lock into position.
- The Adjustable Beard Comb attachment has 10 Length settings:
2-20mm (in increments of 2mm). Begin with a higher numbered setting. Adjust cutting length as desired once you are familiar with using the groomer, it is better to select a longer hair length setting in order not to trim too much hair.
GROOMING TIPS Hair:
- Should be dry and free of lotions or other liquids.
- Comb outward to obtain maximum height / length and facing in the same direction.
Beard / Moustache:
- Use a small comb to straighten hairs for trimming.
- When TRIMMING, first select the Beard Trimmer Attachment. Starting under the chin, follow the jaw line back toward ear. Trim in multiple directions to capture all stray hairs.
- When THINNING or TAPERING, use a small comb to hold beard in place. In your opposite hand, hold the Groomer with the cutting system facing outward while slowly moving the trimmer along the length of the comb. The Adjustable Beard Comb Attachment can also be used to achieve the desired look.
Mini Foil Shaver:
- Use the Foil Shaver attachment to clean-up detailed areas. For best results, avoid holding at an angle.
Note: The foil shaver is designed to shave the detailed areas around your beard, moustache and sideburns. It is not designed to shave your entire face.
Ears:
- When trimming inner ears, avoid inserting the groomer more than 1/4″ into ear canal.
- Turn the trimmer on.
- Insert the trimmer’s cutting unit gently into the ear canal.
- Rotate the groomer in a circular motion while gently moving in and out of ear canal.
Eyebrows:
- Guide cutting edges to stray hairs along eyebrows.
- For best results, do not use the trimmer to define entire eyebrow.
Nape Of Neck:
- Using a hand-held mirror is necessary if self-trimming.
- Lift hair off neck, using index finger to cover & protect hairs NOT needing trimming.
- Carefully touch cutting blade to neck, slowly moving the groomer in an upward direction until stopped by index finger.
Nose:
- Turn the trimmer on.
- Carefully insert the trimmer’s cutting unit no more than1/4″ into nostril.
- Rotate the groomer in a circular motion while gently moving in and out of nose.
Back and Body:
- The Body Trimmer is designed to quickly trim hair over large areas
such as the chest and back. The Body Comb can be used in any of the three length settings (3, 6, 9mm) by sliding the comb in the grooves on the trimmer. Alternatively the comb can be removed for a close trim. Note: Use slow light pressure. Too much pressure may trim off more hair than desired.
CLEANING, CARE & MAINTENANCE
Note: Always clean the groomer attachments regularly to ensure maximum performance and a proper operating life. Cleaning Attachments With Water
- Remove attachment.
- Rinse ONLY the attachment under warm running water. Do NOT use hot water as this might cause damage. Note: Do not rinse the mini foil shaver.
Cleaning Attachments With Brush
- After first removing attachment, thoroughly brush and blow out hair
clippings from cutting system, attachment, and top of groomer handle.
Cleaning Foil Shaver Note: Do not rinse or lubricate the mini foil shaver with oil, as it is permanently lubricated. 1. Remove attachment by pressing security latches on front of foil shaver. 2. Remove head, shake to remove excess clippings. 3. Replace attachment by gently snapping into place.
Oiling Blades & Cautions · Rinsing attachments under water requires lubricating the cutting
blades 1x monthly. Using only light-grade oils (e.g. sewing machine oil), simply spread 1-2 drops lightly over cutters with fingertip. Wipe away all excess. · Use only light-grade oils as these will not evaporate or slow down speed of cutting blades. · Do not use hair oil, grease, or any oil mixed with kerosene or solvent as these too will evaporate. Note: Do not lubricate the foil shaver with oil, as it is permanently lubricated. BATTERY DISPOSAL Note: The battery is not intended to be removed or replaced under normal use. The only time the battery should be removed or the unit opened or disassembled, is at the end of the product’s useful life before it is discarded. · The PG6200AU contains a nickel metal hydride battery. Once the trimmer has reached the end of its life, to ensure proper disposal of the product, please take the appliance to a recycling centre, where the internal rechargeable battery should be removed by a professional and recycled separately. · For more information about recycling of electrical and battery operated appliances, please contact your local council office or your household waste disposal service. Caution: Do not put in the fire or mutilate your batteries when disposing as they may burst and release toxic materials. Do not short circuit as it may cause burns.
7
This product is not suitable for bath or shower. This product conforms to radio frequency interference requirements Any product purchased and used commercially carries a limited 90 Day Warranty.
8
Spectrum Brands Australia Pty Ltd and Spectrum Brands New Zealand Limited
WARRANTY AGAINST DEFECTS
In this warranty:
Australian Consumer Law means the Australian consumer law set out in Schedule 2 to the Competition and Consumer Act 2010;
CGA means the New Zealand Consumer Guarantees Act 1993;
Goods means the product or equipment which was accompanied by this warranty and purchased in Australia or New Zealand, as the case may be;
Manufacturer, We or us means:
- for Goods purchased in Australia, Spectrum Brands Australia Pty Ltd ACN, 007 070 573; or
- for Goods purchased in New Zealand, Spectrum Brands New Zealand Limited, as the case may be, contact details as set out at the end of this warranty;
Supplier means the authorised distributor or retailer of the Goods that sold you the Goods in Australia or in New Zealand; and You means you, the original end-user purchaser of the Goods.
- Our goods come with guarantees that cannot be excluded under the Australian Consumer Law, or the CGA. You are entitled to a replacement or refund for a major failure and compensation for any other reasonably foreseeable loss or damage. You are also entitled to have the goods repaired or replaced if the goods fail to be of acceptable quality and the failure does not amount to a major failure.
- The benefits provided by this Warranty are in addition to all other rights and remedies in respect of the Goods which the consumer has under either the Australian Consumer Law or the CGA. The original purchaser of the Goods is provided with the following Warranty subject to the Warranty Conditions:
- We warrant the Goods for all parts defective in workmanship or materials for the period of three (3) years from the date of purchase (Warranty Period). If the Goods prove defective within the Warranty Period by reason of improper workmanship or material, we may, at our own discretion, repair or replace the Goods without charge.
Warranty Conditions - The Goods must be used in accordance with the manufacturer’s instructions. This Warranty does not apply should the defect in or failure of the Goods be attributable to misuse, abuse, accident or non-observance of manufacturer’s instructions on the part of the user. As far as the law permits, the manufacturer does not accept liability for any direct or consequential loss, damage or other expense caused by or arising out of any failure to use the Goods in accordance with the manufacturer’s instructions.
- Consumable parts (such as shaver heads, cutters and foils) of the Goods are included under this Warranty only where there is a defect in workmanship or materials used.
- The warranty granted under clause 3 is limited to repair or replacement only.
- Any parts of the Goods replaced during repairs or any product replaced remain the property of the manufacturer. In the event of the Goods being replaced during the Warranty Period, the warranty on the replacement Goods will expire on the same date as for the Warranty Period on the original Goods which are replaced.
- In order to claim under the warranty granted under clause 3 you must: (a) Retain this warranty with your receipt/proof of purchase; and (b) Return the Goods to us at the relevant address below or to the Supplier by prepaid freight within the Warranty Period accompanied with (i) the legible and unmodified original proof of purchase, which clearly indicates the name and address of the Supplier, the date and place of purchase, the product name or other product serial number and (ii) this warranty.
- This warranty is immediately void if: (a) Any serial number or appliance plate is removed or defaced; (b) The Goods have been serviced or otherwise repaired by a person not authorised to do so by us or where non approved replaced parts are used.
- The Goods are designed for domestic use only. A limited 90-day Warranty applies to any industrial or commercial use of the Goods. The Goods must be connected to the electrical voltage requirements as specified in the ratings label located on the Goods.
- This warranty does not cover the cost of claiming under the warranty or transport of the Goods to and from the Supplier or us.
- This warranty is only valid and enforceable in Australia against Spectrum Brands Australia Pty Ltd and in New Zealand against Spectrum Brands New Zealand Limited.
Contact us or the Supplier for further details. Spectrum Brands Australia Pty Ltd Locked Bag 3004 Braeside, VIC 3195 AUSTRALIA Customer service in Australia: 1800 623 118 E-mail: [email protected] Website: www.remington-products.com.au Spectrum Brands New Zealand Limited PO Box 9817 Newmarket, Auckland 1149 NEW ZEALAND Customer service in New Zealand: 0800 736 776 E-mail: [email protected] Website: www.remington.co.nz
REMINGTON SERVICE HOTLINE Australia 1800 623 118 (toll free) New Zealand 0800 736 776 (toll free) AUTHORISED REPAIR CENTRES Visit www.remington-products.com.au for Authorised repair centre details. ® Registered Trade Mark of Spectrum Brands Inc., (SBI) or one of its subsidiaries © 2019 Spectrum Brands Inc. Rev. 06/19 Part No. T22-7000874 Type: PG03A
IMPORTANT SAFETY INSTRUCTIONS
When using electrical appliances, basic precautions should always be observed, including the following.
READ ALL INSTRUCTIONS BEFORE USING
For additional protection, the installation of a residual current device (rcd) having a rated residual operating current not exceeding 30 mA is advisable in the electrical circuit supplying the bathroom. Ask your installer for advice.
WARNING – TO REDUCE THE RISK OF BURNS, ELECTROCUTION AND FIRE OR INJURY TO PERSONS
IMPORTANT SAFETY INSTRUCTIONS
When using appliances, especially when children are present, basic safety precautions should always be followed, including the following:
- To prevent accidents keep the appliance away from your eyelashes as well as clothes, brushes and wire.
- Always remember to turn on the trimmer before use to avoid painfully snagging or unintentionally pulling of hairs.
- This appliance is not intended for use by persons (including children) with reduced physical, sensory or mental capabilities, or lack of experience and knowledge, unless they have been given supervision or instruction concerning use of the appliance by a person responsible for their safety. Children shall not play with the appliance. Cleaning and user maintenance shall not be made by children without supervision.
- Use this appliance only for its intended use as described in this manual. Do not use attachments not recommended by Remington.
- Do not use on people who are asleep.
- Never drop or insert any object into any opening of this appliance.
- Do not use this trimmer with a damaged or broken cutter unit, as injury may occur.
- Always store this appliance in a moisture-free area. Do not store it in temperatures exceeding 60°C (140°F).
- Do not disassemble the cutter assembly.
- This trimmer is showerproof, it may be used in the shower.
- This appliance is for household use only.
SAVE THESE INSTRUCTIONS
NE3850AU WETECH ACTIVE TRIMMER USE AND CARE MANUAL
Inside this manual you will find instructions on using and caring for your trimmer.
KEY PARTS

- Dual Sided Trimmer
- Blade with Nano Silver additive
- Active BladeClean Wash Out System Button
- On/Off Switch (by rotating the battery cap)
- Battery Compartment
- Rotary Head
- Trimmer Comb
ALSO INCLUDES
- 1x AA Battery
ABOUT YOUR GROOMER
| NE3850AU SPECIFICATIONS | |
| Power System | Battery Operated 1 x AA battery required (included). |
INSERTING THE BATTERY
Your Remington® Groomer runs on one “AA” Alkaline battery (included).
- To open the battery compartment, turn the base of the unit approximately 1cm to the left and pull it off.
- Insert one “AA” battery into the unit, positive end first.
- Replace the base and turn it 1cm to the right to lock it into place.
Battery cautions
- Use of non-alkaline batteries will impair the unit’s operating performance.
- The battery should not be left in the unit if the unit is not in use for long periods.
- To prevent battery corrosion, the unit should be stored in a dry environment.
- Dead batteries should be removed immediately and disposed of properly.
- Do not use rechargeable batteries with this appliance. The lower voltage in rechargeable batteries impairs the performance of the cutting unit.
HOW TO USE
CHANGING THE ATTACHMENT HEADS
This model comes with interchangeable attachments. You may want to use the dual sided trimmer for your nose, eyebrows, sideburns, and ears. Attach the comb to precisely trim your eyebrows. The rotary trimmer can be used for your ears and nose also.
To change heads:
- Turn the groomer off.
- Detach cutting head by turning it to the right to the unlocked position and pulling it off.
- Once the previous head is removed, attach the other head by placing it on top of the unit and turning it to the left to the locked position.
Turning on your groomer:
The on/off switch is integrated into the battery cap.
- Rotate the battery cap to the right to turn on.
- To turn off, simply rotate the battery cap, to the left back to the off position.
Note: Always remember to turn on the groomer before you insert it into your nose or ear to avoid painfully snagging hairs.
CLEANING & MAINTENANCE
Your groomer is designed to give you years of comfortable use. To ensure that you get optimal performance from your groomer, follow these simple cleaning and lubricating tips:
- After each use, brush or blow accumulated hair from the cutting unit.
Rinsing Your Groomer
- Your groomer can be rinsed with cool or warm water. Just hold the unit’s head under the faucet – it is not necessary to remove the head first. Do not use hot water.
- For best results, keep trimmer running while running it under the tap. Allow water to run through the washout port and over the blades. Press the Active BladeClean system button while rinsing to flush water through the blades.
- Dry off excess water.
- Do not submerge in water as damage will occur.
After Each Use
- Rinse the accumulated hair from the cutters as noted above. Ensure all debris is removed from between the blades and then press the Active BladeClean system button and shake off excess water.
- Hairs should be dry. Avoid using lotions before using your groomer.
- Since all hairs do not grow in the same direction, you may want to try different trimming methods (i.e. upwards, downwards or across). Practice is best for optimum results.
NOTE: Use slow light pressure. Too much pressure may trim off more hair than desired.
Any product purchased and used commercially carries a limited 90 Day Warranty.
Spectrum Brands Australia Pty Ltd and Spectrum Brands New Zealand Limited
WARRANTY AGAINST DEFECTS
In this warranty:
Australian Consumer Law means the Australian consumer law set out in Schedule 2 to the Competition and Consumer Act 2010;
CGA means the New Zealand Consumer Guarantees Act 1993;
Goods means the product or equipment which was accompanied by this warranty and purchased in Australia or New Zealand, as the case may be;
Manufacturer, We or us means:
- for Goods purchased in Australia, Spectrum Brands Australia Pty Ltd ACN, 007 070 573; or
- for Goods purchased in New Zealand, Spectrum Brands New Zealand Limited,as the case may be, contact details as set out at the end of this warranty; Supplier means the authorised distributor or retailer of the Goods that sold you the Goods in Australia or in New Zealand; and
You means you, the original end-user purchaser of the Goods.
- Our goods come with guarantees that cannot be excluded under the Australian Consumer Law, or the CGA. You are entitled to a replacement or refund for a major failure and compensation for any other reasonably foreseeable loss or damage. You are also entitled to have the goods repaired or replaced if the goods fail to be of acceptable quality and the failure does not amount to a major failure.
- The benefits provided by this Warranty are in addition to all other rights and remedies in respect of the Goods which the consumer has under either the Australian Consumer Law or the CGA. The original purchaser of the Goods is provided with the following Warranty subject to the Warranty Conditions:
- We warrant the Goods for all parts defective in workmanship or materials for the period of two (2) year from the date of purchase (Warranty Period). If the Goods prove defective within the Warranty Period by reason of improper workmanship or material, we may, at our own discretion, repair or replace the Goods without charge.
Warranty Conditions - The Goods must be used in accordance with the manufacturer’s instructions. This Warranty does not apply should the defect in or failure of the Goods be attributable to misuse, abuse, accident or non-observance of manufacturer’s instructions on the part of the user. As far as the law permits, the manufacturer does not accept liability for any direct or consequential loss, damage or other expense caused by or arising out of any failure to use the Goods in accordance with the manufacturer’s instructions.
- Exhaustible components (such as shaver heads, cutters and foils) of the Goods are included under this Warranty only where there is a defect in workmanship or materials used.
- The warranty granted under clause 3 is limited to repair or replacement only.
- Any parts of the Goods replaced during repairs or any product replaced remain the property of the manufacturer. In the event of the Goods being replaced during the Warranty Period, the warranty on the replacement Goods will expire on the same date as for the Warranty Period on the original Goods which are replaced.
- In order to claim under the warranty granted under clause 3 you must:
- Retain this warranty with your receipt/proof of purchase; and
- Return the Goods to us at the relevant address below or to the Supplier by prepaid freight within the Warranty Period accompanied with (i) the legible and unmodified original proof of purchase, which clearly indicates the name and address of the Supplier, the date and place of purchase, the product name or other product serial number and (ii) this warranty.
- This warranty is immediately void if:
- Any serial number or appliance plate is removed or defaced;
- The Goods have been serviced or otherwise repaired by a person not authorised to do so by us or where non approved replaced parts are used.
- The Goods are designed for domestic use only. A limited 90-day Warranty applies to any industrial or commercial use of the Goods. The Goods must be connected to the electrical voltage requirements as specified in the ratings label located on the Goods.
- This warranty does not cover the cost of claiming under the warranty or transport of the Goods to and from the Supplier or us.
- This warranty is only valid and enforceable in Australia against Spectrum Brands Australia Pty Ltd and in New Zealand against Spectrum Brands New Zealand Limited.
Contact us or the Supplier for further details.
Spectrum Brands Australia Pty Ltd
Locked Bag 3004
Braeside, VIC 3195
AUSTRALIA
Customer service in Australia: 1800 623 118
E-mail: consumer.[email protected]
Website: www.remington-products.com.au
Spectrum Brands New Zealand Limited
PO Box 9817
Newmarket, Auckland 1149
NEW ZEALAND
Customer service in New Zealand: 0800 736 776
E-mail: [email protected]
Website: www.remington.co.nz
Australia 1800 623 118 (toll free)
New Zealand 0800 736 776 (toll free)
® Registered Trademark of Spectrum Brands, Inc., or one of its subsidiaries.
Made in China to the specifications of Spectrum Brands, Inc.
IMPORTANT SAFETY INSTRUCTIONS
When using electrical appliances, basic precautions should always be observed, including the following.
READ ALL INSTRUCTIONS BEFORE USING
For additional protection, the installation of a residual current device (rid) having a rated residual operating current not exceeding 30 mA is advisable in the electrical circuit supplying the bathroom. Ask your installer for advice.
KEEP THE POWER ADAPTOR AWAY FROM WATER
WARNING – TO REDUCE THE RISK OF BURNS, ELECTROCUTION AND FIRE OR INJURY TO PERSONS
DANGER – As with most electrical appliances, electrical parts are electrically live even when the switch is off.
- Do not place or store the appliance or charging adaptor where it can fall or be knocked into a sink or bath.
- Do not place in or drop into water or any other liquid.
- If an appliance falls into water, “unplug it” immediately. Do not reach into the water.
- Unplug the charging adaptor from the electrical outlet immediately after fully charging.
- Do not use while bathing or in the shower.
- Unplug and switch off this appliance before cleaning it.
- Use this appliance only for its intended use as described in this manual.
- Do not use attachments not recommended by Remington.
- Never drop or insert any object into any opening of this appliance.
- Keep the cord away from heated surfaces.
- Do not use this appliance with a damaged or broken trimming unit as injury may occur.
- Always store the charging adaptor in a moisture-free location.
- For household use only.
- This appliance should not be used by children or other persons with reduced physical, sensory or mental capabilities or lack of experience and knowledge unless they have been given supervision or instruction concerning use of the appliance in a safe way and understand the hazards involved.
- This appliance is not a toy. Children shall be supervised to ensure they do not play with the appliance. Cleaning and use maintenance shall not be made by children without supervision.
- Keep the appliance and the power cord away from edge of tables or countertops and out of reach of children and persons with reduced physical, sensory or mental capabilities.
- Do not use on people who are asleep.
- Never operate this appliance if it has a damaged cord or plug, if it is not working correctly, if the charging adaptor has been damaged or dropped into water.
- Do not use an extension cord or a voltage converter with this appliance.
- Do not wrap the cord around the appliance.
- This appliance should be supplied with approved safety isolating adaptor SW-050150AU or PA-0515A (AUS version) with the output capacity of 5Vd.c, 1.5A (adaptor output).
WARNING – KEEP THE APPLIANCE DRY
Remington strongly recommends that an approved Safety Switch
(residual current device) be installed to protect all bathroom power
outlets. Ask an electrical contractor for advice.
SAVE THESE INSTRUCTIONS
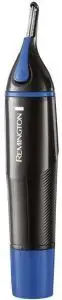
MB6850AU VAC TRIM BEARD TRIMMER USE AND CARE MANUAL
Thank you for purchasing your Remington® Vic Trim Beard Trimmer. Inside this manual you will find instructions on using and caring for your trimmer.
KEY PARTS
- On/Off Button
- 32mm Blade
- Vacuum Intake
- Vacuum Chamber
- Vacuum Chamber Release Buttons
- Charging Indicator Light
- Detail Trimmer Head
- Adjustable Beard Comb (2-18mm)
- Comb Lock Button
Also includes: – Charging Adaptor
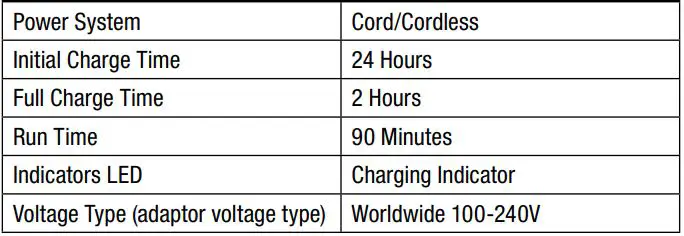
MB6850AU SPECIFICATIONS

CHARGING
- Before using your trimmer for the first time, charge it for 24 hours. Note during this charge ignore the electronic indicators as they are in “start-up cycle”.
- Plug the adaptor into your trimmer and then plug the charging adaptor unit into a 100-240 volt domestic power outlet. Check to ensure that the trimmer On/Off switch is OFF. The Charging Indicator Light will glow to indicate that it is charging. The light will turn off after charging is complete.
- The batteries cannot be overcharged, but it is recommended that charging be discontinued and the trimmer stored away if it will not be used for an extended period of time (2-3 months).
- The trimmer will be fully charged in 2 hours.
- To preserve the life of the batteries, discharge them by running the trimmer until the blades move slowly. Switch off and recharge for 24 hours. Do this every 6 months.
- Use the trimmer only with the charging adaptor supplied.
NOTE: This product is for cordless use only, it cannot be used while it is connected to the mains power outlet or while it is charging.
TRIMMER ATTACHMENTS
CHANGING THE MAIN AND DETAIL BLADES
Your trimmer is supplied with the main blade already fitted. It is easier to remove and refit the main blade with the vacuum chamber removed.
- Switch your trimmer off.
- Hold the trimmer in one hand.
- Push the top of the blade away from the trimmer body using your thumb. (Fig A)
- Use enough force to free the blade from the trimmer body. Once free, lift it off.
- Fit the desired blade by engaging the tab on the back of the blade into the rear of your trimmer. Press the front of the blade down until it clicks.
- Replace the vacuum chamber.
FITTING/REMOVING THE ADJUSTABLE BEARD COMB
- Switch your trimmer off.
- Depress the comb lock button then slide the adjustable comb into the guides on the rear of your trimmer. Slide the comb all the way down then release the button.
- To adjust the length of the beard comb, depress the comb lock button then slide the comb to the desired length.
- The Adjustable Beard Comb attachment has 8 Length settings: 2-16mm (in increments of 2mm). Begin with a higher numbered setting. Adjust cutting length as desired once you are familiar with using the trimmer, it is better to select a longer hair length setting in order not to trim too much hair.
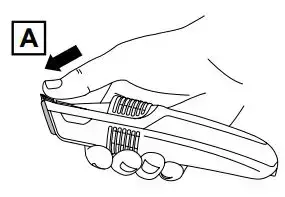
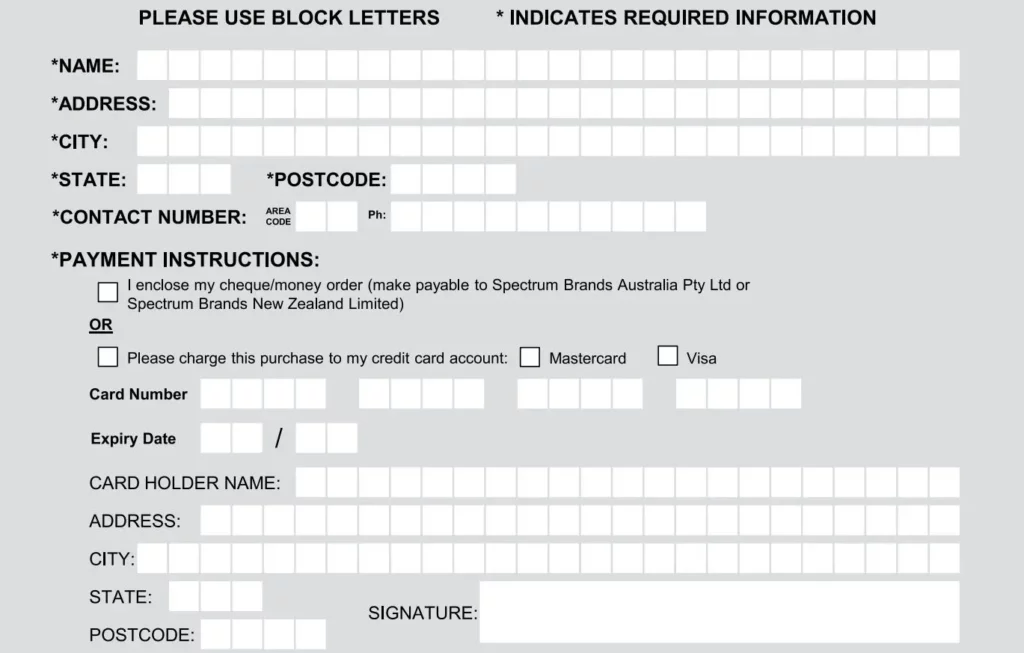
TIPS FOR BEST RESULTS
- Beard, moustache and sideburn hairs should be dry.
- Avoid using lotions before using your trimmer.
- Remove the Adjustable Beard Comb attachment if you are: defining hairline edges such as sideburns, trimming the nape of your neck, trimming your beard line on front of neck.
- Before trimming beards, comb your hair in the direction that it grows so that the hairs are at their maximum height and facing in the same direction.
- Since all hairs do not grow in the same direction, you may want to try different trimming methods (i.e. upwards, downwards or across). Practice is best for optimum results.
NOTE: Use slow light pressure. Too much pressure may trim off more hair than desired.
CARING FOR YOUR TRIMMER
Your beard trimmer is fitted with high quality blades. To ensure long lasting performance, clean the blades and trimmer regularly.
AFTER EACH USE
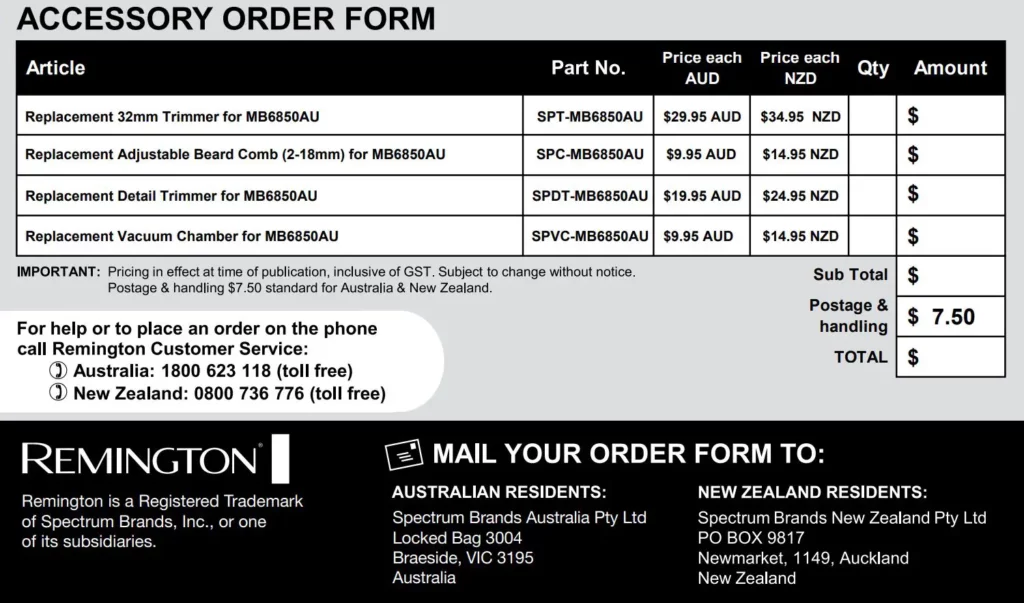
- Ensure your trimmer is switched off and disconnected from the charger before cleaning.
- Remove the blade. Brush the accumulated hair from the blade.
- Wipe your trimmer body with a damp cloth and dry immediately. Do not submerge your trimmer in water.
- Refit the blade.
- Press the two vacuum chamber release buttons and remove the vacuum chamber (Fig B).
- Empty the vacuum chamber (Fig C) and rinse it under a running tap. The chamber must be completely dry before returning it to the trimmer.
WASHABLE HEADS
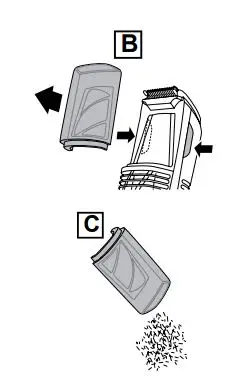
- The trimming heads are washable for ease of cleaning. Always remove the trimming head from your trimmer before washing.
- Rinse the trimming heads under a running tap to remove any hair clippings (Fig D).
- Once dry, refit the trimming head.
NOTE: If you rinse these attachments with cool or warm water (never use hot water) then they will need to be lubricated with light-grade oil or sewing machine oil (1-2 drops over the cutters).
NEVER run the entire Vic Groom unit under the tap.
ENVIRONMENTAL PROTECTION
To avoid environmental and health problems due to hazardous substances in electrical and electronic goods, appliances marked with this symbol must not be disposed of with unsorted municipal waste, but recovered, reused or recycled.
BATTERY REMOVAL
NOTE: The battery is not intended to be removed or replaced under normal use. The only time the battery should be removed or the unit opened or disassembled, is at the end of the product’s useful life before it is discarded.
The MB6850AU contains a lithium-ion battery. Once the groomer has reached the end of its life, to ensure proper disposal of the product, please take the appliance to a recycling center, where the internal rechargeable battery should be removed by a professional and recycled separately.
For more information about recycling of electrical and battery operated appliances, please contact your local council office or your household waste disposal service.
CAUTION! Do not put in the fire or mutilate your batteries when disposing as they may burst and release toxic materials. Do not short circuit as it may cause burns.
![]()
THIS PRODUCT IS NOT SUITABLE FOR USE IN THE BATH OR SHOWER
This appliance conforms to radio frequency interference requirements. Any product purchased and used commercially carries a limited 90 Day Warranty.
Spectrum Brands Australia Pty Ltd and Spectrum Brands New Zealand Limited
WARRANTY AGAINST DEFECTS
In this warranty:
Australian Consumer Law means the Australian consumer law set out in Schedule 2 to the Competition and Consumer Act 2010;
CGA means the New Zealand Consumer Guarantees Act 1993;
Goods means the product or equipment which was accompanied by this warranty and purchased in Australia or New Zealand, as the case may be;
Manufacturer, We or us means:
- for Goods purchased in Australia, Spectrum Brands Australia Pty Ltd ACN, 007 070 573; or
- for Goods purchased in New Zealand, Spectrum Brands New Zealand Limited, as the case may be, contact details as set out at the end of this warranty;
- Supplier means the authorized distributor or retailer of the Goods that sold you the Goods
- in Australia or in New Zealand; and
- You means you, the original end-user purchaser of the Goods.
- Our goods come with guarantees that cannot be excluded under the Australian Consumer Law, or the CGA. You are entitled to a replacement or refund for a major failure and compensation for any other reasonably foreseeable loss or damage. You are also entitled to have the goods repaired or replaced if the goods fail to be of acceptable quality and the failure does not amount to a major failure.
- The benefits provided by this Warranty are in addition to all other rights and remedies in respect of the Goods which the consumer has under either the Australian Consumer Law or the CGA. The original purchaser of the Goods is provided with the following Warranty subject to the Warranty Conditions:
- We warrant the Goods for all parts defective in workmanship or materials for the period of two (2) years from the date of purchase (Warranty Period). If the Goods prove defective within the Warranty Period by reason of improper workmanship or material, we may, at our own discretion, repair or replace the Goods without charge.
• Warranty Conditions - The Goods must be used in accordance with the manufacturer’s instructions. This Warranty does not apply should the defect in or failure of the Goods be attributable to misuse, abuse, accident or non-observance of manufacturer’s instructions on the part of the user. As far as the law permits, the manufacturer does not accept liability for any direct or consequential loss, damage or other expense caused by or arising out of any failure to use the Goods in accordance with the manufacturer’s instructions.
- Exhaustible components (such as shaver heads, cutters and foils) of the Goods are included under this Warranty only where there is a defect in workmanship or materials used.
- The warranty granted under clause 3 is limited to repair or replacement only.
- Any parts of the Goods replaced during repairs or any product replaced remain the property of the manufacturer. In the event of the Goods being replaced during the Warranty Period, the warranty on the replacement Goods will expire on the same date as for the Warranty Period on the original Goods which are replaced.
- In order to claim under the warranty granted under clause 3 you must: (a) Retain this warranty with your receipt/proof of purchase; and (b) Return the Goods to us at the relevant address below or to the Supplier by prepaid freight within the Warranty Period accompanied with (i) the legible and unmodified original proof of purchase, which clearly indicates the name and address of the Supplier, the date and place of purchase, the product name or other product serial number and (ii) this warranty.
- This warranty is immediately void if: (a) Any serial number or appliance plate is removed or defaced; (b) The Goods have been serviced or otherwise repaired by a person not authorized to do so by us or where non approved replaced parts are used.
- The Goods are designed for domestic use only. A limited 90-day Warranty applies to any industrial or commercial use of the Goods. The Goods must be connected to the electrical voltage requirements as specified in the ratings label located on the Goods.
- This warranty does not cover the cost of claiming under the warranty or transport of the Goods to and from the Supplier or us.
- This warranty is only valid and enforceable in Australia against Spectrum Brands Australia Pty Ltd and in New Zealand against Spectrum Brands New Zealand Limited.
Contact us or the Supplier for further details.
Spectrum Brands Australia Pty
Ltd Locked Bag 3004
Braeside, VIC 3195
AUSTRALIA
Customer service in Australia: 1800 623 118
E-mail: [email protected]
Website: www.remington-products.com.au
Spectrum Brands New Zealand Limited
PO Box 9817
Newmarket, Auckland 1149
NEW ZEALAND
Customer service in New Zealand: 0800 736 776
E-mail: [email protected]
Website: www.remington.co.nz
![]()
REMINGTON SERVICE HOTLINE
Australia 1800 623 118 (toll free)
New Zealand 0800 736 776 (toll free)
® Registered Trademark of Spectrum Brands, Inc., or one of its subsidiaries.
Made in China to the specifications of Spectrum Brands, Inc.
© 2018 Spectrum Brands, Inc.
REV. 04/18 PART NO. T22-7000153
TYPE: MB6850
![]()
ENDURANCE BEARD TRIMMER KIT
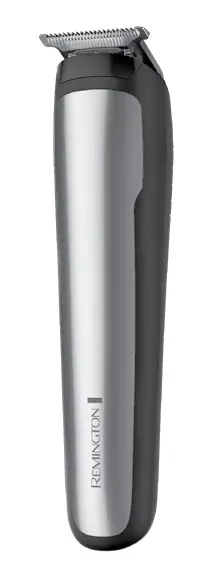 To register your product go to
www.remington-products.com.au
www.remington.co.nz
2 YEAR WARRANTY
MB5000AU
USE & CARE MANUAL
PLEASE READ PRIOR TO USE
IMPORTANT SAFETY INSTRUCTIONS
When using electrical appliances, basic precautions should always be observed, including the following.
READ ALL INSTRUCTIONS BEFORE USING
DANGER: As with most electrical appliances, electrical parts are electrically live even when the switch is off. For additional protection, the installation of a residual current device (rcd) having a rated residual operating current not exceeding 30 mA is advisable in the electrical circuit supplying the bathroom. Ask your installer for advice.
KEEP AWAY FROM WATER WARNING: TO REDUCE THE RISK OF BURNS, ELECTROCUTION AND FIRE OR INJURY TO PERSONS
- The appliance should never be left unattended when plugged into a power outlet, except when charging the appliance.
- This appliance should not be used by children or other persons with reduced physical, sensory or mental capabilities or lack of experience and knowledge unless they have been given supervision or instruction concerning the use of the appliance in a safe way and understand the hazards involved.
- Children shall not play with the appliance.
- Cleaning and user maintenance shall not be made by children without supervision.
- Never operate this appliance if it has a damaged cord or plug if it is not working correctly, if it has been dropped or damaged, or dropped into water. If the supply cord or plug of the appliance is damaged it must be replaced by the manufacturer, its service agent or similarly qualified persons in order to avoid a hazard. It cannot be repaired.
- Keep the cord away from heated surfaces.
- Charge, use and store the product at a temperature between 0°C and 32°C.
- Do not use outdoors or where aerosol (spray) products are being used, or where oxygen is being administered.
- For use on facial hair only. Not intended for shaving the hair on your head.
- Do not plug or unplug the appliance with wet hands.
- For household use only.
- Do not place or store the appliance or charging adaptor where it can fall or be knocked into a sink or bath.
- Do not place in or drop into water or any other liquid for extended periods of time.
- If an appliance falls into water, “unplug it” immediately. Do not reach into the water.
- Unplug the charging adaptor from the electrical outlet immediately after fully charging.
- Unplug the power adaptor from the appliance before cleaning the appliance in water.
- Use this appliance only for its intended use as described in this manual.
- Do not use attachments not recommended by Remington.
- Never drop or insert any object into any opening of this appliance.
- Always store the charging adaptor in a moisture-free location.
- Do not use it on people who are asleep.
- This appliance should be supplied with approved safety isolating adaptor PA-0510A (AUS version) with the output capacity of 5V DC, 1A; 200mA (adaptor output).
- Do not use an extension cord or a voltage converter with this appliance.
SAVE THESE INSTRUCTIONS
MB5000AU Endurance Beard Trimmer Kit
Use & Care Instruction Manual
Thank you for purchasing your Remington ® Endurance Beard Trimmer Kit. Inside this manual, you will find instructions on using and caring for your groomer.

| 1. Line Edger T-Blade | 7. 9 x Trimming Guides (1.5 – 25mm) |
| 2. On/Turbo/Off Switch | 8. Endurance Lock |
| 3. Adjustable Beard & Stubble Comb (1.5mm – 5.0mm) |
Also Includes: • Power Adaptor • Storage Pouch • Lubricating Oil • Cleaning Brush |
| 4. 20mm Detail Head | |
| 5. 7mm Detail Head | |
| 6. Full Size Foil Shaver Head |
Note: The trimming guide attachments supplied are of various lengths (1.5 – 25mm). When first becoming familiar with your Endurance Beard Trimmer Kit, begin with a longer numbered setting. Adjust the cutting length as desired.
ABOUT YOUR TRIMMER
| MB5000AU SPECIFICATIONS | |
| Power System | Cordless (Rechargeable) |
| Full Charge Time | 4 Hours |
| Run Time | 4.5 Hours |
| Quick Charge | Yes (5 Minutes) |
| Indicators | Fuel Gauge (see chart) |
| Voltage Type (adaptor voltage type) | Worldwide 100-240V |
CHARGING
- Before using your groomer for the first time, charge it for 4 hours. The groomer will be fully charged in 4 hours.
- Plug the adaptor into your groomer and then plug the charging adaptor unit into a 100-240V domestic power outlet. Check to ensure that the battery lock switch is in the unlocked position (left). The unit will not charge if the switch is in the lock position. The fuel gauge will illuminate to indicate that it is charging. When the battery is full the fuel gauge will remain illuminated until disconnected from the power outlet.
- The battery cannot be overcharged, but it is recommended that charging be discontinued and the groomer stored away if it will not be used for an extended period of time (2-3 months).
- To preserve the life of the battery, discharge it by running the groomer until the blades move slowly. Switch off and recharge for 4 hours. Do this every 6 months.
- Use the groomer only with the charging adaptor supplied.
Endurance Lock
- The groomer features an endurance lock which helps preserve battery charge during storage.
- To enable the endurance lock when the trimmer is not in use, slide the endurance lock switch to the right.
FUEL GAUGE DISPLAY OF CHARGE LEVELS
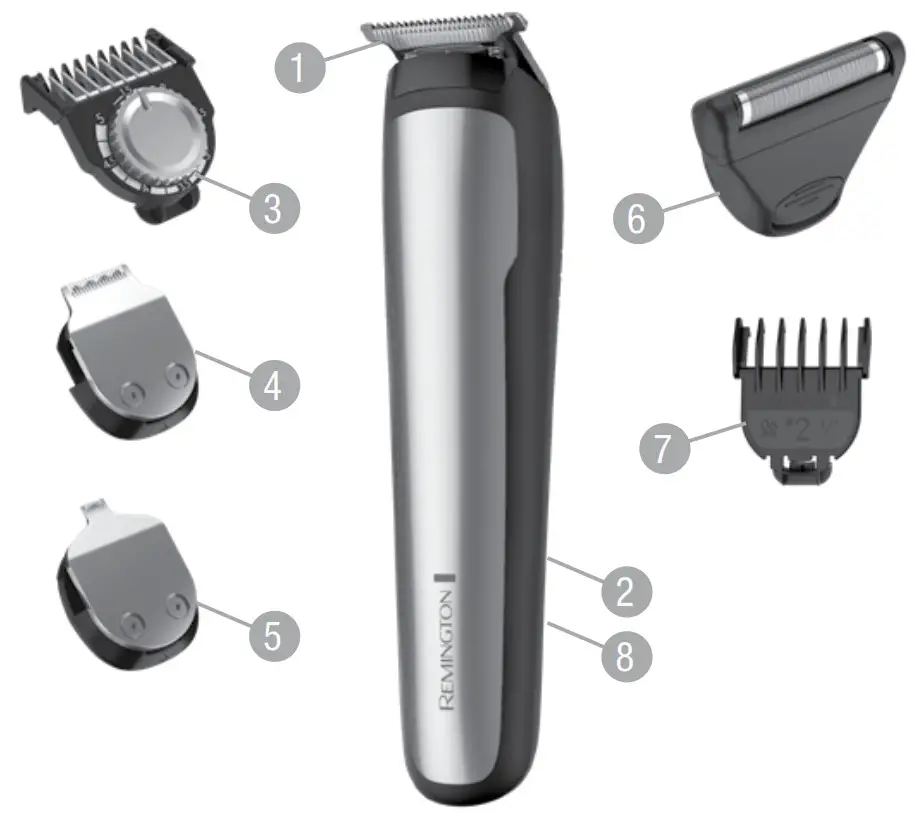
INSTRUCTIONS FOR USE
- Switch the product on by pressing the On/Turbo/Off button once for normal mode, again for turbo mode, and a third time to turn it off.
- Turbo mode is intended for thick beards or heavier areas of facial hair.
- Turbo function provides a boost in motor speed to power through thick beards.
HOW TO USE YOUR ENDURANCE BEARD TRIMMER KIT
What attachments to use:
| T-Blade | Foil Shaver Head |
Adjustable Stubble Comb |
Trimming Guides |
7mm Detail Head |
20mm Detail Head |
|
| Beard | X | X | X | X | ||
| Beard Line | X | X | X | X | ||
| Moustache | X | X | X | X | X | X |
| Nape of Neck | X | X | ||||
| Sideburns | X | X | X | X | ||
| Nose | X | |||||
| Ear | X | |||||
| Eyebrow | X | |||||
| Body | X | X | X | X | ||
| Head | X |
ATTACHING THE GROOMING ATTACHMENTS
Note: Ensure the groomer is switched off before changing any attachments.
To Attach & Remove the Attachment Heads:
- To attach any of the attachment heads, slide the selected head onto the body until it clicks into place.
- To remove the T-Blade & the Detail Heads, press on the eject symbol on the back of the head and slide forward. Make sure the blade is facing away from you.
- The foil shaver attachment has a release button on the back. To remove, press then slides off.
Trimming Guides:
Note: Make sure the T-Blade is on the groomer.
- To attach trimming guides, ensure the trimmer blade is facing away from you. Hook the trim guide on the front of the trimmer blade and push it down to click into place.
- To remove, pull the tab on the back of the trim guide upwards and away from the trimmer blade.
Adjustable Stubble Comb:
- The stubble comb can be adjusted to give you length settings between 1.5 – 5.0mm by turning the wheel to the desired length.
- Turn the wheel clockwise for longer lengths and counterclockwise for shorter lengths. The wheel has an indicator that points to the length setting selected.
GROOMING TIPS
Beard / Moustache:
- Use a small comb to straighten hairs for trimming.
- When TRIMMING, first select a Trimming Guide and attach it to the T-Blade. If you are trimming for the first time start with the maximum length. Adjust the trim guide length as desired once you are familiar with using the groomer.
- Starting under the chin, follow the jawline back towards the ear. Trim in multiple directions to capture all stray hairs.
- When THINNING or TAPERING, use a small comb to hold the beard in place. In your opposite hand, hold the Groomer with the cutting system facing outward while slowly moving through the hair.
- If hair builds up in the trimmer comb during the process, switch the unit off, pull the comb off and remove excess hair by pulling it out of the comb.
- The Adjustable Beard Comb Attachment can also be used to achieve the desired look.
Foil Shaver:
- Use the Foil Shaver attachment to clean up detailed areas. For best results, avoid holding at an angle.
Note: The foil shaver is designed to shave the detailed areas around your beard, moustache and sideburns. It is not designed to shave your entire face. Ensure to trim your facial hair before shaving.
Nape of Neck
- Using a mirror is necessary if self-trimming.
- Lift hair off the neck, using the index finger to cover & protect hairs NOT needing trimming.
- Carefully touch cutting blade to the neck, slowly moving the groomer in an upward direction until stopped by the index finger.
Eyebrows:
- Attach the 7mm detail head trimmer.
- Guide cutting edges to stray hairs along with eyebrows.
- For best results, do not use the trimmer to define the entire eyebrow.
Nose:
- Attach the 7mm detail head trimmer.
- Carefully insert groomer no more than 1/4” into the nostril.
- Rotate the groomer in a circular motion while gently moving in and out of the nose.
Ears:
- Attach the 7mm detail head trimmer.
- When trimming inner ears, avoid inserting the groomer more than 1/4” into the ear canal.
- Rotate the groomer in a circular motion while gently moving in and out of the ear canal.
CLEANING, CARE & MAINTENANCE
Note: Always clean the groomer attachments regularly to ensure maximum performance and proper operating life.
Cleaning Attachments With Water
1. Remove attachment.
2. Rinse the attachment under warm running water. Do NOT use hot water as this might cause damage.
Cleaning Attachments With The Brush
• After first removing attachment, thoroughly brush and blow out hair clippings from the cutting system, attachment and top of groomer handle.
Cleaning Foil Shaver Attachment
The foil shaver attachment has a release button at the back to remove it from the groomer. To remove, press the button then slide off.
Oiling Blades & Cautions
- Rinsing attachments underwater (above) requires lubricating the cutting blades 1x monthly. Using only light-grade oils (e.g. sewing machine oil), simply spread 1-2 drops lightly over cutters with a fingertip. Wipe away all excess.
- Use only light-grade oils as these will not evaporate nor slow down the speed of cutting blades.
- Do not use hair oil, grease, or any oil mixed with kerosene or solvent as these too will evaporate.
BATTERY DISPOSAL
Note: The battery is not intended to be removed or replaced under normal use. The only time the battery should be removed or the unit opened or disassembled is at the end of the product’s useful life before it is discarded.
- The MB5000AU contains a lithium-ion battery. Once the groomer has reached the end of its life, to ensure proper disposal of the product, please take the appliance to a recycling centre, where the internal rechargeable battery should be removed by a professional and recycled separately.
- For more information about recycling electrical and battery-operated appliances, please contact your local council office or your household waste disposal service.
Caution: Do not put in the fire or mutilate your batteries when disposing of them as they may burst and release toxic materials. Do not short circuit as it may cause burns.
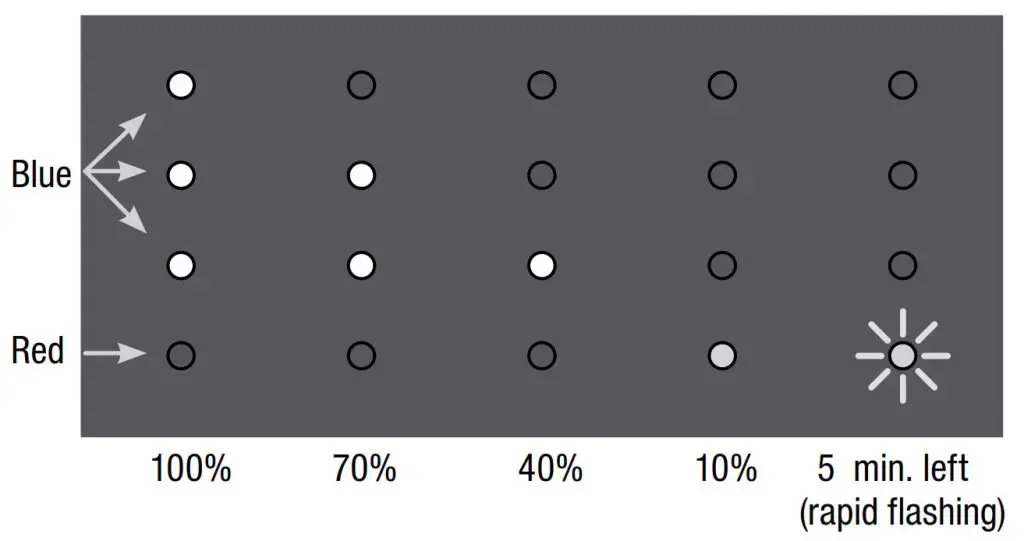
This product is suitable for use in the bath or shower.
This product conforms to radio frequency interference requirements
Any product purchased and used commercially carries a limited 90 Day Warranty.
Spectrum Brands Australia Pty Ltd and Spectrum Brands New Zealand Limited
WARRANTY AGAINST DEFECTS
In this warranty:
Australian Consumer Law means the Australian consumer law set out in Schedule 2 to the Competition and Consumer Act 2010;
CGA means the New Zealand Consumer Guarantees Act 1993;
Goods means the product or equipment which was accompanied by this warranty and purchased in Australia or New Zealand, as the case may be;
Manufacturer, We or us means:
- for Goods purchased in Australia, Spectrum Brands Australia Pty Ltd ACN, 007 070 573; or
- for Goods purchased in New Zealand, Spectrum Brands New Zealand Limited, as the case may be, contact details as set out at the end of this warranty;
Supplier means the authorised distributor or retailer of the Goods that sold you the Goods in Australia or in New Zealand; and
You means you, the original end-user purchaser of the Goods.
- Our goods come with guarantees that cannot be excluded under the Australian Consumer Law, or the CGA. You are entitled to a replacement or refund for a major failure and compensation for any other reasonably foreseeable loss or damage. You are also entitled to have the goods repaired or replaced if the goods fail to be of acceptable quality and the failure does not amount to a major failure.
- The benefits provided by this Warranty are in addition to all other rights and remedies in respect of the Goods which the consumer has under either the Australian Consumer Law or the CGA. The original purchaser of the Goods is provided with the following Warranty subject to the Warranty Conditions:
- We warrant the Goods for all parts defective in workmanship or materials for the period of two (2) years from the date of purchase (Warranty Period). If the Goods prove defective within the Warranty Period by reason of improper workmanship or material, we may, at our own discretion, repair or replace the Goods without charge.
Warranty Conditions - The Goods must be used in accordance with the manufacturer’s instructions. This Warranty does not apply should the defect in or failure of the Goods be attributable to misuse, abuse, accident or non-observance of manufacturer’s instructions on the part of the user. As far as the law permits, the manufacturer does not accept liability for any direct or consequential loss, damage or other expense caused by or arising out of any failure to use the Goods in accordance with the manufacturer’s instructions.
- Consumable parts (such as shaver heads, cutters and foils) of the Goods are included under this Warranty only where there is a defect in workmanship or materials used.
- The warranty granted under clause 3 is limited to repair or replacement only.
- Any parts of the Goods replaced during repairs or any product replaced remain the property of the manufacturer. In the event of the Goods being replaced during the Warranty Period, the warranty on the replacement Goods will expire on the same date as for the Warranty Period on the original Goods which are replaced.
- In order to claim under the warranty granted under clause 3 you must:
(a) Retain this warranty with your receipt/proof of purchase; and
(b) Return the Goods to us at the relevant address below or to the Supplier by prepaid free within the Warranty Period accompanied with
(i) the legible and unmodified original proof of purchase, which clearly indicates the name and address of the Supplier, the date and place of purchase, the product name or other product serial number and (ii) this warranty. - This warranty is immediately void if:
(a) Any serial number or appliance plate is removed or defaced;
(b) The Goods have been serviced or otherwise repaired by a person not authorised to do so by us or where non approved replaced parts are used. - The Goods are designed for domestic use only. A limited 90-day Warranty applies to any industrial or commercial use of the Goods. The Goods must be connected to the
electrical voltage requirements as specified in the ratings label located on the Goods. - This warranty does not cover the cost of claiming under the warranty or transport of the Goods to and from the Supplier or us.
- This warranty is only valid and enforceable in Australia against Spectrum Brands Australia Pty Ltd and in New Zealand against Spectrum Brands New Zealand Limited.
Contact us or the Supplier for further details.
Spectrum Brands Australia Pty Ltd
Locked Bag 3004
Braeside, VIC 3195
AUSTRALIA
Customer service in Australia: 1800 623 118
E-mail: [email protected]
Website: www.remington-products.com.au
Spectrum Brands New Zealand Limited
PO Box 9817
Newmarket, Auckland 1149
NEW ZEALAND
Customer service in New Zealand: 0800 736 776
E-mail: [email protected]
Website: www.remington.co.nz
![]()
REMINGTON SERVICE HOTLINE
![]() Australia 1800 623 118 (toll free)
Australia 1800 623 118 (toll free)
![]() New Zealand 0800 736 776 (toll free)
New Zealand 0800 736 776 (toll free)
AUTHORISED REPAIR CENTRES
Visit www.remington-products.com.au for Authorised repair centre details.
® Registered Trade Mark of Spectrum Brands Inc., (SBI) or one of its subsidiaries![]()
© 2019 Spectrum Brands Inc.
Rev. 05/19
Part No. T22-7000864
Type: MB09A
Official Electrical Styling Partner of Manchester United
QuickCut Hair Clipper
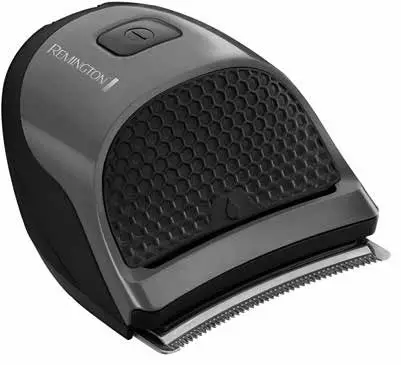
HC4255AU
www.remington-products.com.au
www.remington.co.nz
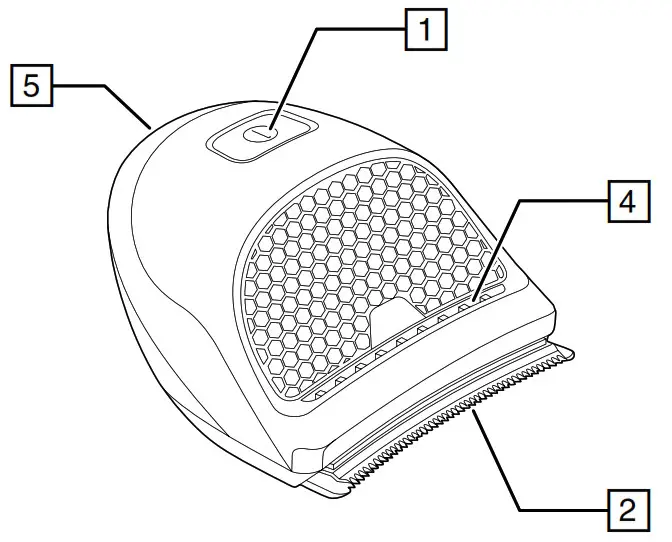
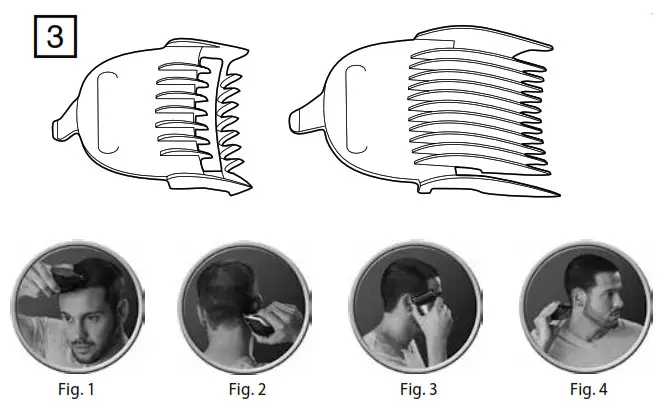
Thank you for buying your new Remington® product. Please read these instructions carefully and keep them safe. Remove all packaging before use.
IMPORTANT SAFEGUARDS
READ ALL INSTRUCTIONS BEFORE USING
When using electrical appliances, basic precautions should always be observed, including the following. For additional protection, the installation of a residual current device (rcd) having a rated residual operating current not exceeding 30 mA is advisable in the electrical circuit supplying the bathroom. Ask your installer for advice
WARNING – TO REDUCE THE RISK OF BURNS, ELECTROCUTION AND FIRE OR INJURY TO PERSONS
DANGER – As with most electrical appliances, electrical parts are electrically live even when the switch is off.
- Do not place or store the appliance or charging adaptor where it can fall or be knocked into a sink or bath.
- Do not place in or drop into water or any other liquid.
- If an appliance falls into water, “unplug it” immediately. Do not reach into the water.
- Unplug the charging adaptor from the electrical outlet immediately after fully charging.
- Unplug and switch off this appliance before cleaning it.
- Use this appliance only for its intended use as described in this manual.
- Do not use attachments not recommended by Remington.
- Never drop or insert any object into any opening of this appliance.
- Keep the cord away from heated surfaces.
- Do not use this appliance with a damaged or broken trimming unit as injury may occur.
- Always store the charging adaptor in a moisture-free location.
- For household use only.
- This appliance is not intended for use by persons (including children) with reduced physical, sensory or mental capabilities, or lack of experience and knowledge, unless they have been given supervision or instruction concerning use of the appliance by a person responsible for their safety.
- Keep the appliance and the power cord away from the edge of table or countertops and out of reach of children and persons with reduced physical, sensory or mental capabilities.
- This appliance is not a toy. Children shall be supervised to ensure they do not play with the appliance.
- Do not use on people who are asleep.
- Never operate this appliance if it has a damaged cord or plug, if it is not working correctly, if the charging adaptor has been damaged or dropped into water.
- Do not use an extension cord or a voltage converter with this appliance.
- Do not wrap the cord around the appliance.
- Do not store the appliance in the shower between uses. Always store it in a dry and safe place.
- This appliance should be supplied with approved safety isolating adaptors PA-4515A (for Australia) with the output capacity of 4.5Vdc; 1500mA
- Remington strongly recommends that an approved Safety Switch (Residual current device) be installed to protect all bathroom power outlets. Ask an electrical contractor for advice.
WARNING: DO NOT USE YOUR HAIR CLIPPER IN THE SHOWER OR UNDER AN OPEN WATER SOURCE WHILE THE UNIT IS CONNECTED TO A LIVE
POWER OUTLET
SAVE THESE INSTRUCTIONS
PARTS
- On/off switch
- Blade set
- 9 attachment guide combs
- Washout port
- Charging indicator
Not shown:
- Cleaning brush
- Oil bottle
- Adaptor
- Travel pouch
- Hair cape
GETTING STARTED
CHARGING YOUR APPLIANCE
Note: It is recommended to fully charge your appliance before using for the first time. Please refer to the charge times shown in this book.
- Connect the product to the adaptor and then to the mains.
- When charging the charge indicator will slowly flash.
CHARGE LEVEL INDICATORS
| Charge Level | Indicator |
| Charging | LED blinks |
| Fully charged | LED solid |
- Run time from fully charged is up to 40 minutes.
- Charge time from empty is 4 hours.
Note: To preserve the life of your batteries, let them run out every 6 months then fully charge.
QUICK CHARGE FUNCTION
- 10 minutes charging will give an emergency burst of run time.
INSTRUCTIONS FOR USE
- For corded use connect the product to the adaptor, then to the mains.
CAUTION Extended mains only use will result in the reduction of the battery life.
CORDLESS USE
- When the unit is switched on and fully charged, the product can be used in cordless mode for up to 40 minutes.
- Switch the product on by pressing the on/off switch.
BEFORE STARTING THE CUT
- Inspect the clipper making sure that it is free from hair and dirt.
- Before cutting, always comb the hair so it is tangle-free and dry.
Guide Comb Cutting length 1 (Grade 0) 1.5mm 2 2mm 3 2.5mm 4 (Grade 1) 3mm 5 4.5mm 6 (Grade 2 6mm 7 (Grade 3) 9mm 8 (Grade 4) 12mm 9 (Grade 5) 15mm - Use the clipper without any fixed combs for trimming hair close to the skin.
- This will trim hair to 1mm, holding the clipper so the blades are perpendicular to the skin will trim hair to 0.5mm.
TO ATTACH A COMB
- Hook the front edge of the comb to the front teeth of the wide trimmer blade. Then push the back of the comb down until it snaps in place.
TO REMOVE THE COMB
- Push up the back of the comb until it clicks off the clipper blade.
INSTRUCTIONS FOR CUTTING HAIR
- The QuickCut Clipper’s ergonomic design provides many different ways of holding the clipper in use.
- For clipping the top of the head (see fig. 1).
- For clipping the back of the head (see fig. 2).
- For clipping the sides of the head (see fig. 3).
- For detailing (see fig. 4).
- For even cutting, allow the comb attachment/blade to cut its way through the hair.
Do not force it through quickly. If you are cutting for the first time, start with the maximum comb attachment. - For one all over cut length, attach the desired guide comb and slowly guide the clipper through the hair against the direction the hair normally grows.
- Remove the guide comb. To produce a clean straight line at the sideburns and the base of the neck, reverse the hair clipper. Place the reversed clipper at right angles to the head, tips of the blades lightly touching the skin and then work downwards.
The following instructions are for those users who want different trimming lengths on the sides, back and top of the head
STEP 1 NAPE OF THE NECK
- Set the comb to 3mm or 6mm.
- Hold the clipper with the blade teeth pointing upwards. Begin starting at the centre of the head at the base of the neck.
- Slowly lift the clipper, working upwards and outwards through the hair, trimming just a little at a time.
STEP 2 BACK OF THE HEAD
- With the comb set at 9mm or 12mm, cut the hair at the back of the head.
STEP 3 SIDE OF THE HEAD
- With the comb set at 3mm or 6mm, trim sideburns. Then change to the longer 9mm guide comb and continue to cut the top of the head.
STEP 4 TOP OF THE HEAD
- Use the longer length comb attachment and set it to 12mm or 15mm then cut hair on top of the head against the direction in which the hair normally grows.
STEP 5 THE FINISHING TOUCHES
- Use the clipper without an attachment comb for close trimming around the base and sides of the neck and around the ears.
- To produce a clean straight line at the sideburns, reverse the hair clipper. Place the reversed clipper at right angles to the head, tips of the blades lightly touching the skin and then work downwards.
CARE FOR YOUR HAIRCLIPPER
- To ensure long lasting performance of your clipper, clean the blades and unit regularly.
- Always keep the clipper in the provided travel pouch.
- Ensure the appliance is switched off and unplugged from the mains before cleaning.
- Do not use harsh or corrosive cleaners on the unit or blades.
- Cleaning should be done with a soft brush.
- After each use – brush the accumulated hair from the blades.
WASHABLE CLEANING
- The QuickCut Clipper is fully washable for easy cleaning.
- Ensure the appliance is switched off and unplugged from the mains.
WASHOUT PORT INSTRUCTIONS
Note: Never rinse, wash or otherwise subject this product to liquid whilst the power cord is connected.
- For best results, keep trimmer running while running it under the tap. Allow water to run through the washout port and over the blades. Recommended to rinse after each use.
- Ensure the clipper is dry after cleaning.
- For more thorough cleaning the blade set can be easily removed to wash any hair trimmings from the blades. To release the blade set, push the blade set release button found on the base of the clipper.
- Ensure the blades are dry after rinsing under the tap. To reattach, align the blade set onto the clipper and push the blade set towards the clipper body until it clicks into place.
- Place a small drop of cutter or sewing machine oil onto the blades at each end and at the middle point of the blades. Turn the unit on for a few seconds to distribute the oil then turn off and wipe off excess oil.
BATTERY REMOVAL
The battery is not intended to be removed or replaced under normal use. The only time the battery should be removed or the unit opened or disassembled, is at the end of the product’s useful life before it is discarded.
- Ensure the device is unplugged from any electrical outlet and discharged of all power.
- Remove the blade cartridge from the trimmer.
- Pry the painted panel from the top of the clipper by prying at the seam where it meets the rubber, working from the top and down each side all the way down to the blade set until it can be removed.
- Remove the two screws from the top body housing
- Starting at the rubber seam on either side of the charge indicator lens, pry open the seam, working back and forth from one side to the other, little by little, following the seam as it stretches from the indicator lens to the blade set until the top shell has been pried apart all the way from the rest of the clipper.
- Pry the top inner housing up and out of the lower main trimmer body
- Remove the two screws from the top of the circuit board.
- Pull upward firmly on the front of the circuit board to create room to remove the battery.
- Cut the exposed black and red wires coming off of each end of the battery.
- Pry the battery out of its holder.
- Dispose of the battery safely and responsibly.
We suggest you use local waste management centres to recycle this product at end of life.
RECYCLING

To avoid environmental and health problems due to hazardous substances, appliances and rechargeable and non-rechargeable batteries marked with one of these symbols must not be disposed of with unsorted municipal waste. Always dispose of electrical and electronic products and, where applicable, rechargeable and non-rechargeable batteries, at an appropriate official recycling/ collection point.
Spectrum Brands Australia Pty Ltd and Spectrum Brands New Zealand Limited
WARRANTY AGAINST DEFECTS
In this warranty:
Australian Consumer Law means the Australian consumer law set out in Schedule 2 to the Competition and Consumer Act 2010;
CGA means the New Zealand Consumer Guarantees Act 1993;
Goods means the product or equipment which was accompanied by this warranty and purchased in Australia or New Zealand, as the case may be;
Manufacturer, We or us means:
- for Goods purchased in Australia, Spectrum Brands Australia Pty Ltd
ACN, 007 070 573; or - for Goods purchased in New Zealand, Spectrum Brands New Zealand Limited, as the case may be, contact details as set out at the end of this warranty;
Supplier means the authorised distributor or retailer of the Goods that sold you the Goods in Australia or in New Zealand; and
You means you, the original end-user purchaser of the Goods.
- Our goods come with guarantees that cannot be excluded under the Australian Consumer Law, or the CGA. You are entitled to a replacement or refund for a major failure and compensation for any other reasonably foreseeable loss or damage. You are also entitled to have the goods repaired or replaced if the goods fail to be of acceptable quality and the failure does not amount to a major failure.
- The benefits provided by this Warranty are in addition to all other rights and remedies in respect of the Goods which the consumer has under either the Australian Consumer Law or the CGA. The original purchaser of the Goods is provided with the following Warranty subject to the Warranty Conditions:
- We warrant the Goods for all parts defective in workmanship or materials for the period of five (5) years from the date of purchase (Warranty Period). If the Goods prove defective within the Warranty Period by reason of improper workmanship or material, we may, at our own discretion, repair or replace the Goods without charge.
Warranty Conditions - The Goods must be used in accordance with the manufacturer’s instructions. This Warranty does not apply should the defect in or failure of the Goods be attributable to misuse, abuse, accident or non-observance of manufacturer’s instructions on the part of the user. As far as the law permits, the manufacturer does not accept liability for any direct or consequential loss, damage or other expense caused by or arising out of any failure to use the Goods in accordance with the manufacturer’s instructions.
- Consumable parts (such as shaver heads, cutters and foils) of the Goods are included under this Warranty only where there is a defect in workmanship or materials used.
- The warranty granted under clause 3 is limited to repair or replacement only.
- Any parts of the Goods replaced during repairs or any product replaced remain the property of the manufacturer. In the event of the Goods being replaced during the Warranty Period, the warranty on the replacement Goods will expire on the same date as for the Warranty Period on the original Goods which are replaced.
- In order to claim under the warranty granted under clause 3 you must:
(a) Retain this warranty with your receipt/proof of purchase; and
(b) Return the Goods to us at the relevant address below or to the Supplier by prepaid freight within the Warranty Period accompanied with (i) the legible and unmodified original proof of purchase, which clearly indicates the name and address of the Supplier, the date and place of purchase, the product name or other product serial number and (ii) this warranty. - This warranty is immediately void if:
(a) Any serial number or appliance plate is removed or defaced;
(b) The Goods have been serviced or otherwise repaired by a person not authorised to do so by us or where non approved replaced parts are used. - The Goods are designed for domestic use only. A limited 90-day Warranty applies to any industrial or commercial use of the Goods. The Goods must be connected to the electrical voltage requirements as specified in the ratings label located on the Goods.
- This warranty does not cover the cost of claiming under the warranty or transport of the Goods to and from the Supplier or us.
- This warranty is only valid and enforceable in Australia against Spectrum Brands Australia Pty Ltd and in New Zealand against Spectrum Brands New Zealand Limited.
Contact us or the Supplier for further details.
Spectrum Brands Australia Pty Ltd
Locked Bag 3004
Braeside, VIC 3195
AUSTRALIA
Customer service in Australia: 1800 623 118
E-mail: [email protected]
Website: www.remington-products.com.au
Spectrum Brands New Zealand Limited
PO Box 9817
Newmarket, Auckland 1149
NEW ZEALAND
Customer service in New Zealand: 0800 736 776
E-mail: [email protected]
Website: www.remington.co.nz
![]()
REMINGTON SERVICE HOTLINE
![]() Australia 1800 623 118 (toll free)
Australia 1800 623 118 (toll free)
![]() New Zealand 0800 736 776 (toll free)
New Zealand 0800 736 776 (toll free)
AUTHORISED REPAIR CENTRES
Visit www.remington-products.com.au for Authorised repair centre details.
® Registered Trade Mark of Spectrum Brands Inc.,
(SBI) or one of its subsidiaries
© 2019 Spectrum Brands Inc.
Ref. No. HC4255AU
Type No. HC4250
Rev. 06/19 Part No. T22-7001093![]()

![]()
2 YEAR WARRANTY
IPL3500AU
THE SKIN CHART
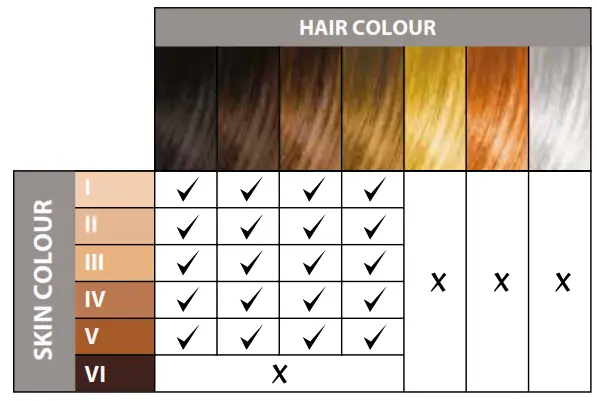 WARNING: i-LIGHT® is not suitable for very dark or black skin, white/ grey or very light blonde/red hair.
FOR FACIAL USE: Only suitable for female facial use below the cheekbone.
DO NOT use on or around the eyes, eyebrows or eyelashes. Doing so can cause serious and permanent eye injury.
The Compact Control IPL is a light-based device for permanent hair reduction designed for home use. It is a powerful electrical device and should be used with special attention to safety. Be sure to read all warnings, contraindications and safety precautions before use, and follow them strictly. We recommend you re-familiarise yourself with the instructions before each treatment.
INTENDED USE
The Remington Compact Control IPL is intended to remove unwanted hair and effect long-term, or permanent hair reduction. Permanent hair reduction is defined as a long-term stable reduction in the number of hairs regrowing after a treatment regime. You may use the Remington Compact Control IPL to remove unwanted body hair. Ideal body areas include the underarms, bikini line, arms, legs, face (female facial use only), back, shoulders and chest.
IMPORTANT SAFETY INSTRUCTIONS
WARNING – TO REDUCE THE RISK OF BURNS, ELECTROCUTION, FIRE, OR INJURY TO PERSONS:
- Use this appliance only for its intended use described in this manual.
- Do not use if it is damaged or malfunctions.
- Do not leave the appliance unattended while plugged in.
- Keep the power plug and cord away from heated surfaces.
- Do not use the product with a damaged cord.
- Store the product at a temperature between -40°C and 70°C. The operating temperature is between 10°C to 35°C.
- Only use the parts supplied with the appliance.
- Do not twist or kink the cable and do not wrap it around the appliance.
- The body of this appliance is not washable or water-resistant. Do not put the appliance in liquid; do not use it near water in a bathtub, basin or another vessel; and do not use it outdoors.
- Make sure the power cable and adaptor do not get wet. Do not reach for your unit if it has fallen into water – immediately unplug it from the electrical outlet.
- Do not plug or unplug the appliance with wet hands.
- This appliance should not be used by anyone under the age of 18 and persons with reduced physical, sensory or mental capabilities or lack of experience and knowledge unless they have been supervised/instructed and understand the hazards involved. Children shall not play with the appliance. Cleaning and user maintenance shall not be made by persons under 18.
- This appliance is not intended for commercial or salon use.
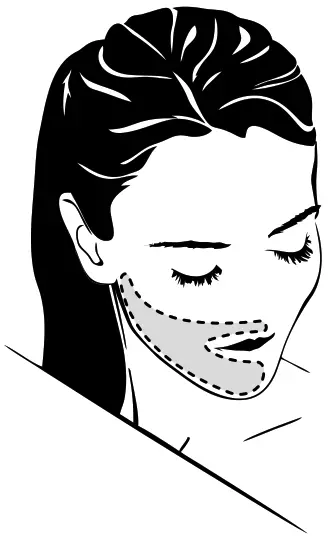 Possible hazardous optical radiation emitted from this product. Do not stare at the light source which may be harmful to the eye.
WARNINGS AND SAFETY INFORMATION
![]() Before you start using i-LIGHT®:
Before you start using i-LIGHT®:
Be sure to read all Warnings and Safety Information. Before you begin, check to see if i-LIGHT® is suitable for you.
Use the skin and hair chart at the front of this manual (page 2) and the integrated skin sensor to determine if this device is right for you.
- For Facial Use: Only suitable for female facial hair on the cheeks, sideburns, chin, neck and above the lips.
- DO NOT use on the eyes, eyebrows or eyelashes. Doing so can cause serious and permanent eye injury.
SKIN TYPE
- DO NOT use on very dark or black skin, as it may result in burns, blisters and changes in skin colour.
- DO NOT use on tanned skin or after recent sun exposure, as it may cause burns or skin injury.
- i-LIGHT® is not effective on naturally white, grey, blonde or red hair.
AREAS NOT TO TREAT:
- DO NOT use it on the scalp or ears.
- DO NOT use on male face or neck.
- DO NOT use above the cheekbone (female facial use).
- DO NOT use on nipples, areola or genitals.
- DO NOT use if you have tattoos or permanent makeup in the area to be treated.
- DO NOT use on dark brown or black spots such as moles, birthmarks or freckles.
- DO NOT use on an area of recent surgery, deep peel, laser resurfacing, scars or skin that has been damaged with burns or scalds.
WHEN NOT TO USE/WHEN TO AVOID USING I-LIGHT®
- DO NOT use if you have tanned skin in the intended treatment area, as your skin may be too dark and treatment in tanned areas could temporarily cause skin swelling, blisters, or could change the colour of your skin. Wait until your tan has faded before treating.
- DO NOT use on skin with cosmetics applied, as treating in those areas could temporarily cause skin swelling, blisters or could change the colour of your skin. Make sure to thoroughly clean the intended treatment area prior to use.
- DO NOT flash the same treatment spot multiple times during the same session, as this could temporarily cause skin swelling, blisters, or could change the colour of your skin.
- DO NOT treat any area more than once every two weeks, as this will not speed up results, but could increase the likelihood of skin swelling, blistering or changes to the colour of your skin.
- DO NOT use on damaged skin, including open wounds, cold sores, sunburn or areas where you have had a skin peel or other skin resurfacing procedure within the last 6-8 weeks.
- DO NOT use on irritated skin, including rashes or swollen skin. These conditions can make the skin more sensitive. Wait for the affected area to heal before use.
- DO NOT use if your skin is sensitive to light. In order to determine if you can use i-LIGHT®, perform a test on a small patch of skin and wait 24 hours to determine if there are any adverse reactions before treating more broadly.
- DO NOT use if you are or may be pregnant or are breastfeeding. i-LIGHT® has not been tested on pregnant women. Hormonal changes are common during pregnancy and breastfeeding and could increase skin sensitivity and the risk of skin injury.
- DO NOT flash against any material other than skin.
- DO NOT use i-LIGHT® for any purpose other than hair removal.
- DO NOT treat any area where you may someday want your hair to grow back. The results may be permanent and irreversible.
- DO NOT use if taking a photosensitising medication or herbal remedy without seeking medical advice as the flash may harm the skin.
- DO NOT use on the face if you have a history of cold sores; use of IPL or any treatment that irritates skin can cause a recurrence of cold sores.
CAUTION: Avoid treating areas that contain only vellus hairs (very thin, fine hair known as “peach fuzz”) as this may result in undesired hair re-growth.
- If you’ve had professional or clinical or self-administered laser or IPL or electrolysis hair removal treatments, wait at least 6 months before using i-LIGHT®. If you’ve waxed, plucked or epilated hair in the treatment area, wait at least 6 weeks before using i-LIGHT®. The device uses the hair under your skin to disable your hair at the root, so it is not effective if the hair has been pulled out.
- DO NOT use directly over or near Active Implantable Medical Devices such as implantable pacemakers, internal defibrillators, or insulin devices. Although no problems associated with the use of this device have been reported during clinical studies, it is recommended to observe all active implantable medical device warnings regarding the use of electronic devices to prevent any failure or interruption of an active implantable device.
- DO NOT use over or near anything artificial such as silicone implants, Implanon contraceptive implants, pacemakers, injectable fillers (eg. Botox), subcutaneous injection ports (insulin dispenser) or piercings.
- DO NOT use over or near fillings or dental implants.
- Wireless communications equipment may affect the i-LIGHT® device and should be kept at least 3.3m away.
i-LIGHT® COMPACT CONTROL KEY FEATURES
PARTS
1. Adapter Socket
2. Energy Level Indicator Lights (5)
3. Control Button
4. Ready Light
5. Treatment Window
6. Skin Tone Tester
7. Adapter (not shown)

GETTING STARTED
Be patient when first using your i-LIGHT® Compact Control, as with any new product, it may take a little while to familiarise yourself with the product. Take the time to acquaint yourself with your i-LIGHT® Compact Control as we are confident you will receive years of enjoyable use and complete satisfaction.
GETTING ACQUAINTED WITH i-LIGHT® COMPACT CONTROL
The efficiency of hair reduction varies from person to person according to body area, hair colour, and how the device is used. A typical full hair growth cycle may take 18-24 months. During this time, multiple treatment sessions are required to achieve permanent hair reduction.
A typical hair reduction plan during a full hair growth cycle includes:
- Treatments 1-6: Plan two weeks apart.
- Treatments 7-8: Plan four weeks apart.
- Treatments 9+: Treat as needed, until desired results are achieved.
EXPECTED TREATMENT OUTCOMES
The individual response depends on hair type as well as biological factors that may affect hair growth patterns. Some users may respond quicker or slower than the average number of treatments.
| Skin Type’ |
Body Haire | Area | Average Treatment Time |
Effectiveness of Hair Reduction |
| – I V | Dark blonde to brown |
Lower/upper leg |
Session 10 – 12 approx. 4 weeks apart |
60% |
| Arms | 50% | |||
| Bikini line | 60% | |||
| Underarms | 55% |
| Skin Type’ | Body Haire | Area | Average Treatment Time |
Effectiveness of Hair Reduction |
| I – V | Brown to black | Lower/upper leg |
Session 8 – 10 approx. 4 weeks apart |
70% |
| Arms | 50% | |||
| Bikini line | 70% | |||
| Underarms | 65% |
- Skin types are based on the Fitzpatrick scale of skin colours. Refer to the skin colour chart at the front of this manual (Fig 1).
- Not effective on white body hair.
ENERGY LEVELS
The energy level determines the intensity of the light pulse delivered to your skin. As the energy level increases, so do hair reduction results, as well as the risk of possible side effects and complications.
• The device has 5 levels of energy from 1 (the lowest) to 5 (the highest), represented by 5 energy level indicator lights.
• When the device is turned on, the energy level is set to level 1 automatically. Only one energy level indicator light will be on.
• To change the energy level, press the control button repeatedly to increase the energy level from 1 to 5. Once at level 5, press the control button again to reduce the energy level from 5 back to 1.
• To determine the right energy level for your treatment area, refer to section BEFORE YOUR FIRST TREATMENT (pg. 11).
PULSING AND GLIDING
Pulsing is the best technique for working at higher energy levels. Press the treatment window against your skin. Work in rows, either across or down. Start at one end of each row and progress to the other end. The treatment window creates temporary pressure marks on the treated area so you can see areas you have treated. After each pulse, move the treatment window to the next spot. Keep doing this pulsing action for the area you are treating. Avoid gaps or overlaps as you use the device. Gliding is the best technique for working at lower energy levels. Press the treatment window firmly against your skin and slowly glide over your skin, either across or down. Make sure that the treatment window is always touching your skin. At lower energy levels, the device takes only 1-1.5 seconds to recharge between pulses. This generates a nonstop sequence of flashes.
Glide at a speed so that you avoid gaps or overlaps.
• Do not treat the same area of skin more than once per hair reduction session.
• Stop use immediately if you have any discomfort.
THE SKIN TONE TESTER
Light-based hair reduction on darker skin tones may result in adverse effects such as burns, blisters and skin colour changes (hyper- or hypo-pigmentation). The built-in skin tone tester detects the colour of your skin automatically. The skin tone tester checks your skin colour at the start of, and occasionally during, each treatment.
If your skin tone is too dark for safe use, the device will not operate, and the skin tone tester light will blink.
WHAT TO EXPECT DURING USE
For many people, using the device may be their first experience with a light-based device. During a treatment session, it is normal to experience or feel:
• Noise: This is the cooling fan.
• Popping sounds: These occur with each flash.
• A sensation of warmth and tingling: During each light pulse.
• Some redness: It is not uncommon to see some very mild, pink-like skin colouration during or just after treatment.
This is usually most noticeable around the hairs themselves.
• Stop use immediately if you see your skin is very red.
• Contact your physician immediately, if you experience any complications.
USING YOUR DEVICE
BEFORE YOUR FIRST TREATMENT
• Remove all jewellery before use.
You must decide which energy level is right for your skin and the area you want to treat. The device has 5 levels of energy from 1 (the lowest) to 5 (the highest). For example, you might treat one area at energy level 1, and another at level 4. For information on energy levels, refer to section ENERGY LEVELS. To choose the right energy level, test each treatment area separately (refer to the skin colour chart at the front of this manual).
- Press the control button to turn on the device. The level 1 energy level indicator light will come on.
- Place the treatment window on your skin to deliver one pulse. If you do not experience abnormal discomfort press the control button again. This will increase the energy level. Deliver one pulse on a different spot at energy level 2.
- Continue testing at increased energy levels. If you do not experience any adverse effects within 24 hours, you can start the full treatment at that energy level.
• Use a lower energy level if you experience any discomfort. Repeat this test for each part of the body you wish to treat.
YOU ARE NOW READY TO USE YOUR DEVICE
- Before treating an area, the skin should be shaved, clean, dry and free of any powders, antiperspirants, deodorants or moisturisers. Do not wax, pluck or tweeze the hair out.
- Press the control button. The device will turn on, the level 1 energy indicator light will be on, and a fan sound will start.
- Approximately 1 second after pressing the control button, the ready light will turn on. The device is then ready to use at the lowest energy level.
- Set the energy level by pressing the control button repeatedly to increase the energy level until you have the level you want. The energy level indicator lights indicate the chosen setting (refer to section ENERGY LEVELS).
- Decide if you wish to treat the area by Gliding or Pulsing (refer to section PULSING AND GLIDING).
- Apply the treatment window to the skin. Make sure that the skin is spread evenly and smoothly. When the treatment window is in full contact with the skin, the ready light will start blinking slowly.
- The device will first determine the colour of your skin automatically and it will flash a pulse of light onto your skin. You will feel a mild sensation of
warmth and tingling, and you may hear a popping sound.
• If you are pulsing, remove the device from your skin. The device will immediately recharge for the next pulse. After a few seconds (depending on the energy level) the ready light will turn on again, and start blinking slowly when pressed against the skin.
• If you are pulsing, repeat the process. If you are gliding, simply continue. Continue to pulse or glide until you have treated the area fully.
• Stop use immediately if your skin blisters or burns.
AFTER TREATMENT
When you have finished your treatment session:
1. Turn the device off by giving the control button an extended press. Remember the last energy level setting you used because it will not be restored when you turn the device on again.
2. Remove the adapter from the electrical outlet.
CLEANING YOUR i-LIGHT® COMPACT CONTROL DEVICE
CAUTION: Before cleaning your i-LIGHT® Compact Control, make sure that the device is switched OFF and the power cord is disconnected from the device.
- Regular cleaning helps to ensure optimal results and long life.
- To clean the flash window, use a dry clean cloth. Take care not to scratch or chip the flash window. Scratches and chips can reduce the effectiveness of the unit.
- Use a small hand-held vacuum to remove dust and debris from the handpiece vents.
WARNING: If the flash window is cracked or broken, the unit must not be used. Never scratch the filter glass or the metallic surface inside the treatment head.
CAUTION: The i-LIGHT® is a high voltage device. Never immerse in water. Never clean the unit or any of its parts under a tap or in a dishwasher.
STORAGE
- Switch the unit off, unplug and allow to cool for 10 minutes before storage.
- Store the unit in a dry place at a temperature between -40°C and 70°C.
TROUBLESHOOTING
- Always read these instructions fully before using i-LIGHT® Compact Control.
- Refer to this troubleshooting guide if you experience any problems with i-LIGHT® Compact Control, as this section addresses the most common problems you could encounter. If you have followed the instructions in this section and continue to experience problems, please contact the Remington® Service Centre for further assistance.
My device does not start.
- Make sure the adapter is properly connected to the device and that it is plugged into an electrical outlet on the wall.
There is no light pulse when the device touches my skin.
- Check that the device is connected and the ready light is on. Make sure that the treatment window is evenly and firmly pressed to the skin and that you are moving the device across your skin. It is also possible that your skin colour is too dark.
The skin tone tester light and the ready light blink.
- The skin colour is too dark.
One or more lights blink.
- The device has malfunctioned.
The device has stopped working and is in standby mode.
- Press the control button again to start the device.
FREQUENTLY ASKED QUESTIONS
Q. What areas of my body can I treat with i-LIGHT® Compact Control?
A. i-LIGHT® Compact Control is designed for unisex use on areas below the neck, including the legs, underarms, bikini line, arms, chest and back. Females can also use on facial hair below the cheekbone.
Q. What are the risks involved with i-LIGHT® Compact Control. Is it safe?
A. i-LIGHT® Compact Control is clinically proven to be safe and effective, but like any electronic device, it is important that you read the operating instructions and safety warnings.
Q. Is IPL dangerous for the skin after long term use?
A. There have not been any reported side effects or skin damage from long term use of intense pulse light (IPL).
Q. Why is my hair growing despite treatments?
A. Results aren’t immediate, and individual results vary. Most users will begin to notice fewer hairs within 1-2 weeks after beginning treatment. During this time it may look like the hair is still growing, but it is actually being ‘pushed out’. Hair grows in a cycle of 3 different phases which lasts 18-24 months. Only hairs in the active growth phase are susceptible to treatment, which is why multiple treatments are required for optimal results. Another reason for continued growth could be that the area was missed during treatment. Repeat the treatment regime when you notice regrowth.
Q. Why can’t I use i-LIGHT® Compact Control after recent sun exposure?
A. Sun exposure causes high levels of melanin to be present and exposes the skin to a higher risk of burns or blisters following treatment.
Q. Do I need eye protection while using i-LIGHT® Compact Control?
A. No, it is not harmful to the eyes. i-LIGHT® Compact Control features a safety system that prevents unintentional flashing when the device is not in contact with the skin. The small amount of light emitted during treatment is similar to that of a camera flash and is not harmful to the eyes.
The specially designed treatment caps minimise light leakage. If the reflected light is unpleasant, you may want to close your eyes before each flash.
ENVIRONMENTAL PROTECTION
In the event that you need to dispose of your i-LIGHT® device, to ensure proper disposal of the product, please take the appliance to a recycling centre, where the battery should be removed by a professional and recycled separately. For more information about recycling electrical and battery-operated appliances, please contact your local council office or your household waste disposal service.
SERVICE AND GUARANTEE
- Defects affecting product functionality appearing within the guarantee period will be corrected by replacement or repair at our discretion provided the product is used and maintained in accordance with the instructions.
- Defects from repair by an unauthorised dealer are not covered.
- Consumables are excluded.
- Your statutory rights are not affected.
- If you call the Service Centre, please have the Model No. on hand, as we won’t be able to help you without it. Model No. can be found on the rating plate of the appliance.
- Replacement accessories are available to buy through your Remington® Service Centre.
TECHNICAL INFORMATION
| Technology | Intense Pulsed Light |
| Spot Size | 0.9cm x 3cm (2.7cm²) |
| Maximum Energy Level | 4J/cm² |
| Pulse Duration | 0.00056 Sec |
Spectrum Brands Australia Pty Ltd and Spectrum Brands New Zealand Limited
WARRANTY AGAINST DEFECTS
In this warranty:
Australian Consumer Law means the Australian consumer law set out in Schedule 2 to the Competition and Consumer Act 2010;
CGA means the New Zealand Consumer Guarantees Act 1993;
Goods mean the product or equipment which was accompanied by this warranty and purchased in Australia or New Zealand, as the case may be; Manufacturer, We or us means:
1. for Goods purchased in Australia, Spectrum Brands Australia Pty Ltd ACN, 007 070 573; or
2. for Goods purchased in New Zealand, Spectrum Brands New Zealand Limited, as the case may be, contact details as set out at the end of this warranty; Supplier means the authorised distributor or retailer of the Goods that sold you the Goods in Australia or in New Zealand; and
You mean you, the original end-user purchaser of the Goods.
- Our goods come with guarantees that cannot be excluded under the Australian Consumer Law, or the CGA. You are entitled to a replacement or refund for a major failure and compensation for any other reasonably foreseeable loss or damage. You are also entitled to have the goods repaired or replaced if the goods fail to be of acceptable quality and the failure does not amount to a major failure.
- The benefits provided by this Warranty are in addition to all other rights and remedies in respect of the Goods which the consumer has under either the Australian Consumer Law or the CGA. The original purchaser of the Goods is provided with the following Warranty subject to the Warranty Conditions:
- We warrant the Goods for all parts defective in workmanship or materials for the period of two (2) years from the date of purchase (Warranty Period). If the Goods prove defective within the Warranty Period by reason of improper workmanship or material, we may, at our own discretion, repair or replace the Goods without charge.
Warranty Conditions - The Goods must be used in accordance with the manufacturer’s instructions. This Warranty does not apply should the defect in or failure of the Goods be attributable to misuse, abuse, accident or non-observance of manufacturer’s instructions on the part of the user. As far as the law permits, the manufacturer does not accept liability for any direct or consequential loss, damage or other expense caused by or arising out of any failure to use the Goods in accordance with the manufacturer’s instructions.
- Exhaustible components (such as shaver heads, cutters and foils) of the Goods are included under this Warranty only where there is a defect in workmanship or materials used.
- The warranty granted under clause 3 is limited to repair or replacement only.
- Any parts of the Goods replaced during repairs or any product replaced remain the property of the manufacturer. In the event of the Goods being replaced during the Warranty Period, the warranty on the replacement Goods will expire on the same date as for the Warranty Period on the original Goods which are replaced.
- In order to claim under the warranty granted under clause 3 you must: (a) Retain this warranty with your receipt/proof of purchase; and (b) Return the Goods to us at the relevant address below or to the Supplier by prepaid freight within the Warranty Period accompanied with (i) the legible and unmodified original proof of purchase, which clearly indicates the name and address of the Supplier, the date and place of purchase, the product name or other product serial number and (ii) this warranty.
- This warranty is immediately void if: (a) Any serial number or appliance plate is removed or defaced; (b) The Goods have been serviced or otherwise repaired by a person not authorised to do so by us or where non approved replaced parts are used.
- The Goods are designed for domestic use only. A limited 90-day Warranty applies to any industrial or commercial use of the Goods. The Goods must be connected to the electrical voltage requirements as specified in the rating label located on the Goods.
- This warranty does not cover the cost of claiming under the warranty or transport of the Goods to and from the Supplier or us.
- This warranty is only valid and enforceable in Australia against Spectrum Brands Australia Pty Ltd and in New Zealand against Spectrum Brands New Zealand Limited.
![]()
Contact us or the Supplier for further details.
Spectrum Brands Australia Pty Ltd
Locked Bag 3004
Braeside, VIC 3195
Australia
Customer service in Australia: 1800 623 118
E-mail: [email protected]
Website: www.remington-products.com.au
Spectrum Brands New Zealand Limited
PO Box 9817
Newmarket, Auckland 1149
New Zealand
Customer service in New Zealand: 0800 736 776
E-mail: [email protected]
Website: www.remington.co.nz
Money-Back Offer
Australia/New Zealand Only
If within 90 days you are not fully satisfied with your Remington® i-LIGHT®
Compact Control, please call your local Remington Customer Service Centre:
Australia: 1800 623 118
New Zealand: 0800 736 776


REMINGTON SERVICE HOTLINE
Australia 1800 623 118 (toll-free)
New Zealand 0800 736 776 (toll-free)
AUTHORISED REPAIR CENTRES
Visit www.remington-products.com.au for authorised repair centre details.
Remington® and i-LIGHT® are registered trademarks of Spectrum Brands, Inc.,
or one of its subsidiaries.
Made in Israel to the specifications of Spectrum Brands, Inc.
© 2018 Spectrum Brands, Inc
Rev: 06/18
Part No. T22-0005625
Type: IPL30A