Richmat HJH55 Ble Handset Instructions

Richmat HJH55 Ble Handset Instructions
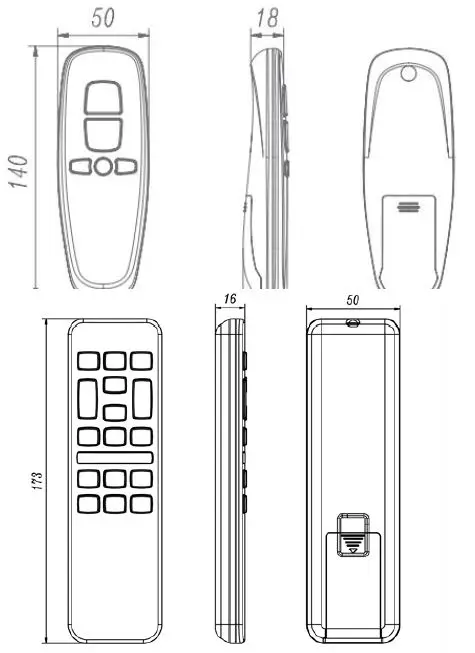
SIZE
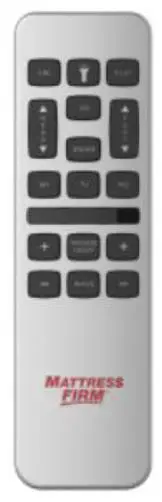
Remote control button diagram

| ZG | SNORE | TV | |
| Head(mm) | 31 | 18 | 114 |
| Foot(mm) | 79 | 0 | 46 |
Remote control function description
| Button
label |
function |
| 1 | The bed bottom lamp is on/off (constant light). |
| 2 | Flashlight on/off (default 15s). Reuse function: ①Press and hold the button for 5s, the backlight flashes, enter the memory mode, press ZG/SNORE/TV/M1/M2 within 2s, the buzzer “dididi” will sound, and the current motor position, massager, and light bar can be memorized state.
②Press and hold the M1 + flashlight for 3s at the same time, the backlight flashes twice, and all the keys on the remote control enter the one-key release mode, which can reset all the memory positions to the factory default |
| settings at the same time. ③Press and hold FLAT+flashlight for 3s at the same time, the backlight flashes three times, the buttons on all positions of the remote control enter the continuous pressing mode, release the button and the motor stops. | |
| 3 | FLAT one-key reset, all motors retract to the minimum stroke position, turn off the bed light, massager (no reset after power on) |
| 4 | The head motor extends. |
| 5 | The motor runs to the ZG position with one key (there is an initial value). Multiplexing function: long press the flashlight for about 5s, the backlight flashes, press ZG within 2s, the buzzer will sound 3 times, and record the current motor position, massager, and light bar status to ZG. (Not cleared after power failure) |
| 6 | The foot motor extends. |
| 7 | Head motor retracted |
| 8 | The motor runs to the SNORE position with one key (with initial value). When the one-key release mode is timed for 15 minutes, it will be leveled and the massager will be turned off. Press any key to exit the timing; continuous pressing mode has no timing. Multiplexing function: long press the flashlight for about 5s, the backlight flashes, press SNORE within 2s, the buzzer will sound 3 times, and record the current motor position, massager, and light bar status to SNORE. (Not cleared after power failure) |
| 9 | Foot motor retracted |
| 10 | The motor runs to the M1 position with one key (initial value is 0). Multiplexing function: long press the flashlight for about 5s, the backlight flashes, press M1 within 2s, the buzzer will sound 3 times, and record the current motor position, massager, and light bar status to M1. (Not cleared after power failure) |
| 11 | The motor runs to the TV position (with an initial value) with one button. Multiplexing function: long press the flashlight for about 5s, the backlight flashes, press TV within 2s, the buzzer will sound 3 times, and record the current motor position, massager, and light bar status to the TV. (Not cleared after power failure) |
| 12 | The motor runs to the M2 position with one key (initial value is 0). Multiplexing function: long press the flashlight for about 5s, the backlight flashes, press M2 within 2s, the buzzer will sound 3 times, and record the current motor position, massager, and light bar status to M2. (Not cleared after power failure) |
| 13 | If the head massager is not turned on, press the button to turn on the massager. The default strength of the |
| massager is the strength when the massager was closed last time. If the massager is turned on, press the button to increase the strength of the head massager. There are 3 intensities, according to: Low->medium->high order, the default time is 15 minutes, and it will continue to run when it reaches the highest intensity. | |||
| 14 | TIME ON/OFF massager switch and timing button, press the button to turn on the massager (the default intensity of the massager is the intensity when it was last turned off, timing time) and timing 15min -> timing 30min -> turn off the massager and timing, timing time Displayed by two indicator lights. | ||
| 15 | If the foot massager is not turned on, press the button to turn on the massager. The default strength of the massager is the strength of the last time it was closed. If the massager is turned on, press the button to increase the strength of the foot massager. There are 3 intensities, according to: Low->medium->high order, the default time is 15 minutes, and it will continue to run when it reaches the highest intensity. | ||
| 16 | Reduce the intensity of the head massager button, 3 intensity, when it reaches the lowest intensity, press the massager again to turn off. | ||
| 17 | WAVE button: If the massager is not turned on, press the button to turn on the massager. This button can make the massager cycle between 4 modes: continuous-low-speed
wave-medium-speed wave-high-speed wave. |
||
| 18 | Decrease the intensity of the foot massager to 3 levels. When it reaches the lowest intensity, press the massager
again to turn off. |
||
| Note: Press any button for more than 50s, the remote control will enter sleep, release it and press it again to resume the function. | |||
| Coding method: ①Single control box/single remote control: Keep pressing the head up and foot down buttons (4, 9) until the backlight flashes to clear the remote control code matching information; power on the control box again, the control box will be in the code matching state within 60s , Keep pressing the head down and foot up buttons (7, 6) of the remote control until you hear the buzzer sound and the backlight flashes, indicating that the code pairing is successful.
②Single control box to dual remote control: keep pressing the |
|||
| head up and foot down buttons (4, 9) until the backlight flashes to clear the remote control code matching information; power on the control box again, the control box will be in the code matching
state within 60s , Keep pressing the head down and foot up |
|||
buttons (7, 6) of the remote control 1 un til you hear the buzzer sound and the backlight flashes, indicating that the remote control 1 is successfully paired; do not press any buttons on the remote control 1, keep pressing the remote control The head down and foot up buttons (7, 6) of the control ler 2 until the buzzer sounds and the backlight flashes, indicating that the remote controller 2 is successfully paired. When the two remote controllers switch control, you need to wait for the previous remote controller to disconnect the Bluetooth connect ion. The latter can be controlled by a remote control. ③ Dual control box to dual
remote control: Use the instructions of “single control box/single remote control” to pair system 1. Use “single control box/single remote control” to explain pairi ng system 2. Unplug the power of System 1 and System 2. Use a synchronization cable to connect the two systems. Power on system 1 and system 2. Now, the two beds will operate in synchronous mode.
Note: 1. After the control box is powered on for 60 seconds, you can press the code matching key to start the code matching, the buzzer will beep three times to enter the code matching state, and the control box code matching key has no reset function 2. The backlight goes out after 10s of inactivity on the remote control, and it sleeps after 15s and the Bluetooth is disconnected. Press the button again to reconnect the Bluetooth. 3. When the control box is powered on for the first time or accidentally cut off, please reset it before using
it. 4. Double control box to double remote control, press one remote control switch when switching the remote control key mode, you can change the key mode of the two remote control at the same time. Continuous pressing mode does not follow the synchronization
Caution:
This device complies with Part 15 of the FCC Rules. Operation is subject to the following two conditions: (1) this device may not cause harmful interference, and (2) this device must accept any interference received, including interference that may cause undesired operation.
Changes or modifications not expressly approved by the party responsible for compliance could void the user’s authority to operate the equipment.
This equipment has been tested and found to comply with the limits for a Class B digital device, pursuant to part 15 of the FCC Rules. These limits are designed to provide reasonable protection against harmful interference in a residential installation. This equipment generates uses and can radiate radio frequency energy and, if not installed and used in accordance with the instructions, may cause harmful interference to radio communications. However, there is no guarantee that interference will not occur in a particular installation. If this equipment does cause harmful interference to radio or television reception, which can be determined by turning the equipment off and on, the user is encouraged to try to correct the interference by one or more of the following measures:
- Reorient or relocate the receiving antenna.
- Increase the separation between the equipment and receiver.
- Connect the equipment into an outlet on a circuit different from that to which the receiver is connected.
- Consult the dealer or an experienced radio/TV technician for help.
FAQS
Is it the same remote in this picture when you receive it?
yes you will get that exact remote or a slight rendition of it With the same number of buttons and the same shape. As our ad mentions, due to Covid, suppliers are desperately trying to provide parts without going out of stock that are still compatible and luckily there are four or five different versions of this remote that are the same with the exception of a few button differences. All of the main functions from the bed will still work! Let me know if you have any questions about exact inventory
Will this remote work on classic brand base beds?
Yes! As long as the light buttons are in the same position! Matt with bedremotes.com by Salt Lake Mattress- text (preferred) or call with any more questions to 866.448.6879
How do you sync the remote to bed?
Hold head and foot up and then press and release the learn button under the bed- Matt with bedremotes.com by Salt Lake Mattress- text (preferred) or call with any more questions to 866.448.6879
How to choose a suitable motor?
The motor is selected according to the actual load. If you want to adjust the speed, you can use a variable frequency drive (VFD) to control it.
Why is my adjustable bed not working?
Check under the bed base to verify that the wired connections are secure and that there are no cords or bedding obstructing the movement of the base. Check to ensure the green LED light is illuminated on the control box. If there is no light, verify that the input and power cords are properly connected.
How do you reset a Sleep Number bed without a remote?
Remove the inlet hose and place the cap supplied with the bed to prevent air from escaping. Hold down both toggle switches simultaneously for ten seconds. The unit is reset.
How long do adjustable bases last?
You can expect your standard adjustable base to last as long as a regular bed frame. You will also get a warranty coverage covering anything from 20 to 40 years for most high-end products.
Can an adjustable bed be repaired?
Keeping beds and mattresses in great condition helps ensure a good nights sleep. All technicians have experience working with many of the major adjustable bed manufacturer’s and can identify and repair most issues within the initial visit.
How to choose the right size of the mattress?
The mattress size should be larger than the actual size of the bed, and the thickness should be about 10cm. A: The mattress should be selected according to the actual size of the bed, and the thickness should be about 10cm.
![]()