Robot Cleaner Instruction Manual
-S6 Series-

Thank you for choosing our product Please read this instruction carefully before use.
Welcome to use
Thank you for choosing our Robot Vacuum Cleaner.
Our robot vacuum cleaner is a smart & intelligent robotic cleaner, which combined path planning, clean & MOP all-in-1, it has moving control special chip & sense simulate calculation technology, can build an accurate map and offering precise navigation for your house, the map construction calculation and GYRO navigation technology will bring a organized, high cleaning coverage rate, Hi-speed sense and high efficiency working way to you. It can also applied to different complex environments for different house, will auto re-charge when the battery power lower than 20%, automatically at whole working period, free you from the cleaning work!
Science and technology changes our life, from now on, your family and you will free from the agonising floor cleaning work, have more time to enjoy your beautiful & ease life!
Enjoy it now!
Introduction of product
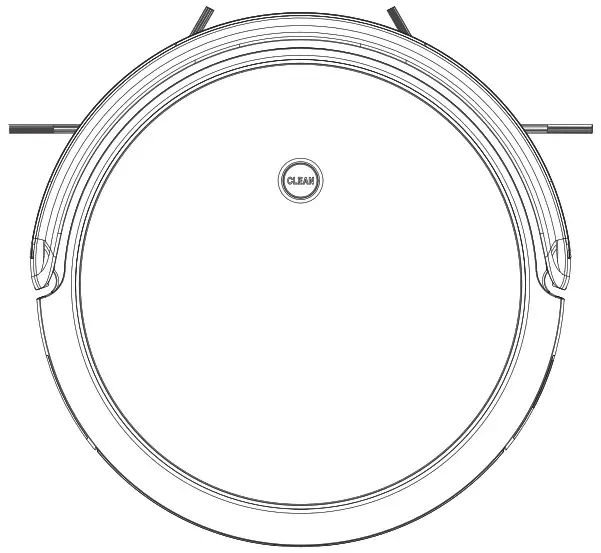
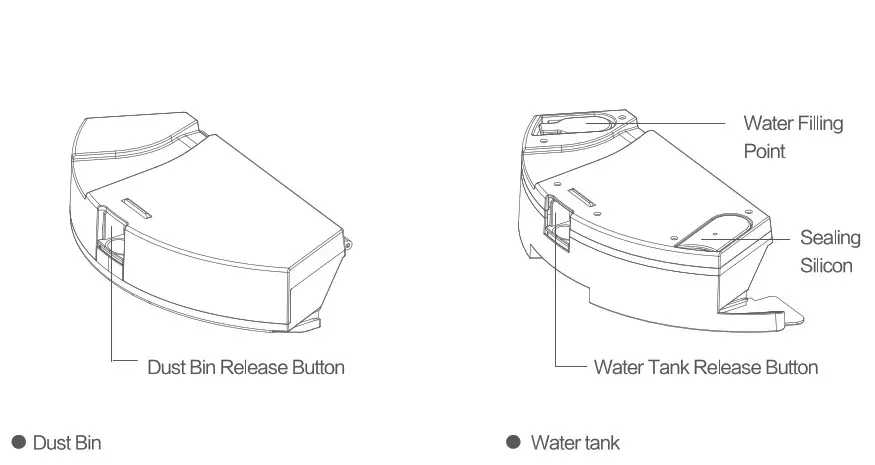
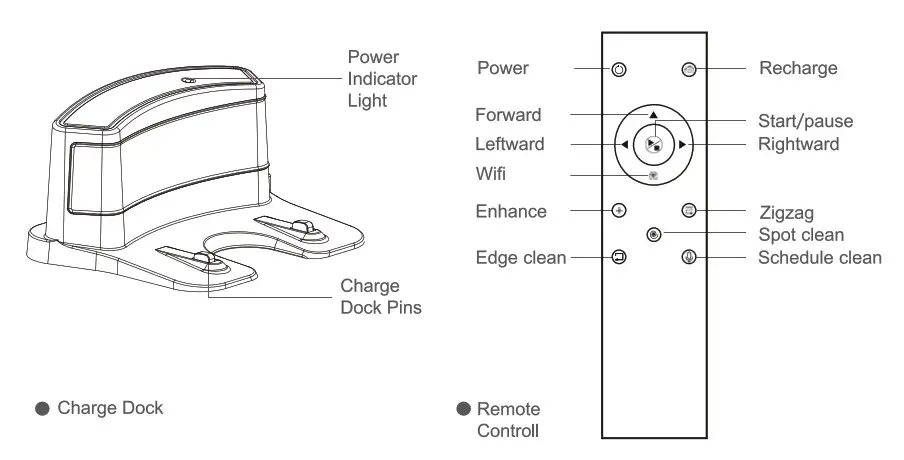
[Name of Parts]
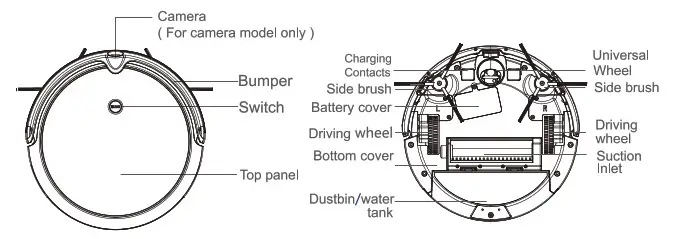
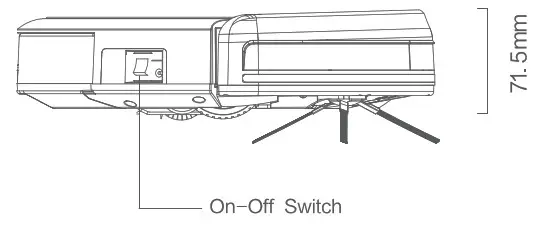 * The height of robot is 78mm for camera model.
Operating Instruction
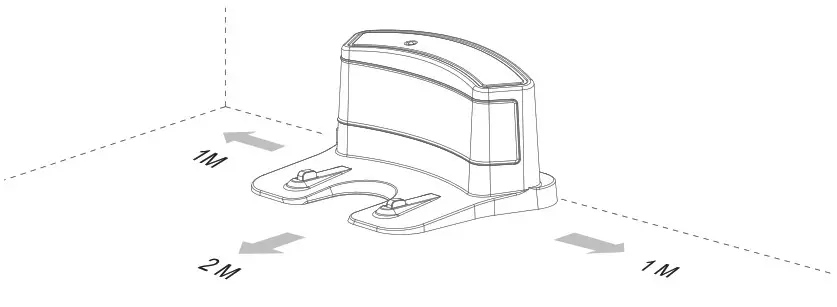
[charging Dock Placement]
- Connect the Power Adapter to the Charging Dock
- Place the Changing Dock on a level floor surface against the wall with the base perpendicular to the ground. Keap the immediate area 2m (6.6′) in front of the charger and 1 m (3.3′) on both sides of the charger clear of objects and reflective surfaces.
- Plug the Charging Dock in
 Methods of charge:
A) Direct Charge: Cannect the Power Adapter to the Robot directly.
B) By remote control: the Robot can be sent back to the Charging Dock at any time to recharge itself by pressing the “ ” Home button on the Remote Control
C) Auto – Recharge: When battery power lower than 20%, Robot will automatically switches
to Retum to Charger Mode and retums to the Charging Dock to recharge itself.
Note:
- Please kept the Charging Dock on, othenvise, Robot can not find the Charging Doct to recharge
- Pleaes make sure the Robot stast to work from the Charging Dock when using, to help it remember the path of returning.
- To extent the life-span of the battery, please use out the existing battery power, and then charge the Robot at least § hours before the first use
- When the Robot under wet sweeping MOP mode, DO NOT charge it on the Charging Dock
Indicator of “Clean” button during Charging:
| Charge status | Indicator of “Clean” buttom |
| Low battery | Red Light |
| Charing | Red light flashing |
| Fully Charged | Green light |
Note: When the Robot under charging, it will not have any action by Tum the robot’s Side Power Switch to the ON / OFF position. ‘I” indicates ON and “O” indicates OFF.
[ON/PAUSE/OFF]
- Turn the robot’s Side Power Switch to the ON position, Robot will standby
- Press the Clean Button on Robot or the START/STOP Button on the Remote Control. Robot starts to work immediately in AUTO Cleaning Mode. (Z-type cleaning as default)
- Pause the Robot by press the Clean Button on Robot or the START/STOP Button on the Remote Control. (Robot will standby and save battery power)
- If Robot not in use & not on the Charging Dock / not In Charging, it will goes to sleep mode, and it will have voice alert when battery power lower than 20%, to avoid any disturbing caused by that, please trun off the Robot when it is not in use for a long time.
[SLEEP MODE]
Sleep Mode means Robot under sleep, the Clean Button on the robot does not flash and buttons ‘on the Remote Control are disabled.
A) If Robot is Paused for more than 60 seconds it goes to sleep to save battery powe
B) press tha Power Button on the Remote Control twice, Robot goas to sleep.
Note: Before cleaning, please make sure the Robot is awake, and the Clean Button is in Green light. If Robot is not waken up, press Clean Buttuon on the Robot or “![]() ” Power Button on the remote control to wake it up.
” Power Button on the remote control to wake it up.
[Remote control operatiom]
Please use 2 pcs AAA R03 batteries in the romote control, and tum the robot’s Side Power Switch to the ON position.
- Press “
 ” Power Button, Robot is waken up and standby, press the Power Button again Robot under sleep mode.
 - Press “” Home Button, Robot return to the Charging Dock & recharge itself automatic, “Clean” Button on the Robot is flashing.
- Press “
 ” Start/Stop Button to start cleaning, press again, Robot Stopped/Paused.
 - “
 ” Forward, “
 ” Len, “
 ” Right, direction of Robot during clesing or stop.
 - “
 ” WIFI Button: ( For APP function Robot only) after tum on the Robot, press this button over 3 seconds after “DingDingDong” bell: Initialization module Smart phone WIFI setting — Search Robot WIFI : IMA – xxx, linked, contro! the Robot via smart phone APP anywhere at anytime.
 - Press “
 ” Enhance Suction Button, Robot enhans suction during cleaning.
 - “
 ” Zigzag smart cleaning: This mode is applicable for a small area of concentrated dirt ‘or dust. Robot run with # meter width zigzag smart move.
 - “
 ” Spot cleaning: This mode is applicable for an area of highly concentrated dirt or dust. Robot run in a smaller Z-type cleaning mode. stops or resumes auto cleaning when it completes. spot cleaning.
 - “
 ” Edge cleaning: This mode is good for cleaning the edges and comers of a room. In Edge Cleaning Mode, Robot cleans along a border (e.g. wall).
 - “
 ” Voice Button: press this button at one time to shut off Voice Alert, press the button again turn on the Voice Alert again.
[Cleaning Mode Selection] Cleaning modes are selected using the Remote Control
Operating Instruction
[Cleaning Mode Selection] Cleaning modes are selected using the Remote Control
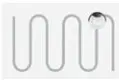 |
AUTO Cleaning Mode (Defautt mode) This is the most commonly used mode. In AUTO Cleaning Mode, Robot cleans in Zigzag line and changes direction when it meets an obstacle |
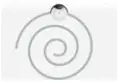 |
Spot Cleaning Made This mode is applicable for an area of highly concentrated dirt or dust. In Spot Cleaning Mode, Robot focuses on a specific area to clean, in Spiral line ‘© * cleaning mode |
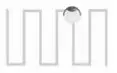 |
Zigzag Smart Cleaning Mode This mode is applicable for a small area of concentrated dirt or dust. Robot run with 1 meter width zigzag smart move for fully clean. |
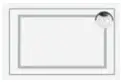 |
Edge Cleaning Mode This mode is good for cleaning the edges and comers of a room. In Edge Cleaning Mode, Robot cleans along a border (e.g. wall). When Robot finished all area cleaning, will turn to Edge Cleaning Mode automatic. |
 |
Schedule Cleaning Mode This mode is to schedule automatic cleaning. Set by smart phone APP (Note: The default cleaning mode of Schedule Cleaning is AUTO Cleaning Mode) |
Maintenance
[ Cleaning the Dust Bin and Filters ]
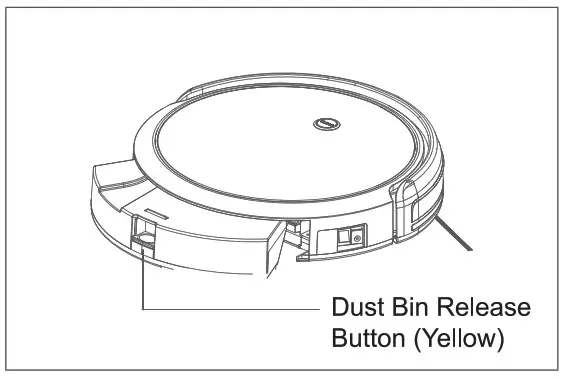
A) Press the Yellow Dust Bin Release Button and remove the Dust Bin from the rear of the Robot.
B) Hold the Dust Bin level and open the Dust Bin Cover by press the yellow Release Button — Empty the Dust Bin — Remove the filters– Rinse the Dust Bin, Filter Net and Sponge Filter under running water — Dry the Dust Bin, Filter Net and Sponge Filter completely before reinstalling.
Remark:
- Before performing cleaning and maintenance on Ronot, power OFF the robot and unplug the Charging Dock.
- Please check and clean the suction inlet if there are any objects on it.
- The life span of the filter is 24 months, please rines the filter every 15 – 30 days.
- Dry the Dust Bin, Filter Net and Sponge Filter completely before reinstalling.
(Note: Do not put the filters consistent exposure to the sun)
[Cleaning the Main Brush ]
A) Tum the robot over. Push the two tabs on the Main Brush Cover to remove it. Pull from Right – Top side to remove the Main Brush. Use the provided Cleaning Tool to remove any hair tangled around the Main Brush.
B) Rinse the Main Brush under running water, reinstalling it after completely dry.

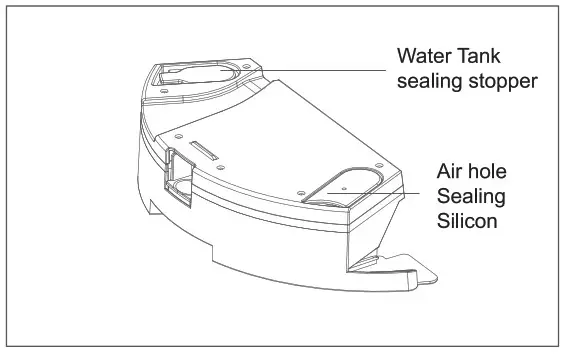
[ Water Tank Filling & MOP ]
A) Water Tank Filling: Open the water tank Sealing stopper — Full Filled water (Must sealed the sealing stopper) — Stick MOP onto the bottom of water tank — Press Yellow Release Button — Push the Water Tank inside the Robot.
B) Cleaning the MOP: Press the Yellow Release Button and remove the Water Tank from the rear of the Robot — Pull out the MOP from the Water Tank — Clean the MOP by detergent — Dry the MOP.
Remark:
- Put the MOP completely onto the bottom of Water Tank, press it onto the sticker
- DO NOT charge the Robot on the Charging Dock when it is in Web Mopping Mode
- Please empty & dry the Water Tank, clean & dry the MOP after use
Note: DO NOT take out the Sealing Silicon & Sealing ball from the Water Tank, to avoid accidentally swallowed by the Childrens and got hurt from that.
[ Cleaning the Side Brushes ]
A) Remove the Side Brushes with a screwdriver.
B) Wipe the Side Brushes clean with a dry cloth.
C) Replace the Side Brush if it is damaged and out of service
D) If there are slight damaged or out of shape of the Side
Brush, remove it from Robot, and reshape by boiled water
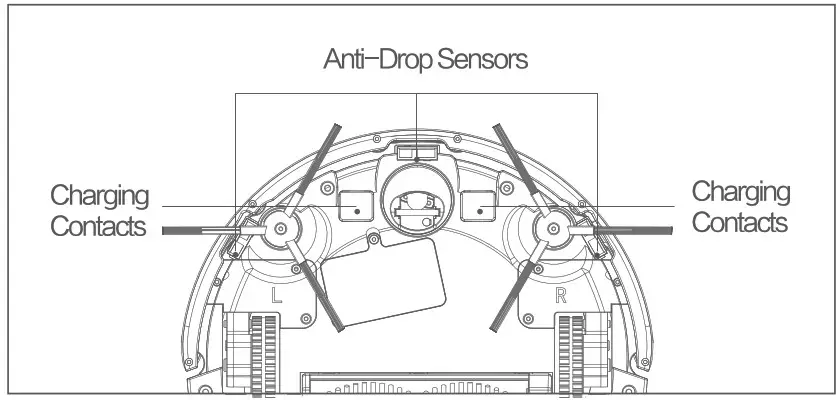
[ Cleaning the Sensors and Charging Contacts)
Wipe the Sensors, Charging Contacts and Charging Dock Pins, Suction Inlet with the provided Cleaning Tool or a soft dry cloth to maintain their effectiveness.
Note: DO NOT use cleaning solutions ( e.g. liquid such as water, diluent and so on…) on the Sensors
[Packing List]
| Robot | 1 pcs |
| Charging Dock | 1 pcs |
| Remote Control( without Battery) | 1 pCS |
| Power Adapter | 1 pcs |
| Side Brush | 2 pcs |
| Cleaning Tool | 1 pcs |
| Instuction Manual | 1 pcs |
[Troubleshooting]
Please use this chart to troubleshoot common problems
| Malfunction (voice alert) | Solution |
| Main Brush tangled | Check the Main Brush, remove the obstacles |
| Left Wheel tangled | Check the Left Wheel, remove the obstacles |
| Right Wheel tangled | Check the Right Wheel, remove the obstacles |
| Sensors blocked | Check the Sensor and clean it |
| Kept Bump Alert | Check the sensibility of Bumper, remove the obstacles |
| Battery charge un-normal | Clean the Charge Contacts (Use soft dry cloth) |
| Battery Charge failure | Check if Charging Contacts have made good connection with the Charging Dock or not. You may move the robot manually to make the connection and clean the Contactors if necessary. |
| Robot gets into trouble while working and stops | Remove the obstacles and restart |
| Failed in WIFI connection | Check WIFI signal strength, make sure Robot is good WIFI condition and incorrect connection |
| Low clean efficiency / Dirt or Dust leaking | Dustbin full, please empty and clean it. Filter jammed, please clean the filter |
| Abnormal noise in Cleaning | Main Brush/Side Brushes/Wheels tangled with something on the floor, shut off the Robot and remove the obstacles |
| AUTO Recharge Failure | Remove the obstacles around the Charging Dock, and place it onto a open & un-obstacles area |
| Robot can not turn on | Low battery, please fully charged before use |
[ Note ]
Please try as following If troubleshoot failure:
- Move the Side Power Button to the ON position. Restart the Robot.
- If Robot kept backward, please pat the Bumper, and restart the Robot.
- If Robot will not move forward, please check the Anti-Drop Sensors, and clean the sensers’ cover.
- If problem still not solved by above moves, please send the Robot back to our after-sales service centre.
Important Safety Instructions
[ Application range ]
- For INDOOR household use ONLY. Do not use the Appliance in outdoor, commercial or industrial environments.
- If there is a drop off in the cleaning area due to a step or stairs, you should operate the appliance to ensure that it can detect the step without falling over the edge. It may become necessary to place a physical barrier at tha edge to keep the unit from falling.
- Do not use the Appliance in extremely hot or cold environments (above 40° C or below 0° C) and do not use on the slime surface.
- Clear the area to be cleaned. Remove power cords and small objects from the floor that could entangle the Appliance. Tuck rug fringe under the rug base, and lift items such as curtains and tablecloths off the floor.
- Do not operate the Appliance in an area where there are lit candles or fragile objects.
- Children shall not play with the appliance. Cleaning and user maintenance shall not be made by children without supervision Please kept the safty space from children and pets when appliance is cleaning the room.
- Please kept the cleaning tools in safety pasition which is not accessible to children.
- Do not put any objects onto the appliance.{Including children and pets)
- Do not use appliance to pick up large objects or Sharp objects ( e.g. stocnes, glass, iron nails etc.)
- Do not use appliance on Long—Plush carpet.
- Do not use Appliance to pick up flammable or combustible materials such as gasoline, printer or copier toner, buming cigarette butts, or use in areas where they may be present.
- Tum OFF / Unplug the power before cleaning or maintaining the Appliance / Charging Dock
- The Appliance must be used in accordance with the directions in this Instruction Manual.
We cannot be held liable or responsible for any damages or injuries caused by improper use.
[Battery & Charging ]
![]()
- Use only the original rechargeable battery and Charging Dock provided with the Appliance from the manufacturer.
- The Robot contains batteries that are only removed/repair/replaceable by skilled persons.
- Do not put the Charging Dock close to a heat source. (e.g. Heating Radiator)
- Do not wipe the Charging Dock Pins and Charging Contacts by damp cloth or wet hand.
- The battery must be removed and discarded according to local laws and regulations before disposal of the Appliance.
- Please make sure the Robot kept in power off during transportation, original packing from manufacturer are strongly recommendation
- If the power cord is damaged, it must be replaced by the manufacturer or its service agent in order to avoid a hazard.
- If the Robot is unused for a long period, please stored it in a Dry & Cool position, fully charged the battery. To avoid damaged to the battery, please recharge the battery every 3 months.
Terms of Warranty
The After—sales service of Robot Cleaners are strictly according to Law of Consumer Rights Protection of PRC and Law of Product Quality of PRC.
[ Warranty Peroid]
- 7 days since confirmed recepit of the Robot, if thera are any quality problems which checked and confirmed by service centre, the Robot will have a free retums or replacement service
- 8—15 days since confirmed recepit of the Robot, if there are any quality problems which checked and confirmed by service centre, the Robot will have a free replacement or repaiment service.
- 12 months since confirmed recepit of the Robot, if there are any quality problems. which checked and confirmed by service centre, the Robot will have a free repairment service.
Tips: Please kept all the pcacking materials at least 30 dys, to avoid any damaged during transportation.
[ Warranty Item]
| Item | Parts & Components | Warranty Period |
| Robot | Robot ( Contains Li-ion Baterries included) | 12 Months |
| Accessary | Charging Dock, Power Cord, Dustbin, Water Tank | 12 Months |
| Consumable | Main Brush, Side Brushes, Remote Control, MOP Cloth, Fters, Cleaning Tools | / |
Note: Provided consumables accessaries with Robot from manufacturer are for replacment only, please buy from manufacturer or its agents.
[ Non-Warranty Conditions ]
- Un-authorized repaired, improper use, has been dropped, damaged,or come in contact with water/liquid, alter / chaged the componets, use the improper components which not original, tera up or tamper the Warranty label or Anti-counterfeiting label.
- Warranty period expired.
- Damaged by force majeure.
- Fails are not caused by quality.
- The fails/damages caused by customer’ s improper preservation maintain, or the usage.
APP Download Instruction
Only for the Robot with WiFi function.
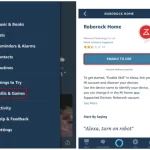
- Scan the follwoing QR code to download the APP.
For Android system
 http://zhushou.360.cn/detail/index/soft_id/3900036?recrefer=SE_D_CLEAN
For IOS system
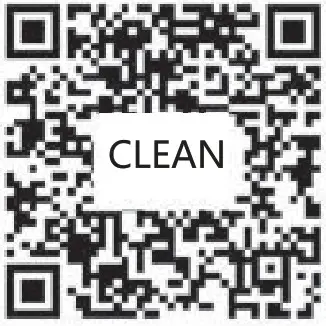 https://itunes.apple.com/cn/app/clean/id1300096318?mt=8
 - After installed the APP, turn on the Robot, press WIFI Button on remote controller, until heard the bell ring “Ding Ding Dong”. (Non-Camera model do not have the “Ding Ding Dong” bell)
- Open the APP, link to your robot, click “ Operating Instruction” at Bottom-Right side of the APP, and follow the instruction step by step, or please refer to the APP user manual.
* Note: Apply to the Robot with WiFi function only *
changes or modifications not expressly approved by the party responsible for compliance could void the user’s authority to operate the equipment. This device complies with Part 15 of the FCC Rules. Operation is subject to the following two conditions:
- this device may not cause harmful interference, and
- this device must accept any interference received, including interference that may cause undesired operation.
Note: This equipment has been tested and found to comply with the limits for a Class B digital device, pursuant to Part 15 of the FCC Rules. These limits are designed to provide reasonable protection against harmful interference in a residential installation. This equipment generates, uses, and can radiate radio frequency energy, and if not installed and used in accordance with the instructions, may cause harmful interference to radio communications. However, there is no guarantee that interference will not occur in a particular installation. If this equipment does cause harmful interference to radio or television reception, which can be determined by turning the equipment off and on, the user is encouraged to try to correct the interference by one or more of the following measures:
- Reorient or relocate the receiving antenna.
- Increase the separation between the equipment and receiver.
- Connect the equipment into an outlet on a circuit different from that to which the receiver is connected.
- Consult the dealer or an experienced radio/TV technician for help.