![]()
Quick Start Guide
AC750/AC1200 Dual Band WiFi Repeater
Model: RSD0607/RSD0608
Technical Phone Support: +1(833)816-6558
Service Time: EST: 9:00-17:00 / PDT: 06:00-14:00,from Monday to Friday
24hour Online After-sales Service: https://rockspace.afterservice.vip
The website list above is the ONLY official after-sales service website that’s been authorized.
Please DO NOT trust the other websites for technical support.
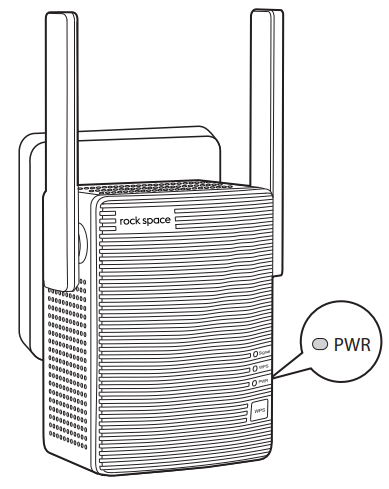
LED Descriptions
| Power LED | Solid on | The extender is powered on. |
| Blinking | The extender is booting. | |
| Off | The extender is powered off. | |
| WPS LED | On | WiFi security is enabled (WPA or WPA2). |
| Blinking | A WPS connection is in progress. | |
| Off | WiFi security is not enabled. | |
| Signal LED This LED indicates the connection between the extender and the router. |
Solid blue | Best connection |
| Solid red | Poor connection. | |
| Off | No connection. |
Method 1: Connect to an Existing WiFi Network with Web Browser Setup
- Place the Extender and Apply Power
Place your extender in the same room as your WiFi router. Plug the extender into an electrical outlet. - Extend Your WiFi Network
1. Use a WiFi network manager on your client devices, such as a computer or WiFi device, to and connect to the “rockspace_EXT ” (SSID) WiFi network.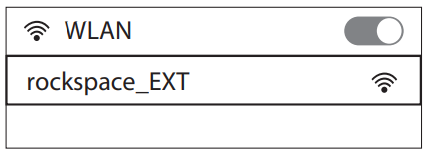
2.After the connection with your client device is established, the setup page will automatically pop up. If the setup page doesn’t pop up automatically, you will need to launch a web browser and enter 192.168.0.254 to get started. In the Password field, type the password
that you wish to use to log into the management interface.
Note: The password you entered in this step is NOT the password for your extended network, it is the password for the extender’s management interface.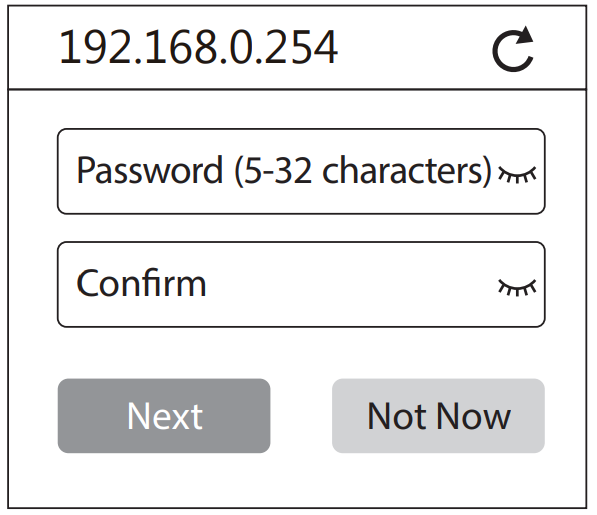
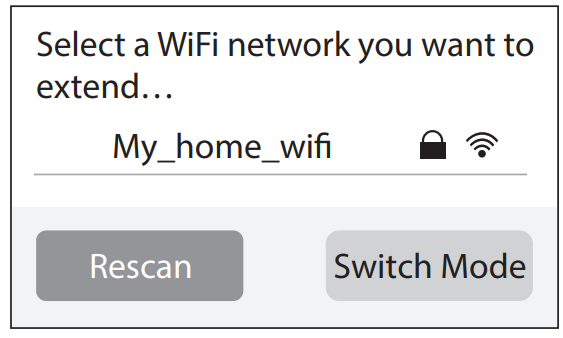
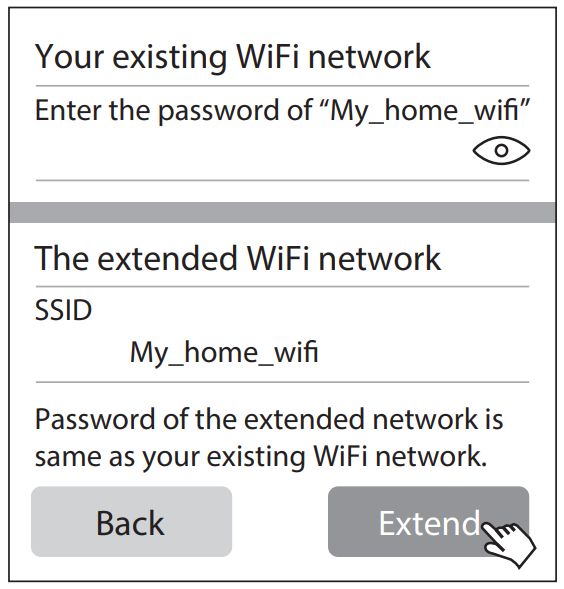
Note: The password for the extended network you entered in step 4 should be the same as the password for your existing WiFi network. - Relocate the WiFi Range Extender
1. Unplug the extender and move it to a new location about halfway between your router and the area with a poor WiFi signal.
The location that you choose must be within the range of your existing WiFi router network.
2. Plug the extender into an electrical outlet and wait for the Signal LED to light blue. If not, plug the extender into an outlet closer to the router and try again.
3. Use a WiFi network manager on your client devices, such as a computer or WiFi device, to find and connect to the extended WiFi network you’ve et up in the previous step.
Note: The password for the extended network is the same as the password for your existing WiFi network.
4. After connecting to the repeater wireless signal, enter domain name: re.Rackspace. local in the address bar to log in.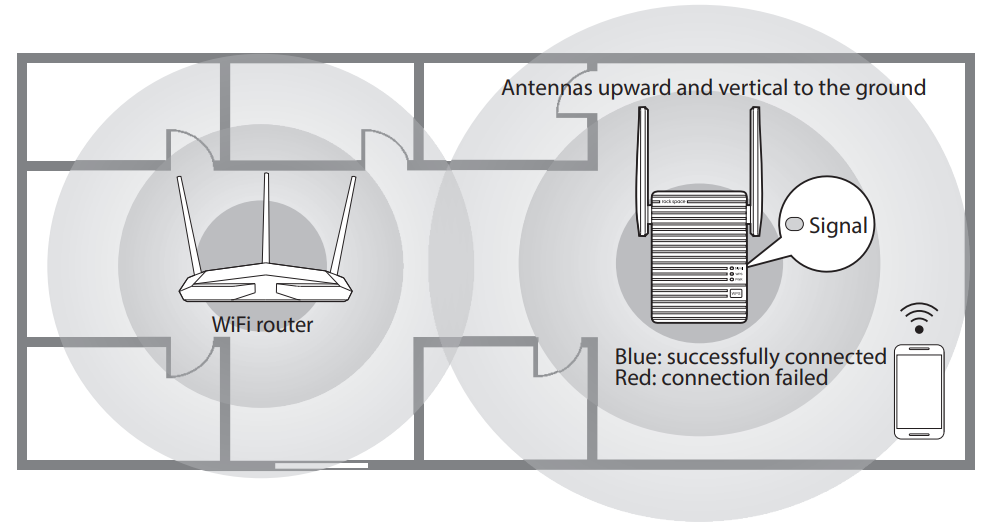


Method 2: Connect to an Existing WiFi Network with WPS
You can use Method 2 if your router has a WPS button (possible icons of a WPS button:
- Place the Extender and Apply Power
Place your extender in the same room as your WiFi router. Plug the extender into an electrical outlet. - Extend Your WiFi Network
1. Press the WPS button on your router. Within two minutes, press the WPS button on the extender.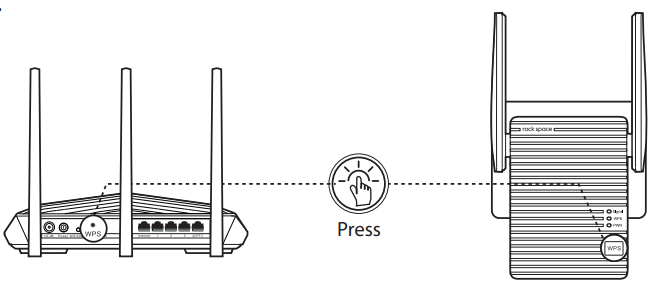
- Relocate the WiFi Range Extender
1. Unplug the extender and move it to a new location about halfway between your router and the area with a poor WiFi signal.
The location that you choose must be within the range of your existing WiFi router network.
2. Plug the extender into an electrical outlet and wait for the Signal LED to light blue. If not, plug the extender into an outlet closer to the router and try again.
3. Use a WiFi network manager on your client devices, such as a computer or WiFi device, to find and connect to the extended WiFi network you’ve set up in the previous step.
Note: the password for the extended network is the same as the password for your existing WiFi network.
4. After connecting to the repeater wireless signal, enter domain name: re. rock space. local in the address bar to log in.

Connect an Ethernet-enabled Device
After the extender is connected to your existing WiFi network, you can connect a wired device to the extender using an Ethernet cable. The device can then access your existing network through the extender’s WiFi connection.

Reset the repeater
•RST
To restore the WiFi range extender to the original factory settings: Plug the extender into a power outlet (the reset pinhole is on the bottom of the extender), using a paperclip, press and hold the reset pinhole for 8 seconds,fland then let go.
The AC750/AC1200 WiFi range extender will then reboot and be at factory default settings.
FAQ
Q1: I cannot login to the web UI of the repeater. What should I do?
A1: Try the following solutions:
If a WiFi device is used, ensure that your WiFi device has connected to the repeater’s WiFi network rockspace_EXT, and the Mobile Data (if any) function is disabled.
If a computer is used, ensure that your computer has connected to the repeater’s WiFi network rockspace_EXT, and your computer has set to Obtain an IP address automatically and Obtain DNS server address automatically.
Or unplug the Ethernet cable.
- Reset the repeater, and try again.
Q2: How to reset the repeater?
A2: When the PWR LED of the repeater is solid on, press the RESET button on the repeater with power on using a paper clip, and release. After the PWR LED turns solid on, the repeater is restored to the factory settings.
Q3: Why is it useless to press the RST button?
A3: Please confarm long-press the RST button for 8 seconds with power on.
Q4: The repeater cannot find the WiFi network of my router/modem.
What should I do?
A4: The router may be encrypted with WEP or WPA/WPA (Enterprise) algorithm.
Change the encryption type of the router to WPA-PSK or WPA2-PSK, and try scanning again.
Q5: Unable to login repeater interface
A5: Confirm the situation is before after extension.
a. Before the extension:
- Please confirm you have connected to the correct signal of the repeater. (The name of its wireless signal is attached to the product sticker)
- Confirm the IP access (192.168.0.254) that entered in the address bar is correct.
- If you are unable to log in, please close the browser(but not just return) and open a new page to try again. If still failed, please wipe all the or reopen the web browser reboot your mobile device.
- If all the solutions above are not working, we recommend that you can restore factory settings or recharging the plugged in the socket, then try to connect and log in again.
b. After the extension:
There are two ways to deal with this problem:
Method 1:
- First, make sure that you have connected to the correct signal of the repeater.
Network Name (SSID) repeater is the same as the superior signal (the router signal), you have to confirm you are connected to the signal of the repeater. - After connecting to the repeater wireless signal, please confirm the extender to get a connection with the correct router. repeater signal is assigned by the superior router.
- Then login with this website address http://re.rockspace.local.
- If failed, please cut off the extender power supply and reconnect the power supply after the extender has been successfully extended the signal, the website window will automatically pop up on the screen.
- If the last step above doesn’t work, please change to a laptop or a mobile phone to login.
Method 2: - First, make sure you have connected to the WiFi signal(no matter the router’s or extender’s), and then login the interface of the router;
- Open the Client List of the router interface to view connected devices. After finding the mac address (that is attached to the product stick)of the repeater, you can get the IP address of the extender assigned by the router.
- Open a browser, enter the IP address in the address bar, and use the created password the first time to log in to the extender website. enter the interface.
Q6: I can find someone else ’s wifi signal, but I can’t find mine?
A6:
- You need to check the signal strength that your mobile advice can get in the same place.(Maybe the signal in this place is poor)
- You should check if the encryption of the superior router is WEP. Only no encryption, WPA, WPA2 and mixed mode can be supporter by this repeater.
- Whether the superior signal is hidden; (You can check this by your mobile advice)
Q7: Always prompt for failure when extending.
A7:
- Check the indicator is blue/red/not bright(if the indicator not bright, it means a failed matching).
- If you can’t find the superior signal when extending, please try the following solutions:
① Set the SSID of the router and repeater to numbers and letters combination;
② Move the repeater closer to the router;
③ Confirm the encryption mode of the superior signal is not WEP.(Only no encryption, WPA-PSK, WPA2-PSK or their mixed mode can be supported by our repeater)
④ Confirm the superior signal is not turned off or hidden.
⑤ Login the interface of the router to check if restrictions are made, such as MAC fllter, Blacklist.
⑥ Confirm the password of your superior router you entered is correct.(The password entered in the extension process is the password for the superior router)
⑦ Modify the signal name and password for the superior router, and reset the repeater.
⑧ If all these situations are excluded, please send your feedback to this email: ,the information includes the superior model, extender serial number, and other information.
Q8: The indicator shows red or no light (weak signal or filed connecting)?
A8:
- How to confirm a successful extension?
① you can check the Network Name (SSID),if is still factory setting name ( “rockspace_EXT”), then it means a failed signal extension
② Log in to the extender website to check the extender state is extended ignal or not. - If you are sure that the extension is successful, you can keep the antenna pward and parallel with the antenna of the router; If not, please replace its angle.
- You can put the repeater and router closer, and observe if the indicator getssolid blue.
Q9: No internet access after extension?
A9:
- Confirm whether the extension is successful. (Judge by indicator and management interface)
- Disconnecting the device without internet access, and connect again to see if it is available.
- Check the router signal strength, if the router signal strength is too low, the extender has hardly extended the signal and doesn’t have internet access.(We recommend the repeater should be placed somewhere between 40%-50% of the signal strength.)
- When the signal of the repeater is connected, see if its SSID is assigned by router.
- Reset the repeater and try others WIFI signal.
Q10: The extended signal is poor?
A10:
- Don’t put the repeater too close to the router.
- Place the repeater in the middle of the router and the farthest place you want to extend.
- If you want to extend the signal in horizontal direction, the repeater antenna is positioned upward, and parallel to the router. If it is for duplex house, both the antennas of the repeater and router should be tilted and remain parallel.
Q11: Unable to connect the repeater signal after a while of a successful extension?
A11:
- Check on the interface for restrictions and blacklist.
- Clear cache of the extended signal, then reconnect.
- Reset the repeater and set up again.
Q12: Sometimes repeater and mobile device will lose their connection after extension?
A12:
a. When the indicator turns no light, it mean the repeater and router are disconnected.
- Please verify if any changes have been made.
- Enter the router interface to view the history, and check the status of the
- superior router.
If the router is fine, judging the strength of the signal by indicator’s color. You can adjust the location and direction of the repeater.
b. When the indicator is solid blue
- Please check if the SSID of the repeater contains special characters or Chinese, we command you can set the SSID to alphanumeric combination.
Q13: The network is not available after extension.
A13:
- Check the indicator light color, if the signal indicator light is red, it means no signal is received from router.
- If the indicator is red, but no network. Check the router signal strength, if the router signal strength is too low, the extender has hardly extended the signal and doesn’t have internet access. low by repeater interface.(We recommend the repeater should be placed somewhere between 40%-50% of the signal strength.)
- Check the extender signal is connectted to the correct router.
Q14: The network is slow after extension.
A14:
- View the color of the indicator:
① Solid blue: The signal strength received by repeater is above -60db.
② Solid red: The signal strength received by repeater is above -61db~-74db.
(The signal is a little bit week. It is recommend to move the repeater a little closer, and the repeater antenna is parallel to the router.)
③ No light: The signal strength received by repeater is below -74db. (The signal is week. It is recommend to move the repeater closer, and the repeater antenna is parallel to the router. ) - Under general situation, when the signal strength that received by repeater is between 40% and 79% (While the interface shows a signal with 2 bars), the repeater works best at this time.
- Check the network speed when your device connect the router directly at that position.
a. When the network speed between the router and repeater is the same, it means the connection is fine.(You can check the router.)
b. When the network speed is faster than that at repeater, please check the following problems:
① Check the placement of the repeater, avoid putting it in the corner;
② Check if the antenna of the repeater and router is paralleled,a paralleled antenna will be better for the connection.
③ If the above situation is excluded, please reset the repeater, and try to connect the repeater to the router again.
④ Reset the repeater.
Q15: After extension, it has a strong signal but low speed.
A15:
- Check the color of the indicator:
① Solid blue indicates a strong signal;
② Solid red indicates a little week signal; - It is recommend to put the repeater in the place where the superior is between 40% and 50%, and please keep the antenna upward.
Q16: Prompt a single frequency extended state after successful expansion:
A16:
- To see if the signal is a hided signal, whether the encryption method is WPA or WPA2 or mixed encryption, whether with special symbols, or modify the signal channel, then attempting to re-enter the Extender interface to try to expand;
- Whether the password of the signal extended unsuccessfully consistent with the extended signal, in this case need to go into the Extender interface to expand it.

FCC Statement
This equipment has been tested and found to comply with the limits for a Class B digital device, pursuant to Part 15 of the FCC Rules. These limits are designed to provide reasonable protection against harmful interference in a residential installation. This equipment generates, uses and can radiate radio frequency energy and, if not installed and used in accordance with the instructions, may cause harmful interference to radio communications. However, there is no guarantee that interference will not occur in a particular installation. If this equipment does ause harmful interference to radio or television reception, which can be determined by turning the equipment off and on, the user is encouraged to try to correct the interference by one or more of the following measures:
- Reorient or relocate the receiving antenna.
- Increase the separation between the equipment and receiver.
- Connect the equipment into an outlet on a circuit difierent from that to which the receiver is connected.
- Consult the dealer or an experienced radio/TV technician for help.
This device is restricted to be used in the indoor..
Operation is subject to the following two conditions: (1) this device may not cause harmful interference, and (2) this device must accept any interference received, including interference that may cause undesired operation.
Radiation Exposure Statement
This device complies with FCC radiation exposure limits set forth for an uncontrolled environment and it also complies with Part 15 of the FCC RF Rules.
This equipment should be installed and operated with minimum distance 20cm between the radiator & your body.
Caution:
Any changes or modifications not expressly approved by the party responsible for compliance could void the user’s authority to operate this equipment.
This transmitter must not be co-located or operating in conjunction with any other antenna or transmitter.
NOTE: (1) The manufacturer is not responsible for any radio or TV interference caused by unauthorized modifications to this equipment. (2) To avoid unnecessary radiation interference, it is recommended to use a shielded RJ45 cable.
Contact
Shenzhen Renqing Excellent Technology Co., Ltd.
Address: 104, No.15, Longfu Industrial Zone, Huarong Road, Tongsheng Community, Dalang Street, Longhua District, Shenzhen, China
Email:
Website: www.rockspace.cc
Technical Phone Support: +1(833)816-6558
Service Time: EST: 9:00-17:00 / PDT: 06:00-14:00,from Monday to Friday
24hour Online After-sales Service: https://rockspace.afterservice.vip
24hour Online
After-sales Service
Scan QR To Visit
https://rockspace.afterservice.vip