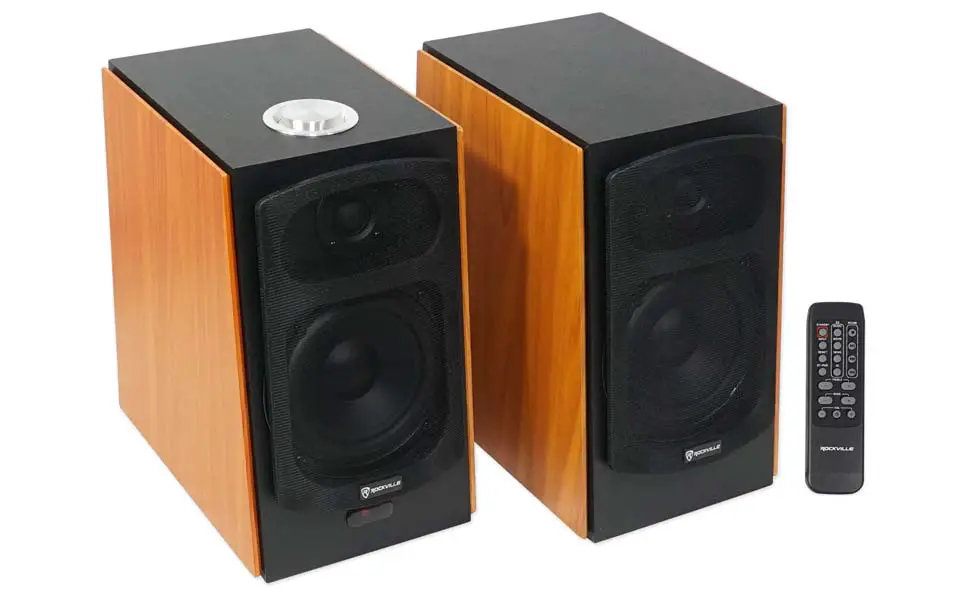
ROCKVILLE Elite Series HD5 5″ Powered Home Theater System
FEATURES HD5
- 5″ Woofer and 0. 75″ tweeter in each speaker
- 600 Watts Peak /150 Watts RMS
- Built-in Digital class “D” amplifier with advanced digital sound processor
• Built-in Bluetooth (Version: 4.2+EDR) with 33 foot range
• Built-in USB playback (16GB max storage)
• 2 Aux input ports allow you to connect the speakers to your T/, phone, or any other device
• 1 Optical (PCM) input port allows you to easily connect to your TV
• 1 Coaxial input port
• Multicolor LED function indicator
• Includes a beautiful fully functional remote control
• 4 preset EQ: Music, Movie, News, 3D
• High-grade MDF wooden enclosure (0.472″thick)
• Auto switchable power supply (110/240V) for use in the U.S. and Europe
SPECIFICATIONS
- Power Supply: SMPS AC 110/240V~50/60Hz
- Impedance: Woofer is 4 ohm and the tweeter is 5 ohm
- Frequency Response: 50Hz-20KHz
- S/N Ratio: 72dB
- THD: 0.5%(1 K/1 W)
- Input Sensitivity: 500mV±50mV
- Dimensions of each speaker: 9.84″ W x 10.83″ H x 6.38″ D
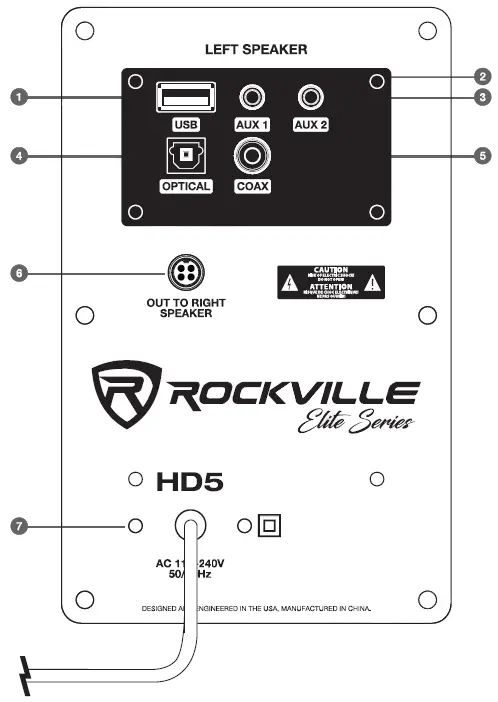
REAR PANEL (MASTER UNIT)

- USB input
- 3.5mm Stereo AUX 1 input
- 3.5mm Stereo AUX 2 input
- Optical input
- Unbalanced RCA input
- Output to right speaker
- Power input
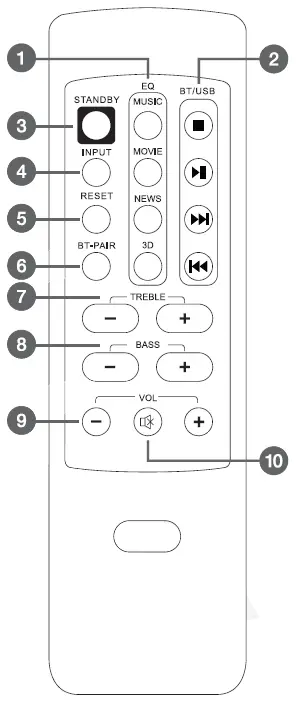
- Multi-function control knob
(Power/Active Input Selection Volume) - LED Function/input indicator:
RED – stand by function
BLUE – Bluetooth function
PINK – USB function
GREEN – AUX 1 input
LIGHT GREEN – AUX 2 input WHITE – Digital coaxial audio input YELLOW – Digital audio optical input
- Preset EQ: music, movie, news, 3D
- BT/USB playback controls:
- Stop
- Play/Pause
- Next Track
- Previous Track
- Power/standby
- Select between inputs: BT, USB, AUX1, AUX2, OPTICAL
- Reset treble and bass adjustments
- Pairs unit to Bluetooth capable devices
- Treble-/+
- Bass-/+
- Volume -/+
- Mute

SET UP
Connect the passive speaker (right) to the port marked “OUT TO RIGHT SPEAKER” on powered speaker (left) . Now plug the master unit to the nearest AC outlet.
STANDBY MODE
- Push the multi-function control knob on top of the left unit or the STANDBY button on the remote control to activate the speakers.
- To place the unit into STANDBY mode, press and hold the multi-function control knob for a few seconds or press the STANDBY button on the remote control.
VOLUME CONTROL/MUTE FUNCTION
The volume can be adjusted by turning the multi-function control knob or by pressing the VOLUME -/+ buttons on the remote control. The LED indicator will flash during the adjustment.
To activate the mute function, simply press the MUTE button on the remote control. To exit the mute function press the MUTE button again.
TREBLE/BASS/PRESET EQ
- Treble: Press the TREBLE -/+ buttons on the remote to make adjustments.
- Bass: Press the BASS -/+ buttons on the remote to make adjustments.
- The LED indicator will flash pink while adjustments are being made and be solid pink when adjustments are complete.
- To activate preset EQs press one of the four keys on the remote under the EQ section. To reset the unit to the default sound setting, press and hold the reset button for a few seconds.
BLUETOOTH
To connect your iPod, iPhone, MP3 player, Android phone or any other Bluetooth capable device follow the steps listed below.
- Make sure the unit is plugged in and the powered on. Press the multi-function control knob several times or press the INPUT key on the remote several times until the indicator LED is blue.
- You will hear a beep and the LED will begin to blink rapidly when the unit enters pairing mode.
- Turn on the Bluetooth feature on your device and ensure that it is in “discoverable” mode. Search for “Rockville HD5” on your list of available devices and select it.
- The LED will remain solid blue when the devices are successfully paired.
- Use the buttons on the remote to control music playback.
- During playback the status LED indicator will be blue. When the mute function is activated, the indicator will flash blue.
USB
For USB playback follow the steps listed below. Please note, due to the incompatibility of some processors this unit may not support some USB. The unit supports the MP3 format.
- Plug in your USB flash drive.
- Make sure the unit is plugged in and the powered on. Press the multi-function control knob several times or press the INPUT key on the remote several times until the indicator LED is pink.
- After a few seconds the unit will automatically read the files and begin playing music.
- Use the buttons on the remote to control music playback.
- During playback the status LED indicator will be pink. While the music is paused the indicator will flash pink.
AUX-IN 1/AUX-IN 2
Use the 3.5mm AUX-IN jacks to connect computers, cellphones, or any other external sound source with a 3.5mm output.
- Plug in any device with a 3.5mm output to either of the AUX-IN inputs using a 3.5mm to 3.5mm cable.
- Make sure the unit is plugged in and the powered on. Press the multi-function control knob several times or press the INPUT key on the remote several times until the indicator LED is green (AUX 1) or light green (AUX 2).
- Use the external device’s functions to control music playback.
COAXIAL DIGITAL AUDIO INPUT
Use the COAXIAL input to connect a TV or other external sound source with a coaxial output.
- Connect a TV or other source device to the input marked COAX using a coaxial cable.
- Make sure the unit is plugged in and the powered on. Press the multi-function control knob several times or press the INPUT key on the remote several times until the indicator LED is white.
- Adjust the volume by turning the multi-function control knob or by pressing the VOLUME -/+ buttons on the remote control.
OPTICAL DIGITAL AUDIO INPUT
Use a digital optical cable to connect a 1V or other external sound source with a optical output.
- Connect a 1V or other source device to the input marked OPTICAL using an optical cable. Please note, some devices require that the optical output feature be enabled.
- Make sure the unit is plugged in and the powered on. Press the multi-function control knob several times or press the INPUT key on the remote several times until the indicator LED is yellow.
- Adjust the volume by turning the multi-function control knob or by pressing the VOLUME -/+ buttons on the remote control.
TROUBLESHOOTING
| PROBLEM | SOLUTION |
| No Power |
|
| No sound |
|
| Bluetooth pairing fails |
|
| Files on USB memory device will not play back |
|
| No sound when receiving 1V input |
|
FEDERAL COMMUNICATIONS COMMISSION COMPLIANCE INFORMATION
Responsible party name: Rockville
Address: 600 Bayview Ave, Entrance A, Inwood, NY 11096
Hereby declares that the product Rockville HD5 powered home theater system complies with FCC rules as mentioned in the following paragraph:
This device complies with Part 15 of the FCC rules. Operation is subject to the following two conditions: (1) this device may not cause harmful interference, and (2) this device must accept any interference received, including interference that may cause undesired operation.
Note: This equipment has been tested and found to comply with the limits for a Class B digital device, pursuant to Part 15 of the FCC rules. These limits are designed to provide reasonable protection against harmful interference in a residential installation. This equipment generates, uses and can radiate radio frequency energy and, if not installed and used in accordance with the instructions, may cause harmful interference to radio communications. However; there is no guarantee that interference will not occur in a particular installation. If this equipment does cause harmful interference to radio or television reception, which can be determined by turning the equipment off and on, the user is encouraged to try to correct the interference by one or more of the following measures:
- Reorient or relocate the receiving antenna.
- Increase the separation between the equipment and receiver.
- Connect the equipment to an outlet on a circuit different from that to which the receiver is connected.
- Consult the dealer or an experienced radio/TV technician for help.
![]()