![]() Operating Instructions
Operating Instructions
Oven Hotpoint SH53X
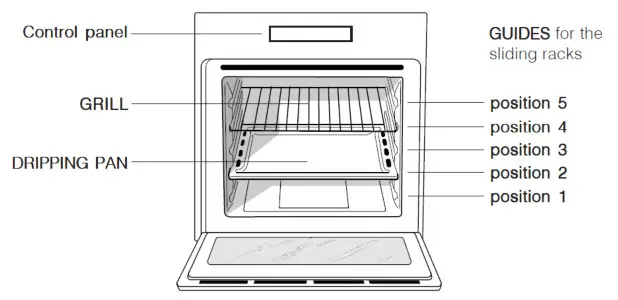
Control Panel

Starting the oven
Select the desired cooking mode by turning the SELECTOR knob.
- Select the desired temperature with the THERMOSTAT knob.
- When lit, the THERMOSTAT indicator light indicates that the oven is heating up to the temperature set.
- You may do the following during cooking:
• Change the cooking mode by turning the SELECTOR knob.
• Change the temperature by turning the THERMOSTAT knob.
• Stop cooking by turning the SELECTOR knob to the “0” position.
Cooking ventilation
In order to cool down the external temperature of the oven, some models are fitted with a cooling fan that blows out air between the control panel and the oven door.
Once the cooking has been completed, the cooling fan remains on until the oven has cooled down sufficiently.
Oven light
It goes on when selecting  with the SELECTOR model knob. It stays on when a cooking mode is selected.
How to use the timer
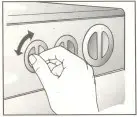
- To set the buzzer, turn the TIMER knob clockwise for almost one complete revolution.
- Turn the knob anticlockwise to set the desired time: align the minutes shown on the TIMER knob with the indicator on the control panel.
- The timer operates in minutes: when the selected time has elapsed, a buzzer will sound.
- The time does not turn the oven on or off.
The electronic cooking programmer
Button functions:
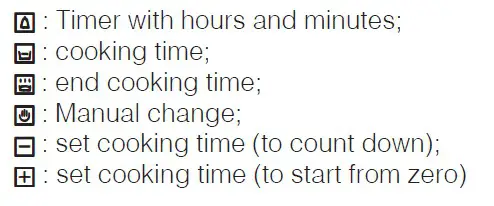
Delayed cooking time for a specified period
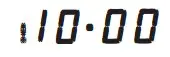
The total cooking time as well as the time at which the cooking will finish must be set. If we assume that the time the display reads 10:00.
- Turn the oven control knob to the setting and temperature desired
- Press the button
 and then set the cooking time (within 4 seconds) using the – and + buttons.
Supposing the cooking time is set to 30 minutes, the display will read as follows: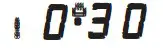
Release the button, and within 4 seconds, the current time will reappear with the symbol along with the word “auto” 3.
 - Press the button
 and then use the – and + buttons to set the time for when the cooking program should end. Let us imagine this time to be 1:00 pm
- After the button has been released, the current time will be displayed after approximately 4 seconds:
When “auto” is on, it indicates that the length of cooking time and the time it is due to finish have been programmed in automatic mode. At this point, the oven will turn on automatically at 12:30 and turn off after 30 minutes. When the oven is turned on, the symbol will be displayed for the entire cooking time. The cooking duration can be displayed at any time by pressing the button  and the time it is due to finish may be displayed by pressing the button.
Once cooking is completed, the time will ring; to then it off, simply press any button except the – and + buttons.
Immediate start for a specified period
By programming just the duration (Points 1 and 2 of the “Delayed cooking time for specified period” section), cooking will begin immediately.
To cancel a cooking schedule already programmed
Press the button, and use the -button to set the time to:
Then press the manual cooking mode button .
.
Timer feature
The timer feature allows you to enter a specific amount of time and begins to count down. This feature does not turn the oven on or off; it merely sounds when the time has elapsed.
When the button has been pressed, the display will read as follows:
Then use the -and + buttons to set the desired time. As soon as the button has been released, the timer will start to count down and the current time will be displayed.
After the time has expired, an audible signal will be emitted, which can be turned off by pressing any button (except the +and-
buttons). At this point, the symbol  will also turn off.
Correction/Cancellation of data
- The data entered can be changed at any time by pressing the corresponding button and the+ or -buttons.
- When the data for the cooking duration is canceled, the data for the time cooking is due to end is also canceled automatically and vice versa.
- If the oven has already been programmed, it will not accept times for the need of cooking which are before the start of the programmed cooking process.
The electronic cooking programmer
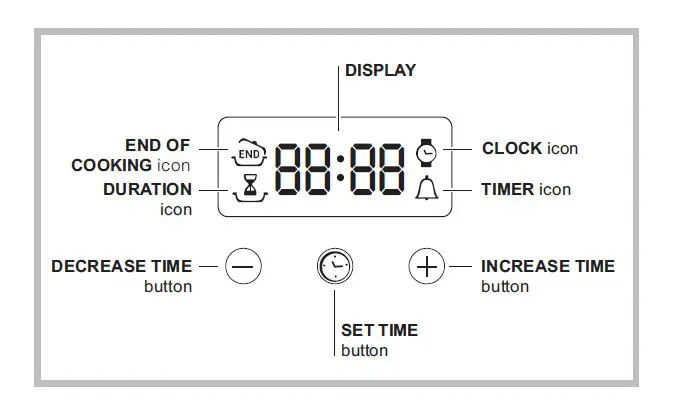
Setting the timer
This function does not interrupt cooking and does not affect the oven; it is simply used to activate the buzzer when the set amount of time has elapsed.
- Press the
 button several times until the icon and the three digits on the display begin to flash.
 - Use the “+” and “-“ buttons to set the desired time; if you press and hold either button, the display will scroll through the values more quickly, making it quicker and easier to set the value.
- Wait for 10 seconds or press the button again to finalize the setting.
The display will then show the time as it counts down. When this period of time has elapsed, the buzzer will be activated.
Programming cooking
A cooking mode must be selected before programming can take place.
Programming the cooking duration
- Press the button several times until the
 icon and the three digits on the DISPLAY begin to flash.
 - Use the “+” and “-“ buttons to set the desired duration; if you press and hold either button, the display will scroll through the values more quickly, making it quicker and easier to set the value.
- Wait for 10 seconds or press the button again to finalize the setting.
- When the set time has elapsed, the text END appears on the DISPLAY, the oven will stop cooking and a buzzer sounds.
Setting the end time for a cooking mode
A cooking duration must be set before the cooking end time can be scheduled.
- Follow steps 1 to 3 to set the duration as detailed above.
- Next, press the button until the
 icon and the four digits on the DISPLAY begin to flash.
 - Use the “+” and “-“ buttons to adjust the cooking end time; if you press and hold either button, the display will scroll through the values more quickly, making it quicker and easier to set the desired value.
- Wait for 10 seconds or press the button again to finalize the setting.
- When the set time has elapsed, the text END appears on the DISPLAY, the oven will stop cooking and a buzzer sounds.
Programming has been set when the and buttons are illuminated. The DISPLAY shows the cooking end time and the cooking duration alternately.
Canceling a program
- Press the button until the icon corresponds to the setting you wish to cancel and the digits on the display are no longer flashing. Press the “-“ button until the digits 00:00 appear on the display.
- Press and hold the “+” and “-“ buttons; this will cancel all the settings selected previously, including timer settings.
Cooking modes
A temperature value can be set for all cooking modes between 60°C and Max, except for
- GRILL (recommended: set only to Max power level)
- GRATIN (recommended: do not exceed 200°C)
 Traditional Oven mode
Both the top and bottom heating elements will come on. With this traditional cooking mode, it is best to use one cooking rack only; if more than one rack is used, the heat will be distributed unevenly.
 Multi-Cooking mode
All the heating elements (top and bottom), as well as the fan, will come on. Since the heat remains constant throughout the oven, the air cooks and browns food uniformly. A maximum of two racks may be used at the same time.
 Top oven mode
The top heating element comes on. This mode can be used to brown food at the end of cooking.
 Grill mode
The top heating element comes on. The extremely high and direct temperature of the grill makes it possible to brown the surface of meats and roasts while locking in the juices to keep them tender. The grill is also highly recommended for dishes that require a high temperature on the surface e.g. Beef steaks, hamburgers, etc. Always cook in this mode with the oven door closed.
 Gratin mode
The top heating element, as well as the fan, will come on. This combination of features increases the effectiveness of the unidirectional thermal radiation of the heating elements through the forced circulation of the air throughout the oven. This helps prevent food from burning on the surface, allowing the heat to penetrate right into the food. Always cook in this mode with the oven door closed.
Cooking advice table