Samson® Meteor Mic USB Studio Microphone User Guide

Samson Technologies Corp. v3.1
Copyright 2018
278-B Duffy Ave
Hicksville, New York
11801 1-800-3-SAMSON
www.samsontech.com
Introduction
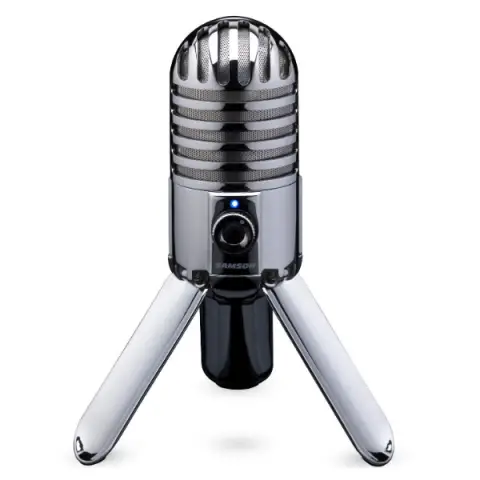
Congratulations on your purchase of the Samson Meteor Mic USB studio condenser microphone. The Meteor Mic is a professional studio microphone with a large 1” (25mm) diaphragm, housed in a die-cast body with patented fold-up legs. The microphone features high-quality onboard digital converters and a USB interface, as well as a headphone output with level control for zero-latency monitoring, and a microphone mute switch for added control over your recordings. The Meteor’s integral tripod legs allow for limitless positioning to capture any sound source. There is even an integrated stand adapter to mount the microphone on a studio boom. With the Meteor Mic, you get everything you need to start recording on your computer – just plug in the supplied USB cable, launch your favorite audio software, and begin recording.
With its extended frequency and fast transient response, the Meteor Mic reproduces any performance with incredible accuracy and clarity. It is also great for VoIP and video chatting. Whether you’re recording your latest song idea, a podcast, or your band’s next big hit, the Meteor Mic is the simplest and most comprehensive solution for high-quality recording on a Mac or PC. Just plug it in and start creating!
In this manual, you’ll find a detailed description of the features of your Meteor Mic USB studio condenser microphone, as well as step-by-step instructions for its setup and use, and full specifications.
We recommend you keep the following records for reference, as well as a copy of your sales receipt:
Serial number: _________________________________________
Date of purchase: ______________________________________
If you have any questions or comments regarding the Meteor Mic or any other products from Samson, do no hesitate to contact us at [email protected].
With proper care and maintenance, your Meteor Mic will operate trouble-free for many years. Should your Meteor Mic ever require servicing, a Return Authorization (RA) number must be obtained before shipping your unit to Samson. Without this number, the unit will not be accepted.
Please visit www.samsontech.com/ra for an RA number prior to shipping your unit. Please retain the original packing materials and, if possible, return the unit in its original carton. If your Meteor Mic was purchased outside of the United States, contact your local distributor for warranty details and service information.
Meteor Mic Features
 Professional, large diaphragm, studio condenser USB microphone
- 1” (25mm) microphone capsule
- Onboard 1/8” headphone output with volume control for zero-latency direct monitoring
- High-quality A/D and D/A converters
- Compatible with Mac and PC computers; no drivers or external power supplies are required
- Microphone mute switch for privacy, and to silence noise during playback
- Computer-controlled analog input gain
- Power, Peak, and Mute LED indicator
- USB cable and carry pouch included
Meteor Mic Layout
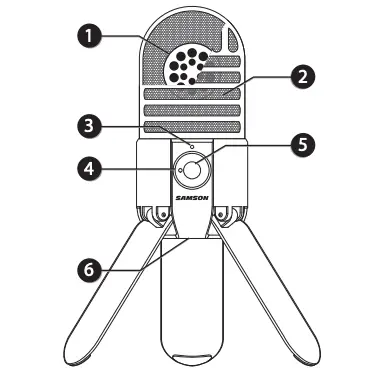
- Capsule – Large, 1” (25mm) diaphragm with a cardioid (unidirectional) polar pattern.
- Windscreen – Dual stage grille protects the capsule and helps reduce wind noise and p-popping.
- LED – Three-color LED illuminates blue to indicate power, amber to indicate that the microphone is muted, and flashes red when the input signal is clipping.
- Headphone Volume – Controls the overall level of the Meteor Mic’s headphone output.
 Microphone Mute Button – Mutes the output of the microphone to the computer and headphone output. The LED will illuminate amber when the microphone is muted.
- Stand Mount – Standard 5/8” thread mount to attach the Meteor Mic to a microphone stand.
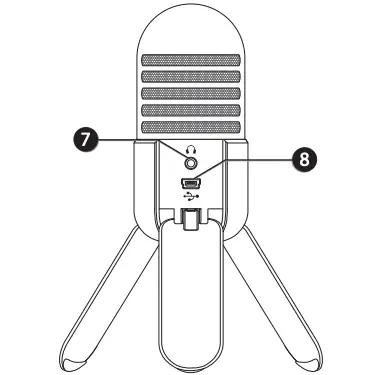
- Headphone Jack – 1/8” (3.5mm) stereo jack for connecting headphones or active studio monitors.
- USB Jack – Mini-B USB connector for interfacing with your computer.
Connecting to a Computer
Using the Meteor Mic with Windows Computers
- From the Start Menu, open the Control Panel and select Sound. Under the Playback and Recording tabs, select the Samson Meteor Mic as the audio device.
- To adjust the gain of the microphone, click the Properties button, and then select the Levels tab. You can view the volume level as either a percentage or in dB, by right clicking on the number box.
- If the microphone LED is lighting red, turn this control down until the LED no longer flashes red.
- In the Playback tab, select the Level tab and set the computer’s Master Volume to 100%. Use the Meteor Mic’s Output Level buttons to control the overall output from the headphones or speaker.
- To adjust the direct monitoring level in the Playback tab by moving the fader labeled Microphone.
Using the Meteor Mic with Apple OSX
- Open System Preferences from the dock or the main Apple Menu.
- Select the Sound preference icon, choose the Input tab and select Meteor Mic.
- Set the gain of the Meteor Mic by adjusting the Input volume slider at the bottom of the Sound dialog box.
- Set the Meteor Mic as playback volume by clicking the Output tab and select Meteor Mic, adjust the Output volume slider at the bottom of the Sound dialog box to the maximum setting and use the Meteor Mic’s front panel Volume knob to control the overall output from the headphones or speakers.
- To turn direct monitoring on or off, open the Audio/MIDI Setup utility located in the Utility folder inside the Applications folder. Then click the check-box in the Thru column in Audio/MIDI Setup.
Quick Start
Follow this simple quick start for a typical set-up to start recording.
- Unfold the legs of the Meteor Mic, and position the microphone on your desktop. The legs can be adjusted to set the angle of the microphone.
- Connect your headphones to the Headphone output located on the rear of the Meteor Mic.
- Plug the mini-B (small) end of the included USB cable into the USB socket on the rear of the Meteor Mic and plug the other end of the USB cable into an available USB port on your computer.
- Set the computer’s output level is set to maximum for full volume in the Meteor Mic headphone monitor.
- Launch your recording software, turn the microphone’s Volume knob down, and select the Meteor Mic for the input and output.
- Set up a mono record track in your software for the vocal track.
- Set the level of the microphone following the instructions in “Connecting to a Computer”. If you see the Power/Peak LED illuminate red, your signal will be distorted. Turn the MIC level control down until it does not flash red.
- Speak or sing into the mic and raise the Meteor Mic’s Headphone Volume knob until you reach a comfortable listening level.
- Press the record button and start creating.
Recording Techniques
The Meteor Mic is a great microphone choice for many instrument miking situations. Below is a brief guide on using the Meteor Mic in some typical applications:
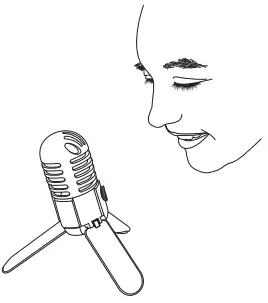 Vocals
Position the microphone directly in front of the artist so that the microphone grille is between 64 to 18 inches away. The closer the artist moves to the microphone, the more the bass or low response increases; this is called proximity effect. To achieve the fullest sound, the vocalist should aim the microphone center line towards their mouth. If p-popping (turbulent bursts of air produced when uttering consonants) is occurring, rotate the microphone a little bit away from the artist so that sound arrives at the microphone slightly off-center.
Acoustic Guitar
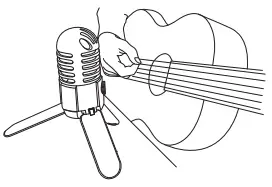 There are a variety of ways that the Meteor Mic can be used to mic an acoustic guitar. Optimal microphone placement will depend on the type of instrument, and what kind of sound you’re looking to capture. It may be necessary to experiment with various positions to achieve full and balanced tone. When miking a standard steel string acoustic, it is suggested that you begin with the microphone at a distance of 6–12 inches from the sound hole, positioned slightly off-axis, and pointing towards the edge of the fingerboard. From this position, moving the microphone towards the sound hole will cause the mic to capture more low frequencies. If, instead, you wish to capture more high-end, or to remove any unwanted boominess, move the microphone toward the fingerboard. Unlike a steel string acoustic guitar, the sound of a nylon string acoustic guitar that is played by finger picking is usually naturally warmer. To record an even, full tone, it is suggested that you begin by positioning the microphone 3–6 inches above the center of the bridge. This will help emphasize the higher frequencies and pick up the attack sound of the finger picking. If the microphone is picking up too much low frequency from the sound hole, move the microphone so that it is slightly off-axis from the guitar. If you have a pair of Meteor Mics, try one positioned at the fingerboard and the second over the bridge of the guitar, or have one microphone positioned close to the guitar and the second a few feet away to pick up the sound of the room, blending the two sources together.
Piano
The grand piano is a very challenging instrument to capture, and can be miked in a variety of ways. For close miking the piano, position the Meteor Mic just inside the piano, centered between the soundboard and the open lid. The closer you move the microphone toward the instrument the more low frequencies the microphone will pick up. For an ambient recording like that used in a classical performance, position the microphone outside the piano, facing into the open lid. For a more contemporary ensemble sound, place two Meteor Mics in the piano, positioning one over the low strings and one over the high strings at a distance of 6–12 inches apart. When miking an upright piano with a single microphone, position the microphone just above and in front of the piano with the top open, centered over the instrument.
Guitar Amp
Placement of the microphone when recording an electric guitar can impact the tone as much as the choice of instrument and amplifier. Guitar amps are usually close-miked but consideration must be made for the type of signal the amp will produce. While condenser microphones like the Meteor Mic have fast transient response, they cannot handle extreme high SPL’s. The Meteor Mic should be placed approximately 4 inches from the grill of the amp. For a brighter sound, the microphone should face the center of the amplifier’s speaker cone. By moving the microphone off of the center of the speaker, the sound becomes mellow, rolling off some of the high frequencies. To add more of the room sound, the microphone can be angled away from the amplifier, or placed further away from the speaker.
Full Band
Because of its wide frequency response and fast transient response, the Meteor Mic performs outstandingly when used to capture a band’s live performance. You can position the Meteor Mic on a mic stand facing the ensemble at a distance of six to twelve feet. You can experiment with the exact placement depending on the size of the room and whether you’re looking for an ambient or close-miked sound.
Proximity Effect
Cardioid (unidirectional) microphones, exhibit a phenomenon known as proximity effect. Proximity effect is a resulting change in the frequency response of a microphone based on the position of the mic capsule relative to the sound source. In general, as the microphone moves closer to the sound source, the bass response increases.
You can also make subtle changes to the frequency response by making minor adjustment to the position. Specifically, when you point a cardioid mic directly at the sound source (on axis) you will get the best frequency response, however when you start pointing the microphone slightly away (off axis) you will notice the high frequency response dropping off and the microphone will start to sound like it has more bass and less highs.
For most vocal applications you’ll want to position the microphone directly in front of the artist about 4 to 18 inches. This will pickup the voice while minimizing unwanted background or ambient noise. If you are close miking vocals, and notice plosive sounds, like p-pops, caused by plosive consonants set the microphone to a slight angle to reduce p-popping. Slight changes to the angle of the microphone in reference to the sound source can make some pretty amazing equalization adjustments. Experimentation and experience are the best teachers in getting good sounds, so plug in and start creating!
Specifications
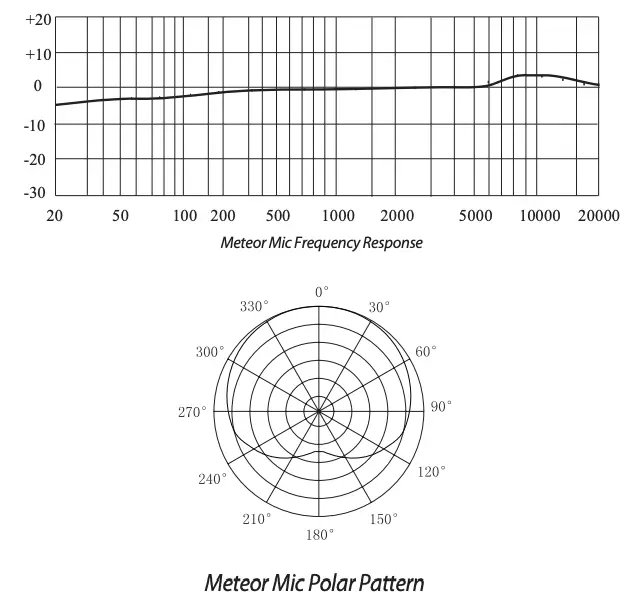
| Polar Pattern | Cardioid |
| Capsule | 1” (25 mm) condenser |
| Frequency Response | 20Hz – 20kHz |
| Max SPL | 120dB |
| Sample Rate | 44.1/48kHz |
| Bit Rate | 16bit |
| Power Requirements | 5V 70mA (idle), 100mA (peak) |
| Controls | Headphone Volume, Microphone Mute Switch |
| Output | 1/8” TRS |
| Headphone Impedance | 16 ohms |
| Headphone Output | 85mW at 16ohms |
| THD | 0.01% unloaded, 0.04% @ 32 ohms |
| Headphone Frequency Response | 20Hz–20kHz |
| Signal to Noise | 96dB (A) |
| Dimensions | 1.92” x 3.9” (49mm x 100mm) |
| Weight | 0.57lbs (263g) |
At Samson, we are continually improving our products, therefore specifications and images are subject to change without notice.
Polar Pattern and Frequency Response
Important Safety Information
Note: This equipment has been tested and found to comply with the limits for a Class B digital device, pursuant to Part 15 of the FCC rules. These limits are designed to provide reasonable protection against harmful interference in a residential installation. This equipment generates, uses and can radiate radio frequency energy and, if not installed and used in accordance with the instructions, may cause harmful interference to radio communications. However, there is no guarantee that the interference will not occur in a particular installation. If this equipment does cause harmful interference to radio or television reception, which can be determined by turning the equipment off and on, the user is encouraged to try to correct the interference by one or more of the following measures:
- Reorient or relocate the receiving antenna.
- Increase the separation between the equipment and receiver.
- Connect the equipment into an outlet on a circuit different from that of the receiver.
- Consult the dealer or an experienced radio/TV technician for help.
 If you want to dispose this product, do not mix it with general household waste. There is a separate collection system for used electronic products in accordance with legislation that requires proper treatment, recovery and recycling.
Private household in the 28 member states of the EU, in Switzerland and Norway may return their used electronic products free of charge to designated collection facilities or to a retailer (if you purchase a similar new one).
For Countries not mentioned above, please contact your local authorities for a correct method of disposal.
By doing so you will ensure that your disposed product undergoes the necessary treatment, recovery and recycling and thus prevent potential negative effects on the environment and human health.
WARNING: Listening to music at high volume levels and for extended durations can damage one’s hearing. In order to reduce the risk of damage to hearing, one should lower the volume to a safe, comfortable level, and reduce the amount of time listening at high levels.
Please use the following guidelines established by the Occupational Safety Health Administration (OSHA) on maximum time exposure to sound pressure levels before hearing damage occurs.
- 90 dB SPL at 8 hours
- 95 dB SPL at 4 hours
- 100 dB SPL at 2 hours
- 105 dB SPL at 1 hour
- 110 dB SPL at 1/2 hour
- 115 dB SPL at 15 minutes
- 120 dB SPL – avoid or damage may occur