SentrySafe Fingerprint / Keypade Fire-Safe Manual

IMPORTANT
DO NOT RETURN SAFE TO THE STORE!
If you experience any problems or challenges with your safe, please contact us. Many issues can be resolved quickly without the product being returned.
Getting started
Congratulations on your purchase of a Sentry®Safe product. SentrySafe is the world’s leader in fi re/water-resistant and security storage. This guide describes how to easily set up your safe.
1. Gain entry with the combination lock
Opening your safe for the fi rst time (keep door open during setup):
The handle should be all of the way UP, in the horizontal position before attempting to dial out safe.
Testing your combination: Your safe’s combina tion is printed on the front of this owner’s manual. You will have
a 3-number or 4-number combination depending upon the model purchased.
3-NUMBER COMBINATION (Cannot be changed)
1. To unlock and open
Before dialing your combination, simply insert the key (if equipped) in the lock and turn until the plunger pops out. Remove key.
NOTE: The safe will lock if key lock cylinder is pressed in with or without key.
- Start the dial at zero.


2. To close and lock
You can relock the safe in two ways. With the door closed, depress the key lock (if equipped) with your finger, or spin the combination dial one full turn. For greatest security, do both. (Make sure the door handle is in the horizontal position.)
4-NUMBER COMBINATION
1. To unlock and open
Before dialing your combination, simply insert the key (if equipped) in the lock and turn until the plunger pops out. Remove key.
NOTE: The safe will lock if key lock cylinder is pressed in with or without key.
- Start the dial at zero.
2. To close and lock
You can relock the safe in two ways. With the door closed, depress the key lock (if equipped) with your finger, or spin the combination dial one full turn. For greatest security, do both. (Make sure the door handle is in the horizontal position.)
Note: Changing the combination voids your warranty. To reinstate your Limited 1-Year Warranty, (valid purchase dated receipt required) you must contact Sentry Customer Service to document your new combination. If Sentry is not notified of the combination change during the Warranty period, locksmith service fees will NOT be covered.
(For Dial safe models manufactured after 2011, use the following instructions to open your safe)
3-NUMBER COMBINATION (Cannot be changed)
1. To unlock and open
Before dialing your combination, simply insert the key (if equipped) in the lock and turn until the plunger pops out. Remove key.
NOTE: The safe will lock if key lock cylinder is pressed in with or without key.
- Start the dial at zero.
2. To close and lock
You can relock the safe in two ways. With the door closed, depress the key lock (if equipped) with your finger, or spin the combination dial one full turn. For greatest security, do both. (Make sure the door handle is in the horizontal position.)
4-NUMBER COMBINATION
1. To unlock and open
Before dialing your combination, simply insert the key (if equipped) in the lock and turn until the plunger pops out. Remove key.
NOTE: The safe will lock if key lock cylinder is pressed in with or without key.
- Start the dial at zero.
2. To close and lock
You can relock the safe in two ways. With the door closed, depress the key lock (if equipped) with your finger, or spin the combination dial one full turn. For greatest security, do both. (Make sure the door handle is in the horizontal position.)
Note: Changing the combination voids your warranty. To reinstate your Limited 1-Year Warranty, (valid purchase dated receipt required) you must contact Sentry Customer Service to document your new combination. If Sentry is not notified of the combination change during the Warranty period, locksmith service fees will NOT be covered.
2. Gain entry with the basic electronic lock
The handle should be all of the way UP, in the horizontal position before attempting to open safe.
Opening your safe for the first time (keep door open during setup):
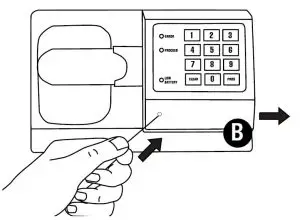
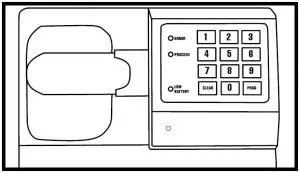
- Insert a paper clip or pen point into the small hole of the battery cover located directly below the keypad. Push in while sliding cover to the right (Fig. B).
- Disconnect and remove battery holder.
• Insert 4 new AA batteries (not included) to power this lock.
• Reconnect the battery holder and put back into proper position. Slide battery cover back in place.
NOTE: The yellow LED will light when the batteries need to be replaced. - Simply insert the key (if equipped) in the lock and turn until the plunger pops out. Remove key.
- Enter the factory code (printed on the first page of this guide). When the green light appears, you have four seconds to turn the handle down to open. Try this several times before proceeding to the next step.
To unlock safe:
Enter the 5-digit factory code, a pre-programmed user code, or a pre-programmed user pin (programming instructions to follow). When the green LED lights you have 4 seconds to turn the handle and open the safe.
To lock safe:
Close the door and return the handle to the horizontal position. For greatest security, depress the key lock (if equipped) with your finger.
NOTE: If your unit is equipped with a water-resistant gasket additional pressure to the left corner of the door may be required before the handle can be returned to the horizontal position.
Access codes
There are 3 possible ways to unlock and access the safe:
- Factory code
(Found on the front cover of this guide.) You can always open the safe by entering the pre-set 5-digit factory code. This code cannot be deleted. - User code
If you prefer to employ your own code, you can program the safe to open using a 5-digit user code of your choice. - User pin
If you wish to give someone else temporary access to the safe, you can program a 5-digit user pin that can later be erased.
Programming the user code
NOTE: One (1) user code is allowed.
To add:
- Press the Prog key , then enter the 5-digit factory code.
- Enter the 5-digit user code of your choice.
To delete:
- Press the Prog key.
- Enter the 5-digit factory code twice.
Programming user pin
NOTE: One (1) user pin is allowed.
To add:
- Press the Prog key 2 times.
- Enter your 5-digit user code.
- Enter the 5-digit user pin of your choice.
To delete:
- Press the Prog key 2 times.
- Enter your 5-digit user code.
- Enter 0, 0, 0, 0, 0.
NOTE: If your safe does not appear to be working, please check batteries before calling Sentry Customer Care.
Signals
Your electronic-lock safe communicates by means of several audio/visual signals.
Red (Error) LED + three beeps indicates one of the following:
- You have pressed Program key out of sequence.
- You have entered an invalid code or user pin.
- You have let 5 seconds or more elapse between key presses.
- Lights after three consecutive invalid codes are input (2-minute delay mode).
Green LED only:
- Comes ON after you enter a valid code and remains lit during the 4-second period in which the safe can be opened.
- Comes ON in the Programming mode and remains lit until you have finished entering a 5-digit code.
Yellow LED only:
- Comes ON when the batteries need to be replaced.
3. Gain entry with the fingerprint lock
For safes with a fingerprint lock
IMPORTANT
For some fingerprint locks
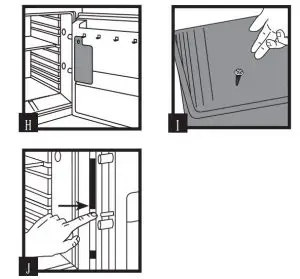
NOTE: Some models with a fingerprint lock are shipped with a screw in the back of the door (Fig. H). This temporary screw keeps the handle from turning and locking the safe before you are ready to use it. Once your safe is delivered, remove this screw and throw it away (Fig. I). After removing the lock out screw, it may be required to push the bolt button which, in turn, will throw the bolts to a locked position while the door is open (Fig. J). The handle should be all the way UP, in the horizontal position before attempting to program your safe. Your finger-print lock is now ready to use. You will find your safes factory combination on the sticker on the front of the owner’s manual.
NOTE: If you are experiencing difficulty with the operation of the locking mechanism, DO NOT RETURN THIS PRODUCT TO THE STORE. PLEASE VISIT OUR SITE AT WWW.SENTRYSAFE.COM
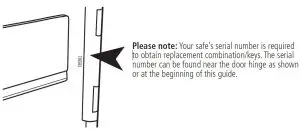
It is important that you keep this Owner’s Manual in a secure place other than IN your safe; it is your reference for the safe’s Serial Number and Factory Code.
To activate lock
Four alkaline AA batteries, equaling voltage: 6Vdc, (not included) are required to activate the fingerprint lock.
NOTE: Non-alkaline and rechargeable batteries ARE NOT RECOMMENDED.
To install batteries:
The battery compartment is located directly beneath the keypad. Insert a small coin in the slot on the left side of the compartment cover. Twist the coin to dislodge the cover, then slide it to the right. Insert four new batteries as indicated, and slide the cover back in place.
Low battery notice
When the battery power gets low, the message “Batteries Low Replace Soon” will appear with each activation of the lock until batteries are replaced.
NOTE: No codes are erased when old batteries are removed for replacement.
First time use
Open unit first, then test with door open! When you have successfully completed the personal code process described below, the LCD on the screen will prompt the next steps. The instructions provided here serve as a beginning guide.
NOTE: The key lock must be in the UNLOCKED position in order to operate the fingerprint lock. To unlock, turn the key to the right. Return key to the locked position when you have closed the safe door. Remove the key from the lock and store it in a secure location other than in the safe.
To enter your personal code
- Press ENTER .
- Enter the 5-digit factory code provided on the front of this manual.
- Press ENTER .
NOTE: When you have successfully entered the factory code, the LCD screen will prompt the next steps.
If you require additional assistance, contact Sentry Customer Service on line at
www.sentrysafe.com, or call: 1-800-828-1438, 8:00am – 6:00pm E.S.T., M–F. - Enter your new personal code consisting of 4–8 digits, then press ENTER.
- Re-enter your new personal code and press ENTER again. Proceed to fingerprint scan procedure.
To enter fingerprint scans
Tips for fingerprint programming and usage
Best finger for programming
- Do not choose a finger with a cut or scar.
- Do not choose a finger with excessively long fingernails.
- Choose a finger with the tightest swirl pattern.
Finger placement
- Place your finger on the sensor in a direct manner. Do not slide or roll your finger onto the sensor.
- Do not move your finger off of the sensor until the lights around the sensor turn off.
- Any trembling or shaky movement of the finger will result in an inaccurate reading.
- Use a medium pressure on the sensor. Too firm or too light will not read correctly.
Location of finger on the sensor
- Look to see where the swirl part of your fingerprint is on your finger.
- Place the swirl part of your fingerprint on the sensor.
- With your finger on the sensor, note the position of your fingernail in relation to the sensor crosshairs. Repeatable placement of the finger is important in programming and usage of the safe.
- Also note where you are standing in relation to the safe. Programming or usage at a different angle will not work well.
Skin condition
- If you have dirt on your hands, please wash them before using the safe.
- Very dry skin will not program well. Use a skin moisturizer, being sure to rub the moisturizer in well and remove any excess before using the safe.
NOTE: Should you choose not to enter your fingerprint scan at the first use, it can be entered at a later date. The original Factory Code is necessary to continue at that later date.
NOTE: The fingerprint lock stores one manager and up to six (6) users. The manager and each user is encouraged to program two fingers, preferably one finger from each hand.
- To store your first fingerprint, place one finger on the sensor and follow prompts as they appear on the LCD screen. (Fig. K) Three accurate reads of the fingerprint are necessary for successful enrollment. Remember how you place your finger on the sensor and try to position it in the same place each time.
- After successful enrollment of the first finger, to store the second fingerprint, press the number 2 and repeat Step 1 using a different finger, preferably one from the other hand. You may enroll additional users at this time or at a later date.

Normal use
To access the safe, first turn the key to the right to unlock. You may then either press the ENTER button and place your finger on the sensor (Fig. K), or, enter your personal code and press ENTER. LCD will prompt the next steps.
For optimal accuracy and fingerprint-reading success, clean the fingerprint sensor periodically with a lint-free cloth.
Enrolling and deleting users
To enroll a new user or delete an existing user, enter your personal code or manager fingerprint scan and press ENTER. Enter a user number (1-6) and follow the prompts which appear on the screen.
Backup
The system memory can be returned to its original status using this sequence and following the screen prompts: 99 > CLEAR > 2004 > ENTER
CAUTION: This action PERMANENTLY ERASES all memory, personal codes and fingerprint scans.
CAUTION: ENVIRONMENTAL CONDITIONS
The electronics may not work or may have a slow reaction time in cold temperatures (50°F or less). Make sure the safe is at room temperature before programming and usage.
Troubleshooting
- If electronics are not functioning, replace batteries first (behind battery cover) as described on page one of this guide.
- If electronics are functioning and you cannot get into safe:
– Pull handle up
– Follow instructions for opening your lock. - You must use both the key (if equipped) and the electronic code to open the safe if the key lock cylinder is pushed in.
Delay mode
Enters a two-minute delay mode after an invalid code has been entered three consecutive times. In this mode, the lock cannot be activated and any key entry will generate an ERROR signal.
Floor mount (optional)
For additional security your safe may be bolted to the floor. For instructions, please visit our website at www.sentrysafe.com.
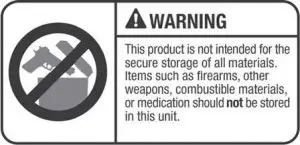
 WARNING
DO NOT store delicate items directly in your safe. SentrySafe products which offer fire protection have a proprietary insulation that has a high moisture content. In addition the SentrySafe.
If you lose your combination/keys or need accessories, we can help!
Visit our website at www.sentrysafe.com
Registration: To be eligible for warranty coverage, the original purchaser must register the product online at www.sentrysafe.com or complete and return to Sentry Group the enclosed registration card.
Advanced safes close airtight to offer water resistance, which may also cause moisture to accumulate inside your safe. The desiccant packet included in your safe during shipment, should be left in your safe. DO NOT DISCARD IT. It is intended to help absorb moisture which may accumulate inside your safe. Please open your unit periodically to avoid moisture accumulation.
If you choose to store delicate items such as jewelry with working parts, watches, stamps, or photos in your safe, we recommend putting them in an air-tight container, prior to placing them in the safe for storage.
NOTE: Sentry Group will not be responsible for any damage or loss of items placed in the unit due to moisture.
WARNING
DO NOT store pearls in this safe unit. In the event of a fire, potential damage to delicate pearls occurs at temperatures much lower than the 350°F interior performance measure which the UL classification performance standard indicated guarantees. Therefore, DO NOT store pearls in your SentrySafe product.
WARNING
No computer disks, audio-visual media or photo negatives. This product is not intended to protect computer floppy or diskettes, cartridges and tapes, audio or video cassettes or photo negatives. For fire-resistant storage of these materials, ask your retailer for the SentrySafe Fire-Safe Media storage products.
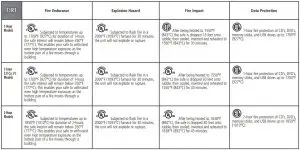
Rigorous testing ensures this product meets our specifications