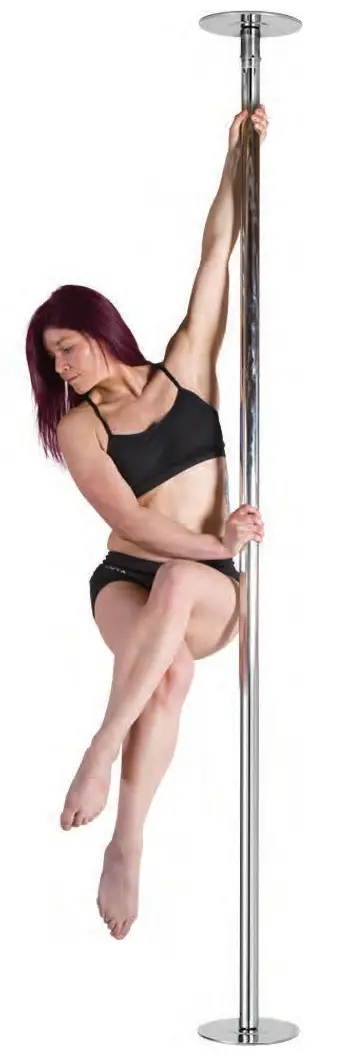
Professional Spinning Dancing Pole
SLDPS
Portable & Removable Stripper Fitness Pole,
Great For Training & Exercise
FINDING A SUITABLE EXERCISE AND DANCE AREA
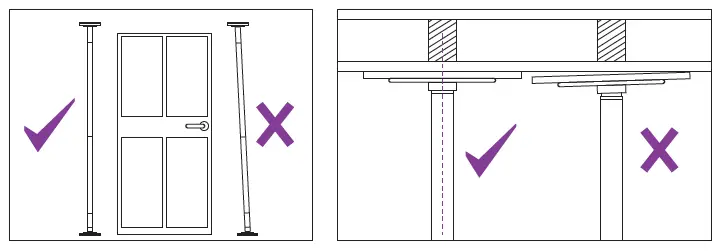
Try to and a suitable area in the centre of your room, where you would like to install your pole. To use Dancing Pole properly you need to be able to rotate around the pole with your arms outstretched and NOT be able to hit or touch anything whilst rotating. Find the area by rotating around an imaginary pole with your arms outstretched, you can use a chair as an imaginary pole or, measure a circle with a diameter of approximately 3.0~3.5mtrs (10~11.5ft). This area will enable you to fully extend your arms.
Once you have located the correct sized clear area you can look for the ceiling joists above the area you have selected.
When you are installing, first measure the height of your ceiling to the ground in advance; then select the appropriate extension pole according to your needs. Do not tighten the poles at the beginning of installation.
After all installations, adjust to the tightest.

Make sure you measure properly the height of what will support your pole.
BEFORE USING YOUR POLE
Mis-using a pole can be dangerous, not only to the user but also to anyone close to the pole. The use of a dance pole is always at the user’s discretion, and it is the user’s responsibility to check the pole is installed correctly and safely before use.
Pole Exercise is extremely physical and uses muscles that you will not have used before and therefore if you are not warmed up; muscle damage, strains and injury can occur. Before using the Dance Pole, it is mandatory to warm up and, after use, cool down. It is highly recommended that before you use your Dance Pole you purchase a suitable DVD to learn the basic moves. Never try moves beyond your ability without an instructor. If at any time whilst using your pole you feel uncomfortable, your muscles hurt, or you are short of breath – take a break. Always rest between moves and exercise sensibly, if you experience any health issues, seek medical advice.
SAFETY INSTRUCTIONS
- Never use oil and/or lotion on your hands or body before using the dance pole.
The oil and/or lotion transferred onto the pole will make it slippery and hard
to hold, which might cause serious bodily injury. - The dance pole should not be installed under false or suspended ceilings that
are not sturdy enough. - Never place a carpet under the dance pole as it could affect the stability of the product.
- Before the installation, all protecting film covering the parts must be removed.
- The horizontal weight capacity of this product is 280 kg/617 lbs. The vertical weight capacity of this product is 500 kg/1102 lbs. Never apply any weight over the weight capacity on this dance pole.
- Ensure that the 3.5 meter peripheral area of the dance pole is free of any objects.
- We recommend the assembly of this product should be carried out by two people.
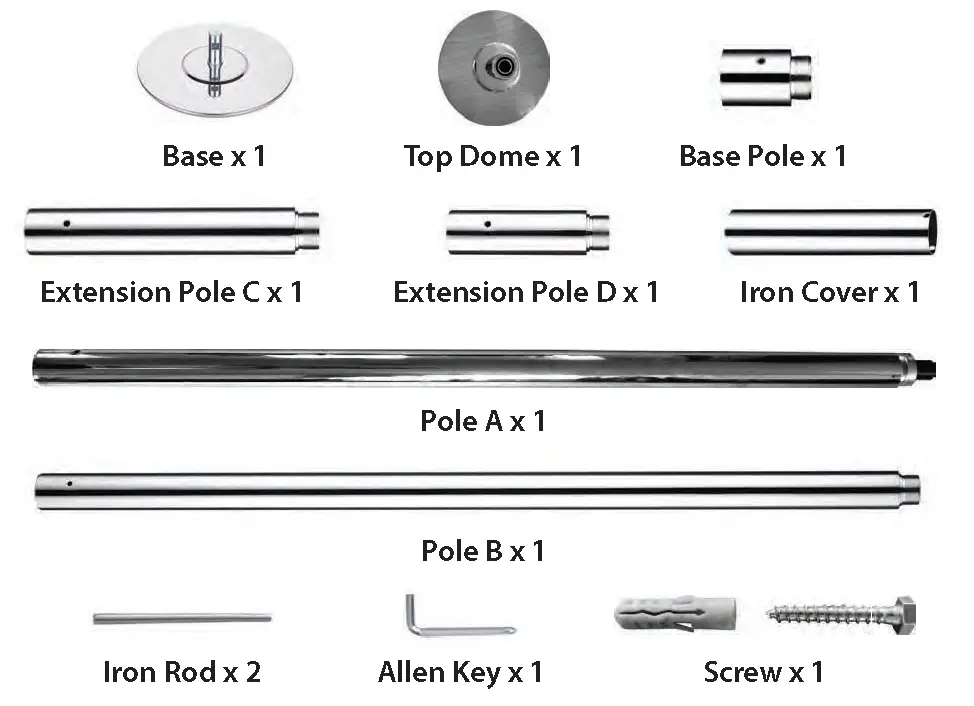
PACKAGE CONTENTS
ASSEMBLY INSTRUCTIONS
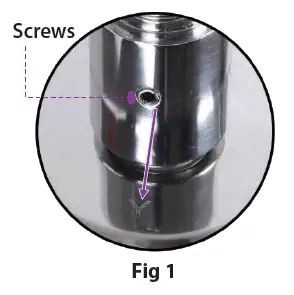
1. Use the allen key to loosen the screws on the base pole and install the base pole on the base. Ensure one of the screws on the base pole is aligned to the “Y” letter on the base (Fig 1). After that, retighten the screws.
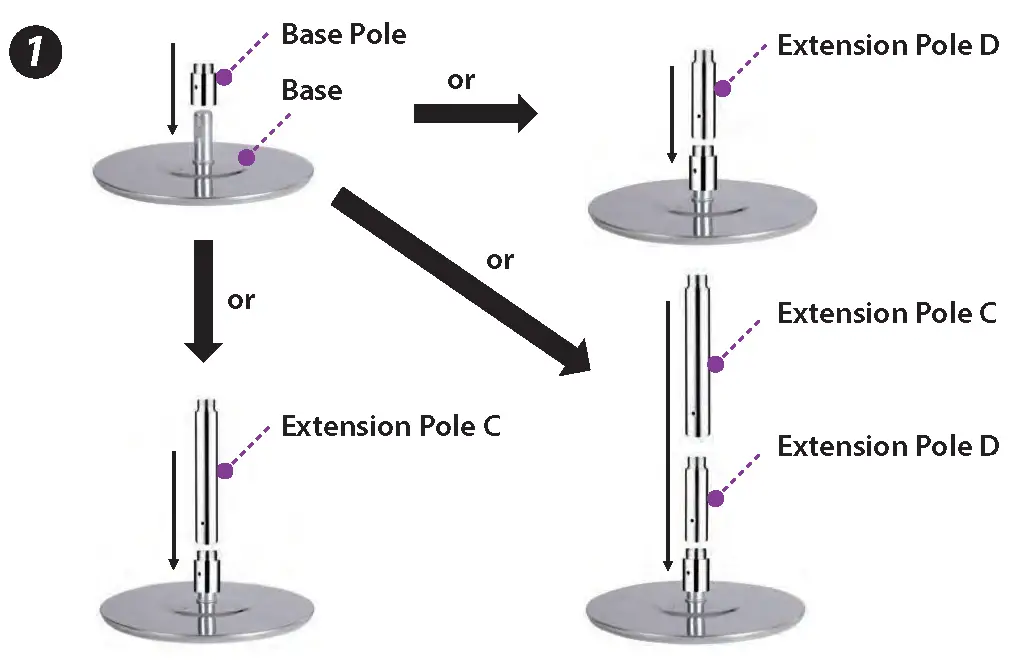
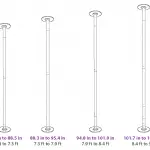
2. Measure the distance between your ground and ceiling and refer to the diagram below to decide if you need to install either the extension pole D or extension pole C or both of them, or none of them on the base. In the following steps, we will take scenario of installing Extension Pole C only as an example.
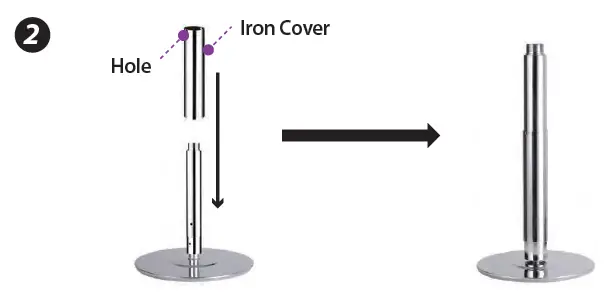
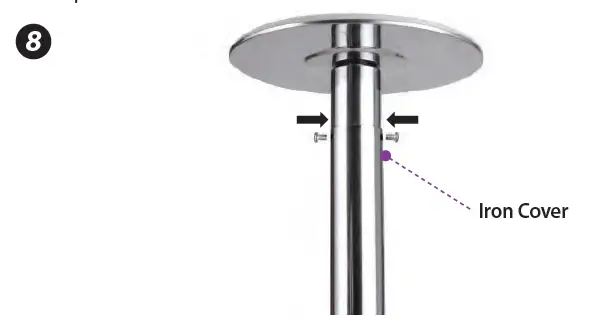
3. Slide down the iron cover through the pole and leave it on the base first. Ensure the end with two holes faces upward.
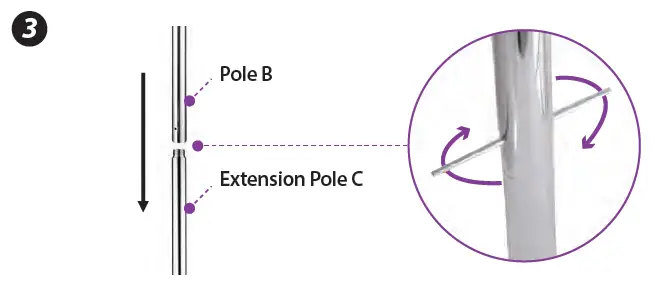
4. Install the pole B on the extension pole C as shown above. Fasten the connection with the iron rod.
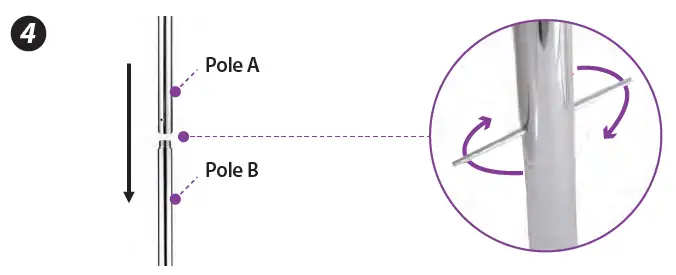
Install the pole A on the pole B as shown above. Fasten the connection with the iron rod
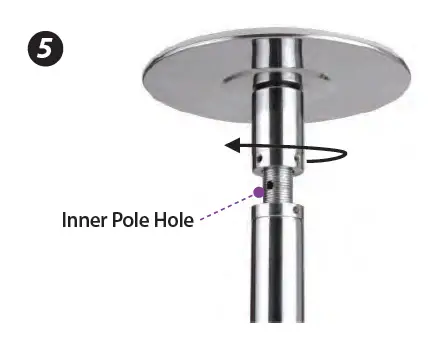
5. Install the top dome on the top of pole A as shown above. Rotate the top of pole A anticlockwise until the hole of the inner pole shows up.
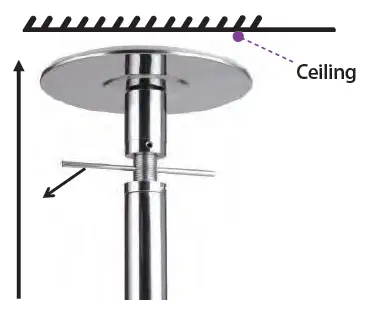
6. Use an iron rod to rotate the inner pole anti-clockwise until the upper base could not go up further against the ceiling. Please make sure that the pole is vertical between the ground and the ceiling and that the upper base is at against the ceiling as shown in the pictures below.
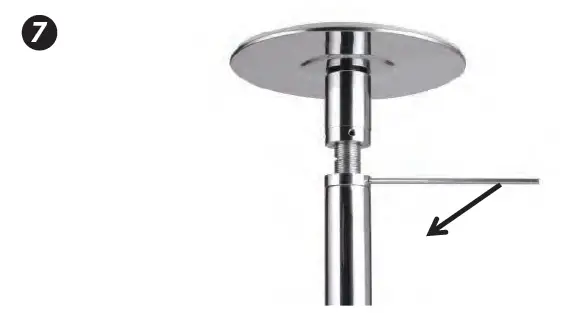
7. Use an iron rod to rotate the iron ring on the pole A clockwise to secure the dance pole.
8. Ensure that the dance pole is set up firmly between your ceiling and ground. After that, slide the iron cover from the bottom base to the upper base. Fasten it with the two screws.
SWITCHING BETWEEN STATIC & SPINNING MODE
- To set the dance pole into the spinning mode, loosen the two screws from the base pole.
- To set it back to static mode, fasten the two screws back and ensure that one of them is aligned to the “Y” letter on the base.
WHAT TO WEAR
Clothing
When it comes to clothing – Less is Best! So try to keep your arms and legs uncovered. Pole work needs the friction created by skin contacted so T-shirt, crop top and shorts are best. However, you must feel comfortable so wear what you feel relaxed in (tracksuit bottoms etc.) even though this may mean you are unable to do some of the pole moves properly because of lack of grip.
Shoes
Again comfort is essential. Bare feet, dance shoes, or trainers are fine. Trainers have high friction so a trainer with a smooth as possible sole is recommended. Later boots and high heels are great for making you look and feel good.
Pole Dancing Gloves
Pole dancing gloves can protect your hands from blisters and burns. Most pole dancing gloves come in fingerless designs. This protects your palms when you are learning your moves. Since your fingers are free, you can feel the pole, but your hands will still be protected from injuries like blisters and friction burns.
Oils and Lotions
NEVER use oils or lotions on your hands or body prior to using your pole. This is very dangerous. The oil transfers to the pole making it slippery and impossible to hold and could cause you to have a serious accident.
NEVER USE OILS OR LOTIONS OF ANY TYPE PRIOR TO USING AN EXERCISE POLE.
POLE CLEANING
The pole will need regular cleaning as you use it. Clean your pole with baby wipes and then dry off with a tea cloth or towel. Keep two towels to hand one for the pole and one for you to wipe your hands and body with.
WARM UP AND COOL DOWN
It can not be stressed highly enough the need to warm up before exercise and then to cool down afterwards. Severe injury can be caused if you fail to warm up and in turn further damage can be caused if you do not cool down
TROUBLESHOOTING
If you follow the assembly instructions there should be no reason for you to have any problems with your Portable Dancing Pole. If you do have any problems please do not hesitate to contact our technical support line.
NEVER use your Portable Dancing Pole if you are in any doubt about its assembly, stability or how to use it.
Locked Tubes
Sometimes if the pole has been worked hard the main poles and/or extensions can tighten and become locked together. If tubes do become locked together use two release rods and twist both anti-clockwise.
If the tubes still will not release insert one of the release rods into the larger tube. Lay the tube on a hard surface and inserting the other release rod in the shorter tube give it a sharp tap with something solid, while holding the larger tube rigid. It does not require heavy force just the shock of the tap to release it.

This is normally due to the locking Hex screws not being unscrewed enough and ush with the outer surface of the pole.
Check the screws.
The other reason could be that the pole is not assembled correctly (the cover flange is the wrong way round) or the pole is severely out of alignment. Go back to square one and reassemble your pole as per the instructions.
MAINTENANCE
Professional Spinning Dancing Pole should need very little maintenance. Routine maintenance would be to check the pole joints are ok, check the bearings turn freely, check the base screws are tight and generally ensure your pole is exercise worthy. Should you have any concerns re your pole and it’s suitability for use please call our technical support department.
CAUTION:
STORE YOUR PROFESSIONAL SPINNING DANCING POLE ONLY IN A WARM, DRY PLACE.
FEATURES:
- Practical Design for Building Muscles, Keeps Fit and Healthy
- Increasing Strength and Flexibility
- Easy to Use, to Install and to Store, Saves Space
- Height Adjustable and Smooth Connection
- High-Quality Steel Pipe Dancing Pole
- Strong and Durable Steel Structure
- Anti-Corrosion and Anti-Rust Surface
- Silicone Ring at the bottom of the Dome and Base Plate
- Suitable for Beginners, Professional Dancers, and Pole Fitness Lovers
- Uses for Physical Exercise at Home, Club, Bar, Gym or Prop for Photography
WHAT’S IN THE BOX:
- Base
- Top Dome
- Base Pole
- Extension Pole C, (12.5’’ -inches)
- Extension Pole D, (7’’ -inches)
- Iron Cover, (7.5’’ -inches)
- Pole A, (38.6’’ -inches)
- Pole B, (37.8’’ -inches)
- Allen Key
- Screw to install to oor
- (2) Iron Rod
- 1 Pair of Gloves
TECHNICAL SPECS:
- Threaded Tube Size: 2.2mm
- Adjustable Height: 82” x 108” -inches
- Horizontal Weight Capacity: 617 lbs.
- Vertical Weight Capacity: 1,102 lbs.
- Construction Material: Steel Tube
- Steel Tube Diameter: 1.77’’ -inch
- Plate Diameter: 9’’ -inches
- Overall Product Dimension (L x W x H): 9” x 9” x 108” -inches
SereneLife
Questions? Issues?
We are here to help!
Phone: (1) 718-535-1800
Email: [email protected]
PLEASE MAKE SURE THAT YOU HAVE READ THE MANUAL CAREFULLY BEFORE USING IT.
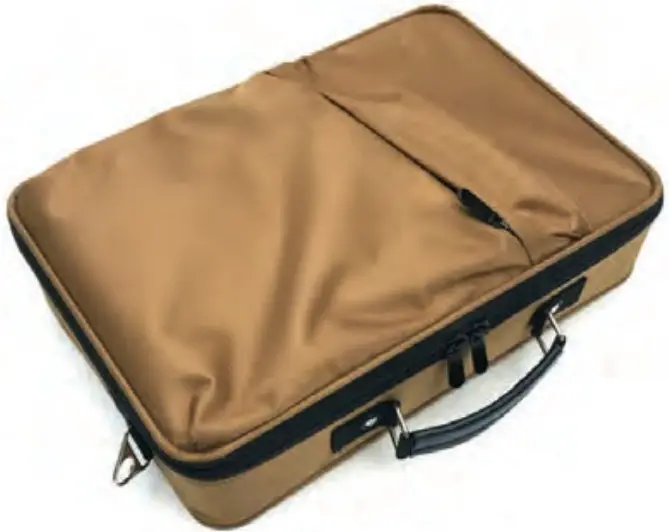
What’s in the Box
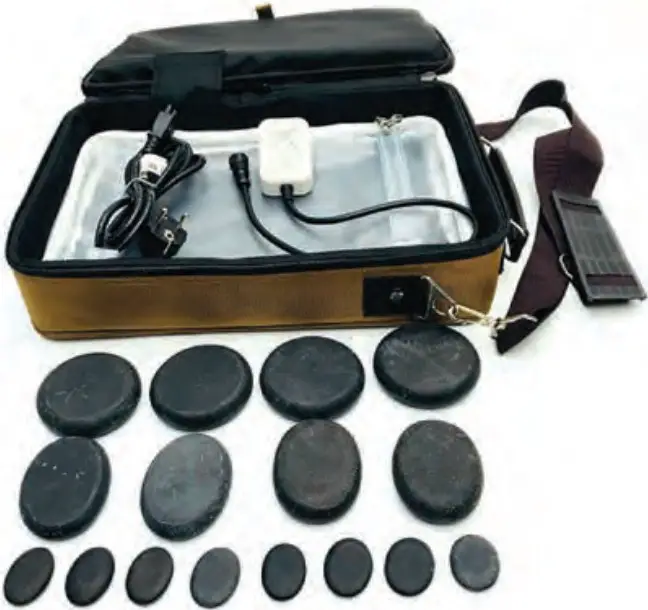
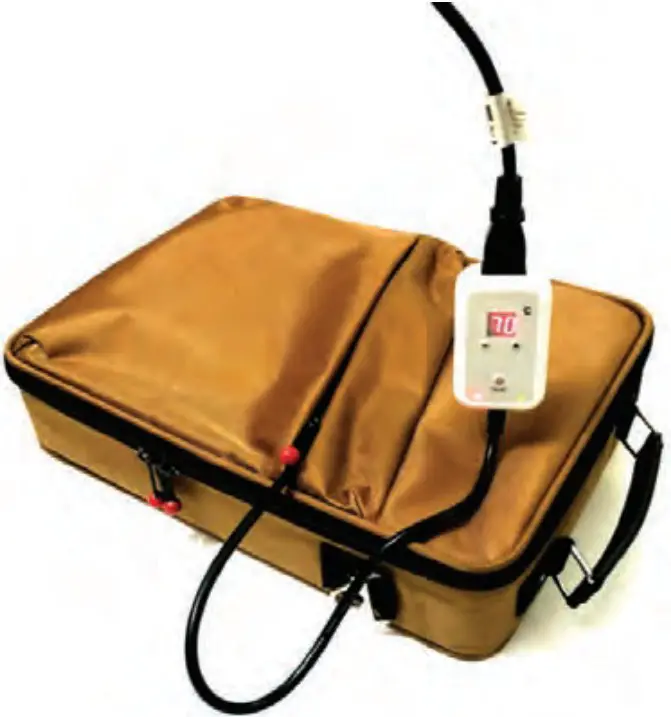
- Hot Stone Heating Bag
- Digital Temp Controller
- (6) Large Stones
- (6) Small Stones
Product Details
A stone massage is a massage that uses smooth, flat, and heated rocks placed at key points on the body. Stones (usually basalt) are placed into an electric slow-cooker or a purpose-built device which is filled with water. The water is typically heated to 52-54 degrees Celsius (122-127 degrees Fahrenheit). Once the stones have heated sufficiently, some are placed onto specific points on the body (such as the back, hands, etc.) and others are held by the massage therapist and used to work the muscles.
But we born out of the desire to make hot stone massage therapy mobile. With the only professional option on the market being a hot stone water heater, we looked to create something unique and flexible enough to open hot stone massage up to possibilities that have not been options before.After consulting with hot stone lecturers and therapists, as well as researching into the history of hot stone massage,it was clear that water for heating stones was not necessary. We found that by not using water, the whole process of preparing for a hot stone massage was more efficient, saving the therapist time and money.
Product Description:

Benefits of the Bag
The obvious advantage of our Bag is that finally there is a way to make hot stone massage mobile. But have you also considered the following benefits?
Equipment: Due to the stones being warmed by a dry heat and having an in-built thermometer, there is no more need for the following traditionally used equipment: thermometer, gloves, scoops, nets etc. Increased
productivity: Not only does the Bag take less time to set up, but unlike a water stone heater, the bag can be transported whilst retaining heat even after its been disconnected from the mains, allowing the therapist to preheat the stones at home, thus saving time (and money!) at the clients house. See our quick formula (right) for how the bag pays for itself.
Dual-powered: As well as being powered by an AC power supply, the bag also features a car lighter adaptor, allowing the stones to be pre-heated in transit.
Storage: The Portable Hot Stone Massage Kit is around half the size of a small water heater! This allows for easier and more convenient storage in spas, colleges, therapy rooms, beauty salons and even at home.
Mobility: The size of the bag also allows for easier transport and deployment than the current available heating equipment.
Maintenance: Unlike existing water stone heaters, the Bag does not require regular cleaning due to limescale build-up.
Greener: Compared to existing water stone heaters, the Bag uses less power to heat, no water and is manufactured using a fraction of the metal used in water stone heaters.
Using the car adaptor, the bag can be connected to the 12V car lighter socket to maintain the temperature of the preheated stones during travel. At your destination the heated stones are ready for immediate use. Once the stones have been used, place them aside in a washable container ready to be washed for their next use. The obvious advantage of the Vulsini Bag is that finally there is a way to make hot stone massage mobile
About Hot Stone Massage
The application of warmed Basalt stones combined with manual massage to provide the client with a deeply relaxing, therapeutic experience. This treatment which also benefits the therapist not only financially but also physically.
As a contemporary therapy, hot stone massage was introduced to the world of spa treatments by Mary Nelson in 1993. The therapeutic use of stones and rocks has, however, been employed for thousands of years in various forms.
The technique utilises smooth warm (basalt*) stones in the therapist’s hands to massage the client’s body; the heat gently penetrating the skin and muscles, helping the recipient to relax quickly and effectively.
Aromatherapy, Reflexology and MLD, along with many other techniques, can be combined with hot stone massage. Many students employing many techniques are able to use thermal stones to avoid, or minimise, the effects of RSI or to continue practicing after sustaining an injury to hands or wrists.
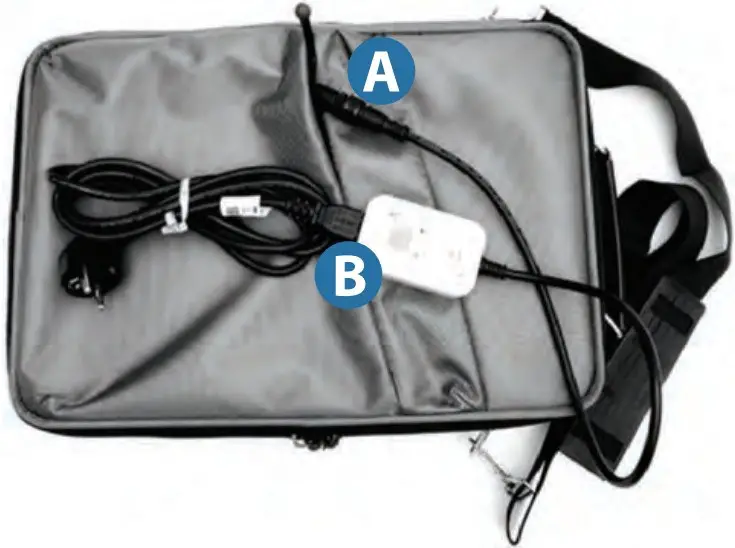
How to Use

- Put massage stones or bamboo sticks inside the small box
- A: Connect temperature controller and then
B: Connect the power cord and set the temperature you like, after minutes you can use the hot stones or bamboo sticks for spa massage.
WARNING
- Ensure to use in a dry environment, heating system is not waterproof.
- This product requires professionals use
- The Portable Hot Stone Massage Kit should be keep away from high temperature environment and point-blank sunshine.
Features
- Hot Stone Massage Kit with 12 Basalt Stones
- Basalt Stones Retains Heat Longer for Best Massage Therapy
- Water-Free Stone Heater Does not Build-Up Lime or Scale
- Large Heating Surface Allow Layout of Stones for Even Heating
- Anti-Over Heating: Shut-O After Desired Temp is Reached
- Heating Bag Keeps Stones at Constant Temperature
- Digital Controlled Temperature for Safe Heating of Stones
- Storage / Travel Bag Doubles as Stone Heating Oven
- Portable: Plugs in Any Outlet, Comes with Car Lighter Adapter
- Digital LCD Display with Selectable Temperature Setting
- Energy Efficient: Heats Up Fast and Retains Heat Longer
- Heated Stone Massage Relieves Pain Cause by Sprain, Strain or Stress
- Ideal for Athletes, Home Care and Spa Centers
Technical Specs
- Construction Material: Fabric
- Type of Stone: Basalt
- Heating Time: 8-15mins
- Maximum Heat Retention: 25–35 mins
- Adjustable Temperature: 86° – 158°F (30–70 °C)
- Large Stone Size: 2.80’’ x 0.70’’ -inches (Each)
- Small Stone Size: 1.80’’ x0.70’’ -inches (Each)
- Large Stone Weight: 0.27 lbs (Each)
- Small Stone Weight: 0.17 lbs (Each)
- Power Cord Length: 5.90’ Ft.
- Power: 120V
- Bag Dimensions (L x W x H): 14.9’’ x 10.2’’ x3.2’’ –Inches
- Sold as: 1
Visit: www.serenelifehome.com
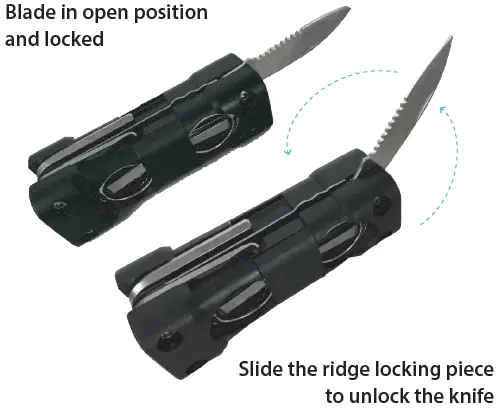
SereneLife Multi-Functional Tool Kit

INSTRUMENTS

This multi-tool has a sharp knife blade! Use with caution when opening. Make sure the blade clicks into locked position before using. Not following this procedure may result in serious injury. KEEP AWAY FROM CHILDREN.
To unlock blade, slide the ridge locking piece to the left, as this will disengage the lock then carefully fold the knife back into closed position.
Features:
- Emergency Handheld Repair Multi-Tool
- Compact & Portable Universal Tool Kit Design
- Unique, Quick Folding Hand Tool Access
- Great for Working in Tight Spaces
- Multi-Functional ‘Swiss Army Knife’ Style
- Built-in LED Flashlight
- Rugged, Durable & Reliable
- Comfortable, Ergonomic Handheld Grip
- Rust-Proof & Stain-Resistant Construction
- Hardened Reinforced Long-Lasting Steel Hobbyist Tools
- Perfect for Home DIY Fixes & Repairs
Built-in Tools:
- (2) Phillips Screwdrivers
- (2) Flathead Screwdrivers
- (3) Hex Keys
- Wrench
- Flashlight
- Tape Measure
- Folding Scissors
- Can Opener
- Cutting Knife
Technical Specs:
- Construction Material: Reinforced Carbon Steel Alloy, Engineered ABS
- Flashlight: 0.5 Watt, 35 Lumens
- Battery Powered Flashlight, Requires (1) x AG-13 Battery, Included
- Dimensions (L x W x H): 6.2” x 1.8” x 1.8” –inches
![]()
SLIRX45
Explanation of the Symbols
![]() Danger symbols: These symbols indicate risks of injury (e.g. from electricity or fire)
Danger symbols: These symbols indicate risks of injury (e.g. from electricity or fire)
 Read through the associated safety instructions carefully and follow them.
 Protection class II
 Danger symbols: These symbols indicate risks of injury
 Read operating instructions before use!
 Supplementary information
Explanation of the Signal Words
DANGER : Warns of serious injuries and danger to life.
WARNING : Warns of possible serious injuries and danger to life.
CAUTION : Warns of slight to moderate injuries.
NOTE : Warns of damage to property
Intended Use
- This device is intended to be used to dry and press textiles, for example blouses and shirts. Delicate textiles such as wool or similar fabrics must not be pressed on the presser. Always follow the care labels for the textiles!
![]() WARNING: This device is intended only for drying textiles washed in water.
WARNING: This device is intended only for drying textiles washed in water.
- The device is for indoor use only.
- The device is for household use only and is not intended for commercial applications.
- The device should only be used as described in these instructions.
Safety Instructions
![]() The device is equipped with safety features. Nevertheless, the device may still present dangers if it is not used as intended.
The device is equipped with safety features. Nevertheless, the device may still present dangers if it is not used as intended.
![]() CAUTION: hot surfaces! The motor unit/telescopic rod will become hot during use. You should therefore not touch it during or shortly after use.
CAUTION: hot surfaces! The motor unit/telescopic rod will become hot during use. You should therefore not touch it during or shortly after use.
- This product is not a toy. Keep away from children.
- The device must always be switched off and disconnected from the main power when it is not being used and before assembling, disassembling or cleaning the device.
- Do not make any modifications to the device.
- Allow the device to cool down completely before it is cleaned and stored away before it is cleaned
DANGER – Danger of Electric Shock from
- Use the device only in closed rooms.
- Do not use the device in rooms with high humidity.
- Never immerse the device, cable or plug in water or other liquids.
- Should the device fall into water, switch off the power supply immediately.
Do not attempt to pull it out of the water while it is still connected to the mains power! - Steam may rise up during operation. For this reason, do not place the device under other electronic devices.
WARNING – Danger of Electric Shock from Damage and Inappropriate Use
- Always switch off the device first before unplugging from the outlet.
- Do not use the device in conjunction with extension cables.
![]() CAUTION – Danger of Injury
CAUTION – Danger of Injury
- The device must not be moved during use.
WARNING – Danger of Fire
- Do not use the device in rooms containing combustible materials
- Do not connect the device with other high wattage products to a multiple socket in order to prevent overloading and a possible short circuit.
NOTE: Risk of Damage to Material and Property
- Never cover up the ventilation slots and do not insert any objects into them.
- Lay the power cable in such a way that it does not become squashed or bent and does not come into contact with hot surfaces (also applies to the hot surfaces of the device!).
- Never pull or carry the device by the power cable. When you pull it out of the plug socket, always pull on the power plug and never the power cable!
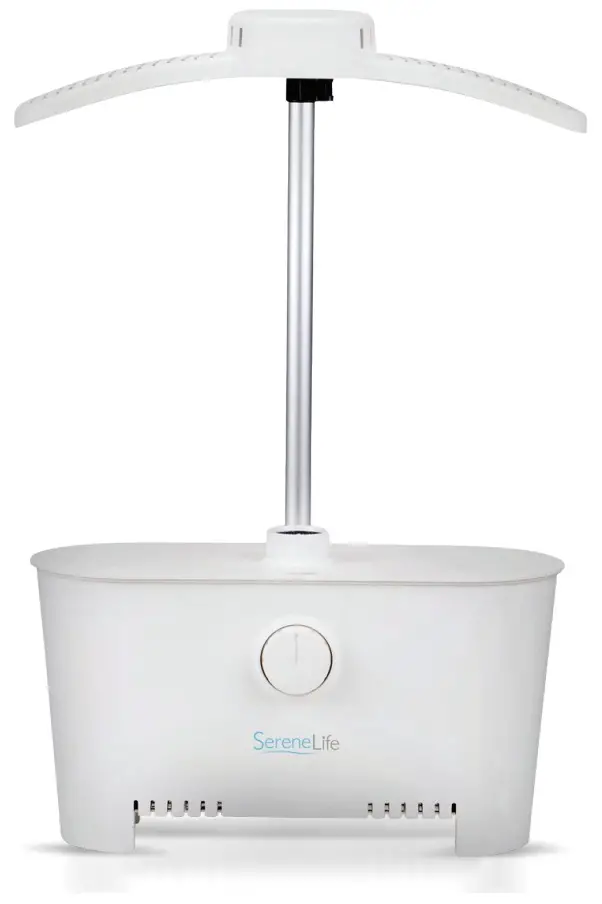
Parts & Device Overview
WARNING: Danger of Suffocation! Keep children and animals away from the packaging material.
- Never remove the rating plate and any warning lables!

- Hanger
- Telescopic rod
- Fan Opening
- Motor unit
- Ventilation slots
- Timer Knob (5 – 30 minutes)
Not shown:
- Nylon balloon
- 5 x clamps with integrated weight
- Mains cable with mains plug
Assembly
- Insert telescopic rod (2) into the recess on the top of the motor unit (4).
- Place the hanger (1) onto the telescopic rod (2). When you do this, make sure that the slight bend in the hanger (1) points forward.
- Attach the nylon balloon:
- Pull it over the hanger (1). When you do this, make sure that the side with the hole line points forward.
- Pull the small elastic cord at the top over the collar section on the hanger (1).
- Pull the large elastic cord at the bottom over the motor unit.
Use
NOTE!
- Always place the device with clear space above it and on all sides on a dry, flat, solid and heat-resistant surface.
- It is essential that you follow the care labels for the textiles to be dried!
- Set the height you want. To do this, open the clip underneath the hanger and pull out the telescopic rod (2) and then close the clip.

- The nylon balloon should wrap around the motor unit so that it can fully inflate
- Pull the garment which is to be pressed over the nylon balloon and the hanger (1) and button up the buttons if necessary.
Make sure that:- the collar is fitted over the collar section
- the arms of the nylon balloon fit properly in the sleeves of the garment and are not twisted or scrunched up,
- all buttons on the garment (including on the sleeves) are button up.
- Spread the clamps along the bottom of the garment so that it is evenly weighed down and will not go out of shape when the nylon balloon is inflated.
- Plug the unit into an electrical outlet.
- Turn the timer knob (6) clockwise and set it to the length of time you want.
- Once the nylon balloon has infl ated, straighten out the garment and smooth it down.
- When the set time is completed, the device switches off automatically.
The drying /pressing process can be interrupted at any time by turning the timer knob (6) to the starting position. - Remove the garment from the nylon balloon and hanger (1).
- Unplug the unit from the electrical outlet and allow the device to cool down completely.
Tips
- The device is intended primarily for machine-spun laundry! If handwashed or nonmachine-spun laundry is to be pressed, first allow it to dry out a little first.
- The drying / pressing process takes around 10 minutes for a spun dried shirt.
However, the length of time can vary depending on the material and thickness of the material. We recommend that you start with a shorter time and extend it if necessary. - The nylon balloon can be enlarged or reduced in size with the aid of the zip fasteners. For smaller sizes, the zip fasteners should be closed. For larger sizes, the zip fasteners should be opened on both sides.
- Wide-spaced buttons may result in the button strip crimping slightly during pressing. This area will need to be smoothed down by hand immediately after the pressing process.
Cleaning and Storage
NOTE!
- Before cleaning, read the safety instructions in the “Safety Instructions”chapter!
- Never immerse the device, or electrical cables in water or other liquids!
- Do not use any corrosive or abrasive cleaning agents or cleaning pads to clean the device. These can damage the surface.
- Clean the device and the nylon balloon if necessary with a slightly damp cloth and a little mild detergent if required. Then wipe down fully with a dry cloth.
- Allow all parts to dry completely before you put them away.
- Store the device in a clean, dry place that is protected from sunlight and is not accessible to children and animals.
Troubleshooting
If the device does not work properly, check whether you are able to rectify the problem yourself. If the problem cannot be solved with the steps that are listed.
![]() Do not attempt to repair a defective electrical device yourself!
Do not attempt to repair a defective electrical device yourself!
| PROBLEM | POSSIBLE CAUSE / SOLUTION |
| The device does not work. The LEDs do not light up. |
|
| Unusual noises |
|
| The device switches off suddenly. |
|
| Odor produced |
|
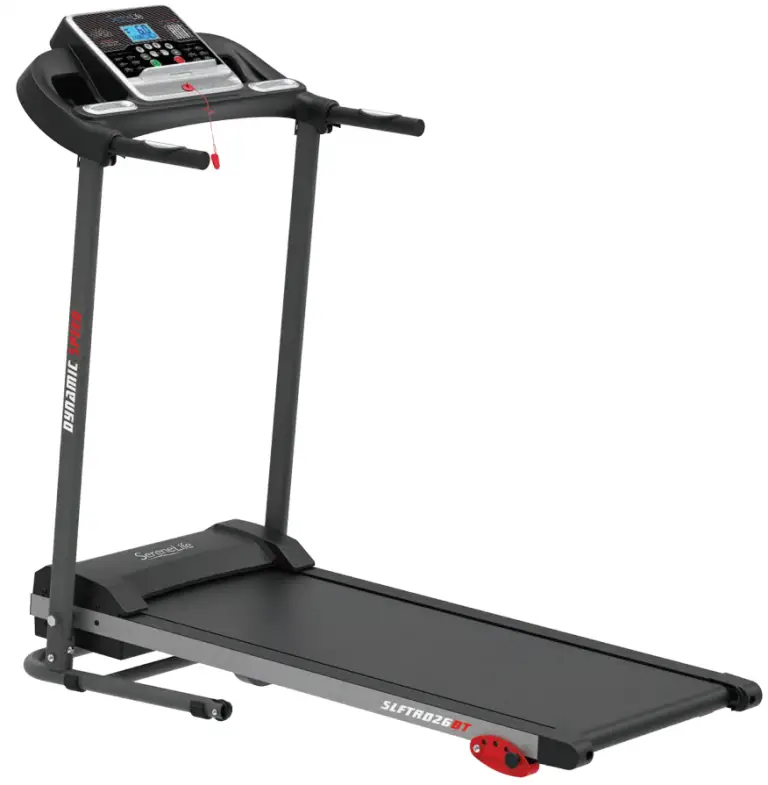
SLIRX45
Shirt Ironing Machine
1400W Ironing Dummy/Press for Shirts/Blouses and Much More, Dries
and Irons Clothes Automatically in one Step
Features:
- Perfect for Shirts, Blouses, Tops, Tees, Sweaters, Jackets and More
- Dries and Irons Clothes Automatically in one Step
- Built-in Timer
- Compact Unit for Easy Storage
- Save Money on Dry Cleaning Bills
- Dry, Steam and Iron Clothes at the Same Time
- Hot Air Tension Technology
- Indoor/Household Use Only
- Intended to be Used to Dry and Press Delicate Textiles
What’s in the Box:
- Styrofoam
- Egg Tray
- Color Box (Single Unit Packaging)
- 1 pc. Unit
- 1 pc. Shoulder Part
- 1 pc. Telescope Pole
- 1 pc. Sack with zipper
- 5 pcs. Round Clips
Technical Specs:
- 1 pc. Poly Bag for Unit (size: 21.65” x 21.65”)
- 1 pc. Poly Bag for Plug (size: 11.81” x 3.94”)
- 1 pc. Poly Bag for Shoulder Part (size: 21.65” x 7.87”)
- 1 pc. Poly Bag for Sack with zipper (size: 10.83” x 10.83”)
- 1 pc. Bubble Bag for 5 pcs. Round Clips (size: 3.54” x 11.81”)
- Material: ABS + Nylon
- AC Power: 1400W 120V AC-60Hz
- Size: Shoulder Part 17.32’’ – inches
- Total Size: 16.34” x 6.61” x 40.94”
 Questions? Issues?
We are here to help!
Phone: (1) 718-535-1800
Email: [email protected]
IMPORTANT: Read all instructions carefully before using this product. Retain this owner’s manual for future reference. The specifications of this product may vary from this photo and are subject to change without prior notice
Basic precautions, including the following important safety instructions should always be followed when using this treadmill. Read all instructions before using this treadmill.
To reduce the risk of electric shock, always unplug the treadmill from the electrical outlet immediately after using and before cleaning, assembling, or servicing the treadmill.
Failure to follow these instructions may lead to personal injury and cause damage to the treadmill.
To reduce the risk of burns, fire, electric shock or injury to any persons, please read the following:
- Never leave the treadmill unattended while plugged in. Disconnect by turning off the master power switch and unplugging from wall outlet when not in use and before putting on or taking off parts.
- Use this appliance only for its intended use as described in this manual. Do not use attachments not recommended by the manufacturer.
- Never operate this treadmill if it has a damaged cord or plug, or if it is not working properly. If it has been dropped or damaged, or been exposed to water, return the appliance to a service center for examination and repair.
- Do not attempt any maintenance or adjustments other than those described in this manual. Should any problems arise, discontinue use and consult an Authorised Service Representative.
- Never operate the appliance with the air openings blocked. Keep the air openings free of lint, hair, and other obstructions.
- Do not use the treadmill outdoors.
- Do not pull the treadmill by its power cord or use the cord as a handle.
- Keep children and pets away from the equipment while in use.
- Elderly or disabled users should only use this treadmill in the presence of an adult who can provide assistance if required.
- Do not operate where aerosol (spray) products are being used or where oxygen is being administered.
- Keep dry – do not operate in a wet or moist condition.
- The motor cover can become hot while the treadmill is in use. Do not place the treadmill on a blanket or other flammable surface as this can create a fire hazard.
- Keep electrical cord away from heated surfaces.
- Keep the treadmill on a solid, level surface with a minimum safety area clearance of two meters around the treadmill. Be sure the area around the treadmill remains clear of any obstructions during use.
- This treadmill is for domestic household use only.
- Only one person should use the treadmill at a time.
- Wear comfortable and suitable clothing when using the treadmill. Do not use the treadmill barefoot or in socks. Always wear appropriate, enclosed athletic footwear. Never wear loose or baggy clothing as it can become caught on the treadmill and create an entrapment hazard.
- Always hold on to the handrails while using the treadmill.
- Always make sure the spring knob and round knob are in place when folding and moving the treadmill.
- Do not leave children who are under 12 years-old unsupervised near or on the treadmill.
- To disconnect, turn all controls to the off position, then remove plug from the wall outlet.
- This appliance is not intended for use by persons (including children) with reduced physical, sensory or mental capabilities, or lack of experience and knowledge, unless they have been given supervision or instruction concerning use of the appliance by a person responsible for their safety.
- Children should not be allowed to play on or near the treadmill at any time.
- CAUTION – RISK OF INJURY TO PERSONS – To avoid injury, use extreme caution when stepping onto or off of a moving treadmill belt. Carefully read this instruction manual before use.
- Maximum Weight Capacity is up to 265+ lbs.
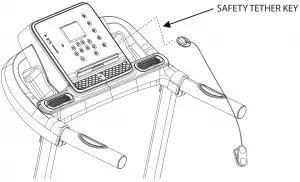
- Pull out the Safety Tether Key for emergency stop.
- This unit must be plugged into a nominal 220-240 volt 50 Hz outlet which has been grounded.
- Keep hands clear of all moving parts. Never place hands or feet under the treadmill while in use.
- Do not use the treadmill on a carpet that is greater than 1.3 cm in height.
- Before using the treadmill, check that the belt is aligned and centered on the running deck and all visible fasteners on the treadmill are sufficiently tightened and secure.
- Children shall not play with the appliance.
- Cleaning and user maintenance shall not be made by children without supervision.
- If the supply cord is damaged, it must be replaced by the manufacturer, its service agent or similarly qualified persons persons in order to avoid a hazard.
- Never operate this treadmill if it is in the folded position.
- Allow the running belt to fully stop and unplug the power cord from the wall outlet before folding up the treadmill.
- Always face towards the computer console and do not run backwards on the running belt.
Before beginning any exercise program consult your physician. This is especially important for people who are over 35 years old or who have pre-existing health problems. Read all instructions before using any fitness equipment. Do not operate this exercise equipment without properly fitted guards, as the moving parts can present a risk of serious injury if exposed.
Read all instructions carefully before operating this product. Retain this Owner’s Manual for future reference.
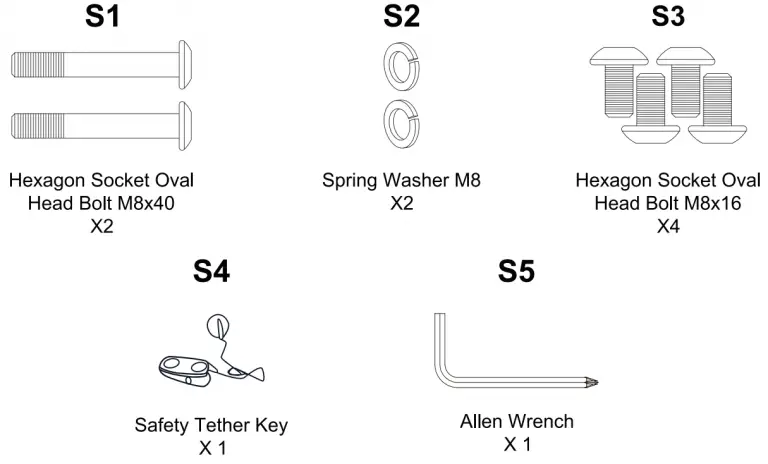
TOOL KIT

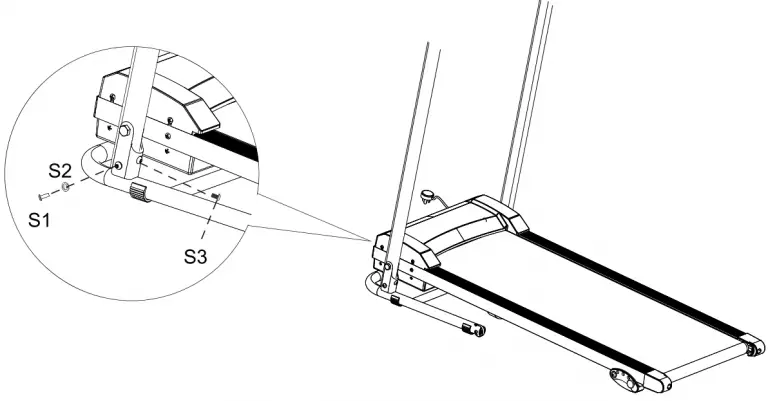
It is recommended to have a second person assist with this step. Lift both Right and Left Handlebar Support Tubes up. One person should hold the both Right and Left Handlebar Support Tubes in place while the other person tightens the bolts. Lift both Right and Left Handlebar Support Tubes up and align bolt holes. Use two M8x50 Hexagon Socket Oval Head Bolts (S1) and two M8 Spring Washers (S2) to secure both Right and Left Handlebar Support Tubes onto the Base Frame.
Use two M8x16 Hexagon Socket Oval Head Bolts (S3) to secure both Right and Left Handlebar Support Tubes onto the Base Frame. Semi-tighten all bolts with the Allen Wrench provided.
NOTE: DO NOT FULLY TIGHTEN BOLTS IN STEP 1 UNTIL STEP 2 IS COMPLETED.
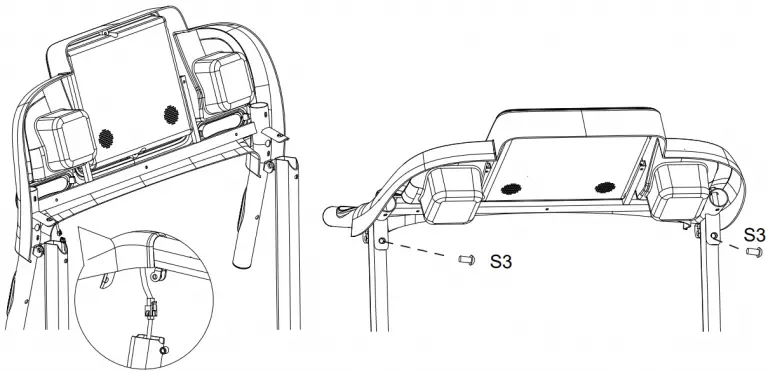
It is recommended to have a second person assist with this step. One person should hold the Computer Console in place while the other person connects the cables. Connect the Main Control Cable from the Right Handlebar Support Tube to the cable that comes from the Computer Console.
Install the Handlebar Bracket onto the Right and Left Handlebar Support Tubes using two M8x16 Hexagon Socket Oval Head Bolts (S3).
MPORTANT:
- While sliding the Handlebar Bracket onto the Right and Left Handlebar
- Support Tubes make sure the cables are installed inside the Right Handlebar
- Support Tube and pay attention not to pinch the cables.
NOW PLEASE FULLY TIGHTEN ALL BOLTS INSTALLED IN STEP 1.
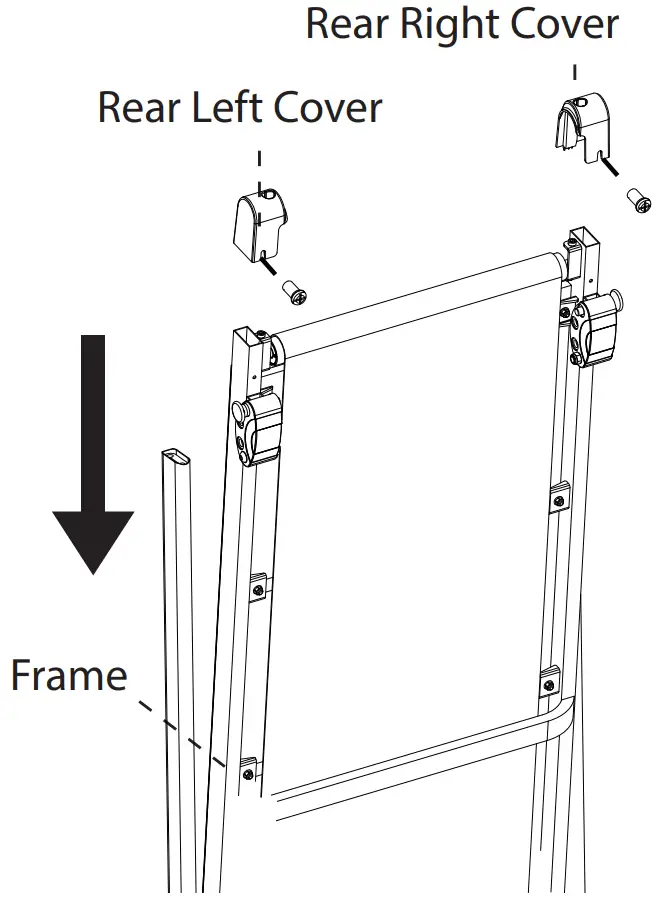
A. Remove one Flat Head Phillips Screw from both sides of the Frame. Attach the Rear Left Cover onto the left side of the Frame. Align the holes and secure the Rear Left Cover using the one Flat Head Phillips Screws, that were previously removed by Allen Wrench.
B. Align the holes and secure the Rear Right Cover using the one Flat Head Phillips Screws that were previously removed by Allen Wrench.
NOTE: Always stand on the side rails when you start the treadmill, never start the treadmill while you are standing on the running belt
Press the START button on the computer to start exercise, the LCD window will countdown 3 seconds with the LCD showing “3-2-1” before the running belt starts moving. The running belt starts moving with an initial speed of 0.6 MPH. Always allow the treadmill to reach a speed of 0.6 MPH before stepping on to the running belt. You may press the SPEED + or SPEED - button on the computer console or handlebar to increase or decrease the running speed during exercise. The split window of SPEED will display your current running speed. The speed range is from the minimum 1.0 MPH to the maximum 6.0 MPH. You may also press one of the INSTANT SPEED buttons (3/4/5) on the computer console and the split window of SPEED will display the speed that you have pressed and the running speed will change to 3 MPH, 4 MPH or 5 MPH respectively. The split window of TIME will display your elapsed workout time in minutes and seconds. The split window of DISTANCE will display the accumulative distance travelled during workout. The split window of CALORIES will display the total accumulated calories burned during workout. The split window of PULSE will display your current heart rate in beats per minute (BPM). To activate, grip the hand pulse sensors on both handlebars during exercise and the pulse will display after 4-5 seconds. For a more accurate reading, grip pulse sensors with both hands.
During training, you may press the STOP button on the computer console to stop the treadmill running at any time, or pull out the safety tether key to stop the treadmill running.
START: Press the START button to start training on different training mode.
PAUSE/STOP: Press Pause/Stop button during exercise to interrupt the program (motor stops running).
Within 4 min. you can press Start button to continue this exercise program or press Pause/Stop button again to finish this program. Pre-values can set to zero by pressing the Pause/Stop button.
PROG (PROGRAM): Press the PROG button to select the pre-set training program (P01-P12) mode before training.
MODE: Press the MODE button to select different functions (time, distance, or calories) for setting exercise goals in manual program mode before training
SPEED + (SPEED UP): Press the SPEED + button to make upward adjustments for pre-setting target training time, distance, or calorie in manual program mode before training. Press the SPEED + button to make upward adjustments for pre-setting target training time in pre-set training program (P01-P12) mode before training.
Makes speed adjustments during all training periods on different training modes. The speed range is from 0.6 MPH to 6.0 MPH.
SPEED – (SPEED DOWN): Press the SPEED - button to make backward adjustments for pre-setting target training time, distance, or calorie in manual program mode before training. Press the SPEED - button to make backward adjustments for pre-setting target training time in pre-set training program (P01-P12) mode before training. Makes speed adjustments during all training periods on different training modes. The speed range is from 0.6 MPH to 6.0MPH
INSTANT SPEED (3/4/5): Used to reach desired speed more quickly.
PULSE/cal: During exercise mode, press the PULSE/cal button to switch display the pulse and calories values on the split window of PULSE/CAL..
TIME: Displays your elapsed workout time in minutes and seconds. Press the START button on the computer to begin exercising, the LCD window will countdown 3 seconds with the LCD showing “3-2-1” before the running belt starts moving. The running belt starts moving with an initial speed of 0.6 MPH. You may press the SPEED + or SPEED - button on the computer console or handlebar to increase or decrease the running speed during exercise. Time starts counting up from 0:00 to 99:59 per 1 second increment.
SPEED: Displays the current speed from the minimum 0.6 MPH to the maximum 6.0 MPH. You may increase or decrease the speed by pressing the SPEED + or SPEED - button on the computer console or handlebar.
DISTANCE: Displays the accumulative distance travelled during workout. Press the START button on the computer to begin exercising, the LCD window will countdown 3 seconds with the LCD showing “3-2-1” before the running belt starts moving. The running belt starts moving with an initial speed of 0.6 MPH.
You may press the SPEED + or SPEED - button on the computer console or handlebar to increase or decrease the running speed during exercise. Distance starts counting up.
CALORIES: Displays the total calories burned during your workout. Press the START button on the computer to begin exercising, the LCD window will countdown 3 seconds with the LCD showing “3-2-1” before the running belt starts moving. The running belt starts moving with an initial speed of 1.0 MPH. You may press the SPEED + or SPEED - button on the computer console or handlebar to increase or decrease the running speed during exercise. Calorie starts counting up. (This data is a rough guide for comparison of different exercise sessions and should not be used in medical treatment).
PULSE: Displays your current heart rate in beats per minute (BPM). To activate, grip the hand pulse sensors during exercise and the pulse will display after 2-5 seconds. For a more accurate reading, grip pulse sensors with both hands.
Connect Your Tablet or Mobile Device to Your Machine
You can download the app using the OR codes shown here or search in your store.
Minimum compatibility specifications for mobile device; android 5.0 or higher with Wireless BT 4.0, iOS 8.0 or higher


Notes on using the App:
As an android user, please make sure that under “Settings -> Device Security” the “Unknown sources” is set by ensuring it is ticked.
Please remember to turn on the Wireless BT feature on your device.
The QR code at the beginning of the manual will guide you to various YouTube tutorials.
There you can access more information about the App and the device.


How to use:
Turn on the Wireless BT function of your mobile device. Open the application on your device. Click on in the main menu on the button “Indoor” to search for available devices.

Choose the shown device from the list to pair it. Once the device is paired you can start using the application in different categories:
- Quick Run
- Map Mode
- Target Mode
| Turn on Bluetooth capability on your device and make it discoverable, choose the shown device “BTMP3” to pair it. Once the device is paired you can start using the application on your device to play, pause and adjust the volume. etc. |
You may pre-set target TIME, DISTANCE, or CALORIES in STOP mode before training.
Only one of the functions can be pre-set.
To set TIME press the MODE button on the computer console until you see the split window of TIME begin blinking. Press the SPEED + or SPEED - button on the computer console or handlebar to change the setting.
Each increment is 1 minute. The pre-set target time range is from 5:00 to 99:00 minutes. Once you pre-set target time, press the START button on the computer to begin exercising. The running belt starts moving with an initial speed of 0.6 MPH. You may press the SPEED + or SPEED - button on the computer console or handlebar to increase or decrease the running speed during exercise. Time starts counting down from pre-set target time to 0:00 per 1 second backward. When the pre-set target time counts down to 0:00, the computer will beep to alert you and the treadmill will stop automatically
To set DISTANCE press the MODE button on the computer console until you see the window of DISTANCE begin blinking. Press the SPEED + or SPEED - button on the computer console to change the setting. The pre-set target distance range is from 0.5 99.5 miles , the default distance is 1 mile . Once you pre-set target distance, press the START button on the computer to begin exercising. The running belt starts moving with an initial speed of 0.6 MPH. You may press the SPEED + or SPEED - button on the computer console or handlebar to increase or decrease the running speed during exercise. Distance starts counting down from pre-set target distance to 0.00. When the pre-set target distance counts down to 0.00, the computer will beep to alert you and the treadmill will stop automatically
To set CALORIES press the MODE button on the computer console until you see the window of CALORIES begin blinking. Press the SPEED + or SPEED - button on the computer console to change the setting. The pre-set target calorie range is from 10 to 995 calories. Once you pre-set target calories, press the START button on the computer to begin exercising. The running belt starts moving with an initial speed of 0.6 MPH. You may press the SPEED + or SPEED - button on the computer console or handlebar to increase or decrease the running speed during exercise. calories start counting down from pre-set target calories to 0. When the pre-set target calories counts down to 0, the computer will beep to alert you and the treadmill will stop automatically
| Program | Speed (MPH) | |||||||||||||||||||
| P1 | 1.5 | 2.0 | 2.0 | 2.5 | 3.0 | 2.0 | 2.5 | 3.0 | 3.0 | 2.0 | 2.5 | 3.0 | 2.5 | 2.5 | 2.5 | 1.5 | 2.0 | 2.0 | 3.0 | 2.0 |
| P2 | 1.5 | 2.5 | 2.5 | 3.0 | 3.5 | 2.5 | 3.5 | 3.5 | 3.5 | 2.5 | 3.0 | 3.5 | 2.5 | 2.5 | 2.5 | 1.5 | 1.5 | 3.0 | 2.5 | 1.5 |
| P3 | 1.5 | 2.5 | 2.5 | 3.5 | 3.5 | 2.5 | 4.0 | 4.0 | 4.0 | 2.5 | 4.0 | 4.0 | 2.5 | 2.5 | 2.5 | 1.5 | 2.5 | 3.0 | 2.0 | 1.5 |
| P4 | 2.0 | 3.0 | 3.0 | 3.5 | 4.0 | 4.0 | 3.0 | 4.0 | 4.0 | 5.0 | 5.0 | 3.0 | 5.5 | 3.0 | 3.0 | 3.5 | 3.5 | 2.5 | 2.5 | 2.0 |
| PS | 1.5 | 2.5 | 2.5 | 3.0 | 3.5 | 4.0 | 4.0 | 3.0 | 3.5 | 4.0 | 5.0 | 5.0 | 3.0 | 2.5 | 2.5 | 3.5 | 3.0 | 3.0 | 2.5 | 1.5 |
| P6 | 1.5 | 2.5 | 2.0 | 2.5 | 3.0 | 2.5 | 5.0 | 4.0 | 3.0 | 4.0 | 5.0 | 2.0 | 3.5 | 2.5 | 2.5 | 1.5 | 3.0 | 2.5 | 2.0 | 1.5 |
| P7 | 1.5 | 2.0 | 2.0 | 2.0 | 2.5 | 3.0 | 2.0 | 2.5 | 3.0 | 2.0 | 2.5 | 3.0 | 2.0 | 2.0 | 2.0 | 3.5 | 3.5 | 3.0 | 2.0 | 2.0 |
| PS | 1.5 | 2.0 | 2.0 | 3.5 | 4.0 | 4.0 | 2.5 | 3.5 | 4.0 | 2.5 | 2.5 | 2.5 | 3.5 | 4.0 | 2.5 | 2.5 | 2.5 | 1.5 | 2.0 | 1.5 |
| P9 | 1.5 | 2.5 | 2.5 | 4.0 | 4.0 | 2.5 | 4.0 | 5.0 | 2.5 | 5.0 | 5.5 | 5.5 | 2.5 | 2.5 | 2.5 | 3.0 | 3.5 | 2.0 | 2.0 | 1.5 |
| P10 | 1.5 | 2.5 | 3.0 | 3.5 | 4.0 | 3.0 | 2.5 | 3.5 | 5.0 | 5.0 | 3.5 | 3.5 | 3.0 | 2.5 | 2.5 | 1.5 | 2.5 | 2.5 | 2.0 | 2.0 |
| P11 | 2.0 | 2.5 | 3.0 | 5.5 | 3.0 | 5.5 | 3.0 | 3.0 | 3.0 | 5.5 | 5.5 | 3.0 | 3.0 | 3.0 | 5.5 | 5.5 | 5.0 | 4.0 | 3.5 | 2.0 |
| P12 | 1.5 | 3.0 | 5.0 | 6.0 | 4.0 | 4.0 | 6.0 | 6.0 | 4.0 | 4.0 | 6.0 | 6.0 | 3.5 | 3.5 | 5.5 | 5.5 | 3.0 | 3.0 | 2.5 | 2.0 |
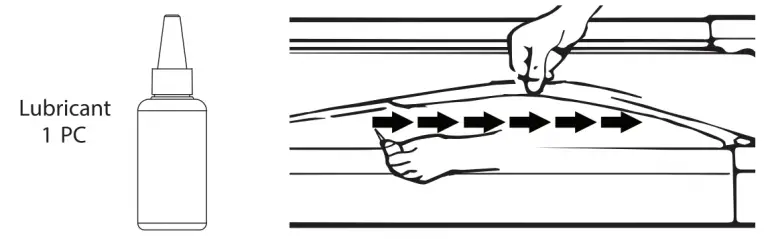
Lubricating under the running belt will ensure superior performance and extend its life expectancy.
After the first 25 hours of use (or 2-3 months) apply some lubricant, and repeat for every following 50 hours of use (or 5-8 months).
How to check running belt for proper lubrication
Lift one side of the running belt and feel the top surface of the running deck. If the surface is slick to the touch, then no further lubrication is required. If the surface is dry to the touch, apply some lubricant.
How to apply lubricant
Lift one side of running belt. Pour some lubricant under the centre of the running belt on the top surface of the running deck. Run on the treadmill at a slow speed for 3 to 5 minutes to evenly distribute lubricant.
NOTE: DO NOT over lubricate running deck. Any excess lubricant that comes out should be wiped off.


Before beginning a workout session ensure that the Safety Tether Key is properly placed onto the Computer Console and the Safety Clip is securely attached to an article of your clothing. If you fall the clip will pull out the SAFETY TETHER KEY from the Computer Console and the running belt will stop immediately for emergency stop, helping to prevent injury. Replaced the Safety Tether Key onto the Computer Console. Press the START button to begin exercise again.
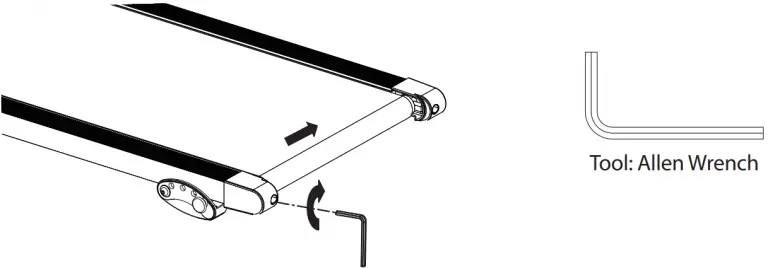
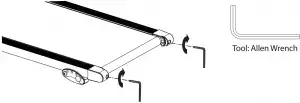
The running belt is pre-adjusted to the running deck at the factory, but after prolonged use it can stretch and require readjustment. To adjust the belt, turn on the main power switch of the treadmill and let the belt run at a speed of 4 -6 MPH. Use the Allen Wrench provided to turn the rear roller adjustment bolts in order to centre the belt. If the running belt is shifting to the left, turn the left adjustment bolt 1/4 turn clockwise, and the running belt should start to correct itself.
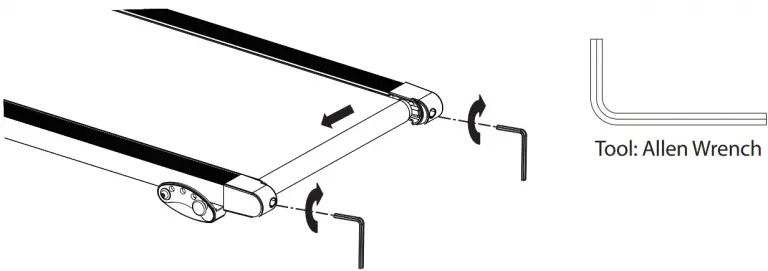
If the running belt is shifting to the right, then turn the right adjustment bolt 1/4 turn clockwise, and the belt should start to correct itself. Keep turning the adjustment bolts until the running belt is properly centered.
If the running belt is slipping during use, turn off and unplug the treadmill. Using the Allen Wrench provided, turn both left and right rear roller adjustment bolts 1/4 turn clockwise, then turn the main power switch back on and run the treadmill at a speed of 4-6 MPH. Run on to the running belt to determine if the belt is still slipping. Repeat this procedure until the belt no longer slips.
CARE, MAINTENANCE & TROUBLESHOOTING GUIDE
WARNING: To prevent electrical shock, please turn off and unplug the treadmill before cleaning or performing routine maintenance.
WARNING: Always check the wear and tear components like spring knob and running belt to prevent injury.
CLEANING
After each exercise, ensure that the unit is wiped down and any sweat is removed from the unit.
The treadmill can be cleaned with a soft cloth and mild detergent. Do not use abrasives or solvents.
Be careful not to get excessive moisture on the display panel as this might damage the unit and create an electrical hazard. Please keep the treadmill, especially the computer console, out of direct sunlight to prevent damage to the screen.
STORAGE
Store the treadmill in a clean and dry indoor environment. Never leave or use the unit outdoors. Ensure the master power switch is off and the power cord is un-plugged from wall outlet.
| Problem | Potential Causes | Corrections |
| Treadmill will not start |
|
|
| Belt slips | Belt not tight enough | Adjust belt tension |
| Belt hesitates when stepped on |
|
|
| Belt is not centred | Running belt tension not even across the rear roller | Center the belt |
 This product can expose you to a chemical or group of chemicals, which may include “Di (2-ethylhexyl) phthalate (DEHP)” which is known in the state of California to cause cancer, birth defects, or other reproductive harm. For more info, go to https://www.p65warnings.ca.gov/. This product can expose you to a chemical or group of chemicals, which may include “Di (2-ethylhexyl) phthalate (DEHP)” which is known in the state of California to cause cancer, birth defects, or other reproductive harm. For more info, go to https://www.p65warnings.ca.gov/. |
WARM UP AND COOL DOWN ROUTINE
The WARM-UP is an important part of any workout. The purpose of warming up is to prepare your body for exercise and to minimize injuries. Warm up for two to five minutes before aerobic exercising. It should begin every session to prepare your body for more strenuous exercise by heating up and stretching your muscles, increasing your circulation and pulse rate, and delivering more oxygen to your muscles.
COOL DOWN at the end of your workout, repeat these exercises to reduce soreness in tired muscles.
The purpose of cooling down is to return the body to its resting state at the end of each exercise session.
A proper cool-down slowly lowers your heart rate and allows blood to return to the heart.
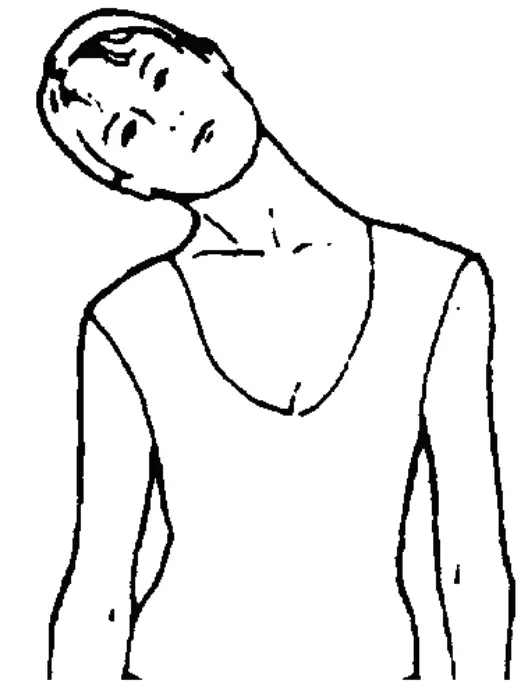
HEAD ROLLS
Rotate your head to the right for one count, you should feel a stretching
sensation up the left side of your neck. Then rotate your head back for one count, stretching your chin to the ceiling and letting your mouth open. Rotate your head to the left for one count, then drop your head to your chest for one count.
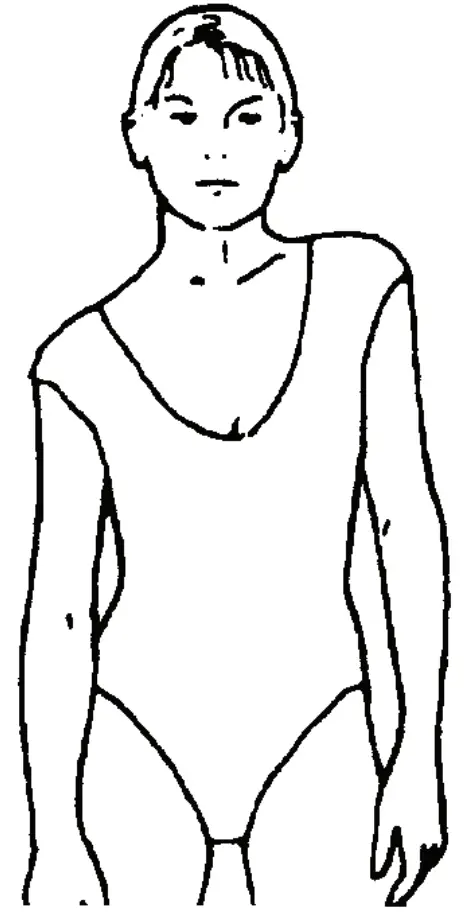
SHOULDER LIFTS
Lift your right shoulder toward your ear for one count. Then lift your left shoulder up for one count as you lower your right shoulder.

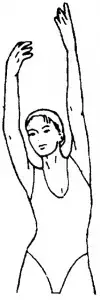
SIDE STRETCHES
Open your arms to the side and lift them until they are over your head. Reach your right arm as far toward the ceiling as you can for one count. Repeat this action with your left arm.
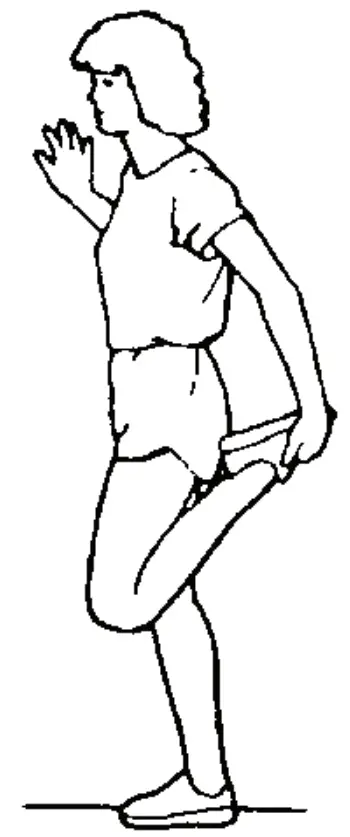
QUADRICEPS STRETCH
With one hand against a wall for balance, reach behind you and pull your right foot up.
Bring your heel as close to your buttocks as possible. Hold for 15 counts and repeat with left foot.
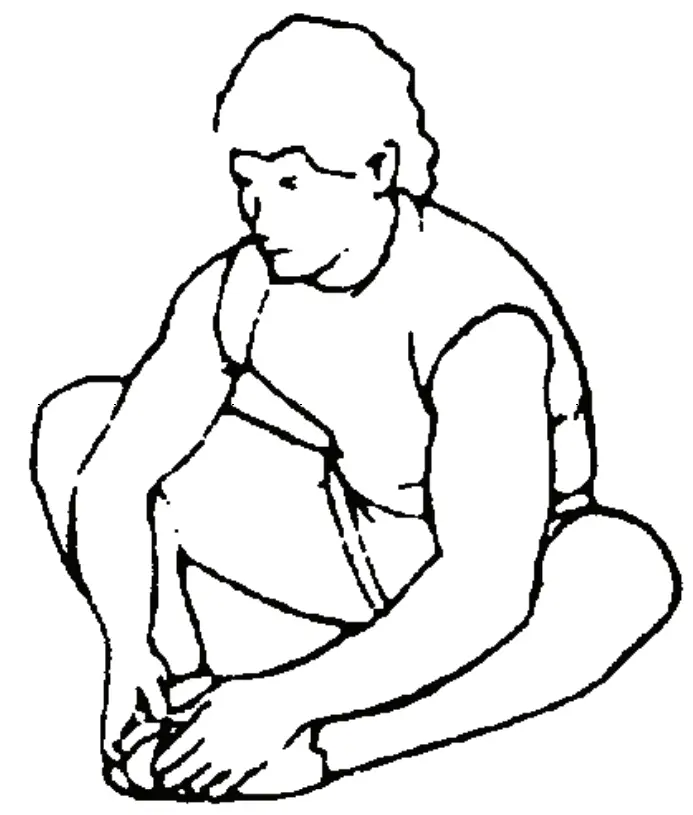
INNER THIGH STRETCH
Sit with the soles of your feet together and your knees pointing outward.
Pull your feet as close to your groin as possible. Gently push your knees toward the floor. Hold for 15 counts.
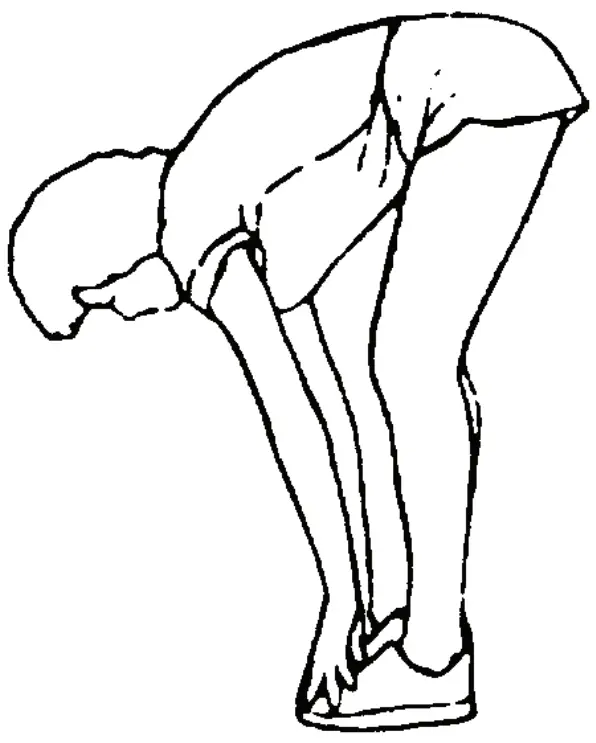
TOE TOUCHES
Slowly bend forward from your waist, letting your back and shoulders relax as you stretch toward your toes. Reach as far as you can and hold for 15 counts.
HAMSTRING STRETCHES
Extend your right leg. Rest the sole of your left foot against your right inner thigh. Stretch toward your toe as far as possible. Hold for 15 counts. Relax and then repeat with left leg.
CALF/ACHILLES STRETCH
Lean against a wall with your right leg in front of the left and your arms forward.
Keep your left leg straight and the right foot on the floor; then bend the right leg and lean forward by moving your hips toward the wall. Hold, then repeat on the other side for 15 counts.
- Home Gym Digital Treadmill Design
- Displays & 12 Pre-set Program
- Simple Electric Motorized Plug-in Design
- Built-in Hand Grip Sensors for Pulse Monitoring
- Displays Run Time, Distance, Speed, Calories Burned, Heart Rate
- Includes Mobile Phone/Tablet,
- Supports Bluetooth Music and App, Support Kinomap and Zwift
- Large Multi-layer Tread Belt
- Powerful 1.0HP Power
- Durable, Steady and Easily Operated
- Preset Training Modes for Quick Exercise Sessions
- Adjustable Speed & Timer Settings
- Manual Style, Angle Adjustable Incline Levels
- Used for Walking, Jogging, Running Exercise Training
- Perfect for Weight Loss, Cardiovascular Fitness, Endurance & Stamina Building
- Integrated Safety Key, Emergency Power Off
- Hydraulic folding system
- Used for Indoor Exercise
- *Some Assembly Required
- (2) M8x40 Hexagon Socket Oval Head Bolts
- (2) M8 Nylon Nuts
- (4) M8x16 Hexagon Socket Oval Head Bolts
- (1) Safety Key (Emergency Stop)
- (1) Allen Key
- Rated Voltage: 120V/60HZ
- Recommended Ages: Up to 35 years old
- Pre-set Target Calorie Range: Up to 10 to 995 Calories
- Incline Level Adjustment Type: Manual 4 Levels
- Adjustable Speed Setting: 0.6 – 6.0 MPH (Up to 10 KMH)
- Adjustable Timer Setting: 5 – 99 Minutes
- Maximum Weight Support: Up to 265+ lbs.
- Treadmill Motor Power: 1.0HP
- Product Weight: 59.5 lbs.
- Running Belt/Running Surface Size (L x W): 15.7” x 39.3” -inches
- Total Folded Dimension (L x W x H): 21.65” x 24.4” x 46.4” -inches
- Total Open Dimension (L x W x H): 50.7” x 24.4” x 46.4” -inches
We are here to help!
Phone: (1) 718-535-1800
Email: [email protected]