SHARP LC-65Q620U TV User Manual
![]()

Copyright Statement
© 2018 Hisense Company Ltd. All Rights Reserved.
All material in this User Manual is the property of Hisense Company Ltd. and its subsidiaries, and is protected under US and International copyright and/or other intellectual property laws. Reproduction or transmission of the materials, in whole or in part, in any manner, electronic, print, or otherwise, without the prior written consent of Hisense Company Ltd., is a violation of Hisense Company Ltd. rights under the aforementioned laws.
No part of this publication may be stored, reproduced, transmitted or distributed, in whole or in part, in any manner, electronic or otherwise, whether or not for a charge or other or no consideration, without the prior written permission of Hisense Company Ltd. Requests for permission to store, reproduce, transmit or distribute materials may be made in writing to the following address:
USA:
Hisense USA Corporation
7310 McGinnis Ferry Road
Suwanee, GA 30024
CANADA:
Hisense Canada Co., Ltd
2283 Argentia Road, Unit 16
Mississauga, ON, Canada
L5N 5Z2
MEXICO:
Hisense Mexico S. de R.L. de C.V.
Blvd. Miguel de Cervantes Saavedra No 301
Torre Norte Piso 2, Col. Ampliación Granada
Miguel Hidalgo, Ciudad de México, C.P. 11520
“Sharp™”, “Aquos™”, “Quattron™” and any and all other Sharp product names, logo’s, slogans or marks are registered trademarks owned exclusively by Sharp Corporation.
“Hisense™”, and any and all other Hisense product names, logo’s, slogans or marks are registered trademarks and intellectual property rights of Hisense Company Ltd. and its subsidiaries.
This product is sold to you under one or more license agreements between Sharp Corporation and Hisense International (Hong Kong) America Investment Co. Ltd. All other trademarks are the property of their respective holders.
Disclaimer Page
**Notwithstanding anything to the contrary, including in any or all descriptions, representations, statements or other communications related to this Sharp, Aquos or Quattron device (hereinafter “Device”) made in any form whatsoever and at any time, some or all of the pre-installed, or subsequently installed Application Services may not be available or capable of functioning as intended by the provider of the Application Services in any or all usage areas for reasons outside of the control of the licensors or manufacturer of this device, including but not limited to, Internet access, local service limitations, etc. Any purchase or use of the Device, including any Application Services, is purely at the user’s risk. Application Services are provided on an as-available basis without warranties of any kind, either expressed or implied, that the Application Service will be uninterrupted or error-free, including but not limited to vagaries of weather, disruption of Service, acts of God, warranties of title, local or regional limitations, no infringement, NOR IMPLIED WARRANTIES OF MERCHANTABILITY OR FITNESS FOR A PARTICULAR PURPOSE. No advice or information given by the licensors or manufacturers providers, affiliates, or contractors or their respective employees shall create such a warranty. All licensors and the manufacturer of this device, jointly and separately, specifically disclaim any and all responsibility for any or all Application Services from functioning at any time, and by purchasing the Device, you accept such disclaimer without any claim on the licensors and manufacturer. You are solely responsible for providing an active and working connection to the Internet, along with any and all hardware and/or software necessary to use the Device as intended.
Disclaimer:
Images throughout this document are for illustrative purposes only and may differ from the actual product.
Connecting Devices to your TV
You have several options for connecting your TV to different devices. The method in which you connect will be based upon the type of cables you have and the available outputs on your device.
Connecting an antenna, cable set-top box or satellite receiver
To connect an antenna, cable set-top box or satellite receiver:
- Connect one end of a coaxial cable (not included) to the RF OUT port on the antenna, cable or satellite box. If you are using an antenna with twin-lead cable, you may need a 300-75 Ohm adapter (not provided) to connect it to the back of your TV. Likewise, if you are using several antennas, you may need a combiner (not provided).
- Connect the other end of the cable to the ANT/CABLE port on the side of TV.
- Using your remote, press the [INPUT] button and select ANT/CABLE as the input source.

Connecting a satellite receiver, DVD player or other audio visual (AV) device with a composite video cable (yellow/red/white)
To connect an AV device with a composite video cable (not provided):
- Use the audio and video cables to connect the composite video/audio ports of the external AV device to the AV IN ports of the TV. (Video = yellow, Audio Left = white, and Audio Right = red)
- Plug the connected devices into the AV connectors on the TV before switching it on.
- Using your remote, press the [INPUT] button and select AV as the input source.

Connecting an AV device with a component video cable (red/blue/green)
To connect an AV device with a component cable (not provided):
- Use a component video cable to connect the component output ports of the external device to the YP B P R ports for the TV. (Y = green, P B = blue, and P R = red). Use an audio cable to connect the component audio ports of the external device to the TV AUDIO (L/R) ports.
- Plug the connected devices into the YP B P R and L/R ports on the TV before switching it on.
- Using your remote, press the [INPUT] button and select COMPONENT as the input source.

NOTE
- One AV device can be connected to the TV using a component video or composite video cable. (Only available for some models)
- YPBPR ports vary by model.
- Images throughout this document are for illustrative purposes only and may differ from the actual product.
Connecting an AV device with an HDMI cable
This 4K TV has three high-powered HDMI version 2.0 inputs that enable you to connect 4K Ultra-HD external devices. For example, if you have an X-box or Blu-ray player that supports the 2.0 standard, more details will be transmitted to the TV screen to maximize your entertainment experience.
Please refer to the User Manual that came with your device for step-by-step instructions.
To connect an AV device with an HDMI cable (not provided):
- Use an HDMI cable to connect the HDMI output port of the AV device to the HDMI port of the TV.
- Plug the connected devices into the HDMI port on the TV before switching it on.
- Using your remote, press the [INPUT] button and select the corresponding HDMI input.

NOTES
- Because the HDMI connector provides video and audio signals, it is not necessary to connect an audio cable.
- We strongly recommend to use HDMI Cable with 2 cores as shown in the figure.
Connecting a headphone
You can connect headphone (not provided) to the AUDIO OUT port on your TV. While the headphone is connected, the sound from the built-in speakers will be disabled.

Connecting speakers or other audio receivers
To connect speakers or other audio receivers with an audio cable (not provided):
- Use an audio cable to connect the digital audio in port of the audio receiver device to the DIGITAL AUDIO OUT port of the TV. Another option is to use an RCA Y-cable (1/8”-stereo mini to L/R phono) to connect an analog sound system to the AUDIO OUT port of the TV.
- Plug the connected devices into the main power socket before switching on the TV.

- TIP: If you prefer to use Audio Return Channel, then see Connecting a digital sound bar to use Audio Return Channel (ARC) on page 7.
NOTES
- When a digital audio system is connected to the DIGITAL AUDIO OUT port, decrease the TV and system volume.
- 5.1 CH (channel) audio is available when the TV is connected to an external device that supports a 5.1 channel surround sound.
- You can receive 5.1 channel audio in one of two ways. The first way is to connect the DIGITAL AUDIO OUT port from the device to the Amplifier. The second way is to connect the DIGITAL AUDIO OUT port on the back of the TV to the Optical port on the Amplifier. After you’ve completed one of the two methods then be sure to go into the Advanced Audio Settings of the TV and select RAW to receive the 5.1 channel audio. You will need to also go into the sound or audio settings of your device to ensure it is set to 5.1 Channel output. It may read ‘Bitstream’, ‘RAW’ or ‘Digital’.
Connecting a digital sound bar to use Audio Return Channel (ARC)
If you’d like to use the Audio Return Channel (ARC) feature to have sound sent from the TV back down an HDMI cable to a digital sound bar, then you will need to connect the cable to the HDMI / ARC port. By using this feature, you will also be able to control the sound bar with your TV remote instead of having to use multiple remotes for each device.
To connect a digital sound bar with an HDMI cable (not provided):
- Connect the cable that’s attached to the sound bar to the HDMI / ARC port on the TV.
- Turn on the sound bar by pressing the Power button.
- Press the [

- Turn on the HDMI-CEC setting.
NOTES
- Only digital sound bars that require a wired connection are compatible with the TV.
- If the device has an Input Selector feature then make sure to change it to TV.

Connecting a USB device
You can connect the USB devices such as hard drives, USB sticks and digital cameras for browsing photos, listening music and watching recorded movies.

- Connect a USB device into the USB port.
- Select the Media type on the Media screen or Home screen. For more information, see Media on page 27.
NOTES
- When connecting a hard disk or a USB hub, always connect the mains adapter of the connected device to the power supply. Exceeding a total current consumption may result in damage. The USB1.1 and USB2.0 devices maximum current consumption are 500mA. The USB3.0 device maximum current consumption is 1A.
- For individual non-standard high-capacity mobile hard disk, if it’s impulse current is greater than or equal 1A, it may cause TV-rebooting or self-locking. So the TV does not support it.
- The USB port supports a voltage of 5V.
Connecting Your TV to a Wireless or Wired Network
You have the option to connect your TV to a wireless or wired network to access the Internet. For more information about the network settings on TV, see Network Menu on page 20.
Connecting to a wireless network
Our built-in wireless LAN adapter supports the IEEE 802.11 ac/b/g/n communication protocols and we recommend that you use an IEEE 802.11n or IEEE 802.11ac router. When you play a video over an IEEE 802.11 b/g connection, the video may not play smoothly.

NOTES
- You must use the built-in Wireless LAN Adapter to use a wireless network because the set does not support an external USB network adapter.
- To use a wireless network, your TV must be connected to a wireless IP sharer. If the wireless IP sharer supports Dynamic Host Configuration Protocol (DHCP), your TV can use a DHCP or static IP address to connect to the wireless network.
- Select a channel for the wireless IP sharer that is not currently being used. If the channel set for the wireless IP sharer is currently being used by another device nearby, this will result in interference and communication failure.
- If you apply a security system other than the systems listed below, it will not work with the TV.
- If Pure High-throughput (Greenfield) 802.11N mode is selected and the Encryption type is set to WEP, TKIP or TKIP-AES (WPS2 Mixed) for your Access Point (AP), then the TV will not support a connection in compliance with these Wi-Fi certification specifications.
- If your access point (AP) supports Wi-Fi Protected Setup (WPS), you can connect to the network via Push Button Configuration (PBC) or PIN (Personal Identification Number). WPS will automatically configure the SSID and WPA key in either mode.
Connecting to a wired (Ethernet) network
You can attach your TV to your LAN in one of the three following ways:
Option 1
You can attach your TV to your LAN by connecting the LAN port on the back of your TV to an external modem using a Cat 5 LAN cable. See the illustration below.

Option 2
You can attach your TV to your LAN by connecting the LAN port on the back of your TV to an IP Sharer which is connected to an external modem. Use an Ethernet cable for the connection. See the illustration below.

Option 3
Depending on how your network is configured, you may be able to attach your TV to your LAN by connecting the LAN port on the back of your TV directly to a network wall outlet with an Ethernet cable. See the diagram below.

If you have a Dynamic Network, you should use an ADSL modem or router that supports Dynamic Host Configuration Protocol (DHCP). Modems and routers that support DHCP automatically provide the IP address, subnet mask, gateway, and DNS, so you don’t have to enter them manually. Most home networks are Dynamic Networks.
Some networks require a Static IP address. If your network requires a Static IP address, you must enter the IP address, subnet mask, gateway, and DNS values manually on your TV’s Cable Setup Screen when you set up the network connection. To get the IP address, subnet mask, gateway and DNS values, contact your Internet Service Provider (ISP).
NOTE
- You can use ADSL modems that support DHCP if your network requires a static IP address. ADSL modems that support DHCP also let you use static IP addresses.
Using Your TV Remote Control
Buttons on your TV remote

NOTE
- Check information according to the actual remote control in the accessory bag.
Remote control range information
- The remote control can work at a distance of up to 26 feet in front of the TV set.
- It can work at a 30 degree horizontal or vertical angle.
Begin using your remote
- Slide the back cover to open the battery compartment of the remote control.
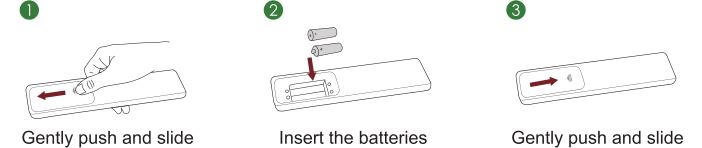
- Insert two AAA size batteries. Make sure to match the (+) and (-) ends of the batteries with the (+) and (-) ends indicated in the battery compartment.
- Replace the battery compartment cover.

NOTES
- Discard batteries in a designated disposal area. Do not throw them into a fire.
- Remove old batteries immediately to prevent them from leaking into the battery compartment.
- If you do not intend to use the remote control for a long time, remove the batteries.
- Battery chemicals can cause a rash. If the batteries leak, clean the battery compartment with a cloth. If chemicals touch your skin then wash it immediately.
- Do not mix old and new batteries.
- Do not mix alkaline, standard (carbon-zinc) or rechargeable (NiCd, NiMH, etc.) batteries.
- Do not continue using the remote if it gets warm or hot.
- Call our Support Center immediately on the support website.
Program your universal cable or satellite remote control to operate your new television (only for USA)
If you would like to program your other household remote controls to your new television, please refer to the User’s Manual supplied by your Cable or Satellite provider. The Cable or Satellite providers’ User’s Manuals should include instructions on how to program their remote to your television.
A list of codes for the most common Cable and Satellite providers are listed below. Use the code that is associated with your Cable or Satellite provider (if applicable).
DIRECTV
0178, 10178, 10019, 10748, 11314, 11660, 11710, 11780, 12049, 10171, 11204, 11326, 11517, 11564, 11641, 11963, 12002, 12183
Time Warner Cable
386, 0178, 10178, 400, 450, 461, 456, 0748, 1463, 0463, 10463
Comcast
0178, 10178, 10463, 11463, 10748, 11314, 11660, 10171, 11204, 11326, 11517, 11641, 11780, 11785, 11892, 11963, 12002
Cox Communications
0178, 10178, 1326, 1463
Dish Network
505, 627, 538, 720, 659
If the code associated with your Cable or Satellite provider is not listed, does not work or you cannot locate the instructions to program your remote, call your local Cable or Satellite provider’s customer service center.
If your Cable or Satellite provider does not have a code available, please contact us.
Using your cable set-top box or satellite receiver remote as a ‘universal’ remote
If you prefer to use your Cable Set-top Box or Satellite Receiver Remote as a ‘Universal Remote’, then visit the Support page to view a list of the codes.
Completing the First-Time Setup Menu
Press the [
After the splash screen that displays the logo appears, begin the first-time setup menu.

Shortcuts Instructions
You can use shortcuts on the remote control for fast operation.
Turning your TV on or off
- To turn your TV on:
- Connect the power cord to the back of the TV, then plug the power cord into an AC outlet.
- When the TV is powered on, press the [

- To turn your TV off, press the [
NOTES
- When your TV is in standby mode, it is still consuming power. To completely disconnect power, please remove the plug from the AC outlet.
- If your TV does not receive an input signal for several minutes, it automatically goes into standby mode.
Selecting the input source
Select the Input Source depending on the video device you have connected to your TV.
To select the input source:
- Turn on your TV, then press the [INPUT] button on the remote, the list of Source appears.
- Press the D-pad arrows of your remote to select the input source.
- Press the [OK] button to confirm your selection.
Using the Live TV
To view broadcast programs, press the [TV] button on your remote.
Channel search guide
When you select ANT/CABLE as input, if no TV channels were saved before, you will be prompted to do a channel search. You can also go to Settings menu > Channel to change the channel settings.
Launch Live TV
After channel tuning is done for the first time, the screen will display Live TV operating tips, including: how to load the
channel list, how to Load info Bar and so on.
[Menu] Load more functions
[OK] Load Channel List
[^] Load Info Bar
[BACK] Load previous channel
Viewing channel information
As you use the [CH ^/ CH v] button on your remote to scroll through channels, an information banner appears on the top of the screen.

The information banner displays the following information:
- Channel number
- Lock status
- Input
- Program name
- Show identification
- Channel name
- Current date and time
- Beginning and end time of the next program
- Start/Stop time progress bar of the current program
- Prompt
If you are watching a particular channel, you can also press the up arrow button of your remote to view channel information.
Viewing a channel list
After you have done an automatic channel scan (if you’re using an antenna) or are receiving your channels through a
cable provider, you can view your list of channels by pressing [OK] on your remote.
Creating a Favorite List
To quickly access your most-watched channels, you can create a Favorite List.
To create your Favorite List:
- Press the [
- Press the [ v ] button to select Settings, and then press [OK] button to enter the Settings menu.
- Select Channel > Favorite List.
- Using the [^ / v] buttons of your remote, select a channel and press [OK] button.
A heart-shaped indicator will appear beside the channel as confirmation that it has been successfully added.
Viewing your Favorite list
To view channels that you’ve added to your Favorite List simply press [OK] on your remote to call out the channel list. The channel list appears on the right side of the screen and heart-shaped icons are shown next to the channels that make up your Favorite List. You can press [ < / > ] buttons to switch the channel list (Antenna or Cable) , Favorite and History list.
Using the Menu Function
To quickly access menu function, press the [
Accessibility
You can set Menu Audio, Video Description and High Contrast Menu on or off. The function can be used to meet the needs of visually impaired people.
When the Menu Audio is set on, the contents of each menu displayed can be broadcast out.
When the Video Description is set on, you can hear the introduction of relevant programs.
When the High Contrast Menu is set on, the comparison of menu items is more vivid.
Picture Mode
If you’d like to configure the settings for your picture, then there are seven types of picture modes available: Vivid, Standard, Energy Saving, Theater, Game, Sports and Calibrated.
Sound Mode
Select a preset sound mode to suit the type of content you are listening to: Standard, Speech, Late Night, Music, Theater and Sports.
Picture Size
Adjust the Aspect Ratio to stretch or zoom in on your picture. You can choose from the following settings: Auto, Normal,
Zoom, Wide, Direct, Dot-By-Dot, Panoramic and Cinema.
Closed Captioning
You can switch between CC Off, CC On and CC On When Mute in ANT/CABLE mode.
Audio Language(MTS)/SAP
You can choose the Audio Language(MTS) in DTV mode and you can set SAP for Mono, Stereo or SAP in ATV mode.
Audio Only
When you select this option, the screen will not display the picture. You can only listen the audio. Press any button except the [
HDMI 2.0 Format
Match the connected device output format. You can select Standard format and Enhanced format in HDMI mode.
Settings
The Settings Menu consists of the following settings: Picture, Sound, Network, Channel, Accessibility, System and Support.
Basic Settings
Your TV comes with many TV setting features to allow you to customize the picture based on your viewing preference and environment. As you navigate throughout different screens to access settings, some of the indicators appear as words On and Off.
Using the Settings Menu
You can press the [
The Settings Menu consists of the following settings:
- Picture
- Sound
- Network
- Channel
- Accessibility
- System
- Support
In each menu, you can:
- Press the [ ^ / v ] buttons to select an item.
- Press the [OK] buttons to enter the sub-menu or to set on or off.
- Press the [ < / > ] buttons to adjust the value.
- Press the [BACK] button to return to the previous menu.
- Press the [EXIT] button to exit the menu.
Picture Menu

- Picture Mode: Select a preset mode that best suits your preference and viewing environment, there are some types of picture modes available: Vivid, Standard, Energy Saving, Theater, Game, Sports and Calibrated.
- Picture Size: Adjust the picture aspect ratio based on the content you are watching. You can choose from the following settings: Auto, Normal, Zoom, Wide, Direct, Dot-By-Dot, Panoramic or Cinema.
- Picture Mode Settings: Customize selected Picture Mode.
- Apply Picture Settings: Remember customized settings when using the Picture Mode on current source or all sources.
- Backlight: Adjust Local Dimming, Backlight Level, Automatic Light Sensor and Minimum Backlight to change the overall brightness of the screen.
NOTE
Some models don’t support the function of Local Dimming.
- Contrast: Increase or decrease contrast between light and dark colors.
- Brightness: Adjust the Brightness level to generate lighter or darker images.
- Color: Adjust the color intensity level.
- Tint: Adjust the colors from green to magenta tint to view the natural skin tones of people on the screen.
- Sharpness: Improve sharpness of the picture edges.
- Overscan: Turn on if you are receiving analog antenna or cable input.
- Color Temperature: Adjust the white color shade.
- Motion Enhancement: This setting minimizes afterimages that are left on the screen when viewing fast-moving objects. You can adjust it from Smooth, Standard, Clear, Film, Custom or Off. A Smooth setting will produce a smoother picture whereas a Clear setting will result in a picture that has less judder (shaking).
NOTE- Some models don’t support the function of Motion Enhancement.
- Digital Noise Reduction: Improve picture clarity by reducing video noise.
- HDMI Dynamic Range: Select Limit for 480p DVD players and select Full for Blu-ray.(HDMI mode only)
- Active Contrast: Automatically adjust contrast according to video content to improve detail.
- Expert Settings: Adjust the color space and Gamma to best suit the content you’re viewing.
- Reset picture settings: Reset all picture settings to factory default.
Sound Menu

- Sound Mode: Select a preset mode that best suits your audio environment: Standard, Speech, Late Night, Music, Theater and Sports.
Set the sound effects to suit your preference.
Configure your audio settings for your sound preferences. Once you choose the mode, you can adjust the audio based on the following settings:
- Speakers: Switches the sound from the TV speakers to Optical or HDMI ARC output connectors.
- Speakers: Switches the sound from the TV speakers to Optical or HDMI ARC output connectors.
- Digital Audio Out: Select the digital audio output format for your external audio device. For example, choose RAW (which is uncompressed audio in RAW form) if you have 5.1 Channel Surround Sound Speaker set up. Choose PCM if you have an amplifier that does not support Dolby Digital technology.
- Digital Audio Delay: Adjust the digital audio output delay time to sync sound from an external speaker with the
images on the TV. - Lip Sync: Synchronize the displayed image with the audio output.
- Balance: Emphasizes sound from the left or right speaker.
- Sound Mode Settings:
- Bass Boost: Bass Boost uses DTS TruBass TM to enhance the perception of bass frequencies to provide deep, rich bass response from the TV’s internal speakers.
- Surround Sound: Surround sound uses DTS TruSurround TM to deliver an immersive surround sound experience from the TV’s internal speakers.
- Dialog Clarity: Dialog Clarity uses DTS Dialog Clarity TM to boost the frequency range of the human voice so dialog is clearly understood and heard above audio or surround effects.
- Equalizer: Adjust low to high pitch sounds.
- Wall Mount setup: Improves sound for wall-mount position.
- Headphone
- Headphone Mode: Disable the TV speaker when you are using a sound bar, ARC or any other external audio amplifiers.
- Headphone Volume: Change the way audio is sent through the type of device that’s connected to your TV Audio Out port.
- Advanced Audio Settings: Tune the audio settings and quality of the TV.
- Auto Volume Control: Activate to prevent the volume from changing when you switch TV channels.
- Preferred Audio Language: Set the audio language based on your preference.(The preferred language must be supported by the broadcaster.)
- Reset Default Audio Settings: Reset all of the Audio settings in current audio mode to the factory default values.
Network Menu

- Network Configuration: Configure network settings to connect to an available network.
When the Connection Type is Wired LAN, means you choose a wired network connection to access the Internet.- IP Settings: Most devices obtain an IP address automatically. Set an IP address manually if you do not have a router, or if your router does not assign IP addresses for you.
When the Connection Type is Wireless, means you choose a wireless network connection to access the Internet. - Refresh: Refresh wireless network.
- Add: You can add wireless network.
- Advanced Settings: Configure the advanced wireless network settings for the TV.
- IP Settings: Most devices obtain an IP address automatically. Set an IP address manually if you do not have a router, or if your router does not assign IP addresses for you.
- Connection Test: Tests the status of your network connection.
- Network Information: View information about your network connection.
- Bluetooth: Connects to external devices via Bluetooth.
NOTE
- Bluetooth function vary by model.
Channel Menu

- Tuner Mode: Select if you receive TV channels over the air (antenna) or through a cable set top box.
- Auto Channel Scan: Automatically scan for channels.
- Add A Channel: Type in a channel to add it manually to your TV.
- Channel Skip: Skip selected channels from your Channel List.
- Favorite List: Add Channels to your Favorite List.
Accessibility

- Closed Captioning: Displays closed captions.
- Video Description: Enables broadcasted descriptive audio for visually impaired.
- Menu Audio: Reads the menu items for visually impaired.
- High Contrast Menu: Improves contrast for visually impaired.
- Closed Captioning Settings: Allows customization of closed caption text display.
- Analog Caption: Select an Analog Caption setting from Off,
CC1-CC4, Text 1-Text 4.
CC1-CC4: Closed captioning appears in a small banner across the bottom of the screen. CC1 is usually the “printed” version of the audio. CC2-CC4 display content provided by the broadcaster.
Text1-Text4: Closed captioning that covers half or all of the screen. Text1-Text4 display content provided by the broadcaster.
Off: To turn off the Analog Caption. - Digital Caption: Select a Digital Caption setting: Off, CS1-CS6.
- Digital CC Settings: There are two caption styles. One is the Automatic function set as the broadcaster, while the other is the Custom style where you can adjust the Size, Font, Text Color, Text Opacity, Background Color etc.
- Analog Caption: Select an Analog Caption setting from Off,
- Menu Audio Settings: Allow customization of spoken menu language. Before using the Menu Audio Settings, please turn on Menu Audio first.
- Volume: Set the volume level of the spoken menu language.
- Language: Selects the spoken menu language.
- Rate: Changes the rate of speech.
- Pitch: Changes the audio menu pitch.
- Focus Menu Audio: Lowers the background volume when menu audio is spoken.
System Menu

- Parental Control: Turn On Parental Controls to block children from being able to view certain programs. The password is required to be set when you use this function for the first time. For more information about Parental Controls, See Parental Controls on page 23.
- Location and Language: Select the language used for this TV and your location.
- Language: Select the language used for this TV.
- Keyboard Layout: Select a language to match your external keyboard.
- Location: Select your location.
- Time Settings: Configure time and date.
- Time Zone: Select your time zone.
- Time Format: Display the time in a 12 or 24-hour format.
- Daylight Savings: Turn on to apply Daylight Savings Time.
- Date and Time: Select your preferred method of setting the time.
- Timers: Configures Sleep Timer, Power On Timer, Power Off Timer and Menu Timeout.
- Sleep Timer: Set the sleep timer to automatically turn the TV Off within a specified time: Off, 10 Minutes, 20 Minutes, 30 Minutes, 40 Minutes, 50 Minutes, 60 Minutes, 90 Minutes and 120 Minutes.
- Power On Timer: Automatically turn the TV on at the set time.
- Power Off Timer: Automatically turn the TV off at the set time.
- Menu Timeout: Turn the menu off after the chosen amount of time : 10s, 20s , 30s , 60s or Off.
- HDMI-CEC: Control your TV and CEC-enabled devices with one remote.
- HDMI-CEC: Turn on to control your TV and CEC-enabled devices with one remote.
- Device Auto Power Off: Turns CEC-enabled devices off with the TV remote.
- Device Auto Power On: The device with CEC function that is connected to current input will be powered on when TV is powered on.
- TV Auto Power On: Turns the TV on with the remote of a CEC-enabled device connected with you TV.
- CEC Device Lists: Allow connected devices to the HDMI ports to communicate back and forth with the TV.
NOTES - HDMI cables must be used to connect HDMI CEC-compatible devices to your TV.
- The HDMI CEC feature of the connected device must be turned on.
- If you connect an HDMI device that is not HDMI CEC-compatible, all the HDMI-CEC Control features do not work.
- Depending on the connected HDMI device, the HDMI-CEC Control feature may not work.
- Application Manager: Play content from another device and remove this TV from your application accounts.
- Anyview Stream: Allow to view videos, images and music shared from another device in your network
- Wake on Wired LAN: An application on your second screen with Wake on Wired LAN will turn on your TV when you use the feature.
- Wake on Wireless Network: An application on your second screen with Wake on Wireless will turn on your TV
when you use the feature. - Netflix: Remove this TV from your Netflix account. Please contact Netflix if you want to stop being billed for your service.
- ESN: Display the Netflix Electronic Serial Number.
- VUDU: Sign out and remove this TV from your list of authorized Vudu devices.(Only for some countries)
- Amazon Alexa Service: Use your voice to control the TV, other smart home devices, and more.
- Amazon Alexa Service: Turn on and off Alexa service.
- Amazon Alexa Service Setup: Set up accounts to use Alexa service.
- Setup Checklist
- Things to try
- Advanced Settings: Access the Advanced Settings menu.
- TV Name: Choose a name for your TV. This is the name that appears on other device in your network.
- Power LED: Set the power indicator light to On or Off during standby.
- Audio Only: Turn off the display when playing the audio. Press any button except the [ ] button, Volume [+/-] buttons and [ ] button to turn the display back on.
- Input Names: Customize the name of your inputs.
- Live TV Input: Change Live TV Input. Change the response channel of the TV button on the remote control
- Screensaver: Enables Screensaver when the TV is idle.
- Notifications Pop-ups: Activate to receive important system notification and latest content recommendations. View all notification on Home > Notifications.(Only for some countries)
- Automatic Content Recognition: Provide useful information based on content that appears on your TV, i.e. popular TV shows.(Only for some countries)
- Send Diagnostics and Usage: Send diagnostics and usage data to help improve product and service quality (No personal information is collected).
- Usage Mode: Home Mode is optimized for in-home use. Store Mode is optimized for display in retail environments. Sore Mode effects E-Streamer and other demo functions.
- Setup Assistant: Start the Setup Assistant if you want to set up your TV again.
Support Menu

- System Info: View system information.
- Signal Info: Show signal information of current input.
- Network Connection: View your TV’s network connection information.
- Input Connections: View your TV’s Input connection information.
- About: View your TV’s software version and hardware code.
- Self Diagnosis: Perform self diagnosis to test sound, picture and connections.
- Picture Test: Perform this test to test your TV’s picture.
- Sound Test: Perform this test to test your TV’s sound.
- Network Test: Perform this test to test network connection.
- Input Connection Test: Show all related information with external connections.
- End User License Agreement: Click to read the our terms and policy.
- Check Software Update: Check if your TV needs software update.
- Open Source License: Click to read Open Source License details.
- Software Update via USB: Update TV software using a flash drive connected to USB.
- Reset Advertising ID: Reset your advertising ID? You may still receive the same number of ads but they may not be relevant to your interests.(Only for some countries)
- Factory Reset: Reset your TV back to the factory settings.
Parental Control
The Parental Controls setting allows you to block content that is not appropriate for children to watch. You can do this by creating a 4-digit password.
Turning Parental Control On
- Press the [
- Press the [ v ] button on the D-pad to select Settings, press [OK] button to enter the Settings menu.
- Select System > Parental Control.
- Press the [OK] button on your remote, a Create PIN window displays. Using the numerical keypad on the window, create the password.
- Press the [OK] button to turn the Parental Control On.
You will see the other Parental Control settings change from a greyed out state and become highlighted. When this occurs, begin adding other settings to the Scheduled Blocking, Channel Blocking, Programme Blocking, Input Blocking, App Blocking, Change PIN or Reset Parental Control Defaults features.
- Scheduled Blocking: Block all channels and programs during selected periods of time.
- Channel Blocking: Block selected channels.
- Programme Blocking: Blocks programs by ratings.
- Input Blocking: Block selected inputs.
- App Blocking: If an app that you want to restrict doesn’t appear here then check the Parental Control settings in the
app. - Change PIN: Change the PIN that you use to access Parental Controls. If you want to change your parental control
password, first enter the new password then enter the same password again.
NOTE- If you forget your password, call the Consumer Electronics Care Center.
- Reset Parental Control Defaults: Reset Parental Controls back to the factory setting.
Description of US TV Ratings

Description of Age-based Ratings

US Movie Ratings

Canadian English Ratings

Canadian French Ratings

NOTE
- All ratings that are higher than those you select are also blocked. For example, if you choose to block the PG-13 rating, then the higher ratings (R and NC-17) are automatically blocked too.
Open V-Chip
Turn this On to automatically block programs based on the US rating.
Block Unrated
Block or unblock unrated movies.
Advanced TV Settings
Getting familiar with the Home screen
The simple design of the Home screen menu makes it easy to navigate. It serves as the central location to access
Notifications, Apps, LiveTV, Inputs, Media and Settings.
To access the Home screen, press the [
your selection.
Indicators and Icons on the top of the Home screen
You can always view the current time in the top left corner of the Home screen.
If your TV is connected to the Internet through a wireless connection, then an icon ![]()
Names of sections that appear on the Home screen
The Home screen displays the following section names:
- Notifications
- Apps
- LiveTV
- Inputs
- Media
- Settings
Notifications
If your TV is connected to an external device, the screen will be prompted.
Apps
Numerous factory-installed apps are available for you to choose from for your entertainment preferences.
Installing an App
- To install an app from the AppsNOW / VEWD:
- From the Home screen, click on the Apps to select the AppsNOW / VEWD icon.
- Use the navigation buttons on your remote to select the app that you want to install.
- Press the [OK] button on your remote.
- To install an app from the SearchNOW / VEWD:
Even though your TV has numerous factory-installed apps, there may be others that you’d like to download.- From the Home screen, click on the Apps to select the AppsNOW / VEWD icon.
Begin typing the name of the app. As you begin typing the first two to three letters the SearchNOW / VEWD icon suggests words to quicken your search time. - Use the navigation buttons of your remote to select the app. A page displays that shows a written description of the app.
- Click on Install.
- From the Home screen, click on the Apps to select the AppsNOW / VEWD icon.
Removing an App
You can only delete apps that you’ve installed to the TV. Factory-installed apps can not be deleted.
To delete an app:
- Use the navigation buttons on your remote to select the app that you want to remove.
- Press the ‘red’ button of Special function buttons on your remote. A dialog message displays that asks do you want to remove this app.
- Click on Uninstall. The icon is removed from the Apps list screen.
NOTE
- If an app is deleted, the information related to that app is also removed.
Moving App Icons around
Apps can not be moved around on the screen.
Customizing the name of your TV
If you have several TV’s in your home then you may want to customize the name of your TV. By giving your TV a name, it will make it easier for you to identify it when connecting devices to the TV to stream or mirror content.
To customize the name of your TV:
- Press the [
- Press the [ v ] button on the D-pad to select Settings, press [OK] button to enter the Settings menu.
- Go to System > Advanced Settings > TV Name.
- Select User Input to bring up the keyboard and begin typing the name.
- When you are finished, power off the TV and power it back on for the change to take effect.
Media
Media is a central location for you to view or listen to different types of content (for example, your photos, music and movies) through the following methods:
- A USB thumb drive or hard drive
- Compatible mobile phone, tablet or other personal device: You can stream movies, music and photos that are stored on Compatible personal device and play or view the content on your TV.
File formats that may be supported
NOTE
- Due to differences in programming tools and other factors, some of the file formats that are listed may or may not be supported.

Browsing Content
To browse through content based on the type that you wish to access:
- You can find the file by Search. Navigate to the appropriate menu tab on the screen and select All, Photo, Music and Video, also you can find the file you want through the file type: Name, Date Modified, Size.
- Click on the name of the folder that contains your content.
- Make your selection to play or view the content.
If you want to close out of the Media center, then press the [EXIT] or [BACK] button on your remote.
Viewing Pictures as a Slideshow
To view pictures in a slideshow:
- Press the [
- Click on Repeat Mode, and select Repeat All.
- Back to the menu by Pressing the [
- Press the ‘Play‘ button on the TV, the slideshow of your pictures begins.
To stop the slideshow, press the [OK] button on your remote and press it again to restart it.
Viewing Video
To stop or restart the video, you can press the [OK] button on your remote. You can use the navigation buttons of your remote to control the video.
Using Anyview Cast to mirror content from your device to the TV screen
The Anyview Cast is an app that enables you to share (or cast) a video, audio or image from your Android-based device to the TV.
From your tablet or phone
To mirror content from your tablet or phone to the TV:
- Press the [ INPUT ] button on your remote and select the AnyviewCast.
- Turn on the wireless display function on your Android-based device.
NOTE- Some Android-based devices may not support casting.
- Find your TV in the list of devices that displays and select it.
- Wait for the Creating Connection progress bar to complete on the TV screen and the video or image will display in a moment.
Software updates for your TV
The software (also referred to as firmware) is part of what powers your TV. We will provide software updates to continuously enhance your TV and correct any issues that may impact your user experience; therefore, we recommend that you keep your TV connected to the Internet to receive updates when they are available.
You can choose to receive updates manually or check for software updates and install them manually.
Checking for the latest firmware
To manually check for the latest firmware:
- Using your remote, press the [
- Press the [ v ] button on the D-pad to select Settings, press [OK] button to enter the Settings menu.
- Go to Support > Check Software Upgrade.
Quick Problem-Solving Tips
When you experience an issue with your TV, turn it off and on again. If this does not resolve the problem, then refer to the tips below. If the problem is still not resolved, then contact us.

NOTE
- For usage in Mexico , operation of this equipment is subject to the following two conditions : 1 ) it is possible that this device doesn’t cause any detrimental interference and 2 ) this device must take any kind of interference, including that which may cause its malfunctioning.