![]()
MODEL
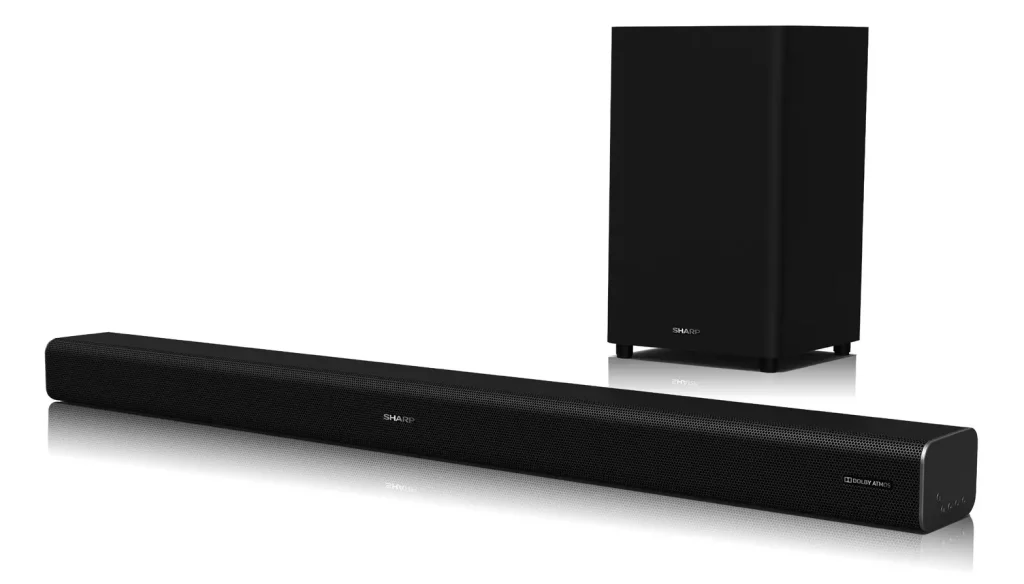
HT-SBW460
SOUND BAR HOME THEATER SYSTEM
OPERATION MANUAL
Thank you for purchasing this SHARP product. To obtain the best performance from this product, please read this manual carefully. It will guide you in operating your SHARP product.


Accessories
The following accessories are included.

Special notes
The terms HDMI and HDMI High-Definition Multimedia Interface, and the HDMI Logo are trademarks or registered trademarks of HDMI Licensing LLC in the United States and other countries.
The Bluetooth® word mark and logos are registered trademarks owned by Bluetooth SIG, Inc. and any use of such marks by SHARP is under license. Other trademarks and trade names are those of their respective owners.
Manufactured under license from Dolby Laboratories. Dolby, Dolby Atmos, and the double-D symbol are trademarks of Dolby Laboratories.
Precaution
General
- Please ensure a minimum distance of 150 cm around the apparatus for sufficient ventilation. Do not block any ventilation openings of this product.
- Use the sound bar on a firm, level surface free from vibration.
- Keep the sound bar away from direct sunlight, strong magnetic fields, excessive dust, humidity and electronic/electrical equipment (home computers, facsimiles, etc.) which generate electrical noise.
- Do not place anything on top of the sound bar.
- Do not expose the sound bar to moisture, to
temperatures higher than 60°C (140°F) or to extremely low temperatures. - If the sound bar does not work properly, unplug and plug it in again. Then turn it on.
- In case of an electrical storm, unplug the sound bar for safety.
- Hold the AC power plug by the head when removing it from the wall socket, as pulling the lead can damage internal wires.
- The AC power plug is used as a disconnect device and shall always remain readily operable.
- Do not remove the outer cover, as this may result in electric shock. Refer internal service to your local SHARP service facility.
- The ventilation should not be impeded by covering the ventilation openings with items, such as newspapers, tablecloths, curtains, etc.
- No naked flame sources, such as lighted candles, should be placed on the apparatus.
- Attention should be drawn to the environmental aspects of battery disposal.
- This unit should only be used within the range of 5°C – 35°C (41°F – 95°F).
- The apparatus is designed for use in moderate climates.
- SHARP is not responsible for damage due to improper use. Refer all servicing to a SHARP authorised service centre.
Warnings:
- The voltage used must be the same as that specified on this sound bar. Using a higher voltage is dangerous and may result in a fire or other type of accident causing damage. SHARP will not be held responsible for any damage resulting from such usage.
- When the
 button is set at STANDBY position, mains voltage is still present inside the sound bar. The sound bar may be brought into operation by the remote control.
 - This sound bar contains no user serviceable parts. Never remove covers unless qualified to do so. This sound bar contains dangerous voltages, always remove mains plug from the socket before any service operation and when not in use for a long period.
- To prevent fire or shock hazard, do not expose this appliance to dripping or splashing. No objects filled with liquids, such as vases, shall be placed on the apparatus.
Volume control
The sound level at a given volume setting depends on speaker efficiency, location and various other factors. It is advisable to avoid exposure to high volume levels, which occurs whilst turning the sound bar on with the volume control setting up high, or while continually listening at high volumes.
Controls and indicators
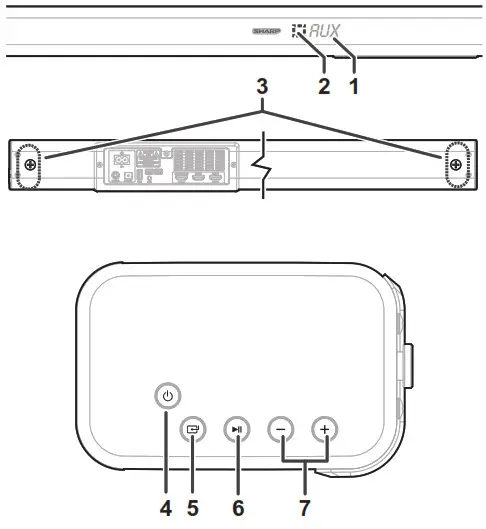
Soundbar
- Display window - Show the current status.
- Remote Control Sensor - Receive signal from the remote control.
- Wall bracket screws
- (ON/OFF) button - Switch the unit between ON and Standby mode.
 (SOURCE) button - Select the play function.
 button - Play/pause/resume playback in Bluetooth/USB mode. Press and hold to activate the pairing function in Bluetooth mode or disconnect the existing paired Bluetooth device.
- VOL+ / VOL- buttons - Increase/decrease the volume level.
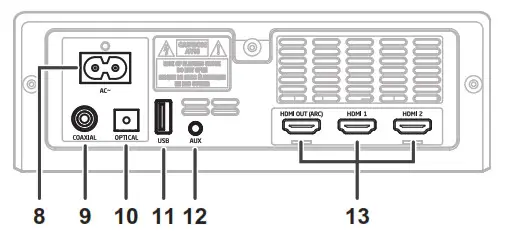
- AC~ Socket
- COAXIAL Socket
- OPTICAL Socket
- USB Socket - Insert the USB device to play music.
- AUX Socket - Connect to an external audio device.
- HDMI (1/2/ARC) Sockets - Connect to a TV via HDMI cable.
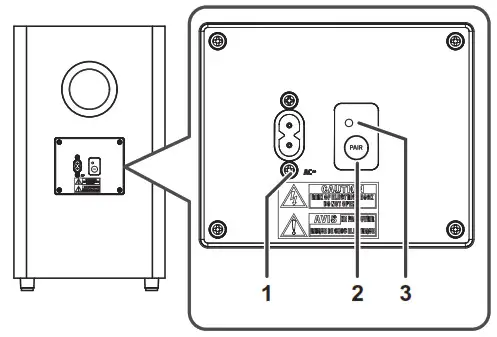
Wireless subwoofer
- AC~ Socket - Connect to power.
- PAIR button - Press activate the pairing function between the sound bar and the subwoofer.
- PAIR Indicator - Light up solidly when the pairing succeed.

Remote control
- – Switch the unit between ON and STANDBY mode.
 Select the Bluetooth mode.
Press and hold to activate the pairing function in Bluetooth mode or disconnect the existing paired Bluetooth device.- Select the play function.
- SURR – Turn the surround ON/OFF.
- HDMI – Select the HDMI 1/2/ARC mode.
- VOL +/- Increase / decrease the volume level.
 Skip to previous / next track in Bluetooth / USB mode.
- Play / pause / resume playback in Bluetooth / USB mode.
 (MUTE) Mute or resume the sound.
- BASS +/- Adjust bass level.
- TRE +/- Adjust treble level.
- EQ – Select a preset sound mode.
( Dimmer Setting )
Remote control
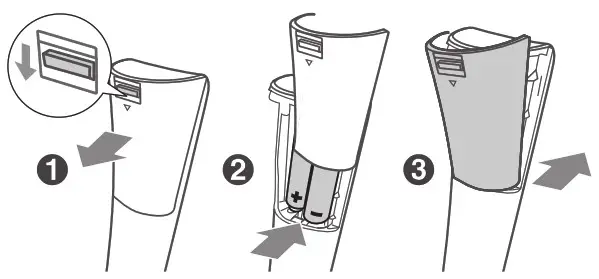
Battery installation
- Open the battery cover.
- Insert the batteries according to the terminal indicated in the battery compartment. When inserting or removing the batteries, push it toward the () battery terminals.
- Close the cover.
Caution:
Replace all old batteries with new ones at the same time.
- Do not mix old and new batteries.
- Remove the batteries if the unit will not be used for a long period of time. This will prevent potential damage due to battery leakage.
- Do not use rechargeable batteries (nickelcadmium battery, etc.).
- Installing the batteries incorrectly may cause the unit to malfunction.
- Batteries (battery pack or batteries installed) shall not be exposed to excessive heat such as sunshine, fire or the like.
Notes concerning use:
- Replace the batteries if the operating distance is reduced or if the operation becomes erratic. Purchase 2 “AAA” size batteries (UM/SUM4, R3, HP-16 or similar).
- Periodically clean the transmitter on the remote control and the sensor on the unit with a soft cloth.
- Exposing the sensor on the unit to strong light may interfere with operation. Change the lighting or the direction of the unit.
- Keep the remote control away from moisture, heat, shock, and vibrations.
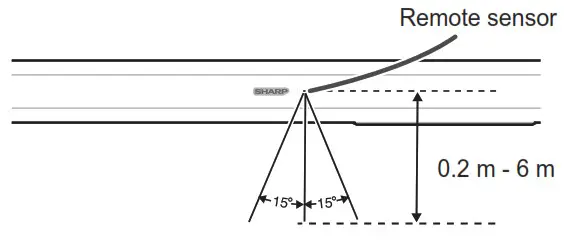
Test of the remote control
The remote control can be used within the range shown below:
System preparation
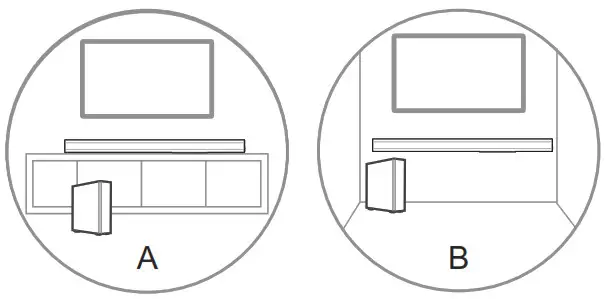
A: Normal Placement (place Sound bar on levelled surface in front of TV)
B: Wall Mounting
Wall mounting
Make sure to unplug the AC power lead before installing the sound bar or changing the position.
Cautions:
- Be very careful to prevent the sound bar [12.5.6 kg (35..733 lbs.)] from falling when mounting on the wall.
- Before mounting, check the wall strength. (Do not put on the veneer plaster or whitewashed wall. The sound bar may fall.) If unsure, consult a qualified service technician.
- Check all wall mount angle screws for looseness.
- Select a good location. If not, accidents may occur or the sound bar may get damaged.
- SHARP is not responsible for accidents resulting from improper installation.
Notes:
- Installation must be carried out by qualified personnel only. Incorrect assembly can result in severe personal injury and property damage (if you intend to install this product yourself, you must check for installations such as electrical wiring and plumbing that may be buried inside the wall). It is the installer’s responsibility to verify that the wall will safely support the total load of the sound bar and wall brackets.
- Additional tools (not included) are required for the installation.
- Do not overtightened screws.
- Keep this instruction manual for future reference.
- Use an electronic stud finder to check the wall type before drilling and mounting.
- Drill 4 parallel holes (Ø 5.5 mm – 6 mm each according to wall type) in the wall. The distance between the holes should be 893 mm. Firmly fix 1 dowel into each hole in the wall if necessary.
- If it is a solid brick, first insert the expansion rubber into the hole. Tighten the wall mount brackets on the wall with screws and screwdriver (not included). Make sure that they are securely installed.
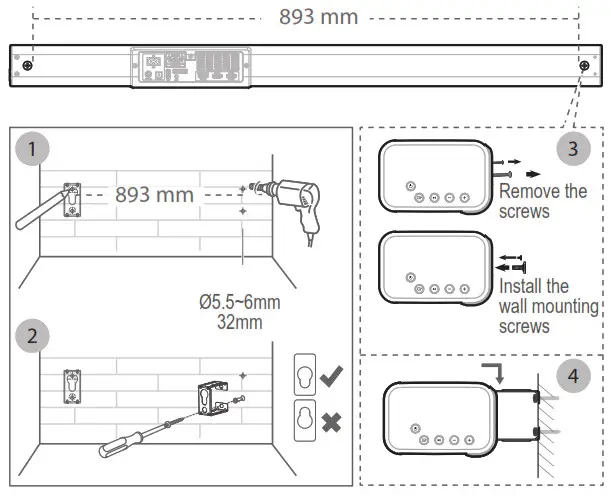
- Remove the screws at the back of the unit. Install the wall mounting screws into the back of the unit.
- Lift the unit onto the wall mount brackets and slot into place.
Connections
Dolby Atmos®
Dolby Atmos gives you amazing experience you have never heard before by overhead sound, and all the richness, clarity, and power of Dolby sound.
For using Dolby Atmos®
Dolby Atmos® is available only in HDMI mode. For the details of the connection, please refer to “HDMI Connection”.
- To use Dolby Atmos® in HDMI 1 / HDMI 2 / HDMI ARC mode, your TV has to support Dolby Atmos®.
- Make sure that “No Encoding” is selected for bitstream in the audio output of the connected external device (e.g. Blu-ray DVD player, TV etc.).
- While entering Dolby Atmos / Dolby Digital / PCM format, the sound bar will show DOLBY ATMOS / DOLBY AUDIO / PCM AUDIO.
- While the soundbar is using Dolby Atmos audio, you can only adjust the bass level of the subwoofer.
HDMI connection
Some 4K HDR TVs require the HDMI input or picture settings to be set for HDR content reception. For further setup details on HDR display, please refer to the instruction manual of your TV.
Using HDMI to connect the sound bar, AV equipment and TV:
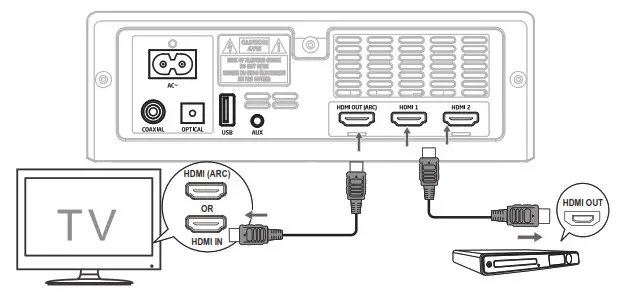
Method 1: ARC (Audio Return Channel)
The ARC (Audio Return Channel) function allows you to send audio from your ARC- compliant TV to your sound bar through a single HDMI connection. To enjoy the ARC function, please ensure your TV is both HDMI-CEC and ARC compliant and set up accordingly. When correctly set up, you can use your TV remote control to adjust the volume output (VOL +/- and MUTE) of the sound bar.
- Connect the HDMI cable (included) from unit’s HDMI (ARC) socket to the HDMI (ARC) socket on your ARC compliant TV. Then press the remote control to select HDMI ARC.
 TIPS:
TIPS: - Your TV must support the HDMI-CEC and ARC function. HDMI-CEC and ARC must be set to On.
- The setting method of HDMI-CEC and ARC may differ depending on the TV. For details about ARC function, please refer to your TV owner’s manual.
- Only HDMI cables of version 1.4 or higher can support the ARC function.
Method 2: Standard HDMI
If your TV is not HDMI ARC-compliant, connect your sound bar to the TV through a standard HDMI connection.
- Use an HDMI cable (included) to connect the sound bar’s HDMI OUT socket to the TV’s HDMI IN socket.
- Use an HDMI cable (included) to connect the sound bar’s HDMI IN (1 or 2) socket to your external devices (e.g. games consoles, DVD players and blu-ray).
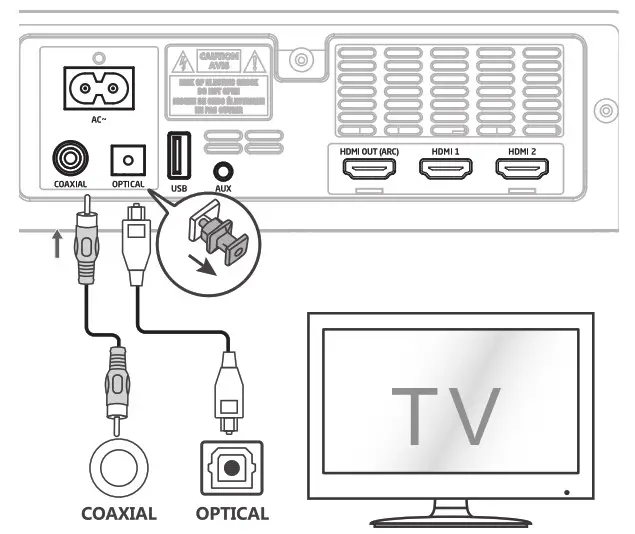
Using the OPTICAL socket
Remove the protective cap of the OPTICAL socket, then connect an OPTICAL cable (not included) to the TV’s OPTICAL OUT socket and the OPTICAL socket on the unit.
Using the COAXIAL socket
You also can use the COAXIAL cable (not included) to connect the TV’s COAXIAL OUT socket and COAXIAL socket on the unit.
TIPS:
The unit may not be able to decode all digital audio formats from the input source. In this case, the unit will mute. This is NOT a defect. Ensure that the audio setting of the input source (e.g. TV, game console, DVD player, etc.) is set to PCM or Dolby Digital (Refer to the user manual of the input source device for its audio setting details) with HDMI/HDMI ARC/OPTICAL/ COAXIAL input.
Using the AUX socket
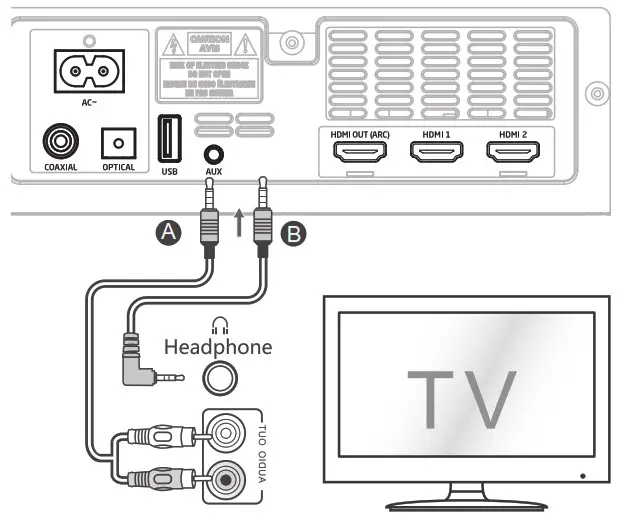 A. Use a RCA to 3.5mm audio cable (not included) to connect the TV’s audio output sockets to the AUX socket on the sound bar.
B. Use a 3.5mm to 3.5mm audio cable (included) to connect the TV’s or external audio device headphone socket to the AUX socket on the sound bar.
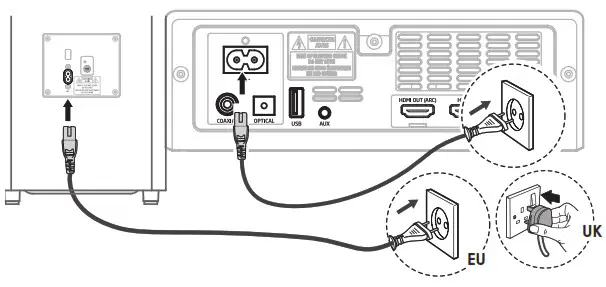
Power connection
Risk of product damage!
- Ensure that the power supply voltage corresponds to the voltage printed on the back or the underside of the unit.
- Before connecting the AC power cord, ensure you have completed all other connections.
Sound bar
Connect the mains cable to the AC~ Socket of the sound bar and then into a mains socket.
Subwoofer
Connect the mains cable to the AC~ Socket of the Subwoofer and then into a mains socket.
Pairing the wireless subwoofer with the sound bar
Automatic pairing
The subwoofer and sound bar will automatically pair when both units are plugged into the mains sockets and turned on. No cable is needed for connecting the two units.
- When the subwoofer is pairing with the sound bar, the Pair Indicator will flash fast.
- When the subwoofer is paired with the sound bar, the Pair Indicator will light up.
Notes:
- Do not press the Pair button on the rear of the 1subwoofer, except for manual pairing.
- If the automatic pairing fails, pair the subwoofer with the sound bar manually.
Manual pairing
- Ensure that all the cables are well connected and the sound bar is in Standby mode.
- Press and hold the Pair button on the rear of the subwoofer for a few seconds. The subwoofer will enter the pairing mode and the Pair Indicator will blink quickly.
- Press the button on the sound bar or on the remote control to switch the sound bar on.
- After the wireless connection succeeded, the Pair Indicator will light up.
- If the Pair indicator blinks, the wireless connection has failed. Unplug the cable of the subwoofer and then reconnect the main cable after 4 minutes. Repeat step 1 ~ 4.
Notes:
- If the wireless connection fails again, check if there is conflict or strong interference (for example, interference from an electronic device) around your location. Remove these conflicts or strong interferences and repeat the above procedures.
- The subwoofer should be within 6 meters of the sound bar in an open area.
- If a TV or an external device is connected, the sound bar AUX mode and the subwoofer will switch on automatically when the TV or the external device is switched on.
- If the sound bar is not connected with the subwoofer and it is in On mode, the POWER Indicator will flash. Follow step 1 ~ 4 above to pair the subwoofer to the sound bar.
Basic operation
Standby / ON
When you first connect the unit to the mains socket, the unit will be in Standby mode.
- Press the button on the unit or on the remote control to switch the unit ON.
- Press the button again to switch the unit back to STANDBY mode.
- Disconnect the mains plug from the mains socket
If you want to switch the unit OFF completely.
• If a TV or an external device is connected, the unit will switch on automatically when the TV or the external device is switched on.
• When there is no input signal from the unit in over 15 minutes, then it will automatically switch to Standby mode.
Select Modes
Press the ![]() button repeatedly on the unit or the
button repeatedly on the unit or the ![]() / HDMI /
/ HDMI /![]() buttons on the remote control to select the AUX, OPTICAL, COAXIAL, HDMI 1, HDMI 2, HDMI ARC, USB and BT (Bluetooth) mode. The selected mode will show on the display.
buttons on the remote control to select the AUX, OPTICAL, COAXIAL, HDMI 1, HDMI 2, HDMI ARC, USB and BT (Bluetooth) mode. The selected mode will show on the display.
Adjust the Bass / Treble
- Press the BASS +/- button on the remote control to adjust bass level.
- Press the TREBLE +/- button on the remote control to adjust treble level.
Turn the Surround Sound ON/OFF
- Press the SURROUND button on the remote control to turn on the surround sound.
- Press this button again to turn off the surround sound.
Adjust the Volume
- Press the VOL+ / VOL- buttons on the unit or on the remote control to adjust the volume.
- If you wish to turn the sound off, press the button on the remote control. Press the button again or press the VOL+ / VOLbuttons on the unit or on the remote control to resume normal listening.
Select Equaliser (EQ) Effect
While playing, press the EQ button on the remote control to select between preset equalisers:
- Movie (recommended for viewing movies),
- Music (recommended for listening to music),
- News (recommended for listening to news),
- Night (recommended for listening at night).
AUX / OPTICAL / COAXIAL / HDMI / HDMI ARC operation
- Ensure that the unit is connected to the TV or audio device.
- Press the button repeatedly on the unit or the / HDMI buttons on the remote control to select the AUX, OPTICAL, COAXIAL, HDMI 1, HDMI 2, HDMI ARC mode.
- Operate your audio device directly for playback features.
- Press the VOL +/ button to adjust the volume to your desired level.
Notes:
- The unit may not be able to decode all digital audio formats from the input source. In this case, the unit will mute. This is NOT a defect. Ensure that the audio setting of the input source (e.g. TV, game console, DVD player, etc.) is set to PCM or Dolby Digital (Refer to the user manual of the input source device for its audio setting details) with HDMI 1 /HDMI 2 / HDMI ARC / OPTICAL / COAXIAL input.
- When the DOLBY DIGITAL audio format is entered, the sound bar display shows DOLBY AUDIO.
- When the PCM audio format is entered, the sound bar display shows PCM AUDIO.
- When entering non-PCM or DOLBY DIGITAL audio formats, if there is no sound output from the unit and the display show NO SUPPORT.
Bluetooth operation
Pair Bluetooth-enabled Devices
The first time you connect your bluetooth device to this unit, you need to pair your device to it.
Notes:
- The operational range between this unit and a Bluetooth device is approximately 180 meters (without any object between the Bluetooth device and the unit).
- Before you connect a Bluetooth device to this unit, ensure you know the device’s capabilities. Compatibility with all Bluetooth devices is not guaranteed.
- Any obstacle between this unit and a Bluetooth device can reduce the operational range.
- If the signal strength is weak, your Bluetooth receiver may disconnect, but it will re-enter pairing mode automatically.
- During ON mode, press the button repeatedly on the unit or the button on the remote control to select Bluetooth mode. “NO BT” will show on the display if the unit is not paired to any Bluetooth device.
- Activate your Bluetooth device and select the search mode. “HT-SBW460” will appear on your Bluetooth device list.
• If you cannot find the unit, press and hold the button on the remote control or button on the unit to be searchable. The display will show “PAIR” and you will hear “Pairing” from the unit. - Select “HT-SBW460” in the pairing list. After successful pairing, you will hear “Paired” from the unit, and the display panel shows “BT”.
- Play music from the connected Bluetooth device.
To disconnect the Bluetooth function, you can:
- Switch to another function on the unit.
- Disable the function from your Bluetooth device.
The Bluetooth device will be disconnected from the unit after the “Disconnected” voice prompt. Press and hold the button on the remote control or button on the unit.
TIPS:
- Enter “0000” for the password if necessary.
- If no other Bluetooth device pairs with this unit within two minutes, it will recover its previous connection.
- The unit will also be disconnected when your device is moved beyond the operational range.
- If you want to reconnect your device to this unit, place it within the operational range.
- If the device is moved beyond the operational range, when it is brought back, please check if the device is still connected to the unit.
- If the connection is lost, follow the instructions above to pair your device to the unit again.
Listen to Music from Bluetooth Device
- If the connected Bluetooth device supports Advanced Audio Distribution Profile (A2DP), you can listen to the music stored on the device through this unit.
- If the device also supports Audio Video Remote Control Profile (AVRCP), you can use the unit’s remote control to play music stored on the device.
- Pair your device with the unit.
- Play music via your device (if it supports A2DP).
- Use supplied remote control to control playback (if it supports AVRCP).
- To pause/resume play, press the button on the remote control or on the unit.
- To skip to a track, press the buttons on the remote control.
USB operation
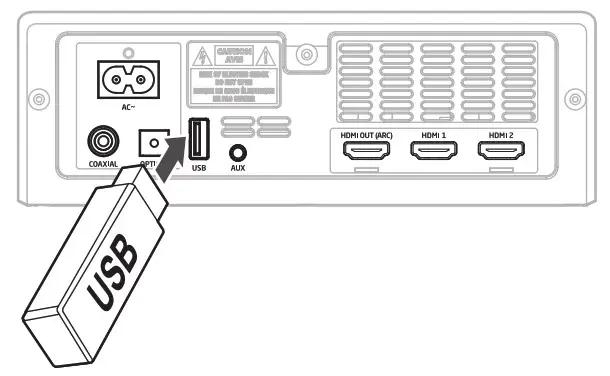
- Insert the USB device.
- Press the button repeatedly on the sound bar or remote control to select USB mode.
- During playback:
• To pause or resume play, press the button on the remote control or on the unit.
• To skip to the previous or next file, press the buttons on the remote control.
TIPS:
- The unit can support USB devices with up to 32 GB of memory.
- This unit can play MP3 only.
Troubleshooting
No power
- Ensure that the AC cord of the apparatus is properly connected.
- Ensure that there is power at the AC outlet.
- Press button to turn the unit on.
Remote control does not work
- Before you press any playback control button, first select the correct source.
- Reduce the distance between the remote control and the unit.
- Insert the battery with its polarities (+/-) aligned as indicated.
- Replace the battery.
- Aim the remote control directly at the sensor on the front of the unit.
No sound
- Make sure that the unit is not muted. Press MUTE or VOL+/VOL button to resume normal listening.
- Press button on the unit or on the remote control to turn the sound bar to standby mode. Then press the button again to turn the sound bar on.
- Unplug both the sound bar and the subwoofer from the mains socket, then plug them again. Turn on the sound bar.
- Ensure the audio setting of the input source (e.g. TV, game console, DVD player, etc.) is set to PCM or Dolby Digital mode while using digital (e.g. HDMI, OPTICAL, COAXIAL) connection.
- The subwoofer is out of range, please move the subwoofer closer to the sound bar. Make sure the subwoofer is within 5 meters from the sound bar (the closer the better).
- The sound bar may have lost connection with the subwoofer. Re-pair the units by following the steps on the section “Pairing the Wireless Subwoofer with the Sound bar”.
- The unit may not be able to decode all digital audio formats from the input source. In this case, the unit will mute. This is NOT a defect.
TV has display problem while viewing HDR content from HDMI source.
- Some 4K HDR TVs require the HDMI input or picture settings to be set for HDR content reception. For further setup details on HDR display, please refer to the instruction manual of your TV.
I can’t find the Bluetooth name of this unit on my Bluetooth device for Bluetooth pairing
- Ensure the Bluetooth function is activated on your Bluetooth device.
- Ensure you have paired the unit with your Bluetooth device.
- This is a 15 minutes power off function, one of the ERPII standard requirement for saving power
- When the unit’s external input signal level is too low, the unit will be turned off automatically in 15 minutes. Please increase the volume level of your external device.
The subwoofer is idle or the indicator of subwoofer does not light up.
- Please unplug power cord from the mains socket, and plug it in again after 4 minutes to resent the subwoofer.
Specification
As part of our policy of continuous improvement, SHARP reserves the right to make design and specification changes for product improvement without prior notice. The performance specification figures indicated are nominal values of production units. There may be some deviations from these values in individual unit.
Sound bar
| Power supply | AC 100-240V – 50/60 Hz |
| Power consumption | 30W |
| Power consumption (standby) | < 0.5 W |
| Output power | 2 x 25 W + 50 W (RMS) |
| Frequency response | 130 Hz – 20 KHz |
| Dimensions | Length: 950 mm Height: 70 mm Depth:105 mm |
| Weight | 2.6 kg |
Bluetooth
| Version | V 4.2 |
| Maximum power transmitted | 5 dbm |
| Frequency bands | 2402 MHz – 2480 MHz |
Wireless Subwoofer
| Power supply | AC 100-240V – 50’60 Hz |
| Power consumption | 25W |
| Power consumption (standby) | < 0.5 W |
| Output power | 120 W (RMS) |
| Maximum power transmitted | 3 dBm |
| Frequency response | 50 Hz – 130 Hz |
| Frequency bands | 5150 – 5250 MHz: 5725 – 5850 MHz |
| Dimensions | Length:240 mm Height:415mm Depth:240mm |
| Weight | 5.6 kg |
Remote control
| Distance/Angle | 6m / 30° |
| Battery type | AAA (1.5V X 2) |
MEMO
![]()
SHARP CORPORATION

Printed in China
20C R MW