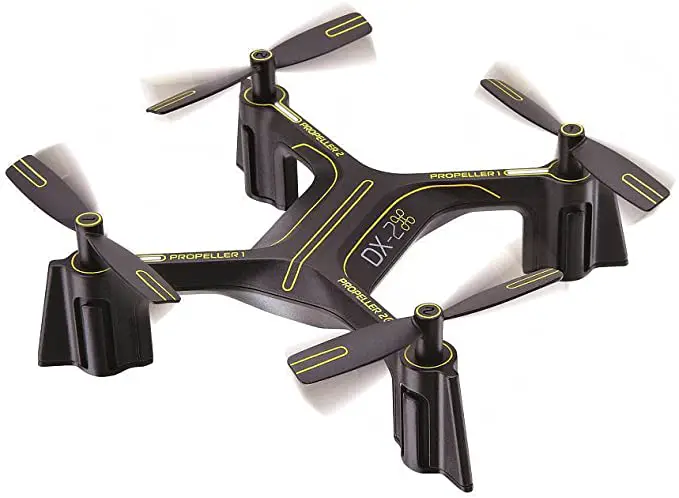
SHARPER IMAGE Rechargeable 2.4GHz DX-2 Stunt Drone

Getting to Know Your Drone
PLEASE READ ALL WARNINGS AND INSTRUCTIONS PRIOR TO USE. KEEP THIS DOCUMENT AS IT CONTAINS IMPORTANT INFORMATION ABOUT YOUR DRONE.
PREPARE FOR FLIGHT
- Drone must be charged before each use (Cable included)
- Indicator light will turn off once fully charged
- Install batteries in remote
PAIR YOUR DRONE
Before each flight pair the remote with the drone:
- Turn your drone on and place on a flat, level surface
- Turn on the remote on and move the left joystick down, then up, then down again
- The beep will indicate successful pairing
DIRECTIONAL LIGHTS
- Turn your drone on and place on a flat, level surface
- Turn on the remote on and move the left joystick down, then up, then down again
- The beep will indicate successful pairing
REMOTE CONTROL OVERVIEW
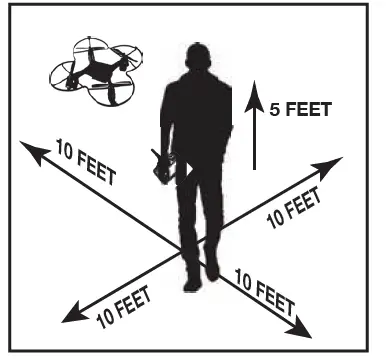
Practice flying your drone below 10 feet and at low speeds until comfortable with all controls to avoid unnecessary damage or injury
- Left joystick:
- Up/Down controls elevation
- Left/Right controls spin
- Right joystick: controls flight direction
- Direction Trim: use to eliminate drift
To cut power to drone, move left joystick to down position
QUESTIONS OR CONCERNS?
PLEASE GIVE US A CALL … WE’RE HERE TO HELP
CUSTOMER SERVICE
(800) 374-2744 Before calling please locate the 10-digit code printed on the back of your remote
ADULT ASSEMBLY, CHARGING, AND BATTERY INSTALLATION IS REQUIRED. ADULT SUPERVISION IS REQUIRED.
WARNING
CHOKING HAZARD – Small Parts. Not for Children under 3 years.
For technical support, please visit www.merchsource.com or call 1-800-374-2744. The artwork and design of this manual are protected by US copyright law and may not be reproduced, distributed, displayed, published or used for any purpose without prior written permission. It is not permitted to alter, remove or reproduce any trademarks or copyright notice from this manual.
Printed in China.
KEEP THIS INSTRUCTION MANUAL AS IT CONTAINS IMPORTANT INFORMATION FOR FUTURE REFERENCE.
Due to continuous product improvements, the picture on the manual may differ slightly from the actual product.
China Patent No. ZL201730239809.4
US Patent No. D902,078
RECHARGEABLE 2.4GHz – DX-2 STUNT DRONE
INTRODUCTION
Congratulations on your purchase of the Rechargeable 2.4 GHz DX-2 Stunt Drone. Get ready to soar to new heights. Master the art of drone flying and stunting with remote control maneuverability. This lightweight stunting drone will provide hours of fun.
SPECIFICATIONS
Drone Battery: 350 mAh Li-po
Remote Controller Battery: 6 x 1.5V AA Charging Time: Approximately 60 minutes Maximum Recommended Altitude 115 ft.
PRECAUTIONS BEFORE USE
- Not recommended for children under 14 years of age. As with all electrical products, precaution should be observed during handling and use to reduce the risk of electrical shock.
- Adult supervision is required at all times.
- Before each use, an adult should review the product and battery to determine that no damage or hazards exist.
- DO NOT TOUCH SPINNING PROPELLERS
- Do not allow anything to intentionally make contact in any way with spinning propellers
- Prevent contact with spinning blades by turning off remote prior to handling drone
- Use caution and pay attention to your surroundings while operating drone
- Do not fly drone into animals, people, or inanimate objects
- Keep drone away from power lines, buildings, trees, public areas, and any other potentially hazardous areas.
- Do not operate in rain, heavy wind, and or any type of severe weather.
- Do not land drone on wet surfaces.
- Never touch or allow others to touch drone while it is flying.
- Always turn drone off when it is not in use.
- Always fly drone in large open areas.
- Never fly drones above or near people, sudden changes in wind or other conditions could lead to unexpected crashes.
- Always use caution when flying drone vehicles, obey relevant laws, respect the privacy and property rights of others.
- The drone shall never be modified or used for anything except its intended purpose.
Note: Wind above a surface is higher than at ground level.
RECOMMENDED FOR INDOOR USE
WARNING: Changes or modifications to this unit not expressly approved by the party responsible for compliance could void the user’s authority to operate the equipment.
Fly-aways are the responsibility of the individual pilot and will not be replaced by the manufacturer.
This drone weighs 0.097lbs (43.8g). As of August 2016, the Federal Aviation Administration (FAA) requires registration of unmanned aircraft weighing more than .55lbs (250g). Visit faadronezone.gaa.gov for more information. Ongoing compliance with federal, state, and local laws is the owner’s sole responsibility. Always fly safely and respect the privacy of others.
This device complies with Part 15 of the FCC Rules. Operation is subject to the following two conditions: (1) this device may not cause harmful interference, and (2) this device must accept any interference received, including interference that may cause undesired operation.
Note: This equipment has been tested and found to comply with the limits for a Class B digital device, pursuant to part 15 of the FCC Rules. These limits are designed to provide reasonable protection against harmful interference in a residential installation. This equipment generates, uses and can radiate radio frequency energy and, if not installed and used in accordance with the instructions, may cause harmful interference to radio communications. However, there is no guarantee that interference will not occur in a particular installation. If this equipment does cause harmful interference to radio or television reception, which can be determined by turning the equipment off and on, the user is encouraged to try to correct the interference by one or more of the following measures:
- Reorient or relocate the receiving antenna.
- Increase the separation between the equipment and receiver.
- Connect the equipment into an outlet on a circuit different from that to which the receiver is connected.
- Consult the dealer or an experienced radio/TV technician for help.
TROUBLESHOOTING
When remote switch is turned on, the remote light does not illuminate:
- Check that batteries in the remote are installed correctly OR
- Replace with new batteries
When the remote is switched on, the remote LED is flashing and remote is beeping:
- Remote batteries are low; replace them with new batteries
Drone and remote properly pair, but the drone will not lift-off:
- Drone Li-Po needs charging. Use charging cable to connect the drone to power source.
After trimming the drone, the drone flight is very unstable and cannot fly properly:
- One or more blades are most likely damaged;
- Turn off the drone and remote.
- Replace with the proper number replacement blade and try flying again.
After impact, the drone is unstable:
- Put the left remote control lever to the left bottom and put the right remote control lever to the right bottom at the same time which connected to the drone (diagram to right).
- If the above does not resolve the issue, reboot the drone and controller and pair again.
Remote Controller and Drone can not be paired:
- CheckPoint: Remote Controller must be closed to Drone, not exceed 4 meters.
Note: If there are 2 sets of Drones within 4 meters for Pairing, you must pair one successfully before pairing the second set.
CONTENTS
REMOTE BATTERY INFORMATION
- Slide open the remote’s battery compartment.
- Install 6“AA” batteries as shown in the diagram above.
- Replace and close battery compartment.
PLEASE RECYCLE OR DISPOSE OF ELECTRONICS PROPERLY RECYCLING INFORMATION IS AVAILABLE AT WWW.MERCHSOURCE.COM
LITHIUM-POLYMER BATTERY WARNING
There is a risk of fire and personal injury if Li-Po battery is punctured, damaged or misused.
- Never expose battery to extreme temperatures or moisture.
- Do not subject battery to strong impacts.
- Always keep battery away from flammable materials.
- Only use manufacturer specified batter(ies), charger(s), and/or adapters, if applicable, specified by the manufacturer.
- Battery is not serviceable.
- Let battery cool to room temperature before charging.
- While charging, never leave battery unattended.
- Recycle or dispose of battery according to federal, state and local laws.
- The battery is not replaceable.
- Cells or batteries should not be disassembled, crushed, punctured, opened, or otherwise mutilated.
- Seek medical advice immediately if a cell or battery has been swallowed.
- In the event that the electrolyte comes into contact with the skin or eyes, immediately flush with fresh water for at least 15 minutes and seek medical advice.
- Keep cells or batteries clean and dry both during use and storage. Wipe metal terminals with a soft, dry cloth if they become dirty.
- Charge cells or batteries before use.
- On first use, or after prolonged periods of storage, it may be necessary to charge and discharge the cell or battery two or three times before obtaining maximum performance.
- It is best to charge the cell or battery at temperatures between 15℃ and 30℃ unless otherwise specified by the manufacturer.
- Retain original product literature for future reference.
BATTERY WARNING – ALKALINE (AA)
- Do not mix old and new batteries.
- Do not mix alkaline, standard (carbon-zinc), or rechargeable batteries.
- Insert batteries using the correct polarity. Do not short-circuit the supply terminal.
- Only use manufacturer specified batter(ies), charger(s), and/or adapters, if applicable, specified by the manufacturer.
- Always use, replace, and recharge (if applicable) batteries under adult supervision.
KEEP THIS INSTRUCTION MANUAL FOR REFERENCE
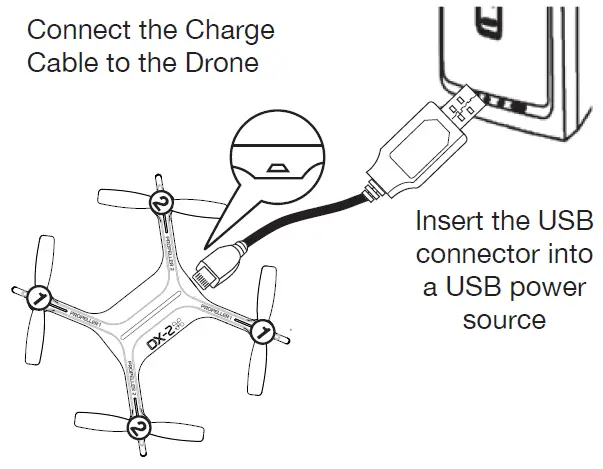
CHARGING BATTERY
Note: The Battery Charger will light up when it is charging the battery and turn off when the battery is fully charged. Charge time is approximately 60 minutes.
- Turn off the drone before charging.
- Connect the Battery Charger Cable to the port found on the rear of the drone
- Connect USB connector to the power source.
REMOTE OVERVIEW
OPERATING DRONE
Step 1 – Pre-Flight Checklist
- Read all warnings and instructions
- Install remote batteries,
- Make sure that drone and remote are powered off
- Install Blade Guards Drone,
- Charge batteries,
Step 2 – Choosing a location
- Drone is designed to be flown/driven indoors and outdoors
- Always make sure you have enough space to fly drone
- Always follow warnings,
Step 3 – Driving Mode
- Making sure your remote is off, slide drone switch to ON. Drone lights will begin to flicker
- Choose a flat even surface and follow the diagram
- Turn remote on. Bring the Throttle all the way up then bring it all the way down. Remote will beep and drone lights will flicker rapidly then turn on permanently once paired.
- Drone is ready for flight.
PRACTICE INDOORS BEFORE 1ST OUTDOOR FLIGHT. MAKE SURE TO RESET THE DRONE AFTER A HARD LANDING.
Step 4 – Lift Off
- Slowly and carefully bring the throttle up. Propellers will begin to spin and drone will begin to elevate. You can compensate for some of the drones drifting by using the Multi-Directional Button or by following step 5. You may need to practice this step several times before successfully getting drone into the air.
Step 5 – Drone Begins to Drift
Follow this step if your drone begins to drift while take off or during flight
- Drone drifts backward: Slide the Forward/Backwards Adjustment up
- Drone drifts forwards: Slide the Forward/Backwards Adjustment down
- Drone drifts left: Slide the Side to Side Adjustment to the right.
- Drone drifts right: Slide the Side to Side Adjustment to the left.
- Drone spins clockwise (viewing drone from top): Slide the Spin Adjustment to the left
- Drone spins counter-clockwise (viewing drone from top): Slide the Spin Adjustment to the right.
Always turn off the remote prior to retrieving or picking up the drone. This will help you avoid accidentally activating propellers.
Step 6 – Operating Drone in Flight
The drones range is approximately 150 feet
- Read and be aware of all warnings found on page 1.
- Maintain your desired elevation by using the Throttle
- Use the Throttle joystick in a circular motion to spin the drone
- Use the Multi-Directional Joystick to move forwards, backward, and side to side
- Review step 5 if your drone begins to drift
MODES
Auto Landing Button
- Make sure you have achieved level, balanced flight, where the drone is neither climbing nor descending. This mode allows you to safely and slowly land your drone without having to control the speed. It is done for you automatically.
- The ideal auto landing height is 25-30 ft.
- Press the “-“ button to trigger auto land. Remote will beep continuously until drone lands
- Do NOT touch the left control stick. This will interrupt the landing sequence.
- To steer the drone during landing, use the right control until the drone has reached the ground.
- Press the “-“ button again to exit auto-landing mode.
NOTE: Please make sure the throttle joystick is on a down position before exit auto-landing mode
Auto Orientation Button
- Auto Orientation default setting is off. To enter this mode press Auto Orientation “+” button. The Remote will beep twice.
- After drone success is paired, the 2 white LED lights toward orientation will be the original forward orientation, when the drone is in auto orientation mode, whatever the drone spin, the forward orientation will be the previous original forward orientation.
- Remote will beep every 6s to indicate the drone is in Auto Orientation mode.
- To exit mode, press the “+“ button. Remote will sound 1 long beep indicating that it has exited Auto Orientation mode.
Stunt Button
Once you are comfortable flying the drone, use the Stunt Button to perform acrobatic stunts.
- Hover the drone to at least above 10 feet.
- Press the Stunt Button. You will hear beeping coming from the remote
- Move the Multi-Directional Button to the desired direction that you would like the drone to flip
- Once you are comfortable with Stunt Mode, you can create multiple flips. Press the Stunt Button and then move the Multi-Directional Button to the desired direction you would like the drone to flip, continue to hold the joystick in the desired direction of the stunt. The drone will continue to flips in the direction you held the joystick, for a maximum of 3 stunts in a row.
REPLACING PROPELLERS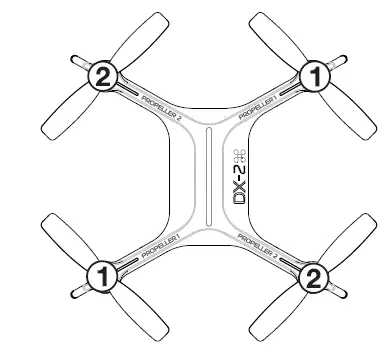
- Follow the diagram to the right.
- Make sure you installed the correct blade. Each blade has a number written on it. Match the blades with the corresponding number on the drone.
- Carefully unscrew the propellers and replace them with the new blade.
NOTE: Blade 1 turns counter-clockwise and Blade 2 turns clockwise
TIPS
- Do not crash the drone into sand or dirt. Drone gears may become clogged
- When first learning to fly, practice lifting off and hovering
- Stay several feet from walls and buildings
- Always Press Throttle all the way down after crashing or when something gets stuck in propellers
- Never fly drones above or near people, sudden changes in wind or other conditions could lead to unexpected crashes.
- Always use caution when flying drone vehicles, obey relevant laws, respect the privacy and property rights of others.
- The drone shall never be modified or used for anything except its intended purpose.