SHARPER IMAGE®
STEADY FLYING WI-FI CAMERA
Item No. 207162

Thank you for choosing the Sharper Image Steady Flying Wi-Fi Camera. Please take a moment to read this guide and store it for future reference.
CONTROLLER COMPONENTS

SETTING UP THE CONTROLLER/DRONE
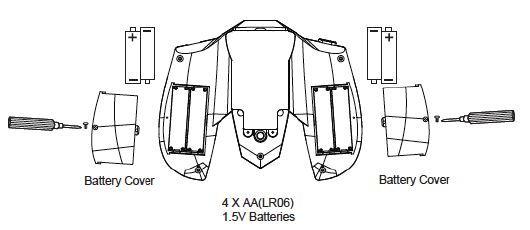
INSTALLING THE CONTROLLER BATTERIES:
- Unscrew the battery cover and insert 4 AA batteries, making sure you match them to their corresponding polarities
- Reattach the battery cover


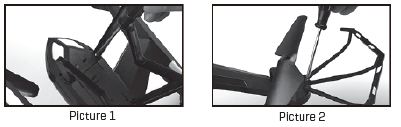
INSTALLING THE PROTECTOR AND LANDING GEAR
- Put the landing gear into the main body and fix it with the screw as seen in Picture 1
- Put the protection circle into the main body and fix it with the screw as seen in Picture 2

CHARGING YOUR DRONE BATTERY
BATTERY WARNING:
Lithium Polymer batteries can expand, burst or catch fire if used incorrectly, causing both property damage and/or personal injury. It is essential that you follow all the included instructions and safety warnings in full. The manufacturer, distributors and retailers will assume no liability for the failure to comply with these safety instructions and warnings.
CHARGING INSTRUCTIONS:
- The battery must be removed from the product before charging
- If the battery has just been used, please let it cool down to room temperature before charging
- Charging must only be undertaken by an adult, using only the charger included with this product
- Always charge the battery on a non-flammable, heat-resistant surface with non-flammable surroundings
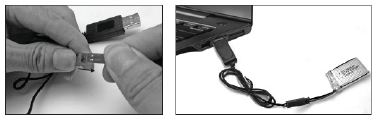
- Connect the battery to the USB charging cable
- Connect the USB charging cable to your USB charging devices. The Red LED on the USB will turn off while charging and will turn on once the battery is fully charged. It takes around 60 minutes to fully charge the battery. Never continue to charge the battery after the Red LED has turned on
- Lithium Polymer batteries do not last forever. If your battery becomes damaged in a crash or no longer charges properly, immediately replace it with a new battery. To prolong the life of your battery, it is always best to retain a bit of charge in your battery prior to charging it. NOTE: Only use the USB charging cable that was included with the device

SAFE FLIGHT ENVIRONMENT
- Make sure the surrounding area is free of all people, pets or other obstacles before you start to fly
- The drone is designed for outside flying, or indoor flying if you have enough space (do not use in strong wind)
- Leave 1.5 meters between you and the drone at all times
SETTING UP THE SIGNAL CONNECTION
STEP 1
Press down on the camera and push the cover of the Battery Housing to the backside (Picture 1) — this will open the cover. Connect the Battery Plug Cable to the Battery Socket Cable, making sure you follow the “One Orientation” fit design of the plug and socket. DO NOT ATTEMPT TO CONNECT IT THE WRONG WAY (Picture 2). Insert the Battery into the Battery Housing (Picture 3). Close the cover. Turn on the Power Switch on the Drone. The LED on the Drone will start to flash. Place the Drone down on a flat surface.
STEP 2
Press down on the controller Power Switch to turn the power on. The controller will make ONE short BEEP sound and the red LED will flash. To pair the signals of the Drone and the Controller, you must raise the Up/Down Lever on the controller all the way to the top. It will make one short BEEP sound. Next, lower it all the way to the bottom. It will make one short BEEP sound. The LED on the Drone will remain on, indicating that the signals have been paired.
STEP 3
Always turn the Drone’s Power Switch to the Off position after flight.
STEP 4
Always turn the controller off after flight. Remove all batteries if the drone will not be used for an extended period of time.
FLIGHT ADJUSTMENT SECTION
When you lift your Drone into the air and don’t use any of the other direction levers, your Drone should simply hover in one spot without moving in any other direction. If it doesn’t, follow these instructions to get your Drone to hover. This is called TRIMMING, and it is always needed before your Drone’s first flight.
AUTO TRIM FUNCTION
Push both control levers to the positions shown in the picture and hold them for one second. The lights on the drone will start to flash. Now the drone is recovered to its original factory settings and is ready to fly again.
HEADLESS FUNCTION
Press the Headless Button once to enter Headless Mode. The Front Red LED on the Drone will flash. To quit Headless Mode, press the Headless Mode Button again.
REPLACING BLADES/FIXING ISSUES
BLADE REPLACEMENT:
Your Drone blades are very strong, but sometimes they can get damaged during a crash. You have spare blades in the box and replacing them is as easy as simply placing a new one over the motor bar. You must always replace an A Blade with an A Blade, and a B Blade with a B Blade.
DRONE NOT LIFTING OR NOT FLYING IN THE PROPER DIRECTION:
- The most common reason for a Drone not lifting or flying properly in a chosen direction is that you have hair or debris wrapped around one or more of the blades. Simply remove the debris and blade, then place the blade back on
- The batteries in the Drone and/or Controller need charging or replacing
- You may have knocked your Trim Button settings out of sync. Follow the instructions in the beginning of this manual to reset back to factory settings, then re-trim as needed
WIFI CAMERA SETUP:
- INSERT THE SMARTPHONE
Pull out the smartphone holder and place the smartphone inside: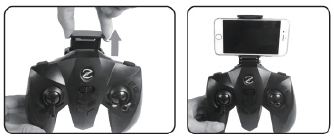
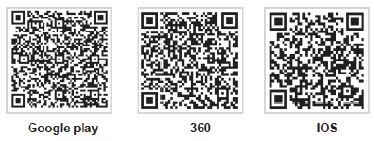
- SCAN THE QR CODE BELOW OR SEARCH FOR AND DOWNLOAD THE “WIFI UFO” APP TO YOUR DEVICE.
- SETUP INSTRUCTIONS
• Turn your Drone to the On position. The Drone is now sending out its own Wi-Fi network signal
• Open the SETTINGS menu on your device and search for new Wi-Fi networks. You should be able to see a new one called “Wi-Fi UFO-XXXXX” (switch your current Wi-Fi network connection on your device to this new network
• Open the Wi-Fi UFO app and press the PLAY icon. You should now be able to see the footage from the camera on the screen of your device
• You can now choose to fly the drone using your smartphone screen or the controller. If using the controller, you can now clip your smartphone to the clip on top of the controller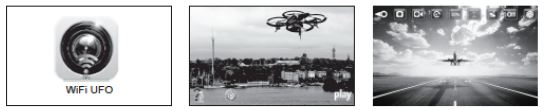


WARNING: For beginners, we advise that you always fly the drone using the controller. Flying using a smartphone screen is very difficult.
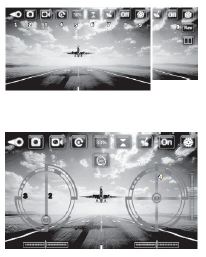
APP FUNCTIONS
- Go back
- Take photo
- Record video
- Photo and video playback
- Drone speed
- Control reverse (when flying in Smartphone Screen Mode, you can switch controls if you’re left handed)
- Gravity sensor mode
- Switch between controller flying and smartphone flying
- Advanced functions (including VR mode)

CONTROLLING BY SMARTPHONE (FOR ADVANCED USERS ONLY):
- Press button 8 to switch to Smartphone Screen Mode
- Use the smartphone screen controls in the exact same way you would use the controller
HOW TO TAKE A PHOTO/VIDEO

- Take a photo by pressing the Photo Button once. The photo will be captured and saved to your smartphone.
- Start filming by pressing the Video Button once, then press it again to stop filming. The video will be captured and saved to your smartphone.
- To view Photos and Videos, press the Photo and Video Playback Button, where it will take you to the media storage interface. Press the Photo Button to view saved photos. Press the video button to view saved videos.
- To return to the normal app screen, press the Go Back button.
WARNINGS
- This device is designed for ages 14+
- Adult supervision is always advisable with flying toys
- Always ensure your flight area is completely free of obstacles before taking off, and that the drone is always flown in excess of 1.5 meters from yourself and others
- Remove all batteries from the drone and controller when not in use
- Never overcharge
- Never leave unattended when charging
- Never touch the drone’s motors during or after flying as they can get hot
- Never touch the blades when they are in motion
- If the drone becomes damaged, stop using it immediately
- Do not dispose of any drone or controller parts in normal garbage; all parts should be taken to your local recycling center
- The battery in the drone should never be exposed to any form of high temperature (never dispose of it in a fire)
WARRANTY/CUSTOMER SERVICE
Sharper Image branded items purchased from SharperImage.com include a 1-year limited replacement warranty. If you have any questions not covered in this guide, please call our Customer Service department at 1 (877) 210-3449. Customer Service agents are available Monday through Friday, 9:00 a.m. to 6:00 p.m. ET.