Item No. 207051
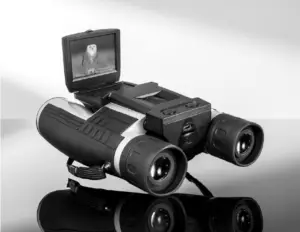
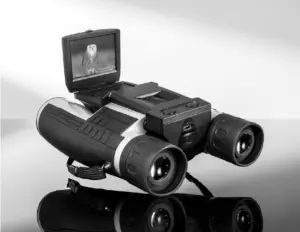
Thank you for purchasing the Sharper Image 12X Zoom Digital Camera Binoculars. Please take a moment to read this guide and store it for future reference.
INTRODUCTION:
12X Zoom Digital Camera Binoculars combine an all-optical binocular system with a high definition digital video camera. The LCD display gives you quick control over various functions to help you capture the perfect photo or video. Use the 12X magnification, 32 mm aperature binocular system to get a closer look at the subject of your choice. Ideal for hunting, birdwatching, surveillance jobs, sporting events, outdoor adventures and more!
INCLUDED COMPONENTS:
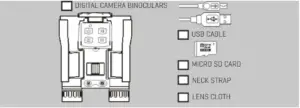
Before using the device, check to make sure that all items listed below have been included with your device.
1. POWER BUTTON 2. MENU BUTTON 3. UP BUTTON 4. DOWN BUTTON 5. SNAP/OK BUTTON 6. MODE BUTTON 7. RESET 8. LENS CONE 9. BINOCULAR FOCUSING KNOB 10. ADJUSTABLE EYEPIECE 11. MICROPHONE 12. TRIPOD CONNECTOUR 13. BATTERY COVER 14. EYEPIECE 15. OBJECTIVE LENS 16. LCD DISPLAY 17. USB INTERFACE 18. MICRO SD-SOCKET 19. LENS

HOW TO USE:
EYE DISTANCE ADJUSTMENT
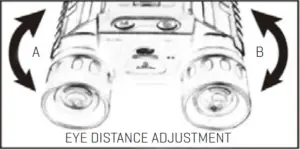
Hold the binoculars in a neutral, observational position and rotate the two lens cones (A) and (B) inward or outward until you see a single circle through the lenses. Make sure to adjust this every time you use the device.
FOCUSING
Close your right eye and observe with your left eye. Rotate the central focusing knob (A) until the image is clear. Next, close your left eye and observe with your right eye. Rotate the right adjustable eyepiece (B) until the image becomes clear. At this point the focal lengths on both sides have been adjusted, so you only need to rotate the central focusing knob to focus on targets.

USERS WITH GLASSES
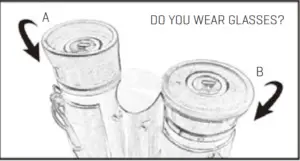
If you wear glasses, simply fold down the rubber eye flaps (A) and (B), and move your eyes closer to the eyepieces in order to establish a proper field of view.
CLEANING & MAINTENANCE:
- To remove dust or fingerprints on the lenses, use a clean microfiber cloth
- Only use liquid cleaning products recommended for prescription lenses
- Do not attempt to clean the inside of the device
- Keep your binoculars in a dry, ventilated place when not in use
- Staring at the sun may cause damage to your eyes
BATTERY:
This item has a built-in rechargeable Lithium battery that automatically charges the camera every time you connect it to a computer via USB cable. When the battery is low, the LCD display shows “Battery Low” accompanied by a red indicator light. After recharging the battery, the indicator light will turn off.
INSTALLING MICRO-SD CARD:
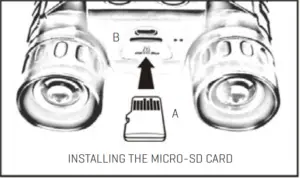
The power must be OFF when installing the included Micro-SD card. Make sure the Micro-SD card (A) is inserted into the correct slot (B) with the printed side facing down and the gold contact pins facing in. Insert the card until you hear a click.
To remove the Micro-SD card you must turn the camera OFF. Once it is OFF, simply push the card inwards to disengage the locking mechanism (the card will pop out).
It is recommended that you use Class 4 or above SD cards with a minimum of 4GB storage. Low speed cards do not support 1080p recording, so this could result in lower quality video.
To safely use your Micro-SD card, do not remove it or turn off the power of your device when the card is being read. Always format a new card before using it.
CAMERA:
MODE OPTIONS
With the camera turned ON, press the Mode button to select the mode you want to use: Photo Mode, Replay Mode or Video Mode.
PHOTO MODE
The camera automatically stays in Photo Mode when it is turned ON. You can either take a photo when looking through the binocular lenses, or with the LCD screen opened (Snap/Ok button).
VIDEO MODE
Press the Mode button to switch to video mode, then press the Snap/Ok button to start recording video. Press Snap/Ok again to play videos or review photos.
REPLAY MODE
Press the Mode button to switch to Replay Mode, then press the Up and Down buttons to select photos or videos. Press Snap/Ok to play videos or review photos.
To use the digital zoom feature, press the Up and Down buttons when in Photo or Video Mode to select your digital zoom range. For best results, hold the binoculars tightly or use a tripod to prevent movement and/or shaking.
PHOTO/VIDEO/REPLAY SETTINGS:
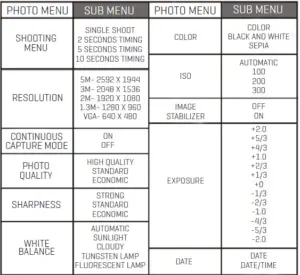
CHANGING PHOTO SETTINGS Select Photo Mode
- Press the Menu button to access the photo menu settings
- Press the Up and Down buttons to navigate the menu options and to select the setting you want to change
- Press the Snap/Ok button to access setting submenu options
- Press Snap/Ok to confirm
CHANGING VIDEO SETTINGS
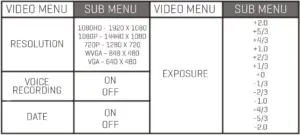
- Select Video Mode. Press the Menu button to access video menu settings
- Press the Up and Down buttons to navigate the menu options
- Press the Snap/Ok button to access setting submenu options
- Press Snap/Ok to confirm
CHANGING REPLAY SETTINGS
- Select Replay mode
- Press the Menu button to access the video menu settings
- Press the Up and Down buttons to navigate the menu options
- Press the Snap/Ok button to access setting submenu options
- Press Snap/Ok to confirm

SYSTEM SETTINGS:
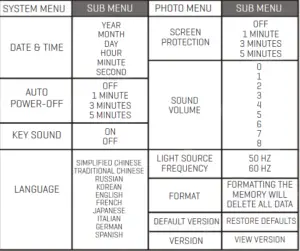
CHANGING SYSTEM SETTINGS
- In Photo or Video Mode, press the Menu button twice to access System Settings
- Press the Up and Down buttons to navigate the menu options
- Press the Snap/Ok button to access setting submenu options
- Press Snap/Ok to confirm
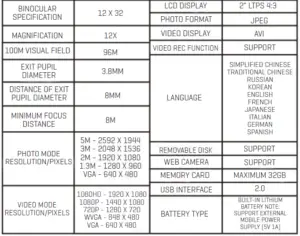
SPECIFICATIONS:
PC & MAC CONNECTION:
HOW TO CONNECT THE 12X ZOOM DIGITAL CAMERA BINOCULARS TO YOUR COMPUTER
- Connect the USB to the camera while the device is turned OFF. Turn the camera ON and the LCD screen will show two options: Storage and Camera
- To upload your saved photos and videos to your computer, select the Storage option and press the Snap/Ok button. Your computer will recognize the device
- To use the camera as a webcam, select the Camera option and press the Snap/Ok button. Your computer will recognize the camera as a webcam to be used with specific programs like Skype, Facebook, etc. This option only works with the following operating systems: Windows 2000/XP/Vista/Windows 7, MAC OS X 10.3.6 and above
WARRANTY / CUSTOMER SERVICE
Sharper Image branded items purchased from SharperImage.com include a 1-year limited replacement warranty. If you have any questions not covered in this guide, please call our Customer Service department at 1 (877) 210-3449. Customer Service agents are available Monday through Friday, 9:00 a.m. to 6:00 p.m. ET.
