![]()
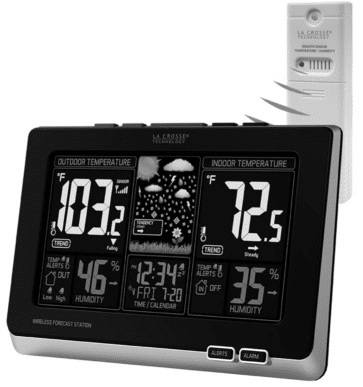
La Crosse Wireless Color Weather Station
POWER UP
- Insert 2-AA batteries into your Outdoor Sensor.
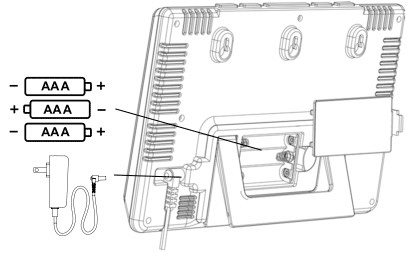
- Insert the 5 volt power cord into an outlet, then into your
Weather Station. Optional: Insert 3-AAA batteries for backup. - Adjust time and date settings on your Weather Station.
- Once the Outdoor Sensor is reading to your station, place it
outside in a shaded location.
Watch sensor mounting video: http://bit.ly/TH_SensorMounting

Outdoor Sensor TX141TH-Bv3
SETTINGS
- Hold the TIME SET button to enter the Settings Menu.
- Press the ARROW buttons to adjust the values.
Hold to adjust quickly. - Press the TIME SET button to confirm and move to the next
menu item.

- Press and release the TIME SET button to manually search for the
- WWVB Atomic Time Signal. Tower Icon will flash while searching.
- Press and release the TIME SET button to stop a search.
- For information about WWVB Atomic Time visit:
- http://bit.ly/AtomicTime
ALARM
- Hold the ALARM button until the Alarm Hour begins to flash.
- Press the ARROW buttons to adjust values, hold to adjust
quickly. - Press the ALARM button to confirm and move to the Alarm
Minutes. - Use the ARROW buttons again to adjust, and press ALARM to
confirm and activate the alarm.
This station uses a crescendo alarm, which will increase in volume over time. If no buttons are pressed within 2 minutes, it will shut off automatically.
DEACTIVATE/ACTIVATE ALARM
- Press and release the ALARM button to deactivate or activate the alarm. The alarm time will show for 2 seconds.
- Alarm Icon (bell) and ALARM ON will show when active
- ALARM OFF will show when inactive.
SNOOZE
- When alarm sounds, press the SNOOZE/LIGHT button to silence alarm for 10 minutes.
- The Alarm Icon Zz will flash
- Press any button except SNOOZE/LIGHT to silence the alarm
for 24 hours.
TEMPERATURE ALERTS
- Hold the ALERTS button for 3 seconds.
- The temperature alert section will light up, and the alert value
will begin to flash. - Press and release the ARROW buttons to adjust alert values.
- Press and release the ALERTS button to confirm & move to the
next alert.
ARM/DISARM ALERTS
- Press and release the ALERTS button to toggle between the alerts. Outdoor HI / Outdoor LOW / Indoor HI / Indoor LOW
- Press the UP ARROW button to arm the alert. Alert Bell Icon will show.
- Press the DOWN ARROW button to disarm the alert.

ACTIVE ALERT
The Bell Icon will flash, indicating which alert is sounding.
- Sounding alerts will beep once per minute while in alert range.
- Press any button to stop a sounding alert. The Bell Icon will remain flashing until out of the alert range.
OTHER BUTTON FUNCTIONS
HEAT/DEW button:
• Press to view Heat Index and Dew Point
• Hold to search for outdoor sensor
HI-LOW-OFF button:
• Press and release to adjust the backlight
DOWN ARROW button:
• Press to view minimum temperature/humidity records
• Hold to reset records
UP ARROW button:
• Press to view maximum temperature/humidity records
• Hold to reset records
LOW BATTERY
• If a low battery icon is displayed in the Outdoor Temperature section,
replace batteries in the sensor.
• If a low battery icon is displayed in the Indoor Temperature section, or
next to the Time, replace batteries in your station.
WE’RE HERE TO HELP!
Our knowledgeable customer support team is available:
Monday-Friday, 8am-6pm CST. Phone: 1.608.782.1610
JOIN THE CONVERSATION
Ask questions, watch detailed setup videos, and provide feedback on our social media outlets!
SENSOR WEATHER SHIELD-NOT INCLUDED
• The Sensor Weather Shield is designed to protect your outdoor sensor from rain and snow.
• This shield will offer limited protection from the sun’s heat.
• Optional purchase at: http://bit.ly/925-1418
SPECIFICATIONS
Indoor:
Temperature Range: 32°F to 122°F (0°C to 50°C) Humidity Range: 10% – 99% RH
Outdoor:
Temperature Range: -40°F to 140°F (-40°C to 60°C) Humidity Range: 10% – 99% RH
Transmission Range: over 330 feet (100 meters) in open air RF 433MHz
Power Requirements:
308-1414Bv2 / 308-1414Wv2: 5-volt power adapter (included)
AC6: GPU280500150WA00
Optional: 3 “AAA” LR6 Batteries (not included) TX141TH-Bv3: 2 “AA” LR6 Batteries (not included)
Battery Life:
308-1414Bv2 / 308-1414Wv2: over 36 months with power cord as primary power TX141TH-Bv3: over 12 months with reputable batteries
Dimensions:
308-1414Bv2 / 308-1414Wv2: 8.34” L x 1.03” W x 5.48” H (
21.18cm L x 2.62cm W x 13.92cm H)
TX141TH-Bv3: 1.57” L x 0.82” W x 5.11” H (3.98cm L x 2.08cm W x 12.98cm H)
WARRANTY INFO
La Crosse Technology, Ltd. provides a 1-year limited time warranty (from date of purchase) on this product relating to manufacturing defects in materials & workmanship. La Crosse Technology, Ltd
2830 S. 26th St.
La Crosse, WI 54601
For Full Warranty Details, Visit: www.lacrossetechnology.com/support
CARE + MAINTENANCE
• Do not mix old and new batteries.
• Do not mix Alkaline, Lithium, standard, or rechargeable batteries.
• Always purchase the correct size and grade of battery most suitable for intended use.
• Clean the battery contacts and also those of the device prior to battery installation.
• Ensure the batteries have with correct polarity (+ / -).
• Remove batteries from equipment that will not to be used for an extended period.
• Promptly remove expired batteries.
FCC STATEMENT
This equipment has been tested and found to comply with the limits for a Class B digital device, pursuant to part 15 of the FCC Rules. These limits are designed to provide reasonable protection against harmful interference in a residential installation. This equipment generates, uses and can radiate radio frequency energy and, if not installed and used in accordance with the instructions, may cause harmful interference to radio communications. However, there is no guarantee that interference will not occur in a particular installation.
If this equipment does cause harmful interference to radio or television reception, which can be determined by
turning the equipment off and on, the user is encouraged to try to correct the interference by one or more of
the following measures:
• Reorient or relocate the receiving antenna.
• Connect the equipment into an outlet on a circuit different from that to which the receiver is connected.
• Increase separation between equipment & receiver.
• Consult the dealer or an experienced radio/TV technician for help.
This device must not be co-located or operating in conjunction with any other antenna or transmitter. Operation is subject to the following two conditions:
(1 ) This device may not cause harmful interference, and (2) This device must accept any interference received,
including interference that may cause undesired operation.
CAUTION!
The manufacturer is not responsible for any radio or TV interference caused by unauthorized changes or modifications to this equipment. Such changes or modifications could void the user authority to operate the
equipment.
All rights reserved. This manual may not be reproduced in any form, even in part, or duplicated or processed using electronic, mechanical or chemical process without the written permission of the publisher.
This booklet may contain errors or misprints. The information it contains is regularly checked and corrections are included in subsequent editions. We disclaim any responsibility for any technical error or printing error, or their consequences. All trademarks and patents are recognized.
WARNING: This product can expose you to chemicals, including styrene, which is known to the State of California to cause cancer. For more information, go to www.P65Warnings.ca.gov
FAQS
Looking to mount this unit flat on a wall. Wtith power cord attached, would this unit sit flush against the wall?
Yes, it can be wall mounted and sit flush against the wall even with the cord attached.
Why does my webcam have a green light?
The green light on the webcam indicates that the webcam is connected to your computer.
Why does my webcam have a red light?
The red light on the webcam indicates that the camera is in use by an application.
Why can’t I see myself in the video call?
Make sure that you are using a supported operating system. For more information, see “Supported Operating Systems” on page 3.
Why can’t I hear audio when I am using video calling?
Make sure that you are using a supported operating system. For more information, see “Supported Operating Systems” on page 3.
Why doesn’t outside temp register? Inside temp is working I also put in brand new batteries?
Check that your batteries are charged to 1.5. If you don’t have a way (voltage meter) to check, try brand new batteries that are new off the store shelf. For the sync-up process, the batteries must be 1.5 or better. It’s the #1 problem we see.
Does it come with the cat?
No cat included, but it is a great product.
where does the display show daily min/max records?
If you press the temperature button on top of unit it will display the hi-lo info on the front display.
What is the purpose of the Mount that you can order for an extra charge? Is it a protective enclosure or do you need it to mount the sensor to a wall?
First, don’t mount the sensor on the outside wall of your house. Heat exchange from inside will skew the readings. If you’re speaking of
the weather shield, you don’t need it, but the sensor is not waterproof, so it’s a good idea. It will mount to a pole, flat surface, etc. Try to
mount it in a shaded area. Mine is on the north side of a power pole in my yard.
does it track chill hours?
No, but if it did it wouldn’t do it accurately anyhow. The outside temp was always off 20 degrees, it has never worked, La Crosse support was useless and consequently, it sits on a bureau in my bedroom and acts as my night light. The internal temperature is always the same.
Have a ceiling projector?
No it dosn’t have a ceiling projector
What is the MHz frequency of this forecast station?
433 MHz
Does it give dew point?
YES, and have found to be very close to local TV weather reports. Cycle through button on top (Temp button) & will get day High Temp, Day low temp, Heat Index, then comes DEW POINT! Hope this helps.
Why does this turn off? I bought 2 of these and both arent visible after I set them. Need to stay lit.
Will only stay lit plugged in. Will not stay lit on battery power.
Does this model have the option to display seconds?
No, no seconds display.