
User Manual
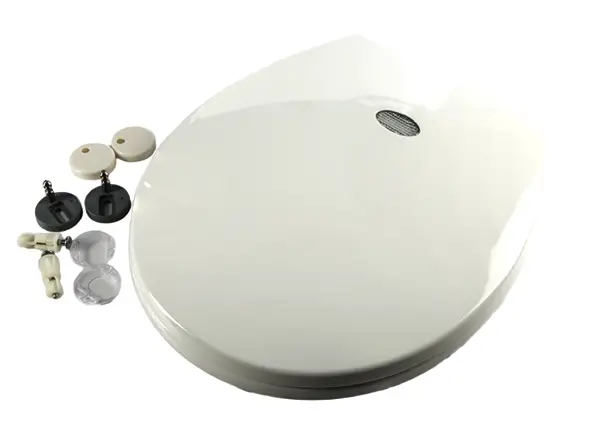
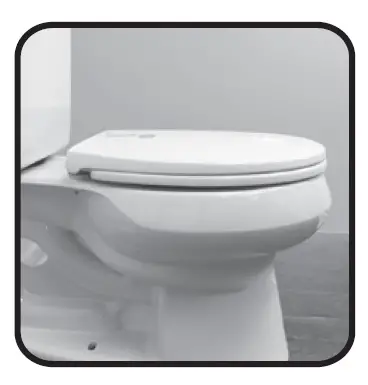
Sharper Image Night Light Toilet Seat
Sound Activated
NIGHTLIGHT TOILET SEAT
With Slow-Close Hinge
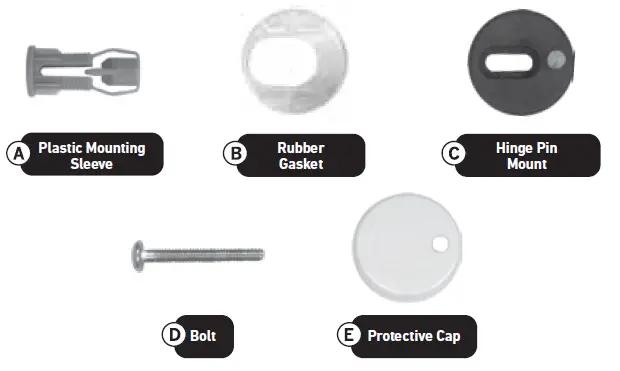
Package List:
Read all instructions very carefully BEFORE installation.
STEP 1.
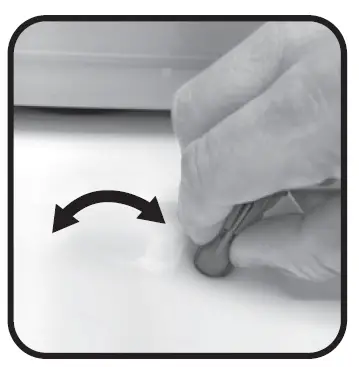
Insert the 2 Plastic Mounting Sleeves (A) into the mounting holes on your toilet bowl by squeezing the 2 plastic arms together with your thumb and forefinger.
Remove the Bolt (D) from the plastic sleeve.

Push the sleeve all the way into the hole until the flange is flush with the top of the bowl.
STEP 2.
Insert the Rubber Gasket (B) into the plastic bottom of each Hinge Pin Mount (C).
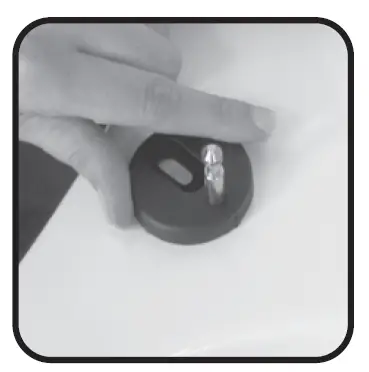
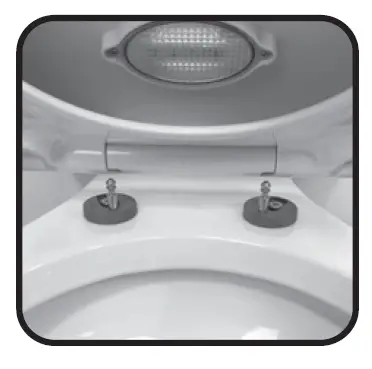
Place the Hinge Pin Mount (C) over the Plastic Mounting Sleeve (A) in the position shown below.
STEP 3.
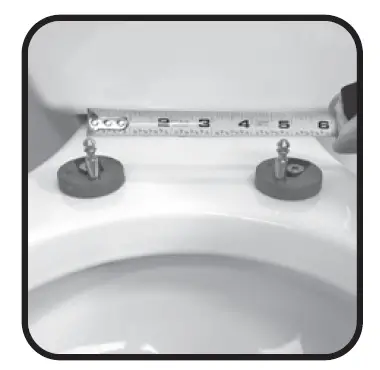
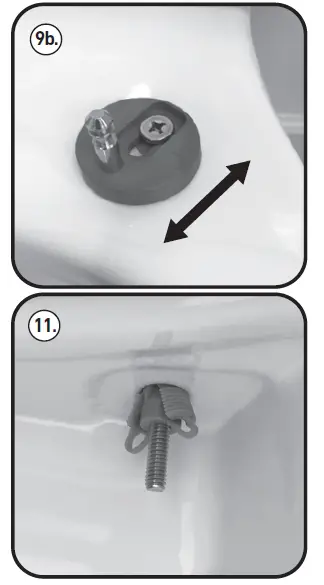
Insert Bolt (D) into Plastic Hinge Mounting Sleeve (A) and tighten to a snug fit only. DO NOT FULLY TIGHTEN THE BOLTS YET. The metal pins need to be equally spaced 6 ¾” apart as shown.
STEP 4.
If the metal pins do not line up with the holes in the toilet seat, loosen Bolt (D) and twist the Hinge Pin Mount (C) until they line up with the holes. Retighten the Bolts (D) until they are snug, but do not fully tightened yet.
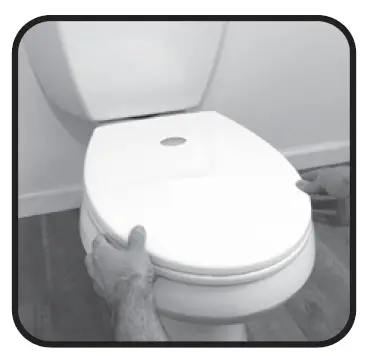
Gently place the toilet seat over the Hinge Pin Mounts (C). Allow the toilet seat to gently close.
STEP 5.
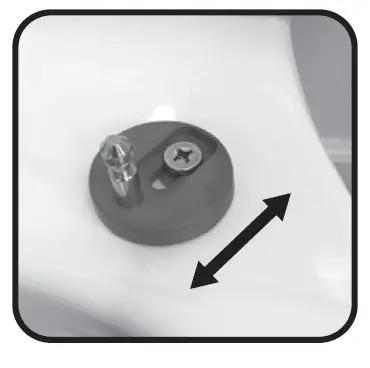
Check the alignment of the toilet seat with the toilet bowl. If the seat is too far forward or too far back or too far left/right, remove the seat and readjust the Hinge Pin Mounts (C). You can adjust the seat forward or back using the slot in the Hinge Pin Mounts (C).
Once the toilet seat is aligned with the bowl, gently remove the seat and fully tighten the bolts securely with a Phillips head screw driver.
STEP 6.
Place the Protective Caps (E) over the Hinge Pin Mounts (C) and push down securely.
Now click the toilet seat onto the Hinge Pin Mounts (C) and check for proper function and alignment with the toilet bowl.
HAVING TROUBLE INSTALLING YOUR SEAT?
Check out our instructional video for the Sharper Image Sound Activated Nightlight Toilet Seat at https://youtu.be/uP9nEbiFam0

Sharper Image
Made in China
For more information on
Sharpe r Image products,
please visit: ww w.sharperimage.com
©2018 Sharper Image. Sharper Image®
name and logo are registered trademarks.
All rights reserved. Manufactured,
marketed and distributed under license
by Ginsey Home Solutions, Swedesboro, NJ 08085.
1 YEAR LIMITED WARRANTY
Thank you for purchasing the Sharper Image® Nightlight Toilet Seat. LED technology softly lights your way to the bathroom at night. The Sound Activated Auto On and Off features allows the LED to operate only when you need it. The slow-close hinge helps prevent the lid and ring from slamming down and waking the house, and the quick release hinge makes cleaning a breeze.
- Read all instructions carefully before use.
- Carefully remove all contents from the packaging and inspect the product to make sure all components have been received.
- Tools Required: Phillips head screwdriver
Register your product at: www.ginsey.com/registration
Diagram:
GETTING STARTED
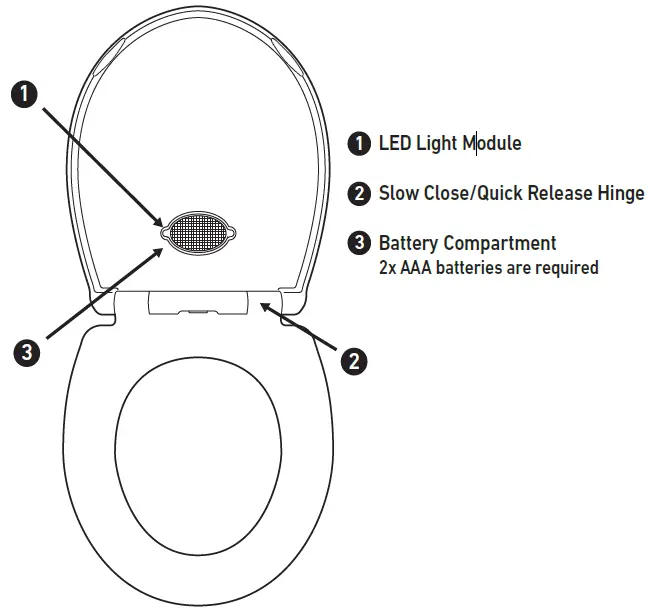
Battery Installation
1) The nightlight operates on 2 x AAA (LR03) batteries (not included).
2) Lay the toilet seat on a flat surface with the lid and ring in the open position as shown.
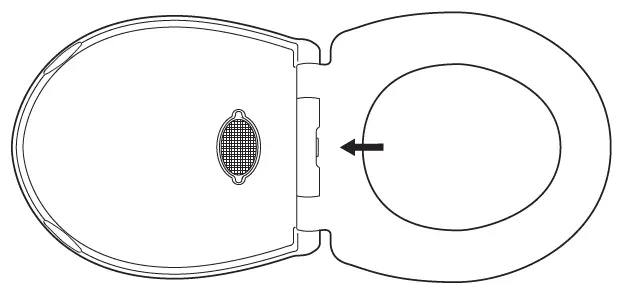
3) Remove the 2 Phillips head screws from the LED housing. Remove and open the LED housing.
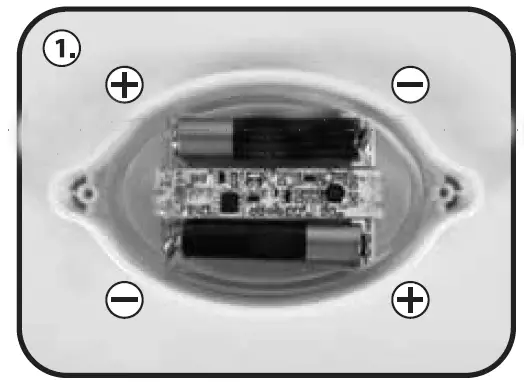
4) Install 2 x AAA batteries with polarity (+/-) as shown in FIGURE 1.
5) Make sure the silicone water seal is seated in place, close the LED housing, place back into the toilet lid and tighten screws. Do not over tighten.
BATTERY INSERTION FIGURE 1.
CAUTION:
- Do not mix old and new batteries or batteries of different types: alkaline, standard (carbon-zinc) or rechargeable (nickel-cadmium).
- Insert batteries with correct polarity as indicated inside the battery compartment.
- Remove batteries during long periods of non-use.
- Always remove exhausted batteries from this product. Dispose of batteries safely.

TOILET SEAT INSTALLATION
Read all instructions very carefully BEFORE installation.
1) Remove old toilet seat and mounting hardware from toilet bowl.
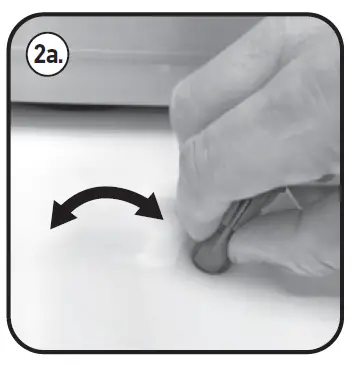
2) Remove new mounting hardware from parts bag. Insert the 2 Plastic Mounting Sleeves (A) into the mounting holes on your toilet bowl by squeezing the 2 plastic arms together with your thumb and forefinger.
a) If you are having difficulty getting the plastic sleeve into the hole, insert the plastic sleeve into the hole at an angle and rock it back and forth as you push it down
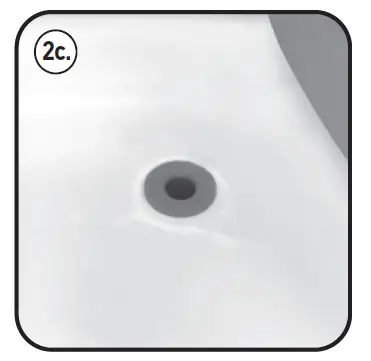
b) Remove the Bolt (D) from the plastic sleeve.
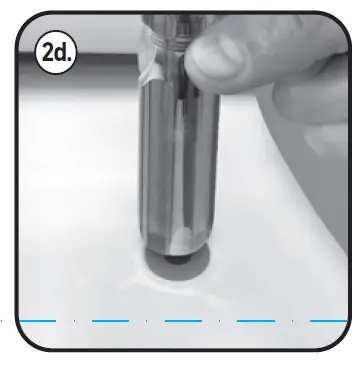
c) Push the sleeve all the way into the hole until the flange is flush with the top of the bowl. d) If the fit is tight, use the handle of the screwdriver to forcibly push the sleeve down until it is completely flush with the bowl.
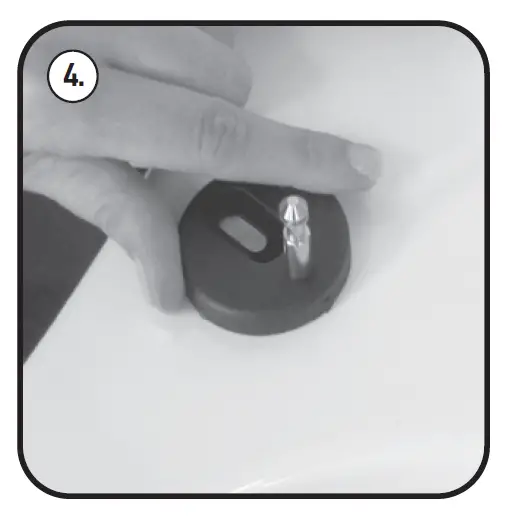
3) Insert the Rubber Gasket (B) into the plastic bottom of each Hinge Pin Mount (C)
4) Place the Hinge Pin Mount (C) over the Plastic Mounting Sleeve (A) in the position shown below.
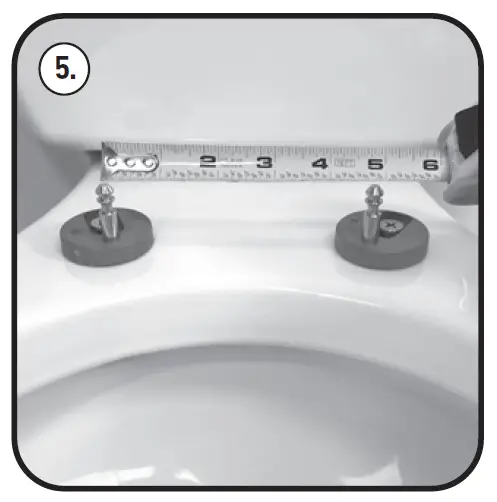
 5) Insert Bolt (D) into Plastic Hinge Mounting Sleeve (A) and tighten to a snug fit only. DO NOT FULLY TIGHTEN THE BOLTS YET. The metal pins need to be equally spaced 4 ¾” apart as shown in Figure 5.
6) To check the spacing, place the toilet seat upside down on the bowl so that the mounting holes in the seat line up with the metal pins.
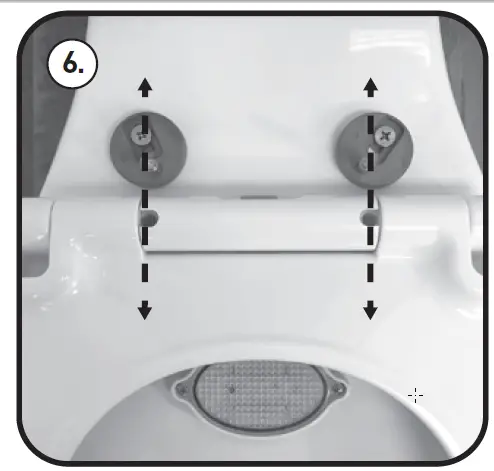
7) If the metal pins do not line up with the holes in the toilet seat, loosen Bolt (D) and twist the Hinge Pin Mount (C) until they line up with the holes. Retighten the Bolts (D) until they are snug, but do not fully tightened yet.
8) Gently place the toilet seat over the Hinge Pin Mounts (C). Allow the toilet seat to gently close.
9) Check the alignment of the toilet seat with the toilet bowl. If the seat is too far forward or too far back or too far left/right, remove the seat and readjust the Hinge Pin Mounts (C). You can adjust the seat forward or back using the slot in the Hinge Pin Mounts (C).
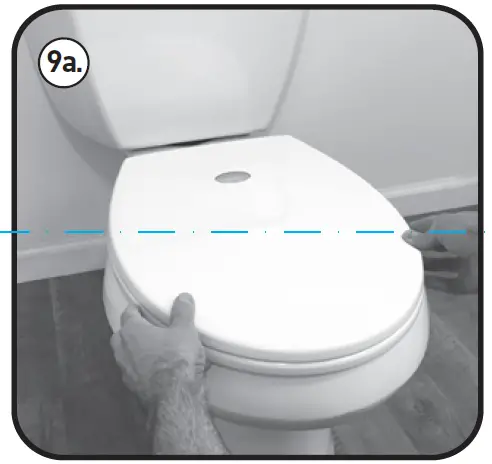
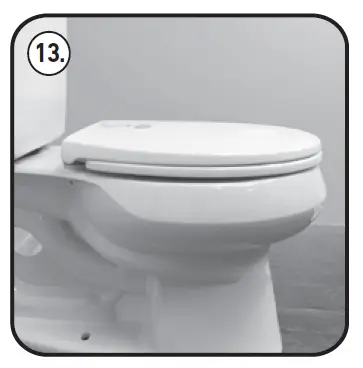
10) Once the toilet seat is aligned with the bowl, gently remove the seat and fully tighten the bolts securely with a Phillips head screw driver.
11) The plastic sleeves
should look as shown
in image.
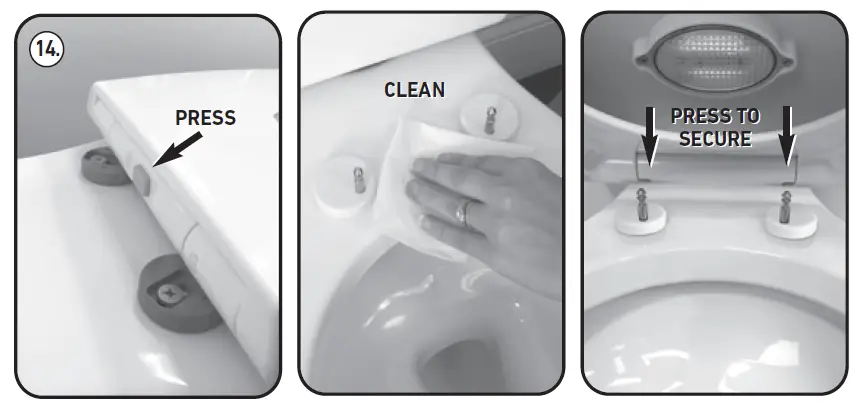
14) To remove the seat for cleaning, simply press the gray button and pull up on the seat. Once cleaning is complete, align the hinge holes to the hinge pins and press down firmly to secure the seat to the toilet bowl.
13) Now click the toilet seat onto the Hinge Pin Mounts (C) and check for proper function and alignment with the toilet bowl.
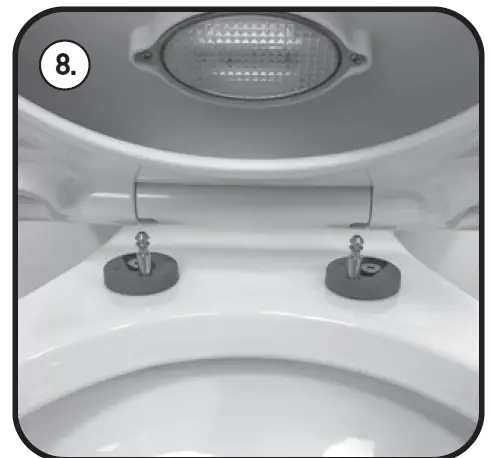
12) Place the Protective Caps (E) over the Hinge Pin Mounts (C) and push down securely.
13) Now click the toilet seat onto the Hinge Pin Mounts (C) and check for proper function and alignment with the toilet bowl.
14) To remove the seat for cleaning, simply press the gray button and pull up on the seat. Once cleaning is complete, align the hinge holes to the hinge pins and press down firmly to secure the seat to the toilet bowl.
HAVING TROUBLE INSTALLING YOUR SEAT?
Check out our instructional video for the Sharper Image Sound Activated Nightlight Toilet Seat at https://youtu.be/uP9nEbiFam0
NIGHTLIGHT FUNCTION
The LED will only turn ON when it is dark or night time. The LED will turn ON when it detects a sound of someone entering the bathroom (Approximately 65 dB). It provides a soft blue glow that illuminates the toilet lid and ring and is easy on your eyes in the middle of the night. The LED will automatically shut off after 2 minutes. The batteries will last about 6 months.
QUICK RELEASE HINGES
The seat has a quick release feature to help you remove it for easy cleaning. To remove the seat, simply press the gray button on the back of the seat and pull up the seat. To put the seat back on, reverse the steps above. The toilet seat will snap back onto the hinges.
CLEANING AND MAINTENANCE
- Clean the toilet seat as you normally would with bathroom cleaner and water. Dry with soft cloth.
- The LED housing is water resistant. DO NOT SUBMERGE THE LED HOUSING.
Model No: 01271
ONE YEAR LIMITED WARRANTY
Ginsey Home Solutions sells its products with the intent that they are free of defects in manufacture and workmanship for a period of one year from the date of original purchase. Ginsey Home Solutions warrants that its products will be free of defects in material and workmanship under normal use and service.
For warranty service call:
Ginsey Home Solutions
2078 Center Square Road
Swedesboro, NJ 08085
1-800-257-7844
[email protected]
Customer Service is available
8:30am – 5:00pm (EST)
Monday – Friday
Made in China
For more information on
Sharper Image products,
please visit: www.sharperimage.com
©2018 Sharper Image. Sharper Image®
name and logo are registered trademarks.
All rights reserved. Manufactured,
marketed and distributed under license
by Ginsey Home Solutions, Swedesboro, NJ 08085.